KanPak CDG-211 User manual

CDG Series
Liquid Dispensers
CDG-211 CDG-311
NORTH AMERICAN
OPERATORS MANUAL
KanPak LLC, 425 Main Street North, Southbury, CT 06488
Phone: 800.569.0826 or 203.264.7203 • Fax: 203.264.7292 • Email: [email protected]
www.kanpak.us
8-0500-0003 - 20121212

INTRODUCTION…………………………..…….……….. 1
INSPECTION FOR DAMAGE………………….. 1
SAFETY……………………………………………….. 1
SPECIFICATIONS………………………………………….. 2
UNPACKING THE DISPENSER………………….….... 3
RESHIPMENT…………………………………………….…. 3
REQUIREMENTS AND SERVICING
ELECTRICAL REQUIREMENTS………………. 3
ELECTRICAL SERVICING………………….……. 3
REFRIGERATION SERVICING…………..……. 3
CORRECT DISPOSAL………………….…………….……. 3
INSTALLATION AND LOCATION……………….……. 4
INSTALL STARTUP………………………………….…….. 4
LOADING PRODUCT……………………………….…….. 5
PRODUCT LOADING INSTRUCTIONS…….. 5
OPERATION…………………………………………..…….. 6
MAINTENANCE…………………………………….………. 6
PREVENTATIVE MAINTENANCE
SCHEDULE……………………………………..… 6
DEFROST……………………………….……………. 6
RESET…………………………………………………. 6
DISPLAY………………………………………………………. 7
LCD…………………………………………………….. 7
LED INDICATOR…………………………………… 7
TROUBLE SHOOTING GUIDE…………………………. 8
DRAWINGS
CDG-211 H DIMENSIONS…………………….. 9
CDG-211 HT DIMENSIONS…………….…….. n/a
CDG-211 V DIMENSIONS…………………….. 11
CDG-311 H DIMENSIONS…………………….. 12
CDG-311 HT DIMENSIONS…………….…….. 13
CDG-311 V DIMENSIONS……………..…….. 14
GENERAL PARTS LIST………………………….. 15
WARRANTY…………………………………………………. 17
TABLE OF CONTENTS
KanPak LLC
425 Main Street North
Southbury, CT 06488
Phone: 800.569.0826 or 203.264.7203
Fax: 203.264.7292
Email: [email protected]
www.kanpak.us
CDG Series
Liquid Dispensers
KanPak Equipment Service
Phone: 800.569.0826
Fax: 203.264.7292
Email: kpservice@kanpak.us

CDG SERIES LIQUID DISPENSERS
OPERATORS MANUAL
Please Read this Manual Now,
And Retain it for Future Reference
KanPak CDG Series Liquid Dispensers provides a temperature controlled environment to sustain liquid
product, such as cream, milk, and other liquids. The product selections are made by depressing a lever
to dispense product. The product is stored in the sanitary interior compartment within the dispenser.
The product (cream, milk, etc.) is prepackaged in a Bag-in-Box.
Operating the dispenser is a simple two-step process:
1. Place a cup under the product tube.
2. Push lever down for the desired quantity and product.
INSPECTION FOR DAMAGE
When you receive the dispenser, inspect the exterior of the shipping container for damage. Note any
damage in detail. Unpack the dispenser at once (follow the instruction sheet inside the top of the box,
or see instructions in this manual). Examine the dispenser for damage. Report any damage to the
transportation company immediately. File a claim for damages promptly. Your immediate inspection
protects you against loss since KanPak is not responsible for damages incurred during shipment.
SAFETY
KanPak, LLC strives to design robust equipment where safety, simplicity and efficiency are paramount.
To this effect, the CDG Series has been designed to be low maintenance with a single outside connection
(electricity). These features are aimed at protecting both operators and technicians.
This appliance is not to be used by persons (including children) with reduced physical, sensory or mental
capabilities, or lack of experience and knowledge, unless they have been given supervision or instruction
concerning use of the appliance by a person responsible for their safety.
SAFETY PRECAUTIONS
•Always plug the dispenser into an approved electrical outlet.
•Do not touch the dispenser with wet hands.
•Unplug the dispenser from its electrical source before servicing.
•Do not immerse the dispenser in water.
•Observe all safety precautions with this dispenser that you would
with any electrical appliance.
•Children should be supervised to ensure that they do not play with
the appliance.
Page 1

SPECIFICATIONS
Power Supply Requirements
120 VAC, 60 Hz, 1 Phase, 4 Amp
Refrigeration
Cold Wall Evaporation
1/6 HP Compressor
134a Refrigerant, 165 Grams
Certifications
NSF/ANSI Standard 20
UL Standard 471
CSA C22.2 No.120
MODEL
TYPE
PRODUCTS
DESCRIPTION
WEIGHT
DIMENSIONS (LxWxH)
CDG211
H
2 x 2 ½ Gallon
Manual Lever Operated Dispenser
77 lbs
22” x 12” x 25 ½”
CDG211
V
2 x 2 ½ Gallon
Manual Lever Operated Dispenser
77 lbs
18 ½” x 12” x 32”
CDG311
H
3 x 2 ½ Gallon
Manual Lever Operated Dispenser
88 lbs
22” x 16” x 25 ½”
CDG311
HT
3 x 2 ½ Gallon
Manual Lever Operated Dispenser
92 lbs
24” x 16” x 32”
CDG311
V
3 x 2 ½ Gallon
Manual Lever Operated Dispenser
88 lbs
18 ½” x 16” x 32”
KanPak LLC, 425 Main Street North, Southbury, CT 06488
Phone: 800.569.0826 or 203.264.7203 • Fax: 203.264.7292 • Email: [email protected]
www.kanpak.us
Page 2

UNPACKING THE DISPENSER
WARNING: Do not attempt to lift the dispenser from the box. Improper lifting may damage the
dispenser.
Inspect the box for any shipping damage.
Remove the protective material from the top and sides of the dispenser.
Remove the corrugated tube from the base.
Remove the dispenser, and other material from the box and inside the dispenser;
Lift the dispenser from the bottom of the equipment.
Remove the plastic protective covering from the stainless steel exterior, if applicable.
Place the dispenser in its final location.
Retain all of the packaging for future reshipment.
CAUTION: Wait 3 hours before plugging in the dispenser to allow the compressor oil to settle.
RESHIPMENT
Packaging for reshipment is done in the reverse order of unpacking. If packaging is not available, it can
be purchased locally, or from KanPak by request. Any damage occurring in transit of the returned goods
caused by improper packaging is not considered a defect covered by warranty.
ELECTRICAL REQUIREMENTS
Be sure the current at the power source receptacle is: 120 VAC, 60 Hz, single phase, 4 Amp.
The dispenser is furnished with a UL-approved 7’power cord. The power cord comes with a 3-
prong (NEMA 5-15) plug, designed to fit a receptacle with provisions for a grounding stud. The
dispenser includes a microprocessor and must be operated on grounded electrical wiring at all
times. Failure to do so will void the Warranty.
To avoid an electrical hazard, if the supplied power cord is damaged, it must be replaced by the
manufacturer, its Authorized Service Agency or by a qualified technician.
ELECTRICAL SERVICING
Electrical servicing must be carried out by a qualified technician. The Warranty will be null and void if
the dispenser is serviced by unqualified personnel.
REFRIGERATION SERVICING
Any servicing of the refrigeration system must be carried out by a qualified technician. The Warranty
will be null and void if the refrigeration system is serviced by unqualified personnel.
CORRECT DISPOSAL OF THIS PRODUCT
This marking indicates that this product should not be disposed with other household
wastes at the end of its working life. To prevent possible harm to the environment or
human health from uncontrolled waste disposal, please recycle it responsibly to
promote the sustainable reuse of material resources.
To return your used device, please contact the manufacturer, the distributor where the product was
purchased, or the local collection system, for details of where and how they can take this product for
environmentally safe recycling.
Page 3

INSTALLATION AND LOCATION
When locating your CDG Series dispenser, convenience and accessibility to best serve your
operation are important considerations, but the following factors must be observed:
Counters, platforms, or shelves should be strong enough to support the dispenser and full
containers of product. Refer to the minimum weight specification of your particular model of
dispenser. This is the weight of the empty dispenser.
The dispenser requires 3”(75mm) of clearance on either side, as well as a 6” (150mm) clearance
on the top. Do not place items on top of the dispenser. Inadequate clearance or covering the
top vents will significantly reduce system efficiency and cause damage to the compressor.
There are no space requirements for the rear of the CDG Series dispenser.
The dispenser must be placed onto a level surface.
Avoid placing the dispenser too close to a heat source, such as a coffee maker. This would affect
the performance of the unit.
Place the dispenser at the appropriate serving height so that staff drawing product from the
dispenser can operate the unit properly.
Do not remove the legs from the dispenser or allow the dispenser to sit flat on the counter.
Airflow and circulation under the machine are essential for the proper operation of the
refrigeration system. Make sure the legs at the four corners of the bottom of the dispenser are
in place. If one has loosened during shipping, re-tighten it. Removal of the legs automatically
voids the Warranty.
INITIAL STARTUP
Before starting the dispenser, make certain that all Installation instructions have been followed
and that the dispenser has been sitting upright for a minimum of 3 hours, to allow the
compressor oil to settle.
Connect the power cord into an approved electrical outlet.
Activate the control system and refrigeration by switching ON the power control switch.
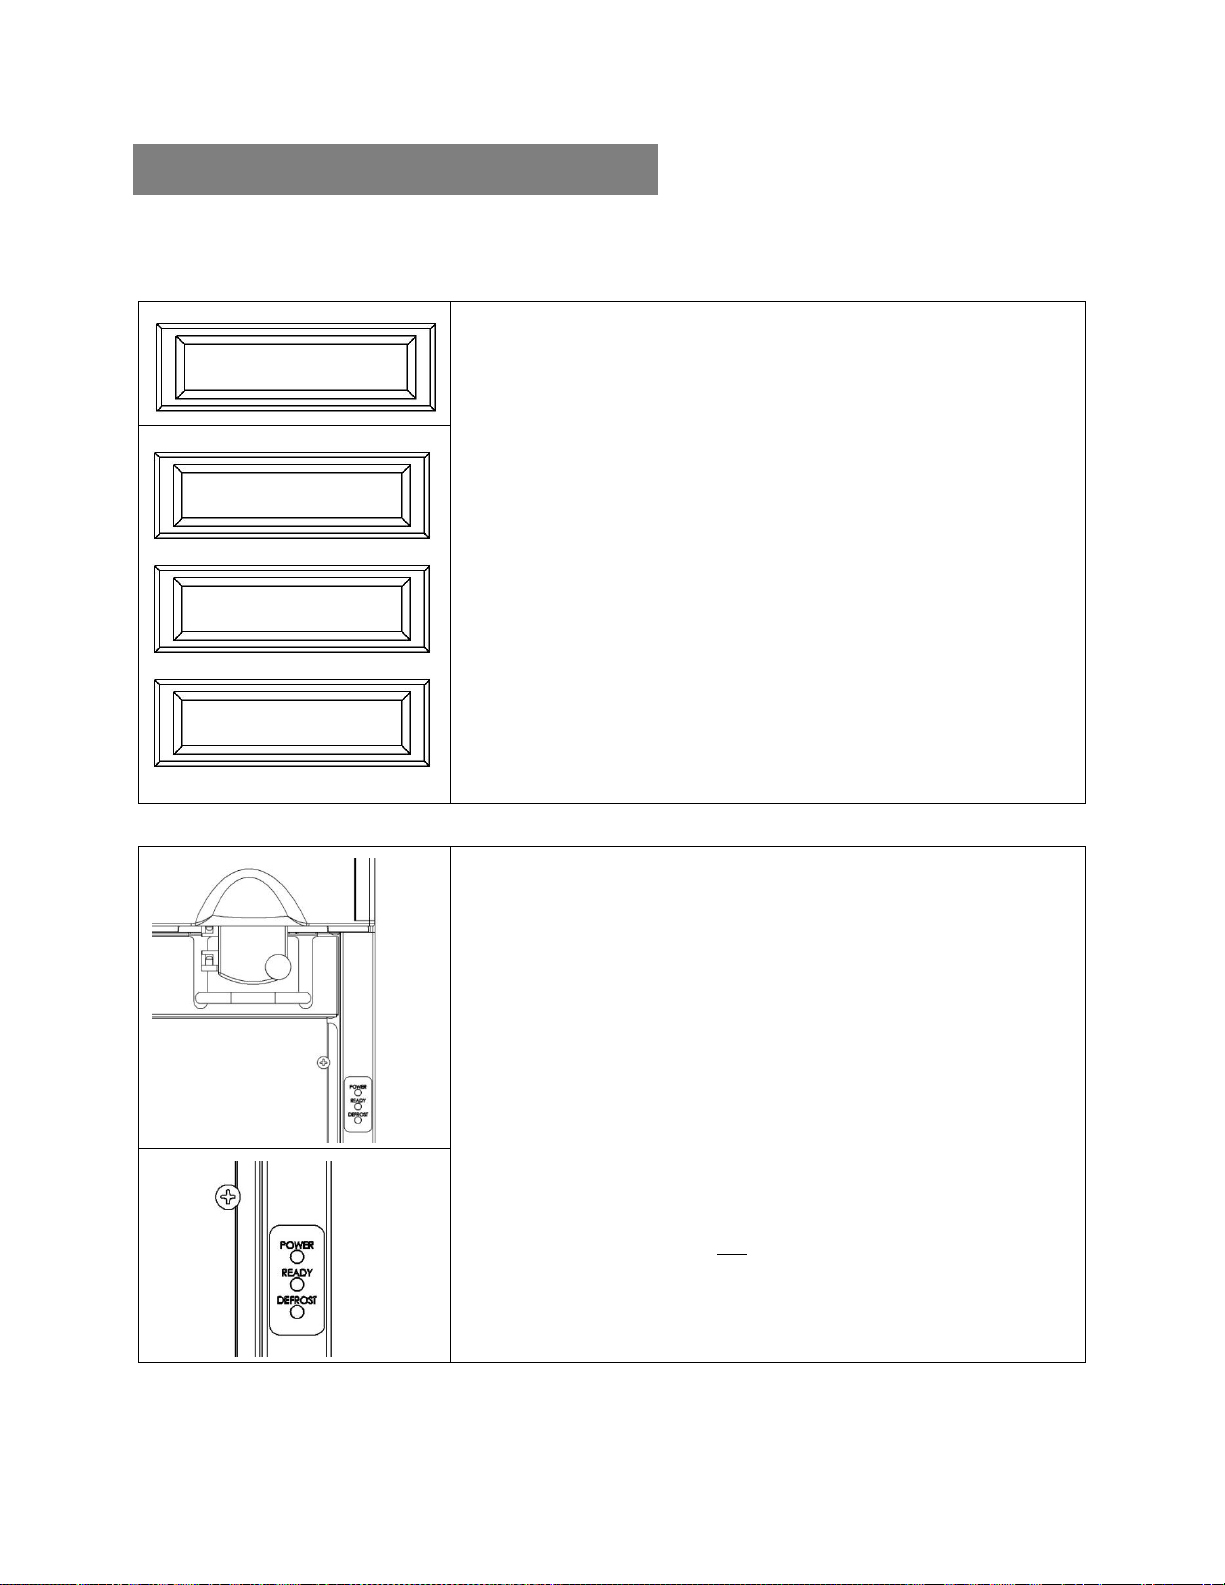
Power can be confirmed by the following (as applicable):
oLCD will indicate “Always Fresh”;
oPower LED will illuminate green;
oBacklit door display will illuminate.
The temperature control has been pre-set at the factory. Allow the dispenser to run
empty for one hour before loading pre-chilled product. Compartment temperature is
confirmed by the following (as applicable):
oLCD will indicate compartment temperature of 32°F to 40°F (0°C to 5°C);
oReady LED will illuminate green;
oInterior compartment thermometer will indicate 32°F to 40°F (0°C to 5°C).
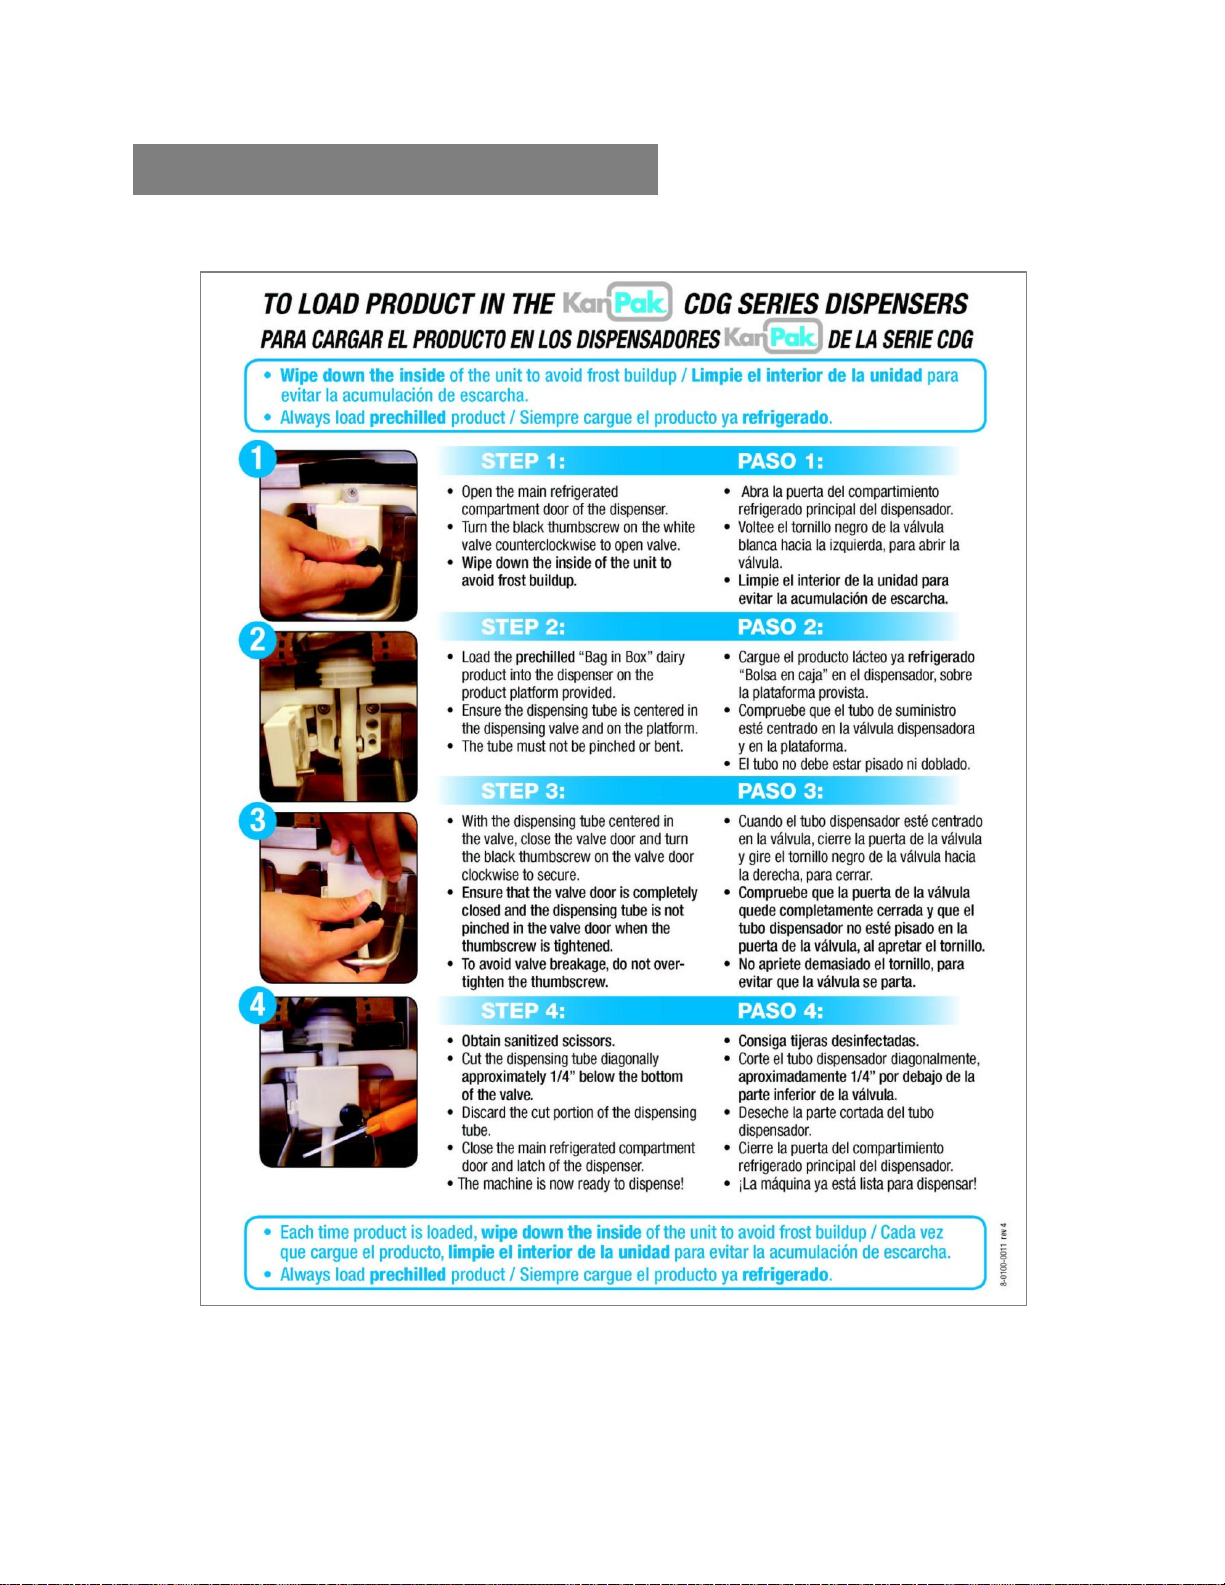
Locate the Drip Tray and install the Bag-In-Box Shelf (or optional accessory).
Load pre-chilled KanPak product of your choice, as instructed.
Close the dispenser door and secure latch.
Page 4

LOADING PRODUCT
KanPak CDG Series dispensers are manufactured to be used in with prepackaged Bag-In-Box products.
Ensure the dispenser has achieved proper operating temperature by running empty for
one hour before loading pre-chilled product to be dispensed.
Product must be pre-chilled prior to loading it into the dispenser. Product temperature
range must be between 32°F to 40°F (0°C to 5°C).
Page 5

OPERATION
When the initial startup is complete, operating your CDG Series dispenser is simple.
•Place cup under the product tube.
•Push lever down for the desired quantity and product.
•Load product as needed.
•Perform preventative maintenance as outlined.
MAINTENANCE
Though the preventative maintenance of your CDG Series dispenser is minimal, these few steps
are important for continued operation to maximize the life of this appliance.
RECOMMENDED PREVENTATIVE MAINTENANCE SCHEDULE
Drip Tray Daily Wash using warm, soapy water or in
dishwasher.
Exterior Cabinet
Surfaces Daily Using a soft cloth, wash using warm, soapy
water. DO NOT use abrasive cleaners.
Refrigerated Interior
Compartment
Each time product is
loaded.
Using a soft cloth, wipe down and thoroughly
dry to remove any condensation.
Monthly, or as needed. Manually defrost when there is ice build-up.
Valve Assembly and
Area Monthly, or as needed. Wash using warm, soapy water or in
dishwasher.
Condenser Every six (6) months. Clean using vacuum.
DEFROST
The CDG Series dispensers are equipped with an automatic defrost cycle to minimize frost
build-up. The defrost cycle reduces but does not eliminate the need for a manual defrost.
Frost or ice will reduce the system efficiency. When frost or ice is build-up is excessive:
•Remove product from the dispenser.
•Turn the power control switch OFF.
•With the compartment door open, wait 15 minutes for ice to melt.
•Remove ice gently, and wash using warm, soapy water.
•Thoroughly dry with a soft cloth, and close the compartment door.
•Turn the power control switch ON.
•When proper operating temperature is achieved, load pre-chilled product.
RESET
Occasionally, it may be necessary to reset the control system. To accomplished this, simply:
•Turn the power control switch OFF.
•Wait 5 seconds to reset the microprocessor.
•Turn the power control switch ON.
Page 6

DISPLAY
The CDG Series dispensers have multiple display options available. Reference the applicable
display option(s) for your dispenser.
LCD
CONFIRMS POWER
LCD turns ON by switching the power control switch ON.
o“ALWAYS FRESH”= Power is ON.
oNo display = Power is OFF.
INFORMATION DISPLAYED
LCD indicates the compartment temperature.
o“ALWAYS FRESH” + flash compartment temperature.
LCD indicates the compressor cycle.
oAsterisk “*” identifies compressor cycle in progress.
o“ALWAYS FRESH” + alternately flashing asterisk and
compartment temperature.
LCD indicates the automatic defrost cycle or service.
o“ALWAYS FRESH DEF” = Automatic defrost in progress.
o“ALWAYS FRESH ERR” = Service is required.
Contact KanPak Equipment Service when unit requires servicing.
LED INDICATOR
CONFIRMS POWER
POWER LED turns ON by switching the power control switch ON.
oSolid Green = Power is ON.
oNo light = Power is OFF.
INFORMATION DISPLAYED
READY LED indicates the compartment temperature.
oSolid Green = Temperature is 32°F to 41°F (0°C to 5°C).
oFlashing Green = Temperature is 42°F to 46°F (5.6°C to 7.8°C).
oNo Light = Temperature is not 32°F to 46°F (0°C to 7.8°C), or
automatic defrost cycle in progress.
DEFROST LED indicates the automatic defrost cycle or service.
oSolid Yellow = Automatic defrost in progress.
oFlashing Yellow = Service is required.
oNo Light = Defrost is not in progress.
Contact KanPak Equipment Service when unit requires servicing.
Always allow the dispenser to run empty for one hour to achieve proper operating temperature.
Compartment temperature during normal operation should be 32°F to 41°F (0°C to 5°C).
ALWAYS FRESH
ALWAYS FRESH DEF
ALWAYS FRESH *
ALWAYS FRESH 35 F
Page 7

TROUBLE SHOOTING GUIDE
ISSUE CAUSE SOLUTION
No power, display, or
lights (as applicable).
Power switch is not turned ON. Reset the power control switch
located on the lower left side of the
unit. Turn the switch OFF, wait 5
seconds, then turn the switch ON.
Circuit breaker on the
dispenser is tripped, indicated
by a white strip on top of the
breaker button when popped
out.
Reset the circuit breaker located on
the lower left side of the unit (below
the power control switch). Depress
the breaker button to reset.
Power cord is not plugged in. Ensure the dispenser power cord is
plugged into a functioning outlet.
Depress the reset button of a GFI
outlet if equipped.
No power at the outlet. Have a qualified person check the
in-store
Dispenser will not
dispense product.
circuit-breaker to restore
power to the circuit.
Product tube is not inserted
properly.
Verify the product tube is installed
correctly, and is not pinched,
twisted or bent.
Dispenser is leaking
product.
Valve door not fully closed. Confirm the valve door is fully
closed and the thumbscrew is
tightened securely.
Product tube is not centered. Ensure the product tube is centered
properly in the dispensing valve
assembly.
Product accumulation within
valve assembly.
Clean the valve assembly and
surrounding area.
Display/compartment
temperature is too
warm or too cold.
Vents are covered. Remove obstructions blocking the
vents located on the top rear of the
unit.
Defrost cycle just completed. Check the temperature again after
15 minutes have elapsed.
Compartment has ice and/or
frost build-up.
Perform the standard preventative
maintenance (PM) as outlined.
The temperature control
requires adjustment. Contact KanPak Equipment Service.
ERR on Display, or
Flashing Yellow LED
The unit requires servicing. Contact KanPak Equipment Service.
Page 8

DRAWINGS
Page 9

DRAWINGS
This page is intentionally left blank.
Page 10

DRAWINGS
Page 11

DRAWINGS
Page 12

DRAWINGS
Page 13

DRAWINGS
Page 14

CDG-211 H PARTS DIAGRAM
Page 15

CDG-211 V PARTS DIAGRAM
Page 16

WARRANTY
All dispensing equipment manufactured by KanPak is warranted against defects in materials and workmanship for a period of
one (1) year from the date of purchase. This Warranty does not apply to installation or problems because of installation. This
Warranty does not apply to normal preventative maintenance, maintenance or adjustment.
This warranty is subject to the following conditions:
•This Warranty applies to the original owner only and is not assignable.
•Should any equipment fail to function in its intended manner under normal use within the limits defined in this
Warranty, at the option of KanPak such equipment will be repaired or replaced by KanPak or its Authorized Service
Agency. KanPak will be responsible only for charges incurred or service performed by its Authorized Service Agencies.
The use of other than KanPak Authorized Service Agencies will void this Warranty and KanPak will not be responsible
for such work or any charges associated with such work. The closest KanPak Authorized Service Agency must be used.
TIME PERIOD
One Year on parts and/or labor, effective from the date of shipment unless otherwise specified. KanPak reserves the right to
replace a unit in warranty in lieu of a service call. The Authorized Service Agency may, at its option, require proof of purchase.
Parts replaced under this Warranty are warranted for the unexpired portion of the original equipment warranty only. A service
consultant is available to assist you during our normal business hours. All service-related issues will be addressed by a return
telephone call the next business day.
WARRANTY PROCEDURE
1. Secure the model and serial number from the data label on the lower left side of the dispenser.
2. Call the phone number (1.800.569.0826 or 203.264.7203) provided on the service label on the dispenser.
3. The service agency will discuss the issue with the operator and determine if parts or servicing/replacing the dispenser
will resolve the issue.
4. If parts are needed, the appropriate parts will be sent to your location.
5. If a dispenser needs to be serviced/replaced by the KanPak service department (at the discretion of the KanPak
service representative), KanPak will provide the operator with a Return Material Authorization (RMA).
6. The operator will arrange for the out-of-service dispenser to be shipped to KanPak in Southbury, CT.
7. Once the out of service dispenser is received by the KanPak service center and it has met the conditions of the
warranty, KanPak will cover the shipping costs to ship a dispenser back to the customer’s original shipping location.
WARRANTY EXCLUSIONS
The following conditions are not covered by this Warranty:
•Equipment failure related to improper installation, improper utility connection or supply, and problems due to
ventilation.
•Equipment that has not been properly maintained, calibration of controls, adjustments, damage from improper
cleaning, and water damage to controls.
•Equipment that has not been used in an appropriate manner, or has been subject to misuse or misapplication,
neglect, abuse, accident, alteration, negligence, damage during transit, delivery or installation, fire, flood, riot, or act
of God.
•Equipment on which the model number or serial number has been removed or altered. If the equipment has been
changed, altered, modified or repaired by other than a qualified service technician during or after the warranty
period, then the manufacturer shall not be liable for any damages to any person or to any property, which may result
from the use of the equipment thereafter. This Warranty does not cover services performed at overtime or premium
labor rates. Should service be required at times which normally involve overtime or premium labor rates, the owner
shall be charged for the difference between normal service rates and such premium rates. KanPak does not assume
any liability for extended delays in replacing or repairing any items beyond its control. In all cases, the use of other
than KanPak authorized OEM replacement parts will void this Warranty.
This equipment is intended for commercial use only. Warranty is void if equipment is installed in other than commercial
applications
THE FOREGOING WARRANTY IS IN LIEU OF ANY AND ALL OTHER WARRANTIES EXPRESSED OR IMPLIED, INCLUDING ANY
IMPLIED WARRANTY OF MERCHANTABILITY OR FITNESS AND CONSTITUTES THE ENTIRE LIABILITY OF KANPAK IN NO EVENT
DOES THE LIMITED WARRANTY EXTEND BEYOND THE TERMS STATED HEREIN.
Page 17

KanPak LLC
425 Main Street North
Southbury, CT 06488
Phone: 800.569.0826 or 203.264.7203
Fax: 203.264.7292
Email: [email protected]
www.kanpak.us
This manual suits for next models
1
Table of contents
Popular Dispenser manuals by other brands

START International
START International THO DC5100 quick start guide

Franke
Franke SD80 Installation and operating instructions

Wagner Ewar
Wagner Ewar WP1300 Series Manual instructions for use

Komos
Komos RUBICON DRAFT BOX instruction manual

Narita
Narita NP-5500 instruction manual

Coopers of Stortford
Coopers of Stortford 10249 instructions

AUTOMATED EQUIPMENT
AUTOMATED EQUIPMENT McDonald's DF22 Equipment manual

NOBLE CHEMICAL
NOBLE CHEMICAL Novo 158NOVAK55SS instruction manual

Vollrath
Vollrath STOELTING A118-102 Operator's manual

Frymaster
Frymaster SINBAD II Installation and operation manual

U-Line
U-Line H-2243 Setup Instruction

BOWMAN
BOWMAN ED-097 manual