Wireless Pet-immunity PIR Detector
Ⅱ Main Features>>>>
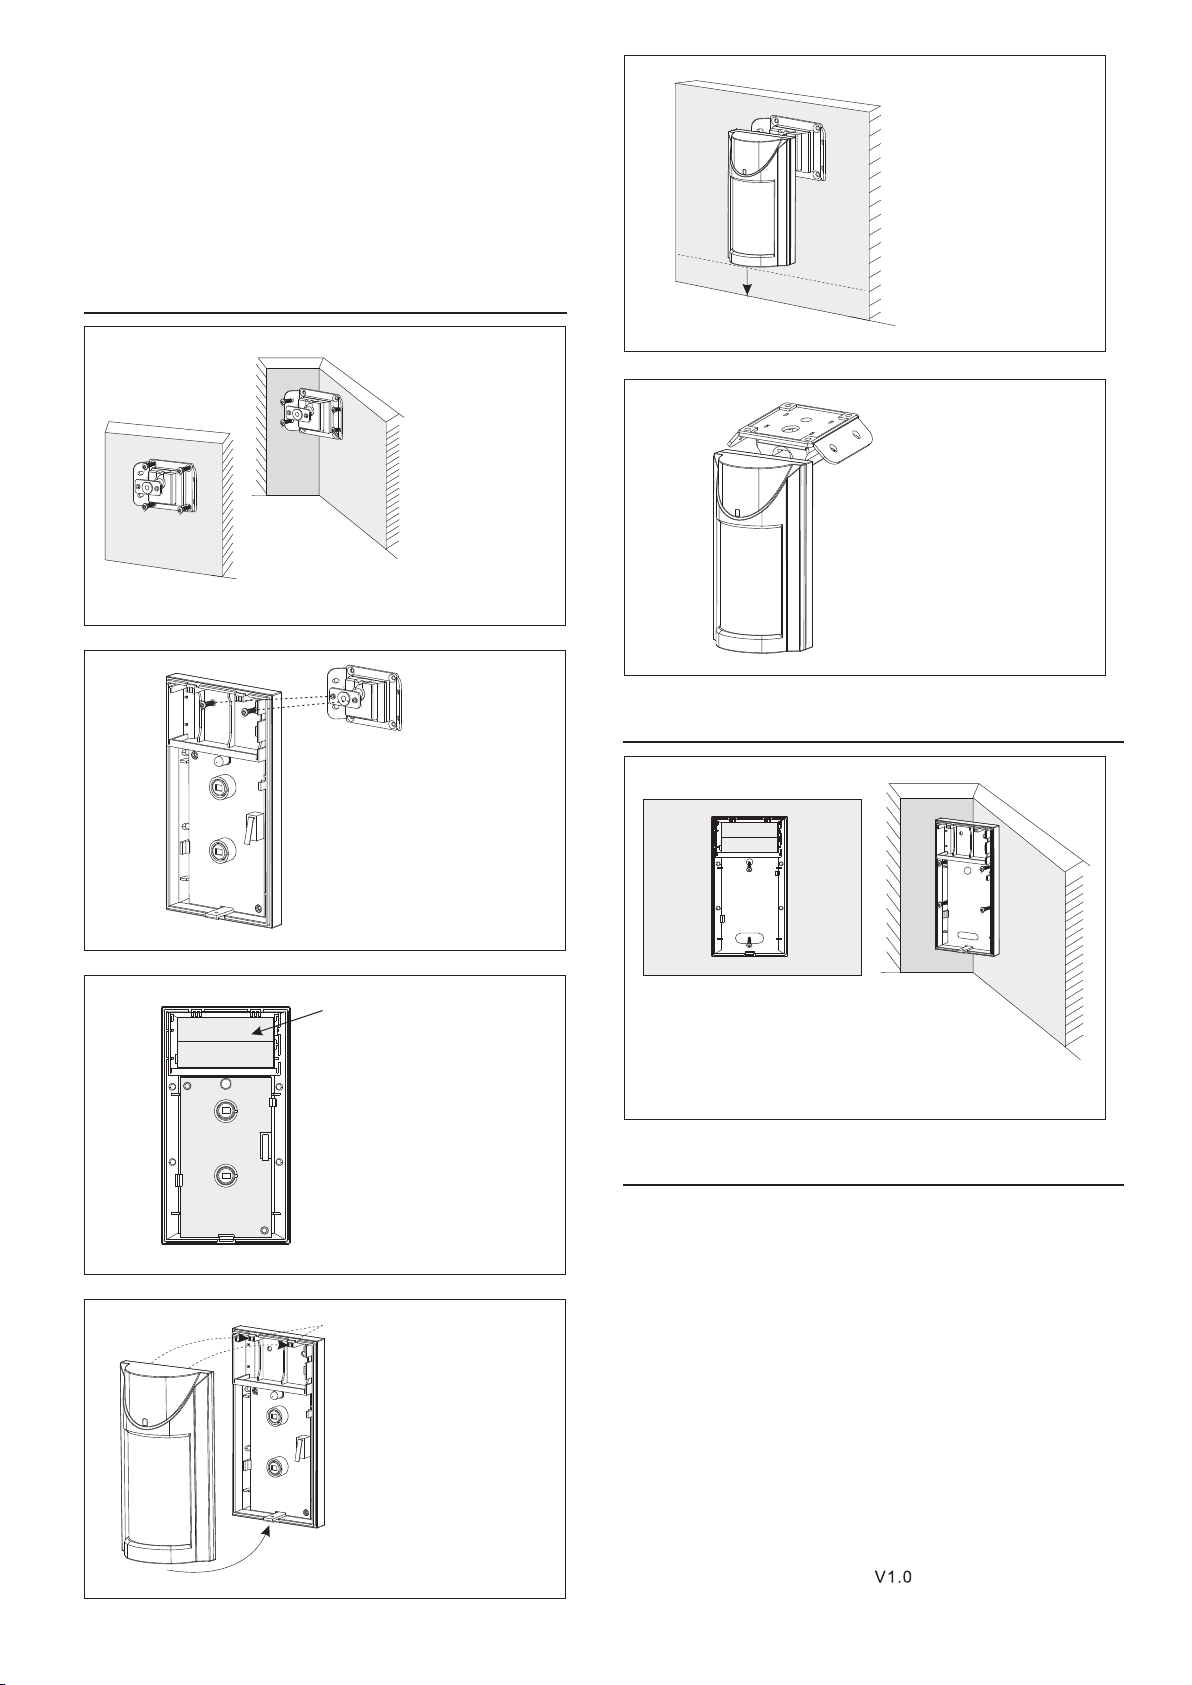
Ⅴ Installation Requirements of Wall-mounting
Installation (without bracket)
Ⅵ Usage of the product>>>>
ⅠComponent Description>>>>
1、Batteries slotting
2、 Indicator
3、Sensor
4、Tamper switch
5、Setting pin
6、Screw holes
Ⅲ Technology Parameter> > > >
Working Current
Time of Alarm Blocking
Pet-immunity
Working Temperature
Installation Mode
Detective Angle
Detective Distance
Wireless frequency
Working Voltage
Tamper switch
DC3V (2 pieces of 5# battery)
≤80uA
60s
35kg
-10℃+50℃
~
Wall/Ceiling mounted
110℃
Wireless distance
5
4
3
3
2
1
6 6
66
1
3
2
1
J7
J6
J5
J4
PULSE 2PPLUSE 1P
LED ON
J4
J5
J6
J7
LED OFF
1 2 2 3
SAVING NORMAL
MODE 1 MODE 2
U4
U1
LED1
K1
7
7、Right buckle
The wireless pet-immunity PIR detector adopts
double infrared sensor technology, which can avoid
false alarm caused by pet and improve stability grea-
tly. Please read the user manual carefully before use.
12m
433.92MHz
300m
N.C
12
108
42
0
24
810
12
110
Ⅳ Chart of Detective Range:>>>>
Top view
1.246 8 10 12m
2.2m
Side view
The infrared detector has the highest sensitivity
when a human body moves horizontally relative to
the lens and the lowest when vertically against the
lens. The installation height should be about 2
meters. The part with indicator should be installed
upwards.
Stand off the warm or cold sources, such as air-
conditioner, fan, refrigerator or oven, and avoid
sunshine.
Make sure that there is no barrier within the
defended area of the detector.
Open the shells via the rectangular holes with a
screwdriver, and take down the PCB, and then
disclose the line holes.
If the PCB needs to be removed, please make
operation as below: take the plug out, and then
carefully pull the right buckle (7) with the right
thumb and the setting pin (5) with the left thumb.
1.
1.
2.
2.
3.
4.
5.
Set working modes based on your demands:
LED ON/OFF selection J4: It indicates the status
when the system alarms. LED (ON/OFF) does not
affect the normal running of the detector. The
default setting is on the position of ON (2, 3).
SAVING / NORMAL selection J5: It is to set the
detective way of PIR.
SAVING is for energy saving (1, 2): If the people
enter the detective area and keep moving
continuously. The infrared detector sends one
signal at first trigger only. The infrared detector
won't send new signal while trigger after 10
seconds immovability.
NORMAL is for energy normal (2, 3): when there is
trigger at one time, the sensor will block itself for
10 seconds. The sensor doesn't make effect by
PIR signal in the 10 seconds. The default setting is
NORMAL.
PULSE selection J6: It is used for setting
sensitivity of the detector.
1P is Mono-pulse mode (1, 2): This mode is used
in general environment
2P is Double-pulse mode: With more anti-jamming
ability, this mode is used in the poor environment.
The default state is 2P.
Note: After changing the setting of alarm
output mode, or sensitivity of the detector,
user shall restart the detector to activate the
settings.
“Mode” selection is not allowed to change. “2,
3” is for default.
After accomplishment, please put two pieces of 5#
batteries into the batteries slotting. When the
indicator is flashing, the detector can start to
work.
Pet immunity with the signal from the double sensor.
Improve the stability greatly based on analyzing the
signal of dual symmetrical element & microprocessor.
Automatic temperature compensation.
Anti-white light function.
Anti-magnetic interference with counting pulse sensi-
tivity
Wireless signal output
*
*
*
*
*
*