Karl Storz 110 Series User manual

Fiberskope
Serien 110xx ..., 111xx ..., 112xx ..., 113xx..., 13304C
Fiberscopes
Series 110xx ..., 111xx ..., 112xx ..., 113xx..., 13304C
Fibroscopios
Series 110xx ..., 111xx ..., 112xx ..., 113xx..., 13304C


1
1 Photographs of the unit ..............................6
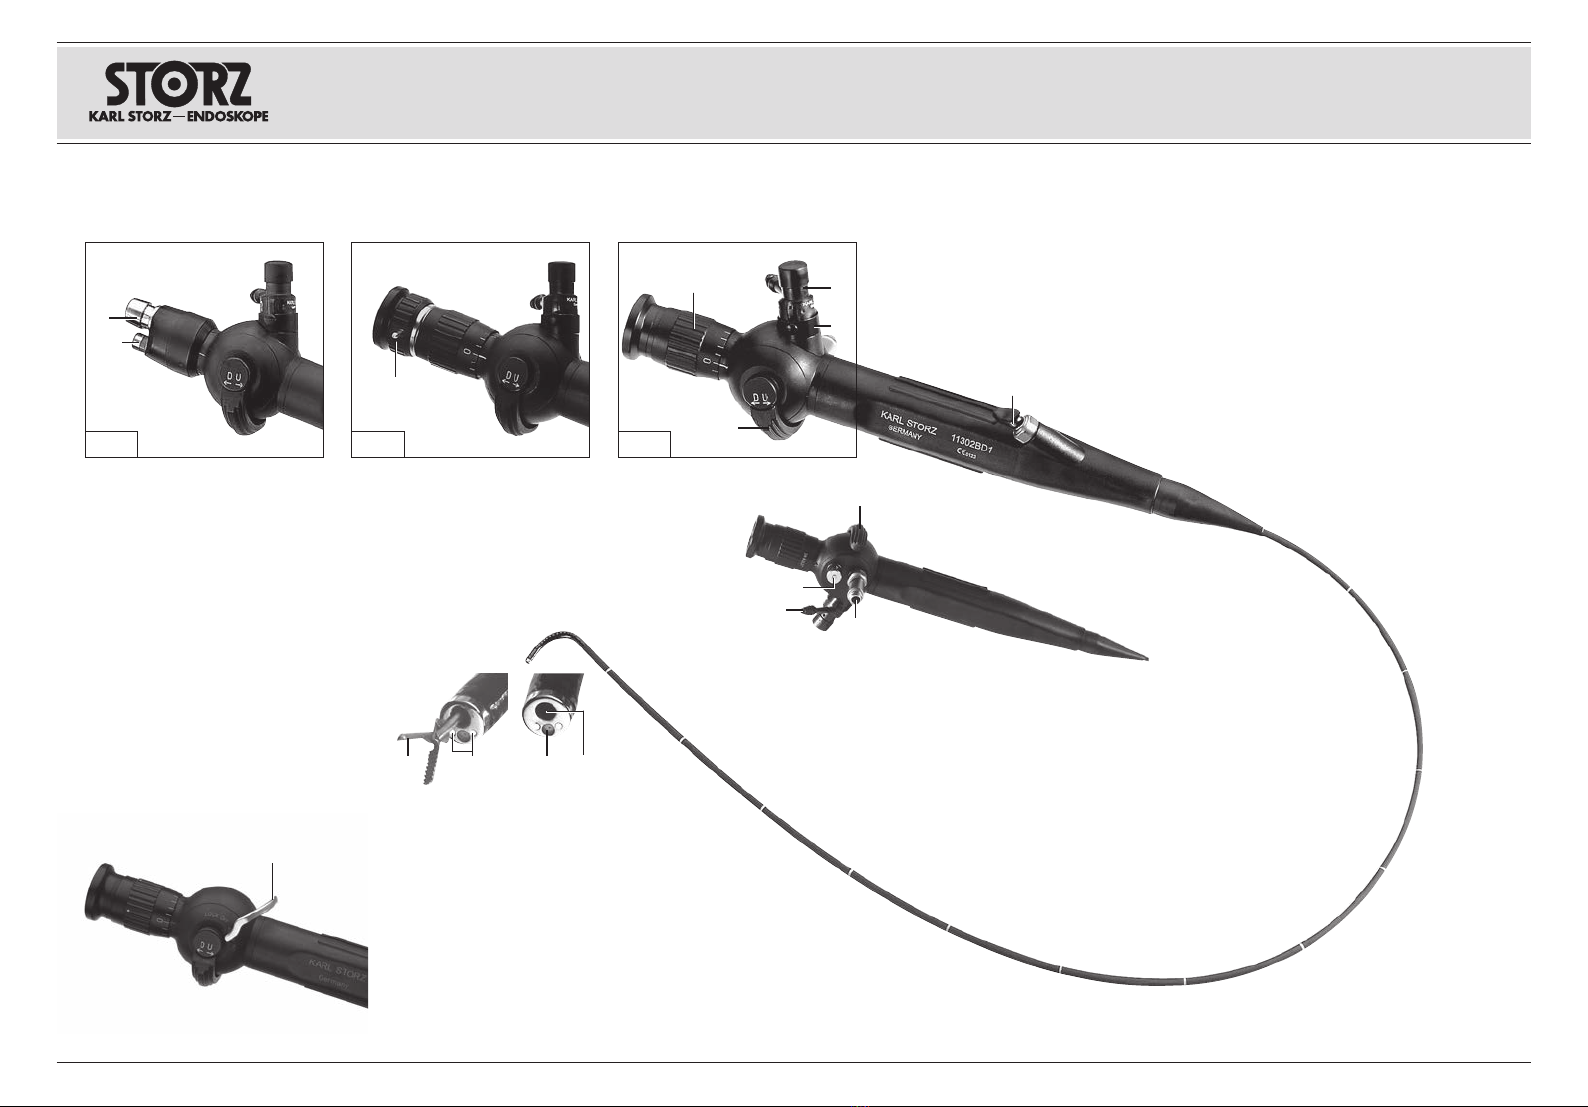
2 Controls ........................................................8
3 Intended Use ..............................................11
3.1 Safety precautions when using the
fiberscopes.............................................11
4 User qualification .......................................12
5 Warnings and cautions..............................13
6 Unpacking...................................................16
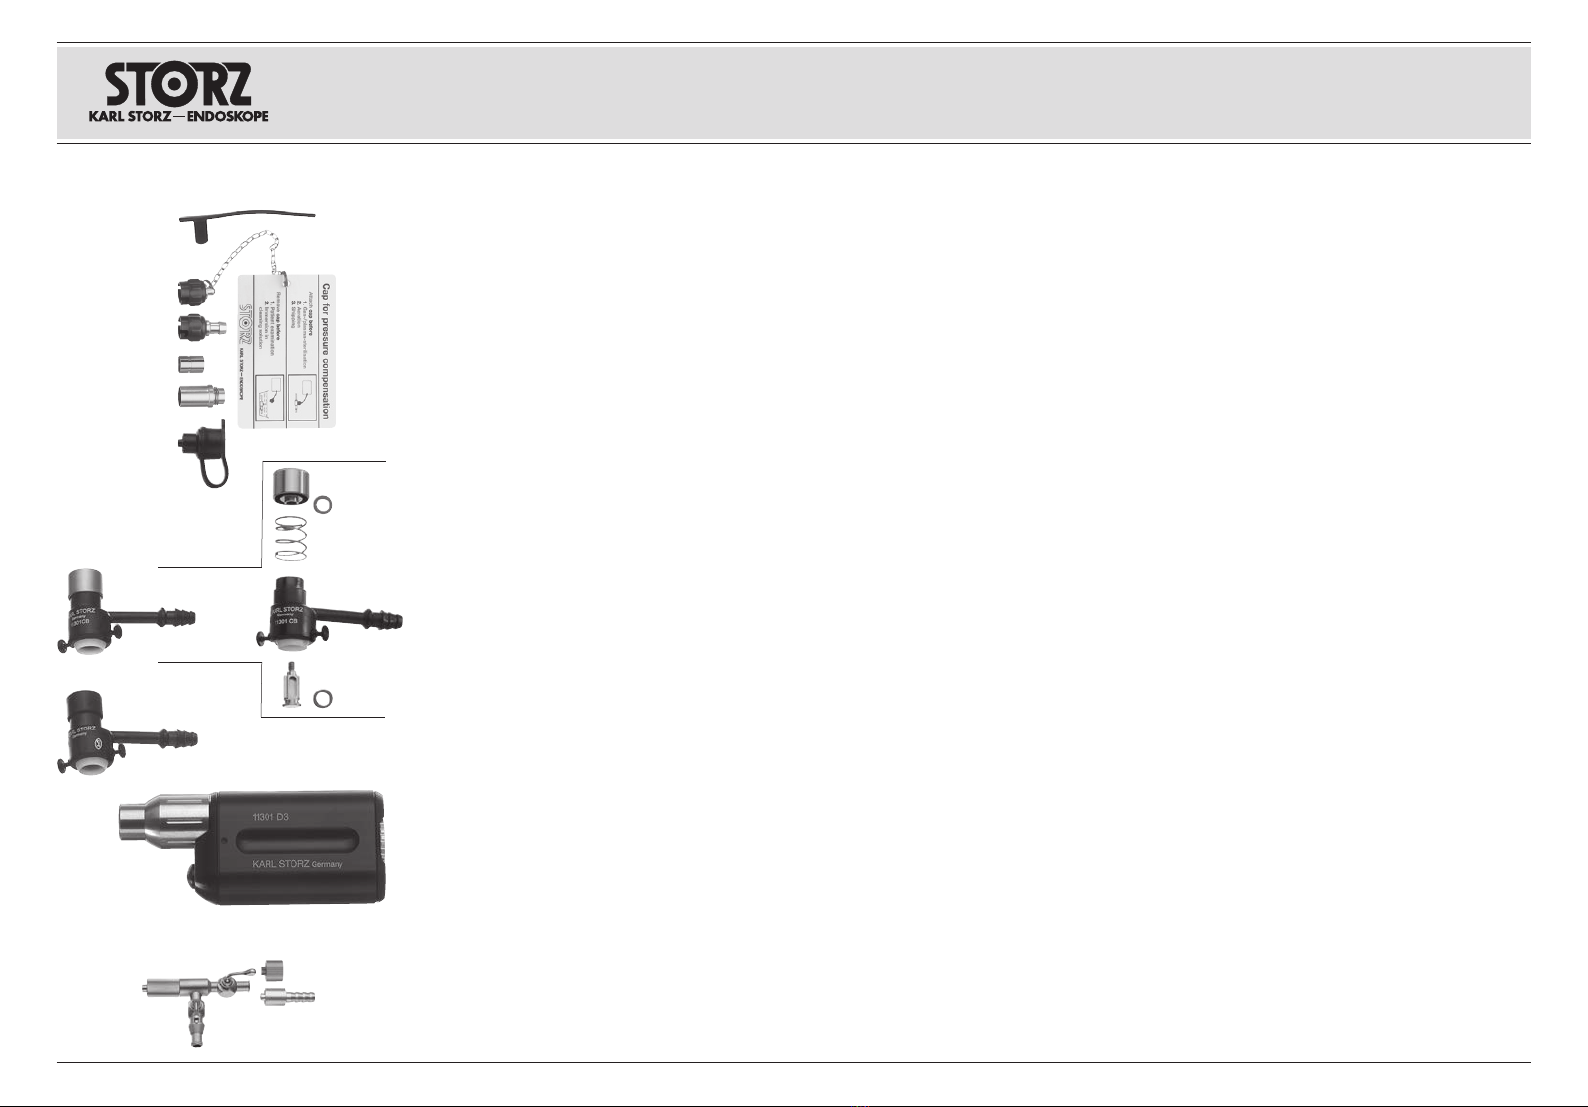
6.1 Basic equipment.....................................16
6.1.1 Accessories ............................................17
7 Initial operation ..........................................18
7.1 Fitting the suction valve ..........................18
7.2 Fitting the tube holder
(only intubation fiberscopes)....................18
7.3 Fitting the lip valve
(only bronchofiberscopes).......................18
8 Handling the fiberscopes ..........................19
9 Using the fiberscopes ...............................20
10 Preparation of the fiberscope...................24
10.1 Connect these supply lines.....................24
10.2 Controlling the distal tip ..........................25
10.3 Suction ...................................................26
10.4 Insufflation ..............................................26
10.5 Focusing.................................................26
10.6 Instrument channel .................................27
10.7 PDD version............................................27
11 DCI®fiberscope with camera ...................28
11.1 Assembly................................................28
11.2 Disassembly ...........................................29
12 DIN eyepiece on DCI®fiberscope.............29
12.1 Assembly................................................29
12.2 Disassembly ...........................................29
13 DCI®camera on DIN eyepiece..................30
13.1 Assembly................................................30
13.2 Disassembly ...........................................30
14 Reprocessing .............................................31
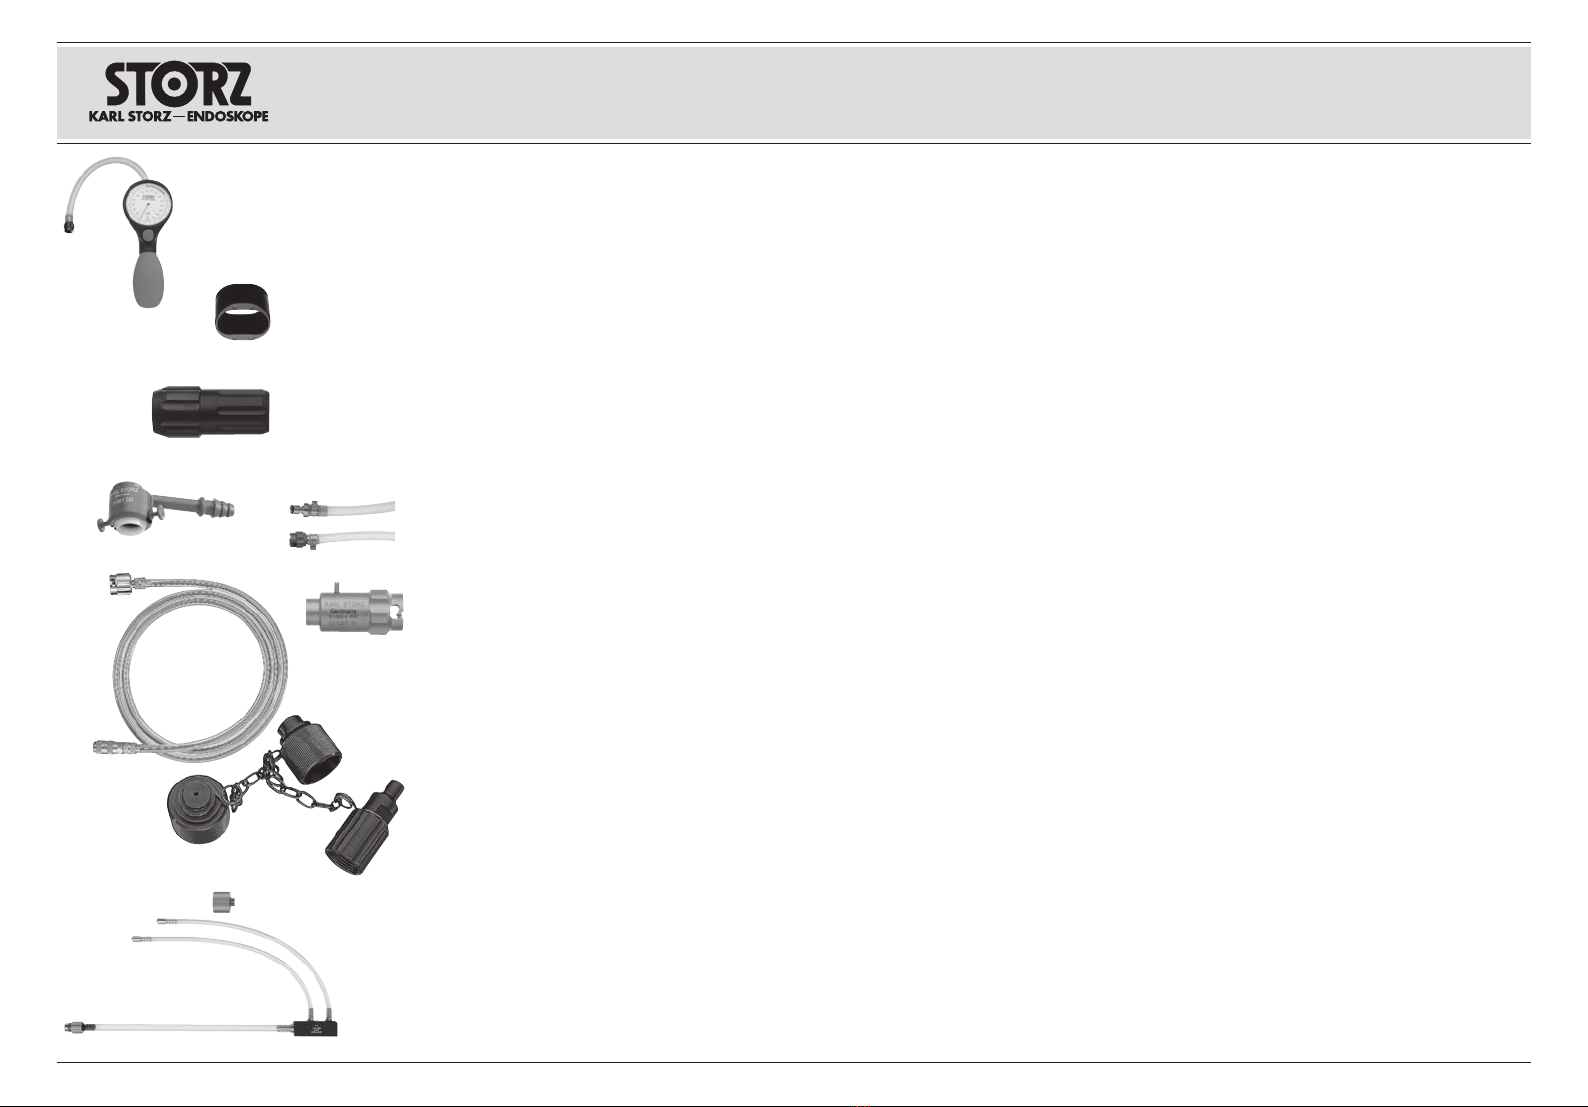
14.1 Accessories ............................................33
14.2 Precleaning.............................................33
14.3 Leakage test...........................................34
14.3.1 Phase 1: Performing the leakage
test – dry ................................................34
14.3.2 Phase 2: Performing the leakage
test – in liquid .........................................35
1 Imágenes del equipo ...................................6
2 Elementos de mando...................................8
3 Empleo previsto .........................................11
3.1 Medidas de precaución al utilizar los
fibroscopios............................................11
4 Cualificación del usuario...........................12
5 Indicaciones de alarma y advertencia .....13
6 Desembalaje...............................................16
6.1 Equipo básico ........................................16
6.1.1 Accesorios..............................................17
7 Primera aplicación .....................................18
7.1 Montaje de la válvula de succión ............18
7.2 Montaje del soporte del tubo
(solamente fibroscopio de intubación).....18
7.3 Montaje de la válvula de labios
(solamente bronco-fibroscopios).............18
8 Manejo del fibroscopio..............................19
9 Aplicación de los fibroscopios .................20
10 Preparación del fibroscopio .....................24
10.1 Conecte las líneas de alimentación.........24
10.2 Mando de la punta distal ........................25
10.3 Succión ..................................................26
10.4 Insuflación ..............................................26
10.5 Enfoque..................................................26
10.6 Canal para instrumentos.........................27
10.7 Ejecución PDD........................................27
11 Fibroscopio DCI®con cámara ..................28
11.1 Montaje ..................................................28
11.2 Desmontaje ............................................29
12 Ocular DIN al fibroscopio DCI®...............29
12.1 Montaje ..................................................29
12.2 Desmontaje ............................................29
13 Cámara DCI®al ocular DIN .......................30
13.1 Montaje .................................................30
13.2 Desmontaje ...........................................30
14 Preparación ................................................31
14.1 Accesorios..............................................33
14.2 Limpieza previa.......................................33
14.3 Prueba de estanqueidad.........................34
14.3.1 Fase 1: Ejecución de la prueba
de estanqueidad – en seco ....................34
14.3.2 Fase 2: Ejecución de la prueba
de estanqueidad – en líquido..................35
ContentInhalt
96216006D _ Version 6.3 – 07/2022
1 Geräteabbildungen ......................................6
2 Bedienungselemente ...................................8
3 Bestimmungsgemäße Verwendung .........11
3.1 Sicherheitsmaßnahmen beim Einsatz der
Fiberskope..............................................11
4 Qualifikation des Anwenders....................12
5 Warn- und Vorsichtshinweise...................13
6 Auspacken ..................................................16
6.1 Grundausstattung...................................16
6.1.1 Zubehör..................................................17
7 Erstanwendung ..........................................18
7.1 Absaugventil montieren...........................18
7.2 Tubushalter montieren
(nur Intubations-Fiberskope)....................18
7.3 Lippenventil montieren
(nur Broncho-Fiberskope) .......................18
8 Handhabung der Fiberskope ....................19
9 Einsatz der Fiberskope..............................20
10 Vorbereitung des Fiberskopes .................24
10.1 Versorgungsleitungen anschließen..........24
10.2 Steuerung der distalen Spitze.................25
10.3 Absaugung .............................................26
10.4 Insufflation .............................................26
10.5 Fokussierung ..........................................26
10.6 Instrumentenkanal ..................................27
10.7 PDD-Ausführung.....................................27
11 DCI®-Fiberskop mit Kamera......................28
11.1 Montage .................................................28
11.2 Demontage.............................................29
12 DIN-Okular an DCI®-Fiberskop .................29
12.1 Montage .................................................29
12.2 Demontage.............................................29
13 DCI®-Kamera an DIN-Okular.....................30
13.1 Montage ................................................30
13.2 Demontage ............................................30
14 Aufbereitung ...............................................31
14.1 Zubehör..................................................33
14.2 Vorreinigung ...........................................33
14.3 Dichtheitstest..........................................34
14.3.1 Phase 1: Durchführung des
Dichtheitstests — trocken.......................34
14.3.2 Phase 2: Durchführung des
Dichtheitstests — in Flüssigkeit...............35
Contenido del manual

2
14.4 Disassembly ...........................................36
14.5 Manual reprocessing ..............................36
14.5.1 Manual cleaning......................................36
14.5.2 Manual disinfection .................................37
14.5.3 Manual High-Level Disinfection (HLD) .....38
14.5.4 Drying.....................................................38
14.6 Machine reprocessing ...........................39
14.6.1 Manual preparation.................................39
14.6.2 Connecting.............................................40
14.6.3 Machine cleaning/
chemical-thermal disinfection..................40
14.7 Assembly, inspection and care ...............41
14.8 Packaging...............................................42
14.9 Sterilization .............................................43
14.9.1 Hydrogen peroxide (H2O2) sterilization –
ASP STERRAD®....................................44
14.9.2 Hydrogen peroxide (H2O2) sterilization –
STERIS®V-PRO®..................................44
14.9.3 Ethylene oxide sterilization (EO)...............45
14.9.4 Chemical low-temperature sterilization
with peracetic acid –
STERIS System 1E®..............................46
14.10 Limits of reprocessing.............................46
14.11 Storage...................................................46
14.12 Reprocessing of accessories ..................47
14.13 Overview: Cleaning brushes....................48
15 Standard compliance.................................49
15.1 Servicing and repair................................49
15.2 Responsibility..........................................49
15.3 Warranty.................................................49
15.4 Directive compliance...............................50
16 Repair and replacement program ............50
16.1 Important information..............................51
14.4 Desmontaje ............................................36
14.5 Preparación manual................................36
14.5.1 Limpieza manual.....................................36
14.5.2 Desinfección manual...............................37
14.5.3 Desinfección manual de alto nivel (HLD) .38
14.5.4 Secado...................................................38
14.6 Preparación mecánica ............................39
14.6.1 Preparación manual................................39
14.6.2 Conexión ................................................40
14.6.3 Limpieza mecánica/
desinfección químico-térmica .................40
14.7 Montaje, verificación y conservación.......41
14.8 Embalaje.................................................42
14.9 Esterilización...........................................43
14.9.1 Esterilización con peróxido de
hidrógeno (H2O2) – ASP STERRAD
®........44
14.9.2 Esterilización con peróxido de
hidrógeno (H2O2) – STERIS
®
V-PRO
®........44
14.9.3 Esterilización con óxido de etileno (OE)...45
14.9.4 Esterilización química a baja
temperatura con ácido peracético –
STERIS System 1E®..............................46
14.10 Limitación del reacondicionamiento ........46
14.11 Almacenamiento.....................................46
14.12 Preparación de los accesorios................47
14.13 Resumen: Cepillos de limpieza ...............48
15 Normativas..................................................49
15.1 Reparaciones..........................................49
15.2 Responsabilidad .....................................49
15.3 Garantía..................................................49
15.4 Conformidad con la directiva ..................50
16 Programa de recambio y reparación .......50
16.1 Observaciones importantes ....................51
ContentInhalt
14.4 Demontage.............................................36
14.5 Manuelle Aufbereitung ............................36
14.5.1 Manuelle Reinigung.................................36
14.5.2 Manuelle Desinfektion.............................37
14.5.3 Manuelle High-Level-Desinfektion (HLD) .38
14.5.4 Trocknung ..............................................38
14.6 Maschinelle Aufbereitung .......................39
14.6.1 Manuelle Vorbereitung ............................39
14.6.2 Konnektierung ........................................40
14.6.3 Maschinelle Reinigung/
chemo-thermische Desinfektion..............40
14.7 Montage, Prüfung und Pflege .................41
14.8 Verpackung ............................................42
14.9 Sterilisation .............................................43
14.9.1 Wasserstoffperoxid (H2O2)-Sterilisation –
ASP STERRAD®....................................44
14.9.2 Wasserstoffperoxid (H2O2)-Sterilisation –
STERIS®V-PRO®..................................44
14.9.3 Ethylenoxid-Sterilisation (EO)...................45
14.9.4 Chemische Niedertemperatur-
Sterilisation mit Peressigsäure –
STERIS System 1E®..............................46
14.10 Begrenzung der Wiederaufbereitung.......46
14.11 Lagerung ................................................46
14.12 Aufbereitung Zubehör .............................47
14.13 Übersicht: Reinigungsbürsten .................48
15 Normatives..................................................49
15.1 Instandsetzung .......................................49
15.2 Verantwortlichkeit ...................................49
15.3 Garantie..................................................49
15.4 Richtlinienkonformität..............................50
16 Reparatur-Austauschprogramm ..............50
16.1 Wichtige Hinweise ..................................51
Contenido del manual

5
Diese Gebrauchsanweisung beschreibt drei Aus-
führungen von Fiberskopen, die sich durch das
bildgebende System unterscheiden. Bezieht sich
ein Abschnitt ausschließlich auf eine dieser Aus-
führungen so ist er entsprechend markiert:
KARLSTORZ arbeitet ständig an der Weiterent
wicklung aller Produkte. Bitte haben Sie Verständ
nis dafür, dass deshalb Änderungen des Liefer-
um fangs, der Form, Ausstattung und Technik
möglich sind. Aus den Angaben, Abbildungen und
Beschreibungen dieser Anleitung können daher
keine Ansprüche hergeleitet werden.
Thank you for your expession of confidence in the
KARLSTORZ brand name. Like all of our other
products, these products are the result of years of
experience and great care in manufacture. You and
your organization have decided in favor of modern,
highquality items of equipment from KARLSTORZ.
This manual is intended to serve as an aid in the
proper use, cleaning, desinfection and sterilization
of fiberscopes manufactured by KARLSTORZ.
The fiberscopes are sensitive precision instruments
which require particular care during reprocessing.
To prevent damage during reprocessing, support is
provided here for disassembly, cleaning, sterilization
and assembly of the KARLSTORZ fiberscopes. For
this reason, read these instructions carefully and
keep them as a ready reference.
This instruction manual describes three fiberscope
versions, distinguished from one another by the
imaging system. If a section refers exclusively
to one of these versions, it is thus appropriately
labeled.
KARLSTORZ is constantly working on the further
development of all products. Please appreciate
that changes to the scope for supply in form,
equipment and technology are possible for this
reason. Therefore, no claims may be derived from
the information, figures and descriptions in this
manual.
PDD
OPT
DCI®
Wichtiger Hinweis Important Information
Optik
Optik mit Spezialfiltern für PDD/AF
DCI®-Fiberskope (Direct-Coupled-Interface)
Telescope
Telescope with special filters for PDD/AF
DCI®fiberscopes (Direct Coupled Interface)
Vielen Dank für Ihr Vertrauen in den Namen
KARLSTORZ. Auch in diesem Produkt steckt
unsere ganze Erfahrung und Sorgfalt. Sie und
Ihr Haus haben sich damit für moderne und
hochwertige Instrumente der Firma KARLSTORZ
entschieden.
Die vorliegende Gebrauchsanweisung soll helfen,
die von KARLSTORZ hergestellten Fiber skope
richtig anzuwenden, zu reinigen, zu desinfi-
zieren und zu sterilisieren. Die Fiberskope sind
empfindliche Präzisionsinstrumente, die eine
besondere Sorgfalt bei der Aufbereitung verlangen.
Um Schäden bei der Aufbereitung zu vermeiden,
wird hier eine Hilfestellung zur Demontage, Reini-
gung, Desinfektion, Sterilisation und Montage der
Fiberskope von KARLSTORZ gegeben. Lesen Sie
deshalb diese Anleitung sorgfältig und be wahren
sie zum etwaigen Nachlesen auf.
Agradecemos la confianza que ha depositado en la
marca KARLSTORZ. Este producto, como el resto
de los que fabricamos, es el resultado de nuestra
am plia experiencia y capacidad técnicas. Con esta
adquisición, tanto usted como su empresa se han
decidido por un producto KARLSTORZ de gran
precisión y alta calidad.
Este Manual de instrucciones contiene todas
las indicaciones necesarias para utilizar, limpiar,
desinfectar y esterilizar correctamente los
fibroscopios de KARLSTORZ. Los fibroscopios
son sensibles instrumentos de precisión,
que requieren un esmero especial en su pre-
paración. Con el fin de evitar deterioros durante la
preparación, se proporciona aquí una ayuda para
el desmontaje, limpieza, esterilización y montaje de
los fibroscopios de KARLSTORZ. Recomendamos
su lectura detenida y colocación en un lugar visible
para facilitar la consulta.
Este Manual de instrucciones describe tres
ejecuciones de fibroscopios que se diferencian
entre sí por el sistema de reproducción
de imágenes. Si una sección se refiere
específicamente a una ejecución determinada,
entonces está marcada:
KARLSTORZ trabaja continuamente en el desa
rrollo de todos sus productos. Por este motivo
rogamos comprendan que pueden producirse
modificaciones en el suministro, tanto en cuanto
a forma como a equipamiento y técnica. De las
indicaciones, ilustraciones y descripciones no
emana por ello derecho alguno.
Indicaciones importantes
Telescopio
Telescopio con filtros especiales para PDD/AF
Fibroscopios DCI®(Direct-Coupled-Interface)
Other manuals for 110 Series
1
This manual suits for next models
4
Table of contents
Popular Laboratory Equipment manuals by other brands

Belden
Belden HIRSCHMANN RPI-P1-4PoE installation manual

Koehler
Koehler K1223 Series Operation and instruction manual

Globe Scientific
Globe Scientific GCM-12 quick start guide

Getinge
Getinge 86 SERIES Technical manual

CORNING
CORNING Everon 6000 user manual

Biocomp
Biocomp GRADIENT MASTER 108 operating manual