Kathrein HDS 66 User manual

Page 1 of 1
KATHREIN SE • P.O. Box 10 04 44 • 83004 Rosenheim • Germany
Rosenheim, 01.05.2018
KATHREIN-Werke KG ist jetzt KATHREIN SE
KATHREIN-Werke KG is now KATHREIN SE
Zum 1. Mai 2018 ist die KATHREIN-Werke KG auf die KATHREIN SE,
einer Europäischen Aktiengesellschaft (Societas Europaea),
übergegangen.
Die neuen Firmendaten lauten seither wie folgt:
KATHREIN SE
Anton-Kathrein-Str. 1–3
83022 Rosenheim, Deutschland
Steuer-Nr.: 156/117/30745
UST-Ident-Nr.: DE 131 558 540
Registergericht: Traunstein, HRB 24848
______________________________________________________________________________
On 1
st
May 2018, KATHREIN-Werke KG has been transferred
to KATHREIN SE, a European stock corporation (Societas Europaea).
Since then the company data is as follows:
KATHREIN SE
Anton-Kathrein-Str. 1–3
83022 Rosenheim, Deutschland
Tax ID No.: 156/117/30745
VAT Reg. No.: DE 131 558 540
Commercial Register: Traunstein, HRB 24848
KATHREIN SE
Anton-Kathrein-Straße 1–3
83022 Rosenheim
Germany
Phone: +49 8031 184-0
Fax: +49 8031 184-306
www.kathrein.com
Executive Board:
Anton Kathrein (CEO),
Joachim Döring, Elmar Geissinger,
Jürgen Walter, Hans-Joachim Ziems
Supervisory Board:
Dr. Michael F. Keppel (Chairman)
VAT Reg. No.: DE 131 558 540
Tax ID No.: 156/117/30745
WEEE Reg. No.: DE 38438502
GLN: 40 21121 00000 3
Registered Office: Rosenheim, DE
Commercial Register: Traunstein, HRB 24848
Deutsche Bank AG
IBAN: DE54 7007 0010 0833 7701 00
BIC: DEUTDEMMXXX
936.0000218

1 / 2
HDS 66 20410060
Steuergerät HDS 66
Merkmale
Das HDS66 ist ein Steuergerät für die Anzeige der Elevation
der Flachantenne BAS60/66.
■Kompatibel mit jedem beliebigen Receiver oder TV-Gerät
mit integriertem Tuner
■Geeignet ausschließlich in Verbindung mit einem
Neigungsmesser HDZ60/66
■Spannungsversorgung über den Receiver
■Keine externe Spannungsversorgung erforderlich
■Zwei F-Buchsen (IEC169-24) als Schnittstellen
■Automatisches Ausschalten der Display-Hintergrundbe-
leuchtung bei unveränderter Elevation (Energiesparmodus)
■Automatisches Einschalten der Display-Hintergrundbe-
leuchtung bei einer Elevationsänderung
■Einfache Wandmontage
■
Lieferumfang
●Steuergerät
●Schrauben für Wandmontage, 2 Stück
●F-Stecker, 2 Stück
Bestimmungsgemäßer Gebrauch
Das HDS66 ist ein Steuergerät für die Anzeige der aktuellen Elevation der Flachantenne BAS60/66 in 0,1°-Schritten
ausschließlich in Verbindung mit dem Neigungsmesser HDZ60/66.
Jegliche anderweitige Nutzung oder die Nichtbeachtung dieses Anwendungshinweises und der den Geräten beilie-
genden Dokumentationen und Anleitungen hat den Verlust der Gewährleistung bzw. Garantie zur Folge.
Tipp Bewahren Sie die Anleitung für später auftretende Fragen sorgfältig auf und geben Sie diese bei einem
Verkauf des Steuergeräts an den nächsten Besitzer weiter.
Montage
Das Steuergerät HDS66 an einer Wand im Innenraum des Fahrzeuges in der Nähe vom SAT-Peilmasten mit den mitge-
lieferten Schrauben befestigen. Darauf achten, dass die Anzeige des Displays zu sehen ist und die F-Buchsen nach
unten zeigen, damit die Anzeige am Display ablesbar ist.
Kabelanschluss
Achtung
Das HDS66 führt zu einem Mehrverbrauch von 150 mA. Stellen Sie sicher, dass der Receiver am Ausgang
diesen Mehrverbrauch liefern kann.

2 / 2
936.4998/–/VMPT/0715/DE – Technische Änderungen vorbehalten!
www.kathrein.com
KATHREIN-Werke KG • Anton-Kathrein-Straße 1 – 3 • 83004 Rosenheim • Deutschland • Telefon +49 8031 184-0 • Fax +49 8031 184-306
Elektronische Geräte gehören nicht in den Hausmüll, sondern müssen – gemäß Richtlinie 2002/96/EG DES
EUROPÄISCHEN PARLAMENTS UND DES RATES vom 27. Januar 2003 – über Elektro- und Elektronik-
Altgeräte fachgerecht entsorgt werden.
Bitte geben Sie dieses Gerät am Ende seiner Verwendung zur Entsorgung an den dafür vorgesehenen
öffentlichen Sammelstellen ab.
Der Neigunssensor und der Receiver sind mit einem Kabel verbunden. Das Steuergerät HDS66 hat jedoch zwei
F-Buchsen, d.h., es sind zwei Kabel notwendig. Um das HDS66 mit dem Receiver und dem Neigungssensor
HDZ60/66 zu verbinden, gibt es zwei Optionen:
1. Kabel zwischen dem Receiver und dem Neigungssensor abschneiden und an beiden Kabelenden die mitgelieferten
F-Stecker montieren, siehe F-Stecker montieren.
ACHTUNG
Stellen Sie sicher, dass das verwendete Kabel einen starren Innenleiter hat, da sonst nach der Montage der
F-Stecker die Einführung des Innenleiters in die F-Buchse des HDS66 nicht möglich ist.
2. Das Steuergerät HDS66 und den Neigungssensor HDZ60/66 mit dem bereits vorhandenen Kabel verbinden. Den
Receiver und das HDS66 mit einem zusätzlichen Koaxialkabel verbinden (nicht im Lieferumfang enthalten).
F-Stecker montieren
Für die Montage ausschließlich die beiliegenden F-Stecker verwenden. Bei der Montage der F-Stecker keine Werkzeuge
verwenden, Stecker nur handfest anziehen.
ACHTUNG
Kurzschlussgefahr!
Sachschaden durch die Berührung der Drähte des Abschirmgeechtes mit dem Innenleiter.
►Sicherstellen, dass bei der Montage des F-Steckers kein Drähtchen des Abschirmgeechtes den Innenleiter
berührt.
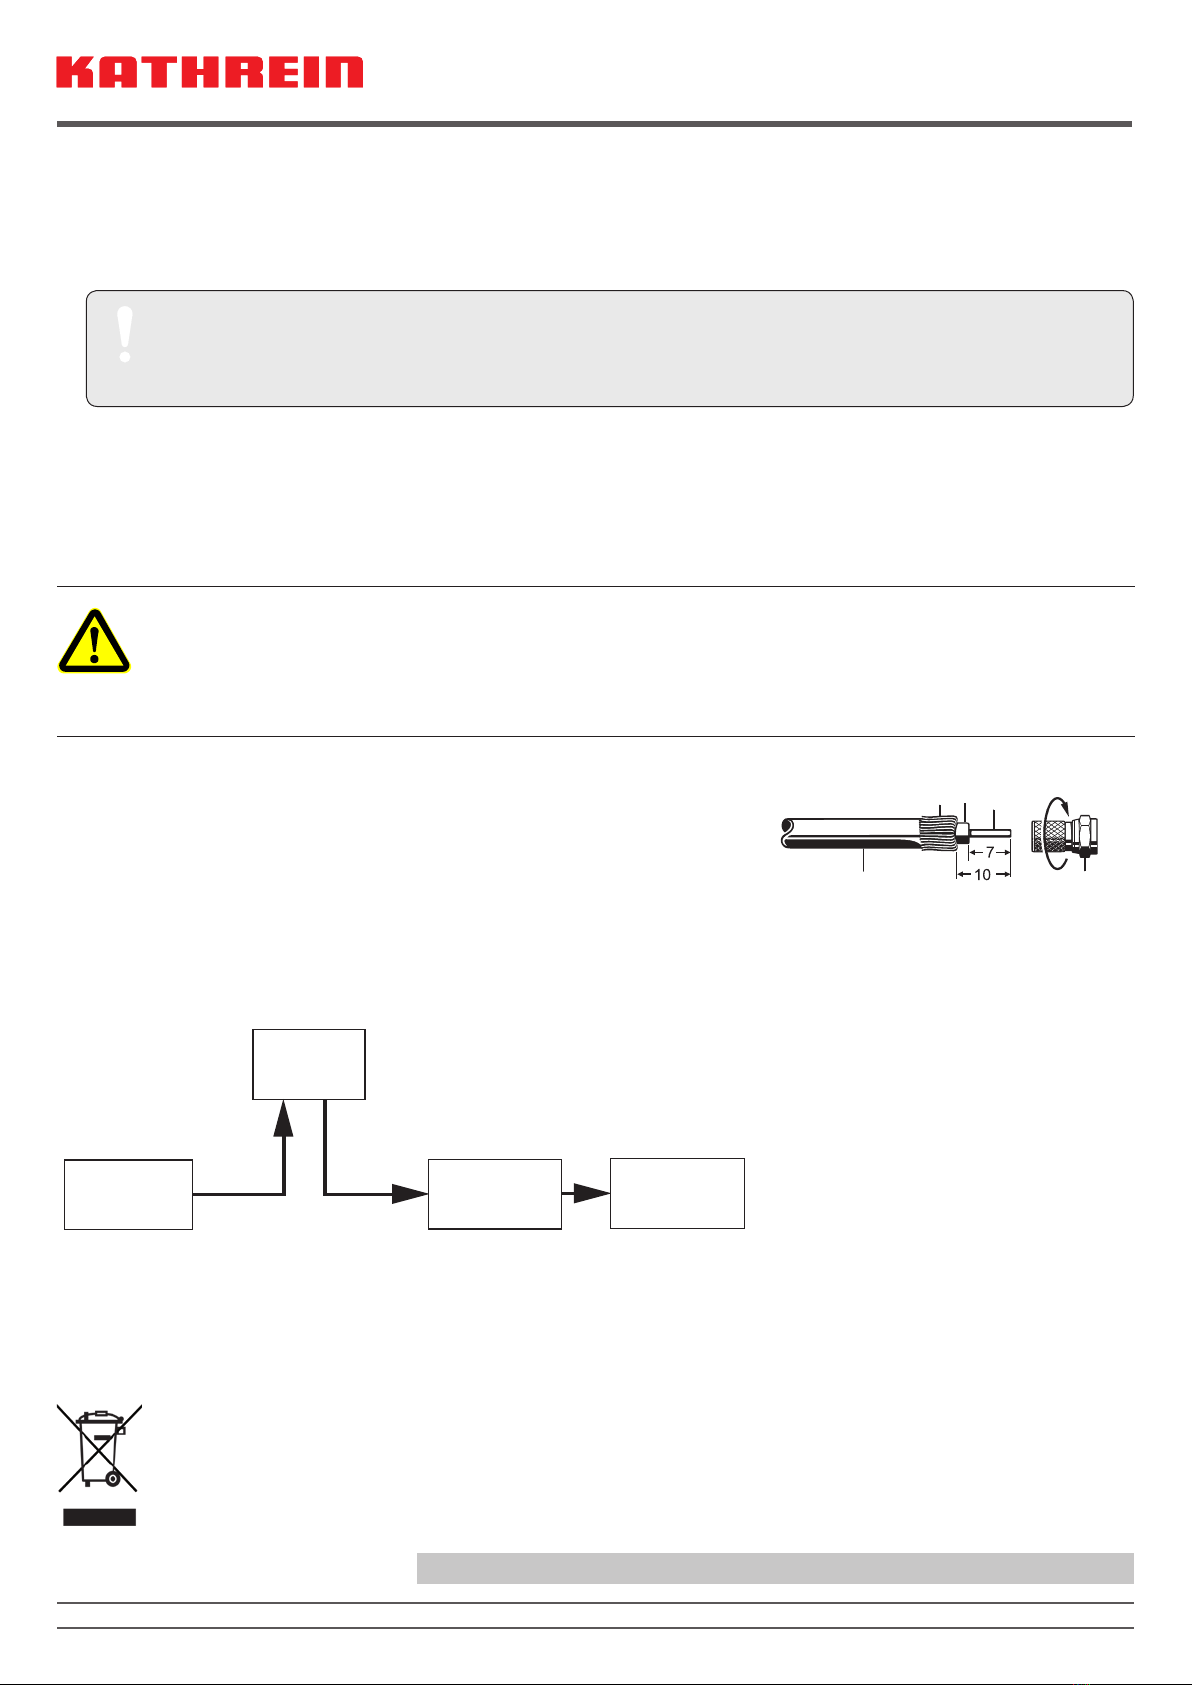
1. 10 mm vom Außenkunststoffmantel ①entfernen. Dabei Außenkunststoff-
mantel vorsichtig einschneiden, um das Abschirmgeecht ②nicht zu beschä-
digen.
2. Abschirmgeecht ② zurücklegen.
3. 7 mm Dielektrikum und Außenleiterfolie ③ vom Innenleiter ④entfernen.
4. F-Stecker ⑤auf das Kabelende aufdrehen, bis der Stecker fest auf dem
Kabel sitzt.
②③④
①⑤
Kabel anschließen
An die Eingangsbuchse des HDS 66 den Receiver, an die Ausgangsbuchse den Neigungssensor HDZ 60/66
anschließen:
Receiver
HDS 66
HDZ 60/66 BAS 60/66

1 / 2
HDS 66 20410060
Control unit HDS 66
Features
The HDS66 is a control unit to display the elevation of the
BAS60/66 planar antenna.
■Compatible with any receiver or TV with an integrated
tuner
■Applicable exclusively in combination with the HDZ60/66
elevation indicator
■Power supply from the receiver
■No external power supply required
■Two F-type female connectors (IEC169-24)
■Backlight turns off automatically if there is no change in
elevation (power saving mode)
■Backlight turns on automatically if there is a change in
elevation
■Easy wall mounting
■
Scope of delivery
●Control unit
●2 screws for wall mounting
●2 F-type connectors
Intended use
The HDS66 is a control unit to display the current elevation of the BAS60/66 planar antenna in 0.1° steps, applicable
exclusively in combination with the HDZ60/66 elevation indicator.
Any other use or failure to comply with these user instructions and the documentation and instructions accompanying
the equipment will void the warranty or guarantee.
Tip Keep these instructions for further reference and give them to the next owner if the control unit is sold.
Installation
Mount the HDS66 control unit on an inner wall of the vehicle in the proximity of the jointed mast using the provided
screws. Make sure that the display is easily seen and the F-type female connectors face downward to be able to read
the information on the display.
Cable connection
NOTICE
The HDS66 leads to an excess consumption of 150 mA. Make sure that the receiver is able to supply this
excess consumption.

2 / 2
936.4998/–/VMPT/0715/GB – Technical data subject to change!
www.kathrein.com
KATHREIN-Werke KG • Anton-Kathrein-Straße 1 – 3 • 83004 Rosenheim • Germany • Phone +49 8031 184-0 • Fax +49 8031 184-306
Electronic equipment is not domestic waste - in accordance with directive 2002/96/EC OF THE EUROPEAN
PARLIAMENT AND THE COUNCIL dated 27th January 2003 on used electrical and electronic appliances, it
must be disposed of properly.
At the end of its service life, take this unit for disposal to an appropriate ofcial collection point.
The elevation indicator and the receiver are connected by means of a cable. The HDS66 control unit has two F-type
female connectors, i.e. two cables are necessary. There are two options to connect the HDS66 to the receiver and the
HDZ60/66 elevation indicator:
1. Cut the cable between the receiver and the elevation indicator and attach the provided F-type connectors onto both
ends of the cable, see Attach the F-type connectors.
NOTICE
Make sure that the cable has a solid inner conductor, otherwise it is not possible to insert the inner conductor
into the F-type female connector of the HDS66 after the F-type connectors have been attached.
2. Connect the HDS66 control unit and the HDZ60/66 elevation indicator using the cable at hand. Connect the receiver
and the HDS66 using an additional coaxial cable (not included in the scope of delivery).
Attach the F-type connectors
Only use the enclosed F-type connectors. Do not use any tools to attach the F-type connectors, tighten them hand-
tight.
NOTICE
Risk of short circuit!
Material damage due to contact between the wires of the braided shield and the inner conductor.
►When attaching the F-type connectors, make sure that there is no contact between the wires of the braided
shield and the inner conductor.
1. Remove 10 mm from the outer plastic jacket ①. Cut into it carefully so as not
to damage the braided shield ②.
2. Pull the braided shield ② back.
3. Remove 7 mm dielectric and aluminium foil ③ from the inner conductor ④.
4. Screw the F-type connector ⑤onto the end of the cable until it sits tightly.
②③④
①⑤
Connect the cable
Connect the receiver to the input F-type female connector and the HDZ60/66 to the output F-type female connector:
Receiver
HDS 66
HDZ 60/66 BAS 60/66
This manual suits for next models
1
Table of contents
Languages:
Other Kathrein Control Unit manuals