KaVo EWL 5423 User manual

Operating Instructions
All Purpose Blasting System
EWL 5423/5030
0.488.5740 ●RB ●09/97 ● GB 02.09
KaVo Elektrotechnisches Werk GmbH
Wangener Straße 78
D-88299 Leutkirch
Tel.: 0 75 61 / 86-0 • Fax: 0 75 61 / 86-22 2


GB
TABLE OF CONTENTS
A 1 User information ..........................................................................................................................................2
A 1.1 Meaning of the pictograms ..................................................................................................................2
A 1.2 Important information ..........................................................................................................................2
A 1.3 Precautions ..........................................................................................................................................2
A 2 Scope of delivery –Accessories ................................................................................................................3
A 3 Mains voltage – Mainsfrequency ..............................................................................................................4
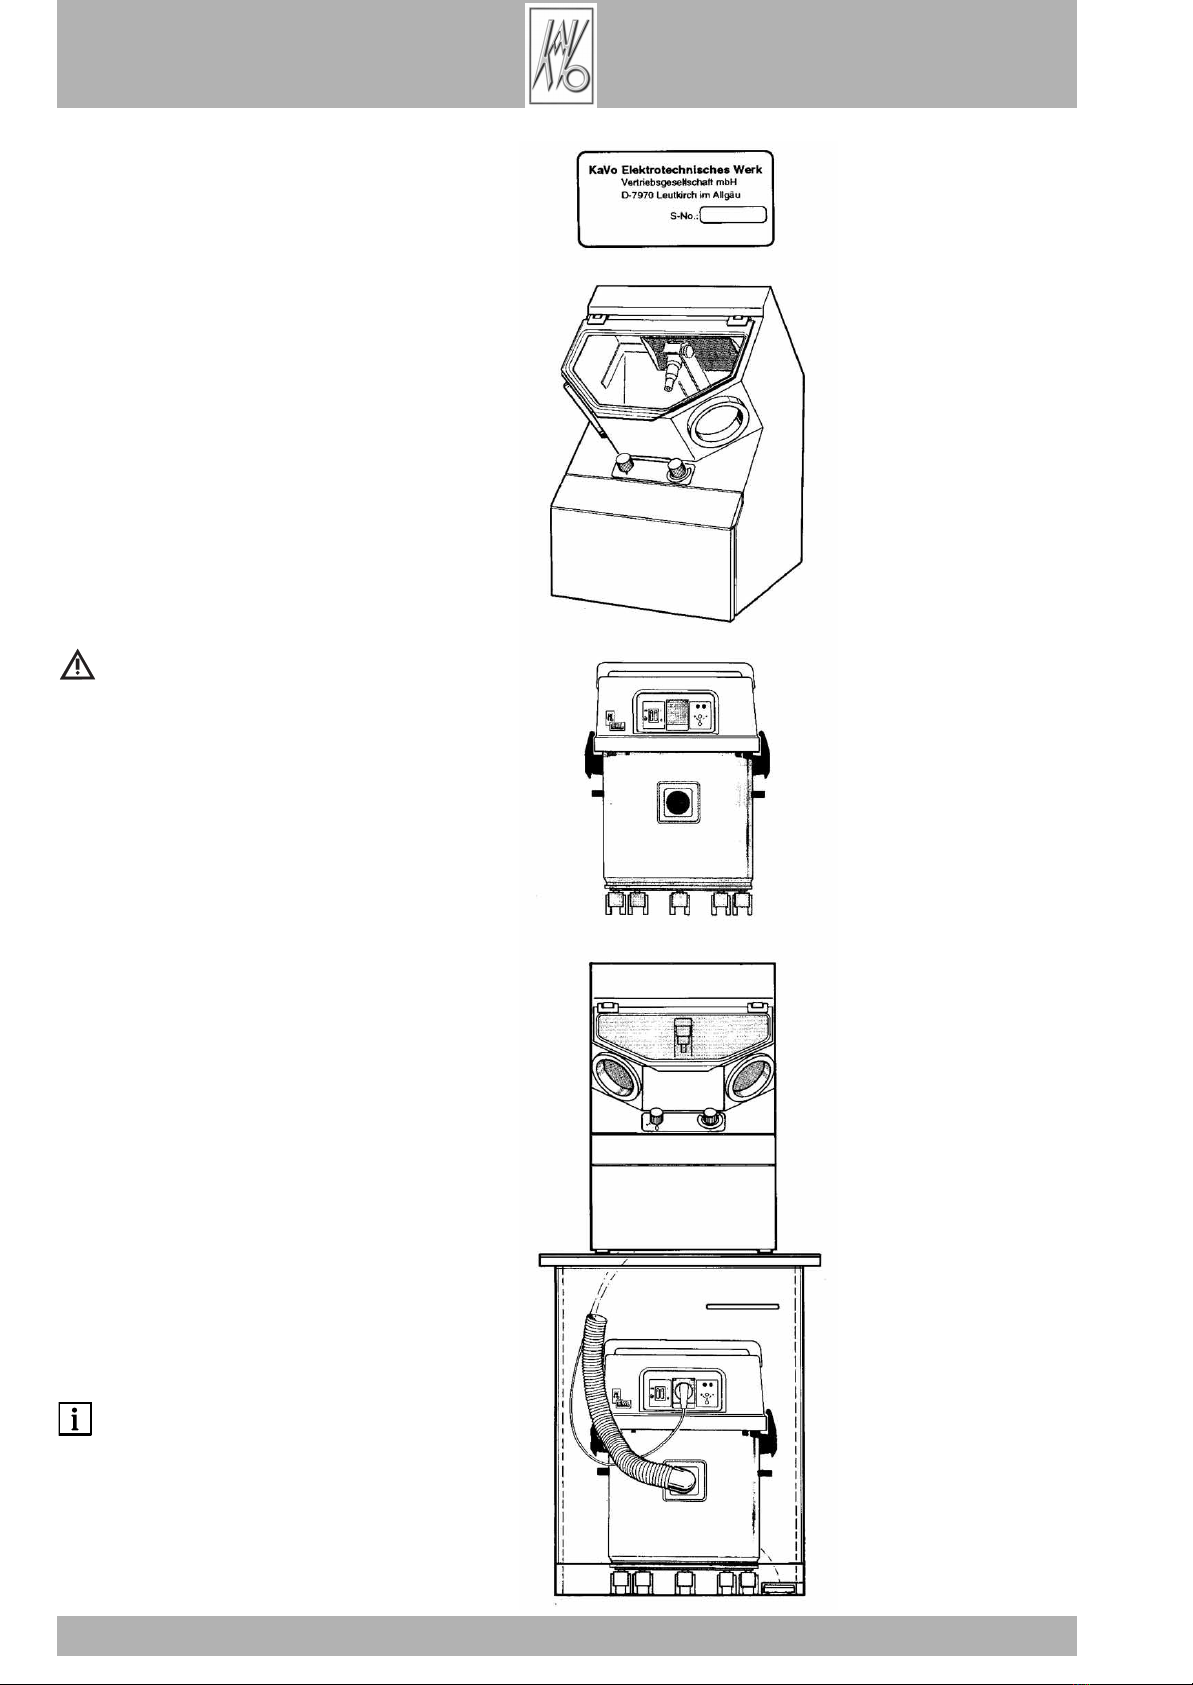
A 4 Location ........................................................................................................................................................4
A 5 Mounting and connection ..........................................................................................................................5
A 6 Preperations for commencing operation ..................................................................................................6
A 6.1 Filling the abrasive container DP in the recirculating blasting range ..................................................6
A 6.2 Filling the abrasive containers inthe disposable abrasive range. ........................................................6
A 6.3 Fitting gloves or cuffs EM ....................................................................................................................7
A 6.4 Setting the blasting pressure in the recirculating blasting range. ........................................................7
A 6.5 Setting the blasting pressure in the disposable abrasive range. ........................................................7
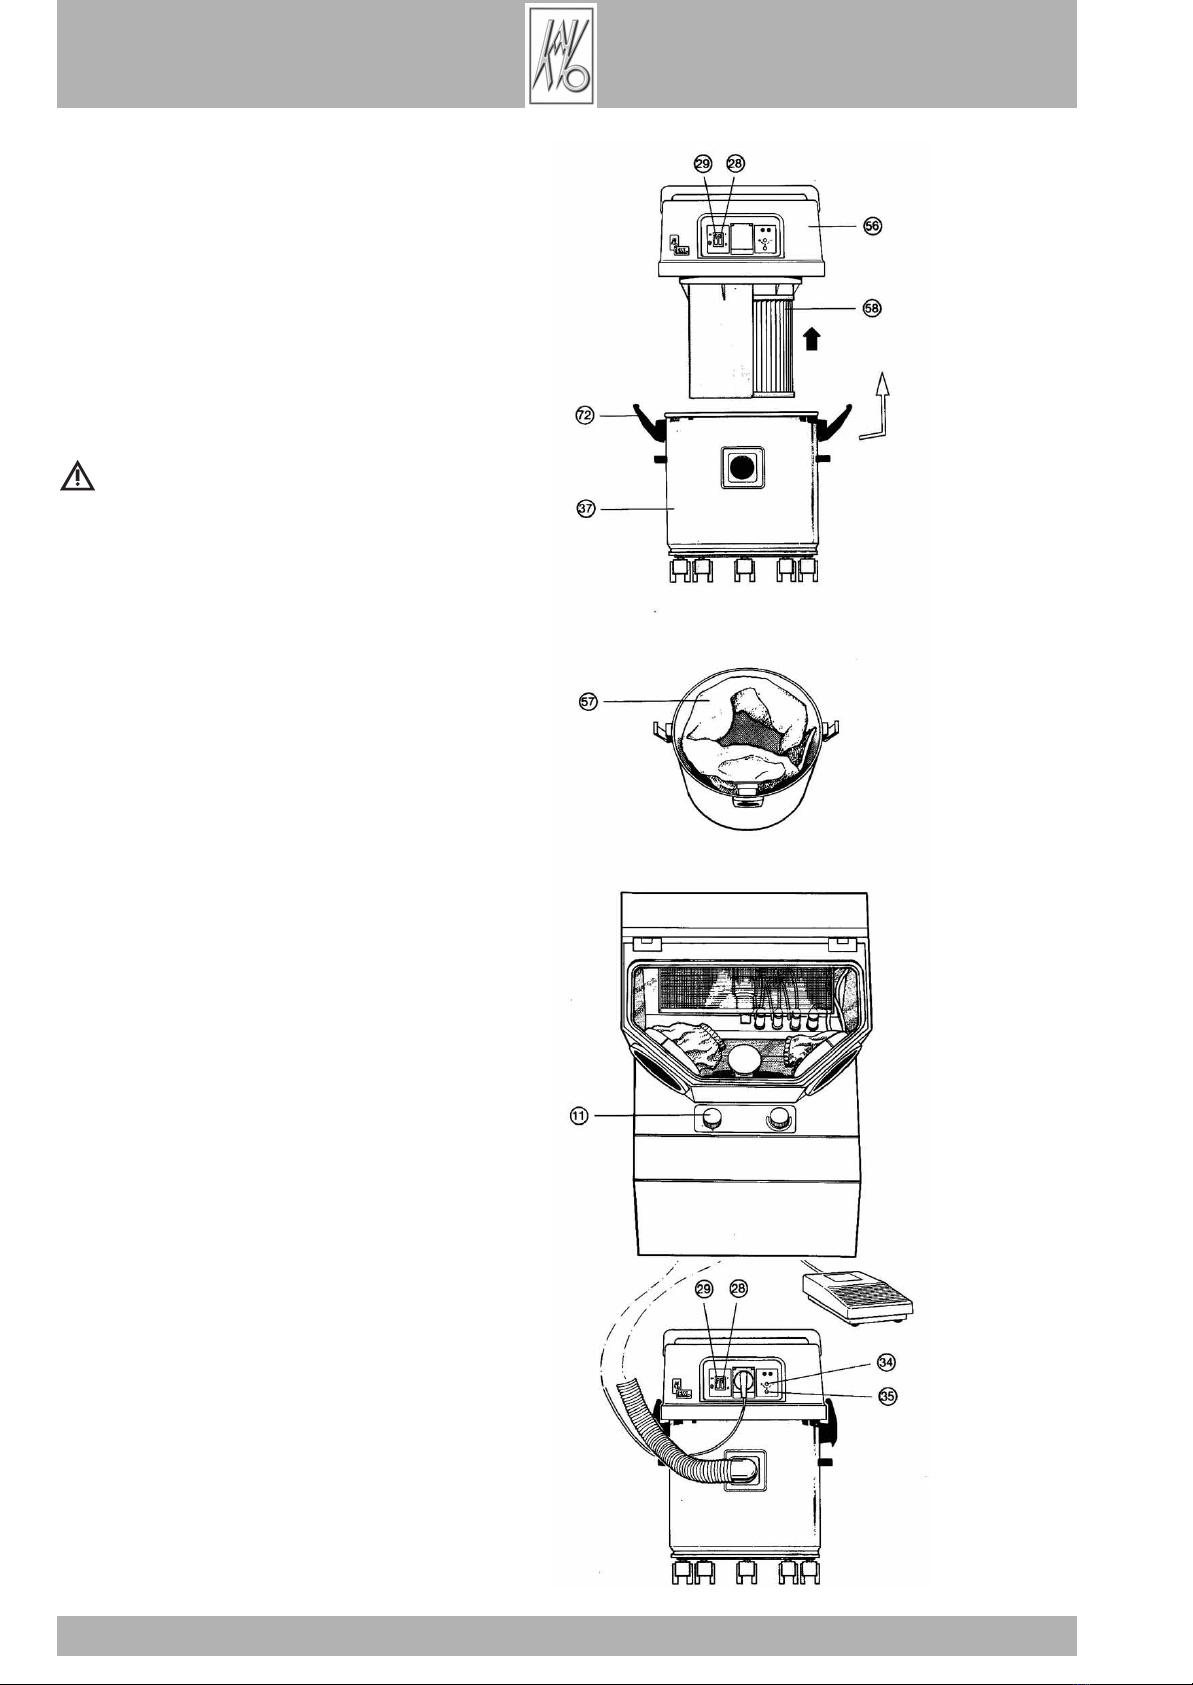
A 6.6 Dust collector EWL 5030 ......................................................................................................................8
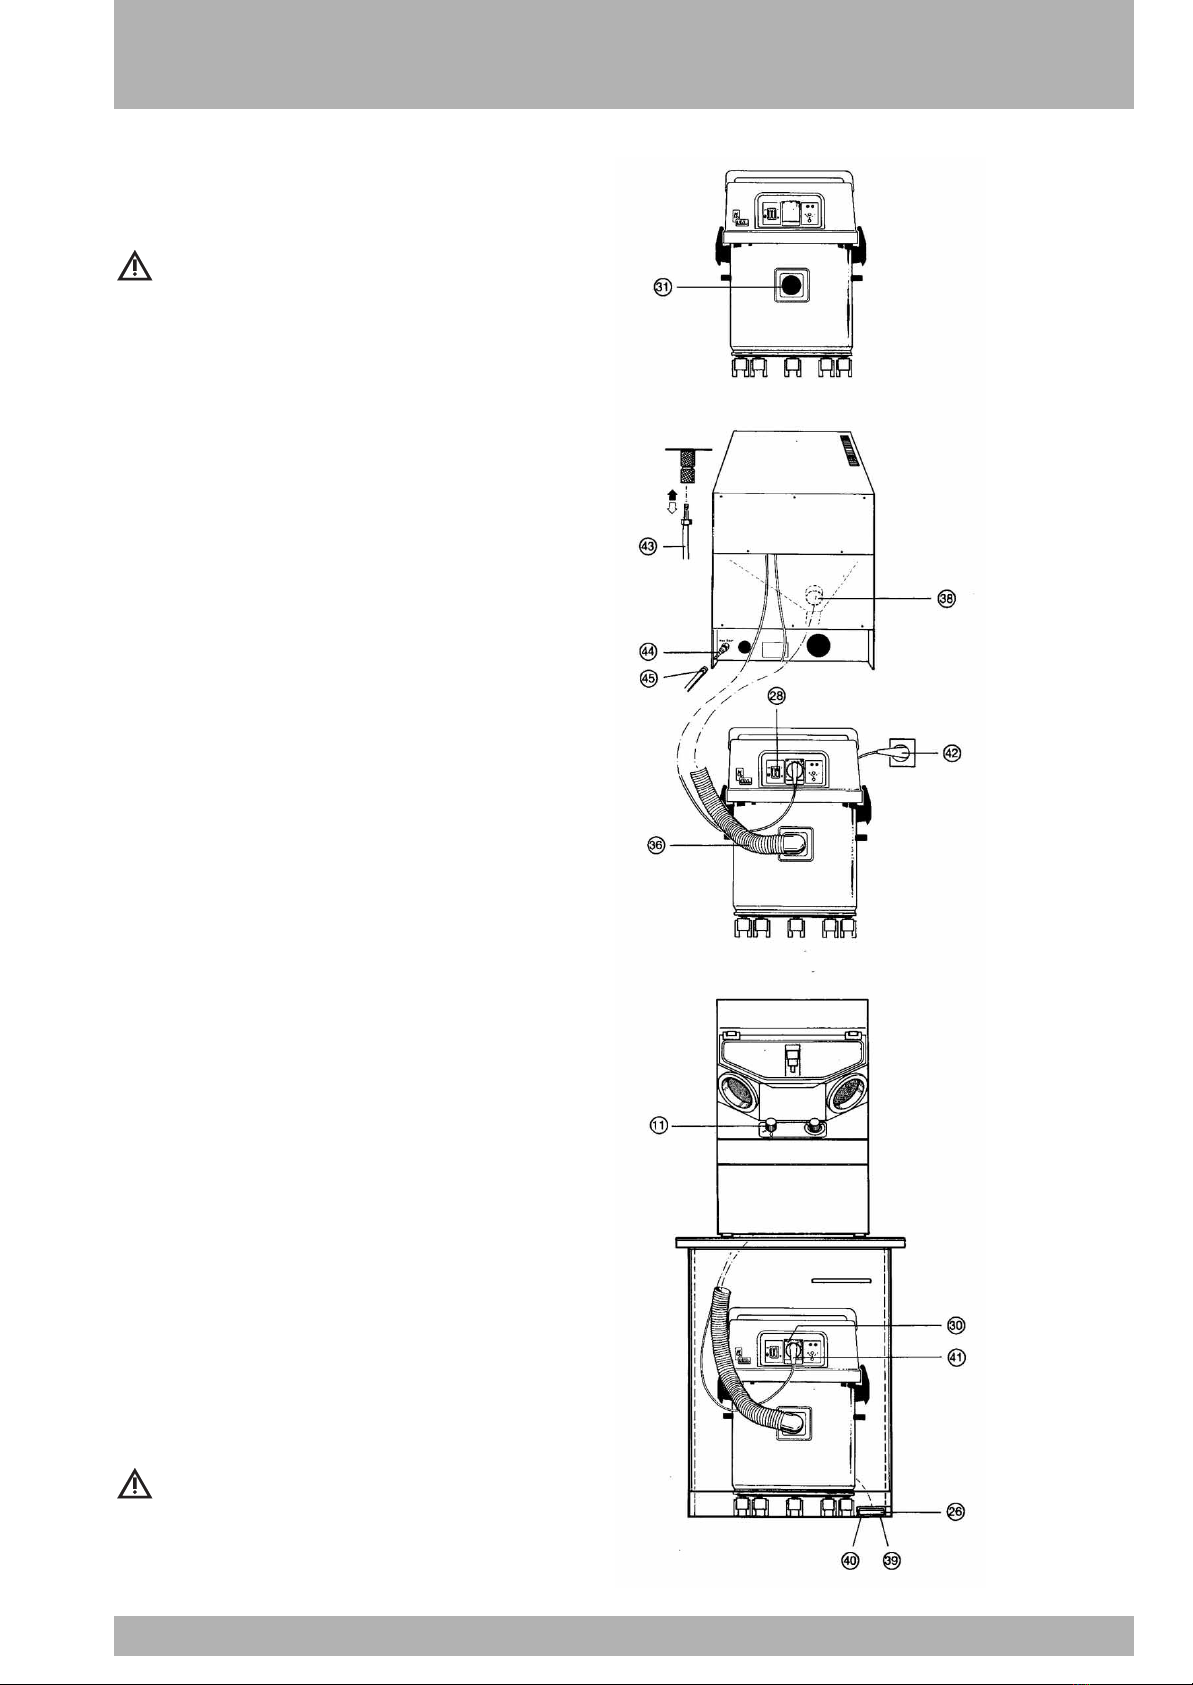
A 7 Organes de commande et defonctionnement ..........................................................................................9
A 8 Operation ....................................................................................................................................................11
A 8.1 Dust collector EWL 5030 ....................................................................................................................11
A 8.2 All purpose blasting station EWL 5423 ..............................................................................................12
A 8.3 Abrasive blasting in the recirculating blasting range ..........................................................................13
A 8.4 Fine blasting in the disposableabrasive range ..................................................................................14
A 9 Maintenance ..............................................................................................................................................15
A 9.1 Apply a touch of oil or grease to the chisel EWL 5419 once a month. ..............................................15
A 9.2 Changing gloves/cuffs ........................................................................................................................15
A 9.3 Changing the abrasive in the recirculating blasting range ................................................................16
A 9.4 Refilling the storage containers in the disposable abrasive range ....................................................16
A 9.5 Changing nozzles in the disposable abrasive range. ........................................................................16
A 9.7 Changing the protection shield ..........................................................................................................17
A 9.8 Changing the fluorescent tube ..........................................................................................................17
A 9.9 Dust collector EWL 5030 ....................................................................................................................18
A 9.10 Changing the micro filter ..................................................................................................................18
A 10 Operating faults ........................................................................................................................................19
A 11 Technical data ............................................................................................................................................22
Guarantee conditions ..................................................................................................................................24
Declaration of conformity ..............................................................................................................................25
Spare parts EWL 5328..................................................................................................................................26
Spare parts EWL 5419..................................................................................................................................32
Spare parts EWL 5030..................................................................................................................................33
K-Control-control unit 1

2EWL 5423/5030
A 1.2 Important information
The instructions for use should be
read by the user before starting up the
unit for the first time, in order to avoid
incorrect operation and other damage. If
other language versions are required, please
request these from your responsible KaVo
agent.
Duplication and distribution of the
instructions for use (IU require KaVo's
prior consent.
All technical data, information and proper-
ties of the product described in the IU cor-
respond to the state on going to press.
Modifications and improvements to the
product as a result of new technical devel-
opments are possible.
This does not imply any right to retrofitting
of existing units.
KaVo assumes no responsibility for damage
arising through:
• external influences (poor quality of the
media or inadequate installation
• use of incorrect information
• improper use
• improperly performed repairs.
Repair and maintenance work - apart from
the activities described in these instructions
for use - may be performed only by quali-
fied technical personnel.
In the event of modifications by third par-
ties, the approvals become null and void.
KaVo recommends using only original
spare parts for operation and for repair.
A 1.3 Precautions
Safe operation and protection of the unit are
ensured only through proper use in accor-
dance with the instructions for use and
using the tools approved for the purpose.
The following should also be observed:
• the work safety regulations,
• the accident prevention regulations.
• Each time before switching on, check the
set speed.
• Observe the permissible maximum speed
and maximum pressure of the tools (accord-
ing to tool manufacturer's instructions .
According to these provisions, it is the
user’s obligation:
• to use only fault-free operating materials
• to ensure that it is used for the correct
purpose
A 1 User information
A 1.1 Meaning of the pictograms
Situations where failure to follow the
instructions may lead to danger,
damage to material or operating faults.
Important information for operator
and engineer.
Automatic mode
Automatic sequence
Close, screw in,
fasten, etc.
Open, release, loosen
+ more, higher
- less, lower
• Continuous operation
Time, time sequence
Disconnect mains plug

EWL 5423/5030 3
GB
OPERATING INSTRUCTIONS
A 2 Scope of delivery –Accessories
Check that the equipment is complete:
2.1 All purpose blasting system EWL
5423/5030 consisting of:
1 All purpose blasting station EWL 5423
1 Pair of gloves size L
2 Cuffs
1 Dust collector EWL 5030
1 Suction hose
1 Pack of 5 spare filter bags
1 Fine blast nozzle 0.5
(used at coarseness grade up to 50 mm
Order no. 620 2792
2.1.1 All purpose blasting system EWL
5423/5030 ith orkstation consisting of:
1 All purpose blasting system
EWL 5423/5030
1 Formdent work bench
2.2 Accessories supplied on request:
Abrasive GP-50/10 kg 0.620.4630
Abrasive EK-25/10 kg 0.620.4670
Abrasive EK-50/10 kg 0.620.4640
Abrasive EK-100/10 kg 0.620.4680
Abrasive EK-150/10 kg 0.620.4650
Rosette ∅80 mm 0.658.8652
Pressure reductor unit 0.620.3642
These instructions are also applicable
to the:
- Recirculating Blasting Station EWL 5420
(without microfine blasting pencils
- Microfine Blasting Station EWL 5433
(without recirculating blasting nozzle

4EWL 5423/5030
A 3 Mains voltage – Mainsfrequency
3.1 Electrical connection
Check that the local mains voltage (± 10%
and mains frequency coincide with the
speci-fications on the rating plate.
The electric mains necessary for operation
has to be protected by fuse with max. 16 A.
3.2 Connected load
220 V 50/60 Hz
220 V 50 Hz
240 V 50 Hz
100 V 50/60 Hz
110 V 50/60 Hz
120 V 50/60 Hz
127 V 50/60 Hz
All purpose blasting station
EWL 5423
Power rating approx. 45 W
Dust collector EWL 5030
Power rating approx. 1000 W
Only attachments up to a maximum cur-
rent consumption or power rating of:
approx. 12 A with 100-130 V
approx. 5.5 A with 220 V (CH
approx. 2200 W with 220-240 V
approx. 5.5 A with 240 V (Austral.
approx. 8 A with 240 V (GB
may be connected to the dust collector
EWL 5030.
A 4 Location
4.1 All purpose blasting station EWL
5423 is intended for work in a standing
position at a recommended bench height of
870 mm.
4.1.1 The built-in dimensions should be
taken into account:
All purpose blasting station EWL 5423
Height: 715 mm
Width: 460 mm
Depth: 457 mm
Height clearance: 935 mm
(with protection shield open
Dust collector EWL 5030
Height 620 mm
Width: 460 mm
Depth without suction hose: 410 mm
Depth with suction hose: 490 mm
Operating the all purpose blasting
station EWL 5423 as specified by the
ma-nufacturer is possible under the
conditions according to IEC 1010, 1.4.

EWL 5423/5030 5
GB
OPERATING INSTRUCTIONS
A 5 Mounting and connection
5.1 Install the all purpose blasting station
EWL 5423 on the selected site.
Do not operate the all purpose blast-
ing station EWL 5423 without
suction. The extractor must be fitted with
an approved filter (such as in dust collector
EWL 5030 when work invol-ving
noxious materials such as investment
compounds containing quartz is undertaen.
5.2 Dust produced by the all purpose
blasting station EWL 5423 is sucked out
through the extraction point .
5.2.1 Insert suction hose into hose noz-
zle of dust collector EWL 5030.
5.2.2 Insert suction hose CP into suction
nozzle of extraction point on the all pur-
pose blasting station EWL 5423 (cut suc-
tion hose shorter if required .
5.3 Installation of all purpose blasting
system EWL 5423/5030 ith ork-station.
5.3.1 Insert suction hose into hose noz-zle
of dust collector EWL 5030.
5.3.2 Feed suction hose through the
apertures in the shelf's base-plate and the
table-top of the Formdent work bench or
slide up the cover in the cabinet door
element.
Insert suction hose into suction nozzle
of the extraction point (cut suction hose
shorter if required .
5.3.3 Fit the foot switch at the bottom
and fix it in position by inserting the rubber
feet in the holes provided in the
recess in the base of the pedestal element.
5.4 Press the power switch on dust
collector EWL 5030 to position "0" OFF
and plug the power plug into a correctly
earthed socket outlet.
5.5 Set the rotary switch on the all
purpose blasting station EWL 5423 to "0"
OFF. Insert the power plug into the
socket of the dust collector EWL 5030.
5.6 Fit the compressed-air hose onto
the connection nozzle and screw up
firmly with the hose clip .
5.6.1 Connect compressed-air hose to
the connection provided on site and check
for leaks.
The line air pressure must not exceed
6 bar. If the air pressure supplied is
higher, a pressure reductor unit, ord.no. 620
3642, must be fitted in the line. Use only
dry compressed air!

6EWL 5423/5030
A 6 Preperations for commencing
operation
A 6.1 Filling the abrasive container
in the recirculating blasting range
6.1.1 Check to ensure that the sealing
cap is properly fitted.
6.1.2 Open the protection shield 1in the
direction of the arrow and fill the all
purpose blasting station EWL 5423 with the
abrasive required (max. grain size 250 mm .
Leave the basket
in the unit when
refil-ling so that any large particles
will remain on the perforated plate and
clogging of the suction system is avoided.
6.1.3 The quantity to be filled is approx.
9.5 kg but must not be above the top edge
of the permanently fitted perforated plate.
6.1.4 Check the profiled joint and clean
if necessary.
6.1.5 Close the protection shield in
the direction of the arrow.
A 6.2 Filling the abrasive containers
inthe disposable abrasive range.
6.2.1 Pull out the drawer in the direction
of the arrow.
6.2.2 Unscrew and remove the container
cover , or .
6.2.3 Fill the abrasive container with the
appropriate abrasive according to range.
Range I (red/violet : Grain 25 - 150 mm
Range II (lime green : Grain 25 - 150 mm
Range III (pigeon blue :Grain 100 -250 mm
Depending on the grain, up to approx. 1.5
kg are to be filled in, but the red mark on
the vertical tube must not be exceeded.
In the case of a very fine grain, fill-
ing should be less to avoid any
spillage.
6.2.4 Check O-ring and clean if neces-
sary. Refit container cover.
The all purpose blasting station EWL
5423 is not ready to operate when the
protection shield
1
or drawer
is open.

EWL 5423/5030 7
GB
OPERATING INSTRUCTIONS
A 6.3 Fitting gloves or cuffs EM
6.3.1 Fully slide back protective grille 2.
6.3.2 Remove the clamping ring in the
direction of the arrow . Evenly mount
glove or cuff onto the muff .
The gloves' thumbs must be pointing
forwards.
6.3.3 Slide clamping ring over glove/
cuff as far as it will go.
To avoid any risk of pain, it is advis-
able to wear gloves when using the
blasting unit.
A 6.4 Setting the blasting pressure in
the recirculating blasting range.
6.4.1 Lift the cover flap in the direction
of the arrow.
6.4.2 Adjust the blasting pressure from 0
to max. 6 bar by turning the pressure
control in the appropriate arrow
direction + according to the pressure gauge .
A 6.5 Setting the blasting pressure in
the disposable abrasive range.
6.5.1 Set the required blasting pressure
with pressure controls , and for
blasting ranges I, II and III as indicated on
pressure gauges , and .
When using glass beads do not
exceed a max. pressure of 3 bar.

8EWL 5423/5030
A 6.6 Dust collector EWL 5030
6.6.1 Press power switch into position
"0" OFF.
6.6.2 Open the clamps in the direction
of the arrow and take off the top part of
the unit .
6.6.3 Check that the filter bag and
micro filter are correctly fitted. Replace
the top part of the unit on the filter
container .
The dust collector EWL 5030 must
only be operated with the two filters
(filter bag
and micro filter
fitted.
6.6.4 Setting the response sensitivity in
the automatic position.
6.6.5 Press power switch to position
"I" ON and selector to the "Automatic"
position.
6.6.6 Set the rotary switch on the all
purpose blasting station EWL 5423 to
position "I" ON. Actuate either the foot
switch, blowing nozzle or chisel and set the
response sensitivity on the potentiometer
using a small screwdriver.
6.6.7 Turn potentiometer clockwise +
until the green LED lights up
continuously and dust collector EWL 5030
starts.
6.6.8 Switch off the all purpose blasting
station EWL 5423. The dust collector EWL
5030 must then also switch off after a few
seconds latency time.
6.6.9 When selector is set to position
"continuous mode" , the dust collector
EWL 5030 is switched on and off with the
power switch .

EWL 5423/5030 9
GB
OPERATING INSTRUCTIONS
A 7 Controls and functional elements
All purpose blasting station EWL 5423
1Protection shield
2Protective grille
3Jet nozzle
4Fine jet I
5Fine jet II
6Fine jet III
7Swivel support
8Chisel
9Rotary switch "Blasting range"
Abrasive discharge nozzle
Rotary switch "ON/OFF"
Manometer "Fine blasting range I"
Pressure control "Fine blasting range I"
Manometer "Fine blasting range II"
Pressure control "Fine blasting range II"
Manometer "Fine blasting range III"
Pressure control "Fine blasting range III"
Storage container I "Grain 25 - 150 mm"
Storage container II "Grain 25 - 150 mm"
Storage container III "Grain 100 - 250 mm"
Blowing nozzle
Cover
Pressure control
"Recirculating blasting range"
Manometer
"Recirculating blasting range"
Drawer
Foot switch

10 EWL 5423/5030
Dust collector EWL 5030
jHandle
kPower switch
lSelector
"Automatic"
"Continuous"
öSocket outlet
yHose nozzle
xLever indicator, red
cOperating indicator, green
vPotentiometer "Response sensitivity"
bIndication, green "Response sensitivity"
nSuction hose compl.
mFilter container

EWL 5423/5030 11
GB
OPERATING INSTRUCTIONS
A 8 Operation
Any liability shall be excluded for defects
which are the consequence of operation
not specified by the manufacturer.
A 8.1 Dust collector EWL 5030
8.1.1 Automatic mode.
Recommended for normal operation.
8.1.2 Press selector to position
"Automatic" . In this position the dust
collector EWL 5030 is switched on and off
automatically together with the EWL 5423
unit connected.
8.1.3 Press power switch to position"I"
ON.
8.1.4 Switch on the EWL 5423 unit. Dust
collector EWL 5030 also starts up
automatically.
8.1.5 When the EWL 5423 unit is
switched off, the dust collector EWL 5030
continues to run for several seconds and
then switches off automatically.
8.1.6 Manual mode.
For operating attachments without
electricity.
8.1.7 Press selector to position
"Continuous mode" .
8.1.8 Switching on and off is effected by
the power switch .
8.1.9 Full indicator .
8.1.10 Operating indication (green LED
shows the operational readiness of the dust
collector EWL 5030 when the power switch
is switched on.
8.1.11 Full indicator (red LED lights
when the permitted full level and the
operating indication (green LED
extinguishes. Dust collector EWL 5030 and
EWL 5423 unit connected to socket outlet
are switched off automatically.
8.1.12 Change filter bag and/or micro filter
(see maintenance 9.7.1-9.8.9 and switch
power switch OFF and then ON again to
establish operational readiness.
The dust collector EWL 5030 must
only be operated with both filters (fil-
ter bag
and micro filter
.

12 EWL 5423/5030
A 8.2 All purpose blasting station
EWL 5423
Any liability shall be excluded for
defects which are the consequence of
operation not specified by the manufacturer.
8.2.1 Mould extraction
8.2.2 Open the protection shield 1in the
direction of the arrow and place the
casting in position.
8.2.3 Close the protection shield 1.
8.2.4 Set rotary switch to position "I"
ON, putting the equipment on standby.
8.2.5 Put your hands through the cuffs
and pick up the casting.
8.2.6 Pick up the chisel 8and turn the
rotary switch all the way in the direction
of the arrow to start the chisel.
The power of the chisel can be
adjusted by varying the pressure
applied.
8.2.7 On completion of the mould
extraction or to check progress, stop the
chisel 8by turning the rotary switch .
Take the blowing nozzle out of its
holder and, by pressing in the direction of
the arrow, clean the casting of mould
residue and dust.
8.2.8 Changing the chisel tool
8.2.9 Remove the chisel by pulling it in
the direction of the arrow and fit a new
tool by pushing it all the way in.
To prevent any damage to the chisel
8
,
never operate it or put it aside with-
out a tool inserted.

EWL 5423/5030 13
GB
OPERATING INSTRUCTIONS
A 8.3 Abrasive blasting in the recir-
culating blasting range
8.3.1 Set rotary switch to position "I"
ON, putting the equipment on standby.
It is recommended to leave the rotary
switch in position "I" ON for the
entire working day.
8.3.2 Open the protection shield 1in the
direction of the arrow and place in position
the object to be blasted.
8.3.3 Close the protection shield 1again.
For safety reasons blasting is only
possible with the protection shield
closed.
8.3.4 Set rotary switch 9to position
"Continuous operation or operation by
foot switch".
8.3.5 Place your hands in both gloves or
cuffs and lower the protective grille 2
all the way in the direction of the arrow.
8.3.6 Pick up the casting and apply
abrasive blasting or, with switch setting
"Operation by foot switch", press the foot
switch in the direction of the arrow and
apply abrasive blasting to the casting.
The blasting direction can be adjusted
vertically within a range of 30° by
slackening the machine knob
on the
injector.
8.3.7 On completion or to check the
progress of the blasting process, release
the foot switch. Take blowing nozzle out
of its holder and clean the casting of
abrasive and dust by pressing in the
direction of the arrow.

14 EWL 5423/5030
A 8.4 Fine blasting in the dispos-
ableabrasive range
8.4.1 Set rotary switch to position "I"
ON, putting the equipment on standby.
It is recommended to leave the
rotary switch in position "I" ON for
the entire working day.
8.4.2 Open the protection shield 1, place
the casting to be treated in the blasting area
and close the protection shield again.
For safety reasons, fine blasting is
only possible with the protection
shield and the drawer closed.
8.4.3 Set the rotary switch 9to the
position of the couloured range required.
Range I (red/violet : Grain 25 - 150 mm
Range II (lime green : Grain 25 - 150 mm
Range III (pigeon blue : Grain 100 - 250 mm
The fine jets are colour-coded
corresponding to the colours on the
rotary switch
9
and respective pressure
controls
,
and
behind the cover
flap
.
8.4.4 Place your hands in both cuffs or
gloves
8.4.5 Move the swivel support 7in the
direction of the arrow s for steady and
precise working.
8.4.6 Pick up the required fine jet 4, 5
or 6 and apply abrasive blasting to the
casting by operating the foot switch .
8.4.7 On completion or to check the
progress of the blasting process, release
the foot switch . Take blowing nozzle
out of its holder and clean the casting of
abrasive and dust by pressing in the
direction of the arrow.

EWL 5423/5030 15
GB
OPERATING INSTRUCTIONS
A 9 Maintenance
Repairs and servicing work on the
electrical part of this equipment must
only be undertaken by experts or by per-
sons trained in our factory who are aware
of the safety regulations. Disconnect the
mains plug from the power supply or
switch off the disconnecting switch before
opening any part of the equipment.
A 9.1 Apply a touch of oil or grease
to the chisel EWL 5419 once a
month.
Disconnect the compressed air hose
from the supply to remove pres-
sure from the all purpose blasting station
EWL 5423.
9.1.1 Unscrew the connection and
remove the compressed air hose .
9.1.2 Apply not more than one drop of oil
to the screw connection .
9.1.3 Insert the compressed air hose
and apply the screw connection .
9.1.4 Slightly grease the O-ring of the
chisel (special grease Ord. No. 352 0429 .
A 9.2 Changing gloves/cuffs
9.2.1 Open the protection shield 1in the
direction of the arrow and slide the
protective grille 2all the way to the rear.
9.2.2 Remove clamping ring in the
direction of the arrow and pull off the
defective glove or cuff .
9.2.3 Evenly mount new right or left hand
glove/cuff on the muff .
The gloves'
thumbs must be point-
ing forwards.
9.2.4 Slide clamping ring over glove/
cuff in the direction of the arrow as far
as it will go.

16 EWL 5423/5030
A 9.3 Changing the abrasive in the
recirculating blasting range
9.3.1 Place empty container under the
abrasive discharge nozzle .
9.3.2 Unscrew the sealing cap in the
direction of the arrow and discharge the
used abrasive.
During discharge, sweep the remain-
ing material on the funnel walls
towards the discharge nozzle
using a
paint brush or small hand brush to ensure
complete emptying.
9.3.3 Refit the sealing cap and check
for tightness.
9.3.4 Fill with abrasive (see A 6.1- A 6.3 .
A 9.4 Refilling the storage contain-
ers in the disposable abrasive range
9.4.1 Unscrew and remove the container
covers , or .
Do not use force to open the covers!
If the covers do not open due to a
technical fault (air pressure in storage con-
tainer
not equalised , open vent screw
by one turn and allow air pressure to
equalise.
9.4.2 Fill the necessary abrasive not
higher than the red mark on the vertical
tube .
In the case of a very fine grain, filling
should be less to avoid any spillage.
A 9.5 Changing nozzles in the dis-
posable abrasive range.
9.5.1 Open the protection shield 1, take
out the jet and unscrew the sleeve cover
in the direction of the arrow .
9.5.2 Take the nozzle out of the sleeve
cover, clean or replace as necessary.
9.5.3 Refit the nozzle and screw the
sleeve cover back on.
Check for correct nozzle diameter.
Fine blasting ranges "I" and "II":
∅ 0.8 mm diameter
Fine blasting range "III":
∅ 1.3 mm diameter

EWL 5423/5030 17
GB
OPERATING INSTRUCTIONS
A 9.6 Changing nozzles in the recir-
culating blasting range
9.6.1 Remove nozzle by slightly
turning it clockwise in the direction of the
arrow .
9.6.2 Clean or, if necessary, replace
nozzle and then reinsert in the direction
of the arrow.
A 9.7 Changing the protection shield
9.7.1 Open the protection shield 1in the
direction of the arrow.
9.7.2 Unscrew screws . Remove the
protection shield 1in the direction of the
arrow, clean or replace if necessary.
9.7.3 Insert the protection shield 1in
the direction of the arrow and secure with
screws .
Do not over-tighten the screws
to
prevent breaking the protective glass.
A 9.8 Changing the fluorescent tube
9.8.1 Unplug the power plug or
disconnect the unit on all poles thereby
disconnecting the unit from the power supply.
9.8.2 Open the protection shield 1.
Remove the protective grille 2by
pressing
in the retention brackets and in the
direction of the arrows.
9.8.3 Unscrew the screws and take
off the spray guard .
9.8.4 Carefully remove the fluorescent
tube in the direction of the arrow.
9.8.5 Insert new fluorescent tube in
the direction of the arrow.
9.8.6 Clean or replace the splash guard
as necessary and secure with screws .
9.8.7 Reinsert protective grille 2.
9.8.8 Close the protection shield 1and
insert power plug into a properly fused
socket.

A 9.9 Dust collector EWL 5030
9.9.1 Changing the filter bag
9.9.2 Press the power switch into
position "0" OFF.
9.9.3 Open the clamps in the direction
of the arrow and take off the top part of
the unit .
9.9.4 Carefully withdraw the filter bag
from the filter connection piece . Close
the filter bag with cover and dispose of it.
9.9.5 Press the new filter bag hard
onto the filter connection piece and
place it in a circle in the filter container .
9.9.6 Fit the top part of the unit so that
the contact plate faces the filter
connection piece and close the clamps
again.
A 9.10 Changing the micro filter
9.10.1 For safety reasons, the micro filter
must be changed every two years of
operating time. The micro filter must
also be changed if after replacement of the
filter bag the dust collector EWL 5030
reveals a malfunction (red full indicator
lights .
9.10.2 Press power switch to position
"0" OFF.
9.10.3 Open the clamps in the direction
of the arrow and take off the top part of
the unit .
9.10.4 Set the top part of the unit down
with the handle downwards.
9.10.5 Open the filter clamping nut in
the direction of the arrow.
9.10.6 Withdraw the micro filter in the
direction of the arrow.
9.10.7 Insert new micro filter .
9.10.8 Secure the filter clamping disc
and micro filter by rotating the filter
clamping nut .
9.10.9 Mount the top part of the unit so
that the contact plate faces the filter
connection piece and apply the clamps .
18 EWL 5423/5030
This manual suits for next models
1
Table of contents
Other KaVo Power Tools manuals
Popular Power Tools manuals by other brands

Master Appliance
Master Appliance Varitemp VTS-750 Specifications

Desoutter
Desoutter EFBCA15-900-10S-ES Product instructions

Kett
Kett KL-2030 manual

Parkside
Parkside PAGS 20-Li A1 Translation of the original instructions

XTline
XTline XT102830 user manual

Ingersoll-Rand
Ingersoll-Rand 130A1M Maintenance information