KBS BKTF 4020 M User manual

BEDIENUNGSANLEITUNG
KBS Gastrotechnik GmbH – Schoßbergstraße 26 – 65201 Wiesbaden
www.kbs-gastrotechnik.de
Stand November 2022

6LIBD006 - 1111
REFRIGERATED COUNTERS
KÜHLTISCHE
TAVOLI REFRIGERATI
TABLES REFRIGEREES
MESAS REFRIGERADA
GEKOELDE WERKBANKEN
ОХЛАЖДЕННЫЕ РИЛАВКИ
%2/+8 °C
%15/%20 °C
USER MANUAL
GENERAL RECOMMENDATIONS 3
ENGLISH
RECEPTION AND DISPOSING OUNIT 3
START-UP 4
CONTROL PANEL 5
CLEANING AND MAINTENANCE 6
SETTINGS AND TROUBLE SHOOTING 7
DIMENSIONS; REFRIG. CIRCUIT DIAGRAM 38
BETRIEBS- UND INSTALLATIONSANLEITUNG
FUNKTIONSBESCHREIBUNG 8
DEUTSCH
ERHALT DER WARE UND BESEITIGUNG 8
INBETRIEBNAHME 9
SCHALTTAFEL 10
REINIGUNG, WARTUNG UND STÖRUNG 11
PARAMETER UND FEHLERSUCHE 12
ABMESSUNGEN, SCH. DES KÜHLKREISLAUFS 38
ISTRUZIONI PER L’INS
TALLAZIONE,
L’USO E LA MANUTENZIONE
DESCRIZIONE FUNZIONALE 13
ITALIANO
RICEVIMENTO E DISMISSIONE 13
MESSA IN FUNZIONE 14
PANNELLO COMANDO 15
PULIZIA E MANUTENZIONE 16
PARAMETRI E RICERCA GUASTI 17
DIMENSIONI, SCHEMA FUNZIONALE 38
INSTRUCTIONS D’INSTA
LLATION ET D’UTLISAT
ION
DESCRIPTION FONCTIONELLE 18
FRANCĄIS
RECEPTION ET ELIMINTION DE L'APPAREIL 18
MISE EN SERVICE 19
PANNEAU DE COMMANDE 20
NETTOYAGE ET ENTRETIEN 21
PARAMETRES ET RECHERCHE PANNES 22
DIMENSIONS, SCHEMA CIRC. FRIGORIFIQUE 38
USUARIO MANUAL
DESCRIPCIÓN FUNCIONAL 23
ESPAÑOL
ELIMINACIÓN DEL APARATO 23
PUESTA EN FUNCIONAMIENTO 24
PANEL DE CONTROL 25
LIMPIEZA Y MANTENIMIENTO 26
PARÁMETROS Y BÚSQUEDA DE AVERÍAS 27
DIMENSIONES, ESQUEMA DEL CIRCUITO FR. 38
INSTRUCTIES VOOR DE
INSTALLATIE, HET
GEBRUIK EN HET ONDERHOUD
FUNCTIONELE BESCHRIJVING 28
NEDERLANDS
ONTVANGST EN ONTMANTELING 28
IN WERKING ZETTEN 29
BEDIENINGSPANEEL 30
REINIGEN EN ONDERHOUD 31
PARAMETERS EN OPSPOREN VAN DEFECTEN 32
AFMETINGEN EN FUNCTIONEEL SCHEMA 38
ИНСТРУКЦИИ
ПО
УСТАНОВКЕ
,
ИСПОЛЬЗОВАНИЮ
ИТЕХНИЧЕСКОМУ ОБСЛУЖИВАНИЮ
ОПИСАНИЕ ФУНКЦИОНИРОВАНИЯ 33
РУССКИЙ
ПОЛУЧЕНИЕ ИВЫВОД ИЗ ЭКСПЛУАТАЦИИ 33
ВВОД ВЭКСПЛУАТАЦИЮ 34
ПАНЕЛЬ УПРАВЛЕНИЯ 35
ЧИСТКА, ТЕХОБСЛУЖИВАНИЕ 36
ПАРАМЕТРЫ ИПОИСК ИУСТРАНЕНИЕ НЕИСПРАВНОСТЕЙ 37
РАЗМЕРЫ, КОНТУРНАЯ ХОЛОДИЛЬНИКА 38

2
RATING PLATE
ENGLISH
MATRIKELANGABEN
DEUTSCH
TARGHETTA TECNICA
ITALIANO
1. Manufacturer
1. Hersteller
1 Construttore
2. Serial number
2. Seriennummer
2 Matricola
3. Code
3. Kodenummer
3 Codice
4. Model
4. Modell
4 Modello
5. Voltage
5. Spannung
5 Tensione
6. Run
ning absorbed current
6. Stromaufnahme in Betrieb
6 Corrente assorbita in funzionamento
7. Max refrigerant power
7. Kälteleistung
7 Potenza refrigerante
8. Running absorbed power
8. Leistungaufnahme in Betrieb
8 Potenza assorbita in funzionamento
9. Defrost heating element power
9. Abtauuheizungleistung
9 Potenza della resistenza di sbrinamento
10. Other elements nominal power
10. Nennleistung anderer Heizungen
10 Potenza nominale di altre resistenze
11. Lamp power
11. Lichtleistung
11
Potenza lampada
12. Max and min. pressure
12. Mindest
-
und Höchstleistung
12 Pressione minima e massima
13. Refrigerant, type and q.ty
13 Kältemittel, Art und Menge
13 Refrigerante, tipo e quantità
14. Net capacity
14 Nettokapazität
14 Capacit
à netta
15. Insulation expanding gas
15 Expansionsmittel
15 Gas espandente nell’isolamento
16. Manufacture year
16 Baujahr
16 Anno di fabbricazione
17. Climatic class
17 Klimaklasse
17 Classe climatica
PLAQUE SIGNALÉTIQUE
FRANC
Ą
IS
DATOS DE MATRÍCULA
ESPAÑOL
TECHNISCH LABEL
NEDERLANDS
1 Constructeur
1. Constructor
1 Constructeur
2 Matricule
2. Matricula
2 Registratie
3 Code
3. Codigo
3 Code
4 Modèle
4. Modelo
4 Model
5 Tension
5. Tension
5 Spanning
6 Courant absorbé en
marche
6. Corriente absorbida en funcionamiento
6 Opgenomen stroom in werking
7 Puissance frigorifique
7. Potencia frigorifiqua
7 Vermogen koelmiddel
8 Puissance absorbée en marche
8. Potencia absorbida en funcionamiento
8 Opgenomen vermogen in w
erking
9 Puissance de la résistance de dégivrage
9. Potencia de la resistencia de
descongelacion
9 Vermogen van de weerstand voor
ontdooien
10 Puissance nominale des autres résistances
10. Potencia nominal de otras resistencias
10 Nominaal vermogen
van andere
weerstanden
11 Puissance lampe
11. Potencia lampara
11 Vermogen lamp
12 Pression min. et max.
12. Pression minima y maxima
12 Minimale en maximale druk
13 Réfrigerant, type et quantité
13. Refrigerante, tipo, cantidad
13 Koelmiddel,
type en hoeveelheid
14 Capacité nette
14. Capacidad neta
14 Netto capaciteit
15 Gaz détendant dans l'isolation
15. Gas extendiente en el aislamiento
15 Uitzettend gas in de isolering
16 Année de fabrication
16. Ano de fabricacion
16 Bouwjaar
17 Classe climatique
17. Clase climatica
17 Klimaatklasse
ТЕХНИЧЕСКАЯ ТАБЛИЧКА
РУССКИЙ
1 Изготовитель
2 Серийный номер
3 Код
4 Модель
5 На ряжение
6 Ток, оглощаемый ри функционировании
7 Мощность охлаждения
8 Мощность, оглощаемая ри
функционировании
9 Мощность со ротивления размораживания
10 Номинальная мощность других
со ротивлений
11 Мощность лам ы
12 Минимальное имаксимальное давление
13 Охлаждения, ти иколичество
14 Емкость
15 Газ, расширяемый ри изол
яции
16 Год вы уска
17 Климатический класс

Translation of the original instructions ENGLISH 3
3
General reccomendations, reception and disposing of unit
INTENDED USE
The device should not be used by people (including
children) of limited physical or motor capacity, or who lack
the necessary skill or expertise, unless aided or instructed
by another person responsible for their safety.
Children should be supervised to ensure they do not play
with the device.
This appliance are designed for indoor use and should only
be used to store food and beverages.
Both the appliance’s construction features and the
condensing unit’s capacity have been designed to store only
pre-cooled or pre-frozen products.
Never place liquids or hot food into the appliance and do not
fill lidded containers to the top.
Never place carbonated beverages into the low-temperature
compartment.
They may explode.
In all appliances there are surfaces subject to frosting.
Depending on the model, frost may be melted away either
automatically (automatic defrost) or manually. Never attempt
to remove frost using a pointed object
You could irreparably damage the appliance.
Do not use any mechanical device or other artificial means
to accelerate the defrost process.
The Manufacturer declines all responsibility, and the
warranty shall be null and void, if electrical and/or
mechanical alterations are made to the product.
CONTROLS AT RECEPTION
On arrival, check that the appliance has not incurred transport damage and
that it is complete according to the order.
In the event of visible damage immediately note the damage
on the transport documents with the following wording:
“RECEIVED WITH RESERVE FOR EVIDENT DAMAGE OF
PACKING”.
ALL THE OPERATIONS INDICATED BELOW MUST BE
PERFORMED IN RESPECT OF EXISTING SAFETY
REGULATIONS, BOTH FOR THE EQUIPMENT IN USE AND
FOR THE OPERATING PROCEDURES
BEFORE BEGINNING HANDLING OPERATIONS ENSURE
THAT THE LIFTING CAPACITY IS SUFFICIENT FOR THE
APPLIANCE IN QUESTION
HANDLING
HANDLING with FORK LIFT or SIMILAR
Insert the forks into the side of back of the wooden pallet supplied with the
appliance.
Begin lifting checking that the appliance is in stable equilibrium.
DURING HANDLING OPERATIONS DO NOT TIP OR
TURNOVER
IF IT’S NECESSARY TO TRANSPORT APPLIANCE
HORIZONTALY; YOU HAVE TO WAIT AT LEAST 2 HOURS
BEFORE OPERATING.
HANDLE WITH CARE AND KEEP DRY
STACKING OF OTHER OBJECTS ON THE APPLIANCE
MUST BE ABSOLUTELY AVOIDED.
UNPACKING
Cardboard packing
Cut the band straps with scissors
Lift the carton (the corner padding will also slide off).
Wooden packing
Unnail the wodden panels starting with the front and top.
Nylon packing
After having removing the adhesive tape, slide off the nylon wrapping
over the top of the unit.
Lift the appliance to separate it from the pallet.
Place the appliance on the ground in its chosen position.
Keep the packing out of the reach of children as it could be a danger
hazard.
Dispose of the packing to the specialised collection or recycling points
(respect existing regulations).
Check that the serial number corresponds to the transport
documents.
NOISE LEVEL
The A-weighted emission sound pressure level at
workstations NOT exceeds 70 dB(A);
DISPOSAL OF UNIT
Our appliances contain the refrigerant shown on the
corresponding rating plate as per Regulation (EC) No.
2037/2000 of 29 June 2000; in addition, the appliance is
composed of reusable or recyclable parts and materials.
Therefore, at the end of its lifetime, the appliance should be
delivered to a specific disposal centre.
The best method to ensure that no one will remain trapped
inside is to take off the door completely.
The appliance must not be disposed of together with
household waste and metal scrap.
Absolutely avoid damaging the refrigeration circuit,
particularly near the heat exchanger.
COMPLY WITH LOCAL REGULATIONS IN
FORCE CONCERNING THE FINAL
DISPOSAL OF THIS TYPE OF EQUIPMENT.

4 ENGLISH Translation of the original instructions
4
Start%Up
IMPORTANT
BEFORE CONNECTING THE APPLIANCE CHECK THAT THE DATA ON THE SERIAL PLATE
CORRESPOND TO THE ACTUAL ELECTRICAL SUPPLY. THE SERIAL PLATE GIVING THE ELECTRICAL
DATA REQUIRED IN THE INSTALLATION IS FOUND ON THE RIGHT SIDE OF THE COMPARTMENT.
An incorrect power supply could be cause of fire, electric shake or accident.
THE INSTALLATION MUST BE MADE ACCORDING TO THE INSTRUCTIONS GIVEN IN THIS SECTION,
BY PROFESSIONALLY QUALIFIED PERSONNEL.
THE ELECTRICAL SAFETY OF THIS APPLIANCE IS ONLY GUARANTEED WHEN IT IS CONNECTED TO
AN EFFICIENT EARTHING PLANT AS PRESCRIBED BY EXISTING ELECTRICAL SAFETY REGULATIONS.
A connection to a defective earthing plant would be cause of short-circuit or electric shake in the case of malfunction.
THE APPLIANCE MUST ALSO BE FITTED WITH AN EQUIPOTENTIAL SYSTEM WHOSE EFFICIENCY
MUST BE VERIFIED ACCORDING TO EXISTING REGULATIONS.
THE USE OF ADAPTERS, MULTI-PLUGS, AND/OR EXTENSION LEADS IS STRICTLY PROHIBITED
PRELIMINARY GENERAL CHECKS
Check that the floor is able to support the weight of the
appliance and that it is level.
Control the appliance is perfectly level. Regulate the
adjustable feet if necessary. Use a level, if needed. The
maximum permissible deviation from the horizontal plane is
+/-0.5 degrees.
All four feet should rest on the floor.
Jeopardizes the stability of the equipment and it can cause the fall of
it.; The proper operation of the doors could be compromised.
To ensure proper airflow and avoid any damage to the
refrigeration circuit, allow a minimum side clearance of 50
mm (2 inches) and 500 mm (20 inches) on the upper side.
Do not place the appliance close to heat sources (such as
ovens, radiators, etc.) or exposed to direct sunlight; do not
prevent air from circulating inside the engine compartment.
Don't respect these norms can provoke serious damages to the circuit
refrigerator or to the contained products in the equipment.
If the appliance has been moved, wait for a while before
switching it on again. In particular, if it was not handled
vertically, you need to wait at least 2 hours.
Remove the plastic protection from the external surfaces and
wash the inside part with tepid water and mild soap.
Keep away from children the closing keys (if available).
PRELIMINARY ELECTRICAL CHECKS
AND START%UP.
The network voltage and frequency values should be the same
of those reported on the appliance part number plate (point 6 of
the "Rating Plate" paragraph).
Un’alimentazione elettrica non corretta potrebbe essere causa di
incendio, scossa elettrica od infortunio.
• Fit a 16A fuse upstream from the socket.
• Switch the main switch that will be connected to the power
lead plug to the OFF position.
CONNECT THE DEVICE TO THE MAINS USING THE PLUG
PROVIDED.
THE PLUG MUST BE EASY TO ACCESS WHEN THE DEVICE
IS INSTALLED
Check that the socket is suitable for the appliance plug. If
necessary, the socket should be replaced with an
appropriate one by qualified personnel. This personnel
should also make sure that the socket cable section is
appropriate to the power absorbed by the appliance. Check
that the plug is plugged into the socket
After the above controls have been thoroughly completed the
appliance may be started-up:
Turn the main switch, connected to the power cable plug, to
the ON position.
Turn the switch of the appliance to the ON position.. .
After about 1 minute, the compressor will start cycling until
internal temperature reaches the factory-set value.
Do not load the appliance until the set temperature value has
been reached
To modify the factory setting of this value consult the CONTROL
PANEL section.
BEFORE INTRODUCING ANY FOODS, WAIT UNTIL THE
UNIT REACHES ITS OPERATING TEMPERATURE.
NEVER EXCEED THE MAX. LOADING LIMIT SHOWED ON
THE STICKER PLACED INSIDE THE COMPARTMENT
OPERATION
Proper storage of foodstuffs is a relevant factor in the safe and
sanitary production of food; in addition, it improves the efficiency
of foodservice activities and positively affects energy
consumption. Follow the directions below to obtain the highest
performance possible out of your appliance.
Products should always be stored on the shelves; do not place
any products on the cabinet’s bottom.
PRODUCTS SHOULD BE PLACED INTO THE APPLIANCE IN
SUCH A WAY AS TO ALLOW UNOBSTRUCTED AIRFLOW.
ALWAYS LEAVE SOME FREE SPACE BETWEEN THE PRODUCTS
AND PREVENT THEM FROM COMING IN CONTACT WITH THE
WALLS. IF NEEDED, ADJUST THE DISTANCE BETWEEN SHELVES.

Translation of the original instructions ENGLISH 5
5
Control Panel
KEYBOARD AND CONNECTED
FUNCTIONS
To lock the keyboard keep pressed the key AUX ()and the key
ON/STAND-BY()for 2 sec: the display will show "Loc" when locked and
"UnL" when not.
ON/STAND BY; keeping pressed the key for 4 s the appliance will turn
off/on
MANUAL DEFROST; keeping pressed the key for 4 s: a manual defrost
starts when the function Overcooling is not activated and the evaporator
temperature allows it.
Power on/off of the compartment light manually (only for models with
glass door) or power on/off of the auxiliary exit manually (if present).
Key DOWN: to scroll the menu labels or decrease the values; keeping
pressed for 4 s the function Overcooling will be activated.
During the function Overcooling the working setpoint is decreased; duration
and temperature offset are established by parameters.
During the function Overcooling, the defrost will never start; if the time
interval for a defrost ends during the function, it will be delayed.
Key UP: to scroll the labels of the menu or increase the values; keeping
pressed for 4 s. starts the function for low and high percentage of relative
humidity (only for some models).
The display will show "rhL" (functioning for low percentage of relative
humidity) or "rhH" (functioning for high percentage of relative humidity) for
10 s.
If the umidity control is not available,the label " ---- " will be shown for 1 s.
SET POINT, permits to access and modify set point.
OPERATION
Find following operation status:
status "on" (the device is powered and turned on)
status "stand-by" (the appliances is turned off but the device is still
powered)
status "off": to put into “off” status it is necessary to turn off the main
switch or disconnect it from power supply.
DO NOT PERFORM ANY MAINTAINANCE WHEN THE
APPLIANCE IS IN ON OR STAND BY
DISCONNECT FROM ELECTRICAL POWER SUPPLY NET.
If the panel is switched on during normal functioning the display will show the
temperature of the compartment.
It is possible to show the value of the evaporator probe (if present) keeping
pressed the key DOWN ()for 2 s; keeping pressed the key DOWN ()for
2 s the display will show “Pb2”. Pressing the key SET ()the temperature of
the evaporator will appear.
After a short time of break or pressing shortly the key SET you return to the
display of the compartment temperature.
SETTING OF SET POINT
• press and release the key SET(): the compressor LED will blink
• press and release the key UP ()or the key DOWN ()within 15 s.
• press and relaese the key SET()or do not operate for 15 s; the
compressor LED will switch off, after which the device will end the procedure.
BASIC HACCP FUNCTION
The device is able to store up to 3 alarms HACCP.
The device provides the following informations:
• the critical value
• the duration of the alarm (from 1 min to 99 h and 59 min, partial if the
alarm is in course).
COD.
TYPE OF ALARM
CRITICAL VALUE
AL
alarm minimum
temperature
the minimum temperature of the
compartment during this type of alarm
AH
alarm maximum
temperature
the maximum temperature of the
compartment during this type of alarm
Id
al
arm entrance door
micro
the maximum temperature of the
compartment during this type of alarm
The device updates the informations if the new alarm is worse than the one
stored or provided that the informations have already been shown.
If the device is switched off, no alarm will be stored.
When the cause of the alarm finish, the display restores the standard
operation.
HACCP LED provides informations concerning the memory status of the
HACCP alarms;
DISPLAY OF INFORMATIONS
CONCERNING HACCP ALARMS
• press the key DOWN ()for 2 s: the display shows the first label.
• press and release the key UP ()or the key DOWN ()to select "LS"
• press and release the key SET (): the display shows one of the codes
given in the table above
To select an alarm:
• press and release the key UP ()or the key DOWN ()(f.e. to select
"AH").
To show the informations concerning the alarm:
• press and release the key SET (): the LED HACCP stops to blink and
the display will show the following informations (for example):
DISPL
AY
MEANING
8,0
The critical value is 8,0 °C/8 °F
Dur
The display is about to show the duration of the alarm
h01
The alarm lasted 1 h (continues ...)
n15
The alarm lasted 1 h and 15 min
AH
Selected alarm
To exit the succession of informations:
• press and release the key ON/STAND-BY(): the display will show the
selected alarm (in the example “AH3").
To exit the procedure:
• exit from the succession of informations
• press and release the key UP ()or the key DOWN () until the
display shows the compartment temperature or do not operate for 60 s.
In alternative exit from the succession of informations
• press and release the key ON/STAND-BY().
If no alarm is stored, the label “LS" will not be showed.

6 ENGLISH Translation of the original instructions
6
Cleaning and maintenance
YOU MUST FOLLOW THE INSTRUCTIONS BELOW
ESPECIALLY WHEN USING R290 COOLANT
(see reference 13 on page 2 of this manual and the
data plate on the device)
KEEP THE VENTS FREE ON THE BODY OF THE DEVICE
OR ON THE MODULAR STRUCTURE.
DO NOT USE MECHANICAL EQUIPMENT OR SIMILAR OTHER THAN
THAT RECOMMENDED BY THE MANUFACTURER TO SPEED UP THE
DEFROSTING PROCESS.
DO NOT TAMPER WITH THE COOLANT CIRCUIT
DO NOT USE ELECTRICAL EQUIPMENT IN THE COMPARTMENTS TO
PRESERVE FOOD FROZEN BY THE DEVICE, UNLESS
RECOMMENDED BY THE MANUFACTURER
This section has been dedicated to the end-user and is
extremely important for the appliance to work correctly in
the long-term.
A few simple operations conscientiously carried out at set
periods can avoid the need of servicing by specialised
personnel.
The operations to be made do not require any particular
technical knowledge
IMPORTANT
BEFORE BEGINNING ANY TYPE OF MAINTENANCE OR
CLEANING WORK ON THE APPLIANCE DISCONNECT THE
MAINS POWER SUPPLY.
WARNING
DO NOT WASH THE APPLIANCE DIRECTLY WITH HIGH PRESSURE
WATER JETS.
AVOID SPRAYING WATER DIRECTLY ONTO ELECTRICAL PARTS.
CLEANING
How often you will need to clean the appliance depends
largely on how often you use it. Analyze the use and
schedule the required cleaning operations.
To clean the appliance’s inside and outside, use a neutral or
slightly alkaline detergent.
We recommend that you clean the inside with a disinfectant
every once in a while. Impurities may be removed using a
damp cloth. Removing the shelves makes cleaning the
inside easier.
Never use metallic tools for clearing appliance; it could be
damaged.
For a deeper cleaning of the compartment, remove the shelf
guide.
IMPORTANT
THE APPLIANCES ARE MADE OF AISI 304 STEEL WHICH IS
CORROSION PROOF UNDER NORMAL USE.
AVOID USING DETERGENTS OR SIMILAR CLEANERS THAT MAY BE
DETRIMENTAL TO ITS PROTECTION.
ROUTINE MAINTENANCE
CONDENSING COIL
It is important that the coil is capable of offering the maximum possible
heat exchange. It is therefore important that its surface be always free of
dirt or dust that may be deposited by the effect of the fan’s operation.
Use a vacuum cleaner and soft bristled brush to remove all
the impurities such as paper or dust that may have
deposited on the coil. When brushing the condenser,
exercise great care so as to avoid damaging the aluminium
grid or the fans.
If a filter is present, remove and clean it. Afterwards, put it in
the original position. If damaged or too dirty, ask for its
replacement and change it.
Don't respect these norms can provoke serious damages to the circuit
refrigerator or to the contained products in the equipment.
DOOR/DRAWER GASKETS
To ensure a perfect seal, it’s important to check the gaskets to be
undamaged and perfectly closing.
POWER CABLE
Check that the power cable that connects the appliance to
the mains socket is not cut, cracked or altered in such a way
as to compromise the insulation. Contact your authorised
service centre if this requires maintenance. If the cord is
damaged, have this replaced by the manufacturer or its an
authorized technical assistance service, or by someone with
similar qualification.
A damaged electric cable could be cause of fire, electric shake or
accident
LONG SHUTDOWNS
If the appliance is inactive for long periods of time proceed as follows:
Turn the main switch to the OFF position.
Remove the plug from its socket.
Empty the appliance and clean as in point CLEANING.
Leave the door ajar to avoid bad odours from forming.
Protect the compressor group from dust.
CHANGING LIGHT BULB [NOT VALID
FOR MODELS WITH GLASS DOORS]
To change the light bulb perform the following steps:
• Switch off the appliance and disconnect the power cord;
• Open the appliance door; and remove the protective glass shield;
• Unscrew the light bulb located in the instrument panel and replace it with an
identical component (voltage of the light bulb is shown on the sticker);
• Refit the glass shield.
MAX LOAD%BEARING CAPACITY OF THE
GRILLS PROVIDED (IF APPLICABLE)
IMPORTANT
THE GRILLS PROVIDED ARE ABLE TO WITHSTAND A MAX
LOAD OF 50 kg EACH.
THE LOAD MUST BE DISTRIBUTED EVENLY ON THE GRILL
AND POSITIONED IN SUCH A WAY AS NOT TO OBSTRUCT
THE VENTS OF THE DEVICE.

Translation of the original instructions ENGLISH 7
7
Settings and Troubleshooting
THE DISPLAY
When the instrument is switched on and operating normally, the P5
parameter is assigned a number:
• when P5 = 0, the display indicates the cell temperature
• when P5 = 1, the display indicates the work setpoint
• when P5 = 2, the display indicates the evaporator temperature
• when P5 = 3, the display indicates the “cell temperature – evaporator
temperature”
CHECKING CELL TEMPERATURE
• make sure the keyboard is enabled and that no processes are in
progress
• press DOWN ()for 2 s: the display indicates the first available label
• press UP () or DOWN () to select “Pb1”
• press SET ()
To exit the procedure:
• press SET () or wait for 15 s
• press ON/STANDBY() or wait for 60 s.
When the display indicates the cell temperature during normal operation
(parameter P5 = 0), the label “Pb1” is not displayed.
CHECKING EVAPORATOR
TEMPERATURE
• make sure the keyboard is enabled and that no processes are in
progress
• press DOWN ()for 2 s: the display indicates the first available label
• press UP ()or DOWN () to select “Pb2”
• press SET ()
To exit the procedure:
• press SET () or wait for 15 s
• press ON/STANDBY()or wait for 60 s.
When the evaporator probe is disabled (parameter P3 = 0), the label “Pb2” is
not displayed.
CONFIGURATION
To enter the procedure:
• make sure no processes are in progress
• press UP ()and DOWN () for 4 s: “PA” appears on the display
• press SET ()
• press UP ()or DOWN () within 15 s to set “-19”
• press SET ()or wait for 15 s
• press UP ()and DOWN () for 4 s: “SP” appears on the display.
To select a parameter:
• press UP ()or DOWN ()
To modify a parameter:
• press SET ()
• press UP ()or DOWN () within 15 s
• press SET ()or wait for 15 s.
To exit the procedure:
• press UP ()and DOWN () for 4 s or wait for 60 s.
Turn off the instrument after modifying the parameters.
ERRORS
CODE
Meani
ng
Solution
PR1
Cell probe error
See parameter P0;
check the condition of the probe and check the connection between the
instrument and the probe;
check cell temperature
Result:
running of the compressor depends on the C4 and C5 parameters
PR2
Evap
orator probe error
the same as above, but with regard to the evaporator probe
Result:
When the P3 parameter is set at 1, the time required for defrosting is
determined by parameter d3;
When the P3 parameter is set at 1 and parameter d8 is set at 2, the
instrument runs as if parameter d8 were set at 0;
When the F0 parameter is set at 3 or 4, the instrument runs as if parameter
were set at 2.
When the cause of the alarm is resolved, the instrument continues to run
normally.
FAULT
The following items will help you find possible solutions to some troubles the
unit could be subject to. It is understood that the information given here does
not cover all possible cases. Whenever a safety device triggers, it means
that there is a malfunction; before resetting it, check and remove the cause.
You’ll find below a list of possible troubles and their causes
After making the above checks, if the fault persist contact your after-sales
service. Remenber to specify the nature of the defect, the appliance’s code
and serial number, which you will find on its nameplate.
PROBLEM
Possible cause
What to do
1 APPLIANCE DOESN’T START
1.1
Appliance isn’t connected to the power supply
Check that the plug is fitted into the mains power supply socket
correctly.
2COMPRESSOR RARELY STOPS
2.1
Room temperature is too high
Ensure proper ventilation to the room
2.2
Refrigerated cabinet condenser is dirty
Check it on a regular basis and clean it thoroughly.
2.3
Low refrigerant charge
Call an authorised technical support centr
e to find and repair any
leaks and to recharge the compressor with refrigerant.
2.4
Door gaskets do not ensure proper seal
Call an authorised technical support centre to perform the
necessary replacement
2.5
Frost build
-
up on the evaporator
Do not pl
ace hot or high water content foodstuffs into the
appliance and, if needed, perform a manual defrost cycle
2.6
Evaporator motor fan(s) damaged
Call an authorised technical support centre to perform the
necessary replacement
3OVERFLOWING OF SELF-EVAPORATING CONDENSATETRAY
3.1
Hot or high
-
water content foodstuffs are being introduced into the
appliance too often.
Do not introduce hot or high water content foodstuffs into the
appliance
3.2
Doors and/or drawers are opened too often.
Pay attention t
o the conditions of use of your appliance
4COMPARTMENT TEMPEATURE TOO HIGH
4.1
Refrigerated cabinet condenser is dirty
Check it on a regular basis and clean it thoroughly.
4.2
Feeble aeration of the zone around the technical compartment.
Remove any
obstructions for a correct airflow
4.3
Hot air entering the compartment.
Check the correct closure of the door and the gasket to be
proper. If it’s not possible to adjust functioning, call a technical
support centre to perform replacement and regulations
4.4
Frost build
-
up on the evaporator
Perform a manual defrost cycle

8 DEUTSCH Übersetzung der Originalbetriebsanleitung
8
Funktionsbeschreibung, erhalt der ware und beseitigung
ZULÄSSIGE VERWENDUNG
Das Gerät ist nicht dafür bestimmt, von Personen
(einschließlich Kindern) mit eingeschränkten geistigen oder
motorischen Fähigkeiten oder mangelnder Erfahrung und
Kenntnissen benutzt zu werden, außer sie werden von einer
für ihre Sicherheit zuständigen Person beaufsichtigt oder im
Gebrauch des Geräts unterwiesen.
Kinder müssen beaufsichtigt werden, um sicherzustellen,
dass sie nicht mit dem Gerät spielen.
Das Gerät darf ausschließlich zur Konservierung von
Lebensmitteln und Getränken verwendet werden.
Der Bau des Gerätes und die Leistungsfähigkeit des
Verflüssigungssatzes wurden ausschließlich zur
Konservierung von vorgekühlten Produkten konzepiert.
Niemals kohlensäurehaltige Getränke in das Tiefkühlfach
legen. Können explodieren.
Niemals heiße Flüssigkeiten oder Lebensmittel einführen
und mit Deckel versehene Behälter nicht bis zum Rand
füllen.
In allen Geräten gibt es Oberflächen, die sich mit Reif
überziehen. Dieser Reif, kann je nach Modell, automatisch
(automatische Abtauung) oder manuell entfernt werden. Nie
versuchen den Reif mit einem spitzigen Gegenstand zu
entfernen.
Das Gerät kann permanent beschädigt werden.
Für elektrische bzw. mechanische Änderungen übernimmt
der Hersteller keinerlei Haftung; diese lassen auch die
Garantie verfallen.
KONTROLLE BEI ERHALT DER WARE
Man sollte sich bei Erhalt der Ware vergewissern, ob diese eventuelle
Transportschäden erlitten hat und ob sie mit allen Teilen gemäss
Bestellung ausgestattet ist.
Bei sichtbaren Beschädigungen muss der Schaden
umgehend auf den Transportunterlagen wie folgt vermerkt
werden: “RÜCKNAHME MIT VORBEHALT WEGEN
OFFENSICHTLICHEN VERPACKUNGSSCHÄDEN”.
ALLE FOLGEND AUFGEFÜHRTEN ARBEITSVORGÄNGE
MÜSSEN GEMÄSS DEN GELTEN SICHERHEITSNORMEN
DURCHGEFÜHRT WERDEN. DIES GILT SOWOHL FÜR DIE
VERWENDETE AUSRÜSTUNG ALS AUCH FÜR DIE
BEDIENUNGSHINWEISE.
SICH VOR DER HANDHABUNG VERGEWISSERN, DASS DAS
ANHEBUNGSVERMÖGEN DEM GEWICHT DER
BETREFFENDEN EINHEIT ANGEMESSEN IST.
HANDHABUNG
HANDHABUNG MIT GABELSTAPLER O.Ä
Die Gabeln in die Längsseite der mitgelieferten Holzpalette des Geräts
einführen.
Die Einheit anheben und sich dabei vergewissern, dass sich diese im
stabilen Gleichgewicht befindet.
WÄHREND DER HANDHABUNG NICHT UMDREHEN
BZW.KIPPEN
FALLS TRANSPORT IN HORIZONTALER LAGE NÖTIG
WIRD, VOR DER INBETRIEBNAHME MINDESTENS 2
STUNDEN WARTEN
VORSICHTIGE HANDHABUNGTROCKEN LAGERN.
AUF KEINEN FALL ANDERE GEGENSTÄNDE AUF DAS
GERÄT STELLEN
BESEITIGUNG DER VERPACKUNG
Kartonverpackung
Die Verpackungsbänder mit einer Schere durchschneiden.
Den Verpackungskarton anheben (gleichzeitig die Schutzwinkelprofile
herausziehen).
Holzverpackung
Die Holzpaneele aufnageln, indem man mit dern Stim- und Oberpaneel
beginnt.
Die Nylonschutzhülle von oben abziehen.
Nylonverpackung
Die Befestigungsklebestreifen beseitigen und anschließend die
Nylonschutzhülle entfernen, indem man sie vom oberen Geräteteil abzieht.
Das Gerät anheben und von der Palette lösen.
Das Gerät in Übereinstimmung mit dem vorbestimmten Punkt auf den
Boden legen.
Das Gerät auf sichtbare Beschädigungen prüfen.
Das Verpackungsmaterial könnte eine mögliche Gefahrenquelle darstellen
und sollte deshalb außer Reichweite von Kindern gehalten werden.
Die Verpackungsprodukte an spezialisierte Sammel- und
Recyclingstellen weiterleiten (die geltenden Normen beachten).
Die Kennummer mit den Angaben der Begleitpapiere
vergleichen.
2.1 GERÄUSCHPEGEL
Die akustische Druckstufe der wohlerwogenen Emission A
in Arbeitsplätzen überschreitet NICHT 70 dB(A).
BESEITIGUNG
Unsere Geräte enthalten laut Europäischer Verordnung (EG) Nr.
2037/2000 vom 29. Juni 2000, das auf dem Typenschild
beschriebene Kühlmittel; außerdem ist das Gerät aus
wiederverwendbaren oder recycelbaren Teilen und Materialien
zusammengesetzt. Deshalb ist es, wenn das Gerät nicht mehr
benutzt wird, wichtig es bei Recyclinghöfen abzuliefern.
Das Ausbauen der Tür ist die beste Lösung, um zu garantieren,
dass niemand im Innern eingesperrt bleiben kann.
Das Gerät darf nicht mit Siedlungsabfällen und Schrott
entsorgt werden.
Die Beschädigung des Kühlkreislaufs, vor allem in der Nähe
des Tauschers, muss vermieden werden.
DIE VERSCHROTTUNG DIESER
GERÄTEARTEN DIE LOKAL GÜLTIGEN
VORSCHRIFTEN EINHALTEN.

Übersetzung der Originalbetriebsanleitung DEUTSCH 9
9
Inbetriebnahme
WICHTIG
BEVOR MAN DAS GERÄT ANSCHLIESST, SOLLTE MAN SICH VERGEWISSERN, DASS DIE DATEN
DES LEISTUNGSSCHILDES DENEN DES STROMNETZES ENTSPRECHEN.
DAS GERÄTESCHILD, AUF DEM DIE FÜR DIE INSTALLATION ERFORDERLICHEN ELEKTRISCHEN
DATEN ANGEGEBEN SIND, BEFINDET SICH AUF DER RECHTEN SEITENWAND DES RAUMES.
Eine unkorrekte elektrische Versorgung könnte zu Brand, Stromschlag oder Unfällen führen.
DIE INSTALLATION MUSS GEMÄSS DEN ANGABEN DES ENTSPRECHENDEN ABSCHNITTS VON
QUALIFIZIERTEM FACHPERSONAL DURCHGEFÜHRT WERDEN.
DIE ELEKTRISCHE SICHERHEIT DIESES GERÄTES IST NUR DANN GARANTIERT, WENN DAS GERÄT
GEMÄSS DEN GELTENDEN ELEKTRISCHEN SICHERHEITSNORMEN AN EINE LESITUNGSFÄHIGE
ERDUNGSANLAGE ANGESCHLOSSEN IST.
Eine defekte Erdung kann im Fall von Fehlbetrieb einen Kurzschluss oder Stromschlag verursachen
DAS GERÄT MUSS AUSSERDEM IN EIN ÄQUIPOTENTIALSYSTEM EINGESCHLOSSEN WERDEN,
DESSEN LEISTUNGSFÄHIGKEIT GEMÄSS DEN GELTENDEN NORMEN GEPRÜFT WERDEN MUSS.
AUF KEINEN FALL ADAPTER, MEHRFACHSTECKDOSEN UND/ODER VERLÄNGERUNGSKABEL BENUTZEN.
EINLEITENDE ALLGEMEINE
KONTROLLEN
Sich überzeugen, dass sich die Auflagefläche für das
Gerätegewicht eignet und eben ist;
Das Gerät nivellieren. Gegebenenfalls den beweglichen Teil der
einstellbaren Füße einstellen, um eine perfekte Ausrichtung zu
erzielen. Eventuell eine entsprechende Wasserwaage verwenden.
Alle Füße müssen auf dem Boden aufliegen. Auf diese Weise
wird der korrekte Betrieb der Türen gesichert. Die
empfohlene Höchstabweichung von der horizontalen Ebene
beträgt +/- 0,5 Grad.
Gefährdet die Stabiliät des Gerätes welches demzufolge kippen kann.
Die korrekte Türfunktion könnte damit beeinträchtigt werden.
Sich für eine ausreichende Luftzirkulation sorgen und um
jeden Schaden am Kühlkreislauf zu vermeiden sich davon
überzeugen, dass das Gerät mit einem seitlichen Freiraum
von mindestens 50 mm und von mindestens 500 mm nach
oben aufgestellt wird; das Gerät nicht in der Nähe von
Wärmequellen (wie Öfen, Heizkörpern, etc ...) oder direktem
Sonnenlicht ausgesetzt, aufstellen und das Gerät.
Das Nichtbeachten dieser Normen, kann zu ernsten Schäden am
Kühlkreislauf sowie an den im Gerät gelagerten Produkten führen.
Falls das Gerät versetzt wurde, ist es erforderlich, bevor
dasselbe wieder eingeschaltet wird, eine bestimmte Zeit zu
warten. Vor allem falls die Handhabung nicht in senkrechter
Lage erfolgte, muss man mindestens 2 Stunden warten.
Die Schutzfolie von den Außenflächen abziehen und Innere mit
lauwarmem Wasser und neutralen Seife reinigen.
Die Schlüssel (falls vorhanden) müssen außerhalb der
Reichweite von Kindern aufbewahrt werden.
KONTROLLEN ELEKTRISCHEN TEILS
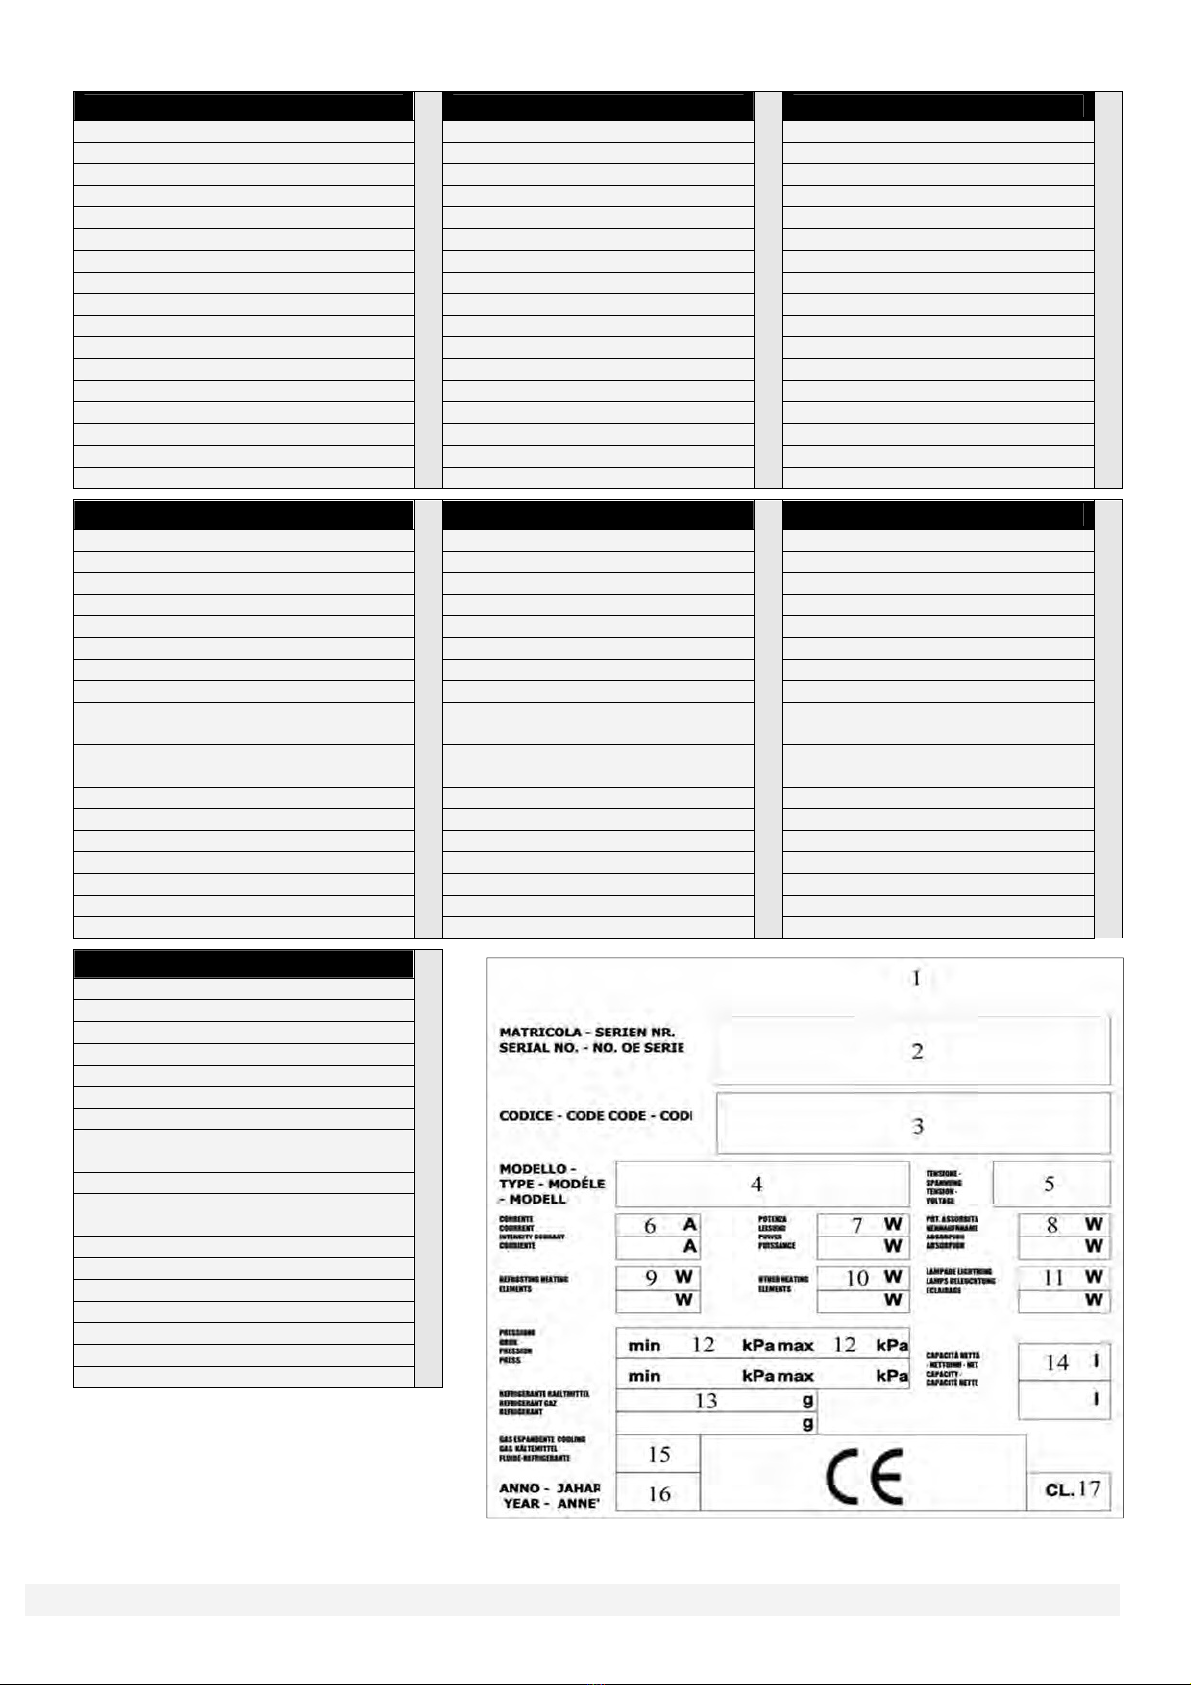
Die Werte der Netzspannung und –frequenz müsen mit denen
übereinstimmen, die auf dem Typenschild des Geräts
angegeben sind (Punkt 6 des Abschnitts "Matrikelangaben").
Eine unkorrekte Stromversorgung könnte einen Brand, Stromschlag
oder einen Unfall verursachen.
Der Steckdose eine Sicherung zu 16A vorschalten.
Den Hauptschalter, an den der Stecker des Netzkabels
angeschlossen wird, in die Position OFF bringen.
DIESES GERÄT MUSS MIT DEM MITGELIEFERTEN
STECKER AN DAS STROMNETZ ANGESCHLOSSEN WERDEN.
SOBALD DAS GERÄT INSTALLIERT WURDE, MUSS DER
STECKER LEICHT ZUGÄNGLICH SEIN.
Sicherstellen, dass die Steckdose mit dem Netzstecker des
Geräts kompatibel ist. WendenSie sich an Fachpersonal, falls die
Netzsteckdose durch eine eines anderen Typs ausgewechselt
werden muss. Dieses Fachpersonal muss sicherstellen, dass der
Querschnitt der Leiter der Netzsteckdose der Leistungsaufnahme
des Geräts angemessen ist.
Nachdem die obengenannten Anweisungen sorgfältig
durchgeführt wurden, kann das Gerät in Betrieb gesetzt werden:
Den Hauptschalter, an dem der Stecker des Versorgungskabels
angeschlossen ist, in Position ON bringen.
Den Schalter des Gerätes in die Position ON bringen.
Nach 1 Minute startet der Kompressor und die Innentemperatur
wird auf den werkseitig eingestellten Sollwert gebracht.
Das Gerät nicht beladen, solange die Temperatur den
voreingestellten Sollwert nicht erreicht hat.
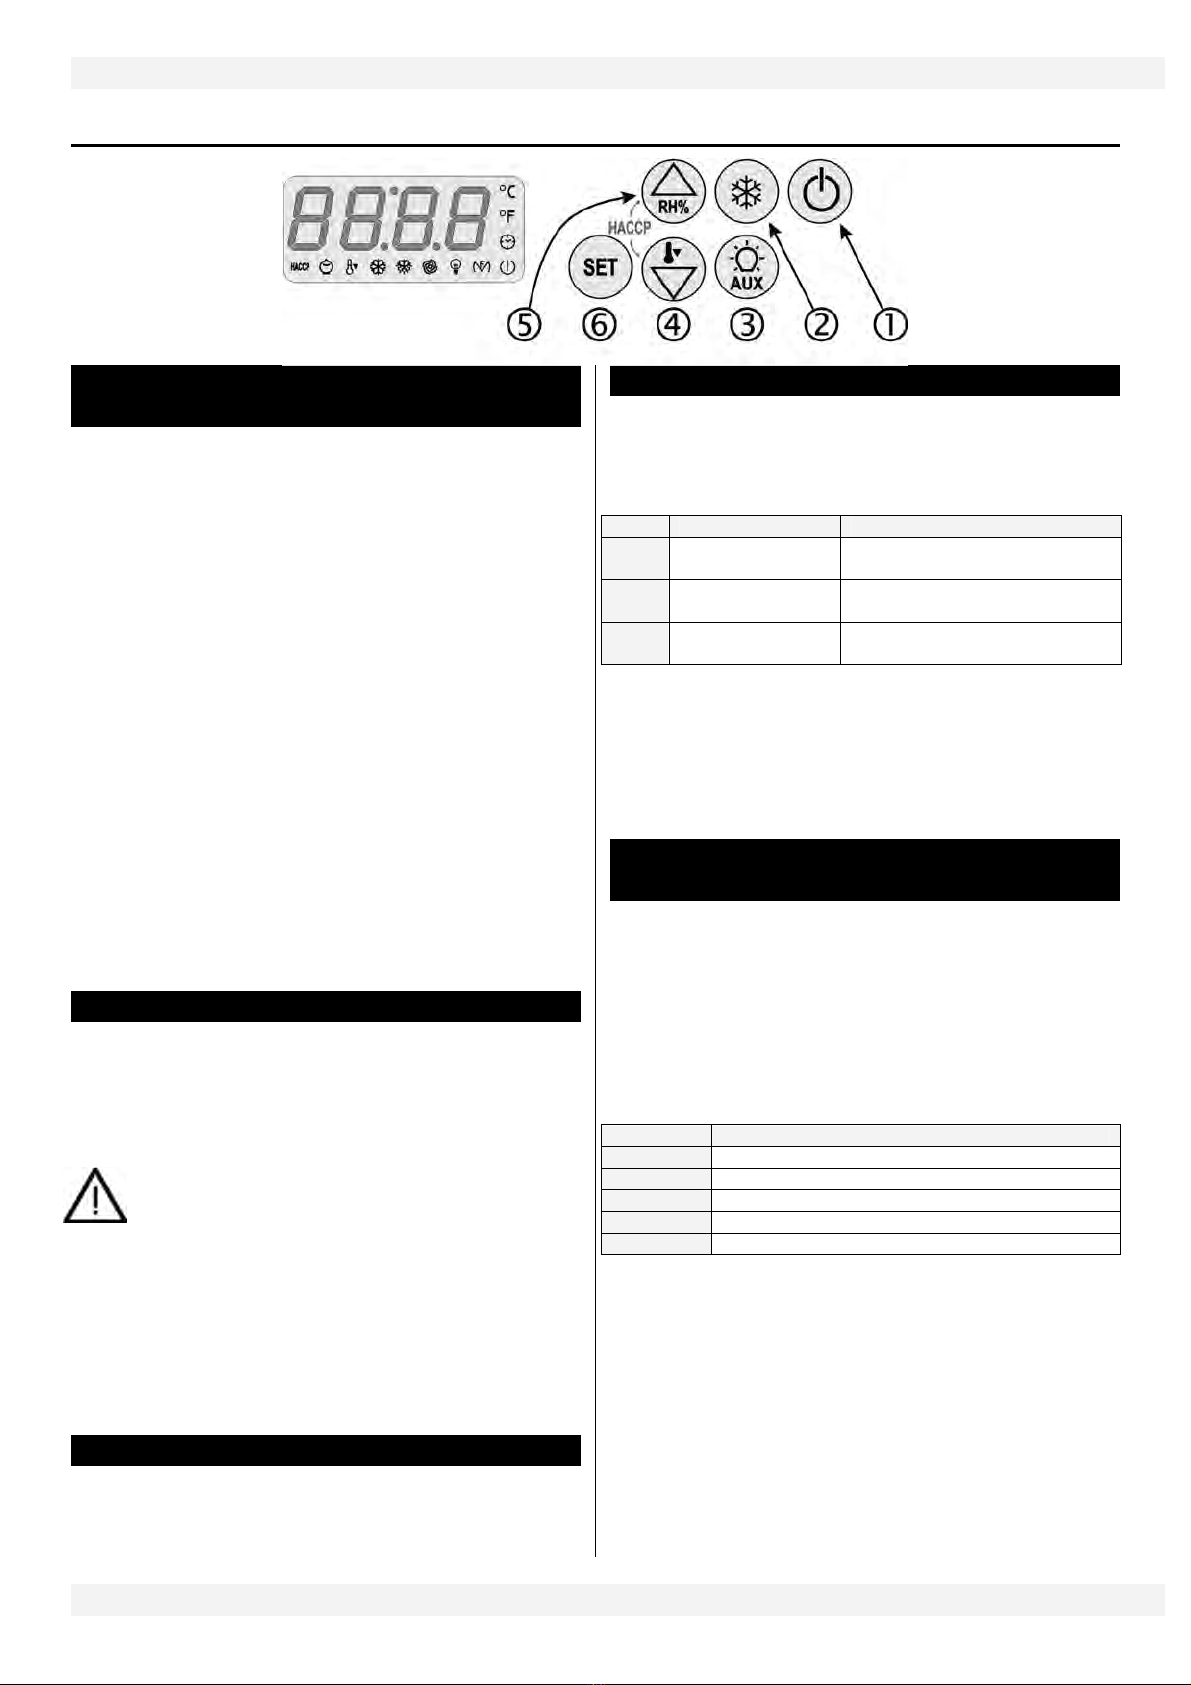
Sollte es notwendig sein, die werkseitig eingestellten Parameter
zu ändern, sind die im Kapitel "Schalttafel" aufgeführten
Anleitungen zu lesen.
BEVOR MAN DIE LEBENSMITTEL EINFÜHRT, DAS GERÄT IN
BETRIEBSZUSTAND BRINGEN.
DIE IM RAUMINNERENANGEZEIGTE LADELINIE NIE ÜBERSCHREITEN.
BETRIEB
Die richtige Konservierung der Lebensmittel stellt einen wichtigen
Aspekt bezüglich der hygienischen und sicheren
Lebensmittelproduktion dar, verbessert die Effizienz der
gastronomischen Tätigkeiten und wirkt sich positiv auf den
Stromverbrauch aus. Die unten aufgeführten Anweisungen
beachten, um die bestmögliche Leistung des Gerätes zu erzielen.
Die Produkte müssen stets auf den Ablagen gelagert werden;
keine Produkte auf den Kühlraumboden legen.
DIE LEBENSMITTEL MÜSSENSO IN DAS GERÄT GELEGT
WERDEN, DASS EIN FREIER LUFTSTROM GEWÄHRLEISTETIST.
ZWISCHEN DEN JEWEILIGEN LEBENSMITTELN AUSREICHENDPLATZ
LASSEN UNDSIE NICHT INBERÜHRUNG MIT DENSEITENWÄNDEN
BRINGEN. IM BEDARFSFALL DEN ABSTAND DER ABLAGEN ÄNDERN.

10 DEUTSCH Übersetzung der Originalbetriebsanleitung
10
Schalttafel
TASTATUR UND DEREN FUNKTIONEN
Um die Tastatur zu sperren, die Taste AUX ()und die Taste ON/STAND-
BY()2 s lang drücken: ist sie gesperrt, zeigt das Display "Loc" an, wenn
ungesperrt "UnL".
ON/STAND BY; hält man die Taste 4 s gedrückt, schaltet sich das Gerät
aus/ein.
MANUELLE ABTAUUNG; hält man die Taste 4 s gedrückt: beginnt eine
manuelle Abbtauung unter Bedingung, dass die Funktion Overcooling nicht
läuft und die Temperatur des Verdampfers es erlaubt.
Ein-/Ausschaltung der Raumbeleuchtung auf manuelle Weise(in
Modellen mit Glastüren) oder Ein-/Ausschaltung des Hilfsausganges auf
manuelle Weise (falls vorhanden).
Taste AB: skrollt die Punkte des Menus und senkt die Werte; für 4 s lang
gedrückt aktiviert sich die Funktion Overcooling. Während der Funktion
Overcooling wird der Arbeits-Set Point um Temperatur und für die von
Paramentern eingestellte Zeit gesenkt.
Während der Funktion Overcooling wird nie die Abtauung aktiviert; fällt der
Zeitabstand der Abtauung wenn die Funktion im Gange ist, wird die
Abtauung am Ende derselben gestartet.
Taste AUF: skrollt die Punkte des Menus und steigert die Werte; für 4 s
lang gedrückt, aktiviert sich die Funktion des hohen oder niedrigen
Prozentsatzes der relativen Feuchtigkeit (nur bei einigen Modellen). Das
Display zeigt "rhL" (Betrieb niedriger Prozentsatz relativer Feuchtigkeit) oder
"rhH" (Betrieb hoher Prozentsatz relativer Freuchtigkeit) für 10 s an. Ist die
Funktion nicht verfügbar, wird bei Druck der Taste AUF ()die Anzeige " ---
- " für 1 s erscheinen.
SET POINT, erlaubt den Zutritt und die Änderung des Set Point.
BETRIEB
Folgende Betriebsstatus sind vorhanden:
Status "on" (die Schalttafel wird versorgt und ist eingeschaltet )
Status "stand-by" (das Gerät ist aus aber die Schalttafel wird versorgt)
Status "off": um auf “off” zu schalten, muss man den Hauptschalter oder
die Versorgung ausschalten.
KEINE WARTUNG VORNEHMEN SOLANGE DAS GERÄT
AUF ON ODER STAND BY IST.
VOM NETZ ODER DER ELEKTRISCHEN VERSORGUNG
ABSCHALTEN.
Ist die Steuerung eingeschaltet, zeigt das Display bei normalem Betrieb die
Raumtemperatur an.
Wechselweise ist es möglich den Wert der Verdampfersonde (falls
vorhanden) zu zeigen, indem man die Taste AB ()2 s lang gedrückt hält;
drückt man die Taste AB ()2 s, zeigt das Display die Schrift “Pb2”. Drückt
man die Taste SET ()erscheint die Temperatur des Verdampfers.
Nach kurzer Zeit ohne Benutzung oder durch kurze Betätgung der Taste
SET kehrt man zur Anzeige der Raumtemperatur zurück.
EINSTELLUNG DES SET POINT
• drücken und loslassen der Taste SET(): der Kompressor LED blinkt
• drücken und loslassen der Taste AUF ()oder AB ()innerhalb 15 s
• drücken und loslassen der Taste SET()oder für 15 s nicht benutzen;
der Kompressor LED schaltet aus, und die Schalttafel verlässt das Verfahren
HACCP GRUNDFUNKTIONEN
Die Steuerung kann bis zu 3 HACCP Alarme speichern.
Die Steuerung liefert folgende Informationen:
• kritischer Wert
• Alarmdauer (von 1 min bis 99 h und 59 min, teils wenn Alarm im Gange)
COD.
ALARMTYP
KRITISCHER WERT
AL
Ala
rm minimum
Temperatur
Die minimum Temperatur des Raumes
während eines solchen Alarms
AH
Alarm maximum
Temperatur
Die maximum Temperatur des Raumes
während einse solchen Alarms
Id
Alarm Eingang Tür
Micro
Die maximum Temperatur des Raumes
während einse solchen Alarms
Die Steuerung vertagt die Informationen falls der neue Alam schlimmer als
der gespeicherte ist oder unter Bedingung, dass die neuen Informationen
schon gezeigt wurden.
Ist die Steuerung ausgeschaltet, wird kein Alarm gespeichert.
Verschwindet die Ursache des Alarms, stellt das Display den normalen
Betrieb wieder her.
Der HACCP LED liefert Informationen über den Speicherzustand der HACCP
Alarme;
ANZEIGE DER INFORMATIONEN ÜBER
DIE HACCP ALARME
• drücken der Taste AB ()für 2 s: das Display zeigt der erste Punkt an.
• drücken und loslassen der Taste AUF ()oder AB ()um "LS" zu wählen
• drücken und loslassen der Taste SET (): das Display einen der Kodes
der oberen Tabelle an.
Um einen Alarm zu wählen:
• drücken und loslassen der Taste AUF ()oder AB ()(z.B. um "AH" zu
wählen).
Um Informationen über Alarm zu zeigen:
• drücken und loslassen der Taste SET (): der HACCP LED hört auf zu
blinken und das Display zeigt in Abfolge diese Informationen (zum Beispiel):
ANZEIGE
BEDEUTUNG
8,0
Der kri
tische Wert ist 8,0 °C/8 °F
Dur
Das Display wird die Alarmdauer anzeigen
h01
Der Alarm hat 1Std gedauert (hält an ...)
n15
Der Alarm hat 1Std und 15 Min gedauert
AH
Gewählter Alarm
Um die Nachfolge der Informationen zu verlassen:
~ drücken und loslassen der Taste ON/STAND-BY(): das Display zeigt
den gewählten Alarm (im Beispiel "AH3").
Um das Verfahren zu verlassen:
• verlassen der Nachfolge der Informationen
• drücken und loslassen der Taste AUF ()oder AB () bis das Display
die Raumtemperatur anzeigt oder 60 s lang nicht bedienen.
Wechselweise Nachfolge der Informationen verlassen
• drücken und loslassen der Taste ON/STAND-BY().
Hat das Instrument keinen Alarm gespeichert, wird der Punkt "LS" nicht
angezeigt.

Übersetzung der Originalbetriebsanleitung DEUTSCH 11
11
Reinigung, wartung und störung
DIE FOLGENDEN HINWEISE SIND BESONDERS
WICHTIG, WENN ES SICH BEI DER
VERWENDETEN KÜHLFLÜSSIGKEIT UM DEN TYP
R290 HANDELT
(siehe Verweis 13 auf der Seite 2 dieses
Handbuchs sowie Typenschilder der Geräts)
DIE LÜFTUNGSÖFFNUNGEN IM GEHÄUSE DES GERÄTS
ODER IN DER EINBAUKONSTRUKTION DÜRFEN
NICHT VERSTOPFT SEIN.
KEINE MECHANISCHEN VORRICHTUNGEN ODER ANDERE MITTEL
ZUR BESCHLEUNIGUNG DES ABTAUPROZESSES VERWENDEN, DIE
NICHT VOM HERSTELLER EMPFOHLEN WURDEN.
DEN KÄLTEKREISLAUF NICHT BESCHÄDIGEN.
IN DEN FÄCHERN FÜR DIE AUFBEWAHRUNG DER TIEFGEKÜHLTEN
SPEISEN DES GERÄTS KEINE ELEKTRISCHEN GERÄTE
VERWENDEN, WENN DER ENTSPRECHENDE TYP NICHT VOM
HERSTELLER EMPFOHLEN WURDE.
Dieser Abschnitt betrifft den Endverbraucher und ist für den
dauerhaften und vorschriftsmäßigen Betrieb des Gerätes
von äußerster Wichtigkeit.
Die sorgfältige und regelmäßige Durchführung einiger
Arbeitsvorgänge beugt den Eingriff von Fachpersonal vor.
Die durchzuführenden Maßnahmen setzen keine besonderen
technische Kenntnisse voraus.
WICHTIG
BEVOR MAN DIE WARTUNG BZW. REINIGUNG VORNIMMT,
DIE STROMVERSORGUNG DES GERÄTES AUSSCHALTEN.
ACHTUNG
DAS GERÄT NICHT MIT DIREKTEN
HOCHDRUCKWASSERSTRAHLEN REINIGEN. AUF KEINEN FALL
WASSERSTRAHLEN GEGEN ELEKTRISCHE TEILE RICHTEN.
REINIGUNG
Die Notwendigkeit einer Reinigung des Gerätes hängt
größtenteils von der Verwendungshäufigkeit ab. Die
sachgemäße Verwendung beachten und die notwendigen
Reinigungsarbeiten programmieren.
Zur Reinigung der Innen- und Außenflächen ein neutrales
oder leicht alkalisches Reinigungsmittel verwenden. Man
empfiehlt, den Innenraum gelegentlich mit einem
Desinfektionsmittel zu reinigen. Eventuelle Unreinheiten
können mit einem feuchten Tuch beseitigt werden. Die
Entfernung der Ablagen erleichtert die Reinigung des
Innenraums.
Zur Reinigung des Gerätes niemals Metallgegenstände
benutzen,; es könnte beschädigt werden.
Für eine tiefere inwändige Reinigung ist es notwendig die
Schienen der Ablagehalterungen zu entfernen.
WICHTIG
DIE GERÄTE WERDEN AUS CNS HERGESTELLT, DER
WIDERSTANDSFÄHIG GEGEN KORROSIONEN IST, DIE DURCH
DEN NORMALEN GEBRAUCH ENTSTEHEN KÖNNEN.
UNBEDINGT REINIGUNGSMITTEL BZW. REINIGUNGSSYSTEME
VERMEIDEN, DIE DIE MASCHINE BESCHÄDIGEN KÖNNTEN.
ALLGEMEINE WARTUNG
KONDENSATIONSBATTERIE
Die Batterie muß unbedingt in der Lage sein, maximalen
Wärmeaustausch zu bieten.
Mit Hilfe eines Staubsaugers und eines Pinsels bzw. einer
metallfreien Bürste alle Verschmutzungen (z.B. Papier, Staub),
die sich eventuell auf der Batterieoberfläche abgelagert haben,
entfernen ohne die aluminiumrippen zu beschädigen. Falls
derartige Beschädigungen vorliegen sollten, die Batterie mit
Hilfe des eigens dazu bestimmten Gerätes "kämmen", um den
optimalen Luftstrom wiederherzustellen.
Falls ein Filter vorhanden ist, diesen entfernen und reinigen
und danach wieder in die ursprüngliche Lage einsetzten.
Falls der Filter beschädigt oder zu schmutzig ist, einen zum
austauschen bestellen.
Das Nichtbeachten dieser Normen kann zu ernsten Schäden am
Kühlkreislauf und an den im Gerät gelagerten Produkten führen.
TÜRDICHTUNGEN
Sich vergewissern, dass die Türdichtungen einwandfrei sind: es ist sehr
wichtig eine perfekte Schliessung zu garantieren.
VERSORGUNGSKABEL
Sich vergewissern, ob das Versorgungskabel Beschädigungen,
Rißbildungen bzw. andere Veränderungen aufweist, die die
Isolierung beeinträchtigen könnten. Sich bei erforderlicher
Wartung an einen zugelassenen Kundendienst wenden. Wenn
das Netzkabel beschädigt ist, muss es vom Hersteller, seinem
Kundendienst oder einer Person mit ähnlichen Qualifikationen
ausgetauscht werden.
Ein beschädigtes elektrisches Kabel kann zu Brand, Stromschlag
oder Unfällen führen.
LÄNGERE STILLSTANDSZEITEN
Bei längeren Stillstandszeiten wie folgt vorgehen:
Das Gerät ausschalten und von der Stromversorgung abschalten.
Das Gerät entleeren und wie bei Kapitel „Reinigung“ vorgehen.
Die Türen nicht vollständig schließen, um das Entstehen von üblen
Gerüchen zu vermeiden.
Die Kompressorgruppe vor Staub schützen.
AUSTAUSCH DER GLÜHBIRNE [AUSSER
BEI MODELLEN MIT GLASTÜREN]
Für den Austausch der Glühbirne sind folgende Anweisungen zu befolgen
(die Glühbirnenspannung ist auf einer Klebe-Etikette angegeben):
• Das Gerät abschalten und das Netzkabel herausziehen;
• Tür öffnen und die Schutzblende der Glühbirne entfernen;
• Die darin befestigteGlühbirne abschrauben und durch eine mit gleichen
Eigenschaften ersetzten;
• Die Schutzblende wieder befestigen.
MAXIMALE BELASTUNG DER
MITGELIEFERTEN ROSTE
WICHTIG
DIE MITGELIEFERTEN ROSTE EIGNEN SICH FÜR EINE
MAXIMALE LAST VON 50 KG PRO ROST.
DIE LAST MUSS GLEICHMÄSSIG AUF DEM ROST VERTEILT
WERDEN UND SO ANGEORDNET SEIN, DASS DIE LÜFTUNG
DES GERÄTS NICHT BEHINDERT WIRD.

12 DEUTSCH Übersetzung der Originalbetriebsanleitung
12
Parameter und fehlersuche
DAS DISPLAY
Wenn das Gerät eingeschaltet ist, zeigt das Display bei Normalbetrieb die
mit dem Parameter P5 festgelegte Größe:
• bei P5 = 0, zeigt das Display die Zellentemperatur an
• bei P5 = 1, zeigt das Display den Betriebssollwert an
• bei P5 = 2, zeigt das Display die Verdampfertemperatur an
• bei P5 = 3, zeigt das Display “Zellentemperatur-Verdampfertemperatur” an
ANZEIGE DER ZELLENTEMPERATUR
• 2 Sek. lang DOWN ()drücken: Das Display zeigt das erste verfügbare
Label an.
• UP () oder DOWN () zur Anwahl von „Pb1” drücken.
• SET () drücken.
Ausstieg aus diesem Vorgang:
• SET () drücken oder 15 Sek. lang nicht bedienen
• ON/STAND-BY() drücken oder 60 Sek. lang nicht bedienen.
Wenn das Display im Normalbetrieb die Zellentemperatur (Parameter P5 =
0) anzeigt, wird das Label „Pb1“ nicht angezeigt.
ANZEIGE DER
VERDAMPFERTEMPERATUR
• 2 Sek. lang DOWN ()drücken: Das Display zeigt das erste verfügbare
Label an.
• UP ()oder DOWN () zur Anwahl von „Pb2“ drücken.
• SET ()drücken.
Ausstieg aus diesem Vorgang:
• SET () drücken oder 15 Sek. lang nicht bedienen.
• ON/STAND-BY()drücken oder 60 Sek. lang nicht bedienen.
Wenn der Verdampferfühler nicht freigegeben ist (Parameter P3 = 0), wird
das Label „Pb2“ nicht angezeigt.
EINSTELLUNG DER PARAMETER
Einstieg in den Vorgang:
• Sicherstellen, dass kein Vorgang läuft
• 4 Sek. lang UP ()und DOWN () drücken: Das Display zeigt „PA” an.
• SET () drücken.
• UP ()oder DOWN () innerhalb von 15 Sek. drücken, um „-19”
einzustellen.
• SET () drücken oder 15 Sek. lang nicht bedienen.
• 4 Sek. lang UP ()und DOWN () drücken: Das Display zeigt „SP” an.
Anwahl eines Parameters:
• UP ()oder DOWN () drücken.
Änderung eines Parameters:
• SET ()drücken.
• UP ()oder DOWN () innerhalb von 15 Sek. drücken.
• SET () drücken oder 15 Sek. lang nicht bedienen.
Ausstieg aus dem Vorgang:
• 4 Sek. lang UP ()und DOWN () drücken oder 60 Sek. lang nicht
bedienen.
Nach Änderung der PARAMETER die Versorgung des Geräts unterbrechen.
FEHLER
CODE
Bedeutung
Behebung
PR1
Fehler Sondenfühler
siehe Parameter P0;
Unversehrtheit des Fühlers und Verbindung Gerät-Fühler prüfen;
Zellentemperatur prüfen.
Folgen:
Die Kompressortätigkeit hängt von den PARAMETERN C4 und C5 ab.
PR2
Fehler Verdampfersonde
Dieselben Parameter wie vorher, nur auf den Verdampferfühler bezogen
Folgen
wenn der Parameter P3 auf 1 eingestellt ist, läuft die Abtauung über die mit
dem Parameter d3 eingestellte Dauer;: wenn der Parameter P3 auf 1 und
der Parameter d8 auf 2 eingestellt ist, arbeitet das Gerät, als ob der
Parameter d8 auf 0 eingestellt wäre;
wenn der Parameter F0 auf 3 oder 4 eingestellt ist, arbeitet das Gerät, als
ob der Parameter auf 2 eingestellt wäre.
Wenn die Ursache für den Alarm beseitigt ist, arbeitet das Gerät wieder im
Normalbetrieb.
STÖRUNGEN
Bei einem fehlerhaften Betrieb des Geräts die nachfolgend aufgeführte Liste
kontrollieren, um festzustellen, ob es ohne Hilfe des Kundendienstes wieder
in Betrieb gesetzt warden kann; in diesem Handbuch sind selbstverständlich
nicht alle Möglichkeiten aufgeführt. Die Einschaltung einer
Sicherheitsvorrichtung ist Anzeichen einer Betriebsstörung; vor
Wiederinbetriebnahme muß die Ursache festgestellt und beseitigt werden.
Falls die Störung danach weiterbesteht, wenden Sie sich bitte an den technischen
Dienst, mit folgenden art der Störung, codenummer und kennzeichen des Geräts,
die dem Geräteschild entnommen werden können
PROBLEM
Mögliche Ursache
Eingriff
1DAS GERÄT STARTET NICHT
1.1
Das Gerät ist nicht korrekt an der Versorgung angeschlossen
Kontrollieren, dass der Stecker richtig in der
Dose steckt
2DER KOMPRESSOR STOPPT SELTEN
2.1
Die Raumtemperatur ist zu hoch
Den Raum ausreichend lüften
2.2
Der Kühlschrankkondensator ist schmutzig
Ihn regelmäßig überprüfen und reinigen.
2.3
Kühlmittelmenge zu gering
Für die Ermittlung und Re
paratur von Lecks und um die
Nachfüllung des Kühlgases auszuführen, wenden Sie sich bitte
an eine dafür zuständige technische Kundendienststelle
2.4
Tür
-
und Schubladendichtungen unwirksam
Für den Ersatz wenden Sie sich bitte an eine dafür zuständige
technische Kundendienststelle
2.5
Verdampfer ist vereist
Keine heißen Lebensmittel mit hohem Flüssigkeitsgehalt einführen;
falls erforderlich, einen manuellen Abtauvorgang ausführen
2.6
Der Ventilator funktioniert nicht korrekt
Sich für einen eventuelle
n Austausch an die zuständige
Kundendienststelle wenden
3ÜBERLAUFEN DERSELBSTVERDAMPFENDEN KONDENSSCHALE
3.1
Häufiges Einführen von warmen Lebensmittel mit hohem Wassergehalt.
Keine warme Lebensmittel mit hohem Wassergehalt einführen
3.2
Häufiges öf
fnen der Türen bzw. Schubladen
Die Geräteanwendungsbedingungen beachten
4RAUMTEMPERATUR IST UNGENÜGEND
4.1
Verschmutzte Kondensationbatterie
Sie regelmäßig überprüfen und reinigen.
4.2
Mangelhafte Belüftung der Zone, die an den Technischen Bereich
Angrenzt
Eventuelle Verstopfungen beseitigen.
4.3
Eintritt heisser Luft in den Raum
Sich vergewissern, dass die Türe sich richtig schliesst und die
Dichtung funktioniert. Falls der Betrieb nicht wieder hergestellt
warden kann, sich für eine Lösung oder Regulierung an die
zuständige Kundendienststelle wenden
4.4
Verdampfer ist vereist
Einen manuellen Abtauvorgang ausführen

Istruzioni originali / Original instructions ITALIANO 13
13
Descrizione funzionale, ricevimento e dismissione
USO CONSENTITO
L’apparecchio non è destinato all'uso da parte di persone
(inclusi i bambini) con ridotte capacità psichiche o motorie,
o con mancanza di esperienza e conoscenza, a meno che ci
sia una supervisione o istruzione sull' uso dell'apparecchio
da parte di una persona responsabile per la loro sicurezza
I bambini devono essere sorvegliati per assicurarsi che non
giochino con l’apparecchio
Gli apparecchi sono progettati per l’installazione all’interno e
deve essere impiegata esclusivamente per la conservazione
di cibi e bevande.
L’apparecchiatura è stata progettata esclusivamente per la
conservazione di prodotti pre-raffreddati o pre-congelati.
Non introdurre mai liquidi o alimenti caldi e non riempire fino
all’orlo i recipienti muniti di coperchio.
Non mettere mai nello scompartimento a bassa temperatura
bibite gassate.
Possono esplodere.
In tutte le apparecchiature ci sono delle superfici che si
coprono di brina. A seconda del modello, tale brina può
essere eliminata automaticamente (sbrinamento automatico)
oppure manualmente. Non tentate mai di togliere la brina
con un oggetto appuntito,
Si rischierebbe di danneggiare irrimediabilmente l’apparecchiatura.
Viene declinata ogni responsabilità del Produttore con
decadimento della garanzia in caso di modifiche elettriche
e/o meccaniche.
CONTROLLO AL RICEVIMENTO
Controllare all’arrivo che l’apparecchio non abbia subito danneggiamenti
durante il trasporto e che lo stesso sia completo nelle sue parti come da
ordine.
Nel caso di danni visibili annotare immediatamente sul
documento di trasporto il danno riscontrato riportando la
dicitura : “RITIRO CON RISERVA PER EVIDENTI DANNI A
IMBALLO.
TUTTE LE OPERAZIONI DI SEGUITO CITATE DEBBONO
ESSERE ESEGUITE IN CONFORMITÀ ALLE NORME DI
SICUREZZA VIGENTI, SIA PER QUANTO RELATIVO
ALL’ATTREZZATURA USATA SIA PER QUANTO RELATIVO
ALLE MODALITÀ OPERATIVE.
PRIMA DI DAR CORSO A OPERAZIONI DI
MOVIMENTAZIONE ASSICURARSI CHE LA CAPACITÀ DI
SOLLEVAMENTO SIA ADEGUATA AL PESO
DELL’APPARECCHIO IN QUESTIONE.
MOVIMENTAZIONE
MOVIMENTAZIONE con CARRELLO ELEVATORE o SIMILARE
Inserire le forche sul lato anteriore o posteriore della pedana in legno a
corredo dell’apparecchio.
Dar corso al sollevamento assicurandosi che l’apparecchio sia in
equilibrio stabile.
NEL CORSO DELLA MOVIMENTAZIONE NON
CAPOVOLGERE O ROVESCIARE.
SE SI RENDE INDISPENSABILE IL TRASPORTO IN
ORIZZONTALE; ATTENDERE ALMENO 2 ORE PRIMA DI
METTERLO IN FUNZIONE.
MOVIMENTARE CON CURA E TENERE ALL’ASCIUTTO
EVITARE NEL MODO PIÙ ASSOLUTO DI SOVRAPPORRE
ALL’APPARECCHIO ALTRI OGGETTI.
RIMOZIONE IMBALLO
Imballo in cartone
Tagliare con forbice le reggette di chiusura.
Sollevare il cartone di imballo.
Imballo in legno
Schiodare i pannelli in legno iniziando dal frontale e da quello superiore.
Imballo in nylon
Togliere la protezione in nylon: non utilizzare utensili che possano
danneggiare la superficie dell’apparecchiatuta
Sollevare l’apparecchio in modo da separarlo dalla pedana.
Appoggiare l’apparecchio a terra in corrispondenza del punto
predestinato.
Tenere fuori dalla portata di mano dei bambini il materiale di imballo in
quanto potenziale fonte di pericolo.
Smaltire i prodotti di imballo facendoli confluire ai centri di raccolta o di
riciclaggio specializzati (attenersi alle norme vigenti).
Verificare la rispondenza del numero di matricola con
quanto riportato nel documento di accompagnamento.
LIVELLO DI RUMOROSITA’
Il livello di pressione acustica dell'emissione ponderato A
nei posti di lavoro NON supera 70 dB(A).
DISMISSIONE
Le nostre apparecchiature contengono il fluido refrigerante,
in base al Regolamento Europeo C.E. n. 2037/2000 del 29
giugno 2000, descritto nella targhetta matricolare; inoltre
l’apparecchiatura è composta da parti e materiali riutilizzabili
o riciclabili.
Terminato l’utilizzo dell’apparecchiatura è importante che venga
consegnata a centri di smaltimento ecologico.
Togliere la porta è il miglior modo per assicurare che
nessuno possa rimanere rinchiuso all’interno.
L’apparecchiatura NON deve essere smaltita con rifiuti
urbani e rottami.
Deve essere evitato il danneggiamento del circuito
frigorifero.
RISPETTARE LE NORMATIVE LOCALI
VIGENTI PER LA ROTTAMAZIONE DI
QUESTO GENERE DI APPARECCHI.

14 ITALIANO Istruzioni originali / Original instructions
14
Messa in funzione
IMPORTANTE
PRIMA DI COLLEGARE L’APPARECCHIO ACCERTARSI CHE I DATI DI TARGA SIANO RISPONDENTI
A QUELLI DELLA RETE ELETTRICA. LA TARGHETTA MATRICOLARE RECANTE I DATI ELETTRICI
NECESSARI ALL’INSTALLAZIONE È POSIZIONATA SUL FIANCO DESTRO DELLA CELLA.
Un’alimentazione elettrica non corretta potrebbe essere causa di incendio, scossa elettrica od infortunio.
L’INSTALLAZIONE DEVE ESSERE EFFETTUATA SECONDO LE ISTRUZIONI RIPORTATE ALLA
PRESENTE SEZIONE DA PERSONALE PROFESSIONALMENTE QUALIFICATO.
COLLEGARE AD UN EFFICACE IMPIANTO DI MESSA A TERRA COME PREVISTO DALLE VIGENTI
NORME DI SICUREZZA ELETTRICA.
Una messa a terra difettosa sarebbe causa di cortocircuito o scossa elettrica nel caso di malfunzionamento.
L’APPARECCHIO DEVE ESSERE INOLTRE INCLUSO IN UN SISTEMA EQUIPOTENZIALE LA CUI
EFFICIENZA DEVE ESSERE VERIFICATA SECONDO LE NORME IN VIGORE.
È VIETATO L’USO DI ADATTATORI, PRESE MULTIPLE, E/O PROLUNGHE.
CONTROLLI PRELIMINARI GENERICI
Verificare che il piano d’appoggio sia adatto a sopportare il
peso dell’apparecchio e sia in piano;
Posizionare l’apparecchio a bolla. Agire eventualmente sulla
parte mobile dei piedini regolabili fino ad ottenere un
perfetto allineamento: tutti i piedini devono poggiare sul
pavimento
Eventualmente utilizzare un’apposita livella. La deviazione
massima consigliata dal piano orizzontale è di +/-0,5 gradi.
Pregiudica la stabilità dell’apparecchiatura e può causarne la caduta.
Il corretto funzionamento delle porte potrebbe essere compromesso.
Lasciare almeno 50 millimetri di spazio libero ai lati ed
almeno 500 mm. tra il soffitto e la parte superiore; non
mettere l’apparecchio vicino a fonti di calore o in un luogo
esposto alla luce diretta del sole; non impedire il libero
circolare dell’aria del vano motore
Non rispettare queste norme può provocare gravi danni al circuito
frigorifero od ai prodotti contenuti nell’apparecchiatura.
Nel caso in cui l’apparecchiatura sia stata spostata, è
necessario aspettare un certo tempo prima di rimetterla in
funzione. In particolare se la movimentazione è avvenuta
con l’apparecchiatura non verticale, bisogna attendere
almeno 2 ore.
Togliere la plastica a protezione delle superfici esterne e lavare
l’interno con acqua tiepida e sapone neutro.
Le chiavi di chiusura (se disponibili) non devono essere a
portata di mano dei bambini.
CONTROLLI PRELIMINARI ALLA PARTE
ELETTRICA E MESSA IN FUNZIONE.
Il valore di tensione e frequenza di rete deve corrispondere a
quello riportato nella targhetta matricolare dell’apparecchiatura
(punto 6 del paragrafo "Dati matricolari").
Un’alimentazione elettrica non corretta potrebbe essere causa di
incendio, scossa elettrica od infortunio.
Installare a monte della presa un fusibile da 16A.
Portare l’interruttore generale a cui andrà collegata la spina
del cavo di alimentazione nella posizione OFF.
QUESTO APPARECCHIO VÀ COLLEGATO ALLA RETE DI
ALIMENTAZIONE UTILIZZANDO LA SPINA IN DOTAZIONE.
UNA VOLTA CHE L'APPARECCHIO E' STATO INSTALLATO, LA
SPINA DEVE RIMANERE FACILMENTE ACCESSIBILE
Verificare la compatibilità della presa con la spina
dell’apparecchio. Nel caso si rendesse necessario, fare
sostituire la presa con altra di tipo adatto da personale
professionalmente qualificato. Quest’ultimo dovrà anche
accertare che la sezione dei cavi della presa sia idonea alla
potenza assorbita dall’apparecchiatura.
Dopo aver effettuato scrupolosamente quanto sopra esposto è
possibile avviare l'apparecchio.
Portare l’interruttore generale a cui è collegata la spina del
cavo di alimentazione nella posizione ON.
Portare l’interruttore dell’apparecchio in posizione ON. .
Dopo 1 minuto, il compressore parte e la temperatura interna si
regola al valore impostato in fabbrica.
Non caricare l’apparecchiatura fino a quando la temperatura
non avrà raggiunto il valore preimpostato.
Per le modalità operative relative alla variazione del valore del
SET POINT predeterminato in fabbrica consultare la sezione
PANNELLO DI COMANDO.
PRIMA DI INSERIRE GLI ALIMENTI PORTARE
L’APPARECCHIO A REGIME.
NON SUPERARE MAI IL LIMITE DI CARICO INDICATO
DALL’APPOSITA ETICHETTA POSTA ALL’INTERNO DELLA CELLA.
FUNZIONAMENTO
La corretta conservazione delle derrate è un fattore importante
nella produzione igienica e sicura di alimenti ed inoltre migliora
l’efficienza delle attività gastronomiche e incide sul consumo di
energia. Rispettare le istruzioni riportate sotto per ottenere il
massimo rendimento dall’apparecchiatura.
I prodotti devono essere sempre conservati sui ripiani; non
caricare prodotti sul fondo della cella.
I PRODOTTI DEVONO ESSERE CARICATI IN MODO TALE DA
PERMETTERE IL LIBERO FLUSSO DELL’ARIA.
LASCIARE DEGLI SPAZI LIBERI TRA I PRODOTTI E NON
SISTEMARLI A CONTATTO CON LE PARETI. ALL’OCCORRENZA,
MODIFICARE LA DISTANZA TRA I RIPIANI.

Istruzioni originali / Original instructions ITALIANO 15
15
Pannello di comando
TASTIERA E FUNZIONI ASSOCIATE
Per bloccare la tastiera tenere premuto il tasto AUX ()e il tasto
ON/STAND-BY()per 2 s: il display visualizzerà "Loc" quando bloccata e
"UnL" se sbloccata.
ON/STAND BY; tenendo premuto il tasto per 4 s l’apparecchio si
spegnerà/accenderà
SBRINAMENTO MANUALE; tenendo premuto il tasto per 4 s: si attiva
uno sbrinamento manuale alle condizioni che la funzione Overcooling non
sia attivata la temperatura dell’evaporatore lo consentano.
Accensione/spegnimento della luce della cella in modo manuale (solo
per modelli con porte vetro) o accensione/spegnimento deII’uscita ausiliaria
in modo manuale (se presente).
Tasto freccia GIÙ: scorre le voci del menù e decrementa i valori;
tenuto premuto per 4 s la funzione Overcooling si attiverà.
Durante la funzione Overcooling il setpoint di lavoro viene decrementato
della temperatura e per il tempo stabiliti da parametri.
Durante la funzione Overcooling lo sbrinamento non viene mai attivato; se
I’intervaI|o di sbrinamento scade quando la funzione è in corso, lo
sbrinamento verrà attivato alla conclusione della funzione.
Tasto freccia SU: scorre le voci del menù; incrementa i valori; tenuto
premuti per 4 s attiva la funzione per bassa o alta percentuale di umidità
relativa (solo per alcuni modelli).
Il display visualizzerà "rhL" (funzionamento per bassa percentuale di umidità
relativa) o "rhH" (funzionamento per alta percentuale di umidità relativa) per 10 s.
Se la funzione non è disponibile, la pressione del tasto SU ()provocherà
la visualizzazione dellindicazione " ---- " per 1 s.
SET POINT, permette di accedere alla funzione di modifica del set point.
FUNZIONAMENTO
Esistono i seguenti stati di funzionamento:
lo stato "on" (lo strumento e alimentato ed è acceso)
lo stato "stand-by" (Io strumento è alimentato ma e spento via software)
lo stato "off": per metterlo in stato “off” è necessario spegnere
l’interrutore a monte o scollegarlo dall’alimentazione.
NON ESEGUIRE NESSUNA MANUTENZIONE QUANDO
L’APPARECCHIATURA È IN ON O IN STAND BY.
DISINSERIRLO DALLA RETE DI ALIMENTAZIONE ELETTRICA.
Se lo strumento e acceso, durante il normale funzionamento il display
visualizzerà la temperatura della cella.
In alternativa è possibile visualizzare il valore della sonda evaporatore (se
presente) tenendo premuto il tasto DOWN ()per 2 s; tenere premuto il
tasto DOWN ()per 2 s il display visualizzerà la scritta “Pb2”. Premendo il
tasto SET ()apparirà la temperatura dell’evaporatore
Dopo un breve periodo di inativittà o premendo il tasto SET brevemente si
tornerà alla visualizzazione della temperatura della cella.
IMPOSTAZIONE DEL SET POINT
• premere e rilasciare il tasto SET(): il LED compressore Iampeggerà
• premere e rilasciare il tasto UP ()o il tasto DOWN ()entro 15 s.
• premere e rilasciare il tasto SET()o non operare per 15 s il LED
compressore si spegnerà, dopodiché lo strumento uscirà dalla
procedura.
FUNZIONI HACCP DI BASE
Lo strumento è in grado di memorizzare fino a 3 allarmi HACCP.
Lo strumento fornisce le seguenti informazioni:
• il valore critico
• la durata deII’aIIarme (da 1 min a 99 h e 59 min, parziale se I’aIIarme è
in corso).
COD.
TIPO DI ALLARME
VALORE CRITICO
AL
allarme temperatura di
minima
la minima temperatura della cella
durante un allarme di questo tipo
AH
allarme temperatura di
massima
la massima temperatura della cella
durante un allarme di questo tipo
Id
allarme ingresso micro
porta
la massima temperatura della cella
durante un allarme di questo tipo
Lo strumento aggiorna le informazioni se il nuovo evento è più critico di
quello in memoria o a condizione che Ie informazioni siano già state
visualizzate.
Se lo strumento è spento, non verrà memorizzato alcun allarme.
Quando la causa che ha provocato l’allarme scompare, il display ripristina il
normale funzionamento.
II LED HACCP fornisce informazioni riguardanti lo stato della memoria degli
allarmi HACCP;
VISUALIZZAZIONE DELLE
INFORMAZIONI DEGLI ALLARMI HACCP
• premere il tasto DOWN ()per 2 s: il display visualizza la prima Iabel.
• premere e rilasciare il tasto UP ()o il tasto DOWN ()per
selezionare "LS"
• premere e rilasciare il tasto SET (): il display visualizzerà uno dei
codici riportati nella tabella precedente
Per selezionare un allarme:
• premere e rilasciare il tasto UP ()o il tasto DOWN ()(p.e. per
selezionare "AH").
Per visualizzare le informazioni riguardanti |’allarme:
• premere e rilasciare il tasto SET (): il LED HACCP smettera di
lampeggiare e il display visualizzerà in successione le seguenti informazioni
(per esempio):
INFORMAZ.
SIGNIFICATO
8,0
il valore critico è di 8,0 °C/8 °F
Dur
il display sta per visualizzare la durata dell’allarme
h01
l’allarme è durato 1 h (continua ...)
n15
l’allarme e durato 1 h e 15 min
AH
l'allarme selezionat
o
Per uscire dalla successione di informazioni:
• premere e rilasciare il tasto ON/STAND-BY(): il display visualizzerà
l’allarme selezionato (nell’esempi0 "AH3").
Per uscire dalla procedura:
• uscire dalla successione di informazioni
• premere e rilasciare il tasto UP ()o il tasto DOWN () fino a quando
il display visualizza là temperatura della cella o non operare per 60 s.
In alternativa uscire dalla successione di informazioni
• premere e rilasciare il tasto ON/STAND-BY().
Se lo strumento non ha alcun allarme in memoria, la label "LS" non verra
visualizzata.

16 ITALIANO Istruzioni originali / Original instructions
16
Pulizia, manutenzione
I SEGUENTI AVVISI SONO PARTICOLARMENTE
IMPORTANTI NEL CASO IN CUI IL FLUIDO
REFRIGERANTE UTILIZZATO SIA DI TIPO R290
(vedi il riferimento 13 a pagina 2 del presente
manuale e la targhetta tecnica dell’apparecchio)
MANTENERE LIBERE DA OSTRUZIONE LE APERTURE DI
VENTILAZIONE NELL'INVOLUCRO DELL'APPARECCHIO O
NELLA STRUTTURA DA INCASSO.
NON USARE DISPOSITIVI MECCANICI OD ALTRI MEZZI PER
ACCELERARE IL PROCESSO DI SBRINAMENTO DIVERSI DA QUELLI
RACCOMANDATI DAL COSTRUTTORE.
NON DANNEGGIARE IL CIRCUITO DEL REFRIGERANTE
NON USARE APPARECCHI ELETTRICI ALL'INTERNO DEGLI
SCOMPARTI PER LA CONSERVAZIONE DEI CIBI CONGELATI
DELL'APPARECCHIO, SE QUESTI NON SONO DEL TIPO
RACCOMANDATO DAL COSTRUTTORE
Questa sezione è dedicata all'utilizzatore finale ed è
estremamente importante per il regolare funzionamento nel
tempo dell'apparecchio.
Poche operazioni eseguite con scrupolo e periodicamente
possono evitare di dover ricorrere a interventi di personale
specializzato.
Le operazioni da effettuare non richiedono conoscenze
tecniche particolari
IMPORTANTE
PRIMA DI DAR CORSO A QUALSIASI OPERAZIONE DI
MANUTENZIONE O PULIZIA DELL'APPARECCHIO
DISINSERIRLO DALLA RETE DI ALIMENTAZIONE ELETTRICA.
ATTENZIONE
NON LAVARE L’APPARECCHIO CON GETTI D’ACQUA DIRETTI E AD
ALTA PRESSIONE.
EVITARE DI INDIRIZZARE L’ACQUA SULLE PARTI ELETTRICHE.
PULIZIA
La necessità di effettuare la pulizia dell’apparecchiatura
dipende in gran parte dalla frequenza di utilizzo. Osservare
l’utilizzo e programmare le operazioni di pulizia necessarie.
Per pulire l’interno e l’esterno, utilizzare un detergente
neutro o leggermente alcalino. Si consiglia di pulire
saltuariamente l’interno con un disinfettante. Le impurità
possono essere rimosse con un panno umido. La rimozione
dei ripiani facilita la pulizia dell’interno.
Non usare mai oggetti metallici per pulire l’apparecchiatura;
essa potrebbe venir danneggiata.
Per effetturare una pulizia interna più accurata è necessario
rimuovere le guide supporto griglie
IMPORTANTE
EVITARE L’USO DI SOSTANZE DETERGENTI O SISTEMI DI PULIZIA
AGGRESSIVI CHE NE POSSANO COMPROMETTERE L’INTEGRITÀ.
MANUTENZIONE ORDINARIA
BATTERIA CONDENSANTE
È importante che la batteria sia in grado di offrire il massimo scambio
termico. .
Rimuovere con l'ausilio di un aspirapolvere, di un pennello o
di una spazzola non metallica tutte le impurità tipo carta e
polveri che possono essersi depositate sulla superficie della
batteria evitando accuratamente di piegare o danneggiare le
alette o le pale del motoventilatore.
In caso di presenza di pannello filtrante, rimuoverlo e pulirlo.
Al termine riposizionarlo nella posizione iniziale. Se
danneggiato o troppo intasato, richiedere il ricambio e
sostituirlo.
Non rispettare queste norme può provocare gravi danni al circuito
frigorifero od ai prodotti contenuti nell’apparecchiatura.
GUARNIZIONI PORTA
Verificare l’integrità delle guarnizioni della porta: è di fondamentale
importanza che sia garantita una perfetta tenuta.
CAVO DI ALIMENTAZIONE
Verificare che il cavo di alimentazione che collega
l'apparecchio alla presa non presenti lacerazioni,
screpolature o alterazioni tali da comprometterne
l’isolamento. Se il cavo di alimentazione è danneggiato, esso
deve essere sostituito dal costruttore o il suo servizio
assistenza tecnica o comunque da una persona con
qualifica similare.
Un cavo elettrico daneggiato potrebbe essere causa di incendio, scossa
elettrica od infortunio.
FERMATE PROLUNGATE
In caso di prolungata inattività procedere come di seguito specificato:
Spegnere l’apparecchiatura e staccare il cavo di alimentazione;
Vuotare l’apparecchio e procedere alla sua pulizia come descritto alla
voce PULIZIA.
Lasciare le porte socchiuse onde evitare la formazione di cattivi odori.
Proteggere dalla polvere il gruppo compressore.
SOSTITUZIONE LAMPADA [ TRANNE
MODELLI PORTE VETRO ]
Per la sostituzione della lampadina è necessario seguire le seguenti
istruzioni (il tipo della lampadina è indicato in una etichetta adesiva):
• Spegnere l’apparecchiatura e staccare il cavo di alimentazione;
• Aprire la porta e togliere il vetrino di protezione della lampadina;
• Svitare la lampadina posta all’interno del cruscotto e sostituire con una
nuova di uguale caratteristiche;
• Riposizionare il vetrino di protezione.
MASSIMO CARICO DELLE GRIGLIE
FORNITE DOTAZIONE (DOVE PREVISTE)
LE GRIGLIE FORNITE IN DOTAZIONE SONO ADATTE A
SOPPORTARE UN CARICO MASSIMO DI 50 kg CIASCUNA.
IL CARICO DEVE ESSERE DISTRIBUITO IN MODO UNIFORME
SULLA GRIGLIA, POSIZIONATO IN MODO DA NON OSTRUIRE
LA VENTILAZIONE NELL'APPARECCHIATURA.

Istruzioni originali / Original instructions ITALIANO 17
17
Parametri e ricerca guasti
IL DISPLAY
Se lo strumento è acceso, durante il normale funzionamento il display
visualizzerà la grandezza stabilita con il parametro P5:
• se P5 = 0, il display visualizzerà la temperatura della cella
• se P5 = 1, il display visualizzerà il setpoint di lavoro
• se P5 = 2, il display visualizzerà la temperatura dell’evaporatore
• se P5 = 3, il display visualizzerà “temperatura della cella – temperatura
dell’evaporatore”
VISUALIZZAZIONE DELLA
TEMPERATURA DELLA CELLA
• premere DOWN ()per 2 s: il display visualizzerà la prima label
disponibile
• premere UP () o DOWN () per selezionare “Pb1”
• premere SET ()
Per uscire dalla procedura:
• premere SET () o non operare per 15 s
• premere ON/STAND-BY() o non operare per 60 s.
Se durante il normale funzionamento il display visualizza la temperatura
della cella (parametro P5 = 0), la label “Pb1” non verrà visualizzata.
VISUALIZZAZIONE DELLA
TEMPERATURA DELL’EVAPORATORE
• premere DOWN ()per 2 s: il display visualizzerà la prima label disponibile
• premere UP ()o DOWN () per selezionare “Pb2”
• premere SET ()
Per uscire dalla procedura:
• premere SET () o non operare per 15 s
• premere ON/STAND-BY()o non operare per 60 s.
Se la sonda evaporatore non è abilitata (parametro P3 = 0), la label “Pb2”
non verrà visualizzata.
IMPOSTAZIONE DEI PARAMETRI
Per accedere alla procedura:
• premere UP ()e DOWN () per 4 s: il display visualizzerà “PA”
• premere SET ()
• premere UP ()o DOWN () entro 15 s per impostare “-19”
• premere SET ()o non operare per 15 s
• premere UP ()e DOWN () per 4 s: il display visualizzerà “SP”.
Per selezionare un parametro:
• premere UP ()o DOWN ()
Per modificare un parametro:
• premere SET ()
• premere UP ()o DOWN () entro 15 s
• premere SET ()o non operare per 15 s.
Per uscire dalla procedura:
• premere UP ()e DOWN () per 4 s o non operare per 60 s.
Interrompere l’alimentazione dello strumento dopo la modifica dei parametri.
ERRORI
CODICE
Significato
Rimedio
Pr1
Errore sonda cella
si veda il parametro P0;
verificare l’integrità della sonda e
verificare il collegamento strumento-sonda;
verificare la temperatura della cella
Conseguenze:
l’attività del compressore dipenderà dai parametri C4 e C5
Pr2
Errore sonda evaporatore
gli stessi del caso precedente ma relativamente alla sonda evaporatore
Conseguenze:
se il parametro P3 è impostato a 1, lo sbrinamento durerà il tempo
stabilito con il parametro d3;
se il parametro P3 è impostato a 1 e il parametro d8 è impostato a 2, lo
strumento funzionerà come se il parametro d8 fosse impostato a 0;
se il parametro F0 è impostato a 3 o 4, lo strumento funzionerà
come se il parametro fosse impostato a 2.
Quando la causa che ha provocato l’allarme scompare, lo strumento
ripristina il normale funzionamento.
GUASTI
Nel caso di un mal funzionamento dell’apparecchiatura, controllare il
seguente elenco per verificare se è possibile rimetterla in funzione senza
l’intervento dell’assistenza; resta inteso che quanto riportato non copre
totalmente la casistica delle possibilità.
L'intervento di un dispositivo di sicurezza indica anomalia di funzionamento;
prima di ripristinare verificare ed eliminarne la causa.
Se il difetto persiste rivolgetevi all’assistenza tecnica ricordandovi di
segnalare la natura del difetto, il codice ed il numero di matricola
dell’apparecchio che si possono rilevare dalla targhetta tecnica situata
all’interno dello stesso.
PROBLEMA
Possibile causa
Intervento
1L’APPARECCHIO NON PARTE
1.1
L’apparecchio non e collegato correttamente all’alimentazione
Controllare che la spina sia inserita correttamente nella presa
della corrente
2IL COMPRESSORE SI ARRESTA RARAMENTE
2.1
La temperatura del locale è troppo elevata
Aerare opportunamente il locale
2.2
Il condensatore del frigorifero è sporco
Controllarlo e pulirlo accuratamente ed a periodi regolari.
2.3
La carica del refrigerante è scarsa
Rivolgersi ad un centr
o assistenza competente per individuare e
la riparare le perdite ed eseguire la ricarica
2.4
Le guarnizioni porta/e sono poco efficienti
Se non è possibile ripristinare la funzionalità, rivolgersi ad un
centro assistenza competente per l’eventuale sostituzione
2.5
L’evaporatore si impacca
Non ntrodurre derrate calde e con alto contenuto d’acqua e alla
occorrenza eseguire uno sbrinamento manuale
2.6
Il motoventilatore non funziona correttamente
Rivolgersi ad un centro assistenza competente per l’eve
ntuale
sostituzione
3TRACIMAZIONE DELLA BACINELLA AUTOEVAPORANTE
3.1
Introduzione frequente di derrate calde e con alto contenuto d’acqua
Non introdurre derrate calde e con alto contenuto d’acqua
3.2
Aperture porte e/o cassetti troppo frequenti
Pre
stare attenzione alle condizioni di impiego della
apparecchiatura
4TEMPERATURA DELLA CELLA INSUFFICIENTE
4.1
Il condensatore del frigorifero è sporco
Controllarlo e pulirlo accuratamente ed a periodi regolari.
4.2
Scarsa aerazione della zona adiacent
e al vano tecnico
Togliere eventuali ostruzioni.
4.3
Ingresso di aria calda nella cella
Controllare che la porta chiuda correttamente e che la
guarnizione sia funzionale. Se non è possibile ripristinare la
funzionalità, rivolgersi ad un centro assistenza competente per
l’eventuale sostituzione e regolazione
4.4
L’evaporatore è impaccato
Eseguire uno sbrinamento manuale

18 FRANCĄIS Traduction de la notice originale
18
Description fonctionelle. reception et elimination de
l’appareil
UTILISATION AUTORISÉE
L’appareil n’est pas destiné à l’emploi de la part de
personnes (enfant compris) ayant des capacités psychiques
ou moteur réduites, ou ayant peu d’expérience et de
connaissances, sauf si c’est sous la supervision d’une
personne responsable de leur sécurité au cours de l’emploi
de l’appareil
Les enfants doivent être surveillés pour s’assurer qu’ils ne
jouent pas avec l’appareil
Les appareils sont conçus pour être installés à l’intérieur et
doit être employé exclusivement pour la conservation de la
nourriture et des boissons.
La construction de l’appareil et la capacité du groupe de
condensation ont été conçues exclusivement pour la
conservation de produits pré-réfrigérés.
Ne jamais introduire de liquides ou d’aliments chauds dans
l’appareil et ne pas remplir jusqu’au ras les récipients munis
d’un couvercle.
Ne jamais ranger de boissons gazeuses dans le
compartiment à basse température : elles pourraient
exploser.
Tous les appareils comportent des surfaces qui se couvrent
de givre. Suivant le modèle, ce givre peut être éliminé
automatiquement (dégivrage automatique) ou manuellement.
Ne jamais tenter d’éliminer le givre à l’aide d’un objet pointu.
Sous peine d’endommager l’appareil de manière irrémédiable.
Le fabricant décline toute responsabilité (avec annulation de
la garantie) en cas de modifications électriques et/ou
mécaniques.
CONTROLE A LA RECEPTION
Contrôler à l’arrivée que l’appareil n’ait pas été endommagé pendant le
transport et qu’il présente toutes les parties mentionnées dans la
commande.
En cas de dommages visibles, indiquer immédiatement sur
le document de transport le défaut en ajoutant le
commentaire: “RETRAIT SOUS RESERVE POUR
DOMMAGES VISIBLES SUR L’EMBALLAGE”.
TOUTES LES OPERATIONS CITEES CI-APRES
CONCERNANT LES EQUIPEMENTS ET LES MODALITES
OPERATIONNELLES DOIVENT ETRE EFFECTUEES
CONFORMEMENT AUX REGLES DE SECURITE EN VIGUEUR.
AVANT DE DEPLACER OU SOULEVER UN
APPAREIL, S’ASSURER QUE LA CAPACITE DE
LEVAGE CONVIENT AU POIDS DE L’APPAREIL.
MANUTENTION
MANUTENTION avec CHARIOT ELEVATEUR ou SIMILAIRE.
Introduire les fourches à l’avant ou à l’arrière du socle en bois de
l’appareil.
Soulever le tout en s’assurant que l’appareil est en équilibre parfait.
PENDANT LES OPERATIONS DE MANUTENTION, NE PAS
RETOURNER NI RENVERSER L’APPAREIL.
S’IL FAUT TRASPORTER L’APPAREIL EN HORIZONTALE;
ATTENDRE AU MOINS 2 HEURES AVANT DE METTRE EN
FONCTION.
MANUTENTIONNER L’APPAREIL AVEC LE PLUS GRAND
SOIN ET L’INSTALLER DANS UN ENDROIT SEC
EVITER ABSOLUMENT D’INSTALLER D’AUTRES OBJETS
AU-DESSUS DE L’APPAREIL.
DEBALLAGE
Emballage en carton
Couper les feuillards de fermeture à l’aide de ciseaux.
Soulever le carton d’emballage (faire également glisser simultanément
les coins de protection).
Emballage en bois
Déclouer les panneaux en bois en commençant du frontal et du
supérieur.
Emballage en nylon
Après avoir enlevé le ruban adhésif de fixage, enlever la protection en
nylon en nylon en l’enlevant de la partie supérieure de l’appareil.
Soulever l’appareil pour le dégager du socle.
Poser l’appareil au sol en correspondance du point prévu pour
l’installation.
Vérifier s’il y a des dommages visibles.
Ne pas laisser les éléments de l’emballage à la portée des enfants car
ils représentent un danger évident.
Éliminer les éléments d’emballage en les amenant dans des centres
spécialisés pour le recyclage ( s’en tenir aux normes en vigueur ).
Vérifier que le numéro de série correspond au numéro
mentionné sur le document d’accompagnement.
NIVEAU DE BRUIT
Le niveau de pression acoustique d'émission pondéré A aux
postes de travail est inférieur à 70 dB (A).
MISE AU REBUT DE L’APPAREIL
Nos appareils contiennent un fluide frigorigène conforme au
règlement (CE) n° 2037/2000 du 29 juin 2000, mentionné sur la
plaquette signalétique ; par ailleurs, l’appareil est constitué
d’éléments et de matériaux réutilisables ou recyclables.
Au terme de son cycle de vie, l’appareil doit être remis à des
centres de traitement écologique.
Déposer la porte représente la meilleure manière de
s’assurer que personne ne puisse rester enfermé
accidentellement à l’intérieur.
L’appareil ne doit pas être mis au rebut avec les déchets
urbains et la ferraille.
Eviter d’endommager le circuit frigorifique, notamment à
proximité de l’échangeur.
LE REGLES LOCALES EN VIGUER POUR LA
MISE A LA FERRAILLE DE CE GENRE
D’APPAREILS

Traduction de la notice originale FRANCĄIS 19
19
Mise en service
IMPORTANT
AVANT DE BRANCHER L’APPAREIL, S’ASSURER QUE LES DONNEES DE LA PLAQUETTE
SIGNALETIQUE CORRESPONDENT A CELLES DU RESEAU ELECTRIQUE.LA PLAQUETTE
SIGNALETIQUE MENTIONNANT LES DONNEES ELECTRIQUES NECESSAIRES A L’INSTALLATION
EST PLACEE SUR LA HANCHE DROITE DE LA CELLULE.
Une alimentation électrique ne corrigée pas pourrait être cause d'incendie, secousse électrique ou accident.
L’INSTALLATION DOIT ETRE EFFECTUEE SELON LES INSTRUCTIONS MENTIONNEES DANS CE
CHAPITRE DE LA PART DE TECHNICIENS QUALIFIES.
L’APPAREIL EST RELIE A UNE PRISE DE TERRE EFFICACE CONFORMEMENT AUX NORMES DE
SECURITE ELECTRIQUE EN VIGUEUR.
Une messe à la terre défectueuse serait cause de court-circuit ou secousse électrique dans le cas de mauvais fonctionnement.
L’APPAREIL DOIT ETRE EGALEMENT INSERE A L’INTERIEUR D’UN SYSTEME EQUIPOTENTIEL
DONT L’EFFICACITE DEVRA ETRE CONFORME AUX NORMES EN VIGUEUR.
IL EST INTERDIT D’UTILISER DES ADAPTATEURS, DES PRISES MULTIPLES, ET/OU DES RALLONGES.
CONTROLES PRELIMINAIRES
Vérifier que le plan d’appui puisse supporter le poids de
l’appareil et qu’il soit de niveau;
Niveler l'appareil à l'aide d'un niveau à bulle. Agir, le cas échéant,
sur la partie mobile des pieds réglables jusqu’à avoir un
alignement parfait: Tousles pieds doivent reposer sur le sol.
Utiliser de préférence un bon niveau. La déviation maximale
autorisée pour le plan horizontal est de +/- 0,5 degrés.
Il compromet la stabilité de l'appareillage et il peut en causer la chute.
Le fonctionnement correct des portes pourrait être compromis.
Laisser un espace libre d’au moins 50 mm sur les côtés e
tau moins de 500 mm sur la partie supérieure.;Ne pas
installer l’appareil à proximité de sources de chaleur ou
dans des endroits exposés au rayonnement solaire direct.
Ne pas empêcher la libre circulation de l’air du moteur.
Ne pas respecter ces règles il peut provoquer dommages graves au
circuit frigorifique ou aux produits contenu dans l'appareillage.
En cas de déplacement de l’appareil, il est nécessaire
d’attendre un certain temps avant de le remettre en marche.
Sur tout si la manutention a été effectué avec l’appareil en
position pas vertical, il faut attendre au moins 2 heures.
Enlever le plastique qui protège les surfaces extérieures; laver
son intérieur à l’eau tiède et savon neutre.
Garder les clés de fermeture (si disponibles) hors de portée
des enfants.
CONTRÔLES DE LA PARTIE
ÉLECTRIQUE ET MISE EN SERVICE
La valeur de la tension et de la fréquence du secteur doit
correspondre à celle indiquée sur la plaque de matricule de
l’appareil (point 6 du paragraphe " PLAQUE SIGNALÉTIQUE").
Une alimentation électrique ne corrigée pas pourrait être cause
d'incendie, secousse électrique ou accident.
Installer un fusible de 16A en amont de la prise.
Ramener l’interrupteur général, auquel il faudra brancher la
prise du câble d’alimentation, sur la position ETEINT (OFF).
CET APPAREIL DOIT ETRE BRANCHE AU RESEAU D’
ALIMENTATION à L’AIDE DE LA PRISE FOURNIE EN DOTATION.
LORSQUE L’APPAREIL A ETE INSTALLE, LA PRISE DOIT ETRE
FACILEMENT ACCESSIBLE
Vérifier la compatibilité de la prise femelle avec la prise mâle de
l’appareil. Le cas échéant, faire remplacer la prise femelle par
une autre adéquate par un personnel professionnel qualifié. Ce
dernier devra même s’assurer que la section des câbles de la
prise est appropriée à la puissance absorbée par l’appareil.
Après avoir effectué soigneusement toutes ces opérations,
mettre l’appareil en marche:
Amener l’interrupteur général auquel est reliée la fiche du
câble d’alimentation sur la position ON.
Amener l’interrupteur de l’appareil sur la position ON.
Après une minute, le compresseur démarre et la température
interne se réglera par rapport à la valeur programmée en usine.
Ne pas charger l’appareil tant que la température n’a pas
atteint la valeur programmée.
S’il devait se rendre nécessaire de modifier les paramètres
programmés en usine, lire les instructions fournies dans le
chapitre " PANNEAU DE COMMANDE"
AVANT D’INTRODUIRE LES ALIMENTS, AMENER
L’APPAREIL A LA BONNE TEMPERATURE.
JAMAIS SUPERER LE LIMITE DE CHARGEMENT INDIQUE
PAR L’ADHESIF A’ L’INTERIEUR DE LA CHAMBRE .
FONCTIONNEMENT
La conservation correcte des denrées alimentaires est un élément
fondamental dans la production hygiénique et sûre des aliments ; par
ailleurs, elle optimise les activités gastronomiques et contribue à
réduire la consommation d’énergie. Pour obtenir le meilleur rendement
de l’appareil, respecterlesinstructions fournies ci-dessous.
Les produits doivent toujours être conservés sur les étagères ; ne
pas charger de produits au fond du compartiment réfrigéré.
LES PRODUITS DOIVENT ÊTRE CHARGÉS DANS L’APPAREIL
DE MANIÈRE À PERMETTRE LE LIBRE PASSAGE DE L’AIR.
LAISSERDES ESPACES LIBRES ENTRE LES PRODUITS ET NE
JAMAIS LES METTRE EN CONTACT DIRECT AVEC LES CLOISONS. SI
BESOINEN EST, MODIFIER LA DISTANCE ENTRE LES ÉTAGÈRES.
This manual suits for next models
7
Table of contents
Languages:
Other KBS Commercial Food Equipment manuals

KBS
KBS Mafirol Cronus 1250 User manual

KBS
KBS Stalgast 9705100 User manual

KBS
KBS NGWT 3-55/SN Manual

KBS
KBS Proxima M Series Quick start guide

KBS
KBS NGWT 7-55/SN Manual

KBS
KBS Tecfrigo FISHING 4 Guide

KBS
KBS 40700001 User manual

KBS
KBS TP-12/E Manual

KBS
KBS Friulinox P 604 User manual

KBS
KBS NGETL 5-50 CE Manual