Kedacom ZCS-KDCA1 User manual

Quick Start Guide
快速安装指南
Data Docking Station
执法数据采集设备

一、前言
感谢您购买我司产品,如对本公司产品有疑问或需要,请随时和我们联系。我们尽最大努力来保证
本手册信息的正确性,如因升级等原因发生信息修改,恕不另行通知。
本手册中的产品外观图仅供参考,请以实物为准。
如需获取最新文档,请至官网下载,官网地址www.kedacom.com。
二、安全说明
此手册的目的是确保用户正确使用本产品,以避免危险或财产损失。在使用产品之前,请认真阅读
此手册并妥善保存以备日后参考。如果用户因没有按照以下安全说明,致使设备不能正常使用或损
坏等情况,我司概不负责,感谢您的配合。
Ÿ设备使用过程中若遇到任何问题,请及时与当地服务中心联系。请勿以任何方式拆卸或修改设备。
Ÿ请勿将任何物品摔落到设备上或强烈敲击设备。
Ÿ避免将产品暴露在非用户手册所示的工作环境下使用。
Ÿ请您确保设备在允许的温度及湿度范围内工作,避免将设备置于挤压、振动、潮湿、多尘、极热、
极冷、强电磁辐射等的场所或场景。
Ÿ使用时不可让水或任何液体流入设备。安装时请严格遵守防水要求,因未做好防水而引起的设备进
水故障,我司概不负责。
Ÿ运送设备时,请重新以出厂时的包装进行包装,或用等品质的材质包装。
Ÿ需要替换部件时,请事先与经销商联系,更换指定型号的部件,或与原部件具有相同特性的部件。
擅自使用其他部件进行替换,后果将由您自行负责。
Ÿ一般情况下,本设备安装在室内,请确保设备连接处采取有效的防潮气措施(特别是设备连接处的
螺钉必须拧紧,确保整体密封性)。为防止雷击,请安装避雷器。
Ÿ本手册能作为多个型号产品的使用指导,但不一一列举每个产品的使用情况,请您根据实际产品自
行对照。
Ÿ本公司保留在没有任何通知或者提示的情况下对本手册内容进行修改的权利,但并不确保手册内容
完全没有错误。
【注意】用错误型号电池更换会有爆炸危险,务必按照说明处置用完的电池。
1

三、安装设备
检查安装环境
2
工作环境
工作电压
额定电压AC100V—240V~50/60HZ(宽电
压),7*24小时不间断工作
功耗
<250W
温湿度
工作温度
-10ºC~55ºC
相对湿度
10%~95%RH(无冷凝)
用4颗螺丝将硬盘固定到硬盘支架上,最多可装3块硬盘,如下图所示。
1. 安装硬盘
图1 安装硬盘
硬盘支架
硬盘
硬盘支架
硬盘

3. 安装主模块
1) 在A1、A2、A3、A4所示的十字光标处用钻头打孔(直径约为8mm),并敲入膨胀螺管(共4颗)。
【注意】主模块右边区域为硬盘抽拔区,挂置在距离墙边或其他障碍物≥400mm处。
主模块与扩展坞背面右上角都有拨码开关并贴有调节开关的信息标签,标签信息如下表。确认安装
时,需先按照指示调整拨码开关。例如:主模块安装之前,将SW1和SW2的开关均调至OFF状态。
SW1
SW2
备注
OFF
OFF
主模块(A)
OFF
ON
扩展坞(B)
ON
OFF
扩展坞(C)
ON
ON
扩展坞(D)
2. 拨码设置
安装时左边缘
对齐参考线
图2 确定打孔位置
A1 A2
A3 A4
430mm
510mm
320mm
95mm
240mm
3

4
2) 在A1、A2、A3、A4处的膨胀螺管上锁上自攻螺栓,螺栓预留5-10mm长度暴露在外。
图3 固定螺栓
5-10mm
自攻螺栓
3) 将设备的左侧与安装提示参考线对齐,将设备举高往下放置使葫芦孔卡进螺丝。
图4 安装主模块
对齐
安装提示
参考线
墙面
螺孔
主模块

1) 在字母A1、A2所示的十字光标处用钻头打孔(直径约为8mm),然后敲入膨胀螺管(共2颗)。
4. 安装扩展坞
A1
A2
510mm
320mm
78mm
95mm 95mm
207mm
安装时上边缘对齐参考线
安装时左边缘
对齐参考线
图5 确定打孔位置
5

定位柱 定位孔
扩展坞
主模块
图6 安装扩展坞
对齐
6
2) 在字母A1,A2所示的膨胀螺管上锁上自攻螺栓,螺栓预留5-10mm长度曝露在外。
3) 将扩展坞的上边缘和左边缘与安装提示线对齐,此时设备后面的葫芦孔即可挂到A1,A2处的自攻
螺栓上。将设备往右推,扩展坞的定位柱即可插入主模块的定位孔,扩展坞在葫芦孔处卡紧。

本保修卡适用于您购买的本公司系列产品。
1. 终身质保,免费保修期一年,如合同中有另行约定则以合同为准。
2. 凡保修期内,由于本产品自身引起的故障,请与公司售后服务部联系。
3. 保修时我们将使用您的保修卡信息,请认真填写。
4. 以下情况,属于有偿保修范围:
- 人为原因造成的设备故障
- 因使用环境不符合本产品要求造成的故障
- 因不可抗力造成的产品损坏
- 无保修卡
- 已过保修期
用户名称:
详细地址:
传真: 电话:
邮箱: 邮编:
产品名称:
产品型号:
购买日期:

1. Preface
2.Safety Instruction
Thank you for purchasing our product. If there are any questions, or requests, please do not hesitate to contact
us. Every effort has been made to ensure the accuracy and validity of this Guide. Any update of this Guide is
subject to change without notice. Product appearance is subject to the actual products and those in the Guide
are for your reference only.
For the latest version of file, please download from our website /en.www.kedacom.com
Any problem of the device during using, please contact our local service center in time. Never attempt to
disassemble or repair the product by yourself in any way.
Do not drop any object onto the device or subject it to any physical shock.
Do not expose the device in the environment not defined in this Guide.
Please make sure the device works in specific temperature and humidity and avoid putting it at squeezing,
vibrating, damp, dusty, extremely hot or cold places or place with strong electromagnetic radiation.
Keep the camera away from water or any liquid. Please strictly follow the waterproofing request during
installation. We shall not be responsible for any malfunction of water leakage caused by failure of
waterproofing.
While shipping the device, pack it in the factory packing or use materials with equivalent quality.
When it is necessary to replace a part, please contact your dealer in advance and replace the part with
specified model or part with same features. We shall not assume any responsibility for problems caused by
unauthorized replacement.
The intention of writing this Guide is to ensure that user can use the product correctly to avoid danger or
property loss. Please read this Guide carefully before using, and keep it properly for future reference. If the
product cannot work normally or is damaged because the user does not follow the safety instructions, we shall
not assume any responsibility. Your cooperation will be highly appreciated.
1
When it is necessary to replace a part, please contact your dealer in advance and replace the part with
specified model or part with same features. We shall not assume any responsibility for problems caused by
unauthorized replacement.
Usually, the device is installed indoor, so please make sure that the connection parts have been
efficiently made dampproof, especially that the screws at connection parts must be tightened up to ensure the
general tightness. Please install a lightning arrester to prevent lightning stroke.
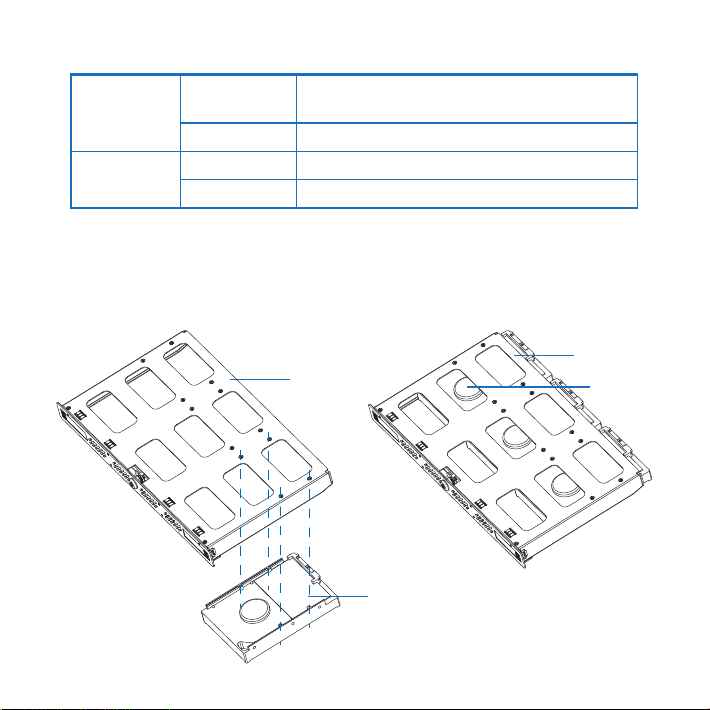
This Guide is made as reference for multiple models but it will not list their installations one by one. Please refer
to it according to the actual model by yourself.
This company reserves the right to modify the content of the Guide without any notice or prompt, but we do not
assure that all the content is completely correct.

3. Preparation
Check the installation environment
Rated voltage: AC100V - 240V ~ 50/60HZ (wide voltage),
non-stop working of 7*24hrs
2
Working Voltage
Power Consumption
Working
Environment
Temperature and
Humidity
Working Temperature
Relative Humidity
<250W
-10 °C ~ 55 °C
10% ~ 95%RH (non-condensing)
1) Install Hard Disk
Picture 1 Install hard disks
Hard disk holder
Hard disk
Hard disk holder
Hard disk
Fix the hard disk onto the hard disk holder with 4 screws. Max 3 hard disks can be mounted, as shown below.

3
3) Install Main Module
(1) Drill holes with a drill (diameter of 8mm) at the cross cursor of letters (A1, A2, A3 and A4) and then strike the
expansion screw tubes into the holes (4pcs in total).
[Notice] The right part on the main module is for inserting hard disks, so when hanging it, reserve at least
400mm distance from it to the wall or other obstacles.
There are dial switches and tags at the top right corner on the back of the main module and the docks. The tags
are indicated below. When installing the device, please adjust the dial switches according to the instructions.
For example, before installing the main module, dial both SW1 and Sw2 switches to OFF.
SW1
SW2
Note
OFF
OFF
Main module (A)
OFF
ON
Dock (B)
ON
OFF
Dock (C)
ON
ON
Dock (D)
2) Dial Switch Setting
Alignment reference
line at left edge
Picture 2 Confirm hole positions
A1 A2
A3 A4
430mm
510mm
320mm
95mm
240mm

4
(2) Lock the tapping screw bolts on the expansion screw tubes at A1, A2, A3 and A4, reserving 5-10mm distance
of the screw bolts external.
Picture 3 Fix screw bolts
Tapping screw bolt
(3) Align the left side of the device to the reference lines for installation. Place the device downward from the
top and lock the hardy holes into the screws.
Picture 4 Install main module
Align
reference
line for
installation
Wall
screw
holes
Main
module

5
(1) D rill holes with a drill (diameter of 8mm) at the cross cursor of letters (A1 and A2) and then strike the
expansion screw tubes into the holes (2pcs in total).
4) Install Docks
A1
A2
510mm
320mm
78mm
95mm 95mm
207mm
Picture 5 Confirm hole position
Alignment reference line at top edge for installation
Alignment reference line
at left edge for installation

6
Location
column
Location
hole
Dock
Main module
Picture 6 Install docks
Align
(2) Lock the tapping screw bolts on the expansion screw tubes at A1 and A2, reserving 5-10mm distance of the
screw bolts external.
(3) Align the top and the left sides of the dock to the reference lines for installation and thus the hardy holes at
the back of the device will be able to hang on the tapping screw bolts at A1 and A2. Push the device to the right
and the location columns will be able to insert into the location holes on the main module and the dock can be
locked tight at the hardy holes.

WHAT IS COVERED BY THIS WARRANTY?
Kedacom warrants the Kedacom-branded hardware product and accessories contained in the original
packaging (hereinafter referred to as "Kedacom Product") against defects in materials and workmanship
when used normally in accordance with Kedacom's published guidelines for a period of TWO (2) YEARS from
the date of original retail purchase in areas other than mainland China by the end-user purchaser (hereinafter
referred to as "Warranty Period"). For the Kedacom Product purchased in mainland China, see the simplified
Chinese version of this warranty for details. Kedacom's published guidelines include but are not limited to
information contained in technical specifications, user guides, and service communications.
The preceding applies unless otherwise agreed in the contract.
Kedacom Two (2) Year Limited Hardware Warranty
WHAT IS NOT COVERED BY THIS WARRANTY?
This warranty does not apply to any non-Kedacom branded hardware products or any software, even if
packaged or sold with Kedacom hardware. Manufacturers, suppliers, or publishers, other than Kedacom, may
provide their own warranties to you but Kedacom, in so far as permitted by law, provides their products "AS
IS". Software distributed by Kedacom with or without the Kedacom brand (including, but not limited to system
software) is not covered by this warranty. Please refer to the licensing agreement accompanying the software
for details of your rights with respect to its use. Kedacom does not warrant that the operation of the Kedacom
Product will be uninterrupted or error-free. Kedacom is not responsible for damage arising from failures to
follow instructions relating to the Kedacom Product's use.
This warranty does not apply: (a) to consumable parts, such as batteries, unless failure has occurred due to a
defect in materials or workmanship; (b) to cosmetic damage, including but not limited to scratches, dents, and
broken plastic on ports; (c) to damage caused by use with another product; (d) to damage caused by acts
outside the control of Kedacom, including without limitation acts of God, accidents, abuse, misuse, fire,
storms, earthquakes, flood, or other external cause; (e) to damage caused by exposure of the product to heat,
bright light, sun, liquids, sand, or other contaminants; (f) to damage caused by operating the Kedacom
Product outside Kedacom's published guidelines; (g) to damage caused by service (including upgrades and
expansions) performed by anyone other than a representative of Kedacom, Kedacom employee, or
authorized Kedacom agent; (h) to an Kedacom Product that has been modified to alter functionality or
capability without the written permission of Kedacom; (i) to defects caused by normal wear and tear or
otherwise due to the normal aging of the Kedacom Product, or (j) if any serial number has been removed or
defaced from the Kedacom Product.
YOUR RESPONSIBILITIES
If your Kedacom product is capable of storing data and other information, you should make periodic backup
copies of the information contained on the storage media to protect the contents and as a precaution against
possible operational failures.
Before receiving warranty service, Kedacom or its authorized agents may require that you furnish proof of
purchase details, respond to questions designed to assist with diagnosing potential issues, and follow
Kedacom's procedures for obtaining warranty service. Before submitting your Kedacom Product for warranty
service, you should maintain a separate backup copy of the contents of its storage media, remove all personal
information that you want to protect, and disable all security passwords.

During warranty service, it is possible that the contents of the Kedacom product's storage media will be lost,
replaced or reformatted. In such an event, Kedacom and its authorized agents are not responsible for any loss
of data or other information contained on the storage media or any other part of the Kedacom product
serviced.
Following warranty service, your Kedacom Product or a replacement product will be returned to you as your
Kedacom Product was configured when originally purchased, subject to applicable updates. You will be
responsible for reinstalling all other data and information. Recovery and reinstallation of other data and
information are not covered under this warranty.
WHAT WILL KEDACOM DO IF THE WARRANTY IS BREACHED?
If during the Warranty Period, you submit a valid claim to Kedacom or an authorized Kedacom agent,
Kedacom will, at its option, (i) repair the Kedacom Product using new or previously used parts that are
equivalent to new in performance and reliability, or (ii) exchange the Kedacom Product for a refund of your
purchase price.
A Kedacom replacement part or product, including a user-installable Kedacom part that has been installed in
accordance with instructions provided by Kedacom, assumes the remaining warranty of the Kedacom Product
or ninety (90) days from the date of replacement or repair, whichever provides longer coverage for you. When
a product or part is replaced or a refund provided, any replacement item becomes your property and the
replaced or refunded item becomes Kedacom's property.
Kedacom reserves the right to refund the purchase price as its exclusive warranty remedy.
HOW TO OBTAIN WARRANTY SERVICE?
To seek warranty service, please contact a local authorized Kedacom agent. When contacting the agent via
telephone, other charges may apply depending on your location.
User Information
Complete the form below and keep for ready reference.
User Name:
Address: Postal Code:
Tel: Mobile:
Fax: E-Mail:
Product Name: Product Model:
Date of Purchase:


中国: 江苏省苏州市高新区金山路131号(215011)
Tel: +86-512-6841 8188 Fax: 86-512-68412699
Suzhou Keda Technology Co.,Ltd.
Singapore: 627A Aljunied Road, #09-07, BizTech Centre, Singapore 389842
Tel: +65-6842-5700 Fax: +65-6842-5900
05.03.800475 V1 20170120
Overseas Hotline: +86-0512-8896 9861
Other manuals for ZCS-KDCA1
1
Table of contents
Other Kedacom Docking Station manuals
Popular Docking Station manuals by other brands

Kensington
Kensington SD4782P manual

Datalogic
Datalogic 11-0139 Installation, assembly and operation manual

Unison Research
Unison Research Unison i-XT user manual

JBL
JBL JBL On Stage Micro user guide

Flight Display Systems
Flight Display Systems FDARM-IPD Installation and operation manual

Bowers & Wilkins
Bowers & Wilkins Zeppelin Air Setup guide