KEENCUT SmartFold Bench User manual

SmartFold Bench
The world’s finest cutting machines
Assembly manual
www.keencut.com
+44(0) 1536 263 158
SFB280920
All manuals and user guides at all-guides.com

All manuals and user guides at all-guides.com

Start
1
All manuals and user guides at all-guides.com

4
Section
Components
A
B
C
D
E
F
G
H
I
J
K
L
M
N
1
Part Description
Part quantities based on bench model
SFB110 SFB160 SFB210 SFB260 SFB310 SFB360 SFB410 SFB460 SFB510
Quantity Quantity Quantity Quantity Quantity Quantity Quantity Quantity Quantity
ABench edge 1 x 1320mm /
52”
2 x 890mm /
35 ¹⁄₁₆”
2 x 1140mm /
44 ⅞”
2 x 1390mm /
54 ¾”
3 x 1080mm /
42 ½”
3 x 1247mm /
49 ¹⁄₁₆”
3 x 1413mm /
55 ⅝”
4 x 1175mm /
46 ¼”
4 x 1300mm /
5 ³⁄₁₆”
BBeam1 3 x 1320mm /
52”
6 x 890mm /
35 ¹⁄₁₆”
6 x 1140mm /
44 ⅞”
6 x 1390mm /
54 ¾”
9 x 1080mm /
42 ½”
9 x 1247mm /
49 ¹⁄₁₆”
9 x 1413mm /
55 ⅝”
12 x 1175mm /
46 ¼”
12 x 1300mm /
5 ³⁄₁₆”
CBeam2 (1247mm / 49 ¹⁄₁₆”) 46668881010
DLeg 46668881010
ECantilever arm 233344455
FCantilever joiner 233344455
GLeft support plate 111111111
HRight support plate 111111111
IIntermediate support plate 011122233
JCorner bracket 20 34 34 34 48 48 48 62 62
KGrub screw 60 102 102 102 144 144 144 186 186
LWorktop fixing bracket 6 11 11 11 16 16 16 21 21
MWorktop fixing screw 6 11 11 11 16 16 16 21 21
NAdjustable foot 46668881010
All manuals and user guides at all-guides.com

5
Section
Tools included Tools not included
4mm
4mm
13mm
13mm
4mm
4mm
1
Spacer
All manuals and user guides at all-guides.com

6
Section
+
+
To prevent injury and damage, lift the boxes with 2 people.
Be careful with lifting 1
All manuals and user guides at all-guides.com

7
Section
1.5m (5’)
1.2m (4’)
1
All manuals and user guides at all-guides.com

Without cantilever
2
All manuals and user guides at all-guides.com

9
Section
4mm
x3
x1
J
K
1.
2.
Prepare the brackets
1. Insert a grub screw backwards into the bracket and screw
into place until only 2 threads are showing.
2. Insert two grub screws in from the flat face of the bracket 2
turns only.
IMPORTANT: Make the brackets for your bench using all J and K parts
supplied.
2
All manuals and user guides at all-guides.com

10
Section
4mm
1. 2.
1. Slide a corner bracket into position and place the spacer over it. Hold the spacer so it is flush with the top of
the leg. Use a straight edge to ensure that the spacer is flush with the end of the leg.
2. Initially tighten gently with the long end of the Allen key. Then remove the spacer and fully tighten with a
further 2-3 half turns using the short end of the Allen key.
IMPORTANT: These steps are essential to ensure the finished bench is rigid. The spacers must be aligned
precisely, and be flush with the ends of the leg. The screws must be tightened fully.
How to fit the brackets 2
All manuals and user guides at all-guides.com

11
Section
Unit Type Corner Leg Middle Leg 1 Middle Leg 2
SFB110 400
SFB160 / SFB210 / SFB260 4 1 1
SFB310 / SFB360 / SFB410 422
SFB460 / SFB510 4 3 3
D D D
The lower brackets can be fixed at any point along the leg as long as they are all the same distance from the upper
brackets. Use a tape measure or make a spacer from an o-cut of board as shown in purple on the corner leg arrangement.
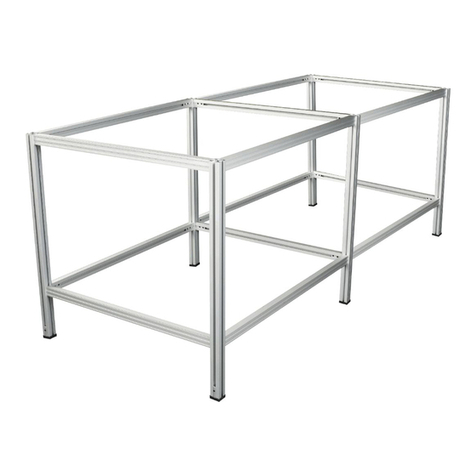
Build the legs
Add the brackets (page 9) to the leg (part D)
IMPORTANT: The brackets must be inserted into the legs in the orientation specified. If the orientation of the brackets
does not match the image above, the bench will not assemble properly.
2
Corner leg
Middle leg 1
Middle leg 2
All manuals and user guides at all-guides.com
12
Section
4mm
Attach the feet
Fix an adjustable foot into any of the four grooves at the bottom of each leg, make sure the aluminium block is flush with
the bottom of the leg. Fix the screw very tightly.
2
C
C
All manuals and user guides at all-guides.com

13
Section
Unit Number of left hand leg frames Number of intermediate leg frames Number of right hand leg frames
SFB110 101
SFB160 / SFB210 / SFB260 1 1 1
SFB310 / SFB360 / SFB410 121
SFB460 / SFB510 1 3 1
Build the leg frames
(See page 14-16 for detailed instructions)
C
C
C
C
C
C
2
Left hand leg frame
Corner Leg
Middle Leg 1
Middle Leg 2
Corner Leg
Corner Leg
Corner Leg
Right hand leg frame
Intermediate leg frame
All manuals and user guides at all-guides.com

14
Section
4mm
4mm
C
C
1. 2.
3.
1.
Take a pair of corner legs (page 11) and lay one on the floor. Place
a beam2 (part C - page 4) on each bracket. Do not tighten the
screws yet.
2. Place the second corner leg over the other end of the beams. Press
down and ensure all the beam ends are flush against the leg
3.
Tighten the screws using the 4mm Allen key supplied. There are
lots of screws, so you can save time by using a battery operated
screwdriver. Whichever method you use, fasten the screws firmly
with the Allen key.
How to build a left hand leg frame 2
All manuals and user guides at all-guides.com

15
Section
4mm
4mm
C
C
4mm
4mm
C
C
1. 2.
3.
1. Take a middle leg 1 (page 11) and lay one on the floor. Place a
beam2 (part C - page 4) on each bracket. Do not tighten the screws
yet.
2. Place middle leg 2 over the other end of the beams. Press down
and ensure all the beam ends are flush against the leg
3.
Tighten the screws using the 4mm Allen key supplied. There are
lots of screws, so you can save time by using a battery operated
screwdriver. Whichever method you use, fasten the screws firmly
with the Allen key.
How to build an intermediate hand leg frame 2
All manuals and user guides at all-guides.com

16
Section
4mm
4mm
C
C
1. 2.
3.
1.
Take a pair of corner legs (page 11) and lay one on the floor. Place
a beam2 (part C - page 4) on each bracket. Do not tighten the
screws yet.
2. Place the second corner leg over the other end of the beams. Press
down and ensure all the beam ends are flush against the leg
3.
Tighten the screws using the 4mm Allen key supplied. There are
lots of screws, so you can save time by using a battery operated
screwdriver. Whichever method you use, fasten the screws firmly
with the Allen key.
How to build a right hand leg frame 2
All manuals and user guides at all-guides.com

17
Section
4mm
4mm
C
C
1.
G
A
2.
The bench is assembled up side down then turned over when complete
Assemble the bench upside down (1/4)
1. Place a bench edge (part A - page 4), flat side down, on the floor together
with the left support plate (Part G)and left hand leg frame. Slide the parts
together.
2. Place three beams on the remaining brackets.
2
IMPORTANT: Do not tighten any screws at this stage. Details for tightening
screws on page 17.
Left hand leg frame
All manuals and user guides at all-guides.com

18
Section
I
4.
Assemble the bench upside down (2/4) 2
3.
Place an intermediate leg frame onto an intermediate support plate
(Part I) and slide so the bracket just enters 1cm into the bench edge
(Part A).
4. Align the other three beams and push the frame into position.
3.
IMPORTANT: If constructing a SFB110, substitute intermediate leg frame for
right hand leg frame.
Intermediate leg frame
All manuals and user guides at all-guides.com

19
Section
4mm
4mm
5. Tighten the remaining loose screws in this section firmly (as shown on
page 10).
6. Continue to build your bench in this way until you reach the end.
Assemble the bench upside down (3/4) 2
6.
5.
All manuals and user guides at all-guides.com

20
Section
H
A
7.
To complete your bench assembly, place a right hand leg frame onto an
right support plate (Part H) and slide so the bracket just enters 1cm into
the bench edge (Part A).
8. Align the other three beams and push the frame into position. Tighten all
screws fully, checking that there are no gaps.
Assemble the bench upside down (4/4) 2
7.
Right leg frame
8.
All manuals and user guides at all-guides.com
Table of contents
Other KEENCUT Indoor Furnishing manuals
Popular Indoor Furnishing manuals by other brands

Southern Enterprises
Southern Enterprises Ava CK437300TX Assembly instructions

Classic Exhibits
Classic Exhibits visionary DESIGNS VK-4022 Setup instructions

Yaasa
Yaasa Desk Light troubleshooting guide

on stage
on stage KB8802 quick start guide

Hooker Furniture
Hooker Furniture Duncan SS635-PHZL3-082 Assembly instruction

Safavieh Furniture
Safavieh Furniture Ellicott ACC4604A manual