KEF PSW2010 User manual

Model KHT 2005.2 Subwoofer
Type Powered Subwoofer
LF Drive Unit 1 x 250 mm (10 in.)
Frequency range 30Hz - 140Hz
Amplifier 250 Watts built in
Maximum Output (SPL) 108 dB
Low Level Signal Inputs RCA phono sockets
Low Level Signal Outputs RCA phono sockets (Actively filtered at 12dB/octave @130Hz)
Enclosure Type Sealed Box
Internal Volume 15.4 litres
Net Weight 14.5 kg (31.9 lbs)
Dimensions (H x W x D) mm 360 x 320 x 320
in. 14.2 x 12.6 x 12.6
Power Requirements 115 V ac ~, 60 Hz
230 V ac ~, 50 Hz
Power Consumption 220 VA
Cabinet Finish Silver and Black
KEF AUDIO reserve the right, in line with continuous research and development, to amend or change specifications without prior notice. E. & O.E.
(F)
Spécifications
(D)
Technische Merkmale
(I)
Specifiche
(ES)
Especificaciones
(P)
Especificações
(NL)
Technische gegevens
(DK)
Specifikationer
KEF AUDIO (UK)
Eccleston Road,Tovil, Maidstone, Kent, ME15 6QP UK
Telephone: +44 (0) 1622 672261 Fax: +44 (0)1622 750653
www.kef.com
KEF AMERICA
10 Timber Lane, Marlboro, New Jersey, 07746 USA.
Telephone: (1) 732 683 2356 Fax: (1) 732 683 2358
www.kefamerica.com
7. SPECIFICATIONS

PSW2010
Powered Subwoofer
Installation Manual
Manuel d’installation
Installationshandbuch
Manuale d’installazione
Manual de instalación
Manual de instalação
Installatie
Installationsanvisning
GB
F
D
I
ES
P
NL
DK
Part No. 290137ML
Issue 1: December 2002

FOR UK:
The mains lead is terminated with a moulded three pin plug.
Should the plug on the flexible cord not be of the type for your socket outlets do not use an adaptor but remove the plug from the cord
and discard. Carefully prepare the end of the supply cord and fit a suitable plug.
The fuse must be replaced with one of the same rating.
IMPORTANT
The wires in this mains lead are coloured in accordance with the following code:
Blue: Neutral
Brown: Live
Yellow & Green: Earth
As the colours of the wires in the mains lead of this appliance may not correspond with the coloured markings identifying the terminals in
your plug, proceed as follows:
The wire which is coloured Blue must be connected to the terminal which is marked by the letter N or coloured Black.
The wire which is coloured Brown must be connected to the terminal which is marked with the letter L or coloured Red.
FOR EUROPE:
A mains lead compatible with national earthing standards and complying with the local safety requirement is supplied.
WARNING
TO REDUCE THE RISK OF FIRE OR ELECTRICAL SHOCK, DO NOT
EXPOSE THIS APPLIANCE TO RAIN OR MOISTURE
• A combined mains power input lead and country specific mains plug
is provided.
• Check before connecting to your local mains supply that the local
supply voltage is the same as that marked on the rear panel. If it is
not, check with your supplier before proceeding.
CAUTION
RISK OF
ELECTRIC SHOCK
DO NOT OPEN
CAUTION:TO REDUCE THE RISK OF
ELECTRIC SHOCK, DO NOT REMOVE
COVER (OR BACK).
NO USER-SERVICEABLE PARTS INSIDE.
REFER SERVICING TO QUALIFIED
SERVICE PERSONNEL.
Explanation of Graphical Symbols
The lightning flash with arrowhead symbol, within an equilateral triangle, is intended to alert the user to the presence of
uninsulated “dangerous voltage” within the products enclosure that may be of a sufficient magnitude to constitute a risk of
electrical shock to persons.
The exclamation mark within an equilateral triangle is intended to alert the user to the presence of important operating and
maintenance (servicing) instructions in the literature accompanying the appliance.
SAFETY INFORMATION
WARNING:
Due to the mains switch being located on the rear panel, the apparatus must be located in an open area without anything obstructing
access to the mains switch.

Please take heed of the following before using the KHT Subwoofer. Note also that the word
“appliance” shall refer to the KHT Subwoofer, or any part of it.
1. Read Instructions – All the Safety and Operating Instructions should be read before the appliance is operated.
2. Retain Instructions – The Safety and Operating Instructions should be retained for future reference.
3. Heed Warnings – All warnings on the appliance and in the Operating Instructions should be adhered to.
4. Follow Instructions – All Operating and Use Instructions should be followed.
5. Water and Moisture – The appliance should not be used in or near water - for example, near a bathtub,
washbowl, kitchen sink, laundry tub, in a wet basement, or near a swimming pool, and the like.
6. Ventilation – The appliance should be situated so that its location or position does no interfere with its proper
ventilation. For example, the appliance should not be situated on a bed, sofa, or similar surface that may block any
ventilation openings; or placed in a built-in installation, such as a bookcase or cabinet that may impede the flow of
air through the ventilation openings.
7. Heat – The appliance should be situated away from heat sources such as radiators, heat registers, stoves or other
appliances (including amplifiers) that produce heat.
8. Power Sources – The appliance should be connected to a power supply only of the type described in the
operating instructions or as marked on the appliance.
9. Grounding or Polarisation – The precautions should be taken so that the grounding or polarisation means of
an appliance are not defeated.
10. Power-cord Protection – Power supply cords should be routed so that they are not likely to be walked on or
pinched by items placed upon or against them, paying particular attention to cords at plugs, convenience receptacles
and the point where they exit from the appliance.
11. Cleaning – The appliance should be cleaned only as recommended by the manufacturer.
12. Non-use Periods – The power cord of the appliance should be unplugged from the outlet or turn off the
“ON/OFF” switch when left unused for a long period of time.
13. Object and Liquid Entry – Care should be taken so that objects do not fall and liquids are not spilled into the
enclosure through openings.
14. Damage Requiring Service – The appliance should be serviced by qualified service personnel when:
a) The power supply cord or the plug has been damaged; or
b) Objects have fallen or liquid has been spilled into the appliance; or
c) The appliance has been exposed to rain; or
d) The appliance does not appear to operate normally or exhibits a marked change in performance; or
e) The appliance has been dropped or the enclosure damaged.
15. Servicing – The user shall not attempt to service the appliance beyond that described in the Operating
Instructions.All other servicing should be referred to qualified service personnel.
IMPORTANT SAFETY INSTRUCTIONS

(GB) Read
(F) ‘A lire’
(D) Lesen
(I) Leggere
(ES) Lea
(P) Leia
(NL) Lees
(DK) Gennemlæs
(GB) Sound changes
(F) Modifications du son
(D) Klang verändert sich
(I) Variazioni del suono
(ES) El sonido cambia
(P) Alterações de som
(NL) Veranderingen in de
weergave
(DK) Ændring af lyden
(GB) Inspect
(F) ‘A inspecter’
(D) Kontrollieren
(I) Controllare
(ES) Inspección
(P) Inspeccione
(NL) Controleer
(DK) Undersøg
(GB) Correct
(F) Correct
(D) Richtig
(I) Corretto
(ES) Correcto
(P) Correcto
(NL) Juist
(DK) Korrekt
(GB) Wrong
(F) Incorrect
(D) Falsch
(I) Errato
(ES) Incorrecto
(P) Errado
(NL) Fout
(DK) Forkert
(GB) Option
(F) Option
(D) Option
(I) Opzione
(ES) Opción
(P) Opcional
(NL) Optie
(DK) Tilbehør
(GB) Adjustment
(F) Réglage
(D) Einstellung
(I) Regolazione
(ES) Ajuste
(P) Ajuste
(NL) Instelling
(DK) Justering
(GB) Caution/Warning
(F) Attention/Avertissement
(D) Achtung / Warnung
(I) Attenzione/Avvertenza
(ES) Precaución/Atención
(P) Atenção/ Aviso
(NL) Opgelet/Waarschuwing
(DK) Forsigtigt / Advarsel
(GB) Electrical Warning
(F) Danger électrique
(D) Warnung: Gefährliche
Spannungen
(I) Rischi elettrici
(ES) Advertencia eléctrica
(P) Aviso sobre a parte
eléctrica
(NL) Opgelet! Elektriciteit!
(DK) Elektrisk advarsel
(GB) Positive/RED
(F) Positif / ROUGE
(D) Positiv / ROT
(I) Positivo / ROSSO
(ES) Positivo / ROJO
(P) Positivo/Vermelho
(NL) Positief / ROOD
(DK) Positiv / RØD
(GB) Negative/BLACK
(F) Négatif / NOIR
(D) Negativ / SCHWARZ
(I) Negativo / NERO
(ES) Negativo / NEGRO
(P) Negativo/ Preto
(NL) Negatief / ZWART
(DK) Negativ / SORT
(GB) Switch off appliance
(F) Couper l’appareil
(D) Gerät abschalten
(I) Disattivazione dell’ap
parecchio
(ES) Interruptor del aparato
(P) Interruptor para desligar
(NL) Het toestel
uitschakelen
(DK) Afbryd apparatet
1
The following icons are used throughout this manual to help you safely install your new speakers. Please follow them carefully.
GB
F
D
I
ES
P
NL
DK
Les icônes reprises ci-après sont utilisées dans tout le manuel de manière à vous aider à installer vos nouveaux haut-parleurs en toute sécurité.
Veuillez suivre scrupuleusement leur signification.
Die folgenden Symbole finden Sie in der gesamten Anleitung. Sie erleichtern eine sichere installation Ihrer neuen Lautsprecher.
Bitte achten Sie sorgfältig auf die Symbole.
Le seguenti icone usate nel manuale aiutano ad installare correttamente i diffusori. Si raccomanda di seguirle con attenzione.
Se utilizan los iconos siguientes en este manual para ayudarle a instalar con seguridad sus nuevos altavoces. Sígalas cuidadosamente.
Os seguintes ícones são utilizados no manual afim de o ajudarem a instalar com segurança as suas novas colunas. Siga-os cuidadosamente.
De hierna volgende pictogrammen worden in de hele handleiding gebruikt om u te helpen bij het veilig aansluiten en gebruiken van uw nieuwe luidsprekers.
Volg de instructies steeds nauwgezet op.
Følgende symboler benyttes i denne manual, for at hjælpe dig med sikker installation af dine højttalere. Følg dem nøje.
Thank you for purchasing the KHT Subwoofer powered subwoofer.We are confident that your PSW2010 will provide reliable, high performance sound for many years
to come. Please read this manual fully before you attempt any connections to the PSW2010.
GB
F
D
I
ES
P
NL
DK
KEF vous remercie de votre achat d’un subwoofer modèle PSW2010. Nous sommes convaincus que votre haut-parleur PSW2010 vous procurera un son fiable et de
hautes performances pendant de longues années.Veuillez lire intégralement le présent manuel avant de procéder à des connexions quelconques.
Vielen Dank für den Kauf des aktiven KEF PSW2010-Subwoofers.Wir sind davon überzeugt, daß Ihr PSW2010 lange Zeit zuverlässig funktionieren wird und eine hohe
Klangqualität gewährleisten wird. Lesen Sie bitte diese Anleitung sorgfältig durch, bevor Sie Ihr Gerät anschließen.
Vi ringraziamo per aver dato la Vs preferenza al subwoofer attivo KEF, apparecchio affidabile e dalle elevate prestazioni. Prima di effettuare i collegamenti si consiglia di
leggere per intero il presente manuale.
Le damos las gracias por haber adquirido el altavoz para graves KEF Modelo PSW2010. Estamos seguros de que el PSW2010 le proporcionará un sonido de calidad y
de altas prestaciones durante muchos años. Por favor, lea este manual antes de intentar conectar y poner en funcionamiento el altavoz.
Obrigado por ter escolhido o modelo KEF PSW2010: um subwoofer com amplificador.Acreditamos que o seu PSW2010 lhe oferecerá durante muitos anos, um som
de alta fidelidade. Leia, por favor, este manual integralmente antes de tentar quaisquer conexões com o PSW2010.
Wij danken u van harte voor uw aankoop van de actieve subwoofer KHT Subwoofer.Wij zijn ervan overtuigd dat uw subwoofer u jarenlang hoogwaardig luisterplezier
zal geven. Lees eerst deze handleiding aandachtig door alvorens u de subwoofer PSW2010 aansluit.
Tillykke med erhvervelsen af din KHT Subwoofer subwoofer med forstærker.Vi er overbevist om, at din PSW2010 vil give dig en stabil high performance sound i
mange år fremover. Gennemlæs venligst denne manual inden du foretager nogen tilslutning til din model PSW2010.
(F) Introduction (D) Einleitung (I) Introduzione (ES) Introducción (P) Introdução (NL) Inleiding (DK) Introduktion
(F) Utilisation du manuel (D) Verwendung der Anleitung (I) Uso del manuale (ES) Uso del manual (P) Utilização do manual (NL) Gebruik van de handleiding
(DK) Brug af manualen
1. INTRODUCTION
USING THE MANUAL

2
(F)
Commandes et prises
(D)
Bedienungselemente und Anschlüsse
(I)
Comandi e prese
(ES)
Controles y conexiones
(P)
Comandos e fichas
(NL)
Regelaars en aansluitingen
(DK)
Betjeningsknapper og stik
1. CONTROLS AND SOCKETS

3
1Introduction/Using the manual/Controls and Sockets..................................................................................................................................................................................1 - 2
GB
F
D
I
ES
P
NL
DK
Introduction / Utilisation du manuel ./Commandes et prises.....................................................................................................................................................................1 - 2
Einleitung / Verwendung der Anleitung / Bedienungselemente und Anschlüsse......................................................................................................................................1 - 2
Introduzione / Uso del manuale / Comandi e prese.....................................................................................................................................................................................1 - 2
Introducción/Uso del manual/Controles y conexiones ................................................................................................................................................................................1 - 2
Introdução/ Utilização do manual/Comandos e fichas..................................................................................................................................................................................1 - 2
Inleiding / Gebruik van de handleiding / Regelaars en aansluitingen .........................................................................................................................................................1 - 2
Introduktion / Brug af manualen / Betjeningsknapper og stik.....................................................................................................................................................................1 - 2
2Index ......................................................................................................................................................................................................................3
GB
F
D
I
ES
P
NL
DK
GB
F
D
I
ES
P
NL
DK
GB
F
D
I
ES
P
NL
DK
GB
F
D
I
ES
P
NL
DK
GB
F
D
I
ES
P
NL
DK
GB
F
D
I
ES
P
NL
DK
Table des matières
. ........................................................................................................................................................................................................................................................3
Übersicht
.........................................................................................................................................................................................................................................................................3
Indice
................................................................................................................................................................................................................................................................................3
Indice
................................................................................................................................................................................................................................................................................3
Índice
................................................................................................................................................................................................................................................................................3
Index
................................................................................................................................................................................................................................................................................3
Indholdsfortegnelse
........................................................................................................................................................................................................................................................3
3Unpacking/Important Points................................................................................................................................................................................................................................4 - 5
Déballage / Points importants.............................................................................................................................................................................................................................4 - 5
Auspacken / Wichtige Punkte .............................................................................................................................................................................................................................4 - 5
Apertura della confezione / Punti importanti.................................................................................................................................................................................................4 - 5
Desembalaje/Puntos importantes ......................................................................................................................................................................................................................4 - 5
Desembalagem/ Pontos importantes ................................................................................................................................................................................................................4 - 5
Het toestel uitpakken / Belangrijke aandachtspunten...................................................................................................................................................................................4 - 5
Udpakning / Vigtige punkter ................................................................................................................................................................................................................................4 - 5
4English Instructions ......................................................................................................................................................................................................................................................6
Instructions en français...............................................................................................................................................................................................................................................7
Deutsche Anleitung......................................................................................................................................................................................................................................................8
Istruzioni in italiano......................................................................................................................................................................................................................................................9
Instrucciones en español..........................................................................................................................................................................................................................................10
Instruções em português .........................................................................................................................................................................................................................................11
Nederlandse Handleiding .........................................................................................................................................................................................................................................12
Danske instruktioner.................................................................................................................................................................................................................................................13
5Positioning/Connecting mains lead.........................................................................................................................................................................................................................14
Positionnement / Branchement sur secteur. .......................................................................................................................................................................................................14
Aufstellung / Netzkabelanschluß.............................................................................................................................................................................................................................14
Posizionamento / collegamento del cavo di alimentazione..............................................................................................................................................................................14
Posicionamiento/Conexión a la red.......................................................................................................................................................................................................................14
Posicionamento/ Ligações principais......................................................................................................................................................................................................................14
Plaats en aansluiting van het netsnoer ..................................................................................................................................................................................................................14
Placering / Tilslutning af strøm ................................................................................................................................................................................................................................14
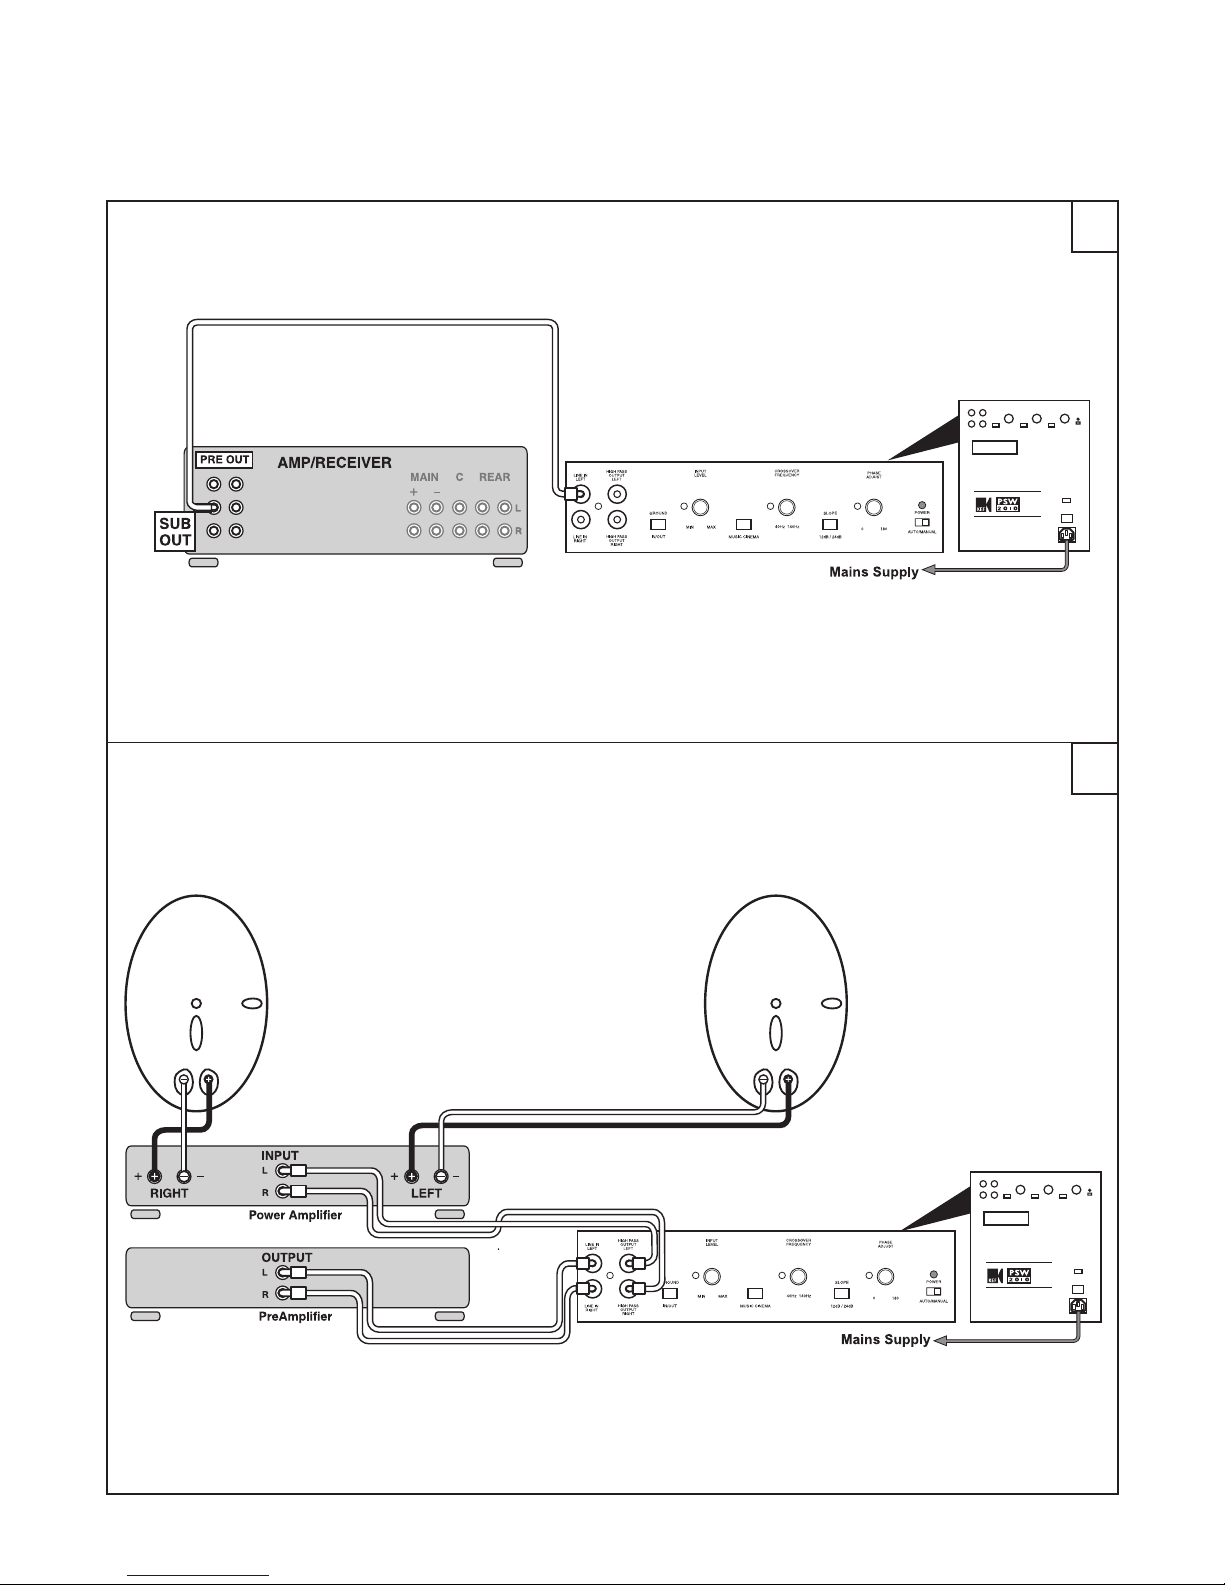
6Connections/Adjusting the controls.............................................................................................................................................................................................................15 - 16
Connexions / Réglage des commandes. ......................................................................................................................................................................................................15 - 16
Anschlüsse / Einstellen der Bedienungselemente......................................................................................................................................................................................15 - 16
Collegamenti / regolazione dei comandi......................................................................................................................................................................................................15 - 16
Conexiones/Ajuste de los controles............................................................................................................................................................................................................15 - 16
Ligações / Ajuste dos comandos....................................................................................................................................................................................................................15 - 16
Aansluitingen / bediening van de regelaars .................................................................................................................................................................................................15 - 16
Forbindelser / Justering af betjeningsknapperne........................................................................................................................................................................................15 - 16
7Specifications...............................................................................................................................................................................................................................................................17
Spécifications...............................................................................................................................................................................................................................................................17
Technische Merkmale................................................................................................................................................................................................................................................17
Specifiche......................................................................................................................................................................................................................................................................17
Especificaciones...........................................................................................................................................................................................................................................................17
Especificações..............................................................................................................................................................................................................................................................17
Technische gegevens..................................................................................................................................................................................................................................................17
Specifikationer.............................................................................................................................................................................................................................................................17
(F) Table des matières (D) Übersicht (I) Indice (ES) Indice (P) Índice (NL) Index (DK) Indholdsfortegnelse
2. INDEX

16
(F)
Connexions
(D)
Anschlüsse
(I)
Collegamenti
(ES)
Conexiones
(P)
Ligações
(NL)
Aansluitingen
(DK)
Forbindelser
6. CONNECTIONS
– + – +
1
2

15
(F)
Réglage des commandes
(D)
Einstellen der Bedienungselemente
(I)
regolazione dei comandi
(ES)
Ajuste de los controles
(P)
Ajuste dos comandos
(NL)
bediening van de regelaars
(DK)
Justering af betjeningsknapperne
6. ADJUSTING THE CONTROLS

12
34
65
4
(F)
Déballage
(D)
Auspacken
(I)
Apertura della confezione
(ES)
Desembalaje
(P)
Desembalagem
(NL)
Het toestel uitpakken
(DK)
Udpakning
3. UNPACKING

5
SPIRIT
> 35ºC < 5ºC
(GB) Follow this manual carefully for best results from speakers.
(F) Afin de tirer les meilleurs résultats des haut-parleurs, veuillez suivre scrupuleusement les instructions reprises dans le présent manuel.
(D) Für optimale Ergebnisse mit Ihrem Lautsprecher befolgen Sie diese Anleitung
(I) Per ottenere le migliori prestazioni dai diffusori seguire le istruzioni contenute nel presente manuale
(ES) Siga las instrucciones de este manual para obtener los mejores resultados de los altavoces
(P) Siga este manual atentamente para obter o melhor resultado das colunas
(NL) Volg terwille van een optimaal resultaat de instructies nauwkeurig op.
(DK) Følg denne manual omhyggeligt for at opnå det bedste resultat fra højttalerne
(GB) Read and return warranty card.
(F) Veuillez lire et renvoyer la carte de garantie.
(D) Lesen Sie die Garantiekarte und senden Sie
sie ausgefüllt zurück.
(I) Si prega di restituire la scheda di garanzia,
previa attenta lettura
(ES) Lea y envíenos la tarjeta de garantía
(P) Leia e devolva o cartão de garantia
(NL) U kunt na lezing en invulling de garantiekaart
aan de importeur sturen.
(DK) Gennemlæs og send garantibeviset tilbage
(GB) Clean with a damp lint free cloth.
(F) Nettoyer à l’aide d’un chiffon humide, non
pelucheux.
(D) Mit einem angefeuchteten, nicht fuselnden
Tuch abwischen.
(I) Pulire con un panno umido non sfilacciato
(ES) Limpie con un paño húmedo
(P) Limpe com um pano húmido sem pêlos
(NL) Reinigen met een vochtige niet pluizende doek
(DK) Rengør med en fugtig klud, der ikke fnugger
(GB) Do not use spirit based cleaners.
(F) Ne pas utiliser d’agents nettoyants à base
d’alcool.
(D) Keine alkoholhaltigen Reinigungsmittel
verwenden.
(I) Non utilizzare prodotti a base di alcol
(ES) No use limpiadores con base de alcohol
(P) Não utilize produtos de limpeza à base de
álcool
(NL) Gebruik geen reinigingsprodukten op basis
van alcohol
(DK) Brug ikke rengøringsmidler med alkohol
(GB) Avoid direct sunlight.
(F) Eviter l’exposition directe aux rayons du
soleil.
(D) Direktes Sonnenlicht vermeiden.
(I) Evitare l’esposizione diretta ai raggi del sole
(ES) Evite la luz directa del sol
(P) Evite a exposição directa à luz do sol
(NL) Vermijd rechtstreeks zonlicht
(DK) Undgä direkte sollys
(GB) Avoid temperature extremes.
(F) Eviter les températures extrêmes.
(D) Extreme Temperaturen vermeiden.
(I) Evitare temperature troppo alte o troppo
basse.
(ES) Evite temperaturas extremas
(P) Evite temperaturas extremas
(NL) Vermijd extreme temperaturen.
(DK) Undgå ekstreme temperaturer
(GB) SAFETY NOTICE! trailing cables are dangerous, secure all cables.
(F) NOTE DE SECURITE ! Les câbles de haut-parleurs traînant sur le sol peuvent être source de danger. Fixer tous les câbles.
(D) SICHERHEITSHINWEIS ! Herumliegende Lautsprecherkabel sind eine Gefahrenquelle. Bitte alle Lautsprecherkabel sorgfältig verlegen.
(I) NOTA PER LA SICUREZZA: i cavi di uscita dei diffusori possono essere pericolosi se non sistemati in un posto sicuro.
(ES) ¡ATENCION! los cables de conexión sueltos de los altavoces son peligrosos. Fíjelos
(P) Precauções de segurança! Os cabos das colunas espalhados são perigosos, fixe todos os cabos
(NL) VOOR UW VEILIGHEID! Loshangende luidsprekerkabels zijn gevaarlijk! De kabels steeds op een veilige plaats leggen.
(DK) BEMÆRK! skarpe knæk og slid på højttalerledningerne er farlig, de skal fastgøres.
(GB) Avoid damp.
(F) Eviter l’humidité.
(D) Feuchtigkeit vermeiden.
(I) Evitare l’umidità
(ES) Evite la humedad
(P) Evite a humidade
(NL) Vermijd vocht
(DK) Undgå fugt
(F) Points importants (D) Wichtige Punkte (I) Punti importanti (ES) Puntos importantes (P) Pontos importantes (NL) Belangrijke aandachtspunten (DK) Vigtige punkter
3. IMPORTANT POINTS

14
0dB 107dB
0dB 107dB
103dB
0dB 107dB
100dB
(F)
Positionnement
(D)
Aufstellung
(I)
Posizionamento
(ES)
Posicionamiento
(P)
Posicionamento
(NL)
Plaats en aansluiting van het netsnoer
(DK)
Placering
5. POSITIONING

6
KHT Subwoofer Rear Panel
1. Line in input sockets
2. High pass output sockets
3. Ground In / Out
4. Level control
5. Music / Cinema
6. Crossover Frequency control
7. Slope
8. Phase control
9. Mains indicator light Power ON
Power OFF
10. Auto/manual switch
11. ‘ON/OFF’ switch (Vacation switch)
12. AC power input (230V Euro SP 3333 AA)
(230V UK SP 3333 AC)
(115V US SP 3333 AB)
FAULT
Mains indicator light does not come on.
If the mains indicator light still does not come on.
If the mains indicator light is on but no sound
comes from the subwoofer.
If there is still no sound.
REMEDY
Check that the subwoofer is plugged into the mains supply and that any switches are on.
Check any fuses (including the plug) or circuit breakers on the mains supply which may effect the
power to the subwoofer.
Contact your dealer for further advice.
Ensure that all equipment is switched on.
Check and adjust the level control.
Check that the output sockets on the source equipment are correctly switched and
adjusted to provide sufficient level to drive the subwoofer.
Check that all connections between the subwoofer and the source equipment are
correct and adjust as necessary.
Contact your dealer for further advice.
As the sub-bass (low frequency) sound produced by the
subwoofer is non-directional it can be positioned almost
anywhere in the room, although it should not be placed too close to the
listener. If possible try the subwoofer in different positions to find the best
place for a boom-free sound.
Front speakers full range - speakers capable of producing full
frequency range.
A. Line Level - connected to amplifier processor loop (set
frequency to 80Hz when using model HTS2001 speakers).
B. Line level inputs - connected to subwoofer output on amplifier
by single (C1) or ‘Y’ (C2) cable.
A. Frequency Control
The frequency control changes the upper cut-off frequency of the
subwoofer. Its effective range is from 15Hz to 140Hz at a rate of
12dB/24dB per octave.The frequency control should be adjusted to
achieve the smoothest integration between the main/satellite speakers and
the subwoofer.
Clockwise rotation will increase the cut-off frequency and
anti-clockwise rotation will decrease the cut-off frequency.
1. Ideal Crossover - Flat Response.
2. Crossover point set too low - Causes Dip in combined response.
3. Crossover Point set too high - Causes hump in combined response.
B. Phase Control
The phase control will normally be set at 0° but more output level can
sometimes be achieved in the 180° position, particularly when the
subwoofer is far away from the satellite speakers.
C. Volume Control
The volume control adjusts the output level of the subwoofer in relation
to the satellite or AV speaker output level. Clockwise rotation to increase
the output level or anti-clockwise to decrease the output level.
D. Auto/Manual Switch
It enables / disables your subwoofer in standby (mute). Setting this switch
to Auto position, the subwoofer will go to standby automatically if idle for
45 minutes. It resumes working immediately after an input signal is
received. If Manual is set, the unit will not go to standby even when there
is no signal input.
E. Ground In/Out
Enhances compatibility. Used to break possible earth loops which cause
audible hum.
F. Music/Cinema
This switch selects one of two characteristics: Music is selected to give
deep, clean bass; Cinema is selected to give cinematic impact.
G. Slope
Used to adjust transition between speakers and subwoofer.
1 Controls and sockets
5 Positioning
6 Connections
6 Adjusting the controls
4. ENGLISH INSTRUCTIONS
Fault Finding

A. Frekvenskontrol
Frekvenskontrollen kontrollerer subwooferens øverste afskærings frekvens,
dens effektive område ligger fra 15 Hz til 140 Hz med 12 dB /24 dB pr.
oktav. Frekvenskontrollen bør justeres for at opnå det bedste samspil
mellem hoved/satellithøjttalerne og subwooferen.
Ved at dreje den i urets retning øges afskærings frekvensen og ved at dreje
den mod urets retning formindskes.
1. Ideel overgangsfrekvens - Jævn gengivelse.
2. Overgangsfrekvens sat for lavt - medfører fald i den kombinerede
gengivelse.
3. Overgangsfrekvens sat for højt - medfører en pukkel i den
kombinerede gengivelse.
B. Fase regulering
Faseo regulering er normalt sat til 0° men større udgangsniveau kan nogle
gange opnås i 180° positionen, specielt når subwooferen er anbragt langt
fra satellithøjttalerne.
C. Niveaukontrol
Niveaú kontrollen regulerer subwooferens udgangsniveau i forhold til
satellit- eller AV højttalerne.Ved at dreje den i urets retning øges
udgangsniveauet ved at dreje den mod urets retning formindskes
udgangsniveauet.
D. Auto/Manual omskifter
Når denne omskifter står i “Auto” position vil subwooferen automatisk gå
i standby og afbryde indgangssignalet efter ca. 45 minutters, når der ikke
tilføres noget audio-signal. Omvendt vil subwooferen straks være operativ,
så snart der tilsluttes et audiosignal. Når omskifteren står i stillingen
“manual”, vil subwooferen konstant være tændt og spilleklar.
E. Ground In/Out
Omskifter som bruges til at bryde eventuelle “stelsløjfer”, der kan
forårsage brum og støj.
F. Music/Cinema-omskifter
Denne omskifter bestemmer subwooferens basale lydopsætning:
Indstillingen Music giver en dyb, ren og velopløst baslyd, mens indstillingen
Cinema understreger bassens dynamiske slagkraft og dramatik.
G. Slope
Med denne knap justeres overgangsområdet mellem subwooferen og
anlæggets hovedhøjttalere.
13
KHT Subwoofer bagside
1. Bøsninger for linieindgange
2. Højpas udgangsbøsninger
3. Jordforbindelse Tænd / Sluk
4. Niveaukontrol
5. Music / Cinema Omskifter
6. Frekvenskontrol
7. Omskifter for Flankestejlhed
8. Fase-regulering
9. Indikator for TÆNDT
net spænding
SLUKKET
10. Omskifter for Auto/Manual drift
11. TÆND/SLUK afbryder (Hoved afbryder)
12. AC net indgang (230V Euro SP 3333 AA)
(230V UK SP 3333 AC)
(115V US SP 3333 AB)
MIDDEL
Check at stikket til subwooferen er sat i stikkontakten, og at der er tændt for den.
Check alle sikringer og hovedstrømafbryderen, som har indflydelse på strømmen til
subwooferen.
Kontakt forhandleren for yderligere detaljer.
Check at der er tændt for hele udstyret.
Check og justér lydniveauet
Check at udgangsstikket på dit anlæg er korrekt monteret og justeret til passende
niveau for at trække subwooferen.
Check at alle forbindelser mellem subwooferen og dit anlæg er korrekt monteret
og justeret, om nødvendigt.
Kontakt din forhandler for yderligere detaljer.
Da den lavfrekvente sub-bas lyd fra subwooferen ikke er retningsbestemt
kan den anbringes næsten alle steder i rummet, dog bør den ikke
anbringes for tæt på tilhøreren.Afprøv forskellige positioner for at finde
det bedste sted for en resonans fri lyd.
Udstyret leveres med strømstik med jord, der passer til den
nationale standard.
Front højttalere,- højttalerne der er i stand til fuld gengivelse i hele
frekvensområdet.
A. Line niveau - forbindes til forstærkerens processor loop (indstil
frekvensen på 80 Hz ved brug af model HTS2001 højttalere).
B. Line niveau indgang - forbindes til subwoofer udgang på
forstærkeren med en enkelt- eller en ‘Y’ ledning.
1 Betjeningsknapper og stik
5 Placering / Tilslutning af strøm
6 Forbindelser
6 Justering af betjeningsknapperne
4. DANSKE INSTRUKTIONER
Fejlfinding
FEJL
Net indikatoren lyser ikke.
Hvis net indikatoren stadig ikke tænder.
Hvis net indikatoren lyser, men der ingen lyd
kommer fra subwooferen.
Hvis der stadig ikke er nogen lyd.

7
Panneau arrière du modèle KHT Subwoofer.
1. Prises d’entrée auxiliaire.
2. Prises de sortie passe-hautes.
3. Mise a la terre Oui / Non
4. Commande de niveau.
5. Musique / Cinema
6. Commande de la fréquence de coupure.
7. Courbe de basse
8. Contrôle de phase.
9. Témoin de mise MARCHE
sous tension ARRET
10. Commutateur Automatique/Manuel.
11. Commutateur ‘MARCHE/ARRET’(ON/OFF).
(Interrupteur Vacances)
12. Entrée d’alimentation en c.a. (230V Euro SP 3333 AA)
(230V UK SP 3333 AC)
(115V US SP 3333 AB)
REMEDE
Vérifier que la fiche du subwoofer est bien branchée sur le secteur et que les commutateurs sont
positionnés sur ‘ON’.
Vérifier tous les fusibles (ainsi que la fiche) circuit d’alimentation du subwoofer.
Pour de plus amples conseils, adressez-vous à votre revendeur.
Vérifier que toute l’installation est branchée.
Vérifier et régler le commande de niveau.
Vérifier que les prises de sortie de l’équipement source sont correctement
commutées et procéder à un réglage de manière à obtenir un niveau suffisant pour le
subwoofer.
Vérifier que toutes les connexions entre le subwoofer et l’équipement source sont
correctes et procéder, si nécessaire, à la correction.
Pour de plus amples conseils, adressez-vous à votre revendeur.
Dans la mesure où le son infra-grave (basse fréquence) produit par le
subwoofer est non-directionnel, ce dernier peut être placé en n’importe
quel endroit de la pièce. On veillera toutefois à ne pas le positionner trop
près de l’auditeur. Essayez, si possible, de placer successivement le
subwoofer en différents endroits de manière à localiser le meilleur endroit
pour un rendu du son sans grondement.
Un fil d’alimentation satisfaisant aux normes nationales de mise à la terre
et répondant aux exigences locales en matière de sécurité est fourni
avec le subwoofer.
Et sans résonnances - Haut-parleurs avant capables de reproduire la
gamme complète des fréquences.
A. Niveau de ligne - connecté à la boucle de processeur
d’amplificateur (régler la fréquence sur 80 Hz dans le cas
d’utilisation des haut-parleurs modèle HTS2001).
B. Entrées niveau de ligne - connectées à la sortie subwoofer
sur l’amplificateur au moyen d’un câble simple ou ‘Y’.
1 Commandes et prises
5 Positionnement/Branchement sur
6 Connexions
A. Commande de la fréquence de coupure.
Cette commande modifie la fréquence de coupure supérieure du
subwoofer. Sa plage de réglage efficace s’échelonne de 15 Hz à 140 Hz à
un taux de 12 dB / 24 dB par octave. La commande de fréquence doit être
réglée de manière à obtenir la parfaite intégration entre les haut-parleurs
principaux/satellites et le subwoofer.
Une rotation dans le sens horlogique relèvera la fréquence de coupure et
une rotation dans le sens anti-horlogique abaissera la fréquence de
coupure.
1. Croisement idéal - Réponse plate.
2. Point de croisement réglé trop bas - provoque um creux en
réponse combinée.
3. Point de croisement réglé trop haut - provoque une boss en
réponse combinée.
B. Contrôle de phase
Le contrôle de phase sera normalement positionné sur 0°. Un niveau plus
élevé de sortie peut toutefois être obtenu en position 180°, et ce plus
particulièrement lorsque le subwoofer est éloigné des haut-parleurs
satellites.
C. Commande du niveau
La commande de niveau règle le niveau de sortie du subwoofer en
fonction du niveau de sortie du haut-parleur satellite ou AV. Une rotation
dans le sens horlogique augmentera le niveau de sortie et une rotation
dans le sens anti-horlogique abaissera le niveau de sortie.
D. Commutateur Automatique/Manuel
Ce commutateur permet d'activer/de désactiver la fonction sourdine de
votre subwoofer. En position Automatique, le subwoofer mettra les entrées
en sourdine automatiquement s'il est laissé inoccupé pendant 45 minutes. Il
se remet instantanément au travail lorsqu'un signal est donné. Si le
commutateur est en position Manuel, l'unité ne sera jamais mise en
sourdine, même sans signal d'entrée.
E. Mise à la terre oui/non
Améliore la compatabilité avec certains équipements. Utilisé pour éviter les
boucles de masse qui pourraient causer un ronflement audible.
F. Musique/Cinéma
Adaptation des performances en fonction de l’utilisation. Musique:basses
très propres et profondes. Cinema: basses donnant plus d’impact.
G. Pente du filtre
Permet une meilleure transition entre le caisson de graves et les enceintes.
6 Réglage des commandes
PROBLEME
Le témoin indicateur de mise sous tension ne
s’allume pas.
Le témoin indicateur de mise sous tension ne
s’allume toujours pas.
Le témoin indicateur de mise sous tension est
allumé mais aucun son ne provient du subwoofer.
Le subwoofer n’émet toujours aucun son.
4. INSTRUCTIONS EN FRANCAIS
Depannage

A. Instelling voor de overgangsfrequentie
Met deze Instelling kiest u tot welke frequentie de aktief blijft. Het bereik van
deze instelling loopt van 15Hz tot 140Hz, met een filtersteilheid van 12 dB / 24
dB per octaaf. Stel deze regelaar zodanig in, dat u de soepelste overgang tussen
hoofd- en satellietluidsprekers en de subwoofer bereikt.
Als u de regelaar met de klok mee draait (de overgangsfrequentie hoger legt),
verbreedt u het werkingsgebied van de 20B.Tegen de klok in gaand versmalt u
dit.
1. Ideale overgang - vlakke responscurve
2. Overgangspunt te laag - veroorzaakt een kuil in de totale
frequentiecurve
3. Overgangspunt te hoog - veroorzaakt een berg in de totale
frequentiecurve
B. Fase regelaar
De fases regelaar staat normaal gezien op 0°. Soms kunt u echter een hoger
uitgangsniveau bereiken door de regelaar op 180° te zetten, vooral als de
subwoofer ver weg staat van de satellietluidsprekers.
C. Niveauregeling
Met de niveauregeling regelt u het volume van de subwoofer in verhouding tot
het volume van de satellietluidsprekers of de AV-luidsprekers. Draai met de
klok mee om het volume te verhogen. Draai in de andere richting om het
volume te verlagen.
D. Auto/handbedienings schakelaar
Maakt afkoppeling van de ingang van de subwoofer mogelijk. In 'auto' positie
koppelt de subwoofer zijn ingang automatisch af na ± 45 minuten stilte, om
meteen na binnenkomst van enig signaal weer aktief te worden. In de stand
'manual' wordt de ingang nooit afgekoppeld.
E. Aarding in/uit
Dient om mogelijke aardlussen, die brom veroorzaken, te onderbreken.
F. Muziek/Cinema
‘Muziek’ is ideaal voor muziekweergave met een diep, droog laag;‘Cinema’
zorgt voor een imponerend laag, zoals we dat bij film wensen.
G. Steilheid
Past de steilheid van de overgang tussen subwoofer en hoofdluidsprekers aan.
12
KHT Subwoofer achterpaneel
1. lijn-niveau ingangbussen
2. luidspreker-niveau uitgangsbussen
3. Aarding Ja / Ne
4. Niveauregeling
5. Muziek / Cinema
6. Instelling voor de overgangs-frequentie
7. Flanksteilheid
8. Fases regelaar
9. Aan/uit Netschaklaar
indicatielampje
Toestel UIT
10. Auto/handbedienings schakelaar
11. Netschakelaar (Vakantiestand)
12. Aansluiting voor netkabel (230V Euro SP 3333 AA)
(230V UK SP 3333 AC)
(115V US SP 3333 AB)
STORING
Het aan/uit indicatielampje wil niet branden.
Als het aan/uit indicatielampje nog steeds niet oplicht.
Het aan/uit indicatielampje licht op, maar de subwoofer
geeft geen geluid.
Ik hoor nog steeds geen geluid.
VERHELPEN VAN DE STORING
Controleer of het netsnoer van de subwoofer aangesloten is op een stopcontact en de aan/uit-
schakelaar ingeschakeld is.
Controleer de smeltzekeringen of stroomonderbrekers van het stroomcircuit waarop de subwoofer is
aangesloten.
Raadpleeg uw dealer voor meer informatie.
Vergewis u ervan dat alle toestellen ingeschakeld zijn.
Controleer de volumeregeling en stel deze in.
Ga na of de uitgangspluggen van de geluidsbron het juiste signaal voeren, op het juiste
niveau stann en voldoende vermogen leveren om de subwoofer aan te drijven.
Controleer alle aansluitingen tussen subwoofer en de geluidsbron en voer indien nodig
correcties uit.
Neem contact op met uw handelaar of de importeur.
Omdat het oor de herkomst van de lage frequenties van het subbas-geluid
niet kan waarnemen, kunt u de subwoofer plaatsen waar het u uitkomt.
Plaats het toestel echter niet te dicht bij de luisteraar. Probeer
verschillende plaatsen in de woonkamer en kies de optimale plaats voor
een zuiver laagweergave.
Het bijgeleverde netsnoer beschikt over de juiste aardingsaansluiting en
voldoet aan de plaatselijke veiligheidsnormen.
De frontluidsprekers zijn Full Range luidsprekers die het volledige
frequentiespectrum weergeven.
A. Lijnnlveau - aangesloten op de processor in - en uitgangen van
de versterker (zet de instelling voor de overgangsfrequentie op 80
Hz indien u luidsprekers van het model HTS2001 gebruikt).
B. Ingangen lijnniveau (line level) - aansluiten op de
subwooferuitgang van de versterker met een enkelvoudige of een
‘Y’-kabel.
1 Regelaars en aansluitingen
5 Plaats en aansluiting van het nets-
6 Aansluitingen
6 Bediening van de regelaars
4. NEDERLANDSE HANDLEIDING
Opsporen van storingen

A. Frequenzeinstellung
Die Frequenzeinstellung ändert die obere Trennfrequenz des Subwoofers, Der Einstell-
bereich reicht von 15Hz bis 140Hz; die Flankensteilheit beträgt 12dB/24dB Oktave. Der
Regler sollte so eingestellt sein, daß Frontlautsprecher und Subwoofer optimal zu-
sammenarbeiten; d.h. es sind weder “Frequenzlücken” vorhanden, noch findet eine
Überbtonung bestimmter Grenzfrequenzen statt.
Durch Rechtsdrehen (im Uhrzeigersinn) wird die Trennfrequenz erhöht. Durch
Linksdrehen (gegen den Uhrzeigersinn) wird sie gesenkt.
1. Ideale Trennfrequenz : flacher Frequenzgang
2. Übergangspunkt zu niedrig:Verursacht eine “Frequenzlücke” im kombinierten
Frequenzgang
3. Übergangspunkt zu hoch: verursacht eine Überbetonung bestimmter
Frequenzen im kombinierten Frequenzgang
B. Phasensteurung
Der Phasensteurung wird normalerweise auf 0° eingestellt.Allerdings kann manchmal in
der Position 180° ein höherer Ausgangspegel erzielt werden, insbesondere, wenn der
Subwoofer weit von den Satellitenlautsprechern entfernt ist.
C. Pegeleinstellung
Mit der Pegeleinstellung kann der Ausgangspegel des Subwoofers auf den Ausgangspegel
der Satelliten- oder AV-Lautsprecher eingstellt werden. Durch Rechtsdrehen (im
Uhrzeigersinn) wird der Ausgangspegel erhöht. Durch Linksdrehen (gegen den
Uhrzeigersinn) wird er gesenkt.
D. Auto-/Manual-Schalter
Er schaltet die Stummschaltung (‚Muting‘) des Eingangs zu Ihrem Subwoofer ein/aus.
Wenn Sie diesen Schalter in die Position ‚Auto‘ stellen, schaltet der Subwoofer den
Eingang automatisch stumm, wenn er ca. 45 Minuten spannungslos ist. Er nimmt den
Betrieb automatisch wieder auf, wenn ein Signal angelegt wird.Wenn ‚Manual‘ eingestellt
ist, wird das Gerät niemals stumm geschaltet, selbst wenn kein Signaleingang vorliegt.
E. Erdungsanschluss
Erweitert die Kompatibilität.Verwenden Sie diesen Anschluss um Brummgeräusche, die
durch Erdungsschleifen entstehen können, zu unterdrücken.
F. Musik/Kino
Mit diesem Schalter kann zwischen zwei Klangcharakteristiken gewählt werden:“Musik”
sorgt für einen tiefen, klaren Bass;“Kino” sorgt für kinotypische Basseffekte.
G. Slope
Wird verwendet um den Frequenzübergang zwischen den Lautsprechern un dem
Subwoofer einzustellen.
8
Modell KHT Subwoofer Rückseite
1. Line in-Eingangsbuchsen
2. Hochpass-Ausgangsbuchsen
3. Erdung Ein / Aus
4. Pegeleinstellung
5. Musik / Kino
6. Frequenzeinstellung
7. Bassfrequenzkurve
8. Phasensteurung
9. Betriebsanzeige Betrieb
Gerät ausgeschaltet
10. Auto/Manual-Schalter
11. Netzschalter (EIN/AUS) (Urlaubsschalter)
12. Netzstromeingang (230V Euro SP 3333 AA)
(230V UK SP 3333 AC)
(115V US SP 3333 AB)
SYMPTOM
Betriebsanzeige leuchtet nicht auf.
Betriebsanzeige leuchtet immer noch nicht auf
Betriebsanzeige leuchtet, jedoch kein Ausgangssignal
aus dem Subwoofer.
Immer noch kein Ausgangssignal aus dem Subwoofer.
FEHLERBESEITIGUNG
Vergewissern Sie sich, daß der Subwoofer an das Stromnetz angeschlossen ist.
Überprüfen Sie (z.B. mit irgendeinem anderen Gerät), ob an der betreffenden Netzsteckdose
Spannung anliegt.
Bitte wenden Sie sich an lhren Fachhändler.
Vergewissern Sie sich, daß alle Geräte eingeschaltet sind.
Pegeleinstellung überprüfen und ggf, korrigieren.
Überprüfen Sie, ob der entsprechende Hoch-oder Niederpegel-Ausgang am
Verstärker aktiviert ist und so eingestellt ist, daß ein ausreichender Pegal an den
Subwoofer übertragen wird.
Vergewissern Sie sich, daß alle Anschlußkabel bzw. - stecker fest und ordnungsgemäß
sitzen.Tauschen sie ggf, die Anschlußkabel aus.
Bitte wenden Sie sich an lhren Fachhändler.
Da der vom Subwoofer produzierte Tiefbaß ungerichtet ist, kann das Gerät
praktisch fast an jedem Ort im Raum aufgestellt werden. Eine Aufstellung in
direkter Nähe des Zu-hörers ist allerdings nicht empfehlenswert. Nach Möglichkeit
sollten Sie den Subwoofer probeweise an verschiedenen Orten aufstellen um die
beste Position zu ermitteln.
Ein Netzkabel, das den gültigen landesspezifischen Sicherheitsbestimmungen
entspricht, ist im Lieferumfang enhalten.
1 Bedienungselemente und
5 Aufstellung/Netzkabelanschluß
6 Anschlüsse
6 Einstellen der Bedienungselemente
Vollbereichs-Frontlautsprecher - Lautsprecher für die Wiedergabe
des gesamten Frequenzbereichs.
A. Niederpegel: Anschluß erfolgt an PRE OUT/MAIN IN- oder
PROCESSOR LOOP- Anschlußbuchsen des Verstärkers (wenn die KEF
HTS2001- Lautsprecher inVerbindung mit diesem Subwoofer Verwendung
finden, solite die Frequenz am Subwoofer auf 80Hz enigestellt werden).
B. Niederpegeleingänge: Anschluß an den Subwoofer-Ausgang des
Verstärkes oder jeden anderen (geregelten) Niederpegel-Ausgang über ein
einfaches oder ein Y-Kabel.
Fehlersuche
4. DEUTSCHE ANLEITUNG

A. Controlo de frequência
O controlo de frequência altera a frequência superior de corte do
subwoofer. O seu intervalo efectivo é de 15 Hz a 140 Hz numa proporção
de 12dB/24dB por oitava. O controlo de frequência deve ser ajustado para
se obter a mais suave integração possível entre a coluna principal/ satélite e
o subwoofer.
A rotação no sentido dos ponteiros do relógio aumentará a frequência de
corte e a rotação no sentido inverso diminuirá a frequência corte.
1. Confluência Ideal - Resultado monótono.
2. Ponto de confluência fixado demasiado baixo - Provoca descidas nas
respostas combinadas.
3. Ponto de confluência fixado demasiado alto - Provoca elevações nas
respostas combinadas.
B. Controlo de fase
O controlo de fase será fixado normalmente a 0° mas algumas vezes pode-se
conseguir um maior nível de saída numa posição a 180°, nomeadamente
quando o subwoofer se encontra longe das colunas satélites.
C. Controlo de nível
O controlo de nível ajusta o nível de saída do subwoofer em relação ao
nível de saída da coluna satélite ou AV.A rotação no sentido dos ponteiros
do relógio permite aumentar o nível de saída e a rotação no sentido inverso
permite diminuir o nível de saída.
D. Interruptor Auto/Manual
Este interruptor permite activar/desactivar a entrada do subwoofer. Se definir
este interruptor para a posição Auto, o subwoofer silenciará a entrada
automaticamente se ficar inactivo durante mais de 45 minutos. O
funcionamento será retomado instantaneamente após a detecção do sinal. Se
estiver definido para Manual, o aparelho nunca será silenciado, mesmo não
havendo entrada de sinal.
E. Terra Ligado/Desligado
Melhora a estabilidade. Usado para evitar retornos de terra no caso de ruido
audivel.
F. Música/Cinema
Este interruptor selecciona um dos dois modos: Música é seleccionado para
fornecer baixos mais profundos e claros; Cinema é seleccionado para
oferecer um impacto mais cinéfilo.
G. Corte
Usado para ajustar o corte (frequência) entre as colunas e o subwoofer.
11
Painel traseiro do Modelo KHT Subwoofer
1. Tomadas de entrada de linha
2. Tomadas de saída high pass
3. Terra Activada / Desactivada
4. Controlo de nível
5. Música / Cinema
6. Controlo de frequência
7. Corte
8. Controlo de fase
9. Luzes indicadoras Power On
de tensão
Desligado
10. Interruptor Auto/Mamual
11. Interruptor “ON/OFF” (Interruptor Férias)
12. Entrada de corrente AC (230V Euro SP 3333 AA)
(230V UK SP 3333 AC)
(115V US SP 3333 AB)
FALLHAS
O indicador luminoso de tensão não se acende.
Se o indicador luminoso de tensão continua sem se
acender.
Se o indicador luminoso de tensão está aceso mas
não há som do subwoofer.
Se ainda não há som.
SOLUÇõES
Verifique se o subwoofer está ligado à corrente e se todos os interruptores estão ligados.
Verifique todos os interruptores (incluindo a tomada) ou corta-circuitos da tomada que possam
afectar a chegada de corrente ao subwoofer.
Contacte o seu fornecedor para mais conselhos.
Verifique se todo o equipamento está ligado.
Verifique e ajuste o controlo de nível.
Verifique se as fichas de saída do equipamento principal estão correctamente ligadas
e ajustadas para fornecerem um nível suficiente de energia ao subwoofer.
Verifique se todas as conexões entre o subwoofer e o equipamento principal estão
correctas e ajustadas convenientemente.
Contacte o seu fornecedor para mais conselhos.
Como o som sub-baixo (baixa frequência) produzido pelo subwoofer não
é direccional, pode ser posicionado em quase todos os locais da sala,
embora não deva ser colocado muito próximo do ouvinte. Se possível,
tente colocar o subwoofer em diferentes posições até encontrar o melhor
local para obter um som sem ressonância.
É fornecido um cabo de ligação à corrente compatível com os padrões
eléctricos nacionais e de acordo com as normas locais de segurança.
Colunas frontais de gama completa - colunas capazes de produzir
toda a gama de frequências.
A. Nível de linha - ligado ao loop do processador do amplificador
(fixe a frequência em 80Hz quando utilizar as colunas Modelo
HTS2001).
B. Terminais de entrada do nível de linha - conectados aos
terminais de saída do subwoofer e do amplificador por um cabo
simples ou em “Y”.
1 Comandos e fichas
5 Posicionamento/Ligações principais
6 Ligações
6 Ajuste dos comandos
4. INSTRUÇÕES EM PORTUGUÊS
Detector de falhas

A. Regolazione di frequenza
Il regolatore di frequenza modifica la frequenza di taglio superiore del
subwoofer, con un intervallo effettivo di 15-140 Hz a 12dB/24dB per
ottava. Regolare la frequenza in modo da ottenere la migliore integrazione
tra i diffusori principali/secondari e il subwoofer.
La rotazione in senso orario aumenta la frequenza di taglio, mentre quella
in senso orario la riduce.
1. Crossover ideale - risposta piatta.
2. Frequenza di taglio troppo bassa: provoca una flessione nella
risposta combinata.
3. Frequenza di taglio tropo alta: provoca un innalzamento nella
risposta combinata.
B. Interruttore di fase
In genere l’interruttore di fase viene impostato a 0° ma a volte si ottiene
un maggior livello d’uscita nella posizione a 180°, particolarmente se il
subwoofer è molto distante dagli altoparlanti secondari.
C. Regolazione di livello
Il regolatore di livello consente di regolare il livello d’uscita del subwoofer in
rapporto al livello d’uscita dai diffusori AV o secondari. Ruotare in senso
orario per aumentare il livello d’uscita o in senso antiorario per ridurlo.
D. Interuttore Auto/Manual (automatico/manuale)
Si attiva/disattiva, silenziando i segnali in ingresso al subwoofer. Impostando
questo interruttore sulla posizione automatica (Auto), il subwoofer
instaura il silenziamento automatico dei segnali in ingresso dopo
un’inattività di circa 45 minuti; riprendendo a lavorare istantaneamente se
c’è un segnale. In modalità manuale (Manual), l’unità non viene mai
silenziata, anche in assenza di segnale.
E.Terra In/Out
Per eliminare il ronzìo causato da un eventuale anello di terra. In presenza
di ronzìo, provare la posizione out.
F. Musica/Cinema
Questo selettore permette di scegliere tra due caratteristiche sonore:
posizione Music per bassi chiari e profondi; posizione Cinema per bassi di
grande impatto.
G. Pendenza
Utilizzato per variare la curva di transizione tra sub-woofer e satelliti.
9
Modello KHT Subwoofer Pannello posteriore
1. Prese ingresso linea
2. Prese uscita passa-alto
3. Terra Si / No
4. Regolazione di livello
5. Musica / Cinema
6. Regolazione di frequenza
7. Pendenza
8. Interruttore di fase
9. Indicatore luminoso Acceso
di alimentazione
Spento
10. Standyby
11. Interruttore ON/OFF (Interruttore Vacanze)
12. Alimentazione a c.a. (230V Euro SP 3333 AA)
(230V UK SP 3333 AC)
(115V US SP 3333 AB)
ANOMALIA
La spia di alimentazione non si accende.
Se la spia di alimentazione resta ancora spenta
Se la spia di alimentazione è accesa ma non arriva
alcun suono dal subwoofer
Se persiste l’assenza del suono.
AZIONE
Verificare che il subwoofer sia collegato all’alimentazione di corrente e che gli eventuali
interruttori presenti siano su ON.
Controllare gli eventuali fusibili (spina compresa) o sezionatori sull’alimentazione che possano
influenzare l’alimentazione del subwoofer.
Per ulteriori informazioni rivolgersi al rivenditore.
Verificare che l’apparecchiatura sia accesa.
Controllare il regolatore di livello e regolarlo di conseguenza.
Verificare che le uscite della sorgente (pre o finale) siano correttamente impostate, in
modo da garantire un adeguato livello al subwoofer.
Verificare che tutti i collegamenti tra il subwoofer e la sorgente siano stati realizzati
in modo appropriato e modificarli se necessario.
Per ulteriori informazioni rivolgersi al rivenditore.
Il subwoofer, poiché produce un suono a bassa frequenza non-direzionale,
può essere posizionato in qualunque punto dell’ambiente, purché non
troppo vicino all’ascoltatore.Tuttavia, per ottenere un suono quanto più
pulito possibile si consiglia di provare il subwoofer in diverse posizioni.
Viene fornito un cavo di alimentazione compatibile con le normative di
messa a terra nazionali ed in conformità ai requisiti di sicurezza locali.
Diffusori anteriori a gamma intera: in grado di produrre l’intera
gamma di frequenze.
A. Livello di linea: collegato al circuito di elaborazione
dell’amplificatore (impostare la frequenza a 80Hz se si usano i
diffusori modello HTS2001).
B. Ingressi livello di linea: collegati all’uscita del subwoofer su
amplificatore mediante cavo singolo o aY.
1 Comandi e prese
5 Posizionamento/collegamento del cavo di alimentazione
6 Collegamenti
6 Regolazione dei comandi
Individuazione delle anomalie
4. ISTRUZIONI IN ITALIANO

A. Control de frecuencia
El control de frecuencia cambia el umbral superior de la frecuencia del altavoz de
graves. Su intervalo efectivo va desde 15 a 140 Hz a un régimen de 12 dB / 24 dB
por octava. El control de frecuencia debe ajustarse para obtener la integración
más suave entre los altavoces principal/satélite y los altavoces de graves.
El giro en el sentido de las agujas del reloj incrementa la frecuencia de corte y en
sentido contrario la decrementa.
1. Frecuencia de cambio ideal. Respuesta plana.
2. El punto de frecuencia de cambio fijado demasiado bajo causa una
depresión en la respuesta combinada.
3. El punto de frecuencia de cambio fijado demasiado alto causa una cresta
en la respuesta combinada.
B. Controllo di fase
El Controllo di fase debe estar normalmente en 0˚, pero algunas veces se puede
obtener un mayor nivel de salida en la posición de 180˚, especialmente cuando el
altavoz de graves esta alejado de los altavoces satélite.
C. Control de nivel
El control de nivel ajusta el nivel de salida del altavoz de graves en relación con
los altavoces AV o satélites. El giro hacia la derecha incrementa el nivel de salida y
hacia la izquierda lo disminuye.
D. Conmutador Auto/Manual
Activa / desactiva el silenciamiento de la entrada al subwoofer.Al colocar este
conmutador en la posición Auto, el subwoofer silenciará la entrada
automáticamente si éste se mantiene inactivo durante alrededor de 45 minutos, y
reanudará su funcionamiento apenas aparezca una señal. Si se coloca en Manual, la
unidad nunca será silenciada, incluso cuando no haya una señal de entrada.
E. Tierra Si/No
Mejora la compatibilidad. Se usa para romper posibles lazos de tierra que causen
zumbidos audibles.
F. Musica/Cine
Este conmutador selecciona una de estas caracteristicas: Musica se selecciona
para obtener graves profundos y limpios; Cine se selecciona para conseguir
impacto en las peliculas.
G. Rampa
Usado para ajustar la transicion entre altavoces y subgrave.
10
Panel trasero del Modelo KHT Subwoofer
1. Línea en el zócalo de entrada
2. Zócalos de salida pasa alto
3. Tierra / Flotante
4. Control de nivel
5. Música / Cine
6. Control de frecuencia
7. Caída
8. Controllo di fase
9. Luz indicadora de Encendido
conexión a red
Power OFF (desconectado)
10. Interuttore Auto/Manual (automatico/manuale)
11. Interruptor ON/OFF (botón Vacaciones)
12. Entrada de corriente (CA) (230V Euro SP 3333 AA)
(230V UK SP 3333 AC)
(115V US SP 3333 AB)
SINTOMA
La luz indicadora de red no se ilumina
Si la luz indicadora de red sigue sin iluminarse
Si la luz indicadora de red está iluminada pero el
altavoz de graves no suena
Si sigue sin emitir sonido
REMEDIO
Compruebe que el altavoz de graves está conectado a la red y que los interruptores están
activados
Compruebe los fusibles o disyuntores de la red que puedan afectar a la falta de
funcionamiento del altavoz
Póngase en contacto con el proveedor del equipo para obtener asesoramiento.
Asegúrese de que todo el equipo está conectado
Compruebe y ajuste el control de nivel.
Compruebe que las clavijas de salida del equipo principal están correctamente conectadas y
ajústelas para proporcionar potencia suficiente para que funcione el altavoz de
graves.
Compruebe que todas las conexiones entre el altavoz de graves y el equipo
principal (fuente) están correctas y ajústelas según sea necesario.
Póngase en contacto con el proveedor del equipo para obtener asesoramiento.
Puesto que el sonido de baja frecuencia producido por el altavoz de bajos
no es direccional, puede ser colocado en cualquier lugar de la habitación,
aunque no debe ser colocado demasiado cerca del oyente. Si es posible,
pruebe el altavoz en diferentes ubicaciones para encontrar el lugar en el
que no se produce reverberación del sonido.
Se suministra un cable de conexión a la red de acuerdo con los requisitos
del país y las regulaciones relativas a la toma de tierra.
Altavoces frontales capaces de producir frecuencias de amplia gama.
A. Línea de nivel - conectada al bucle del procesador del
amplificador (fije la frecuencia en 80 Hz cuando use los altavoces
Modelo HTS2001).
B. Entradas de líneas de nivel - conectadas a la salida de
altavoces de graves del amplificador por medio de cable sencillo o
en Y.
1 Controles y conexiones
5 Posicionamiento/Conexión a la red
6 Conexiones
6 Ajuste de los controles
4. INSTRUCCIONES EN ESPAÑOL
Localizacion de averias
Other manuals for PSW2010
1
This manual suits for next models
2
Table of contents
Languages:
Other KEF Subwoofer manuals