Keg King robobrew 8695 User manual

Instruction Sheet
Robobrew 35L All In One Brewery with Pump
Model: 8695

WARNING IMPORTANT INFORMATION !
1. Please read this ENTIRE
instruction sheet before using
the Robobrew unit. If you are
unsure about any part of using
this brewery please contact
www.kegking.com.au
2. If the Robobrew is damaged in
any way do not use it.
3. NEVER turn on the pump
without attaching the
recirculation arm shown in step
4 of the instructions. If you do
not fit this arm you could be at
risk of spraying hot wort into the
air and into your face. Please
NEVER turn on the pump
without first attaching the
recirculation arm first.
4. If at any stage the recirculation arm is not fitted and/or needs to be removed
always ensure the ball valve is turned off (see instructions under the heading
BEFORE WE START)

BEFORE WE START
The Robobrew home brewery is a
fantastic unit for making high
quality beer at home. When used
correctly this brewery is safe to
use, easy to operate and fast to
clean up and store. It should be a
joy to use this unit for making beer
at home.
As we will be dealing with
electricity, hot liquids, pumps etc.
there is some inherent dangers
that need to be considered.
Always use a sturdy bench where
the Robobrew cannot fall over.
Do not brew in an area with poor
ventilation, high foot traffic area or
any area where children can reach
the Robobrew unit.
Before you start using the brewery
check that you have all the
components in these instructions.
Please also check that before you
fill the Robobrew unit that this ball
valve on the side of the unit is
turned off and is in the horizontal
position (shown in the picture to
the right).

1. Boiler False
Bottom
Assembly
This model of Robobrew has
been designed with a false
bottom. This false bottom HAS
NOT been designed so you can
place grain directly onto this
screen. This false bottom is
designed to protect your pump
from solids and drawing in things
such as hop pellets, flowers,
grain, etc. This false bottom
adds significantly to the reliable
operation of the Robobrew units
and it’s recommended that this
screen is always in place if the
pump is going to be used.
The false bottom has legs that suspend the false bottom about 20mm above the base of
the boiler so all liquid that exits into the pump our out via the ball valve will be filtered
using this screen.
Once the screen is in place fill
the boiler with the desired
amount of water for mashing in.
Set the temperature on the
display and wait for the water to
heat up.

2. Malt Pipe Assembly
The malt pipe is the pie that sits
inside the boiler and contains your
grain. The malt pipe is made up of
a top screen and a bottom screen.
As you can see from the right the
bottom screen looks slightly
different and it has no silicon seal
and also has a stainless threaded
rod that screws into the malt pipe
bottom screen. Screw this threaded
rod onto the bottom screen as
shown.
Once the rod is screwed onto the
bottom screen place the bottom
screen inside the malt pipe so it’s at
the bottom of the malt pipe.

Once the bottom screen is in place
use the extension tube and place
this on top of the other stainless tube
that you just attached to the bottom
screen.
There is no need to push this
extension tube all the way to the
bottom.
After you have attached the
extension pipe you can then use the
small black plastic knob and put this
over the hole at the top of the
extension pipe. This knob will
prevent grain for pouring into the
middle of the pipe and ending up in
the boiler.

You now need to transfer the
malt pipe to the boiler. In order
to do this you need to fit the
malt pipe handle.
To fit the handle feed one end
of the handle through one hole
in the malt piple. Push the
handle in on one side far
enough so you have enough
clearance on the other side to
feed the handle into the
opposing hole.
Once the handle has been fitted
you can lift/maneuver the malt
pipe easily.
Use the handle to place the
malt pipe into the boiler.

3. Mashing
Once the malt pipe has been
assembled you can pour your grain
into the malt piple. The malt pipe is
designed to take up to abour 9kg of
grain but in the majority of recipes you
will probably only probably use 4-5kg.
Once the grains have been poured into
the malt pipe it’s important to stir in the
grains and remove all dough balls (dry
spots). Thoroughly stirring the grain
will take you about 2-5 minutes.
Once you have stired in the grain fit
the top screen (show to right)
The top screen should be placed so
that it lightly touches the top of the
grain and you should make sure the
silicon seal is concentric against the
inside diameter of the malt pipe.
Once you have fitted the top screen
use the stainless siphon cone and
place this over the extension tube with
the cone side facing up.
Push down on the cone until the extension tube and cone is
sitting gently against the top screen. (shown to left)

4. Fitting the Recirculation Pipe
WARNING: The recirulation arm
must be fitted whenever the pump
is in use. Follow these instructions
to fit the recirculation arm.
Fit the silicon seal onto the bottom
of the recirculation arm as show in
the picture to the right.
Use the black hand wheel to
attach the arm to the body of the
boiler as shown in the photo.
There is no need to overtighten
the hand wheel. Only light force is
required and overtightening can
result in premature wear on the
silicon seal.

5. Temperature Adjustment
To adjust the temperature of the
brewery simply hit the set butto until
you see the numbers on the display
flash. Then use the arrow keys to
set the desired temperature.
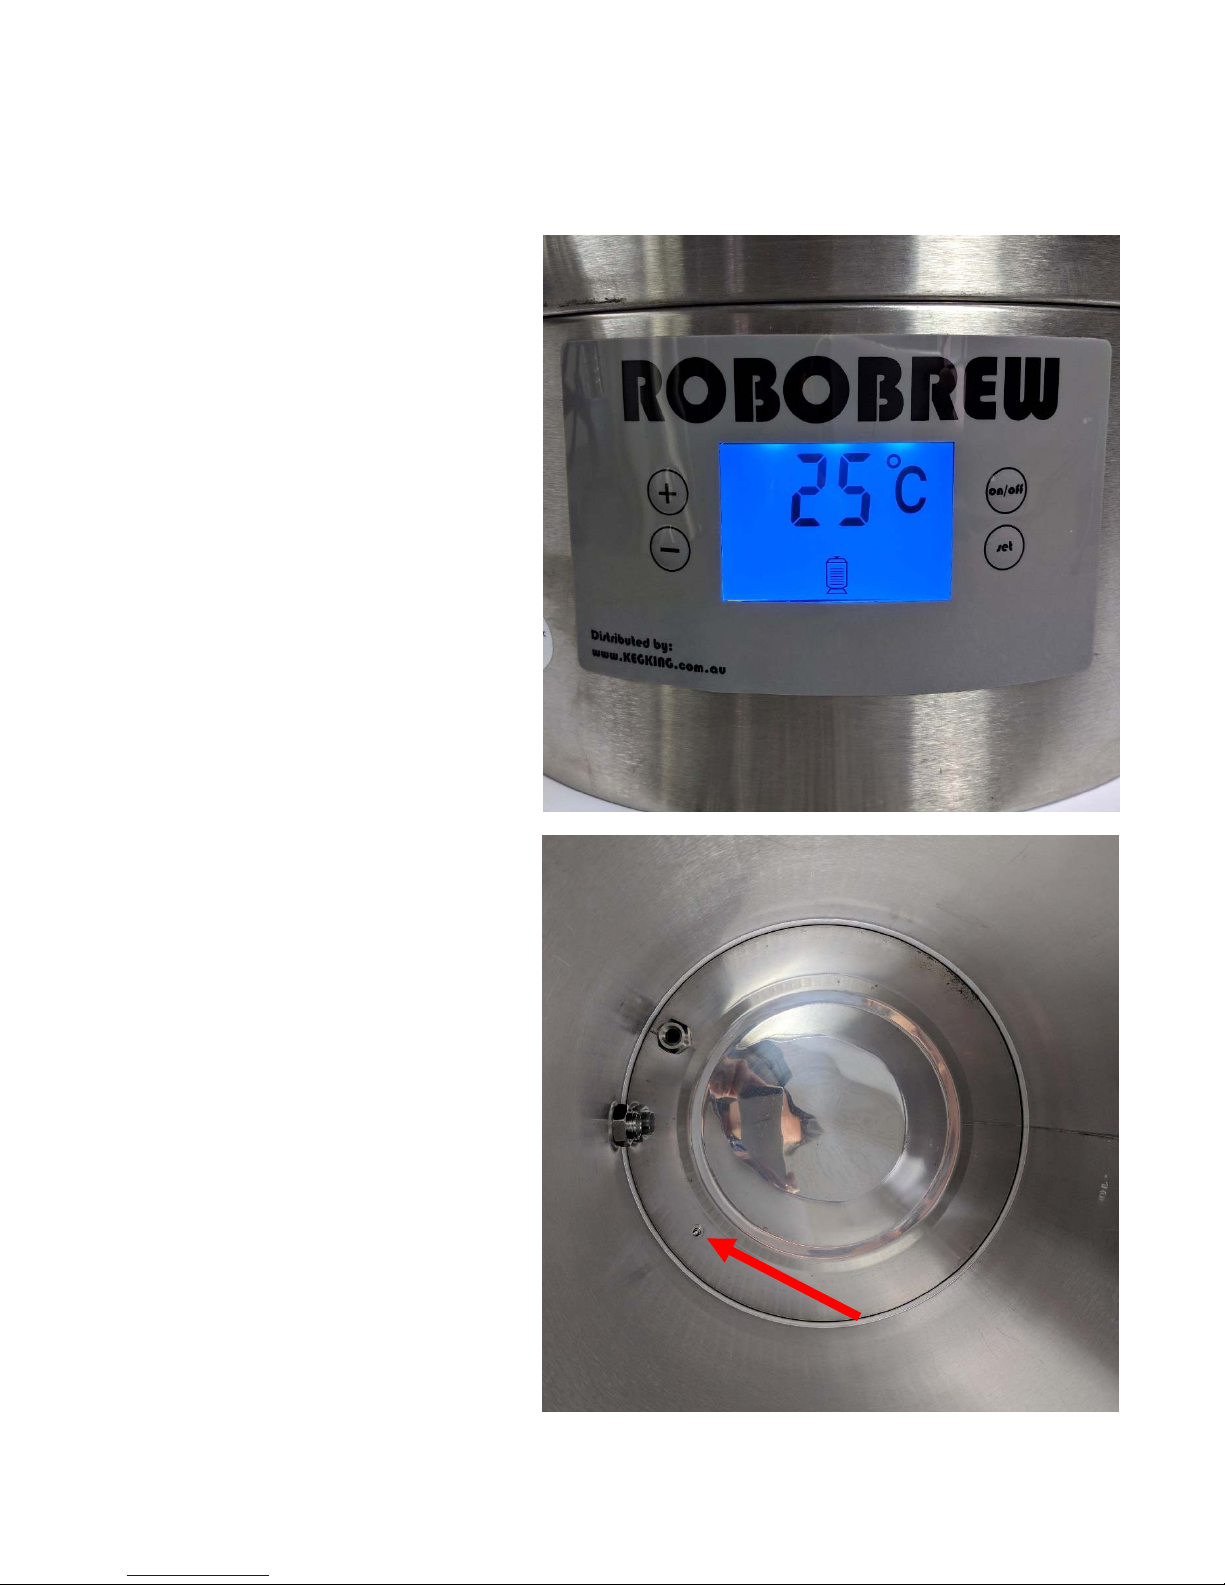
The temperature on the display
reads the temperature at the
bottom of the boiler near where the
element is mounted. It is important
to understand that this is not the
core temperature of the mash. If
you recirculate for long enough the
mash temp will eventually be close
to the display temp. With that said
if you want to increase the
termperature of the mash it is
normally fastest and easiest to
overshoot the desired mash
temperature by a few degrees while
using a secondary thermometer in
the mash to keep an eye on the
core temperature of the mash.
A photo to the right shows the
placement of the probe. The probe
placement has been designed like
this as it prevents the element from
overheating and scorching wort by
taking the temperature of the wort
closest to the element.
TEMPERATUREPROBEPLACEMENT

6. Recirculation
Recirculation is something that
can be done easily using the
pump that is built into this model
of Robobrew.
It is recommended to purchase
some silicon tubing with the
Robobrew as this will help with
recirculation and also with
transfering the wort from the
Robobrew unit to your fermenter.
If you are recirculating during
mashing it is recommend that you
only use the 500watt element.
This will normally be fast enough
on it’s own to gently heat the
mash.
The recirculation speed can be
controlled using the ball vave at
the base of the recurculation arm.
ConnectTubeto
Recirculation
Arm

7. Sparging
Once you have mashed your grain
for 60-90 minutes it’s then time to
sparge the grain.
Using the malt pipe handle lift the
malt pipe out of the boiler and
rotate 90 degrees until you see
the feet of the malt pipe locate
near the wire supports. (see
picture to the right)
Once the feet have been located
place the malt pipe down and
ensure its securely in place.
Pour warm water (approximatley
75-80C) ontop of the grain inside
the malt pipe and this will rinse the
grain of the majority of remaining
sugars. This process will probably
require 5-15 liters of water
depending on your recipe and
desired gravity that you are trying
to achieve.

8. Boiling
Boiling is one of the final steps to making beer in the Robobrew. Simply set the
temperature to 120C and turn on both elements. Once the Robobrew has started to boil
normally the single 1900 watt element is sufficient to maintain a constant rolling boil.
9. Cooling
The Robobrew includes a
immersion cooling coil.
Keg King also have an optional
counter flow chiller as well but
this is slightly more complicated
to use and it is sold as an
optional extra.
The immersion chiller is easy to
use and clean. Simply connect
your garden hose to each end
and run cold water through this
while it’s immersed in the wort
inside the boiler.
If you want to
accelerate the
cooling process
you can also stir the wort while cooling or use the
pump to recirculate the wort. This will greatly
increase the speed at which the heat is extracted
through the immersion chiller.
Compression fittings for the immersion chiller can be purchase
separately if you want to use threaded connections. (see picture
to left - part number 009326).
Another great method of cooling wort that saves time is hot-
cubing. If you fill a plastic cube show to the right with hot wort then quickly fit the lid this
will keep your wort in a sanitary environment. If you use this method make sure to
purge air out of the cube and then simply leave the cube at ambient temperature for
24hrs to cool down.

Recommended
Accessories
SiliconTubing
Silicontubingisgreatfortransferingthewortfromthe
Robobrewunittoyourfermenterorintoahotcube.We
recommendheavydutysilicontubingwith12mmIDand
18.5mmOD.Thistubinghaspartnumber005496andcan
beorderedfromanygoodKegKingdistributor.TheSilicon
tubingisplasticiserfreesothereisnoBPA.It’salsosuitable
fortemperaturesupto200Csoit’ssuitableforthetransferofhotwort.Unfortunatelysilicontubingis
moreexpensivethanvinyl(PVC)tubinghoweverit’sbettersuitedforthisapplication.
SodiumPercarbonateBreweryCleaner
SodiumPercarbonateisagreatcleanerforremovingprotein,hopmaterialandtannins
thatstarttobuildupinyourbrewery.Sodiumpercarbonateisapopularchoicefor
manyhomebrewersasit’shighlyeffective,itdecomposesquicklyintooxygenand
sodiumbicarbonate.It’sveryeffectiveatkillingbacteria,moldspores,virusus
andvariousothermicroorganisms.Soevenonceit’sfullydecomposeditdoes
notharmfinishedbeerifithappenstogetleftinthebrewerysomehow.Itis
soldin400gramjars(partnumber#006172)andalso1kgbags(partnumber
#006141).
WoodenMashPaddle
Woodmashpaddlesareagreattoolforanyseriousbrewer.
Thewooddoesnotscratchyourstainlesssteelpotsandthe
mashpaddledesignisidealforremovingdoughballs.
Refractometer
Arefractometerisafantastictooltotakeinstantgravity
readingsofhotwort.Thistoolwillhelpyouoptimiseyour
sparging.Ifyouwanttocollectthemaximumsugarsfromyour
maltpipeyoucankeepsparginginthemaltpipeuntilthewort
fallingfromtheundersideofthemaltpipereaches1.010.This
toolissiginifiacntlybetterthanthehydrometersastheygivea
fasterreadingwithouthavingtocalibratethereadingbasedon
thetemperatureofthewort.
HeavyDutyGloves
Theseheavydutyglovesaregreatforhandlingchemicals,and
alsoforgrabbingitemscoveredinhotwort.Theyhavelong
sleevesonthemandareperfectforbrewingwith.Partnumber
#008718)
Table of contents
Other Keg King Dispenser manuals
Popular Dispenser manuals by other brands

Hupfer
Hupfer TE-2/V19-26 operating instructions

Gastrodomus
Gastrodomus GRANISMART 3 operating instructions

Wilbur Curtis
Wilbur Curtis Primo Cappuccino PCGT3 user guide

Alpine
Alpine ASPEN 427-L-GRY Operation & installation manual

Stern
Stern 350920 Installation and maintenance guide

GE
GE Cafe ENERGY STAR CFE29TSDSS Owner's Manual & Installation Instructions

Follett
Follett Symphony Plus 110CT425A Installation, operation and service manual

M. C. Miller Co.
M. C. Miller Co. HlP010 instruction manual

Metcal
Metcal DX-355 user guide

Kallista
Kallista P25015 installation instructions

HOR
HOR HOR-007ASSM user manual

Delfield
Delfield Shelleymatic RFF-103 Specifications