Kegco Hot Draft KC HDT301 User manual

Installation Guide
Model: KC HDT301

8510 Miralani Dr.
San Diego, CA 92126
(888) 980 - 4810
2
TABLE OF CONTENTS
TABLE OF CONTENTS......................................................................................................................................2
SAFETY WARNING..........................................................................................................................................3
IMPORTANT SAFETY INFORMATION...............................................................................................................4
ABOUT...........................................................................................................................................................5
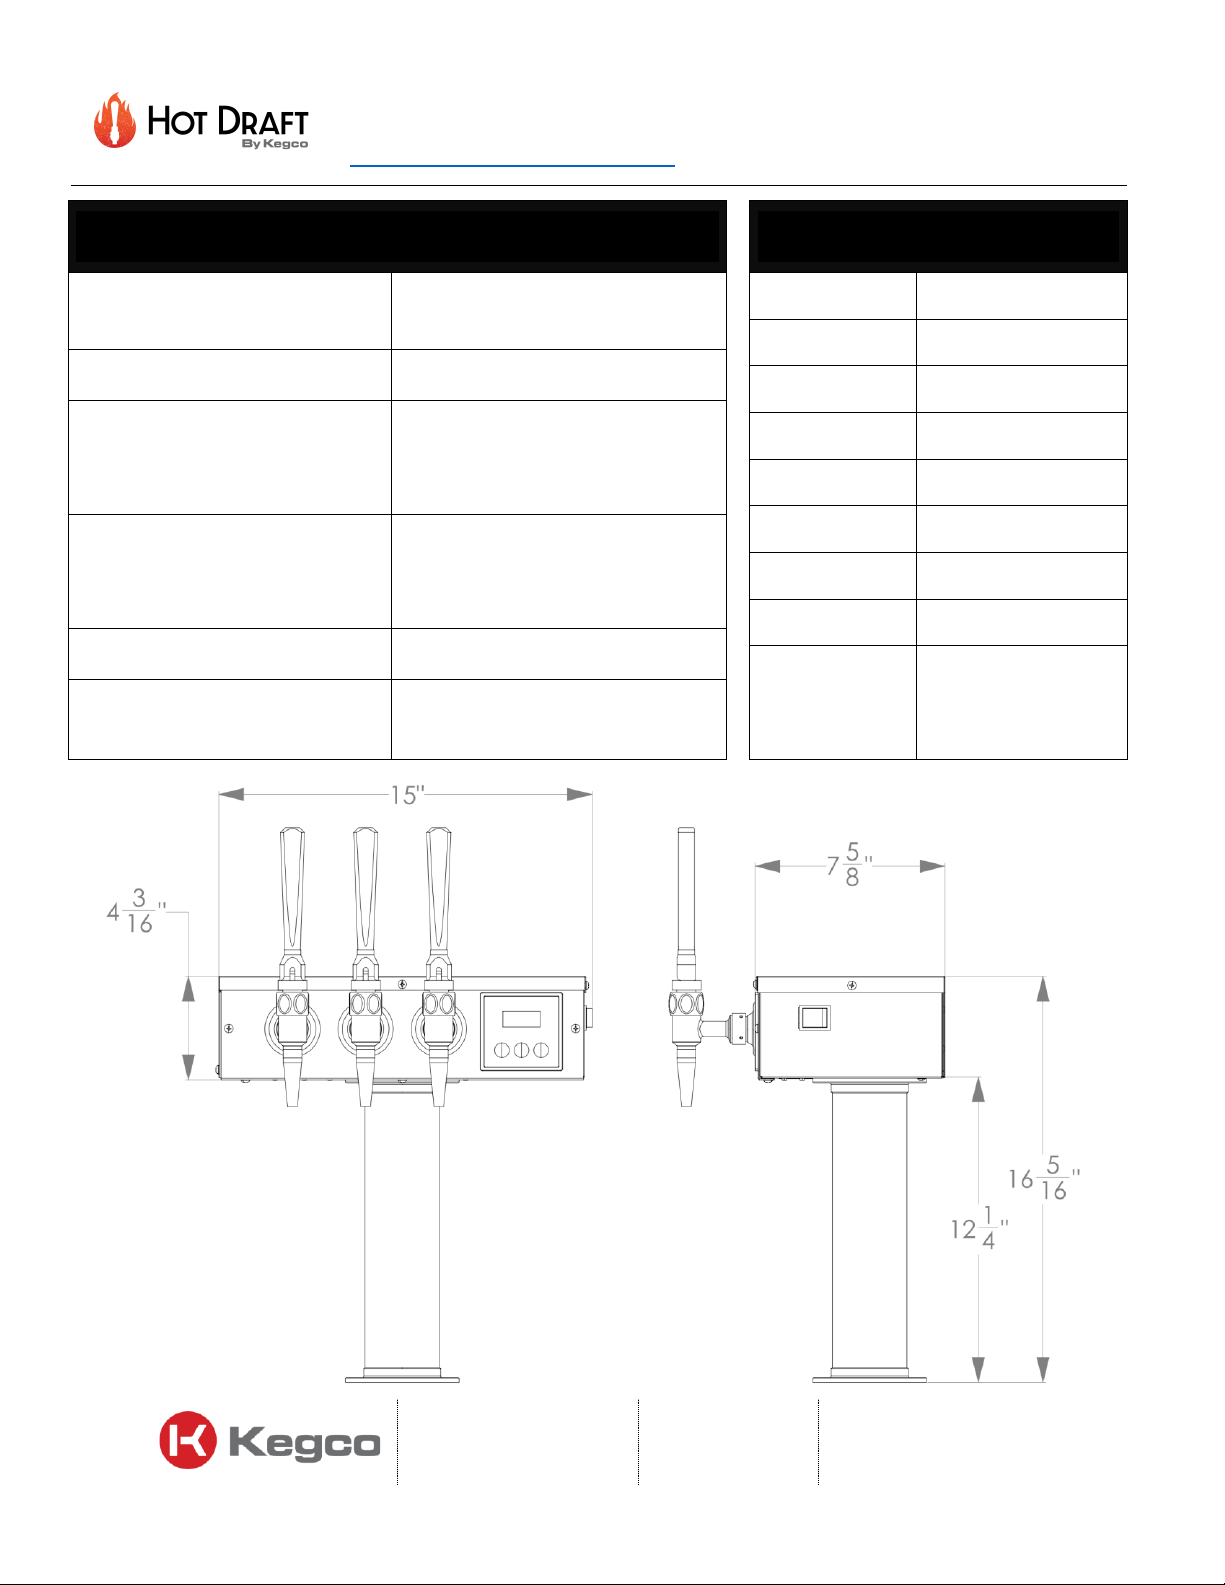
TECHNICAL SPECIFICATIONS ...........................................................................................................................6
PRODUCT FEATURES ......................................................................................................................................6
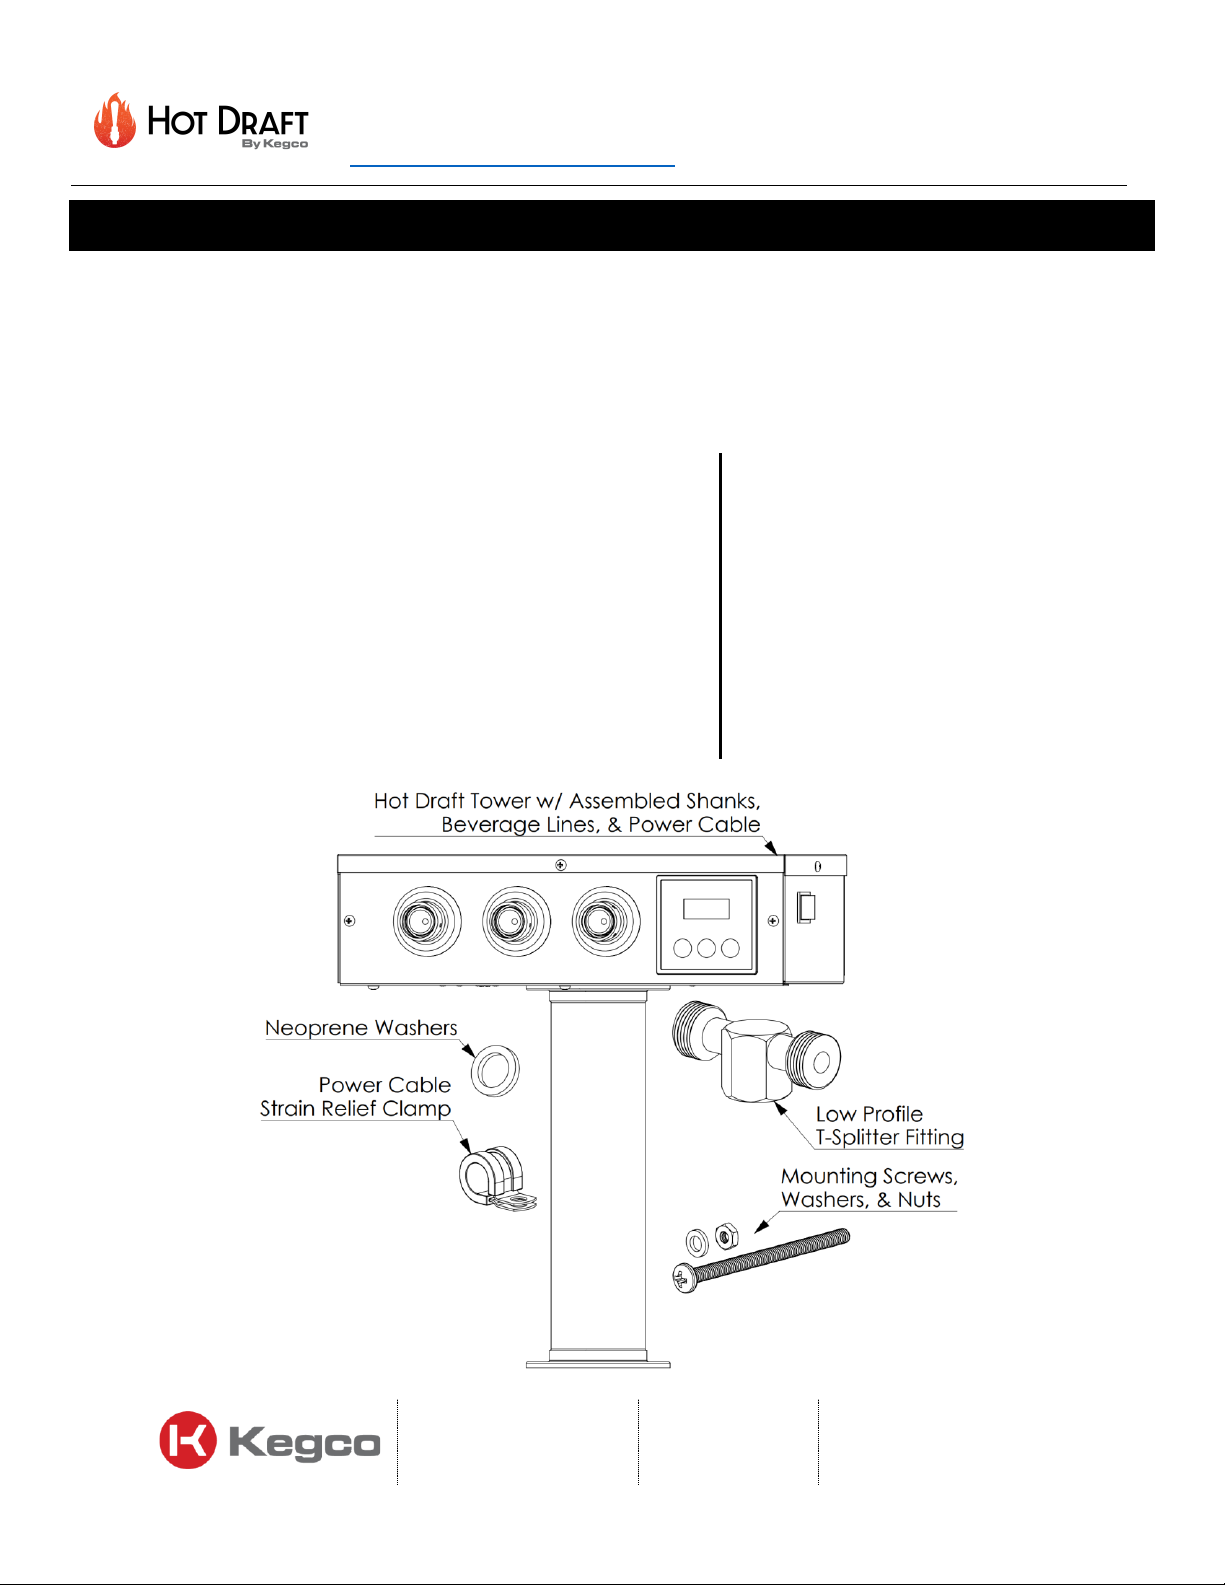
PARTS DIAGRAM............................................................................................................................................7
BEFORE INSTALLATION OF YOUR HOT DRAFT® TOWER ...................................................................................8
ASSEMBLE THE HOT DRAFT® TOWER DISPENSE SYSTEM..................................................................................9
Attaching the Tower.................................................................................................................................................. 9
Attaching the Faucets ............................................................................................................................................. 13
Gas Connection....................................................................................................................................................... 14
Coupler Connection ................................................................................................................................................ 15
Setting Pressure ...................................................................................................................................................... 18
Setting Kegerator Temperature .............................................................................................................................. 18
ELECTRICAL CONFIGURATION.......................................................................................................................19
Electrical specifications........................................................................................................................................... 19
Electrical Plug Installation ....................................................................................................................................... 19
Voltage Setting Configuration................................................................................................................................. 20
Electrical Diagram ................................................................................................................................................... 22
NAVIGATING YOUR HOT DRAFT® TOWER .....................................................................................................23
Accessing the Service Menu.................................................................................................................................... 23
SETPOINT ................................................................................................................................................................ 23
PURGE..................................................................................................................................................................... 24
CLEAN...................................................................................................................................................................... 24
FLOW, PWM, IN/OUT, & VERSION .......................................................................................................................... 24
COMP...................................................................................................................................................................... 24
POURING WITH YOUR HOT DRAFT® TOWER .................................................................................................25
FINE TUNING YOUR HOT DRAFT® TOWER SYSTEM ........................................................................................26
CLEANING AND MAINTENANCE FOR YOUR HOT DRAFT ® TOWER..................................................................29
TROUBLESHOOTING THE HOT DRAFT ® TOWER.............................................................................................31
WARRANTY INFORMATION..........................................................................................................................32

8510 Miralani Dr.
San Diego, CA 92126
(888) 980 - 4810
3
SAFETY WARNING
When installing or using any high voltage electrical appliance, basic safety precautions should always be followed.
Under no circumstance should you attempt to clean, install, inspect, repair, disassemble or otherwise service this
product, without first shutting off all power to the unit and uncoupling the keg so that pressure is eliminated during
the cleaning / inspection.
THIS PRODUCT SHOULD BE INSTALLED BY A QUALIFIED ELECTRICIAN AND A QUALIFIED PLUMBER IN ACCORDANCE
WITH ALL NATIONAL, STATE, PROVINCIAL AND LOCAL ELECTRICAL & PLUMBING CODES.
PLEASE READ THESE INSTRUCTIONS THOROUGHLY AND COMPLETELY PRIOR TO INSTALLATION & USE. FAILURE TO DO
SO COULD CAUSE PROPERTY DAMAGE, SERIOUS INJURY, OR DEATH.
SERIOUS BODILY INJURY OR DEATH COULD OCCUR IF YOU IGNORE THIS WARNING.
“Hot liquids under pressure can be dangerous and even fatal if installed improperly installed and maintained. “

8510 Miralani Dr.
San Diego, CA 92126
(888) 980 - 4810
4
IMPORTANT SAFETY INFORMATION
1. You must read and follow all instructions.
Serious bodily injury or death could occur if
you ignore this warning.
2. All circuit breakers and/or disconnect switches
servicing the HOT DRAFT® Tower must be
turned off when installing, uninstalling, or
repairing this unit.
3. The Tower must be installed by a licensed
electrician.
4. The Tower must be wired in accordance with
the current version of the National Electrical
Code (US) or Canadian Electric Code (Canada).
5. This installation must comply with all national,
state, and local plumbing and electrical codes.
6. When the Tower is not within sight of the
electrical circuit breakers, an additional local
means of disconnection of all ungrounded
conductors must be provided that is within
sight of the appliance or a circuit breaker
lockout must be used. (Ref. NEC 422.31)
7. If the Tower is installed in a location where
liquid damage could occur in the event of a
leak, it is recommended that a drip pan be
installed and connected to a suitable drain.
8. This is a closed system meaning that the
product is coming from a container under
pressure or from a vacuum system of delivery.
Adhere to the labeling requirements on the
containers regarding allowable pressure and/
or delivery recommendations so that system is
not compromised.
9. Product containers such as kegs, bag-in-box, or
other types of product packaging each come
with guidelines as to maximum pressure
allowed or recommended delivery instructions
required for safe handling. It is imperative that
operator follow these guidelines at all times!
10. This Tower must be installed in a location
where it is not subject to freezing
temperatures unless supplied with factory
installed freeze protection.
Beverage Factory
Phone: 1-(800) - 710-9939

Installation Guide for HOT DRAFT®
https://kegco.com/pages/patents
8510 Miralani Dr.
San Diego, CA 92126
(888) 980 - 4810
5
ABOUT
Congratulations on the purchase of your new HOT DRAFT® Tower! This U.S. patented product
(https://kegco.com/pages/patents) is the property of Ryan Bros. Coffee and is the World’s First Draft System that
allows you to enjoy both cold and hot products at the point of dispense without the burning effects of holding tanks or
the lessening of flavor from oxidation. Utilizing a tankless method of just-in-time heating, the structure and flavor
integrity of the beverage is at its original maximum quality without the degradation of heretofore constant reheating.
What does this mean? The HOT DRAFT® Tower delivers constant freshness with zero waste! Inside the keg, nitrogen is
displacing oxygen, keeping the beverage 100% fresh while infusing the beverage with a creamy finish. The finished
product is as good as when it was originally crafted—every ounce and all the time! With the HOT DRAFT® Tower, you
are serving products at their very best...highlighting peak freshness and flavor...and the last ounce is as good as the
first! We hope you enjoy having chosen our innovative solution and for helping us solve the many flavor pitfalls and
waste traditional brewing yields. As you will soon discover yourself—The HOT DRAFT® Tower is “Not Your Same Old
Drip!” ®

Installation Guide for HOT DRAFT®
https://kegco.com/pages/patents
8510 Miralani Dr.
San Diego, CA 92126
(888) 980 - 4810
6
TECHNICAL SPECIFICATIONS
Dimensions
16 5/16” (H) x 15” (W) x 7 5/8” (D)
Operating Temperature Range
140oF –180oF
Wattage/Voltage/
Frequency/Amperage
4.8 kW/240 V/60 Hz/20A
4.4 kW/230 V/60 Hz/20A
3.6 kW/208 V/60 Hz/18A
Operating Pressure Range
(Optimal Operating
Pressure Range)
20 PSI –40 PSI
(25 PSI –35 PSI)
Minimum Flow Rate
0.15 GPM
Minimum/Maximum Inlet
Beverage Temperature
34oF/70oF
PRODUCT FEATURES
On/Off Switch
Yes
Gas Used
Nitrogen
Electrical Plug
No
Taps Available
3
Display
LCD
Display Color
Blue
Buttons
Push
Appearance
Brushed Steel
Certifications
CSA C22.2 NO.109
NSF/ANSI STD.4
UL STD. 197

Installation Guide for HOT DRAFT®
https://kegco.com/pages/patents
8510 Miralani Dr.
San Diego, CA 92126
(888) 980 - 4810
7
PARTS DIAGRAM
1. Heater Assembly
2. Compression Fitting
for Hot Draft® Tubing
3. Flow Restriction
Spindle
4. Outlet Thermistor
5. ECO (Electrical
Cutoff)
6. Heating Chamber
7. Inlet Manifold
8. Triac
9. Inlet Thermistor
10. Hall Effect Sensor
11. Flow Meter
12. Inlet Screen
13. Inlet Barbed Nipple
for 3/16” ID Tubing
14. Power Board
15. Terminal Block
16. Power Switch
(On/Off)
17. Tower Column
18. Control Board
19. Control Panel
20. 90oElbow Shank
21. Straight Shanks
22. Inlet Manifold &
Beverage Line Mount
23. Solenoid Valve

Installation Guide for HOT DRAFT®
https://kegco.com/pages/patents
8510 Miralani Dr.
San Diego, CA 92126
(888) 980 - 4810
8
BEFORE INSTALLATION OF YOUR HOT DRAFT® TOWER
READ THESE INSTRUCTIONS THOROUGHLY AND COMPLETELY PRIOR TO INSTALLATION & USE. FAILURE TO FOLLOW
INSTRUCTIONS COULD CAUSE PROPERTY DAMAGE, SERIOUS PERSONAL INJURY, OR DEATH.
By installing this product, you acknowledge the terms of the manufacturer’s warranty. Once the Tower is installed, do not
return product to the place of purchase. If you have any questions regarding the warranty or product return policies,
please contact Beverage Factory at 1-(800) 710-9939.
Before installation, inspect all components. Along with any add-ons
purchased with your Hot Draft® Tower, the package includes:
•HOT DRAFT® Tower with assembled shanks, lines, and power cable
•Mounting Screws, Washers, and Nuts
•Power Cable Strain Relief Clamp
•Low Profile T-Splitter Fitting
•Neoprene Washers for Beer Lines and Fittings
Contact a licensed electrician to configure the
electrical system.
Recommended tools for installation:
•Philips Head Screwdriver
•Flat Head Screwdriver
•Appropriately Sized Wrenches
•Faucet Wrench

Installation Guide for HOT DRAFT®
https://kegco.com/pages/patents
8510 Miralani Dr.
San Diego, CA 92126
(888) 980 - 4810
9
ASSEMBLE THE HOT DRAFT® TOWER DISPENSE SYSTEM
Safety Instructions:
1. Pressurized Nitrogen can be dangerous. Handle with care.
2. Never exceed 60 PSI.
3. Always connect Nitrogen tank to regulator. Never connect the tank directly to keg.
4. Keep the Nitrogen tank in an upright position.
5. Ventilate area after Nitrogen leak.
6. The regulator may break if the tank falls on it. Secure the Nitrogen tank.
7. If it becomes difficult to breathe and your head starts to ache, high levels of Nitrogen may be present. LEAVE THE
ROOM IMMEDIATELY.
8. Pressures above 50 PSI will release the coupler’s built-in pressure relief valve.
Attaching the Tower
1. Start by guiding beverage lines and power cable through the hole on the kegerator top. For more than one beverage
line, put the first line through and press the second nut into the hole next to the first tube. Then pull the first tube
from inside the kegerator and it will bring the second nut through the hole. Ensure there is a rubber tower gasket
between the tower and the kegerator top.

Installation Guide for HOT DRAFT®
https://kegco.com/pages/patents
8510 Miralani Dr.
San Diego, CA 92126
(888) 980 - 4810
10
2. Once the power cable is inside the kegerator cabinet, (a) guide the cable through the knockout in the back wall and (b)
out the other side.
3. (a) Align the tower flange with the holes on top of the kegerator. Insert the provided Tower Screws into the holes. (b)
Use a Philips Head Screwdriver and appropriate wrench to tighten the screws with provided nuts and washers.

Installation Guide for HOT DRAFT®
https://kegco.com/pages/patents
8510 Miralani Dr.
San Diego, CA 92126
(888) 980 - 4810
11
4. Feed the air-cooling line up into the tower.
5. Install the Power Cable Strain Relief Clamp. (a) Slip the Clamp around the power cable. (b) Pinch the ends of the Strain
Relief Clamp close together. (c) Align the holes with the back right Tower Screw. (d) Use the provided nut and washer
to tighten the clamp. (e) Use an appropriate wrench to further tighten the nut and washer until the clamp is shut,
shown in (f).

Installation Guide for HOT DRAFT®
https://kegco.com/pages/patents
8510 Miralani Dr.
San Diego, CA 92126
(888) 980 - 4810
12
If you are installing the tower on a surface other than the kegerator top, you must use the necessary hardware to drill
holes for screws and beverage lines. Follow the tower flange dimensions outlined below to match the screw positions on
your surface. Visit www.kegco.com or call (888) 980-4810 for a printable template.
If installing the kegerator under a countertop, ensure you have the proper amount of air circulation around the kegerator
with no obstructions. If the top of the kegerator touches the bottom of the countertop, seal the gap with caulk or silicone.
If there is a gap between the top of the kegerator and the bottom of the countertop, you can create a spacer using PVC
pipe and seal around that. Drop the line beverage line and power cable through the countertop and spacer and attach the
tower to the countertop.

Installation Guide for HOT DRAFT®
https://kegco.com/pages/patents
8510 Miralani Dr.
San Diego, CA 92126
(888) 980 - 4810
13
Attaching the Faucets
When attaching the faucet to the tower, (a) line up the teeth on the inside of the faucet with the teeth inside the shank.
(b) Screw the coupling nut onto the faucet and tighten with the faucet wrench. (c) Screw the tap handle onto the faucet
lever. The lever is an industry standard thread size to allow for aftermarket tap handles.

Installation Guide for HOT DRAFT®
https://kegco.com/pages/patents
8510 Miralani Dr.
San Diego, CA 92126
(888) 980 - 4810
14
Gas Connection
The Nitrogen tank will arrive empty, and you will need to have it filled locally. The best way to find a place to fill the tank is
to search for a welding supply store in your zip code. We recommend the use of Industrial Grade Nitrogen for the best
result. Be sure to position the tank in an upright manner.
1. Attach the regulator to the Nitrogen tank. If there is a washer built on to the end of your regulator, you do not need to
use any additional washer. (a) Hand tighten the coupling nut. (b) Use a 1 1/8” wrench to tighten an extra quarter to
half turn. Overtightening the coupling nut may cause a leak.
2. (a) Attach 5/16” I.D. Gas Line Tubing to regulator nipple. The tubing can be made more pliable by heating the end in
hot water. (b) Pinch white plastic clamp into place. (c) Use a pair of pliers to further tighten the clamp.
Note: Ensure the clamp is very tight as this system requires higher pressure than typical beverage systems.

Installation Guide for HOT DRAFT®
https://kegco.com/pages/patents
8510 Miralani Dr.
San Diego, CA 92126
(888) 980 - 4810
15
Coupler Connection
Commercial keg couplers attach to both the beverage and gas lines. With this unit, you can use one keg to dispense both
cold and hot beverage by using the provided Low Profile T-Splitter Fitting.
1. (a) Place a neoprene washer between the T-Splitter and the top of the coupler. (b) Attach the T-Splitter to the top of
the coupler. Do not overtighten the T-Splitter as this will cause a leak.
2. (a) Connect the 5/16” ID Gas Line Tubing to a hose nipple on the side of the coupler. (b) Clamp the into place. Use a
pair of pliers to further tighten the clamp.
Note: Ensure the clamp is very tight as this system requires higher pressure than typical beverage systems.

Installation Guide for HOT DRAFT®
https://kegco.com/pages/patents
8510 Miralani Dr.
San Diego, CA 92126
(888) 980 - 4810
16
3. Identify the beverage lines. Pull the beverage lines away from the Hot Draft® Tower until they are taut. The beverage
lines will be different lengths. Follow the guide pictured below to identify the lines and corresponding faucet.
Note: The Hot Draft® faucet will dispense hot beverage. Faucet and Faucet will dispense cold
beverage.
H.D
1
2

Installation Guide for HOT DRAFT®
https://kegco.com/pages/patents
8510 Miralani Dr.
San Diego, CA 92126
(888) 980 - 4810
17
4. The beverage lines come with Beer Nuts at the end that attach to the T-splitter. (a) Be sure to insert a neoprene
washer into the Beer Nut before attaching to the T-splitter. (b) Attach the Hot Draft® Beverage Line to one end
of the T-Splitter. (c) Attach Beverage Line or Beverage Line to the other end of the T-splitter.
5. The keg coupler attaches to the top of a keg. Slide the coupler into the keg’s Coupler Receiver. Twist to lock the
coupler to the keg. This keg can now be dispensed as either a hot or cold beverage.
H.D
1
2

Installation Guide for HOT DRAFT®
https://kegco.com/pages/patents
8510 Miralani Dr.
San Diego, CA 92126
(888) 980 - 4810
18
Setting Pressure
If dispensing coffee, the pressure should be set to about 30-40 PSI. The best way to set the pressure is to turn the dial on
the front of the regulator counterclockwise until it is all the way out. This will turn the regulator off. Turn the valve on the
bottom of the regulator to the side to ensure no Nitrogen will pass through the regulator. Pull the pin on the side of the
coupler to release built up pressure from the keg. Open the cold draft faucet. Nothing should come out initially as there is
no pressure to the keg. Put a container under the faucet and open the valve at the bottom of the regulator. Turn the dial
clockwise with the faucet open and beverage will start to pour. Stop turning when you get the best flow rate. This should
be about 30-40 PSI. This method should prevent your regulator from creeping.
If you are dispensing at altitude, you will need to increase your output pressure by one pound for every 2,000 feet of
elevation above sea level.
Setting Kegerator Temperature
Refer to your kegerator’s manual to change your kegerator temperature. We recommend coffee to be kept at 37 degrees.
Do not store coffee above 40 degrees.
The air temperature inside the kegerator can fluctuate greatly as you open and close the door. Check the liquid
temperature by putting a thermometer in a glass of water inside the kegerator. Let the glass cool for 24 hours with the
door shut for the most accurate reading.

Installation Guide for HOT DRAFT®
https://kegco.com/pages/patents
8510 Miralani Dr.
San Diego, CA 92126
(888) 980 - 4810
19
ELECTRICAL CONFIGURATION
Beverage Factory recommends that this product be installed by a licensed and qualified electrician in accordance with all
applicable national, state, provincial, and local electrical codes. As with all electrical appliances, under no circumstances
should you attempt to install, repair, or disassemble this water heater without first shutting off all power to the unit
directly at the fuse or breaker box. Make sure to shut off all breakers. SERIOUS BODILY INJURY OR DEATH COULD OCCUR
IF YOU IGNORE THIS WARNING.
All wiring (wire gauge) and circuit protection (breakers) must comply with the U.S. National Electrical Code (NEC) in the
USA, or the Canadian Electrical Code (CEC) in Canada. Failure to do so could result in property damage and/or personal
injury, and void your warranty.
Electrical specifications
MODEL
VOLTAGE/PHASE
KW
TOTAL AMPS
RECOMMENDED
WIRE SIZE (CU) 90° C
RECOMMENDED MINIMUM BREAKER
SIZE (PER NEC –INTERMITTENT DUTY)
KC HDT301
240 1ΦΔ
4.8
20
14
20
230 1ΦΔ
4.4
20
14
20
208 1ΦΔ
3.6
18
14
20
Electrical Plug Installation
The HOT DRAFT® Tower will arrive without an electrical plug installed at the end of the power cable. We recommend a
plug to be installed by a licensed and qualified electrician. Ensure the plug matches the power outlets found in your
installation location.

Installation Guide for HOT DRAFT®
https://kegco.com/pages/patents
8510 Miralani Dr.
San Diego, CA 92126
(888) 980 - 4810
20
Voltage Setting Configuration
The HOT DRAFT® Tower will be operable on either 208V, 220V, or 240V electrical systems. Contact a licensed and
qualified electrician to confirm your installation location’s voltage supply. The unit must be configured for your specific
voltage supply. Configure the unit by setting a DIP Switch located inside the unit, behind the Control Panel. The lid must
be removed to access the DIP Switches. DO NOT ATTEMPT TO INSTALL, REPAIR, OR DISASSEMBLE THIS WATER HEATER
WITHOUT FIRST SHUTTING OFF ALL POWER TO THE UNIT DIRECTLY AT THE FUSE OR BREAKER BOX.
1. Remove the lid by removing 4 screws, circled in red below. Lift the lid to open the HOT DRAFT® Tower. The Control
Board will now be accessible. It is located behind the Control Panel, as shown below.
Other manuals for Hot Draft KC HDT301
1
Table of contents
Other Kegco Kitchen Appliance manuals