kenall Indigo-Clean IC100 User manual

www.kenall.com |P: 800-4-Kenall |F: 262-891-9701 |10200 55th Street Kenosha, Wisconsin 53144, USA
This product complies with the Buy American Act: manufactured in the United States with more than 50% of the component cost of US origin. It may be covered by patents
found at www.kenall.com/patents.Content of specication sheets is subject to change; please consult www.kenall.com for current product details. ©2019 Kenall Mfg.Co.
1
INSTALLATION INSTRUCTIONS
IC100_F-5986_070622
IC100 CONTROL SYSTEM
IMPORTANT SAFEGUARDS
When using electrical equipment, basic safety precautions should always be followed, including the following:
THIS PRODUCT MUST BE INSTALLED IN ACCORDANCE WITH THE APPLICABLE INSTALLATION CODE BY A PERSON FAMILIAR WITH
THE CONSTRUCTION AND OPERATION OF THE PRODUCT AND THE HAZARDS INVOLVED. DISCONNECT POWER TO ALL CIRCUITS
BEFORE WIRING FIXTURE. INSTALL IN ACCORDANCE WITH ALL NATIONAL, STATE, AND LOCAL CODES. DO NOT CONNECT TO
AN UNGROUNDED SUPPLY. READ ALL FIXTURE MARKINGS AND LABELS TO ENSURE CORRECT INSTALLATION OF FIXTURE.
SUPPLEMENTAL INSTRUCTIONS MAY BE LOCATED ON THE FIXTURE, IN ADDITION TO THIS INSTRUCTION SHEET, REGARDING
ORIENTATION, OR MOUNTING RESTRICTIONS.
SAVE THESE INSTRUCTIONS
INSTALLATION INSTRUCTIONS
CONTROLLER BOX INSTALLATION
1. Open housing using supplied key.
2. Determine which side(s) of housing control wires and lead wires will be entering and exiting. Remove knockout(s), install 1/2" NPT
wet location conduit tting(s), and seal threads using approved method.
3. Place housing at the intended mounting location. Locate and drill (4) pilot holes in mounting surface using housing as template or
see gure 1 below. Using 1/4-20 fasteners and anchors appropriate to the mounting surface (supplied by others), mount housing
to surface.
2.35" 9.50"
1.17"
4.50"
14.10"
6.85"
4. Input rating: 120VAC or 277VAC; 50-60Hz
5. To prevent damage to electrical components it may be necessary to employ internally sealed conduit ttings or to ll all conduit
tting throats to avoid water penetration of the unit. If sealant is used, a sealant compatible for use with solid-state electronics
should be used.
Figure 1

www.kenall.com |P: 800-4-Kenall |F: 262-891-9701 |10200 55th Street Kenosha, Wisconsin 53144, USA
This product complies with the Buy American Act: manufactured in the United States with more than 50% of the component cost of US origin. It may be covered by patents
found at www.kenall.com/patents.Content of specication sheets is subject to change; please consult www.kenall.com for current product details. ©2019 Kenall Mfg.Co.
2
INSTALLATION INSTRUCTIONS
IC100_F-5986_070622
ULTRASONIC SENSOR INSTALLATION
Using a 4” Octagonal J-Box
1. Connect low voltage wires to the appropriate terminals on the
depluggable terminal (red=24V+, black=24V-, blue=control).
2. Loosen the appliance mounting screws attached to the J-Box.
3. Align the sensor in the J-Box so that the mounting screws on the box
match the key holes on the sensor’s rear housing.
4. Push the sensor up into the J-Box and twist is so the mounting screws
are seated in the key hole slots.
5. Tighten the two screws to secure the sensor to the J-Box.
6. Snap the front cover onto the sensor
Ensure dipswitch position set to preferred program function
OCCH: Occupancy High program sets the yellow and brown output voltage to approximately 10V DC for
occupancy and less than 5V DC for no occupancy.
OCCL: Occupancy Low program sets the yellow and brown output voltage to less than 5V DC for occupancy
and approximately 10V DC for no occupancy.

www.kenall.com |P: 800-4-Kenall |F: 262-891-9701 |10200 55th Street Kenosha, Wisconsin 53144, USA
This product complies with the Buy American Act: manufactured in the United States with more than 50% of the component cost of US origin. It may be covered by patents
found at www.kenall.com/patents.Content of specication sheets is subject to change; please consult www.kenall.com for current product details. ©2019 Kenall Mfg.Co.
3
INSTALLATION INSTRUCTIONS
IC100_F-5986_070622
DIP SWITCH SETTING
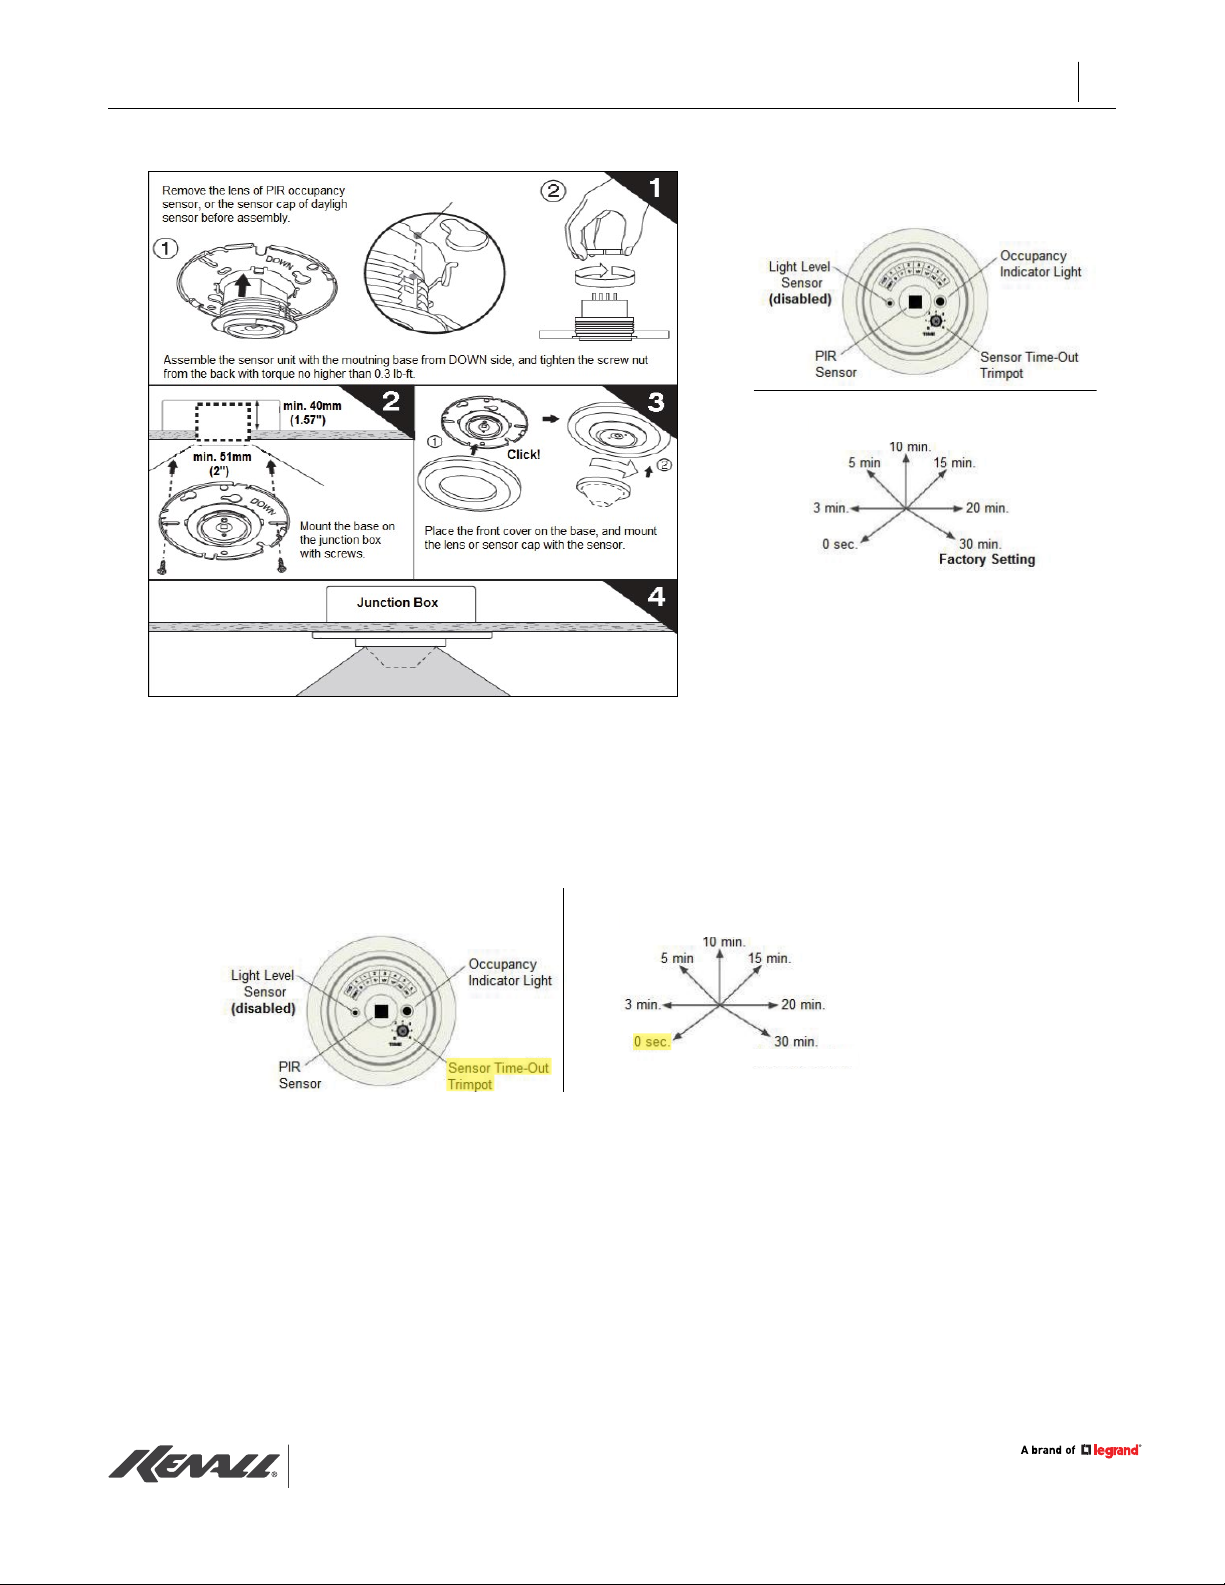
Time Delay: Switches 1, 2, 3
The sensor will hold the lights ON as long as occupancy is detected. The time delay countdown starts when no motion is detected. After no
motion is detected for the length of the time delay, the sensor will turn the lights OFF.
Walk-Through Switch 4
Walk-Through mode turns the lights OFF three minutes after the area is initially occupied, if no motion is detected after the rst 30
seconds. If motion continues beyond the rst 30 seconds, the selected time delay applies.
Service: Switch 5
To override all sensor functions, set DIP Switch 5 to the ON position. The green LED will come on and stay on for the duration of the
override. This bypasses the occupancy control functions of the sensor, but still allows the lights to be manually controlled with a light
switch, if one is installed.
On Mode: Switch 6
The Manual ON function is facilitated by installing a momentary switch such as a Wattstopper LVS-1 Momentary Toggle Switch, or RS2-3
Low Voltage Momentary Switch. This switch connects to the sensor’s Manual (Man.) Switch and +24V terminals as shown in the wiring
diagram. Each time the switch is pressed, the load changes state. The sensor’s operation as related to the manually operated switch is
determined by the setting for DIP Switch 6.
Manual On: In this mode, the switch is required to turn ON the load. The sensor is then used to
keep the load on, based on occupant activity. After the time delay ends, if there is no movement
detected within the 30 second re-trigger period the manual switch must be used to turn ON the
load.
Automatic On: This mode uses occupancy as well as switch activation to turn the load ON. A
manual switch provides the following additional functionality:
• The load can be turned ON by manual switch activation and it stays on as long as occupancy
is detected. The sensor time delay operates as programmed. When the load turns OFF due to
lack of occupancy detection, the load can be turned ON again by occupancy detection or switch
activation.
Activating the manual switch while the load is ON turns the load OFF.When the load is turned OFF
manually, as long as the sensor continues to detect occupancy the load stays OFF. For the selected
time delay, the lights stay OFF and the sensor reverts to the automatic-on mode.
When the load is turned OFF manually, pressing the switch again turns the load ON and the sensor
reverts to the automatic-on mode.
Once the sensor returns to automatic-on mode, either the switch or occupancy detection can turn
the load ON.
Switch#
20 minutes
40 minutes
60 minutes
80 minutes
100 minutes
120 minutes
2 Minutes
1 2 3
Time Delay
Test Mode/2 min
5
Auto On
Manual On
6
Normal
Service
Service
= ON
= OFF
= Factory Setting
4
Disabled
Enabled
Walk-Through
On Mode

www.kenall.com |P: 800-4-Kenall |F: 262-891-9701 |10200 55th Street Kenosha, Wisconsin 53144, USA
This product complies with the Buy American Act: manufactured in the United States with more than 50% of the component cost of US origin. It may be covered by patents
found at www.kenall.com/patents.Content of specication sheets is subject to change; please consult www.kenall.com for current product details. ©2019 Kenall Mfg.Co.
4
INSTALLATION INSTRUCTIONS
IC100_F-5986_070622
IC100 OPERATION VERIFICATION
The sensors are factory preset to 30 minutes, which allows for quick installation. Verication of system performance can be done through
the following procedures.
1. Removed the lens from each PIR sensor and turned Time-Out trimpot to 0 seconds:
Occupancy and Daylight
Sensor Components Time-Out Trimpot Setting
PIR SENSOR INSTALLATION
USING A 4” OCTAGONAL J-BOX
Occupancy and Daylight
Sensor Components
Time-Out Trimpot Setting

www.kenall.com |P: 800-4-Kenall |F: 262-891-9701 |10200 55th Street Kenosha, Wisconsin 53144, USA
This product complies with the Buy American Act: manufactured in the United States with more than 50% of the component cost of US origin. It may be covered by patents
found at www.kenall.com/patents.Content of specication sheets is subject to change; please consult www.kenall.com for current product details. ©2019 Kenall Mfg.Co.
5
INSTALLATION INSTRUCTIONS
IC100_F-5986_070622
IC100 OPERATION VERIFICATION (CONTINUED)
Note – Before making adjustments to the Ultrasonic Sensor, make sure the lighting circuits are turned ‘ON’ and the HVAC systems are in
the overridden/on position. VAV systems should be set to their highest airow.
2. Open front cover of Ultrasonic sensor to access the dip switches and set the Time Delay to 2 minutes.
3. Ensure the Ultrasonic Sensitivity trimpot is set to about 90% - clockwise.
4. Remain still or exit the room. The Indigo-Clean luminaires should emit an indigo-colored light within 45 seconds of no movement in
the room, indicating the system is in Indigo Disinfection mode.
5. Move about the room and the Indigo-Clean luminaires should return to emitting a white light, indication he system is in White
Disinfection mode.
6. Reset the PIR sensor time-out setting to 30 minutes; reset the ultrasonic time-out setting to 2 hours and replace the lenses and front
cover on the sensor, respectively.
Important Note – If optional override switch (See IC100 wiring diagram) is installed and connected to the controller, ensure the switch
is on the ‘OFF’ (i.e. open) position for verication test. If Optional override switch is in the ‘ON’ (i.e. short) position, then the Indigo-Clean
luminaires will stay White Disinfection mode indenitely.
Blue (Occ)
Blk (-)
Red (+)
Blue (Occ)
Blk (-)
Red (+)
Blue (Occ)
Blk (-)
Red (+)
BU3
BK3
RD3
BU2
BK2
RD2
BU1
BK1
RD1
PIR
Sensor
PIR
Sensor
PIR
Sensor
BU6
BK6
RD6
BU5
BK5
RD5
BU4
BK4
RD4
Ultrasonic
Sensor
Blue (Occ)
Blk (-)
Blk (-)
Red (+)
Red (+)
–
+
Override
Switch
(DC)
(Optional)
(Optional)
BRN
BRN BRN
YEL YEL
YEL
Daisy-chain
to Multiple
Indigo-Clean
Luminaires
Blue (Occ)
Red (+)
BAY 1
BAY 2
BAY 3
BAY 6 BAY 5 BAY 4
120/277 VAC
120/277 VAC
INDIGO-CLEAN
LUMINAIRE
IC100
CONTROLLER
VIO
GRY
VIO
VIO
GRY GRY
0-10V
Dimmer
Occupancy
Status
Monitoring,
0-5VDC
Interconnect
(BMS)
WIRING DIAGRAM
For technical assistance, call 1-800-4KENALL (1-800-453-6255).
CUSTOMER SERVICE
WARRANTY
For warranty information visit www.kenall.com/Resources/Certied-Performance-Warranties
Switch#
1 2 3
Time Delay
20 minutes
40 minutes
60 minutes
80 minutes
100 minutes
120 minutes
2 Minutes
Test Mode/2 min
Table of contents