manuals.online logo
Brands
  1. Home
  2. •
  3. Brands
  4. •
  5. Kendox
  6. •
  7. Fitness Equipment
  8. •
  9. Kendox RowShaper Quick reference guide

Kendox RowShaper Quick reference guide

Other manuals for RowShaper

1

Popular Fitness Equipment manuals by other brands

Revitive Arthritis-Knee user manual

Revitive

Revitive Arthritis-Knee user manual

Domyos BM100 operating instructions

Domyos

Domyos BM100 operating instructions

Movement EDGE PUXADA ALTA Assembly manual

Movement

Movement EDGE PUXADA ALTA Assembly manual

Lifeline LLUWB-BLK owner's manual

Lifeline

Lifeline LLUWB-BLK owner's manual

Precor CW-816 Assembly guide

Precor

Precor CW-816 Assembly guide

Balanced Body Precision Rotator Discs manual

Balanced Body

Balanced Body Precision Rotator Discs manual

G-FITNESS AIR ROWER user manual

G-FITNESS

G-FITNESS AIR ROWER user manual

CAPITAL SPORTS Dominate Edition 10028796 manual

CAPITAL SPORTS

CAPITAL SPORTS Dominate Edition 10028796 manual

Martin System TT4FK user guide

Martin System

Martin System TT4FK user guide

CIRCLE FITNESS E7 owner's manual

CIRCLE FITNESS

CIRCLE FITNESS E7 owner's manual

G-FITNESS TZ-6017 user manual

G-FITNESS

G-FITNESS TZ-6017 user manual

Accelerated Care Plus OMNISTIM FX2 CYCLE/WALK user manual

Accelerated Care Plus

Accelerated Care Plus OMNISTIM FX2 CYCLE/WALK user manual

pedalo 20230165 manual

pedalo

pedalo 20230165 manual

Saebo SaeboStim Pro Instructions for use

Saebo

Saebo SaeboStim Pro Instructions for use

Performance HyperVibe User instructions

Performance

Performance HyperVibe User instructions

Scalamobil S27 Operator's manual

Scalamobil

Scalamobil S27 Operator's manual

Precor Experience Series Service manual

Precor

Precor Experience Series Service manual

FYTTER RedMIUM BENCH BE-T6R manual

FYTTER

FYTTER RedMIUM BENCH BE-T6R manual

manuals.online logo
manuals.online logoBrands
  • About & Mission
  • Contact us
  • Privacy Policy
  • Terms and Conditions

Copyright 2025 Manuals.Online. All Rights Reserved.

1
Montage-/Bedienungsanleitung.............................................. 6
Assembly/Operating Instructions ............................................ 7
Notice de montage et d'utilisation............................................ 8
Istruzioni di montaggio/Funzionamentoe................................. 9
Montage-/Bedieningshandleiding ......................................... 10
Szerelés/Kezelési útmutató ................................................... 11
Montážní návod/Návod k obsluze........................................... 12
Návod na montáž /Obsluhu .................................................... 13
Instrucţiuni de montaj/De utilizare......................................... 14
Instrukcja montażu/Obsługi................................................... 16
Montaj/Kullanma kılavuzu ..................................................... 17
Instrucciones de montaje y uso .............................................. 18
M22225_M30176_RowShaper_Manual_20220323_MM.indd 1M22225_M30176_RowShaper_Manual_20220323_MM.indd 1 23.03.22 13:1023.03.22 13:10
2
3
NR. BESCHREIBUNG ANZAHL
1 Handgriff 2
2 Computer (benötigt 2 x 1,5V AAA-
Batterien – Batterien sind NICHT im
Lieferumfang enthalten)
1
3 Vorderer Hauptteil 1
4 Sechskantmutter M8 5
5 Hinterer Haupteil 1
6 Schraube M8x60 1
7 Schaumstoff Endkappen 4
8 Schnellverstellschraube A 1
9 Extension 1
10 Schnellverstellschraube B 1
11 Inbusschraube M8x75 1
12 Schnellverstellschraube C 1
13 Hinterer Standfuß 1
14 Inbusschraube M8x16 4
15 Gabelschlüssel 1
16 Inbus 1
NO. DESCRIPTION NUMBER
1 Handle 2
2 Computer
(requires 2 x 1.5V AAA batteries -
batteries are NOT included)
1
3 Front main component 1
4 Hexagon nut M8 5
5 Rear main component 1
6 Screw M8x60 1
7 Foam end caps 4
8 Fast adjustment screw A 1
9 Extension 1
10 Fast adjustment screw B 1
11 Allen screw M8x75 1
12 Fast adjustment screw C 1
13 Rear stand 1
14 Allen screw M8x16 4
15 Open-ended wrench 1
16 Allen key 1
N° DESCRIPTION QUANTITÉ
1 Poignée 2
2 Ordinateur
(nécessite 2 piles AAA de 1,5 V -
piles NON fournies)
1
3 Partie principale avant 1
4 Écrou hexagonal M8 5
5 Partie principale arrière 1
6 Vis M8x60 1
7 Embouts en mousse 4
8 Vis de réglage rapide A 1
9 Extension 1
10 Vis de réglage rapide B 1
11 Vis Allen M8x75 1
12 Vis de réglage rapide C 1
13 Pied arrière 1
14 Vis Allen M8x16 4
15 Clé à fourche 1
16 Clé Allen 1
LIEFERUMFANG + ÜBERSICHT TEILE (# 1) | DELIVERY CONTENTS + OVERVIEW OF PARTS (# 1) | CONTENU DE LA LIVRAISON + APERÇU DES PIÈCES
(N° 1) | FORNITURA + PANORAMICA PARTI (# 1) | LEVERINGSOMVANG + OVERZICHT ONDERDELEN (# 1) | A CSOMAG TARTALMA + ÁTTEKINTÉS AZ
ALKATRÉSZEKRŐL (# 1) | OBSAH BALENÍ + PŘEHLED DÍLŮ (# 1) | ROZSAH DODÁVKY + PREHĽAD ČASTÍ (Č. 1) | SFERA DE LIVRARE + PREZENTARE
GENERALĂ PIESE (# 1) | ZAKRES DOSTAWY + PRZEGLĄD CZĘŚCI (# 1) | TESLİMAT KAPSAMI + PARÇALARA GENEL BAKIŞ (# 1) | VOLUMEN DE
SUMINISTRO+ VISTA GENERAL DE PIEZAS (# 1)
NR. DESCRIZIONE QUANTITÀ
1 Maniglia 2
2 Computer (richiede 2 batterie AAA
da 1,5 V - le batterie NON sono
incluse)
1
3 Parte principale anteriore 1
4 Dado esagonale M8 5
5 Parte principale posteriore 1
6 Vite M8x60 1
7 Tappi terminali in schiuma 4
8 Vite di regolazione rapida A 1
9 Estensione 1
10 Vite di regolazione rapida B 1
11 Vite a brugola M8x75 1
12 Vite di regolazione rapida C 1
13 Cavalletto posteriore 1
14 Vite a brugola M8x16 4
15 Chiave a forchetta 1
16 Chiave a brugola 1
NR. BESCHRIJVING AANTAL
1 Handgreep 2
2 Computer (werkt op 2 x 1,5V AAA-
batterijen – batterijen worden NIET
meegeleverd)
1
3 Voorkant hoofddeel 1
4 Zeskantmoer M8 5
5 Achterkant hoofddeel 1
6 Schroef M8x60 1
7 Schuimrubberen doppen 4
8 Snelstelschroef A 1
9 Verlengstuk 1
10 Snelstelschroef B 1
11 Inbusschroef M8x75 1
12 Snelstelschroef C 1
13 Staander achterkant 1
14 Inbusschroef M8x16 4
15 Moersleutel 1
16 Inbus 1
SZ. LEÍRÁS DARABSZÁM
1 Fogantyú 2
2 Számítógép (szükséges hozzá 2
db 1,5 V-os AAA-elem - Az elemek
NEM képezik a csomag részét)
1
3 Elülső központi rész 1
4 M8-as hatlapú csavaranya 5
5 Hátsó központi rész 1
6 M8x60-as csavar 1
7 Habszivacs zárósapkák 4
8 Gyorsállító csavar (A) 1
9 Hosszabbító 1
10 Gyorsállító csavar (B) 1
11 M8x75-ös imbuszcsavar 1
12 Gyorsállító csavar (C) 1
13 Hátsó állóláb 1
14 M8x16-os imbuszcsavar 4
15 Villáskulcs 1
16 Imbuszkulcs 1
Č. POPIS POČET
1 Rukojeť 2
2 Počítač (vyžaduje 2 x baterie 1,5V
AAA – baterie NEJSOU obsaženy
v balení)
1
3 Přední hlavní část 1
4 Šestihranná matice M8 5
5 Zadní hlavní část 1
6 Šroub M8x60 1
7 Pěnové koncové krytky 4
8 Rychlonastavovací šroub A 1
9 Extenze 1
10 Rychlonastavovací šroub B 1
11 Inbusový šroub M8x75 1
12 Rychlonastavovací šroub C 1
13 Zadní opěrná noha 1
14 Inbusový šroub M8x16 4
15 Vidlicový klíč 1
16 Inbus 1
Č. OPIS POČET
1 Rukoväť 2
2 Počítač (vyžaduje 2 x 1,5 V AAA
batérie - batérie NIE sú súčasťou
balenia)
1
3 Predná hlavná časť 1
4 Šesťhranná matica M8 5
5 Zadná hlavná časť 1
6 Skrutka M8x60 1
7 Penové koncové uzávery 4
8 Skrutka na rýchle nastavenie A 1
9 Predĺženie 1
10 Skrutka na rýchle nastavenie B 1
11 Imbusová skrutka M8x75 1
12 Skrutka na rýchle nastavenie C 1
13 Zadný stojan 1
14 Imbusová skrutka M8x16 4
15 Kľúč s otvoreným koncom 1
16 Inbus 1
NR. DESCRIERE NR. BUCĂŢI
1 Mâner 2
2 Computerul (necesită 2 x baterii
de 1,5V tip AAA – bateriile NU sunt
cuprinse în sfera de livrare)
1
3 Partea principală frontală 1
4 Piuliţă hexagonală M8 5
5 Partea principală posterioară 1
6 Şurub M8x60 1
7 Capace din material expandat 4
8 Şurub de reglare rapidă A 1
9 Extensie 1
10 Şurub de reglare rapidă B 1
11 Șurub cu cap cilindric și locaș
hexagonal M8x75
1
12 Şurub de reglare rapidă C 1
13 Picior suport posterior 1
14 Șurub cu cap cilindric și locaș
hexagonal M8x16
4
15 Cheie fixă tip furcă 1
16 Inbus 1
M22225_M30176_RowShaper_Manual_20220323_MM.indd 2M22225_M30176_RowShaper_Manual_20220323_MM.indd 2 23.03.22 13:1023.03.22 13:10
2
3
NR. OPIS ILOŚĆ
1 Uchwyt 2
2 Komputer (wymaga zasilania
bateriami 2 x 1,5 V AAA – baterie
NIE wchodzą w zakres dostawy)
1
3 Przednia część główna 1
4 Nakrętka sześciokątna M8 5
5 Tylna część główna 1
6 Śruba M8x60 1
7 Nasadki końcowe z pianki 4
8 Śruba szybkiej regulacji A 1
9 Przedłużenie 1
10 Śruba szybkiej regulacji B 1
11 Śruba imbusowa M8x75 1
12 Śruba szybkiej regulacji C 1
13 Tylna nóżka 1
14 Śruba imbusowa M8x16 4
15 Klucz płaski 1
16 Klucz imbusowy 1
NO. TANIM ADET
1 Tutamak 2
2 Gösterge (2 adet 1,5V AAA tipi pil
– Piller teslimat kapsamına dahil
DEĞİLDİR)
1
3 Ön ana parça 1
4 M8 altı köşeli somun 5
5 Arka ana parça 1
6 M8x60 cıvata 1
7 Köpük uç kapaklar 4
8 Hızlı ayar cıvatası A 1
9Uzatma 1
10 Hızlı ayar cıvatası B 1
11 M8x75 alyan cıvata 1
12 Hızlı ayar cıvatası C 1
13 Arka ayak 1
14 M8x16 alyan cıvata 4
15 Çatal anahtar 1
16 Alyan 1
N.º DESCRIPCIÓN NÚMERO
1Mango 2
2 Ordenador (se necesitan 2 pilas
AAA de 5V – Las pilas NO están
incluidas en el volumen de
suministro)
1
3 Parte principal delantera 1
4 Tuerca hexagonal M8 5
5 Parte principal trasera 1
6 Tornillo M8x60 1
7 Tapas finales de espuma 4
8 Tornillo de ajuste rápido A 1
9 Extensión 1
10 Tornillo de ajuste rápido B 1
11 Tornillo Allen M8x75 1
12 Tornillo de ajuste rápido C 1
13 Soporte posterior 1
14 Tornillo Allen M8x16 4
15 Llave de boca 1
16 Allen 1
1
M22225_M30176_RowShaper_Manual_20220323_MM.indd 3M22225_M30176_RowShaper_Manual_20220323_MM.indd 3 23.03.22 13:1023.03.22 13:10
4
5
2
3
M22225_M30176_RowShaper_Manual_20220323_MM.indd 4M22225_M30176_RowShaper_Manual_20220323_MM.indd 4 23.03.22 13:1023.03.22 13:10
4
5
4 A
4 B
5
4 C
UNLOCK / LÖSEN
HOHE INTENSITÄT
HIGH HOLE
DREHEN UND ZIEHEN
TURN AND PULL
MITTLERE INTENSITÄT
MIDDLE HOLE
NIEDERE INTENSITÄT
LOW HOLE
LOCK / FIXIERT
M22225_M30176_RowShaper_Manual_20220323_MM.indd 5M22225_M30176_RowShaper_Manual_20220323_MM.indd 5 23.03.22 13:1123.03.22 13:11
6
7
DE
WICHTIGE HINWEISE UND SICHERHEITSHINWEISE
Lesen Sie die gesamte Gebrauchsanweisung, bevor
Sie mit dem Aufbau beginnen und das Gerät in Betrieb
nehmen. Bitte beachten Sie folgende Sicherheitshinweise:
• Konsultieren Sie Ihren Arzt, bevor Sie mit dem Training beginnen.
• Sollten Sie beim Trainieren unter Schwindel, Übelkeit oder
Brustschmerzen leiden, brechen Sie umgehend das Training ab und
konsultieren Sie sofort Ihren Arzt.
• Das Gerät ist nicht für den Gebrauch durch Personen mit einem
Gewicht über 120 kg geeignet. Das Gerät darf NICHT von mehreren
Personen gleichzeitig benutzt werden!
• Dieses Gerät kann von Kindern ab 8 Jahren sowie von Personen mit
reduzierten physischen, sensorischen oder mentalen Fähigkeiten
oder Mangel an Erfahrung und/oder Wissen benutzt werden,
wenn sie beaufsichtigt oder bezüglich des sicheren Gebrauchs
des Gerätes unterwiesen wurden und die daraus resultierenden
Gefahren verstanden haben. Kinder dürfen nicht mit dem Gerät
spielen. Reinigung und Benutzer-Wartung dürfen nicht durch Kinder
durchgeführt werden, es sei denn, sie sind älter als 8 Jahre und
beaufsichtigt. Kinder jünger als 8 Jahre sind vom Gerät und der
Anschlussleitung fernzuhalten.
• Halten Sie Haustiere vom Gerät fern.
• Kontrollieren Sie das Gerät vor jedem Gebrauch und stellen Sie
sicher, dass alle Schrauben fixiert und alle Riegel gut eingerastet
sind.
• Stellen Sie sicher, dass Hebel oder weitere Einstellungs-
Mechanismen nicht Ihre Bewegungsfreiheit während des Gebrauchs
beeinträchtigen.
• Halten Sie Hände und Füße von allen beweglichen Teilen fern.
• Stellen Sie sicher, dass vom Gerät jederzeit ohne jegliche
Einschränkungen abgestiegen werden kann.
• Führen Sie niemals Objekte in Öffnungen am Gerät ein.
• Lassen Sie beim Verwenden des Geräts 2m Abstand an allen Seiten
des Geräts, damit genügend Freifläche für das Absteigen gegeben ist
und damit Kinder, Zuschauer und Haustiere weit genug entfernt sind.
• Stellen Sie sicher, dass Sie über genügend Platz für den Aufbau und
den Gebrauch verfügen.
• Dieses Gerät ist ausschließlich für den Heimgebrauch geeignet.
• Machen Sie vor und nach jedem Training Dehnungsübungen.
• Nehmen Sie vor, während und nach dem Training genügend
Flüssigkeit (vorzugsweise Wasser) zu sich.
• Tragen Sie beim Trainieren auf dem Gerät NIEMALS weite
Kleidungsstücke, da sich diese im Gerät verfangen und zu Unfällen
führen können. Tragen Sie Sportbekleidung.
• Beginnen Sie ihr Training NIEMALS mit hohem Tempo.
• Personen mit körperlichen Einschränkungen oder ältere Personen
MÜSSEN vor dem Gebrauch einen Arzt konsultieren.
• Verwenden Sie das Gerät NICHT wenn Sie einen Herzschrittmacher
oder ein anderes kardiologisches Gerät haben.
• Schwangere müssen vor dem Gebrauch ihren Arzt konsultieren.
• Tauschen Sie beschädigte Teile umgehend aus und verwenden Sie
das Gerät erst wieder, wenn es vollständig repariert ist.
• Lagern Sie das Gerät an einem sauberen und trockenen Ort.
• Das Sicherheitsniveau des Gerätes kann nur gehalten werden,
wenn es regelmäßig auf Schäden und Verschleiß geprüft wird.
Insbesondere die Rollen auf dem Sitz sollten regelmäßig überprüft
werden.
• Defekte Teile sofort austauschen und/oder das Gerät bis zur
Instandsetzung nicht mehr zu benutzen.
• Bei unsachgemäßem oder übermäßigem Training sind
Gesundheitsschäden möglich.
• Das Trainingsgerät muss auf einem standsicheren und waagerechten
Untergrund aufgestellt werden.
MASSE/GEWICHT DES GERÄTS:
Gesamtgewicht 12,5kg, Aufstellmaß 156cm Länge,
Breite 43,3cm, Höhe 58cm
ZUSAMMENBAU (# 2):
Schritt 1: Verbinden Sie den vorderen (3) und den hinteren Haupteil (5) mittels
der vier Inbusschrauben M8x16 (14) und den Sechskantmuttern M8 (4).
Schritt 2: Klappen Sie den hinteren Teil des Haupteil 90° aus und verschauben
Sie diesen mittels Schraube M8x60 (6) und der Schnellverstellschraube B
(10). Danach stecken Sie den hinteren Standfuß (13) in den Hauptteil und
fixieren diesen mit der Schnellverstellschraube C (12).
Schritt 3: Schieben Sie die vier Schaumstoff Endkappen (7) auf die
Extension (9) und verschrauben die Extension mittels Inbusschraube M8x75
(11) und Sechskantmutter M8 (4) mit dem Haupteil. Zuletzt fixieren Sie es
mit der Schnellverstellschraube A (8) in Position.
Schritt 4: Schieben Sie die beiden Handgriffe (1) ein und setzen Sie den
Computer (2) auf.
COMPUTER (# 3)
Batterien einsetzen: Setzen Sie vor Beginn die Batterien ein (2 x 1,5V
AAA-Batterien) und achten Sie hierbei auf die Polarität. Der Batterieschacht
befindet sich auf der Rückseite des Gerätes. Info: Batterien sind nicht im
Lieferumfang enthalten!
Achtung: Der Computer schaltet sich automatisch ein, wenn Sie mit dem
Ruder-Workout beginnen. Wenn Sie das Workout beenden oder pausieren,
schaltet sich der Computer automatisch nach ca. 4 Minuten aus. Wechseln
Sie die Batterien, wenn das Display trotz Bewegung schwarz bleibt und sich
nicht einschaltet.
Display/Funktionen:
1. SCAN: Mit dieser Funktion springt die Anzeige des Computers
automatisch durch alle Funktion und zeigt diese jeweils für 4 Sekunden an.
2. TIME (Zeit 00:00—99:59 Min): Gibt die gesamte Trainingszeit an.
3. COUNT (Zähler 0—9999): Gibt die Wiederholungen während des Trainings an.
4. R.P.M (Frequenz 0.0—999.9 Wh/Min): Gibt Ihnen Auskunft, wie viele
Wiederholungen Sie pro Minute machen.
5. CAL (Kalorien 0—9999 Kcal): Gibt an, wieviel Kilokalorien Sie verbrannt
haben.
Mode: Drücken Sie die Mode-Taste um zwischen den verschiedenen
Funktionen zu wechseln. Wenn Sie die Taste 4 Sekunden gedrückt halten,
werden alle Werte auf 0 gesetzt.
Reset: Durch drücken der Reset-Taste können Sie den ausgewählten Wert
auf 0 setzen.
ALLGEMEINE INFORMATION ZUM TRAINING
MIT DEM KENDOX ROWSHAPER:
Rudern ist das perfekte Ganzköpertraining. Es ist ein sehr effizientes Kraft-
und Ausdauertraining bei dem bis zu 85 % der gesamten Körpermuskulatur
trainiert wird.
SCHWIERIGKEITSSTUFEN: Zum einen kann der Zugwiderstand am
12-stufigen Einstellrad eingestellt werden. Zum anderen kann die Neigung
des Gerätes in 3 unterschiedlichen Stufen eingestellt werden.
M22225_M30176_RowShaper_Manual_20220323_MM.indd 6M22225_M30176_RowShaper_Manual_20220323_MM.indd 6 23.03.22 13:1123.03.22 13:11
6
7
WICHTIG! Je höher die jeweilige Einstellung gewählt wird, desto
intensiver ist das Training!
Sollten Sie beim Trainieren unter Schwindel, Übelkeit oder Brustschmerzen
leiden, brechen Sie umgehend das Training ab und konsultieren Sie sofort
Ihren Arzt.
FÜR EINE OPTIMALE AUSFÜHRUNG DIESER ÜBUNGEN ACHTEN SIE
UNBEDINGT AUF EINEN GERADEN RÜCKEN – SO KÖNNEN SIE ZERRUNGEN
UND SCHMERZEN IM RÜCKENBEREICH VORBEUGEN!
ERSTE SCHRITTE (# 4 – A, B, C)
A: Treten Sie auf das Pedal und ziehen die Gurte fest.
B: Mittels drehen des Einstellrades am Hydraulikzylinder können Sie aus
12 unterschiedlichen den Widerstandsstufen wählen.
C: Lösen Sie den Zugbolzen und ziehen Sie diesen heraus. Stellen Sie
den hintern Fuß auf die gewünschte Höhe ein (je höher, desto intensiver
trainieren Sie Ihre Beine), lassen Sie den Zugbolzen los und verschrauben
diesen wieder.
SICHERN DES SITZES (# 5)
Bei Bedarf (zB. zum Verstauen des Gerätes oder für Sit Up Übungen)
können Sie den Sitz mittels Bolzen fixieren (LOCK). Für das Rudern stecken
Sie den Bolzen in die UNLOCK Position um den Bolzen sicher zu verstauen.
EN
IMPORTANT NOTES AND SAFETY NOTICES
Read the instructions for use in their entirety before
you start assembling and using the appliance. Please
note the following safety instructions:
• Consult your doctor before starting any training.
• If you experience any dizziness, nausea or chest pain while
exercising, stop exercising immediately and consult your doctor
straight away.
• The appliance is not suitable for use by people with a weight of over
120 kg. The appliance must NOT be used by more than one person at
a time!
• This appliance should only be used by children aged 8 years and
over, as well as by persons with reduced physical, sensory or
mental abilities or lack of experience and knowledge, if they are
supervised or have been instructed on the safe use of the appliance
and understand the dangers associated with its use. Children must
never be allowed to play with the appliance. Cleaning and user
maintenance must not be carried out by children unless they are
older than 8 years and under adult supervision. Children younger
than 8 years of age are to be kept away from the appliance and the
connection cable.
• Keep pets away from the appliance.
• Check the appliance before each use and make sure that all screws
are fixed and all latches are properly engaged.
• Make sure that levers and other adjustment mechanisms do not
restrict your freedom of movement during use.
• Keep your hands and feet away from all moving parts.
• Make sure that it is possible to dismount the appliance at any time
without any restrictions.
• Never insert objects into openings on the appliance.
• When using the appliance, leave a clearance of 2 m around all sides,
so that there is enough space to dismount and so that children,
bystanders and pets are far enough away.
• Make sure you have sufficient space to set up and use the appliance.
• This appliance is only suitable for domestic use.
• Perform stretching exercises before and after each workout.
• Ensure that you drink enough fluids (preferably water) before, during
and after your workout.
• NEVER wear loose clothing when exercising, as it can get caught
in the appliance and cause accidents. Wear clothing suitable for
exercising.
• NEVER start your workout at a fast pace.
• Individuals with physical limitations and the elderly MUST consult a
physician before using.
• DO NOT use the appliance if you have been fitted with a pacemaker or
other cardiological device.
• Pregnant women must consult their doctor before use.
• Replace damaged parts immediately, and do not use the appliance
until it has been completely repaired.
• Store the appliance in a clean and dry place.
• The appliance‘s safety can only be maintained if it is regularly
checked for damage and wear. In particular, the rollers on the seat
should be checked regularly.
• Replace defective parts immediately and/or cease use of the
appliance until it has been repaired.
• Improper or excessive exercise can be detrimental to your health.
• The training appliance must be set up on a stable and level surface.
APPLIANCE DIMENSIONS/WEIGHT:
Total weight 12.5kg, assembled dimensions: length 156cm,
width 43.3cm, height 58cm
ASSEMBLY (# 2):
Step 1: Connect the front (3) and rear main components (5) using the four
Allen screws M8x16 (14) and the hexagon nuts M8 (4).
Step 2: Unfold the rear component of the main component by 90° and screw it
in place using the screw M8x60 (6) and the fast adjustment screw B (10). Then
insert the rear stand (13) into the main component, and fix it in place with the
fast adjustment screw C (12).
Step 3: Slide the four foam end caps (7) onto the extension (9) and screw the
extension to the main part using the Allen screw M8x75 (11) and hexagonal
nut M8 (4). Finally fix it in position with the fast adjustment screw A (8).
Step 4: Slide in the two handles (1) and attach the computer (2).
COMPUTER (# 3)
Inserting the batteries: Before starting, insert the batteries (2 x 1.5V AAA
batteries), paying attention to the polarity. The battery compartment is
located on the rear of the appliance. Note: The batteries are not included in
the delivery contents!
Warning: The console will switch on automatically when you start your
rowing workout. When you end or pause the workout, the computer will
automatically turn off after approximately 4 minutes. Change the batteries if
the display remains black despite movement and fails to turn on.
Display/Functions:
1. SCAN: With this function, the display of the computer automatically
scrolls through all functions and displays each of them for 4 seconds.
2. TIME (Time 00:00—99:59 mins): Shows the total training time.
3. COUNT (Counter 0—9999): Shows the number of repetitions during the
workout.
4. R.P.M (Frequency 0.0—999.9 rep/min): Shows the number of repetitions
per minute.
5. CAL (Calories 0—9999 Kcal): Shows the number of kilocalories you have
burned.
M22225_M30176_RowShaper_Manual_20220323_MM.indd 7M22225_M30176_RowShaper_Manual_20220323_MM.indd 7 23.03.22 13:1123.03.22 13:11
8
9
Mode: Press the Mode button to switch between the different functions. If
you keep the button pressed for 4 seconds, all values are reset to 0.
Reset: You can set the selected value to 0 by pressing the Reset button.
GENERAL INFORMATION ABOUT TRAINING
WITH THE KENDOX ROWSHAPER:
Rowing is the ideal full-body workout. It is a highly efficient form of strength
and endurance training, in which up to 85% of the entire body‘s muscles are
trained.
RESISTANCE LEVELS: On the one hand, the pulling resistance can be set on
the 12-level dial. On the other, the inclination of the appliance can be set to
3 different levels.
IMPORTANT! The higher the setting, the more intensive the training!
If you suffer from dizziness, nausea or chest pain while training, stop
exercising immediately and consult your doctor straight away.
IN ORDER TO OPTIMALLY PERFORM THESE EXERCISES, MAKE SURE YOU
HAVE A STRAIGHT BACK - THIS WILL PREVENT STRAIN AND PAIN IN THE
BACK AREA!
FIRST STEPS (# 4 – A, B, C)
A: Step on the pedals and tighten the straps.
B: By turning the adjusting wheel on the hydraulic cylinder, you can choose
between 12 different resistance levels.
C: Loosen the draw bolt, and pull it out. Adjust the rear foot to the desired
height (the higher it is, the more intensively you will train your legs), release
the tension bolt, and screw it back in place.
SECURING THE SEAT (# 5)
If necessary (e.g. to stow the appliance or for sit-up exercises) you can fix
the seat with the bolts (LOCK). For rowing, put the bolt in the UNLOCK
position to keep it secured in place.
FR
REMARQUESIMPORTANTESET CONSIGNES DESÉCURITÉ
Lisez l‘intégralité de la notice d‘utilisation avant
de commencer le montage et d‘utiliser l‘appareil.
Veuillez respecter les consignes de sécurité suivantes :
• Consultez votre médecin avant de commencer tout entraînement.
• Si vous souffrez d‘étourdissements, de nausées ou de douleurs
thoraciques pendant l‘exercice, arrêtez aussitôt l‘entraînement et
consultez immédiatement votre médecin.
• L‘appareil ne convient pas aux personnes pesant plus de 120 kg.
L‘appareil NE doit PAS être utilisé par plusieurs personnes à la fois !
• Cet appareil peut être utilisé par des enfants âgés de 8 ans et plus
ainsi que par des personnes ayant des capacités sensorielles,
mentales ou physiques réduites ou manquant d‘expérience et
de connaissances si ces personnes sont supervisées ou ont été
informées de l‘utilisation en toute sécurité de l‘appareil et si elles
comprennent les dangers qui en résultent. Les enfants ne doivent
pas jouer avec l‘appareil. Le nettoyage et l‘entretien de l‘appareil ne
doivent pas être effectués par des enfants à moins qu‘ils ne soient
âgés de plus de 8 ans et surveillés. Les enfants de moins de 8 ans
doivent être tenus à l‘écart de l‘appareil et du cordon d‘alimentation.
• Éloignez les animaux domestiques de l‘appareil.
• Vérifiez l‘appareil avant chaque utilisation et assurez-vous que
toutes les vis sont serrées et que tous les loquets sont correctement
engagés.
• Assurez-vous que les leviers ou autres mécanismes de réglage
n‘entravent pas votre liberté de mouvement pendant l‘utilisation.
• Gardez les mains et les pieds éloignés de toutes les pièces mobiles.
• Assurez-vous de pouvoir quitter l‘appareil à tout moment sans
encombre.
• N‘insérez jamais d‘objets dans les ouvertures de l‘appareil.
• Pour utiliser l‘appareil, prévoyez un dégagement de 2 m tout autour
afin qu‘il y ait suffisamment d‘espace pour le quitter et que les
enfants, les spectateurs et les animaux domestiques soient tenus
suffisamment à l‘écart.
• Assurez-vous de disposer de suffisamment de place pour l‘installer
et l‘utiliser.
• Cet appareil convient uniquement à un usage domestique.
• Faites des exercices d‘étirement avant et après chaque
entraînement.
• Buvez suffisamment (de préférence de l‘eau) avant, pendant et après
votre entraînement.
• NE portez JAMAIS de vêtements amples pendant l‘entraînement, car
ils peuvent se coincer dans l‘appareil et provoquer des accidents.
Portez des vêtements de sport.
• NE commencez JAMAIS votre entraînement à un rythme rapide.
• Les personnes ayant des limitations physiques ou les personnes
âgées DOIVENT consulter un médecin avant l‘utilisation.
• N‘utilisez PAS l‘appareil si vous portez un stimulateur cardiaque ou
un autre appareil cardiologique.
• Les femmes enceintes doivent consulter leur médecin avant
utilisation.
• Remplacez immédiatement les pièces endommagées et n‘utilisez
plus l‘appareil tant qu‘il n‘a pas été complètement réparé.
• Rangez l‘appareil dans un endroit propre et sec.
• Le niveau de sécurité de l‘appareil ne peut être maintenu que s‘il
est régulièrement vérifié quant aux dommages et à l‘usure. En
particulier, les roulements à billes du siège doivent être vérifiés
régulièrement.
• Remplacez immédiatement les pièces défectueuses et/ou arrêtez
d‘utiliser l‘appareil jusqu‘à ce qu‘il soit réparé.
• Un entraînement inapproprié ou excessif peut nuire à votre santé.
• L‘appareil d‘entraînement doit être installé sur un sol stable et plat.
DIMENSIONS ET POIDS DE L‘APPAREIL :
Poids total 12,5 kg, encombrement 156 cm de long x 43,3 cm
de large x 58 cm de haut
MONTAGE (N° 2) :
Étape 1: Assemblez la partie principale avant (3) et la partie principale arrière
(5) à l‘aide des quatre vis Allen M8x16 (14) et des écrous hexagonaux M8 (4).
Étape 2: Dépliez la partie arrière de la pièce principale de 90° et vissez-la à
l‘aide de la vis M8x60 (6) et de la vis de réglage rapide B (10). Insérez ensuite
le pied arrière (13) dans la partie principale et fixez-le à l‘aide de la vis de
réglage rapide C (12).
Étape 3: Faites glisser les quatre embouts en mousse (7) sur l‘extension
(9) et vissez l‘extension sur la partie principale à l‘aide de la vis Allen M8x75
(11) et de l‘écrou hexagonal M8 (4). Maintenez le tout en place avec la vis de
réglage rapide A (8).
Étape 4: Insérez les deux poignées (1) et mettez l‘ordinateur en place (2).
ORDINATEUR (N° 3)
Insertion des piles : Avant de commencer, insérez les piles (2 piles AAA de
1,5 V) en respectant la polarité. Le compartiment à piles est situé à l‘arrière
de l‘appareil. Information : Piles non fournies !
M22225_M30176_RowShaper_Manual_20220323_MM.indd 8M22225_M30176_RowShaper_Manual_20220323_MM.indd 8 23.03.22 13:1123.03.22 13:11
8
9
Attention : L‘ordinateur s‘allumera automatiquement lorsque vous
commencerez votre entraînement. Lorsque vous arrêtez l‘entraînement ou
faites une pause , l‘ordinateur s‘éteint automatiquement après environ 4
minutes. Remplacez les piles si l‘écran reste noir malgré le mouvement et
ne s‘allume pas.
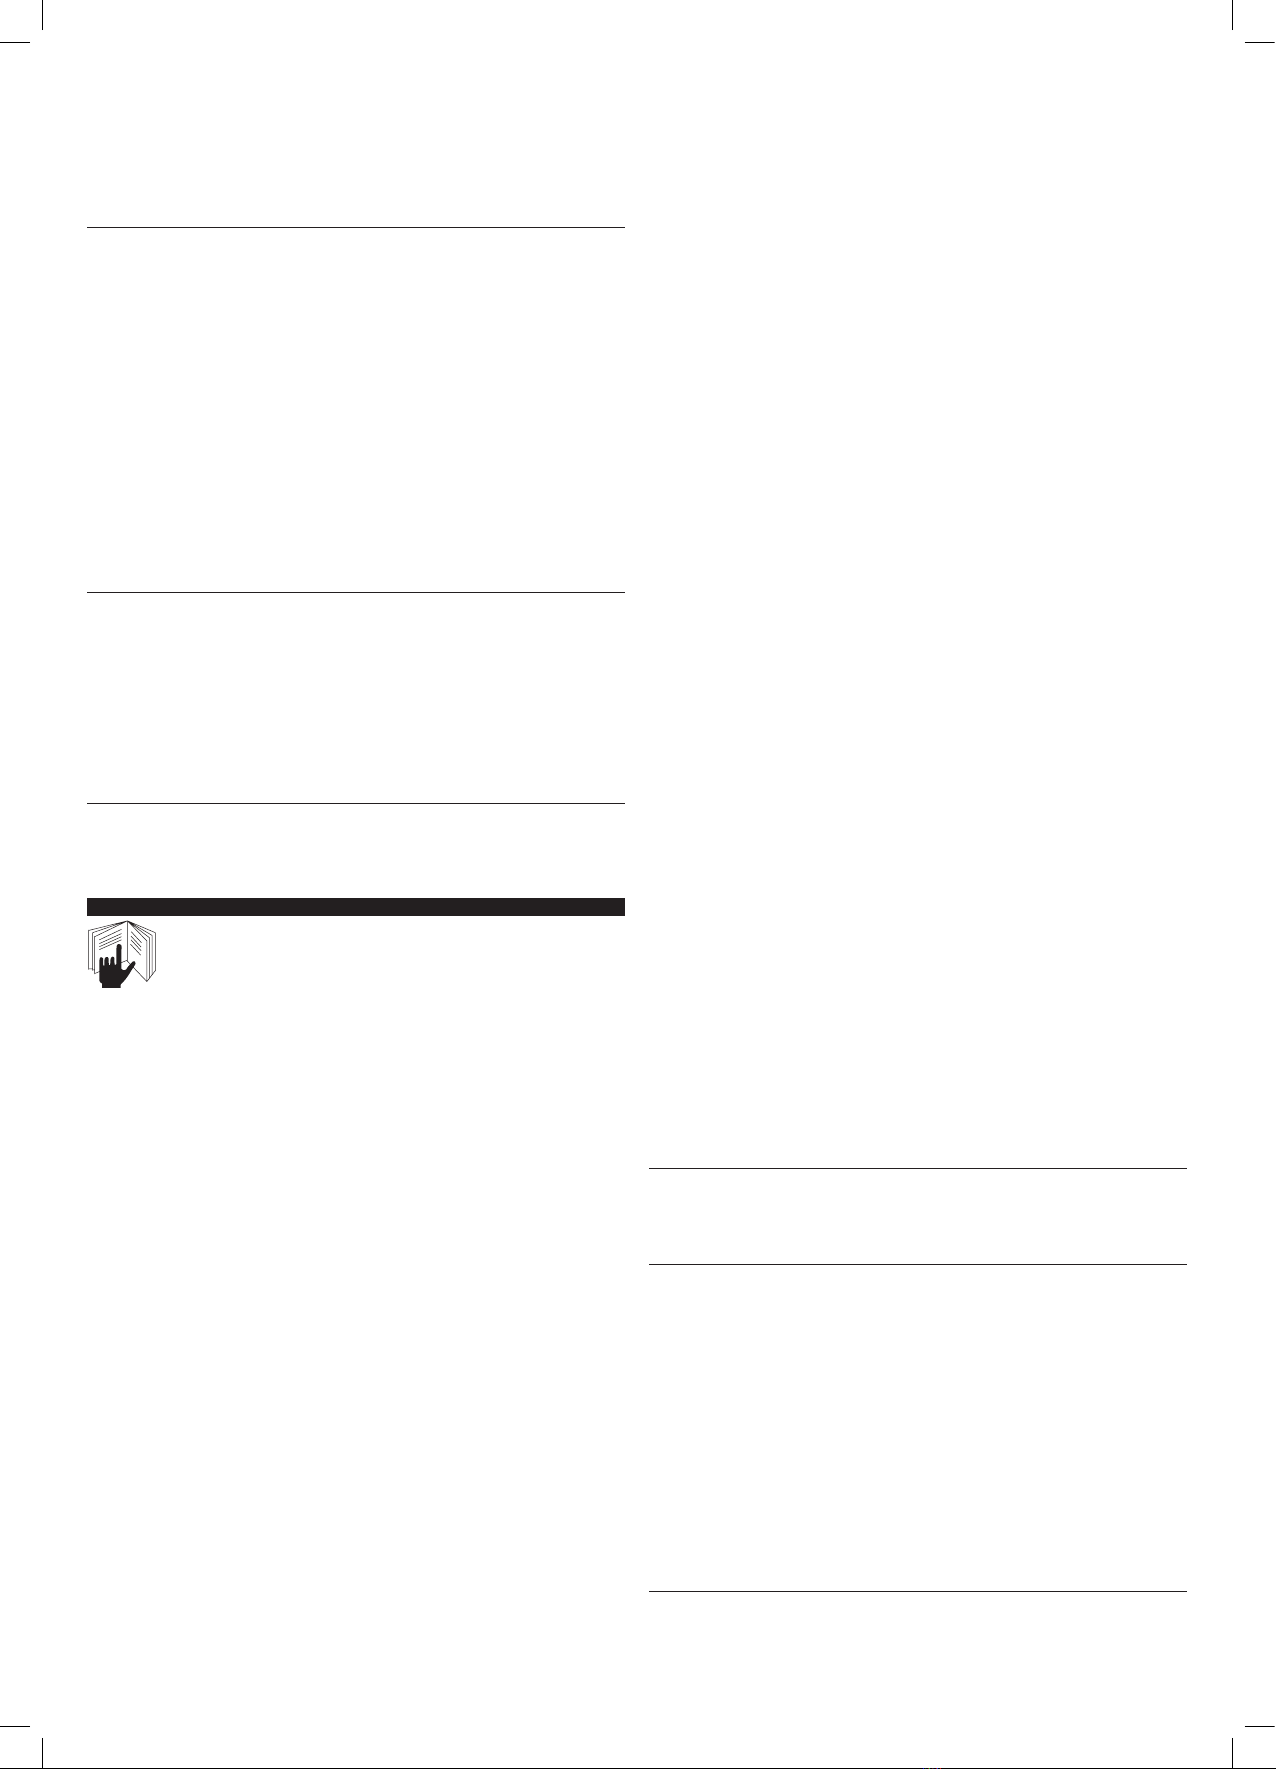
Affichage/fonctions :
1. SCAN: permet de passer automatiquement par toutes les fonctions en les
affichant pendant 4 secondes.
2. TIME (durée 00:00-99:59 min) : indique la durée totale de l‘entraînement.
3. COUNT (compteur 0-9999) : indique les répétitions pendant l‘entraînement.
4. R.P.M (fréquence 0,0-999,9 rép/min) : fournit des informations sur le
nombre de répétitions que vous faites par minute.
5. CAL (calories 0-9999 Kcal) : indique le nombre de kilocalories que vous
avez brûlées.
Mode: appuyez sur la touche Mode pour basculer entre les différentes
fonctions. Si vous maintenez la touche enfoncée pendant 4 secondes, toutes
les valeurs sont mises à 0.
Reset: un appui sur la touche Reset permet de remettre la valeur
sélectionnée à zéro.
INFORMATIONS GÉNÉRALES CONCERNANT L‘ENTRAÎNEMENT AVEC
LE RAMEUR KENDOX ROWSHAPER:
Le rameur est un outil d‘entraînement parfait pour tout le corps. Les
exercices de force et d‘endurance sont très efficaces et permettent de faire
travailler jusqu‘à 85 % des muscles du corps entier.
NIVEAUX DE DIFFICULTÉ : D‘une part, la résistance à la traction peut être
réglée sur le cadran à 12 niveaux. D‘autre part, l‘inclinaison de l‘appareil
peut être réglée sur 3 niveaux différents.
IMPORTANT ! Plus le réglage est élevé, plus l‘entraînement est intensif !
Si vous souffrez de vertiges, de nausées ou de douleurs thoraciques pendant
l‘exercice, arrêtez aussitôt l‘entraînement et consultez immédiatement votre
médecin.
POUR UNE EXÉCUTION OPTIMALE DE CES EXERCICES, ASSUREZ-VOUS DE
GARDER LE DOS BIEN DROIT - CELA ÉVITERA LES TENSIONS ET LES MAUX
DE DOS !
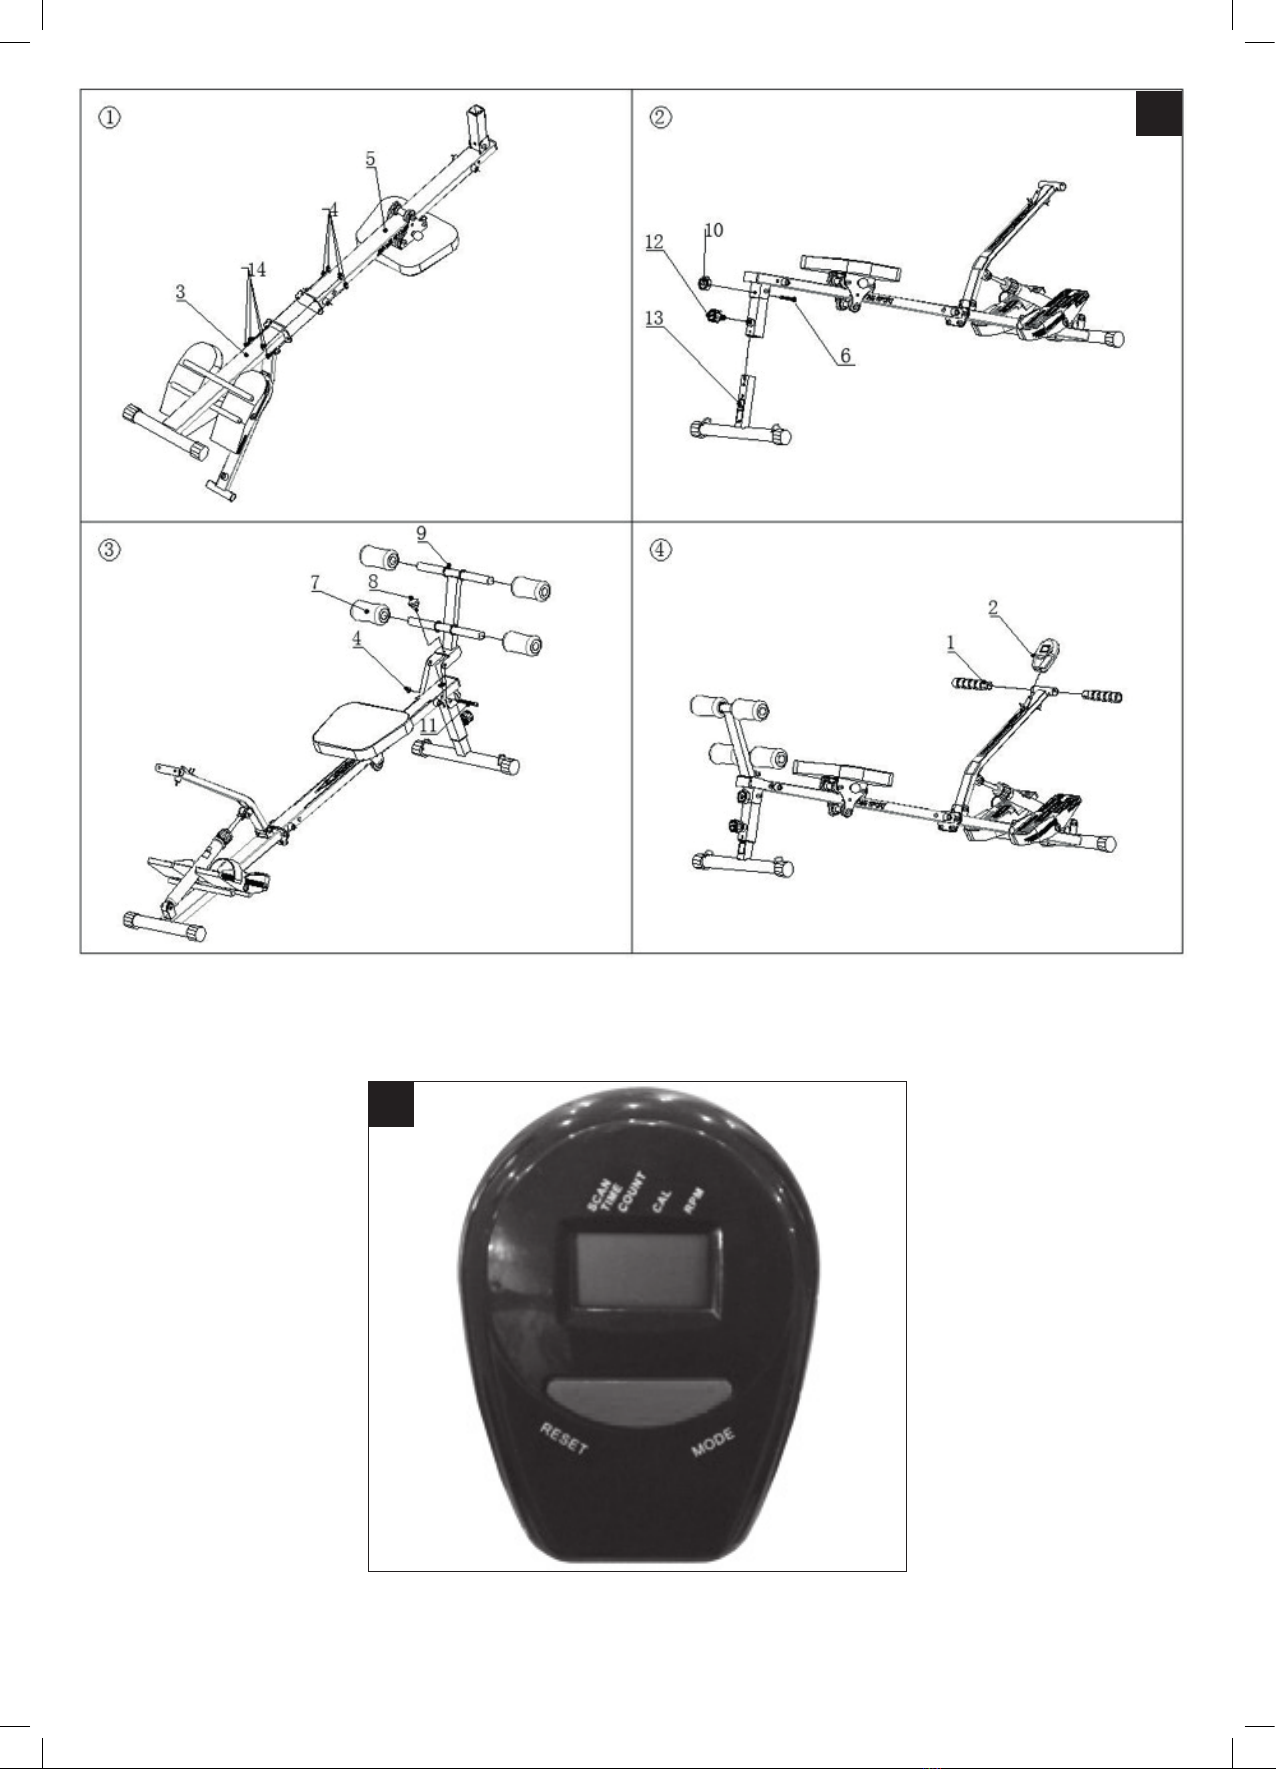
MISE EN ROUTE (N° 4 - A, B, C)
A : Appuyez sur les pédales et serrez les sangles.
B : En tournant la molette de réglage sur le vérin hydraulique, vous pouvez
choisir parmi 12 niveaux de résistance différents.
C : Desserrez le boulon de traction et retirez-le. Réglez le pied arrière à la
hauteur désirée (plus la hauteur est élevée, plus vous entraînez intensément
vos jambes), remettez le boulon de traction et revissez-le.
BLOCAGE DU SIÈGE (N° 5)
Si nécessaire (par ex. pour ranger l‘appareil ou pour des exercices de sit up),
vous pouvez bloquer le siège à l‘aide du boulon (LOCK). Pour ramer, mettez
le boulon en position UNLOCK pour le sécuriser.
IT
INFORMAZIONI IMPORTANTI EISTRUZIONI SULLA
SICUREZZA –Leggere tutte leistruzioni perl‘uso prima di
iniziare ilmontaggio ela messa inservizio del
dispositivo.Sipregadiosservarele seguenti istruzionidisicurezza:
• Consultare il proprio medico prima di iniziare qualsiasi allenamento.
• In caso di vertigini, nausea o dolore al petto durante l‘allenamento
interrompere immediatamente l‘allenamento e consultare
immediatamente il proprio medico.
• Il dispositivo non deve essere utilizzato da persone di peso superiore
a 120 kg. Il dispositivo NON deve essere utilizzato da più di una
persona contemporaneamente!
• Questo dispositivo può essere utilizzato da bambini di età superiore
agli 8 anni e da persone con ridotte capacità fisiche, sensoriali o
mentali o con mancanza di esperienza e / o conoscenza se sono
stati supervisionati o istruiti sull‘uso sicuro del dispositivo e hanno
compreso il pericoli che ne derivano. I bambini non devono giocare
con il dispositivo. La pulizia e la manutenzione non devono essere
eseguite da bambini a meno che non abbiano più di 8 anni e siano
sorvegliati. Tenere i bambini di età inferiore agli 8 anni lontani dal
dispositivo e dal cavo di collegamento.
• Tenere gli animali domestici lontani dal dispositivo.
• Controllare il dispositivo prima di ogni utilizzo e assicurarsi che tutte
le viti siano fissate e tutti i fermi siano correttamente inseriti.
• Assicurarsi che le leve o altri meccanismi di regolazione non
ostacolino la libertà di movimento durante l‘uso.
• Tenere mani e piedi lontani da tutte le parti in movimento.
• Assicurarsi che il dispositivo possa essere smontato in qualsiasi
momento senza alcuna restrizione.
• Non inserire mai oggetti nelle aperture del dispositivo.
• Quando si utilizza il dispositivo, lasciare 2 m di spazio su tutti i lati
del dispositivo in modo che ci sia spazio sufficiente per smontarlo
e in modo che i bambini, i passanti e gli animali domestici siano
sufficientemente distanti.
• Assicurati di avere abbastanza spazio per il montaggio e l‘uso.
• Questo dispositivo è adatto solo per uso domestico.
• Fare esercizi di stretching prima e dopo ogni allenamento.
• Bere abbastanza liquidi (preferibilmente acqua) prima, durante e
dopo l‘allenamento.
• NON indossare MAI indumenti larghi durante l‘allenamento sul
dispositivo, poiché possono rimanere impigliati nel dispositivo e
provocare incidenti. Indossare abbigliamento sportivo.
• NON iniziare MAI l‘allenamento a un ritmo veloce.
• Le persone con limitazioni fisiche o gli anziani DEVONO consultare
un medico prima dell‘uso.
• NON utilizzare il dispositivo se si dispone di un pacemaker o di un
altro dispositivo cardiologico.
• Le donne incinte devono consultare il proprio medico prima dell‘uso.
• Sostituire immediatamente le parti danneggiate e non utilizzare
nuovamente il dispositivo fino a quando non è stato completamente
riparato.
• Conservare il dispositivo in un luogo pulito e asciutto.
• Il livello di sicurezza del dispositivo può essere mantenuto solo se
viene controllato regolarmente per danni e usura. In particolare, i
rulli sul sedile dovrebbero essere controllati regolarmente.
• Sostituire immediatamente le parti difettose e/o interrompere
l‘utilizzo del dispositivo fino a quando non è stato riparato.
• Un allenamento improprio o eccessivo può danneggiare la salute.
• Il dispositivo di allenamento deve essere posizionato su una
superficie stabile e piana.
DIMENSIONI/PESO DEL DISPOSITIVO:
Peso totale 12,5 kg, dimensioni di installazione 156 cm di lunghezza,
43,3 cm di larghezza, 58 cm di altezza
MONTAGGIO (# 2):
Passo 1: collega la parte anteriore (3) e la parte principale posteriore (5)
utilizzando le quattro viti a brugola M8x16 (14) e i dadi esagonali M8 (4).
M22225_M30176_RowShaper_Manual_20220323_MM.indd 9M22225_M30176_RowShaper_Manual_20220323_MM.indd 9 23.03.22 13:1123.03.22 13:11
10
11
Passo 2: aprire la parte posteriore della parte principale di 90 ° e avvitarla in
posizione utilizzando la vite M8x60 (6) e la vite di regolazione rapida B (10).
Quindi inserire il cavalletto posteriore (13) nella parte principale e fissarlo
con la vite di regolazione rapida C (12).
Passo 3: far scorrere i quattro cappucci terminali in schiuma (7)
sull‘estensione (9) e avvitare la prolunga utilizzando la vite a brugola M8x75
(11) e dado esagonale M8 (4) con la parte principale. Infine fissarlo con la
vite di regolazione rapida A (8) in posizione.
Passo 4: Fai scorrere le due maniglie (1) uno e metti il computer (2) sopra.
COMPUTER (# 3)
Inserire le batterie: Prima di iniziare, inserire le batterie (2 batterie AAA da
1,5 V), prestando attenzione alla polarità. Il vano batteria si trova sul retro
del dispositivo. Informazioni: Le batterie non sono incluse!
Pericolo: Il computer si accende automaticamente quando inizi il tuo
allenamento di canottaggio. Quando si termina o si mette in pausa
l‘allenamento, il computer si spegne automaticamente dopo circa 4 minuti.
Sostituire le batterie se il display rimane nero nonostante il movimento e
non si accende.
Display/funzioni:
1. SCAN: Con questa funzione, il display del computer salta
automaticamente attraverso tutte le funzioni e le mostra per 4 secondi.
2. TIME (Tempo 00: 00—99: 59 min): indica il tempo totale di allenamento.
3. COUNT (Contatore 0-9999): indica le ripetizioni durante l‘allenamento.
4. R.P.M (Frequenza 0,0—999,9 Wh / Min): fornisce informazioni su quante
ripetizioni si stanno eseguendo al minuto.
5. CAL (Calorie 0-9999 Kcal): indica quante kilocalorie hai bruciato.
Mode: premi il tasto Mode per passare da una funzione all‘altra. Se si tiene
premuto il pulsante per 4 secondi, tutti i valori vengono impostati a 0.
Reset: premendo il pulsante Resetè possibile impostare il valore
selezionato su 0.
INFORMAZIONI GENERALI SULL‘ALLENAMENTO
CON IL ROWSHAPER KENDOX:
Il canottaggio è l‘allenamento perfetto per tutto il corpo. È un allenamento
di forza e resistenza molto efficiente in cui vengono allenati fino all‘85% dei
muscoli dell‘intero corpo.
LIVELLI DI DIFFICOLTÀ: da un lato, la resistenza alla trazione può essere
regolata sul quadrante a 12 livelli. D‘altra parte, l‘inclinazione del dispositivo
può essere impostata su 3 diversi livelli.
IMPORTANTE! Più alta è l‘impostazione, più intenso sarà l‘allenamento!
Se soffri di vertigini, nausea o dolore al petto durante l‘allenamento,
interrompi immediatamente l‘allenamento e consulta immediatamente il
medico.
PER UNA PRESTAZIONE OTTIMALE DI QUESTI ESERCIZI, ASSICURATI
DI AVERE UNA SCHIENA DIRITTA - PER PREVENIRE LA TENSIONE E IL
DOLORE ALLA SCHIENA!
PRIMI PASSI (# 4 – A, B, C)
A: Salire sul pedale e stringere le cinghie.
B: Girando la rotella di regolazione sul cilindro idraulico, è possibile
scegliere tra 12 diversi livelli di resistenza.
C: Allentare il perno di trazione ed estrarlo. Regola il piede posteriore
all‘altezza desiderata (più è alto, più intensamente alleni le gambe), lascia
andare il bullone di trazione e riavvitalo.
BLOCCARE IL SEDILE (# 5)
Se necessario (ad es. per riporre il dispositivo o per esercizi di sit-up) è
possibile fissare il sedile con bulloni (LOCK). Per il canottaggio, mettere il
bullone in posizione UNLOCK per riporlo in modo sicuro.
NL
BELANGRIJKE OPMERKINGEN+VEILIGHEIDSINSTRUCTIES
Lees de volledige gebruiksaanwijzing voordat u het
apparaat monteert en het in gebruik neemt. Houd
rekening met de volgende veiligheidsinstructie:
• Raadpleeg uw arts voordat u met trainen begint.
• Als u tijdens het trainen last krijgt van duizeligheid, misselijkheid
of pijn op de borst onderbreek dan direct de training en raadpleeg
onmiddellijk uw arts.
• Het apparaat is niet geschikt voor gebruik door personen met een
gewicht boven de 120 kg. Het apparaat mag NOOIT door meerdere
personen tegelijkertijd worden gebruikt!
• Dit apparaat kan worden gebruikt door kinderen van 8 jaar en
ouder, maar ook door personen met verminderde lichamelijke,
zintuiglijke of mentale vermogens of gebrek aan ervaring en kennis
als ze onder toezicht staan of geïnstrueerd zijn over het veilige
gebruik van het apparaat en de gevaren die hiermee gemoeid zijn
begrijpen. Kinderen mogen niet met het apparaat spelen. Reiniging
en gebruikersonderhoud mogen niet zonder toezicht door kinderen
worden uitgevoerd, tenzij ze ouder dan 8 jaar zijn en onder toezicht
staan. Kinderen jonger dan 8 jaar moeten uit de buurt van het
apparaat en het stroomsnoer worden gehouden.
• Houd huisdieren uit de buurt van het apparaat.
• Controleer het apparaat voor ieder gebruk en zorg dat alle schroeven
bevestigd zijn en alle grendels goed vastgemaakt zijn.
• Zorg ervoor dat hendels of andere instellingsmechanismen uw
bewegingsvrijheid tijdens het gebruik niet verhinderen.
• Houduwhandenen voeten uitde buurtvan allebewegendeonderdelen.
• Zorg ervoor dat u altijd zonder beperkingen van het apparaat kunt
stappen.
• Plaats nooit voorwerpen in openingen op het apparaat.
• Behoud bij het gebruik van het apparaat 2 m afstand van alle
kanten, zodat er genoeg ruimte is om af te stappen en kinderen,
toeschouwers en huisdieren op voldoende afstand worden
gehouden.
• Zorg ervoor dat u over voldoende ruimte beschikt voor de montage
en het gebruik.
• Dit apparaat is uitsluitend bedoeld voor huishoudelijk gebruik.
• Voer voor iedere training stretchoefeningen uit.
• Neem voor, tijdens en na de training voldoende vocht (bij voorkeur
water) tot u.
• Draag tijdens de training op het apparaat NOOIT wijde
kledingstukken. Deze kunnen beklemd raken in het apparaat en
ongevallen veroorzaken. Draag sportkleding.
• Begin uw training NOOIT op een hoog tempo.
• Personen met lichaamsbeperkingen of oudere personen MOETEN
voor gebruik een arts raadplegen.
• Gebruik dit apparaat NIET als u een pacemaker of een ander
cardiologisch apparaat heeft.
• Zwangere vrouwen moeten voor gebruik hun arts raadplegen.
• Vervang beschadigde onderdelen en gebruik het apparaat pas
wanneer het volledig gerepareerd is.
• Berg het apparaat op in een schone en droge locatie.
• Het veiligheidsniveau van het apparaat kan alleen worden
gehandhaafd als er regelmatig wordt gecontroleerd op schade en
M22225_M30176_RowShaper_Manual_20220323_MM.indd 10M22225_M30176_RowShaper_Manual_20220323_MM.indd 10 23.03.22 13:1123.03.22 13:11