Kenmore ELITE 1009101770A User manual

Use & Care Guide
E L I T E ®
12-Cup Thermal Carafe
Coffeemaker
Model No,
CAUTION: Read, understand and follow
all Important Safeguards and Operating
Instructions in this Manual before using
this product.
Sears, Roebuck and Co., Hoffman Estates, IL 60179 U.S.A.
www.kenmore.com

KENMORE ELITE FULL WARRANTY
If this product fails due to a defect in material or workmanship within five years from the
date of purchase, return it to any Sears store or other Kenmore outlet in the United States
for free replacement.
This warranty does not include expendable parts, such as filters or blades, which can
wear out from normal use within the warranty period.
This warranty applies for only 90 days if this product is ever used for other than private
household purposes.
This warranty applies only while this product is used in the United States.
This warranty gives you specific legal rights, and you may also have other rights which
vary from state to state.
Sears, Roebuck and Co., Hoffman Estates, IL 60179
When using electrical appliances, basic safety precautions should always be
followed, including the following:
1. READ all instructions.
2. DO NOT touch hot surfaces. Use handles or knobs.
3. To protect against fire, electric shock and injury to persons, DO NOT immerse cord,
plug, or the coffeemaker in water or other liquids.
4. Close supervision is necessary when any appliance is used by or near children.
5. ALWAYS UNPLUG coffeemaker from power outlet before cleaning, and when storing.
Allow to cool before putting on or taking off parts, cleaning or storing.
6. DO NOT operate any appliance with a damaged cord or plug, or after the appliance
malfunctions or has been dropped or damaged in any manner. Return appliance to
the nearest authorized service facility for examination, repair or adjustment.
7. The use of accessory attachments not recommended by the appliance manufacturer
may result in fire, electric shock or injury to persons.
8. DO NOT use outdoors.
9. NEVER let the cord hang over the edge of table or counter or touch hot surfaces.
10. DO NOT place coffeemaker on or near a hot gas or electric burner or in a heated oven.
11. DO NOT use this coffeemaker for anything other than its intended use.

12. The carafe is designed for use only with this coffeemaker.
13. Scalding may occur if the lid is removed during the brewing cycles.
ALWAYS keep the lid on the carafe when in use.
14. To protect against electrical shock, this appliance is equipped with a cord having
a 3-prong grounding-type plug for insertion into a proper grounding-type receptacle.
DO NOT alter the plug for use in a 2-prong receptacle. If the plug will not fit into
a receptacle, have the proper receptacle installed by a qualified electrician.
15.SAVE THESE INSTRUCTIONS!
Fig. 1
Carafe
Lid
(turns)
,piece cover Open button
one-piece
cover ;ontrol Panel Display
_ntrol Panel
Carafe
Housing Gold Filter
-Spreader cover
Carafe Plate Base
Water Filter
Brew Basket

Beforethefirstuseofthecoffeemakerwashthebrewbasket,thepermanentgold-tone
filter,andcarafelidineitherthetoprackofyourdishwasher,orbyhandin warm, sudsy
water. The carafe must be HAND WASHED ONLY. Do not wash the carafe in the
dishwasher.
The exterior of the coffeemaker, the control panel area and the carafe plate should only
be cleaned with a soft damp cloth.
INOTE: NEVER clean the warming plate unless it is completely cool. I
To clean the inside of the
reservoir cover, open the
one-piece cover, allowing
it to rest in the open position.
Pull the water spreader hose
out from under the guide on the
inside of the lid (See Fig. 2),
wipe surfaces with a damp cloth,
replace water spreader hose
under guide, and close cover.
Fig. 2
INOTE: DO NOT use abrasive cleansers or scouring pads when cleaning
your coffeemaker. NEVER immerse the coffeemaker in water or any liquid. I
After all parts are washed for the first time, pour cold water up to the 12 cup level mark in
the water reservoir. Brew it through the coffeemaker as instructed in BREWING, but do
not add coffee grounds to the paper filter. When done, turn off the coffeemaker and
discard the water from the carafe.
4

The easy-to-use programmable digital controls let you know when the coffee is ready,
and even keeps track of the freshness of each brewed carafe. It's never been easier to
brew the perfect cup of coffee.
The stainless steel thermal carafe features a double-walled, vacuum-insulated design
that will keep coffee hot and flavorful for hours. Once your coffee is brewed, it needs no
external heating to keep it warm, so instead of a warming plate, the coffeemaker has a
carafe plate used to position the carafe while coffee is brewing.
The lid of the carafe is designed so the coffee enters the carafe from the brew basket
with the lid on. Place the lid with the pouring indentation at about 11 o'clock and twist
clockwise, using the finger indentations on the lid, to align the opening with the pouring
spout in the front of the carafe.
Before brewing, make sure the lid is securely fastened. The lid must be on the carafe for
the coffee to be released from the brew basket.
To pour coffee from the thermal carafe, make sure the lid is screwed on securely with its
pouring indentation aligned with the pouring spout of the pot, press the lever by the
carafe's handle, and pour.
BREWING COFFEE
.
.
Press the Open button on the control
panel and lift the one-piece cover
(See Fig. 3).
Unscrew the carafe lid and use the
carafe to fill the water reservoir of the
coffeemaker to the desired level with
cold water. There is a gauge marked from
2 to 12 cups on the coffeemaker's water
reservoir (see Fig. 4). These marks show
the amount of cold water needed for each
cup of coffee. The amount of brewed coffee
will differ slightly due to the coffee grinds
absorbing some water.
Fig. 4
\
Fig. 3

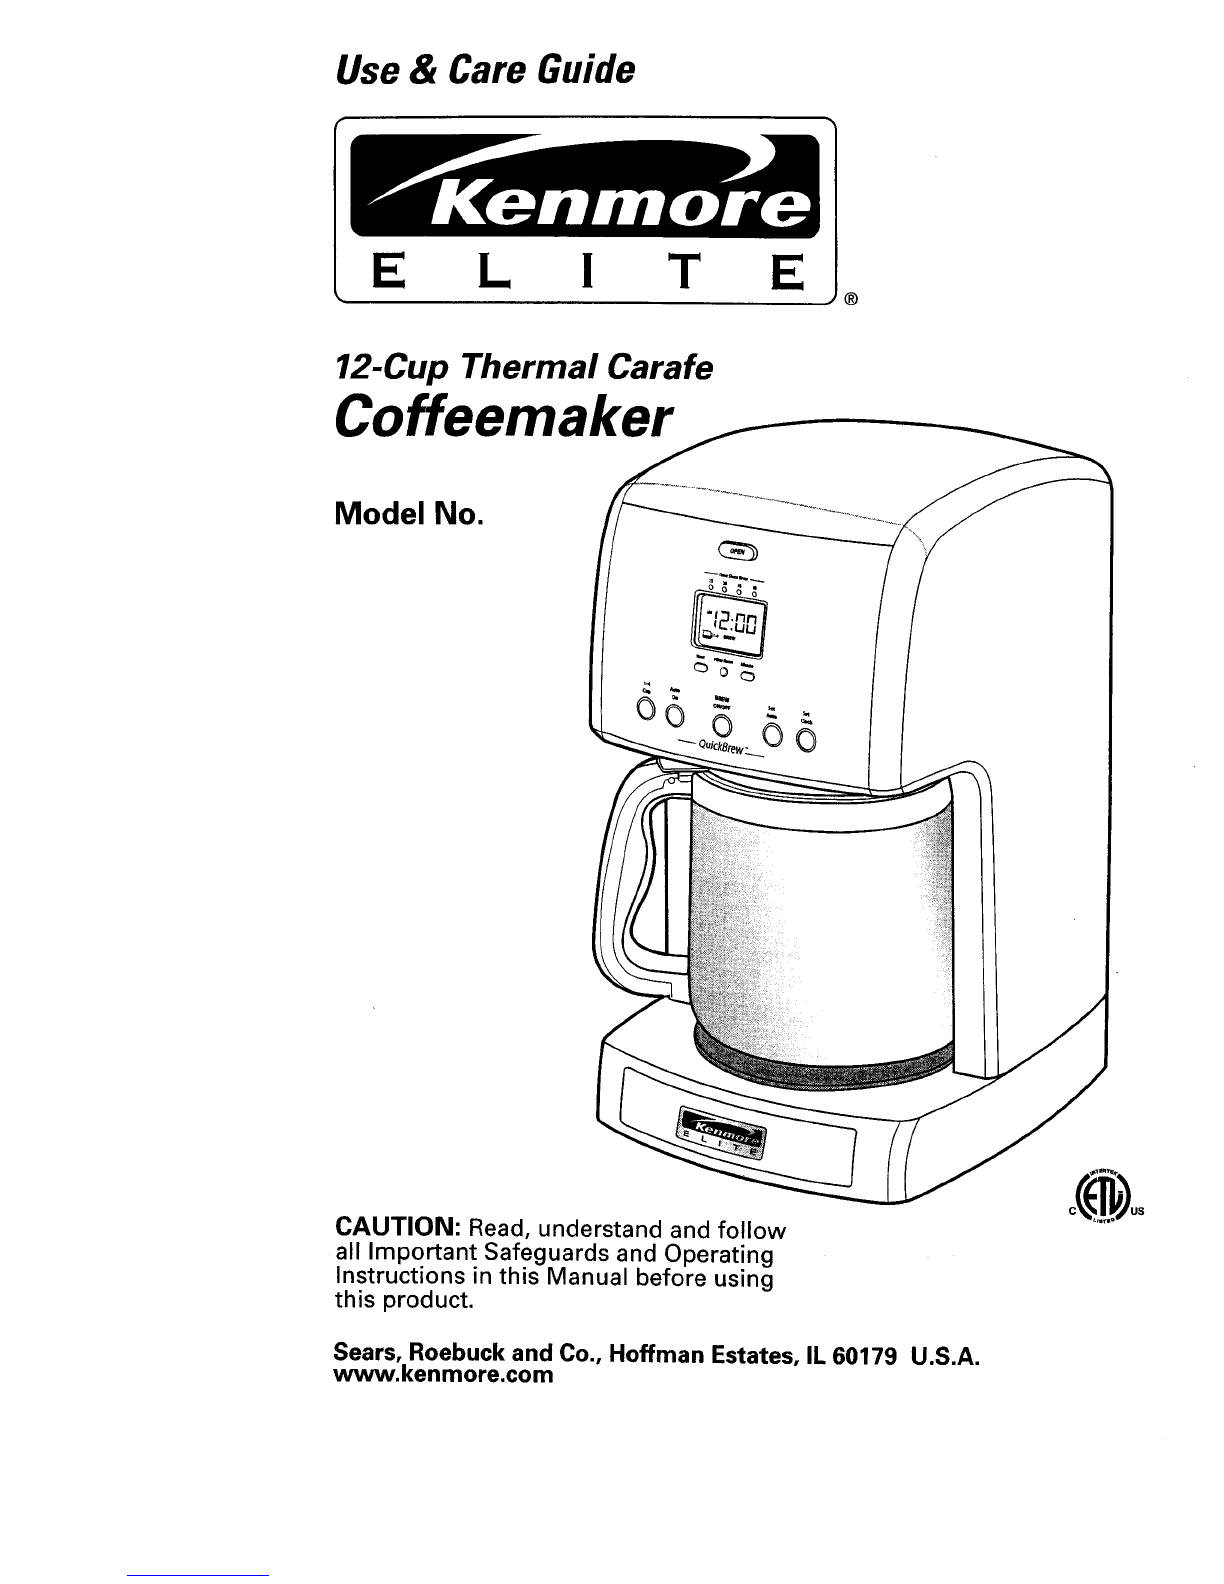
BREWING COFFEE cont.
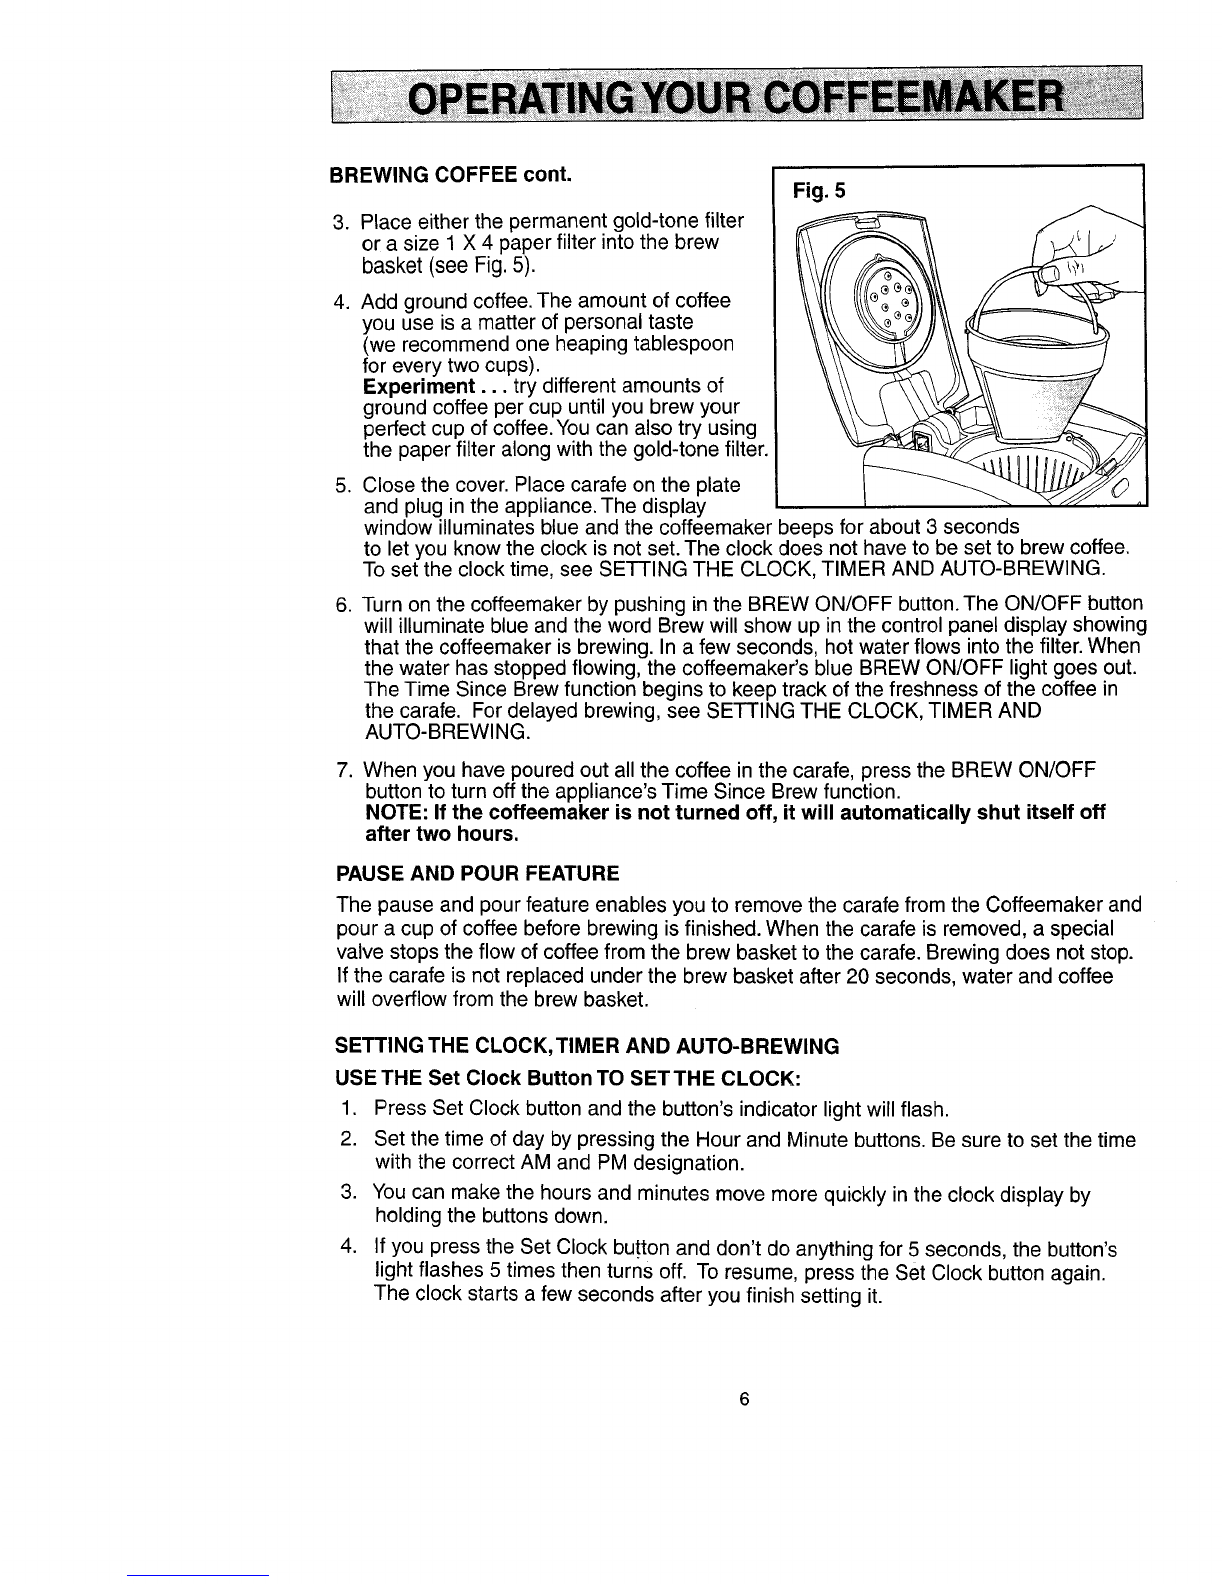
3. Place either the permanent gold-tone filter
or a size 1 X 4 paper filter into the brew
basket (see Fig. 5).
4. Add ground coffee. The amount of coffee
you use is a matter of personal taste
(we recommend one heaping tablespoon
for every two cups).
Experiment... try different amounts of
ground coffee per cup until you brew your
perfect cup of coffee. You can also try using
the paper filter along with the gold-tone filter.
.
Fig. 5
Close the cover. Place carafe on the plate
and plug in the appliance. The display
window illuminates blue and the coffeemaker beeps for about 3 seconds
to let you know the clock is not set. The clock does not have to be set to brew coffee.
To set the clock time, see SETTING THE CLOCK, TIMER AND AUTO-BREWING.
6. Turn on the coffeemaker by pushing in the BREW ON/OFF button. The ON/OFF button
will illuminate blue and the word Brew will show up in the control panel display showing
that the coffeemaker is brewing. In a few seconds, hot water flows into the filter. When
the water has stopped flowing, the coffeemaker's blue BREW ON/OFF light goes out.
The Time Since Brew function begins to keep track of the freshness of the coffee in
the carafe. For delayed brewing, see SETTING THE CLOCK, TIMER AND
AUTO-BREWING.
7. When you have poured out all the coffee in the carafe, press the BREW ON/OFF
button to turn off the appliance's Time Since Brew function.
NOTE: If the coffeemaker is not turned off, it will automatically shut itself off
after two hours.
PAUSE AND POUR FEATURE
The pause and pour feature enables you to remove the carafe from the Coffeemaker and
pour a cup of coffee before brewing is finished. When the carafe is removed, a special
valve stops the flow of coffee from the brew basket to the carafe. Brewing does not stop.
If the carafe is not replaced under the brew basket after 20 seconds, water and coffee
will overflow from the brew basket.
SETTING THE CLOCK, TIMER AND AUTO-BREWING
USE THE Set Clock Button TO SETTHE CLOCK:
1. Press Set Clock button and the button's indicator light will flash.
2. Set the time of day by pressing the Hour and Minute buttons. Be sure to set the time
with the correct AM and PM designation.
3. You can make the hours and minutes move more quickly in the clock display by
holding the buttons down.
4. If you press the Set Clock button and don't do anything for 5 seconds, the button's
light flashes 5 times then turns off. To resume, press the Set Clock button again.
The clock starts a few seconds after you finish setting it.

SETTHE Set Auto Button TO PROGRAM IN A BREWTIME:
1. First set the clock. See directions above.
2. Press the Set Auto button and the button's indicator light will flash.
3. Set the time you wish the coffeemaker to begin brewing by pressing the Hour and
Minute buttons. Be sure to set the correct designation of AM or PM.
4. You can make the hours and minutes move more quickly in the clock display
by holding the buttons down.
USE THE Auto On Button TO SET THE AUTOMATIC BREW TIME:
Once you have set the correct time to begin the automatic brewing and the clock has
returned to the time of day, push in the Auto On button. On the display panel under the
time of day the word, Auto will come on, along with the icon of a clock face. These
indicate that the automatic timer is now activated.
The Auto Brew can be cancelled at any time by pressing the Auto On button a second
time. The Auto On light goes out. To check what time the Auto Brew is set for, push in the
Set Auto button and the time will be displayed.
1-4 CUP BUTTON
This special cycle optimizes the flavor
when brewing 1 to 4 cups of coffee, but
it can also be used to increase the brew
strength of any number of cups you are
brewing.
Press 1-4 Cup button once and the blue
light illuminates and the stronger brewing
option is activated. An icon of a coffee
carafe and 1-4 Cup will show on the panel
display under the time (See Fig. 6). Now
press the ON/OFF button to start the
brewing process.
NOTE: The 1-4 Cup cycle button must
be pushed before the ON/OFF button
is pressed. If not, the 1-4 Cup cycle will
not be activated.
Fig. 6
0000
[-, _I, i"i€'I
J,.C=_;UU
C3 0 (_
14 _O_
OO ©O©
--QuickBrew--

TIME SINCE BREW IN PANEL DISPLAY
Time Since Brew is an indicator of the freshness
of your carafe of coffee designed into your coffeemaker.
After you have brewed a pot of coffee, the coffeemaker
keeps track of its freshness.
For the first 15 minutes after you brew, there is
no indicator. After 15 minutes and up to 30 minutes,
one blue LED light appears under the indication Time
Since Brew under the number 15. At this time a long
beep will sound to notify you of the change of freshness.
Once the carafe has been sitting for 30 to 45 minutes,
a blue LED light also appears under
the number 30. Another long beep sounds.
Fig. 7 (_
_"rlme Since 8few
55S
Jl
Hour Filter Reset Minute
CD 0 C_
After 45 to 60 minutes an LED also appears under the number 45 along with a beep, and
after 60 minutes and longer, an LED light appears under the number 60 with another long
beep. The time since brew indictor will shut itself after 2 hours. At this time another long
beep will sound.

ALWAYS UNPLUG the coffeemaker from the electric outlet before cleaning. The exterior
of the coffeemaker, the control panel area and the warming plate should only be cleaned
with a soft damp cloth.
WARNING: NEVER immerse the coffeemaker in 1
I
water or any liquid.
WARNING: DO NOT clean the warming plate unless it is completelycool. DO NOT use abrasive cleansers or scouring pads.
To clean the inside of the reservoir cover, open the one-piece cover, allowing it to rest in
the open position. Pull the water spreader hose out from under the guide on the inside of
the lid (See Fig. 2), wipe surfaces with a damp cloth, replace water spreader hose under
guide, and close cover. Do not use abrasive cleansers or scouring pads.
CARAFE CARE
The stainless steel thermal carafe features a double-walled, vacuum-insulated design.
1. HAND WASH ONLY. Do not clean the carafe in a dishwasher. Wash or rinse by hand.
2. NEVER use abrasive scouring pads or cleansers; they will scratch and damage the metal.
3. DO NOT place the carafe on or near a gas or electric burner, in a heated oven,
or in a microwave oven.
4. Avoid rough handling and sharp blows.
9

CLEANING THE COFFEEMAKER AND CHANGING THE CHARCOAL FILTER
After every 70 cycles, or carafes of coffee, a reminder will appear in the control panel
display, change filter and clean along with three beeps, to tell the user it is time to clean
the inside of the coffeemaker of all mineral buildup, and to change the water filter.
Mineral deposits left by hard water can clog your coffeemaker. Cleaning is recommended
about every 70 uses, when the coffeemaker's reminder lets you know you have reached
this point.
To Clean:
1. Press the Filter Reset button on the control
panel to stop the blinking words icon and
the beeps (Fig. 8).
2. Open the lid of reservoir, and pull out the
water filter. Do not clean coffeemaker with
water filter in place (Fig. 9).
3. Pour white vinegar into water reservoir up
to about the 6-cup level shown inside reservoir.
4. Add cold water up to the 12-cup line.
5. Put a paper filter in the brew basket, close
cover, and place empty carafe on the
warming plate.
6. Turn ON the coffeemaker and let half of the
vinegar water solution brew through and
into carafe.
7. Turn the coffeemaker OFF at this point and
let it soak for at least 15 minutes to soften
any deposits.
8. Turn the coffeemaker back ON and brew the
remaining solution into the carafe. When brew
cycle has stopped, turn OFF coffeemaker,
empty carafe, and discard soiled paper filter.
9. Refill reservoir with cold water and turn ON to
run another brew cycle. You may want to repeat
again to eliminate any vinegar smell/taste.
10. Wash the brew basket and carafe.
11. Open the Water Filter, pull out the old
charcoal, discard and replace with a
new one (Fig. 10).
12. Place the Water Filter with new charcoal
into the reservoir. Coffeemaker is cleaned
and ready for use.
To reset the cycle count and remove the
reminder in the control panel display, push the
"Filter Reset" button.
Fig. 8 (_
"'l 3,ram
_,!..IU
Rep_a_ Fi_e)" _¢k, em
Hour _et Minute
CD CD
Fig. 10 ./'/ /
10
'_i ¸ .• _ _

11

Your Home
For repair - in your home - of all major brand appliances,
lawn and garden equipment, or heating and cooling systems,
no matter who made it, no matter who sold it!
For the replacement parts, accessories and
owner's manuals that you need to do-it-yourself.
For Sears professional installation of home appliances
and items like garage door openersand water heaters.
1-800-4-MY-HOME ® (1-800-469-4663)
Call anytime, day or night (U.S.A. and Canada)
www.sears.com www.sears.ca
For expert home solutions advice: www.managemyhome.com
....._: (1 888 784 6427)
_- _ _
Our Home
For repair of carry-in items like vacuums, lawn equipment,
and electronics, call or go on-line for the location of your nearest
Sears Parts & Repair Service Center
1-800-488-1222 (U.S.A.) 1-800-469-4663 (Canada)
Call anytime, day or night
www.sears.com www.sears.ca
To purchase aprotection agreement on a product serviced by Sears:
1-800-827-6655 (U.S.A.) 1-800-361-6665 (Canada)
Para pedir servicio de reparaci6n Au Canada pour service en fran_ais:
a domicilio, y para ordenar piezas: 1-800-LE-FOYER Mc
1-888-SU-HOGAR ®(1-800-533-6937)
www,sears,ca
Sears
®Registered Trademark /TMTrademark /SMService Mark of Sears Brands, LLC
®Marce Registrada /"rMMarca de Fdbrice /sM Marca de Servicio de Sears Brands, LLC
MCMarque de commerce /MOMarque d_posee de Sears Brands, LLC © Sears Brands, LLC
Table of contents
Other Kenmore Coffee Maker manuals

Kenmore
Kenmore KKECM12SS User manual

Kenmore
Kenmore 100.90007 User manual

Kenmore
Kenmore KKCMEMT User manual

Kenmore
Kenmore KKECMGBSS User manual

Kenmore
Kenmore KKCM12S User manual

Kenmore
Kenmore 100.06962 User manual

Kenmore
Kenmore 100.80509 User manual

Kenmore
Kenmore KKCM12S User manual

Kenmore
Kenmore 100.40706310 User manual

Kenmore
Kenmore KKECMGBSS User manual