KENT USA KEB-CNC Series User manual

D
www.kentusa.com I 1.800.KENT.USA
Property of Kent USA
Do Not Reproduce

KEB-CNC Operation Manual
- 1 -
Table of Contents
1. Introduction…………………………………………………….……………………..
1
1.1 Keys Symbol Description………………………………………………….…….
1
1.2 Hint Symbols………………………...…….…………………….……………….
1
1.3 Things to be careful…………….………………………………………….…….
1
1.4 Manual…………………………...………………………………………………..
2
2. Machine transportation and installation……………………………….................
1
2.1 Layout of the machine…………………………………………………………...
1
2.2 Installation site ………………………………….………………………...........
4
2.3 Transportation………………………………………………………..…………..
5
2.4 Machine installation……………………………………………………………...
7
2.5 Check before start the machine….…………………..….……………………..
14
3. Safety Directives……..………………………………………………………………
1
4. Machine service………………………………………………………………………
1
5. Systematic Specifications………………...…………………………………………
1
5.1 Hardware………………………………………..………………………….…….
1
5.2 Software……………………………...…………………………….……………..
1
6. Start and shut down the machine…………………………………………………..
1
6.1 Starting the machine………………….…….…………………………………...
1
6.2 Shut down the machine………………………..………………………………..
2
7. Operation..………………….…………………………………………………………
1
7.1 Screens Layout ………………………………………………………………….
1
7.2 Screen Layout of each system mode……………...…………………………
4
7.3 Layout of Control Panel and Descriptions………….…………………………
7
7.4 Illustration of functional buttons………………………………………..……….
11
8. Manual mode……………………………………………..…………………………..
1
0.
8.1 Home ………………….……………..……………………………….…………..
2
8.2 Edge ………………………………………………………………………………
3
Property of Kent USA
Do Not Reproduce

KEB-CNC Operation Manual
- 2 -
8.3 INT.CAVITY………………………………………………………………………
5
8.4 EXT.CAVITY…………………………………………..………………………….
7
8.5 ATC (Option: ATC models)……………………………………………………..
11
8.6 REL_POS…………………………………………………………………………
17
8.7 ABS_POS…………………….……………..……….…………………………...
19
8.8 POS_SETUP………………………….……………………………….…………
21
8.9 POS_SAVE.……….……………………………………………………………...
23
8.10 Set a speed mode for manual wire control box……………….…………….
25
9. Operation mode…..………………………………………………………………..
1
9.1 INSERT……………………………………..…………..………………………..
9
9.1.1 POSITIONING………………………………………………….…………..
9
9.1.2 CUTTING……………………..……………….....………………………….
15
9.1.3 VECTOR………………………………………………………….…………..
26
9.1.4 SHAKE…………………………………....…………..…….....…………….. 33
9.1.5 IO-ON………..……………………………………..……………….……….
37
9.1.6 IO-OFF…………………………………….…………....………..…………
38
9.1.7 POSITION………………….………………………………….…………….
39
9.1.8 C_AXIS..……………………………………………………………..………
50
10.2 Re_WRITE………………………………………………………………………
.
61
10.3 COPY……………………………………………....…………....……………....
61
10.4 DELETE….………………..…………………………………………………….
61
10.5 CHANGE_POS…………...……………..……………………………………..
62
10.6 LOAD_FILE and SAVE_AS……….…………………………………………..
63
9.7 READY_SAVE…………………………….…………………………………......
64
10. C_CODE…...…………………………………………………...…………….…… 1
12. AI…………………………..……………………………………………….…….....
1
Property of Kent USA
Do Not Reproduce

KEB-CNC Operation Manual
- 3 -
12. SYSTEM…………..…..………………………….…………………………………
1
12.1 PARA…....…………………………………….……..………………………….
2
12.2 TIME SET………………………………………………………………………
3
12.3 IN/OUT …………………………………………….…………………………...
4
12.4 MESSAGE..………………………………………..……………………………
5
12.5 DP_RAM..……….………………………………………………………………
8
12.6 USUAL……..…………………………………………………………………….
9
12.7 ATC………………………………………………………………………………
10
12.8 CLEAR LAG……………………….………………………..…………………..
10
12.9 RETURN……………………………………..………………………………….
10
13. Operation of dust stir………………………………………...……………………..
1
13.1 Start dust stir system manually……………………………………………….
2
13.2 Start the program of dust stir system…………………………………………
4
14. Graphite processing…………………………………………………………….….
1
15. Super Sparking……………………………………………………………………...
1
Appendix
Appendix 1
Appendix 2
KEB-CNC Machine Data Sheet
Property of Kent USA
Do Not Reproduce

KEB-CNC Operation Manual
1. Introduction
- 1 -
1 Introduction
1.1 Keys Symbol Description
Symbols and Texts used in this manual, described as bellow:
Key Text Symbol Description
Function
Key:
Symbol used:【F1】Press【F1】
Key means press
Function Key
Text Key:Symbol used:<A>Press<A>
Key means press
Text Key
Input Key:Symbol used:『Enter』
Press『Enter』Key
Means press Input Key
1.2 Hint Symbols
Symbols used in this manual:
Symbols Description
⌦Warning This symbols means wrong operation will damage Operator.
!Note
This symbols means wrong operation will damage workpiece or
machine.
Hint This symbols means useful information is provided.
1.3 Things to be careful
⌦Danger 1. Do no touch electrode while discharging。
The Electrode has high voltage while discharging. Do not
touch electrode to prevent electrical shock.
2. Do not open the Power Generator while the Machine
power is ON. There is high voltage in Power Generator
while the power is on. Do not open the power generator to
prevent electrical shock.
Property of Kent USA
Do Not Reproduce

KEB-CNC Operation Manual
1. Introduction
- 2 -
!Note
Hint
1.4 Manual
This manual is design for EDM KEB-CNC series, especially is for system
operation and program editing purpose.
* Please back up programs, machining parameters,
machining conditions and other parameters.
Programs, machining condition and parameters are saved
in memory chips. Even the power off, machine still keep
all the information.
* Unfortunately, some information might be lost due to the
wrong operation or machine error. Operator always can
reload the information from the back up disk.
*Parameters:
Please setup the right parameters。
Wrong parameters might cause of the machine
malfunction. Parameters are very important to the machine.
*Back up Disk:
Back up program is necessary.
Property of Kent USA
Do Not Reproduce
KEB-CNC Operation Manual
2.Machine transportation & Installation
1
2. Machine transportation and installation
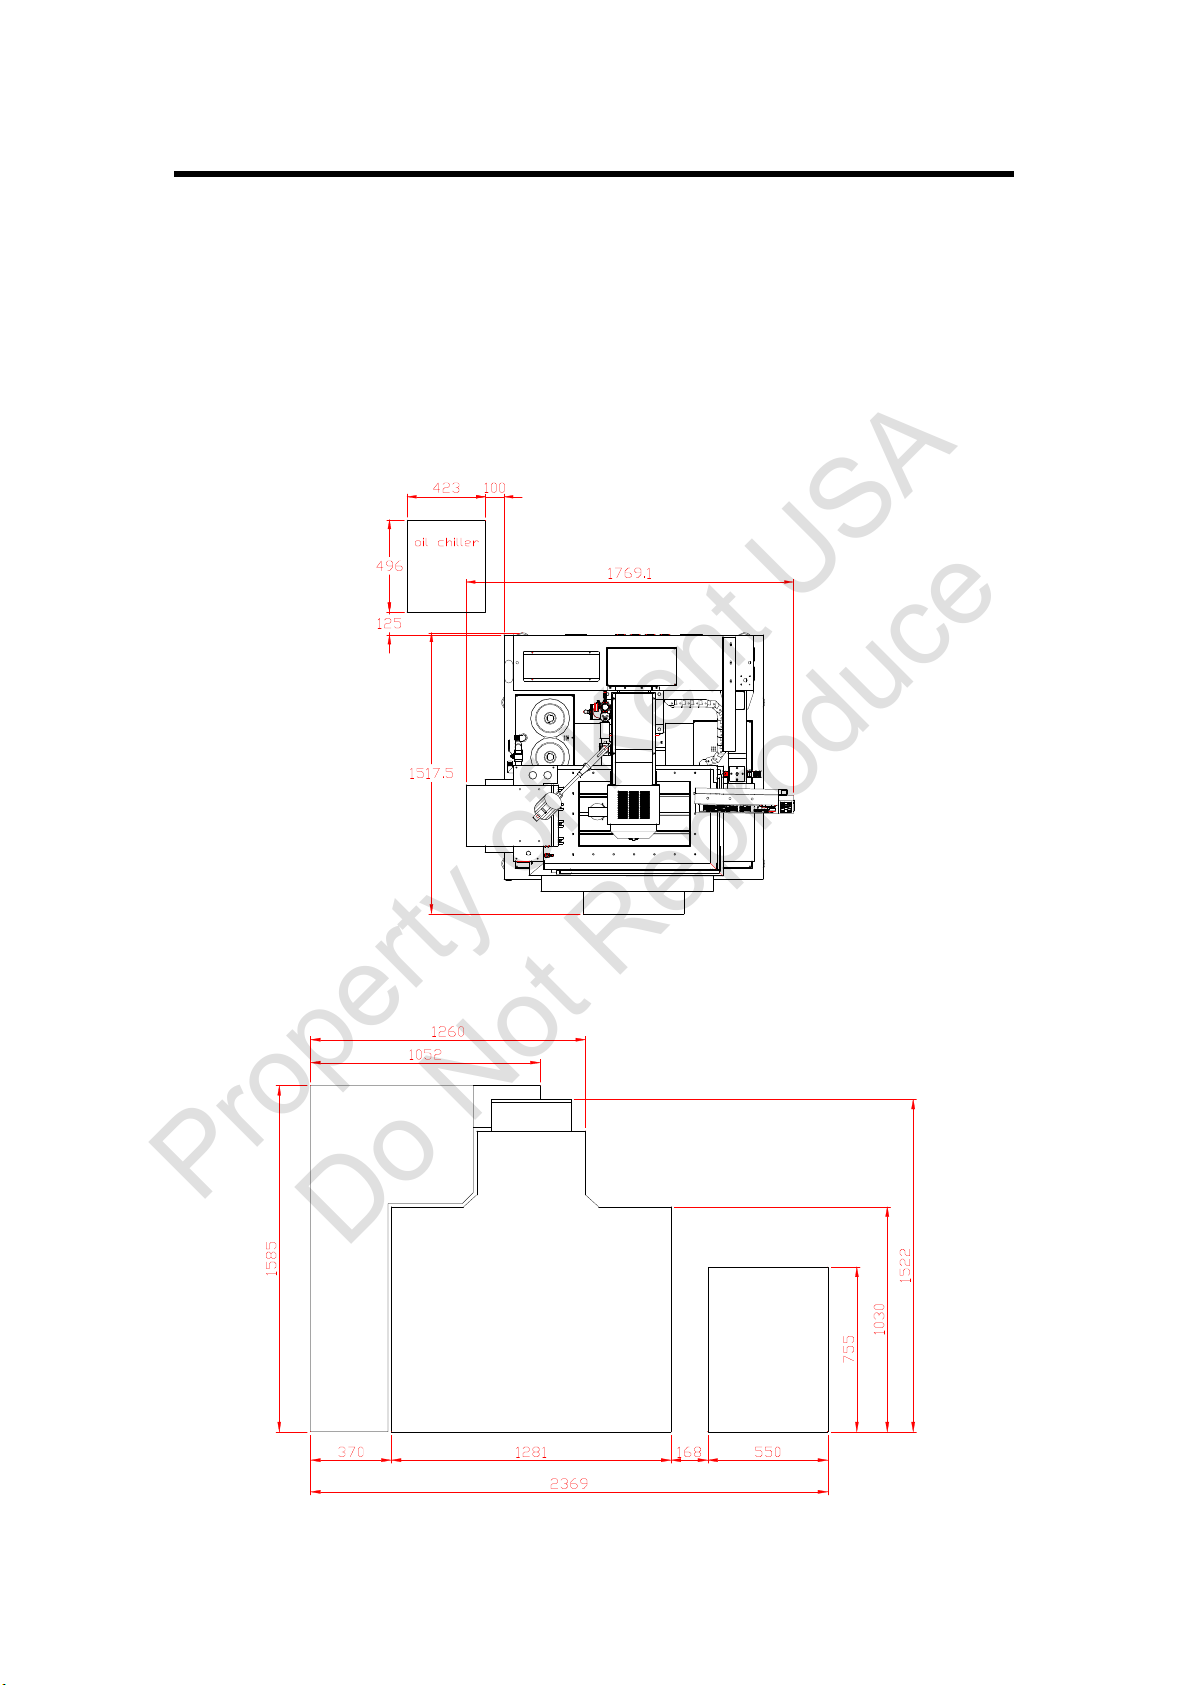
2.1 Layout of the machine
For the floor occupied by each mode of the machine, refer you to the
following layouts.
KEB-433CNC unit: mm
KEB-600LCNC unit: mm
machine
Oil tank
Electric
control
box
Property of Kent USA
Do Not Reproduce
KEB-CNC Operation Manual
2.Machine transportation & Installation
2
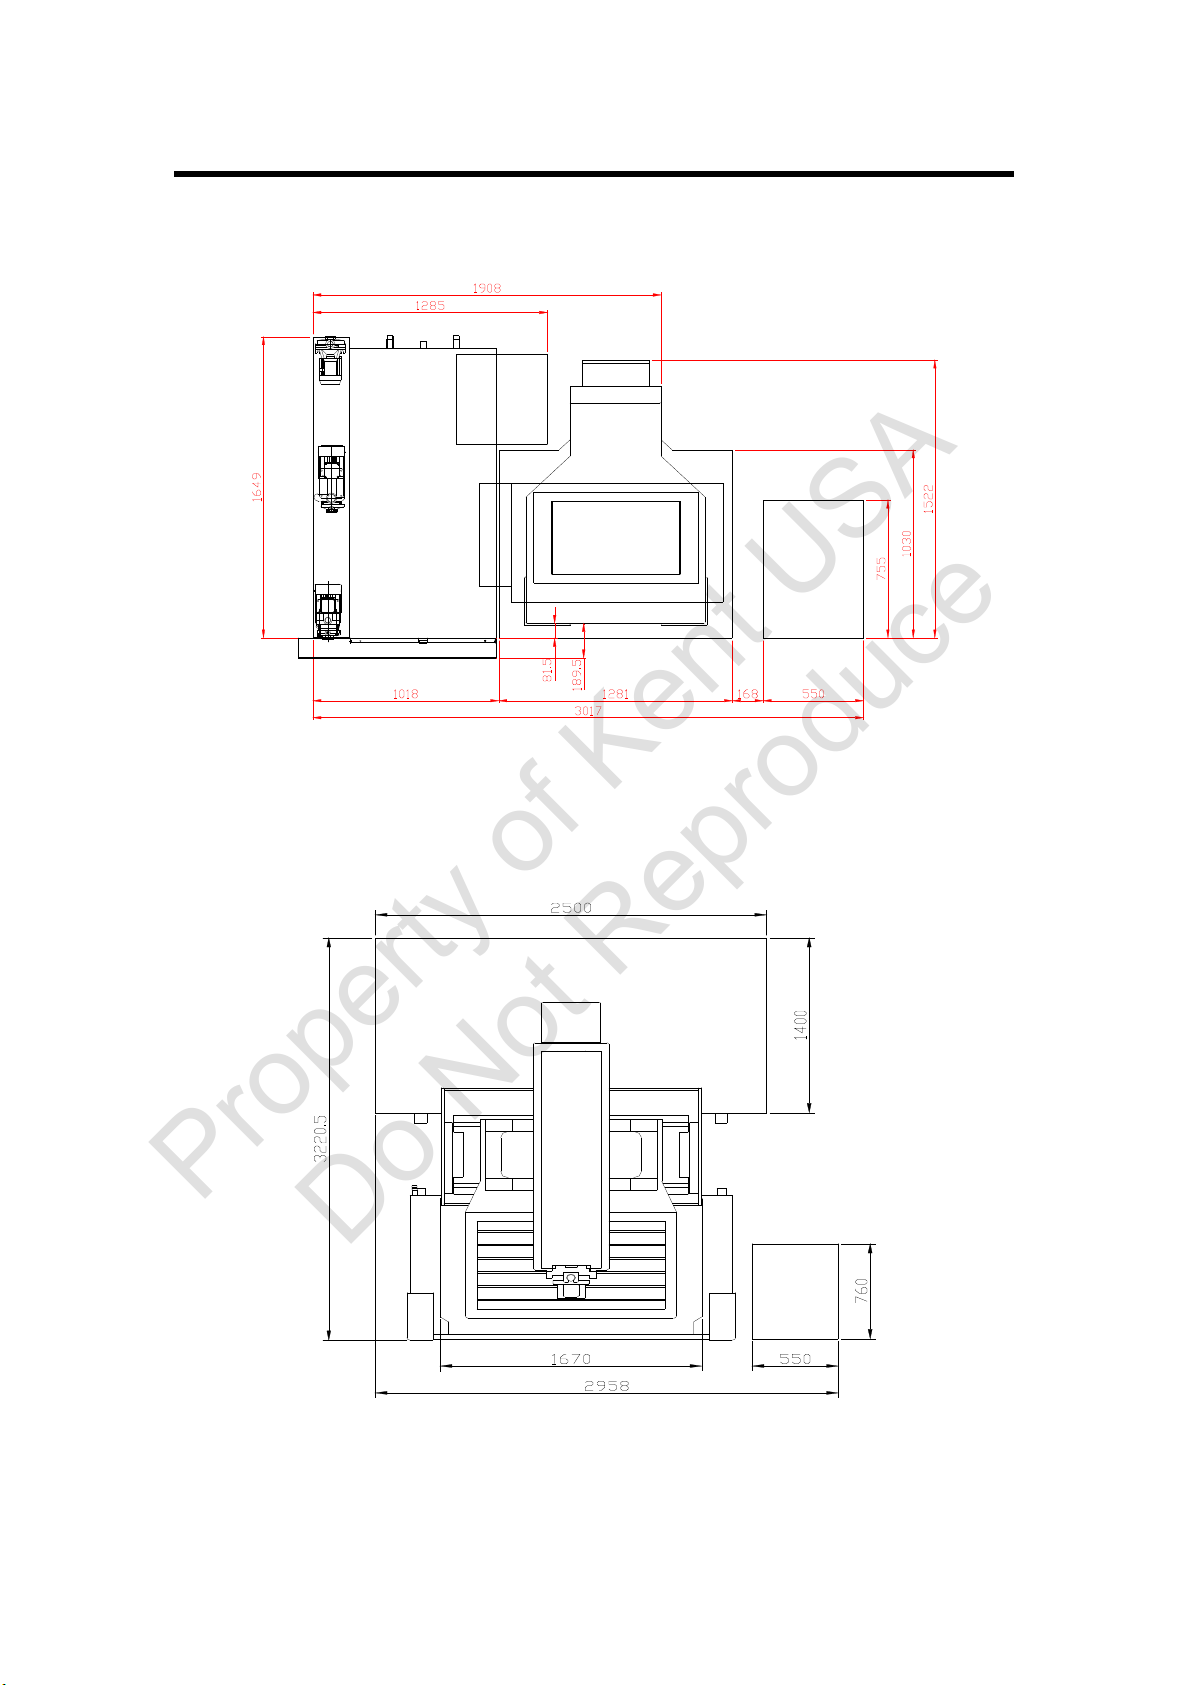
KEB-600LCNC (S.F) unit:mm
KEB-700LCNC Unit: mm
Oil tank
machine
Electric
control box
Property of Kent USA
Do Not Reproduce

KEB-CNC Operation Manual
2.Machine transportation & Installation
3
KEB-800LCNC Unit: mm
KEB-900LCNC Unit: mm
Property of Kent USA
Do Not Reproduce
KEB-CNC Operation Manual
2. Machine Transportation & Installation
- 4 -
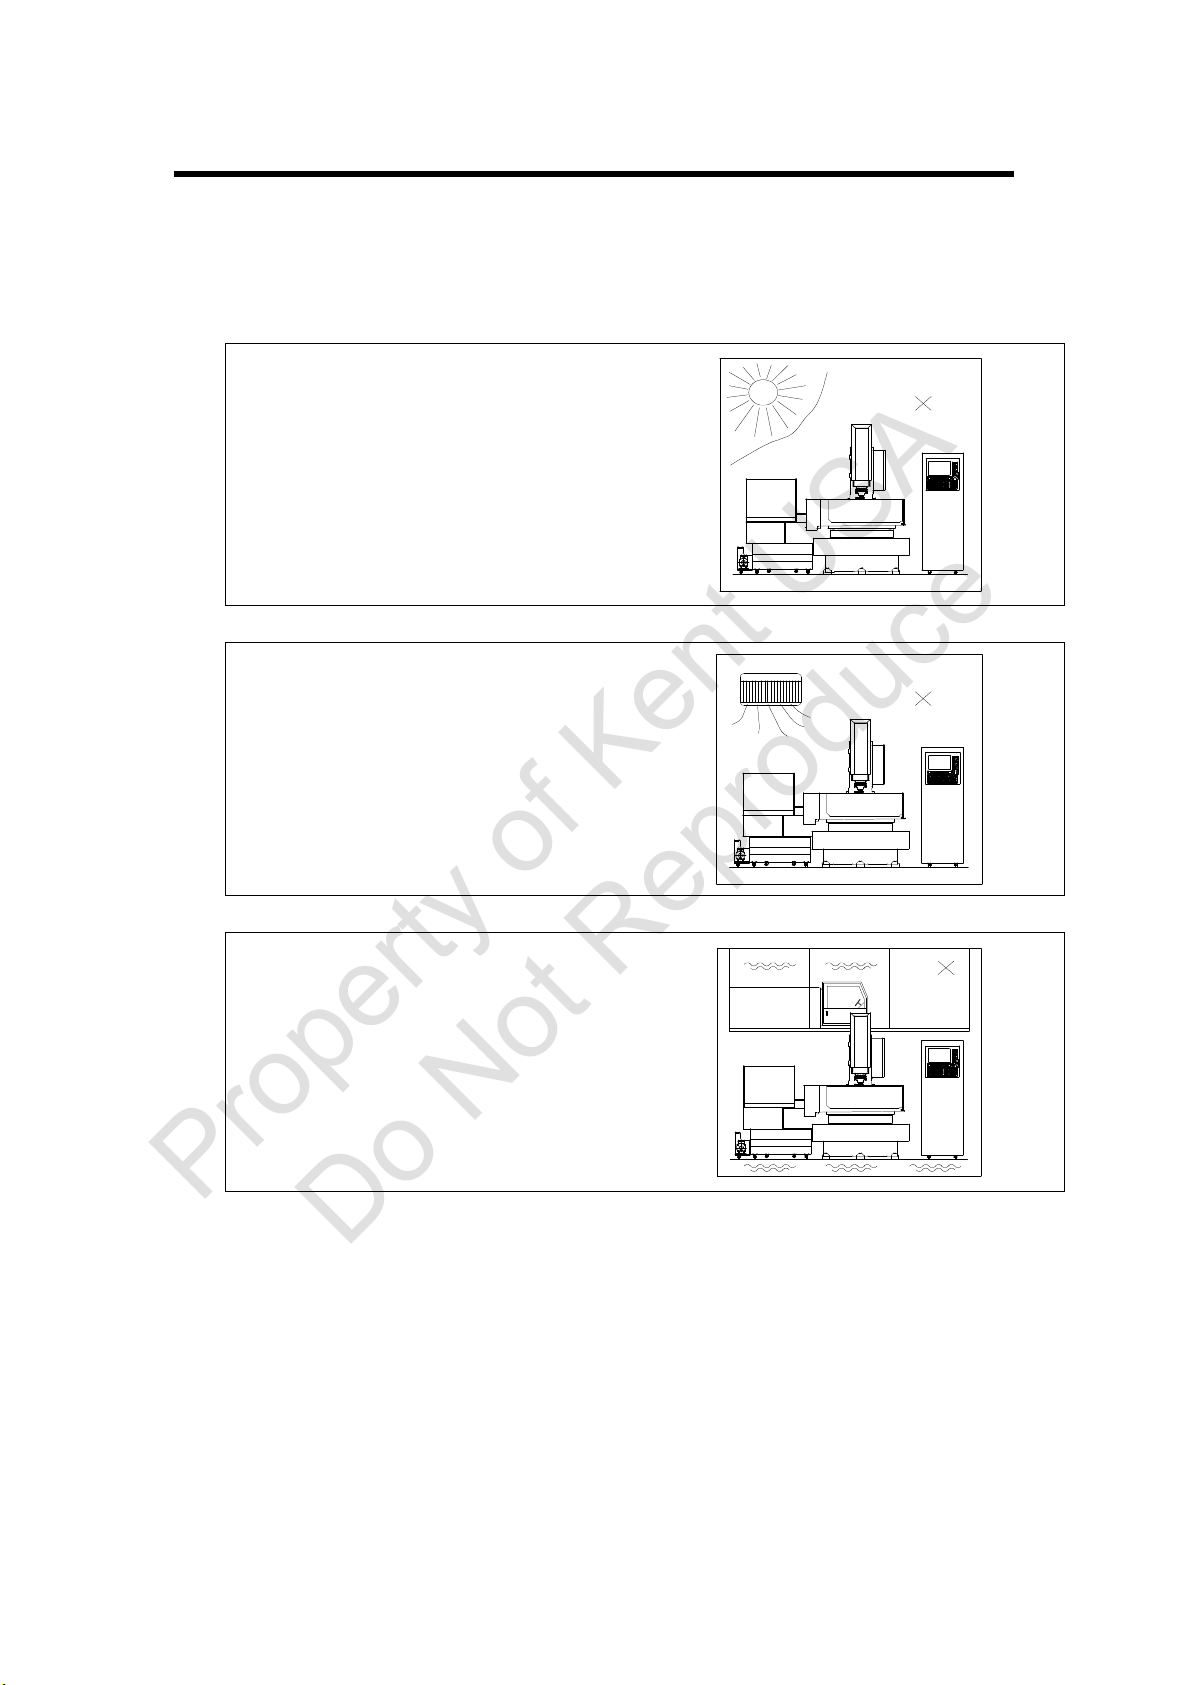
2.2 Installation site
(1)CNC EDM is a precision machine. Please carefully select
an installation site according to following points:
1. Install the machine at less dust
and bright place, but avoid being
exposed under direct sunlight.
2.
The machine must be installed at a
well-ventilated and temperature
regulated place (Suggested work
temperature to be 25℃). Avoid
air conditioner to blow air directly
to the machine.
3. The machine must be installed on
a no-vibration and solid ground.
4. The machine surroundings should
be reserved a sufficient space (at
least 300mm) for the convenience of
loading workpiece and machine
service.
5. The path where the machine will
pass should be safe and wide
enough.
Property of Kent USA
Do Not Reproduce

KEB-CNC Operation Manual
2. Machine Transportation & Installation
- 5 -
2.3 Transportation
Machine:
(1)Use only forklift to move the machine as following FIG. shown.
(2)KEB-600LCNC needs at least 2.5 Ton forklift.
(3)KEB-700LCNC needs at least 5 Ton forklift.
(4)KEB-800LCNC needs at least 10 Ton forklift.
(5)KEB-800LCNC needs at least 10 Ton forklift.
!Note
* Keep machine balanced during transportation. The
machine should avoid slanting.
* When the machine is lifted by forklift, the center of
gravity of the machine should be slightly backward.
* Before using the forklift, be careful with the
transportation path, and verify that the space is wide
enough for making a U-turn.
* Only qualified persons are allowed to operate the
forklift.
Property of Kent USA
Do Not Reproduce
KEB-CNC Operation Manual
2. Machine Transportation & Installation
- 6 -
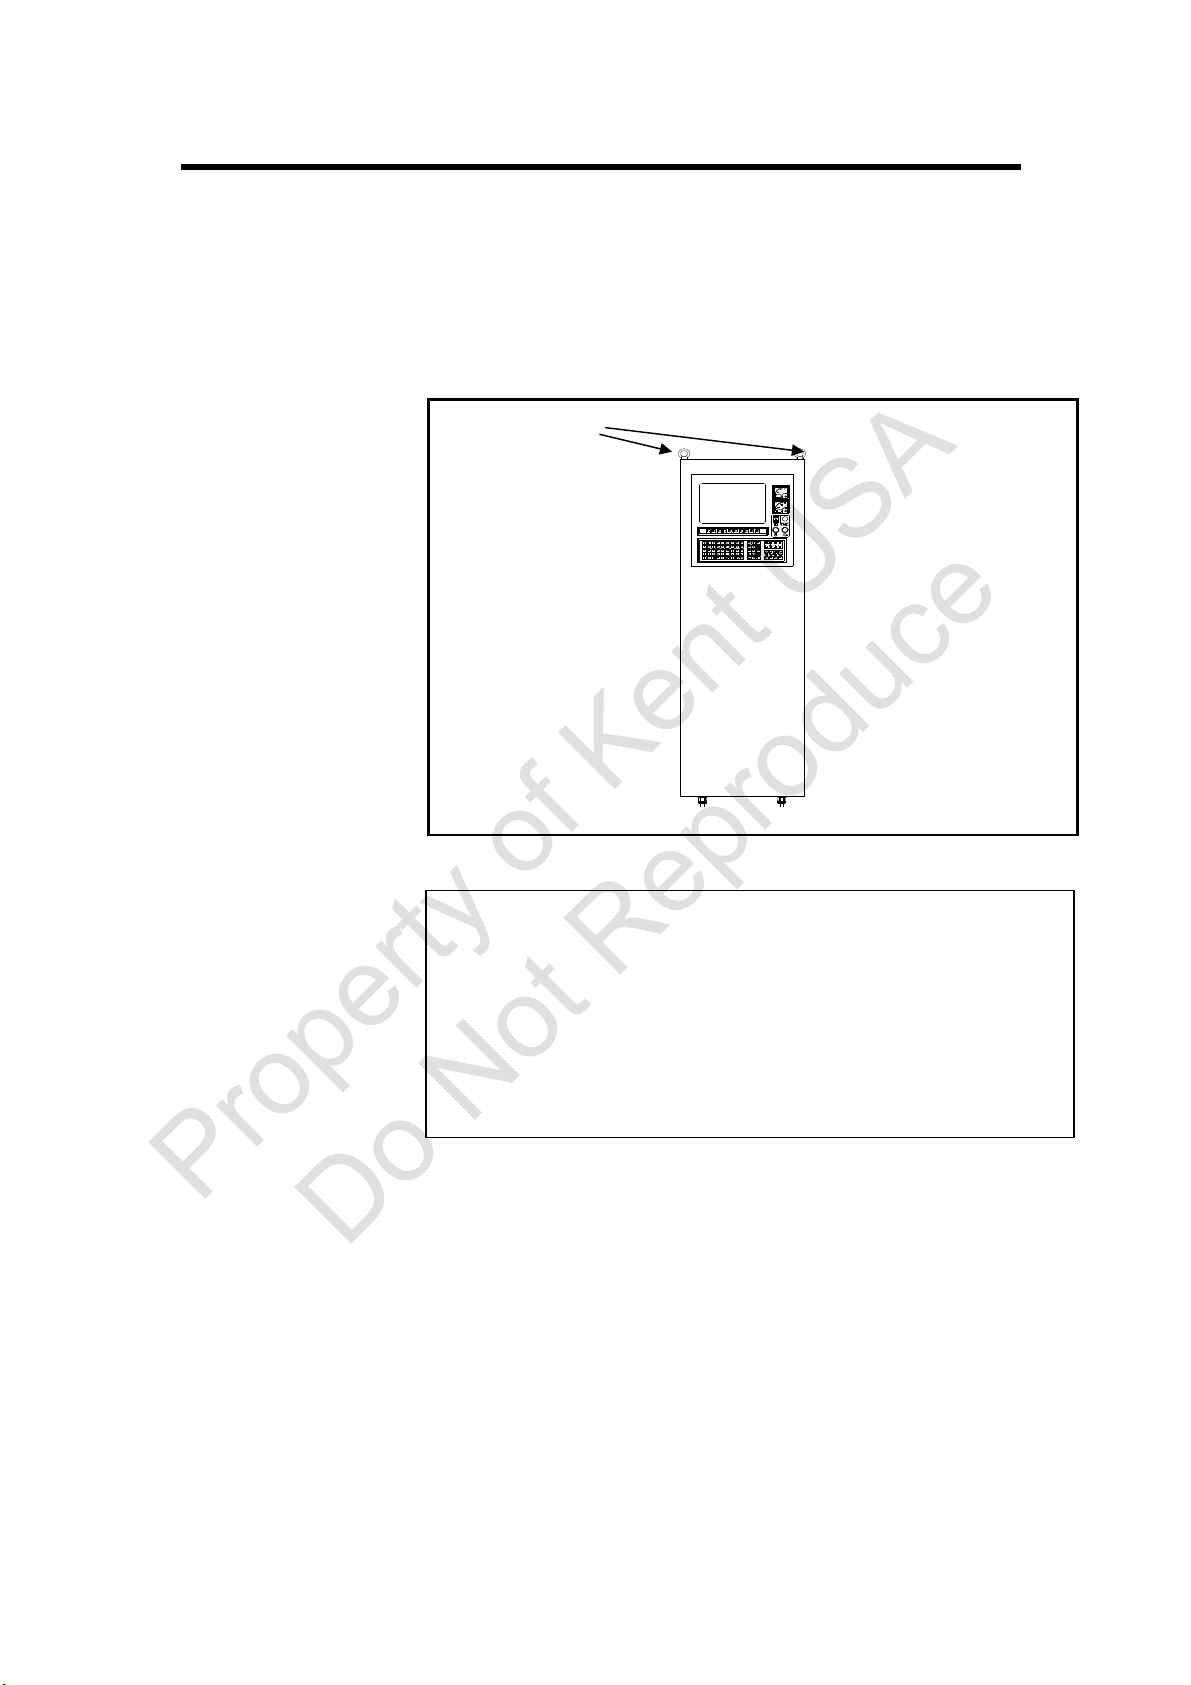
Power control box:
(1)Use a hoister to hook the power control box as following figure shown.
(The power control box has two hanging rings.)
(2)The power control box on the ground can be moved.
!Note
Transportation of work liquid tank
(1)Use a forklift to move it.
(2)When the work liquid tank is on the ground, you can use hands to push
the work liquid system.
Hanging ring
Hook the hang
rings to move
the power control
box.
* When the power control box is moved on the ground,
the ground should be even and without any obstacles.
* For pushing the power control box, there should be
one man before and behind the power control box so
as to avoid losing center of gravity, or the power control
box may overturn.
Property of Kent USA
Do Not Reproduce

KEB-CNC Opertation Manual
2. Machine Transportation & Installation
-7-
2.4 Machine installation
(1)Power supply and wire connection
1. It would be better to prepare a voltage stabilizer for the power required
by the electric control box. It is necessary to have a protective measure
for your machine before installation.
!Note If the voltage fluctuation in your area is over + 10%, it is
necessary to install a voltage stabilizer to protect the
controller, and ensure a normal function with the circuit
board. It is to prevent the machine from being damaged.
2 . The machine must be grounded. It is better that the operator stands on
a wooden stand to operate the machine.
3. The wire connection of the machine is as following figure shown.
Please connect the electric control box and the wires according to the
instructions.
!Note Do not connect the auto fire extinguisher to the electric
control box in parallel so as to avoid error action on safety
functions.
Property of Kent USA
Do Not Reproduce
KEB-CNC Opertation Manual
2. Machine Transportation & Installation
-8-
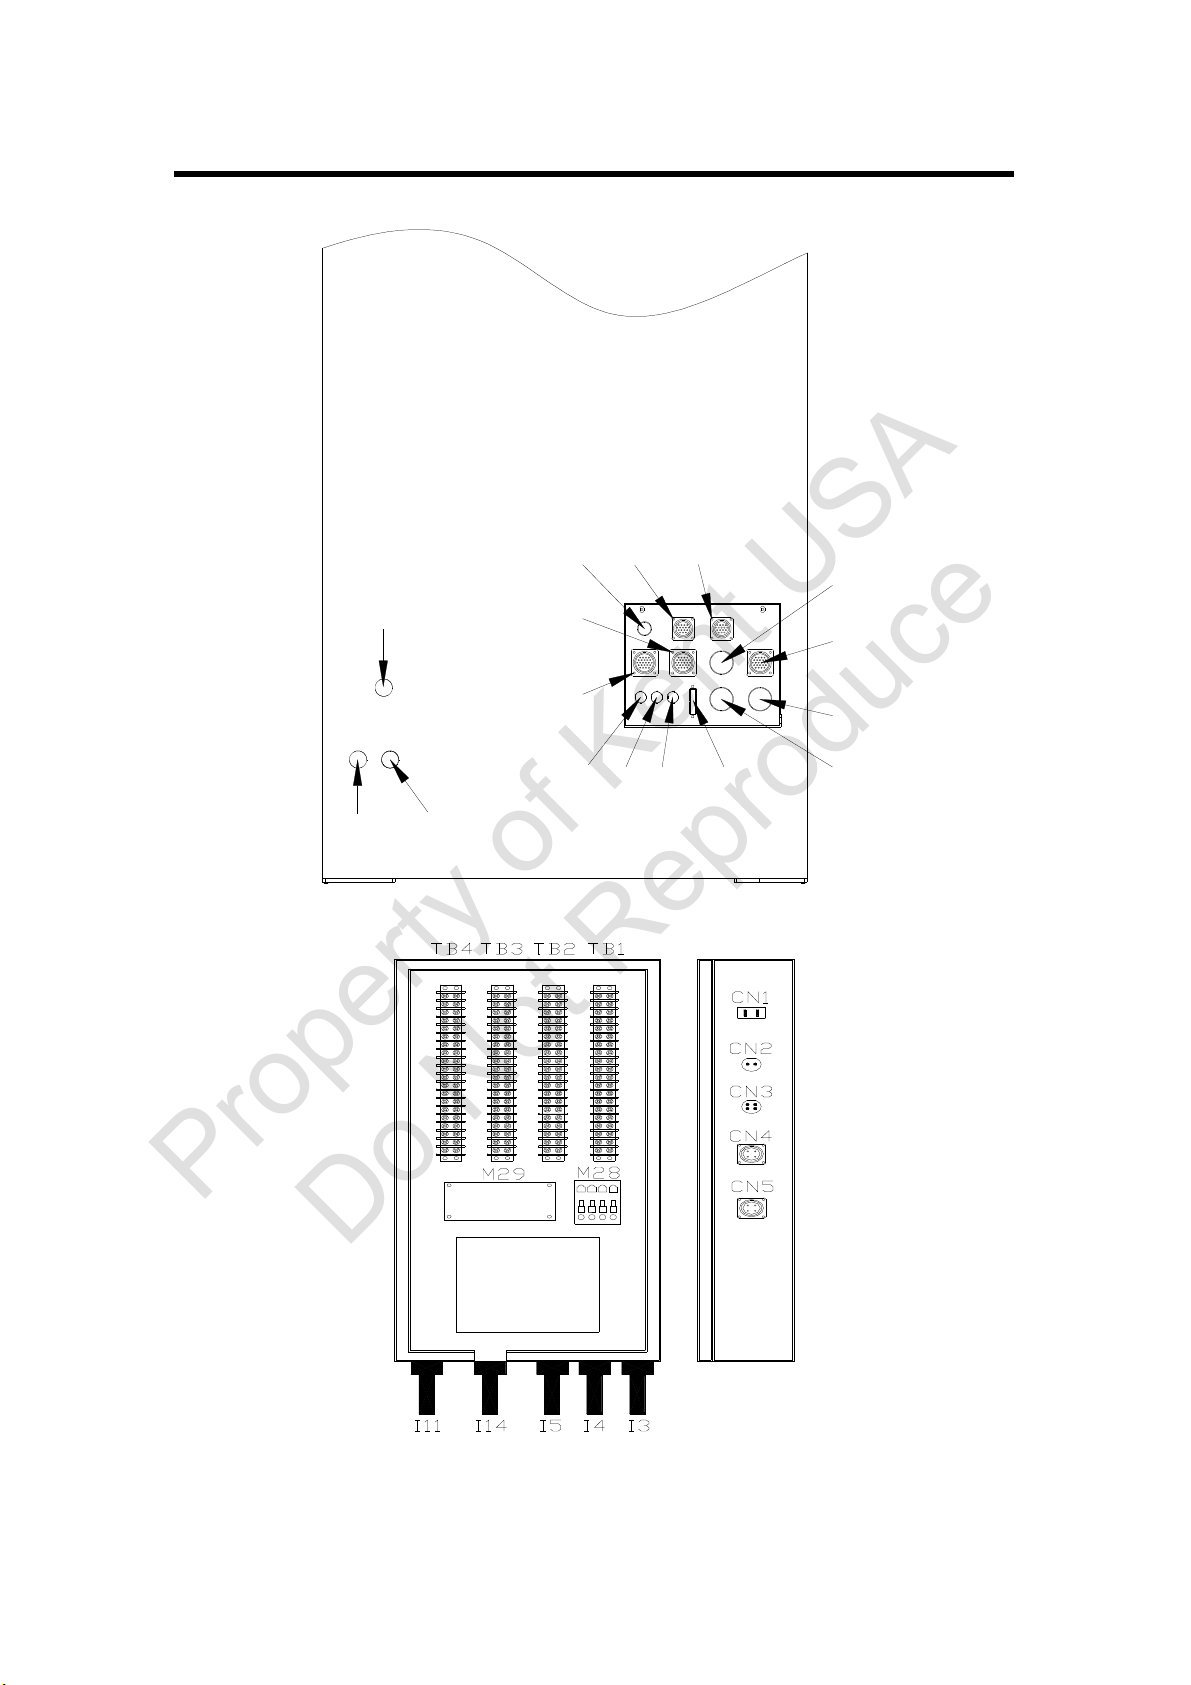
I1
I2
I9
I4
I3
I6 I7 I8 I13
I11
I10 I12
I15
I5
I16
I14
Wire diagram of machine to electric control box
Property of Kent USA
Do Not Reproduce

KEB-CNC Opertation Manual
2. Machine Transportation & Installation
-9-
(2)Remove the red metal plates of X and Y axes
KEB-600L
Fixed plate of Y axis
Fixed plate of X axis
KEB-433
Fixed plate of Y axis Fixed plate of X axis
Property of Kent USA
Do Not Reproduce

KEB-CNC Opertation Manual
2. Machine Transportation & Installation
-10-
(3)Level the machine
1 . There are 5 level bolts under the adjusting base.
Use a wrench to turn the level bolts, and level the
machine.
2. Measure again and again till the machine is
practically leveled.
(4)Remove anti-rust oil
During the storage and transportation, some
components and the hand scraping surface of the
parts needs to be covered with one layer of
anti-rust oil. Before using the machine, it is
necessary to degrease them by kerosene, gasoline
or methyl benzene. After removing the anti-rust oil,
please feed following lubricant or same grade
lubricant to the machine.
SHELL TONNA 68
GULF GULF 59
Machine base
nut
Level bolt
Level block
Property of Kent USA
Do Not Reproduce
KEB-CNC Opertation Manual
2. Machine Transportation & Installation
-11-
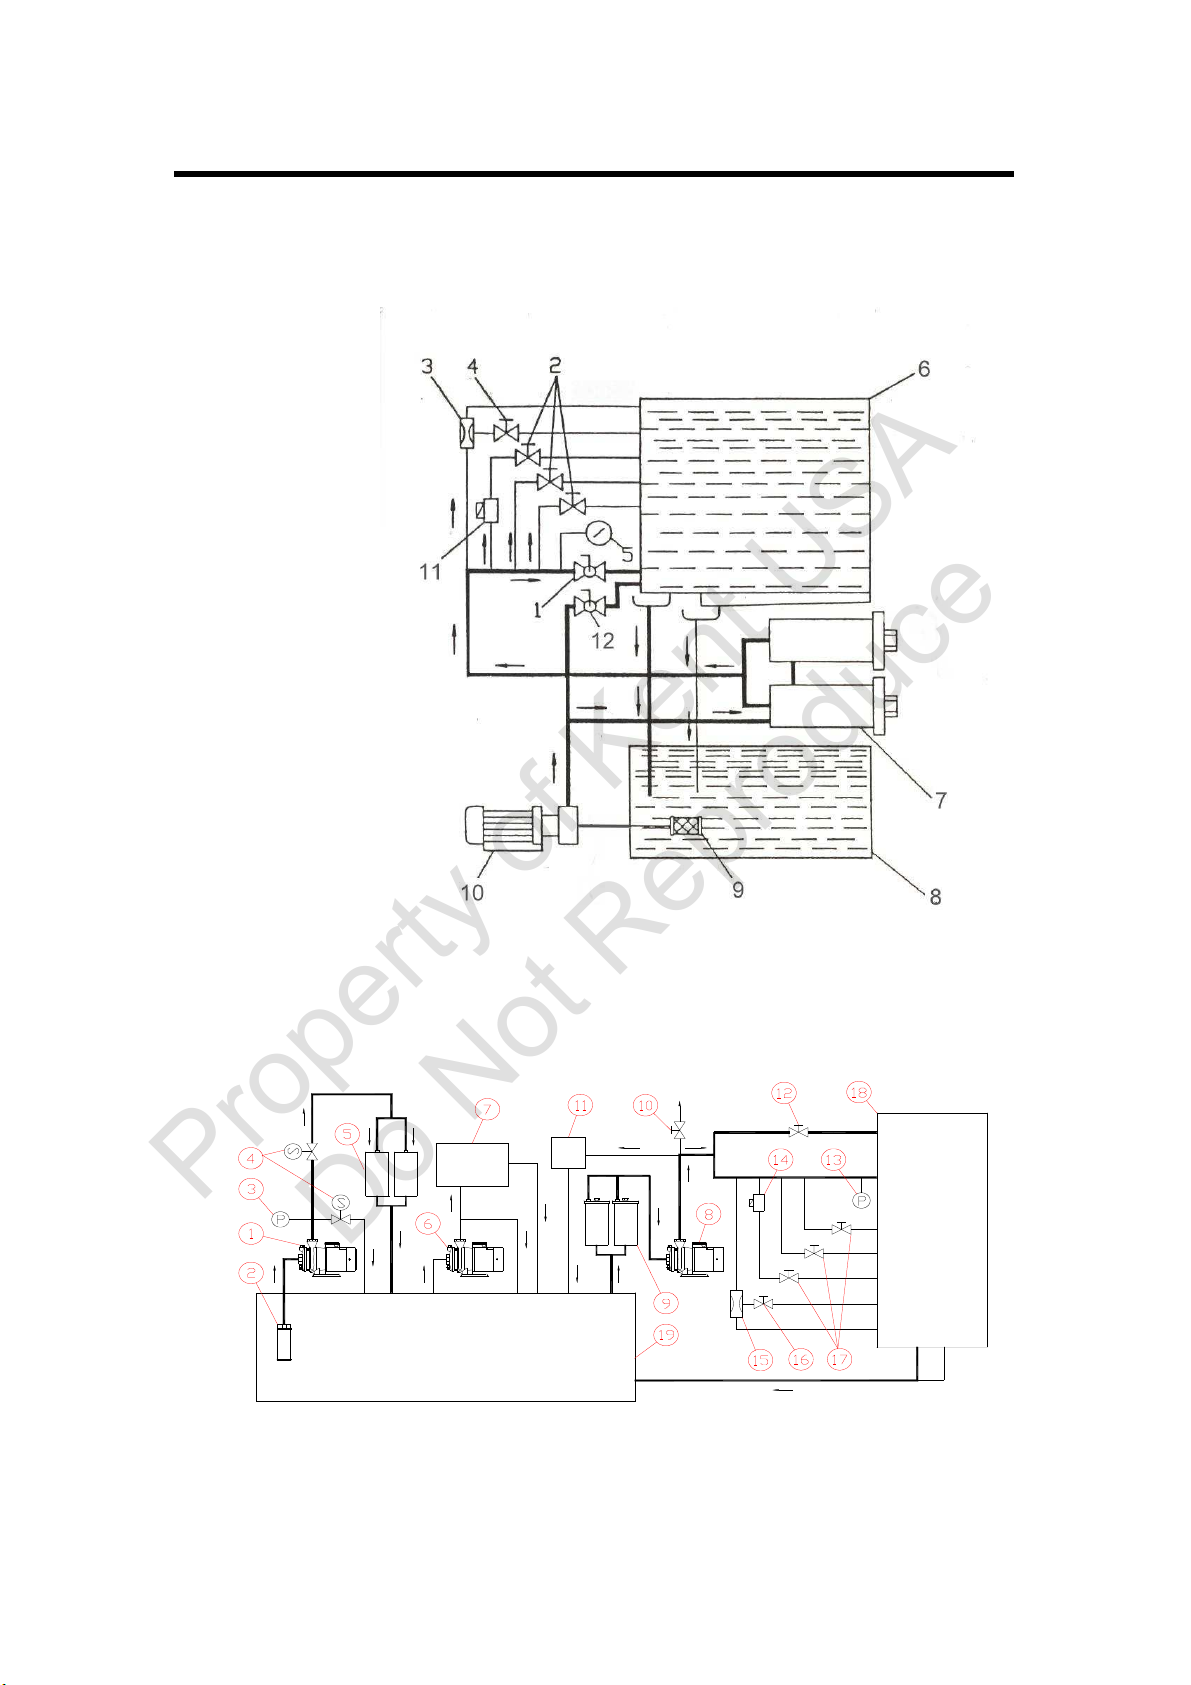
(5)Install pipes of oil tank
Connect the oil tank to the inlet of the oil trough, and fix the pipe.
01 oil filter valve
02 oil spray valve
03 oil sucker
04 oil sucking valve
05 built-in
pressure meter
06 oil trough
07 filter barrel
08 oil tank
09 filter net
10 oil pump
11 intermittent
oil spray
12 fast oil
feeding valve
Suitable models: KEB-600L、KEB433
Suitable models: KEB-600L(S.F.)
Oil tank
Oil trough
Property of Kent USA
Do Not Reproduce

KEB-CNC Opertation Manual
2. Machine Transportation & Installation
-12-
01 motor for filtering silicon powder 11 powder tester
02 small filter net 12 fast oil feeding valve
03 vertical pressure meter 13 built-in pressure meter
04 solenoid valve 14 intermittent oil spray
05 powder filter net 15 oil sucker
06 cooling motor 16 oil sucking valve
07 cooler 17 oil spray valve
08 motor for filtering metal powder 18 oil trough
09 metal powder filter barrel 19 oil tank
10 pressure valve for oil spray gun
(6)Check the door catch of oil trough
1. Before
feeding oil,
please check if
the door catch is
clasped. (For
the machine to
be exported, its
door catch is
loosened.) If the
door cannot be
clasped, please
use one 4mm
wrench to adjust
the tightness.
Suitable models: KEB-600L, KEB-433
Property of Kent USA
Do Not Reproduce

KEB-CNC Operation Manual
2. Machine Transportation & Installation
- 13-
2.5 Check before start the machine
1. Check power
Before starting the machine, please verify if the input power agrees with the
rating power labeled on the electric control box.
2.Check the electric control box
If the machine arrived through a long transportation, please ask the
installation technician to open the front and the rear doors of the electric
control box, and check if any of the contact is loose.
3. Check the connecting wire
Verify if every wire is connected to correct position as labeled.
4. Verify the removal of the shipment blocks
There is one fixed block to lock X axis and Y axis respectively. It is to
prevent X axis and Y axis moving during transportation. Before you switch
on the power, please verify these blocks are removed.
5. Check if oil can enter every oil pipe of the oil feeder
6. Check the pipe circuit of work liquid
A: Close the two doors of the oil trough. Check if the door catch is clasped.
B: Check if the oil trough and the tube harness of the oil tank are tightened.
C: Fill oil to the oil tank and the pump. Close all the oil spray valves. Then,
you can switch on power.
D: Switch on power, and start the machine in order. After completing the
start procedure of the machine, press PUMP ON, and verify if the pump
rotates in arrowheaded direction.
E: Check if the pressure valve of the oil trough reaches 20 KGS (When
input 380V to motor, the oil trough reaches 30 KGS) . Please also check
if the filter barrel leaks oil.
F: Check the oil spray valve.
G: Check the oil sucking valve.
H: Check if the door of the oil trough leaks oil.
I: Check if the surroundings of the oil trough leaks oil.
Property of Kent USA
Do Not Reproduce

KEB-CNC Operation Manual
3. Safety Directive
-1- 1
3. Safety Directive
The work liquid used in EDM will sparkle and produce high temperature
during work. Therefore, following regulations must be strictly followed.
1. Safety Device and its installation
Do not remove or modify any of the safety devices without permission
when you operate the EDM.
(1)power : EDM should have an independent power supply. Do not
share a circuit breaker with other machines.
(2)Liquid level sensor: when the level of the work liquid is lower than
the setting, the machine will stop working immediately, and sends
out a warming.
(3)Fire prevention sensor: When fire alarm happens during work, the
machine will stop working immediately, and sends out a warming.
(4)Fire extinguisher : when the work liquid is on fire, the auto fire
extinguishing device will spray fire-extinguishing chemical
automatically.
(5)Temperature control switch ( limited to the machines with CE mark) :
Please set 50℃for the work liquid. If the temperature is over 50℃,
the machine will stop working immediately. 8
(6)The switch of oil trough door (limited to the machines with CE
mark): if the door of the oil trough is open, the machine cannot
work.
2. Environment
Be sure to clean the surroundings of the machine frequently
(1)Avoid harm to the operators
a. The work liquid is one kind of corrosive liquid. It will make human
skin allergic. Suggest the operators to wear work gloves, or
spread hand ointment. Suggest the operators to wear gloves, or
Spread hand care ointment.
b. The work process will produce harmful gas to operators. Please
install an exhaust pipe to exhaust the waste gas during the work.
(2)Avoid polluting environment
a. Avoid work liquid leak
b. Prepare a non-leaking floor.
Property of Kent USA
Do Not Reproduce
This manual suits for next models
2
Table of contents


