Kenwood HM-L700 User manual

LIFE STYLE HI-FI COMPONENT SYSTEM
INSTRUCTION MANUAL
KENWOOD CORPORATION
B60-5365-00 01 MA (E)
CR
0305
HM-L700
ESPAÑOL
ITALIANO
DEUTSCH
FRANÇAIS
DIGITAL AUDIO
COMPACT
ENGLISH
5MD3MD/01-05/EN 10/2/03, 4:12 AM1

Before applying power
2EN
ENGLISH
Units are designed for operation as follows.
Europe ................................................. AC 230 V only
Safety precautions
WARNING : TO PREVENT FIRE OR ELECTRIC SHOCK, DO NOT
EXPOSE THIS APPLIANCE TO RAIN OR MOISTURE.
CAUTION: TO REDUCE THE RISK OF ELECTRIC SHOCK, DO NOT RE-
MOVE COVER (OR BACK). NO USER-SERVICEABLE PARTS INSIDE.
REFER SERVICING TO QUALIFIED SERVICE PERSONNEL.
RISK OF ELECTRIC SHOCK
DO NOT OPEN
THE LIGHTNING FLASH WITH ARROWHEAD SYMBOL, WITHIN AN EQUILATERAL TRIANGLE, IS IN-
TENDED TO ALERT THE USER TO THE PRESENCE OF UNINSULATED "DANGEROUS VOLTAGE" WITHIN
THE PRODUCT’S ENCLOSURE THAT MAY BE OF SUFFICIENT MAGNITUDE TO CONSTITUTE A RISK OF
ELECTRIC SHOCK TO PERSONS.
THE EXCLAMATION POINT WITHIN AN EQUILATERAL TRIANGLE IS INTENDED TO ALERT THE
USER TO THE PRESENCE OF IMPORTANT OPERATING AND MAINTENANCE (SERVICING) INSTRUC-
TIONS IN THE LITERATURE ACCOMPANYING THE APPLIANCE.
CAUTION
Before applying power
Caution : Read this page carefully to ensure safe operation.
The marking of products using lasers
The marking of this product has been classified as Class 1. It means
that there is no danger of hazardous radiation outside the product.
Location: Back panel
CLASS 1
LASER PRODUCT
5MD3MD/01-05/EN 9/5/03, 2:02 PM2

Before applying power
3EN
ENGLISH
VERSATILE timer features
÷Weekly timer playback :
Two timer programs (PROG. 1, PROG. 2) are available for timer playback or AI timer playback. (With the
AI timer playback, the playback volume increases gradually after the start of timer playback.)
÷Sleep timer :
This timer turns the unit off automatically when the set time has elapsed. It is convenient for example,
falling asleep while listening to music in the night time, etc.
This unit is equipped with a demonstration function (only display). The demonstration consists of se-
quentialchangeofdisplayandindicatorsshowingtheoperations,buttheaudioitselfdoesnotchange.
The demonstration function can be canceled as follows.
÷This operates automatically when a power failure
has occurred or the plug of the power cable has
been pulled while the power was ON.
In regard to demonstration
"DEMO ON" (To execute demonstration):
After turning power ON, press and hold the en-
ter/demo key (for more than 2 seconds).
"DEMO OFF" (To cancel demonstration):
Press the enter/demo key during demonstration.
Special features
Playback capability of CD-R and CD-RW discs.
This unit can playback music data recorded in CD-R (Compact Disc Recordable) and CD-RW (Compact Disc
Rewritable).
However, some CD-R and CD-RW discs may not be playable on the CD player depending on the recording
characteristics of the recording equipment (including the pick-up), properties of the CD-R or CD-RW in use,
its recording condition and so on. Also note that a CD-R or CD-RW disc which has not been finalized cannot
be played back.
5MD3MD/01-05/EN 9/5/03, 2:02 PM3

Before applying power
4EN
ENGLISH
Unpacking
Unpack the unit carefully and make sure that all the accessories are present.
If any accessories are missing, or if the unit is damaged or fails to operate, notify your dealer immediately. If the unit was
shipped to you directly, notify your shipper immediately. Kenwood recommends that you retain the original carton and
packing materials in case you need to move or ship the unit in the future.
Keep this manual handy for future reference.
FM indoor antenna (1)AM loop antenna (1) Card-type remote control unit
(1, with built-in button battery)
Accessories
Before use
Peel the battery sheet from the
card-type remote control unit
in the direction of the arrow.
AC adaptor (1) Power cord (1)
5MD3MD/01-05/EN 9/5/03, 2:02 PM4

Before applying power
5EN
ENGLISH
Contents
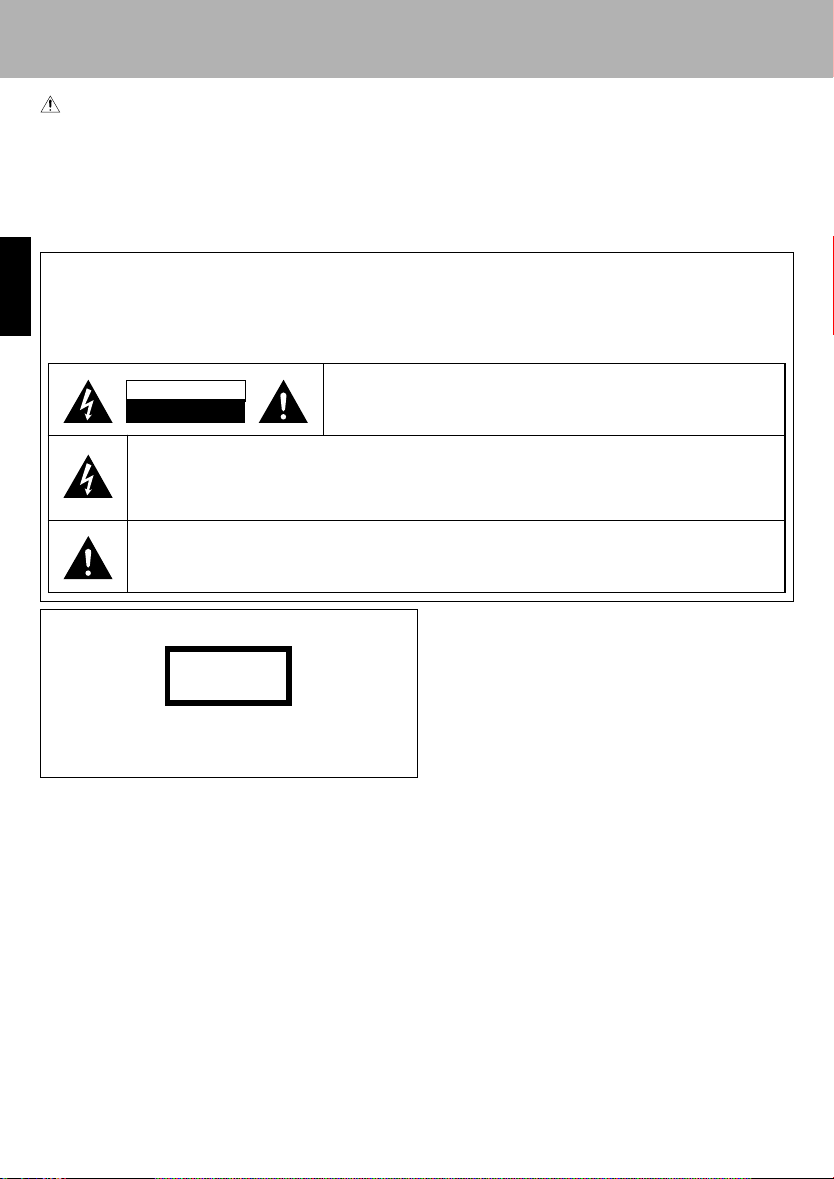
Caution : Read the pages marked carefully to ensure safe operation.
Before applying power .......................................2
Safety precautions ......................................................... 2
Special features ..................................................................... 3
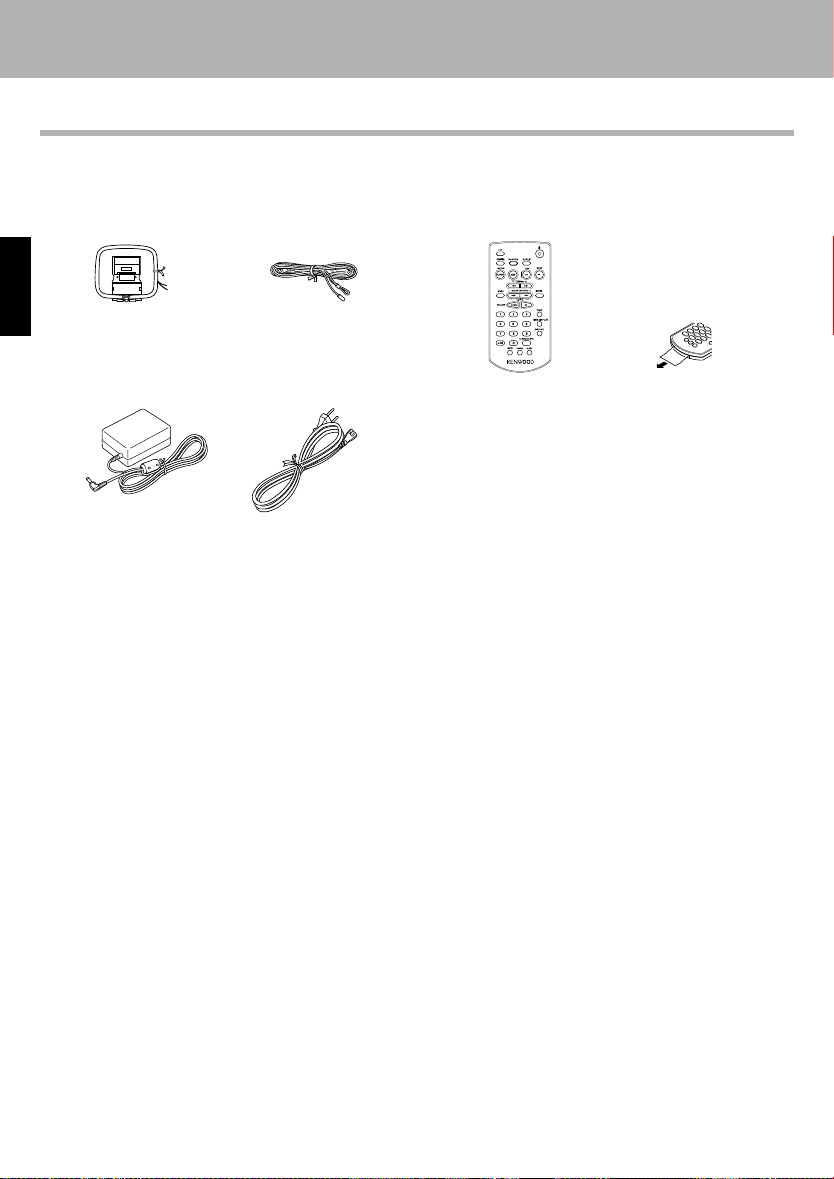
Accessories ............................................................................4
Contents ................................................................................... 5
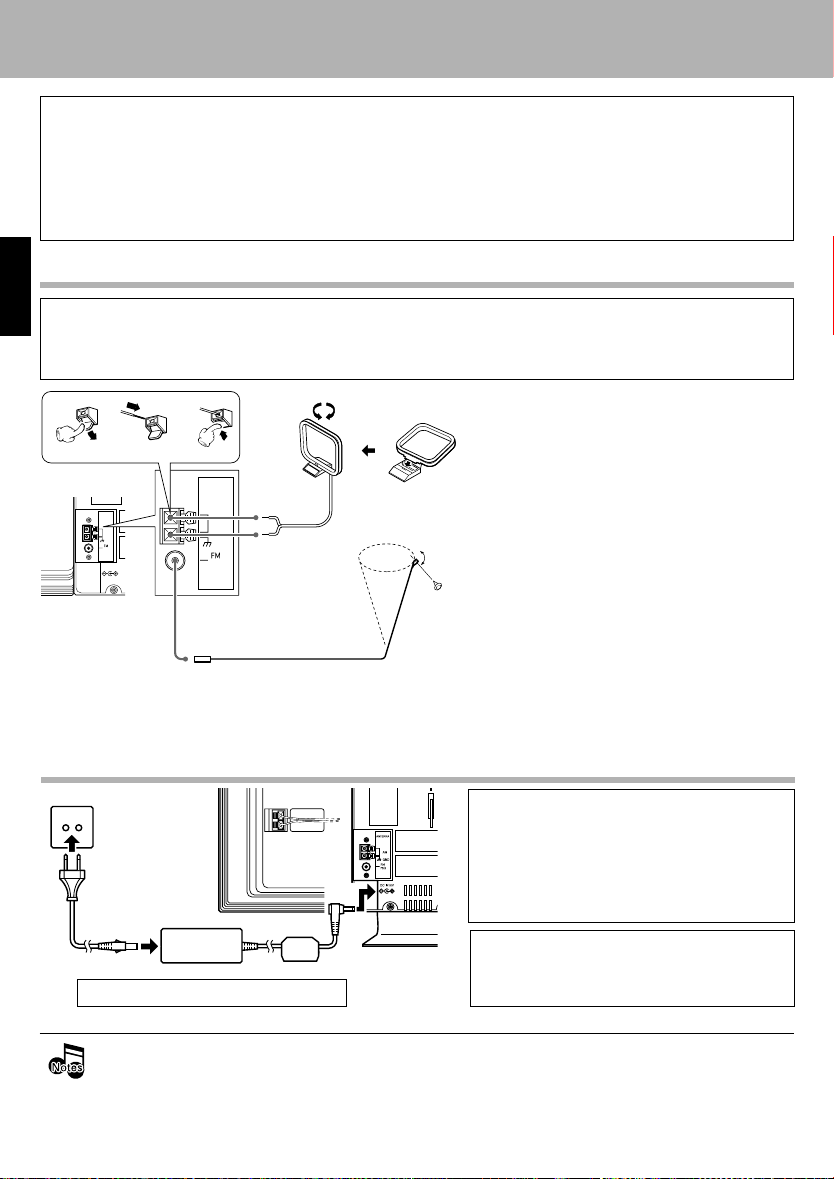
System connection ....................................................6
Connection of the supplied antenna .................................. 6
Connection of the AC adaptor ............................................. 6
Connection of other accessories (Commercially available
parts) ........................................................................................7
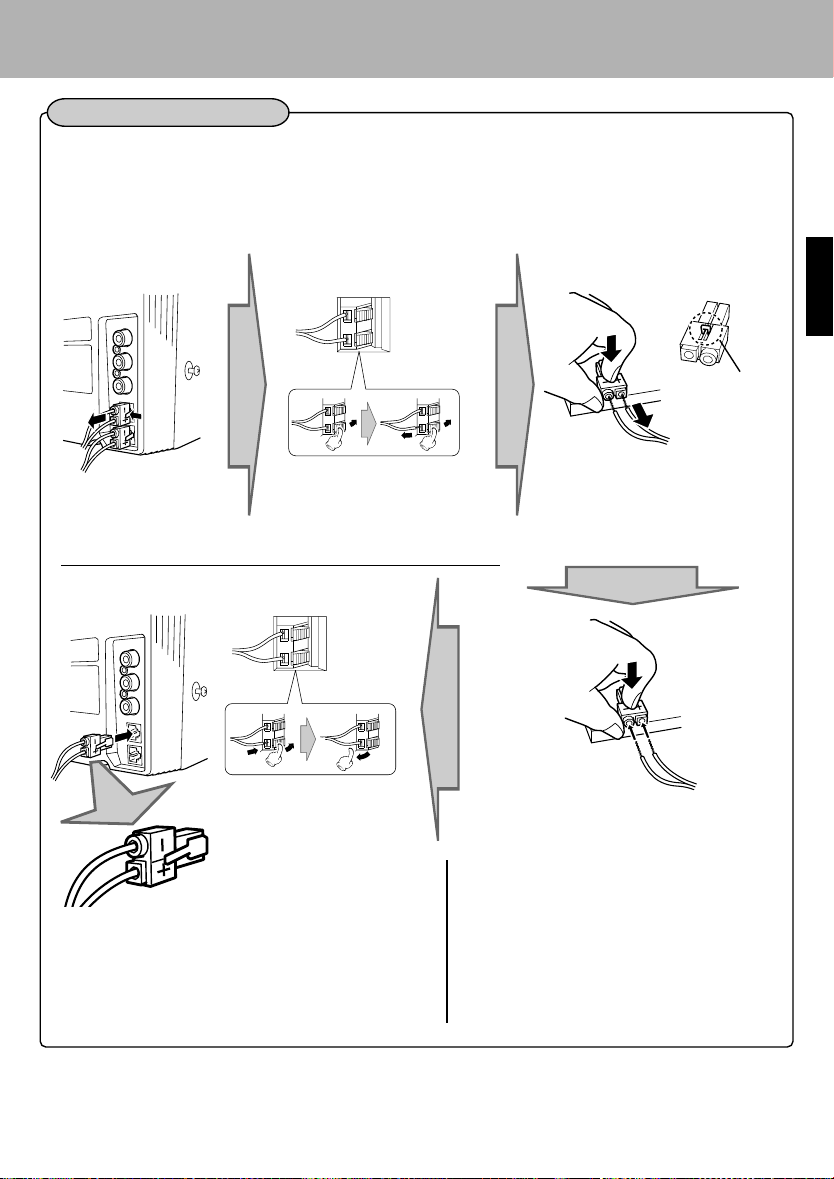
Detaching and attaching the speakers ............................. 8
Controls and indicators...........................................10
Main unit ............................................................................... 10
Operation of remote control unit ...................................... 12
Display ...................................................................................14
Preparation section
Basic section
Application section
Knowledge sections
Basic use method..................................................... 15
Playback of CD .........................................................17
Receiving broadcast station ..................................20
RDS (Radio Data System)........................................ 24
Searching for a desired program type (PTY search)..... 25
Listening to an AUX input source.......................... 27
Various CD playback features ...............................28
Listening to the desired sequence
(program playback) ............................................................. 28
Repeated playback .............................................................. 30
Playing tracks in a random order (random playback) .. 31
Clock adjustment .....................................................32
Timer operation ........................................................33
Sleep timer (SLEEP) .............................................................33
Setting the timer program .................................................. 34
To cancel the program timer ............................................. 37
Adjusting the display and setting indicator ........ 38
Important items......................................................... 39
Maintenance ........................................................................39
Reference ..............................................................................39
In case of difficulty ..................................................41
Specifications........................................................... 43
5MD3MD/01-05/EN 9/5/03, 2:02 PM5

System connection
6EN
ENGLISH
System connection
AM
ANTENNA
75‰
GND
DC IN10V
AM
ANTENNA
75‰
GND
White
Black
Connection of the AC adaptor
Malfunction of microcomputer
If operation is not possible or erroneous
display appears even though all connections
have been made properly, reset the
microcomputer by referring to "In case of
difficulty". q
÷Be sure to insert all connection cords securely. If their connections are imperfect, the sound may not be
produced or noise may interfere.
÷The magnet in the speaker may cause color irregularity to the TV or PC monitor. Place the speaker farther
away from the TV set or PC monitor.
÷Locate the unit in a safe sturdy place.
To wall
AC outlet
Do not install this AC adaptor in a confined space
such as a book case or similar unit.
CAUTION
Note on Using the AC Adaptor
123
Use the included W09-1299 AC adaptor.
Be sure to adhere to the following, or proper ventilation will be blocked causing damage or fire hazard.
÷Do not place any objects impairing heat radiation onto the top of the unit.
÷Leave some space around the unit (from the largest outside dimension including projection) equal to or greater than,
shown below.
Top panel : 50 cm
Back panel : 10 cm
CAUTION
Do not plug the power cord into a wall AC outlet until all connections have been made. Before disconnect-
ing cables of any kind, shut power OFF and unplug the power cord from the wall AC outlet.
CAUTION
Note on Connection
Connection of the supplied antenna
AM loop antenna
The supplied antenna is for indoor use. Place
it as far as possible from the main system, TV
set, speaker cords and power cord, and set it
to a direction which provides the best recep-
tion.
FM indoor antenna
The supplied antenna is for temporary indoor
use only. For stable signal reception, we rec-
ommend to use an outdoor antenna. Remove
the indoor antenna if you connect to an out-
door antenna.
1Connect the antenna to the antenna terminal.
2Locate the position providing good recep-
tion condition.
3Fix the antenna.
5MD3MD/06-14/EN 9/5/03, 2:02 PM6

System connection
7EN
ENGLISH
Connection of other accessories
(Commercially available parts)
Connect the components as shown in the dia-
gram. Only plug the power cord into a power
outlet once connections are completed.
CAUTION
Note on Connection
÷In case an associated system component is connected, also read the instruction manual of the component.
÷Be sure to insert all connection cords securely. If their connections are imperfect, the sound may not be
produced or noise may interfere.
FM outdoor antenna
Lead the 75Ωcoaxial cable con-
nected to the FM outdoor an-
tenna into the room and con-
nect it to the FM 75Ωterminal.
Please remove the indoor an-
tenna after an outdoor antenna
has been installed.
Audio cord
Audio output
Antenna adaptor
(Commercially
Available Parts)
FM outdoor antenna
VCR, Analog turnable with
built-in RIAA equalizer (optional
P-110), etc.
Subwoofer
5MD3MD/06-14/EN 9/5/03, 2:02 PM7

System connection
8EN
ENGLISH
Detaching and attaching the speakers
The speakers can be detached from the main unit and located in a preferred location.
Before detaching or attaching the speakers, or changing the speaker cables, shut power OFF and unplug the power cord from the
wall AC outlet. If there is a disc in the player, eject it first, too. Also, using the main unit with only one speaker attached makes the
unit unbalanced. Shocks and vibrations can cause it to topple over. Use caution when attaching and detaching the speakers.
Detaching the speakers Attaching the speakers
Free the speaker cable from the hook on the
rear panel.
Push the speaker from the rear in the direction
of the arrow.
Be careful not to drop the speaker.
Detach the speaker from the main unit.
Align the recesses on the speaker with the pro-
jections on the main unit.
Use the bottom recess on the rear of both
the left and right speakers.
Push the speaker from the front in the direction
of the arrow.
Positioning the speakers
Lay the speaker on the side that was attached to the
main unit. That side has antislip stoppers.
Side that was attached
to main unit
DC IN10V
The speaker's magnetism can distort the color of TV and
PC. If that happens, move the speakers farther away
from the TV or PC.
Hook

System connection
9EN
ENGLISH
Changing the speaker cables
If too short for reaching the speakers in their position detached from the main unit, the speaker cables
can be changed with compatible commercially available cables (AWG24 ~ 18 [wire diameter: 0.511 ~
1.024 mm]). Peel off about 1 cm of the vinyl sheathing and twist the end of the wire so that it does not
fray.
Main unit rear panel Speaker rear panel
While pressing the lever in
the direction of the arrow,
disconnect the speaker con-
nector.
While depressing the lever, pull
out the speaker wires.
Hold the projected part of the
speaker connector firmly against a
desktop and pull the wires out.
Projected part
of speaker con-
nector
Main unit rear panel Speaker rear panel
While pressing the lever, insert
the speaker wires into the jack.
– connector wire ➞Connect
to the black jack on the speaker.
+ connector wire ➞Connect
to the red jack on the speaker.
Insert the speaker connector into the rear panel of the main
unit and connect the speaker wires to the speaker jack on
the rear panel of the speaker.
•Insert the speaker connector into the speaker connector
jack on the main unit until hearing it click.
Hold the projected part of the speaker con-
nector firmly against a desktop and insert the
speaker wires of the purchased cable into it.
•Frayed wires stuck out from the connec-
tor can cause a short-circuit. Twist the
wires tight before inserting them into the
connector.
•Once the wires are inserted, hold the con-
nector and gently tug on the wires to
make sure they do not come out.
•Do not short-circuit the + and – speaker wires.
•If wires are connected with the polarity (+ and -) backwards, the location of instruments is unclear and the produced
sound seems unnatural.
•Do not insert metal or other objects into the speaker connector jack.
5MD3MD/06-14/EN 9/5/03, 2:02 PM9

System connection
10 EN
ENGLISH
About the one-touch operation function
This unit incorporates the one-touch operation function for the user's convenience.
When on standby, pressing the TUNER FM/AM key, AUX key or CD 6key inside the section @above
activates power.
•If the TUNER FM/AM key, is pressed, the last radio station received prior to the power being shut OFF is picked up.
•If the CD 6key is pressed and there is a CD in the CD player, playback starts.
Main unit
Controls and indicators
0
@
#
$
%
!
^
Front panel
Top panel
1Door !
20/open CD eject key *
Press to eject the CD.
3door open/close key !
Press to open and close the door.
4CD slot &
5sound key ^
Press to select EX. BASS.
6tone key ^
Press to set the tone.
7mode key !
Press to get the setting mode.
8enter/demo key 3!
Press to enter settings in the setting mode.
Press to turn the demonstration ON/OFF.
9sleep key ‹
Press to set the sleep timer.
0CD indicator &
Lit while a CD is in the main unit.
!Display $
@Basic operation keys
TUNER FM/AM key )
Each time this key is pressed, radio reception toggles
between AM and FM.
AUX key 
Switches input to the auxiliary channel.
CD 6key &
Switches input to the CD player and starts playback. If
pressed during CD playback, playback pauses.
multi control 4key
multi control ¢key
- Press to skip tracks on the CD. *
- Press to select preset radio stations. )
- Press to select items in the setting mode. !
STOP/[tuning mode] key
When using the CD player *
Press to stop disc operation.
When using the tuner ™
Switches between auto tuning (stereo reception)
and manual tuning (monaural reception).
When on standby ¤
Displays the time on the display.
#Volume knob %
Turning to the right increases the volume. Turning to
the left decreases the volume.

System connection
11 EN
ENGLISH
$Headphones jack ^
Connect headphones with a stereo mini-plug (sold
separately) here.
%Remote sensor #
Detects signals sent from the remote control unit.
^key %
Switches power between ON and standby.
on/standby (timer) indicator
When power is on, the indicator is orange.
When on standby, the indicator lights as follows.
Red : Ordinary standby
Green : Timer standby
\
\\
\
To close the door, press the door open/close key
again.
•When power is turned OFF, the door automatically
closes.
•Do not force the door shut by hand.
Basic operations in the setting mode
Settings and adjustments are made using the mode
key. Press the mode key to get the setting mode.
Make settings with the 4and ¢multi control
keys. Use the enter/demo key to enter settings.
"TIMER SET"
"AUTO MEMORY "
(Only when the TUNER input is selected)
"AUX INPUT"
(Only when the AUX input is selected)
"BALANCE"
"A.P.S. SET"
"DISPLAY SET"
"TIME ADJUST"
•When the mode key is pressed followed by the 4
and ¢multi control keys, the display changes as fol-
lows.
•The setting next to “>” is the selected item.
Example: When “ON” is selected
•If an operation is not performed for 20 sec or more, the
setting mode is automatically canceled. (TIME ADJUST
and TIMER SET excluded)
Opening/Closing the door
You can open the door on the top of the main unit
to the section of the operation keys by pressing the
door open/close key.
Standby mode
While the on/standby (timer)indicator is lit (red, green), a small amount of power is supplied to the sys-
tem to back up the memory. This is called standby mode. Under the condition, the system can be turned
ON by the remote control unit.
Controls and indicators
door open/close key
5MD3MD/06-14/EN 9/5/03, 2:02 PM11

System connection
12 EN
ENGLISH
The keys on the remote control unit with the same names as on the main unit have the same function as
the keys on the main unit.
Controls and indicators
Operation of remote control unit
1
2
3
4
5
6
7
8
9
0!
@
#
$
%
1key %
Switches power between ON and standby.
2Basic operating keys
TUNER FM/AM key )
AUX key 
CD 6key &
STOP 7key *™¤
3TUNING ∞/1key
TUNING 5/¡key
When using the tuner ™
Use to select radio stations.
When using the CD player *
Use for fast-forwarding and fast-reverse.
4MODE key #
Press to get the setting mode.
MULTI CONTROL 4/P.CALL 4key
MULTI CONTROL ¢/P.CALL ¢key
- Press to skip tracks on the CD. *
- Press to select preset radio stations. )
- Press to select items in the setting mode. #
ENTER key #
Use to enter settings in the setting mode.
5VOLUME UP key
VOLUME DOWN key %
Press to increase or decrease the volume.
6TONE key ^
Press to set the tone.
7TIME DISPLAY key (
Press to switch the CD time display.
8DISPLAY key (¡
Press to display the title or time.
9CLEAR/DELETE key ª
Press to clear programmed CD tracks.
0SLEEP key ‹
Press to set the sleep timer.
!SOUND key ^
Press to select EX.BASS.
@MUTE key ^
Press to temporarily mute the sound.
#Numeric keys
Press to select CD tracks and preset radio stations.
*)
$P.MODE key •
Use at the time of CD program playback.
RANDOM key ⁄
Press to play back tracks in random order.
REPEAT key º
Press to repeat playback.
%PTY key ∞
Use at the time of program type ditection.
Before Use:
Pull the battery sheet out from
the card-type remote control unit
to the direction of the arrow.
5MD3MD/06-14/EN 9/5/03, 2:02 PM12

System connection
13 EN
ENGLISH
÷The provided battery is intended for use in operation checking, and its service life may be short.
÷When the remote controllable distance becomes short, replace the battery with a new one.
÷
If direct sunlight or the light of a high-frequency fluorescent lamp (inverter type, battery etc.) is incident a new one to
the remote sensor, malfunction may occur. In such a case, change the installation position to avoid malfunction.
Changing the battery of the remote control unit
Controls and indicators
\
\\
\
Basic operations in the setting mode
"TIMER SET"
"AUTO MEMORY "
(Only when the TUNER input is selected)
"AUX INPUT"
(Only when the AUX input is selected)
"BALANCE"
"A.P.S. SET"
"DISPLAY SET"
"TIME ADJUST"
•The setting next to “>” is the selected item.
Example: When “ON” is selected
•If an operation is not performed for 20 sec or more, the
setting mode is automatically canceled. (TIME ADJUST
and TIMER SET excluded)
Settings and adjustments are made using the
MODE key. Press the MODE key to get the setting
mode. Make settings with the 4and ¢keys.
Use the ENTER key to enter settings.
2Replace the old battery with
a new one.
Use a commercially available button battery (CR2025).
1Insert something narrow like a paperclip into the hole 1
and pull out the battery tray.
CR2025
(+ side)
•When the MODE key is pressed followed by the 4
and ¢keys, the display changes as follows.
After plugging the power cord of this unit, press the
key of the remote control unit to turn the system
ON. When the system is turned ON, press the key
of the function to be operated.
Operation
÷When pressing more than one remote control keys
successively, press the keys securely by leaving an in-
terval of 1 second or more between keys.
Operating range (approx.)
Remote sensor
6 m
30˚30˚
Load the battery in the right direction.
5MD3MD/06-14/EN 9/5/03, 2:03 PM13

System connection
14 EN
ENGLISH
The displays given in this manual are approximations only. They may differ from what actually appears on
the display.
1Select “A.P.S. SET”.
AUTO POWER SAVE function
When the unit is ON and the unit is left for 30 minutes with CD not operating, the unit is switched off automati-
cally by this function. This is convenient when you forgot to switch off the unit. This function can be activated or
deactivated by the following operation.
•While this feature is active, “A.P.S.” appears on the
display.
•This feature works only when input is set to TUNER
or AUX and volume is either at 0 or muted.
Display
1
4
2
3
5
1Timer and A.P.S. indications
2EX.BASS indication
3 Tuner indications
4 Text information display area
5 CD playback indications
Main unit
\
\\
\
Remote control unit
Use the 4and ¢keys to select “A.P.S. SET”.
While “A.P.S. SET” is flashing, press the enter/
demo key.
2Select “ON” or “OFF”.
Main unit Remote control unit
Example: When “ON” is selected
3Enter the setting.
Main unit Remote control unit
Controls and indicators
5MD3MD/06-14/EN 9/5/03, 2:03 PM14

15 EN
Basic use method
ENGLISH
The volume
decreases
The volume
increases
Example:
To select the CD input
Basic use method
1. Set the key to ON.
Pressing the key when the unit is ON turns it off (Standby mode
of power).
÷Pressing the TUNER FM/AM, CD 6or AUX key also turns power on
and starts playback (reception) of the corresponding input. (One-touch op-
eration)
÷When the CD input is selected while the disc has been loaded, it
immediately starts to play.
2. Selecting the desired output.
÷Pressing the TUNER FM/AM,
CD 6or AUX key selects the
corresponding input.
Each time the TUNER FM/AM
key is pressed, radio reception
toggles between AM and FM.
CD &
TUNER (Broadcasts) )
AUX (External input) ¶ [Adjusting the AUX input level]
When CD has been selected.
Volume display
3. Volume adjustment.
÷The display shows a reference value.
÷From the remote control unit, press the VOLUME UP and DOWN keys.
Listening through
headphones
33
11
22
Turn power ON (OFF)
Select a source
Adjust the
volume
Temporarily
mute the
sound
Enhance the bass
Set the tone
Set the tone
Enhance
the bass
22
11
33
5MD3MD/15-19/EN 9/5/03, 2:04 PM15

16 EN
Basic use method
ENGLISH
Muting the sound temporarily (MUTE)
÷Press again to resume the original volume.
÷This is also canceled when the volume is changed.
Enhancement of bass (EX. BASS feature)
÷Headphones with a stereo mini plug can be con-
nected.
÷The sound from all speakers are cut off.
Listening through headphones
Insert the headphone plug into the headphones jack.
The lower and higher frequency bands can be
adjusted independently.
Tone adjustment
÷The levels of both "BASS" and "TREBLE" can be ad-
justed in 2 steps in the range between – 8 and +8.
÷The TONE and EX.BASS feature cannot be active at
the same time.
(To adjust the other frequency band, repeat steps
1and 2for it.)
1Select the frequency band.
1
2Adjust.
(Go to step 2within 20 seconds.)
Only from the remote control unit
Blink during the mute
Main unit Remote control unit
Each press switches the mode as follows.
1"EX.BASS" lights
Low frequency sounds are enhanced.
“EX.BASS ON” appears on the display.
2"EX. BASS" goes off
Sound is enhanced by the TONE control.
“SOUND MODE OFF” appears on the
display.
÷The TONE and EX.BASS feature cannot be active at
the same time.
Set the balance. (BALANCE feature)
This feature balances the sound between the left and
right speakers.
1Press the mode key.
2Use 4and ¢to select “BALANCE” and
press the enter/demo key.
3Use 4and ¢to set the balance and
press the enter/demo key.
\
\
\
\
Main unit Remote control unit
Main unit
Remote control unit
Main unit
Remote control unit
Each press switches the operation.
"BASS" (low frequency) adjustment
2
"TREBLE" (high frequency) adjust-
ment
3Original display

17 EN
Basic use method
ENGLISH
1. Load a disc.
Playback of CD
2. Start playback.
÷After a few seconds, play
starts from track No.1.
When playback starts, the
door closes automatically.
÷Titles are displayed with
CD-TEXT discs. Elapsed time of track being played
Track No. being played
When a disc is placed into the CD player in advance, the unit will be switched on automatically by pressing
the CD 6key, and playback will start.
Playback from
desired track
To stop playback
To stop
playback
Start playback/ To pause playback
22
11
To fast
forward and
backward
Skipping tracks
Start playback/ To pause playback
Skipping tracks
Eject the CD
22
Load CD
with label
facing the
front.
Press the door open/close key to open the door and carefully insert
the CD into the center of the CD slot. Once the CD has been inserted
halfway, it is automatically drawn into the CD player automatically.
•Do not touch the play side of the CD.
•When a CD is loaded into the CD player, the CD indicator on the front panel of
the main unit lights up. If the CD indicator is lit, eject the current CD before
attempting to load another one.
•Particularly with 8 cm CDs, the CD is not automatically drawn into the CD
player if the CD is not at the center of the CD slot when loaded.
•If the CD player does not draw the CD in, pull the CD out and try loading it
again.
When on standby, CDs cannot be loaded or ejected.
Do not force CDs in or out of the CD player when on standby. Doing so
can damage the CD and CD player.
CD indicator

18 EN
Basic use method
ENGLISH
÷Each press pauses and plays the CD alternately.
Start playback/ To pause playback
÷Press and hold one of the keys during playback.
Normal playback resumes at the point where the
key is released.
To fast forward and backward
Skipping tracks
÷The track in the direction of the key pressed is skipped,
and the selected track will be played from the beginning.
÷When the 4key is pressed once during playback, the
track being played will be played from the beginning.
To skip further to a track located before the current track,
press the 4key quickly.
÷Tracks can be skipped by pressing the 4or ¢key
even when the CD is in stop mode. In this case, playback
starts automatically from the point reached by skipping.
Forward
search
Backward
search
Press the numeric keys as shown below....
To select track No. 12 : +10, 2
To select track No. 40 : +10, +10, +10, +10, 0
Playback from desired track
Select the desired track No.
To stop playback
Eject the CD
÷If the door is closed, it opens and the CD is ejected
from the CD player.
If the 0/open CD key is pressed again, the CD rises
further. If it is hard to get a hold of the CD as can
happen with 8 cm CDs, it is handy to press the 0/
open CD key twice.
Do not leave the door open for extended periods of
time. To close the door, press the door open/close
key. The door can close even if there is a CD in the
slot. However, when the 0/open CD key is pressed
twice and the CD is ejected, the door does not close
even if the door open/close key is pressed. Re-
move the CD from the slot and close the door.
Playback of CD
Main unit Remote control unit
Only from the remote control unit
To skip
backward
To skip
forward
Main unit Remote control unit
Main unit only
To skip
backward
To skip
forward
Do not use CDs with affixed labels. This can lead to trouble.
Do not use irregular shaped (star-shaped, heart-shaped,
card-shaped, etc.), cracked or warped CDs or CDs with pro-
tective stabilizers. These types of CD can lead to trouble.
This component stereo optical scans CDs to read content,
therefore transparent CDs cannot be used with it.
5MD3MD/15-19/EN 9/5/03, 2:04 PM18

19 EN
Basic use method
ENGLISH
Each press of the TIME DISPLAY key changes the
displayed contents.
1Elapsed time of track
2Remaining time of track
3Elapsed time of entire disc
4Remaining time of entire disc
Time display on CD player
÷Only time information 1and 2can be displayed dur-
ing single-track repeated playback or random playback.
÷In the program mode, display 3shows the elapsed
time of the entire program and display 4shows the
remaining time of the entire program.
÷When the displayed time is 1,000 minutes or more,
the display shows "– – : – –".
Switching the display
Only from the remote control unit
Each time the DISPLAY key is pressed, the con-
tent of the display switches.
Only from the remote control unit
1CD player time indication
2Title indication (Only for CDs that sup-
port CD-TEXT)
3Time indication
÷With ordinary CDs (discs that do not support CD-
TEXT), each time the DISPLAY key is pressed, the
content of the display switches between 1and 3.
÷The title indication is the disc title when playback is
stopped, whereas the track title is displayed during
playback.
÷When “CHECK DISC” appears on the display, the
content of the display cannot be switched. w
Title indications on discs that support CD-TEXT
This component system can display the text information of CD-TEXT discs that contain titles in alpha-
bet or numerals. If CD is selected as the input source and a CD-TEXT disc is loaded into the CD player, the
disc’s title appears on the display. If the title is too long to fit in the display, the title is scrolled across the
display.
When a CD-TEXT disc is played back, the title of the current track appears on the display.
Title indication
÷Titles are not displayed with some CD-TEXT discs. If
the disc contains more than 1,536 characters, “TEXT
FULL” appears on the display.
Playback of CD
5MD3MD/15-19/EN 9/5/03, 2:04 PM19

Playback of TAPE
20 EN
ENGLISH
1. Select the tuner input.
Each press of the TUNER FM/AM key switches the band as follows.
FMjAM
2. Preset a radio station in memory.
Collective presetting of stations (AUTO MEMORY) ¡
Follow the procedure in "Collective presetting of stations (AUTO
MEMORY)" to preset automatically the tunable radio stations in your area.
3. Tuning (Preset Call)
÷
If radio stations have already
been stored with AUTO MEMO-
RY (Auto memory function) or
manual presetting, select a sta-
tion using the 4, ¢key.
Each press of the same key
switches the preset stations in
sequence.
÷When a key is held depressed, preset stations will be skipped at an inter-
val of about 0.5 second.
÷To select a preset station from the remote, use the 4P.CALL ¢key
or numeric keys.
Tuning indicator lights up
when a station is received
One-by-one presetting (Manual preset) £
A station can also be tuned even when it is not preset. For details, read
"Tuning to a non-preset radio station (Auto tuning, Manual tuning)".
™
÷Once the stations are stored with AUTO MEMORY (Auto memory
function) you are not required to repeat this procedure the next time
you listen to radio. However when you shift to another location where-
by the broadcast station frequencies are different, you will have to re-
execute the presetting of stations.
When the TUNER FM/AM key is pressed, the unit will automatically be switched on and reception status will be reached.
When ¢is pressed : P1=P2=P3 ... P38=P39=P40=P1...
When 4is pressed : P40=P39=P38 ..... P3 =P2 =P1 =P40.....
Receiving broadcast station
Lights during stereo reception.
11
33
Collective
presetting of
stations
Collective
presetting of
stations
11
33
Sequence for pressing numeric keys
To input “12” ..... +10, 2
To input “20” ..... +10, +10, 0
÷When a preset RDS broadcast is selected, the station name appears on
the display.
One-by-one
presetting
(Manual pre-
set) (3) £
Tuning to a non-
preset radio station
(Auto tuning,
Manual tuning) (1)
™
Collective
presetting of
stations (AUTO
MEMORY)
Tuning to a non-
preset radio station
(Auto tuning,
Manual tuning) (2)
™
5MD3MD/20-26/EN 9/5/03, 2:05 PM20
Table of contents
Languages:
Other Kenwood Stereo System manuals

Kenwood
Kenwood UD-90 User manual

Kenwood
Kenwood SRC-401 User manual

Kenwood
Kenwood K-575BT Installation guide

Kenwood
Kenwood SRC-780 User manual

Kenwood
Kenwood SRC-502 User manual

Kenwood
Kenwood A-311 User manual

Kenwood
Kenwood RXD-V252 User manual

Kenwood
Kenwood CLX-70 User manual

Kenwood
Kenwood HM-332 User manual

Kenwood
Kenwood MS-5 User manual

Kenwood
Kenwood UD-553 User manual

Kenwood
Kenwood M-909DV User manual

Kenwood
Kenwood RXD-M55-H User manual

Kenwood
Kenwood UD-700 User manual

Kenwood
Kenwood RXD-355 User manual

Kenwood
Kenwood MIDI M-93 User manual

Kenwood
Kenwood UD-500 User manual

Kenwood
Kenwood RXD-V323 User manual

Kenwood
Kenwood RXD-M31MD User manual

Kenwood
Kenwood UD-303 User manual