Kenwood K814WM14 Service manual

8KG washing machine
K814WM14
installation / instructions manual
K814WM14_IB_RC_151203_grace.indd 1 3/12/15 10:44 am

K814WM14_IB_RC_151203_grace.indd 2 3/12/15 10:44 am

contents
safety warnings .................................................................................................................. 4
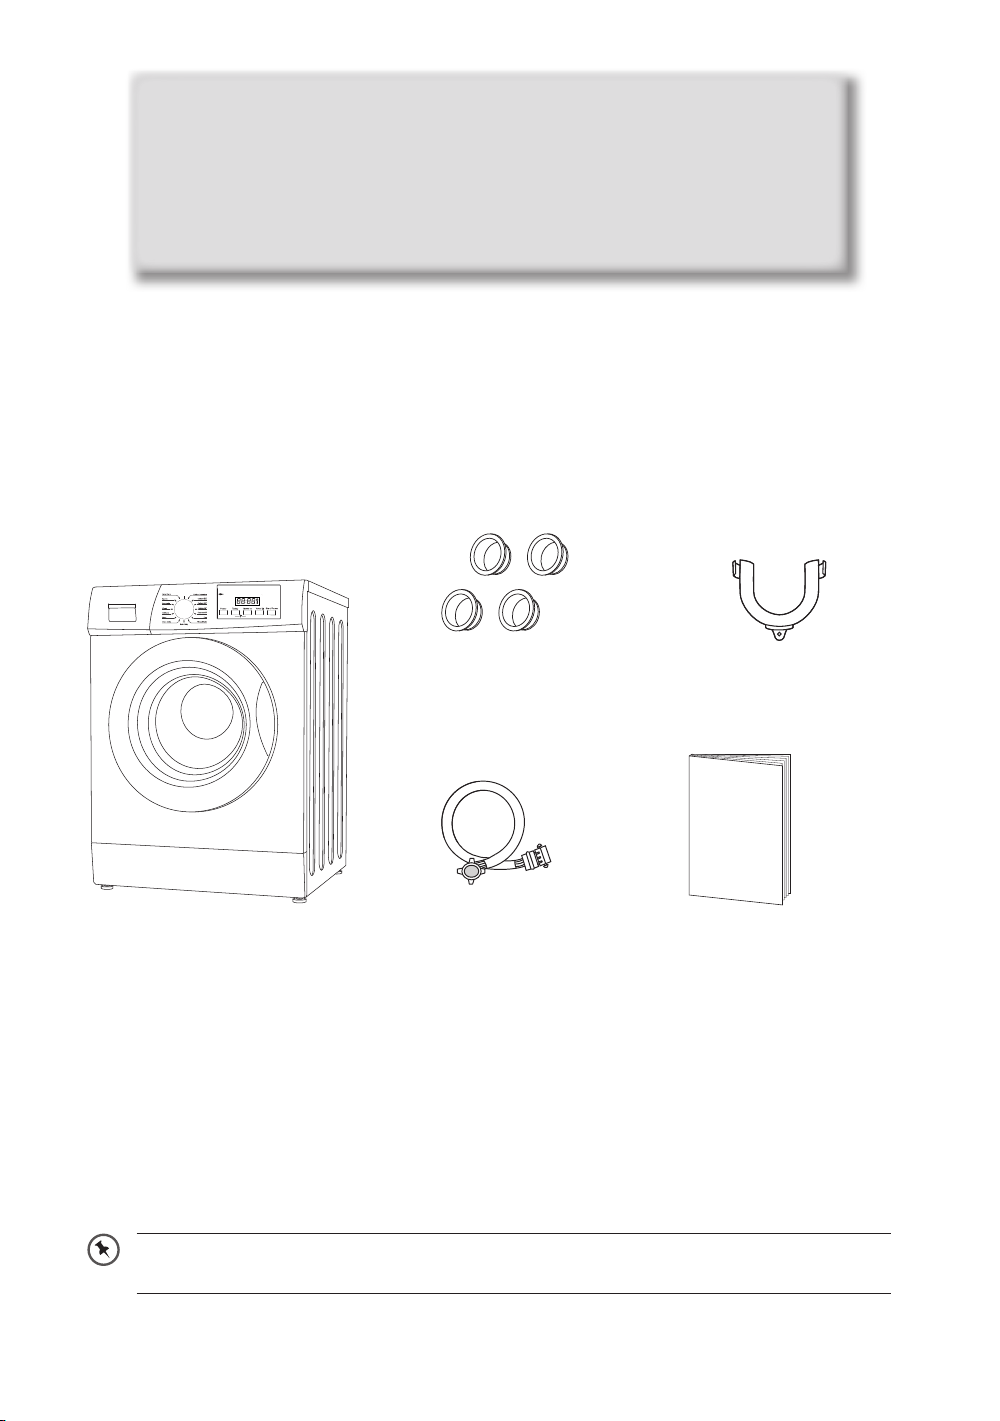
unpacking............................................................................................................................ 7
installation........................................................................................................................... 8
installing your washing machine...................................................................................... 8
choosing the right location for your washing machine..................................................... 8
moving and installing......................................................................................................... 9
removing the transit bolts ................................................................................................ 9
moving the washing machine from one location to another ............................................ 9
hose and cable lengths ................................................................................................. 10
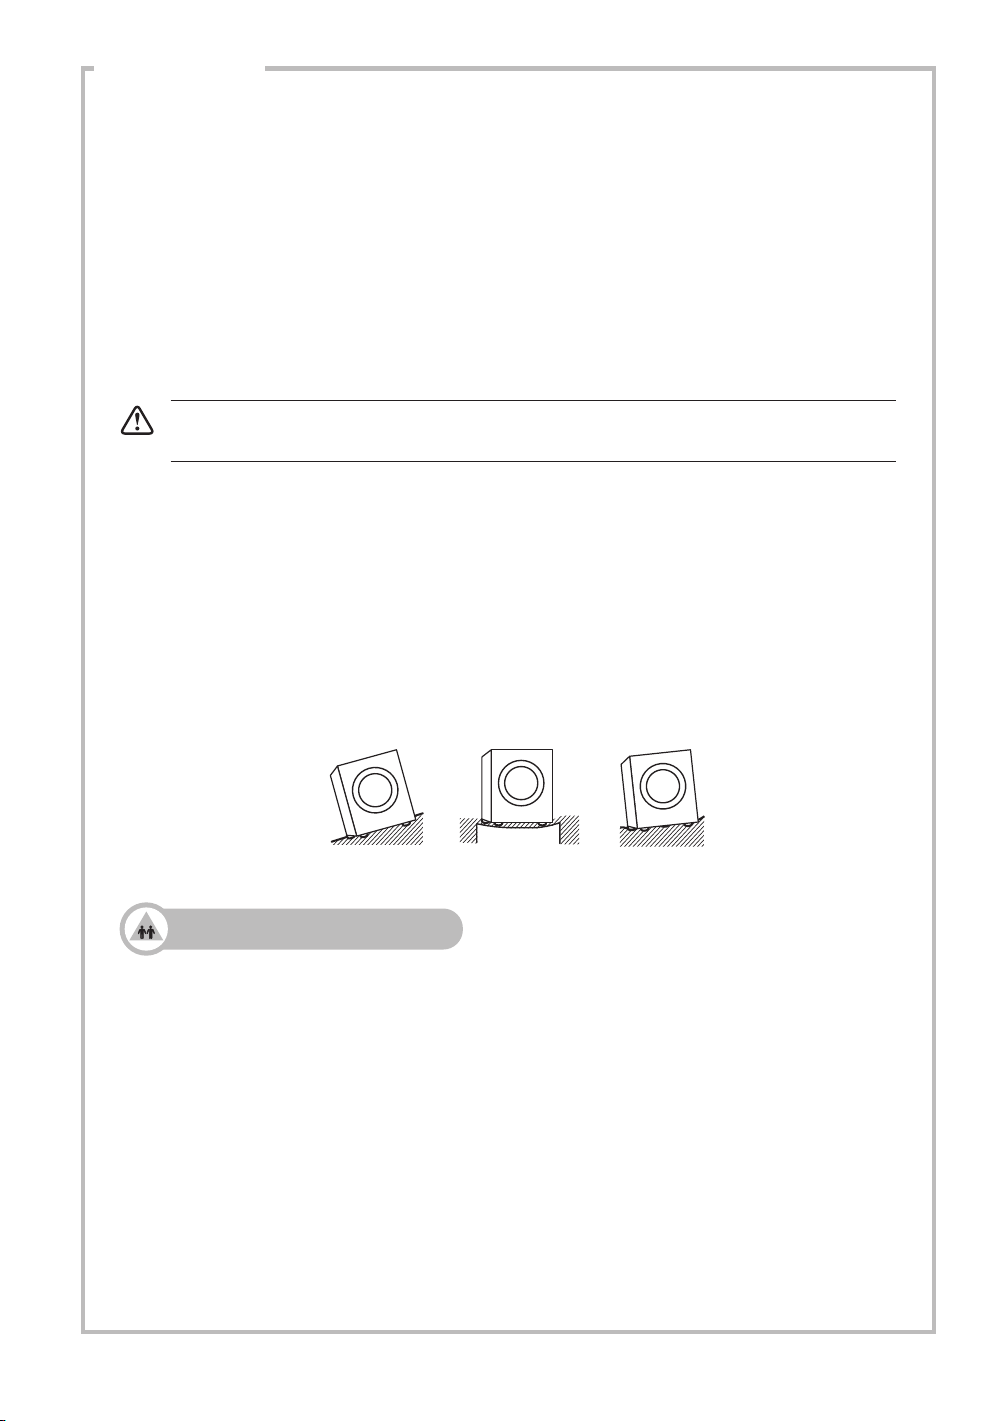
levelling the washing machine....................................................................................... 10
water supply hose ......................................................................................................... 10
connecting the water supply hose ..................................................................................11
water drain hose.............................................................................................................11
connecting to the mains supply ..................................................................................... 12
product overview.............................................................................................................. 13
the unit........................................................................................................................... 13
the control panel............................................................................................................ 14
preparation........................................................................................................................ 15
organising laundry ......................................................................................................... 15
preparing laundry .......................................................................................................... 15
adding detergent and softener ...................................................................................... 15
before rst use.................................................................................................................. 17
wash setting...................................................................................................................... 17
standard washing .......................................................................................................... 17
removing washing (once programme is nished).......................................................... 17
selecting the programme............................................................................................... 18
muting & turning on the sound ...................................................................................... 19
important information ...................................................................................................... 19
washing delicates (wool and silk) .................................................................................. 19
adding delicate laundry items to the drum..................................................................... 19
which detergent to use .................................................................................................. 19
how to set the child lock ............................................................................................... 20
maintenance - cleaning the washing machine .............................................................. 21
cleaning the drum.......................................................................................................... 21
cleaning the exterior of your washing machine ............................................................. 21
cleaning the detergent drawer....................................................................................... 21
siphon plug .................................................................................................................... 21
cleaning the door seal and window ............................................................................... 21
cleaning the drain lter .................................................................................................. 22
preventing a frozen water supply hose.......................................................................... 22
cleaning the lter net of the water supply hose ............................................................. 22
hints and tips .................................................................................................................... 23
questions and answers.................................................................................................... 25
error codes .................................................................................................................... 26
specications.................................................................................................................... 26
product che..................................................................................................................... 27
K814WM14_IB_RC_151203_grace.indd 3 3/12/15 10:44 am

4
safety warnings
For your continued safety and to reduce the risk of injury or electric shock,
please follow all the safety precautions listed below.
WARNING!
• If you will not be using the washing machine for a while such as when you
go on holiday, disconnect the plug from the mains supply and turn off the
water supply to the washing machine. This is particularly important if there
is no drainage around the washing machine.
• If the water supply is left on, water pressure may build up and cause a leak.
General Use
• Transit bolts are used to transport the washing machine. You should
remove these using a spanner or similar tool before you install the washing
machine. If you do not, it will cause strong vibrations when the washing
machine is spinning.
• Do not install your washing machine anywhere that is damp or exposed
to the weather. If you do, it may cause an electric shock, fire, failure or
deterioration.
• Do not pour water directly onto any part of the washing machine. It may
cause a short circuit or electric shock.
• Keep burning objects such as candles or cigarettes, away from the washing
machine. They may cause a fire or damage.
• Keep flammable substances well away from the washing machine – for
example kerosene, gasoline, benzene, paint thinner and alcohol, or clothing
soaked with these. They may cause an explosion or a fire.
• This washing machine is only suitable for washing textiles labelled ‘washing
machine washable’.
• Do not connect the washing machine to hot water. The washing machine
works with cold water only.
• Before you start using the washing machine, turn the tap on to check that
the hose is properly connected. If it’s not, there may be a water leak.
• Do not put too much laundry or detergent into the washing machine. It may
cause issues with the washing machine or laundry.
• Be careful not to get your laundry caught in the door when you close it. This
could cause a water leak or damage your laundry.
• This washing machine is for household (domestic) use only.
K814WM14_IB_RC_151203_grace.indd 4 3/12/15 10:44 am

5
Power Source and Cable
• Use an independent household dedicated mains socket, rated at 13
Amp 220V to 240V AC. If the washing machine is plugged in with other
appliances, it may overheat and cause a fire.
• Make sure the mains plug is pushed firmly into the socket. A loose
connection may overheat and cause electrical shock or a fire.
• Check the mains lead and mains plug for any damage. If the mains cable
is damaged, it must be replaced by the manufacturer, its service agent or
similarly qualified persons in order to avoid a hazard.
• Unplug the mains lead when cleaning the washing machine.
• Do not touch the mains lead or mains plug with wet hands. It may cause an
electric shock.
• Check the mains plug regularly for dirt. If dirt accumulates on the mains
plug, it could cause a fire. To prevent this, unplug the cable and clean the
mains plug with a dry rag.
• If you disconnect the mains plug, hold onto the mains plug not the cable.
Pulling the cable may cause an electric shock or a fire.
• Do not use a mains plug adapter or extension cable. It may overheat and
cause a fire.
• Make sure your home voltage matches the voltage displayed on the
washing machine. If you are not sure, contact an electrician.
• The mains plug must remain accessible to allow disconnection or an all
pole switch must be incorporated in the fixed wiring in accordance with the
wiring regulations.
To Prevent Injury / Damage
• Do not climb on the washing machine. You may hurt yourself or damage the
washing machine.
• When opening and closing the door ensure you keep fingers away from the
door hinge, or this could lead to injury.
• Check your washing for objects such as nails, pins, coins, clips etc. They
could damage your laundry or the washing machine.
• To prevent any large, heavy objects (e.g., buckles, large buttons, etc.) from
hitting the glass door, turn your clothing inside out or remove the heavy
objects. They could damage your laundry or the washing machine.
• Do not wash, rinse or spin water-proof sheets or clothing. These may cause
vibration or washing machine failure during spin-drying, which could lead to
injury, damage to the washing machine or damage due to water leaking.
• Be careful when draining hot water or any detergent from the drum.
K814WM14_IB_RC_151203_grace.indd 5 3/12/15 10:44 am

6
• Do not dismantle, repair or modify the washing machine. The washing
machine could malfunction and cause a fire or injury.
• This appliance can be used by children aged from 8 years and above
and persons with reduced physical, sensory or mental capabilities or
lack of experience and knowledge if they have been given supervision or
instruction concerning use of the appliance in a safe way and understand
the hazards involved. Children shall not play with the appliance. Cleaning
and user maintenance shall not be made by children unless they are older
than 8 and supervised.
• Children should be supervised to ensure that they do not play with the
appliance.
• Children of less than 3 years should be kept away unless continuously
supervised.
• Do not touch the laundry inside the washing machine, until the drum has
completely stopped. Even if the drum is spinning at low speed it can cause
an injury. Take particular care of children in this respect.
• The appliance is to be connected to the water mains using the new hose-
set supplied. Old hose-sets should not be reused.
• The ventilation openings in the base of the washing machine must not be
obstructed by a carpet.
WARNING
IT IS HAZARDOUS FOR ANYONE OTHER THAN AUTHORISED
SERVICE PERSONNEL TO CARRY OUT SERVICING OF REPAIRS
WHICH INVOLVE THE REMOVAL OF COVERS.
TO AVOID THE RISK OF AN ELECTRICAL SHOCK DO NOT
ATTEMPT REPAIRS YOURSELF.
K814WM14_IB_RC_151203_grace.indd 6 3/12/15 10:44 am

7
unpacking
Remove all items from the packaging. Retain the packaging. If you dispose of it please do so
according to local regulations.
The following items are included:
The Main Unit Instruction ManualWater Supply Hose x 1
U-Shape Drain Hose HolderTransport Bolt Covers x 4
KENWOOD
Press for 3 sec. to set Favourite
Favourite
Thank you for purchasing your new Kenwood Washing Machine.
These operating instructions will help you use it properly and safely.
We recommend that you spend some time reading this installation/instruction
manual in order that you fully understand all the operational features it offers.
Read all the safety instructions carefully before use and keep this installation/
instruction manual for future reference.
If items are missing or damaged please contact Partmaster (UK only).
Tel: 0344 800 3456 for assistance.
Instruction
Manual
K814WM14_IB_RC_151203_grace.indd 7 3/12/15 10:44 am

8
installation
An additional space (approximately 120mm) is required at the rear of the washing
machine. This is to allow enough space for the water hose and drain hose connections.
installing your washing machine
Please Read And Follow The Instructions Carefully.
• In addition to the instructions mentioned here, special regulations of the relevant water and
power supply companies may apply. If in doubt, have the washing machine connected by a
qualified technician.
• The washing machine is heavy - caution when lifting it. Do not lift by projecting components
(e.g. washing machine door).
• Warning: Frozen hoses may tear/burst. Do not install washing machine in outdoor areas or
where there is a risk of frost.
• Lay hoses and cables in such a way that there is no risk of tripping over them.
installation
choosing the right location for your washing machine
• Make sure there’s enough space for your washing machine.
• Install your washing machine on a flat, stable surface to avoid excessive vibrations and
noise.
• Don’t install your washing machine in direct sunlight or in a place where temperatures can
reach freezing.
• The ventilation openings in the base of the washing machine must not be obstructed by
carpet.
• Start by tilting the washing machine backwards.
• One person should stand behind it, holding the rear of the top panel. The other person
should grip the bottom feet at the front.
• Check that you have all the required accessories for installation.
• We recommend that you entrust the installation of the washing machine to a qualified
technician.
Two or more people are required to move
the washing machine.
ÒÒÒ
Sloping
surface
Unstable Bumpy
surface
xSloping
surface
xUnstable xBumpy
surface
K814WM14_IB_RC_151203_grace.indd 8 3/12/15 10:44 am

9
installation
Don’t run the washing machine without removing the transit bolts, as this can cause
excessive vibrations and may damage your machine.
moving and installing
removing the transit bolts
Four transit bolts keep the interior of the washing machine in place while it’s being moved.
They need to be removed before installation. Use a spanner (not supplied) and follow the
instructions detailed below.
To remove the transit bolts:
1. Use a spanner to loosen the four bolts. They are located at the rear of the washing machine.
2. Pull the bolts out horizontally. Make sure the entire bolt is removed.
3. 3. Push the four cover caps (included with your accessories) into the respective bolt holes.
moving the washing machine from one location to another
Before you move the washing machine:
• Shut off the tap and run the washing machine to drain the water. Drain any remaining water
from the pump hose.
• Disconnect the mains cable.
• Attach the transit bolts.
You’ll need the transit bolts again if you move the washing machine, so make sure you
keep them in a safe place.
Make sure to fix the transit bolts prior to moving the washing machine.
K814WM14_IB_RC_151203_grace.indd 9 3/12/15 10:44 am

10
installation
hose and cable lengths
How to connect from the left side How to connect from the right side
levelling the washing machine
There are 4 levelling feet on the underside. They must be adjusted to make sure the washing
machine is level.
1. On each foot, loosen the lock ring by turning it
clockwise.
2. Adjust all four feet by rotating each upwards or
downwards.
3. Use a spirit level to ensure the washing machine
is level.
4. Tighten each lock ring by turning them anti-
clockwise (towards the washing machine body).
Ensure all four lock rings are tightened securely.
Check that the feet are still bolted to the washing
machine - if they’re unbolted, the washing machine
will move around.
water supply hose
Points to remember
• Follow the instructions in this section to avoid water leaks.
• Don’t connect the hose to a combination tap.
• Don’t twist, squash, modify or cut the hose.
• This machine is designed to connect to the cold water supply. Do not connect to the hot
water supply.
• Use only the new water supply hose supplied. Old hose sets should not be reused.
Press for 3 sec. to set Favourite
Favourite
~80cm
~90cm
110 -135cm
min. 60cm
max. 100cm
~40cm
~130cm
K814WM14_IB_RC_151203_grace.indd 10 3/12/15 10:44 am

11
installation
connecting the water supply hose
1. To prevent leakage from the connection
joints, ensure the rubber washer seals are
fitted to each end of the water supply hose.
Do not use without the seals in place.
2. Fit the straight end of the water supply
hose to the cold water tap.
3. Connect the angled end of the white
headed hose to the water inlet valve on
the machine. Hand tighten the plastic parts
of the connections. If you are unsure,
please call a qualified plumber for safer
connections.
4. Open the tap slowly and check that there
are no leaks around the connection joints.
water drain hose
Points to remember:
• Don’t twist, pull out or bend the drain hose.
• Your washing machine should be no more than 85cm from the drain outlet.
• The water drain hose should be mounted at a height of minimum 60 cm, maximum 100 cm
from the ground.
Draining to a sink or wash-basin
• Secure the drain hose in position, so it can’t drop out of the basin.
• Don’t block the basin’s drain outlet, and make sure that the drainage through it is sufficient to
prevent overflowing.
• Don’t let the tip of the drain hose dip into the drained water, as this can cause the water to
flow back into the washing machine.
3/4”
3/4”
min. 10 mm min. 10 mm
Plastic joint
U-Shape Holder
Draining to a wash-basin Draining to a drain hose
Before connecting to the waste pipe, make sure to check the waste pipe and remove
any stopper or blockage inside, otherwise the unit may not be able to expel the waste
water properly.
K814WM14_IB_RC_151203_grace.indd 11 3/12/15 10:44 am

12
installation
connecting to the mains supply
For your safety:
• Do not use a mains plug adapter or extension cable.
• If the mains cable or mains plug are damaged, stop using them and call a qualified
technician for assistance.
• An earthed plug has been attached to the power cable of your washing machine. This plug
must be inserted into an earthed socket capable of supplying 13 Amps. If you have no such
sockets and fuses in your house, call a qualified electrician.
• The mains plug must remain accessible to allow disconnection or an all pole switch must be
incorporated in the fixed wiring in accordance with the wiring rules.
Installation check list
By now, you should have installed the washing machine.
Let’s go through the checklist to ensure that the installation has been done correctly!
Questions Checkbox
Transit bolts - Have you removed them and attached the cover caps properly?
4 levelling feet Four Adjustable Feet - Are they bolted securely to the washing
machine?
Four Feet Cushions - Are they standing flat?
Power supply - Is the household dedicated mains socket rated for 220V - 240V
AC and can supply 13 Amps?
Location - Is your washing machine on a flat, stable surface?
Water Supply Hose - Is it free from leaks and is the water supply normal?
K814WM14_IB_RC_151203_grace.indd 12 3/12/15 10:44 am

13
product overview
the unit
KENWOOD
Pres s for 3 sec. to set Favourite
Favourite
Detergent
Compartment Control Panel
Door Handle
Service Panel
Window
K814WM14_IB_RC_151203_grace.indd 13 3/12/15 10:44 am

14
the control panel
Press for 3 sec. to set Favourite
Favourite
Rinse & Spin
Power Button
Press to turn on/
off the machine.
Spin Speed
Button
Press to select the
desired spin speed
of the selected wash
programme.
Press and hold to set
as favourite one of the
wash programmes.
Temperature
Button
Press to select the
desired temperature
of the selected wash
programme. (If no
temperature indicator
is lit, the water
temperature is cold.)
Start/Pause
Button
Press to start your
wash. Press while
in operation to
pause your wash.
Delay Button
This button is used
to delay the wash.
Press continuously
to select the time
you want to start
the wash.
Programme Dial
Different wash programmes can
be selected according to your
wash requirements.
To set your Favourite wash
programme, turn the dial to
the desired wash programme,
adjust the spin speed and
temperature, then press and
hold Spin Speed Button until a
beep is heard.
LED Display
• The delay light will be on to indicate the delay time. It will start the
programme after the selected hours.
• After the wash procedure begins, the display will show the wash
remaining time.
• When the child lock function is selected, the Child Lock icon will be
illuminated.
• When the door is at the lock state, the Door Lock icon will be illuminated.
• If you need to change a setting after the wash has started, switch the machine off. Switch
on the machine. Re-select the programme, spin speed and optional functions, and then
press the Start / Pause button. (Ensure the Child Lock is off, otherwise the original
programme will continue.)
• Water is poured into the washing machine to perform an inspection at the time of
shipment from the factory, so there may be drops of water or condensation in the washing
machine. This is not an indication of a malfunction.
During initial start-up and use of the unit, there may be a slight smell
while the motor is settling in. This is not a fault; this is normal operation.
K814WM14_IB_RC_151203_grace.indd 14 3/12/15 10:44 am

15
preparation
Read the following to understand how best to prepare your laundry for washing.
organising laundry
• Read the washing label on each garment to help you sort your washing into different loads.
• Sort the laundry by colour, type of fabric and by how soiled it is. This will help you choose the
correct programme and temperature for each wash.
• Do not exceed the maximum load! See the programme selection table for the maximum load for
the programme you require.
preparing laundry
• Treat stains before washing.
• Some items should be put into a cleaning net before going
into the washing machine, i.e. bras with metal wires, tights
and lace clothing to prevent damage.
• Check that pockets do not contain any objects which may
damage your clothes and the washing machine.
• Tie up any loose strings on laundry, close zippers and
reverse clothing with zips inside out.
• To prevent any large, heavy objects (e.g., buckles, large
buttons, etc.) from hitting the glass door, turn your clothing
inside out, or remove the heavy objects. These could
damage your laundry or the washing machine.
• Remove any surplus hair, animal fur, sand, and other
materials with a brush before washing.
• If clothes have raised fabric turn them inside out.
• Clothes that are not colour fast should be washed separately.
• Insert your clothes into the washing machine. Close the
washing machine door. Ensure that you do not trap any items
of clothing between the loading door and the rubber seal.
adding detergent and softener
• Add detergent into the appropriate dispenser.
• Apply softener before you start washing.
• Apply detergent and softener according to the washing
amount, the soiling level, the water hardness in your area
and the manufacturer’s instructions of these products.
• For slightly dirty clothes, put a small amount of detergent
in compartment (II) of the detergent drawer.
II
I
Main wash
detergent
Softener
Pre-wash
detergent
Detergent
Detergent
Softener
K814WM14_IB_RC_151203_grace.indd 15 3/12/15 10:44 am

16
• Do not use the washing machine when the detergent drawer is removed. It may cause a water
leak or it may not work normally.
• If you forget to add detergent, you can drain the washing machine by running a drain only
programme. Then you can add detergent and start the programme again. Detergent only
reaches the drum when water flushes through the detergent drawer.
• To prevent powder detergent staying in the drawer, dry the inside of the drawer with a cloth.
Make sure the powder isn’t lumpy when you add it into the drawer.
• If the rinse cycle isn’t removing all the detergent from your wash, use less detergent.
• Softener should not exceed the MAX level in the compartment.
• Wash out unused softener with a splash of water or a damp cloth after the programme has
finished.
• You can use liquid detergents in all programmes.
Fibre Type Maximum Loading Capacity
8.0kg
Cotton 8.0kg
Synthetic 4.0kg
Wool 2.0kg
Delicate 2.5kg
• For excessively dirty clothes, put ¼ of the detergent to be used in compartment (I) of the
detergent drawer and the remaining amount in compartment (II).
Dilute viscous fabric softener and fabric conditioner with water. Prevent blockage of the
overflow. Maximum level is 40ml.
K814WM14_IB_RC_151203_grace.indd 16 3/12/15 10:44 am

17
wash setting
standard washing
1. Pull the door handle and put the laundry in the drum.
(Refer to Preparation to sort your laundry before it goes
into the drum.) Make sure no washing gets caught in the
door.
2. Close the door and turn the Programme Selection Dial to
select your wash programme.
3. Select the temperature if desired.
4. Add detergent into the detergent drawer. The quantity
of detergent will depend on the amount of laundry,
the degree of soiling and the water hardness. Use the
amount of detergent suggested on the packaging.
5. Press the Power button.
6. Press the Start / Pause button to start the washing.
7. The washing machine will sound when the programme is
complete.
before first use
Before washing your clothes for the first time, run a full wash programme first:
1. Connect the machine to the mains power supply and the water supply.
2. Put a small amount of detergent in the detergent drawer. Close the drawer.
3. Select a wash programme.
4. Press the POWER button.
5. Press the START/PAUSE button.
removing washing (once programme is finished)
• Open the washing machine door and remove your washing.
• Remove any foreign objects to avoid risk of rusting.
• Leave the door and detergent drawer open so that residual water can evaporate.
If the door is locked and you switched the washing machine off and then on - or if there’s a
power cut - it will stay locked for 1 minute.
Door remains locked for 1 minute after wash stopped.
Cotton Intensive
Eco
Favourite
Express 15'
Press 3 sec. to set Favourite
K814WM14_IB_RC_151203_grace.indd 17 3/12/15 10:44 am

18
selecting the programme
Here are the available programmes, additional functions and option settings.
Temperature can be selected separately for certain programmes.
Procedure
Description
Load(kg) Detergent Box Default
Temp.(˚C)
Default
Time (Min)
Default
Speed
(rpm)
8.0
Case
I
Case
II
Softener
Case 8.0 8.0 1400
Cotton Intensive 8.0 X O 40 120 1000
Cotton 60° 8.0 X O 60 229 1400
Cotton 40° 8.0 X O 40 229 1400
Cotton 20° 8.0 X O 20 82 1000
Express 15’ 2.0 X O Cold 15 800
Eco 2.0 X O 30 64 800
Rinse & Spin 8.0 X X O Cold 35 1000
Baby Care 8.0 X O 60 110 1000
Sports 4.0 X O 40 87 800
Synthetic 4.0 X O 40 77 800
Mixed 8.0 X O 40 79 1000
Delicate 2.5 X O 30 70 600
Wool 2.0 X O 40 64 400
Drain Only NA X X X Cold 1 0
Spin Only 8.0 X X X Cold 13 1000
Means must
O Means optional
X Means not necessary
The energy class is A+++
Energy test programme: Cotton 60˚C/40˚C (under the highest speed; others as the default)
Half load for 8.0Kg machine: 4.0Kg.
“Cotton 60˚/40˚” are the standard washing programmes to which the information in the label and the
fiche relates, and they are suitable to clean normally soiled cotton laundry and they are the most
efficient programmes in terms of combined energy and water consumption for washing that type of
cotton laundry, the actual water temperature may differ from the declared cycle temperature.
Notes: The parameters in this table are only for user’s reference. It is different from the normal time
when using depending on the temperature and the load.
• Washing times depend on programme and temperature settings selected.
• Washing times may be longer if the laundry in the drum needs to be balanced.
K814WM14_IB_RC_151203_grace.indd 18 3/12/15 10:44 am

19
important information
washing delicates (wool and silk)
• Silk laundry loads: 2kg or less
• Tips for Wool programme:
Approximate Weights:
-Wool sweater (400g)
-Silk blouse / under garment (200g)
-Trousers (400g)
adding delicate laundry items to the drum
• Close zips and buttons.
• Add items one by one on top of each other.
• Don’t overload the drum as it may cause excessive
vibrations or damage the washing machine.
which detergent to use
• For woolen items, use a mild liquid detergent. Other detergents may damage your woolen
clothes.
• With wool or silk, you may need to use an extra rinse cycle to remove excess detergent from
your clothes. This depends on the amount of detergent you use, and the amount of foam that
develops in the main wash cycle.
muting & turning on the sound
• The machine will beep when buttons are pressed.
• To mute the sound, press “TEMP” for 3 seconds after starting the wash programme.
• To turn on the sound, press “TEMP” again for 3 seconds.
The setting will be kept until the next programme.
K814WM14_IB_RC_151203_grace.indd 19 3/12/15 10:44 am

20
how to set the child lock
The Child Lock prevents children from accidentally changing a wash programme.
1. Switch on the washing machine.
2. When the washing machine is operating, press and hold the Delay and Speed buttons at the
same time for 3 seconds to set the child lock. The Child Lock icon will light to indicate that the
child lock is active.
3. If a function button is pressed while the child lock is active, the machine will beep to indicate that
the child lock is active.
4. To deactivate the child lock, press and hold the Delay and Speed buttons until the Child Lock
icon disappears.
• The child lock will deactivate automatically when the programme ends.
• Your machine will deactivate the function buttons when the child lock is activated.
K814WM14_IB_RC_151203_grace.indd 20 3/12/15 10:44 am
Table of contents
Other Kenwood Washer manuals

Kenwood
Kenwood K914WM16 Service manual

Kenwood
Kenwood K914WM18 Service manual

Kenwood
Kenwood K1014WM18 Service manual

Kenwood
Kenwood K1016WM17 Quick guide

Kenwood
Kenwood Mini 1150 rapid User manual

Kenwood
Kenwood KVWA146SL User manual

Kenwood
Kenwood K714WM18 Service manual

Kenwood
Kenwood K714WM16 Service manual

Kenwood
Kenwood K814WM16 Service manual

Kenwood
Kenwood K814WM18 Service manual