For warranty information please visit: kichler.com/customer-care/warranty-information/landscape-warranty
Pour de plus amples informations sur la garantie, cliquez sur le lien ci-dessous : kichler.com/customer-care/warranty-information/landscape-warranty IS-16099-CB
We’re here to help 866-558-5706
Hrs: M-F 9am to 5pm EST
OUTDOOR USE ONLY
DOM ETRE INSTALLE A L’EXTERIEUR
For Assembling and Installing Fixtures in Canada
Pour L’assemblage et L’installation Au Canada
Nous sommes là pour vous aider 866-558-5706
Heures : du lundi au vendredi, de 9h à 17h (heure de l’Est)
Fig. 1
SAFETY INSTRUCTIONS READ THIS FIRST KEEP THESE INSTRUCTIONS
CAUTION – RISK OF SHOCK –
Disconnect Power at the main circuit breaker panel or main fusebox before starting and during
the installation.
This xture is intended for installation in accordance with the National Electric Code (NEC) and
Local code specications. Failure to adhere to these codes and instructions may result in serious
injury and/or property damage and will void the warranty. If you are not familiar with code
requirements, installation by a certied electrician is recommended.
FOR USE WITH LANDSCAPE LIGHTING SYSTEMS ONLY.
1) The device is accepted as a component of a landscape lighting system where the suitability of the
CSA or UL labeled combination shall be determined by CSA, UL respectively or the local inspection
authorities having jurisdiction.
2) Fixture shall be connected to an extra low voltage transformer approved for use with landscape
lighting systems.
3) Thisxtureistobeconnectedtoasecondarywiringofthefollowingtype:
12 GA 60°C minimum type;
SPT-3 suitable for outdoor use; or
approved landscape lighting cable.
WARNING – RISK OF ELECTRIC SHOCK
• Do not mount luminaire within 10 feet (3m) of a swimming pool, spa or fountain.
• ThisxtureistobeusedonlywithalistedKichler®lowvoltagelightingpowerunit(transformer)rated
a maximum 15 volts, 300 W per secondary (25 AMPS)
NOTE:KitwithIn-GroundLEDFixturewalk-overanddrive-overratedfora4500lbcarortruck.
NOTE: IfadditionalDirectBurialwireisneeded,contactyourlocalKichler®landscapedistributor.
•8GAwirecanbepurchasedinlengthof250’(76M),15503-BK.
• 10GAwirecanbepurchasedinlengthof250’(76M),15504-BK.
• 12GAwirecanbepurchasedinlengthsof100’(30M),15501-BK;250’(76M),15502-BK;
500’(152M),15505-BK;and1000’(304M),15506-BK.
InstructionsforConcreteInstallationKit,PartNo.16099BKwiththeIn-GroundLEDFixtures
16023CBR27,16023CBR30,16024CBR27,16024CBR30,16025CBR27and16025CBR30.
INSTALLATION
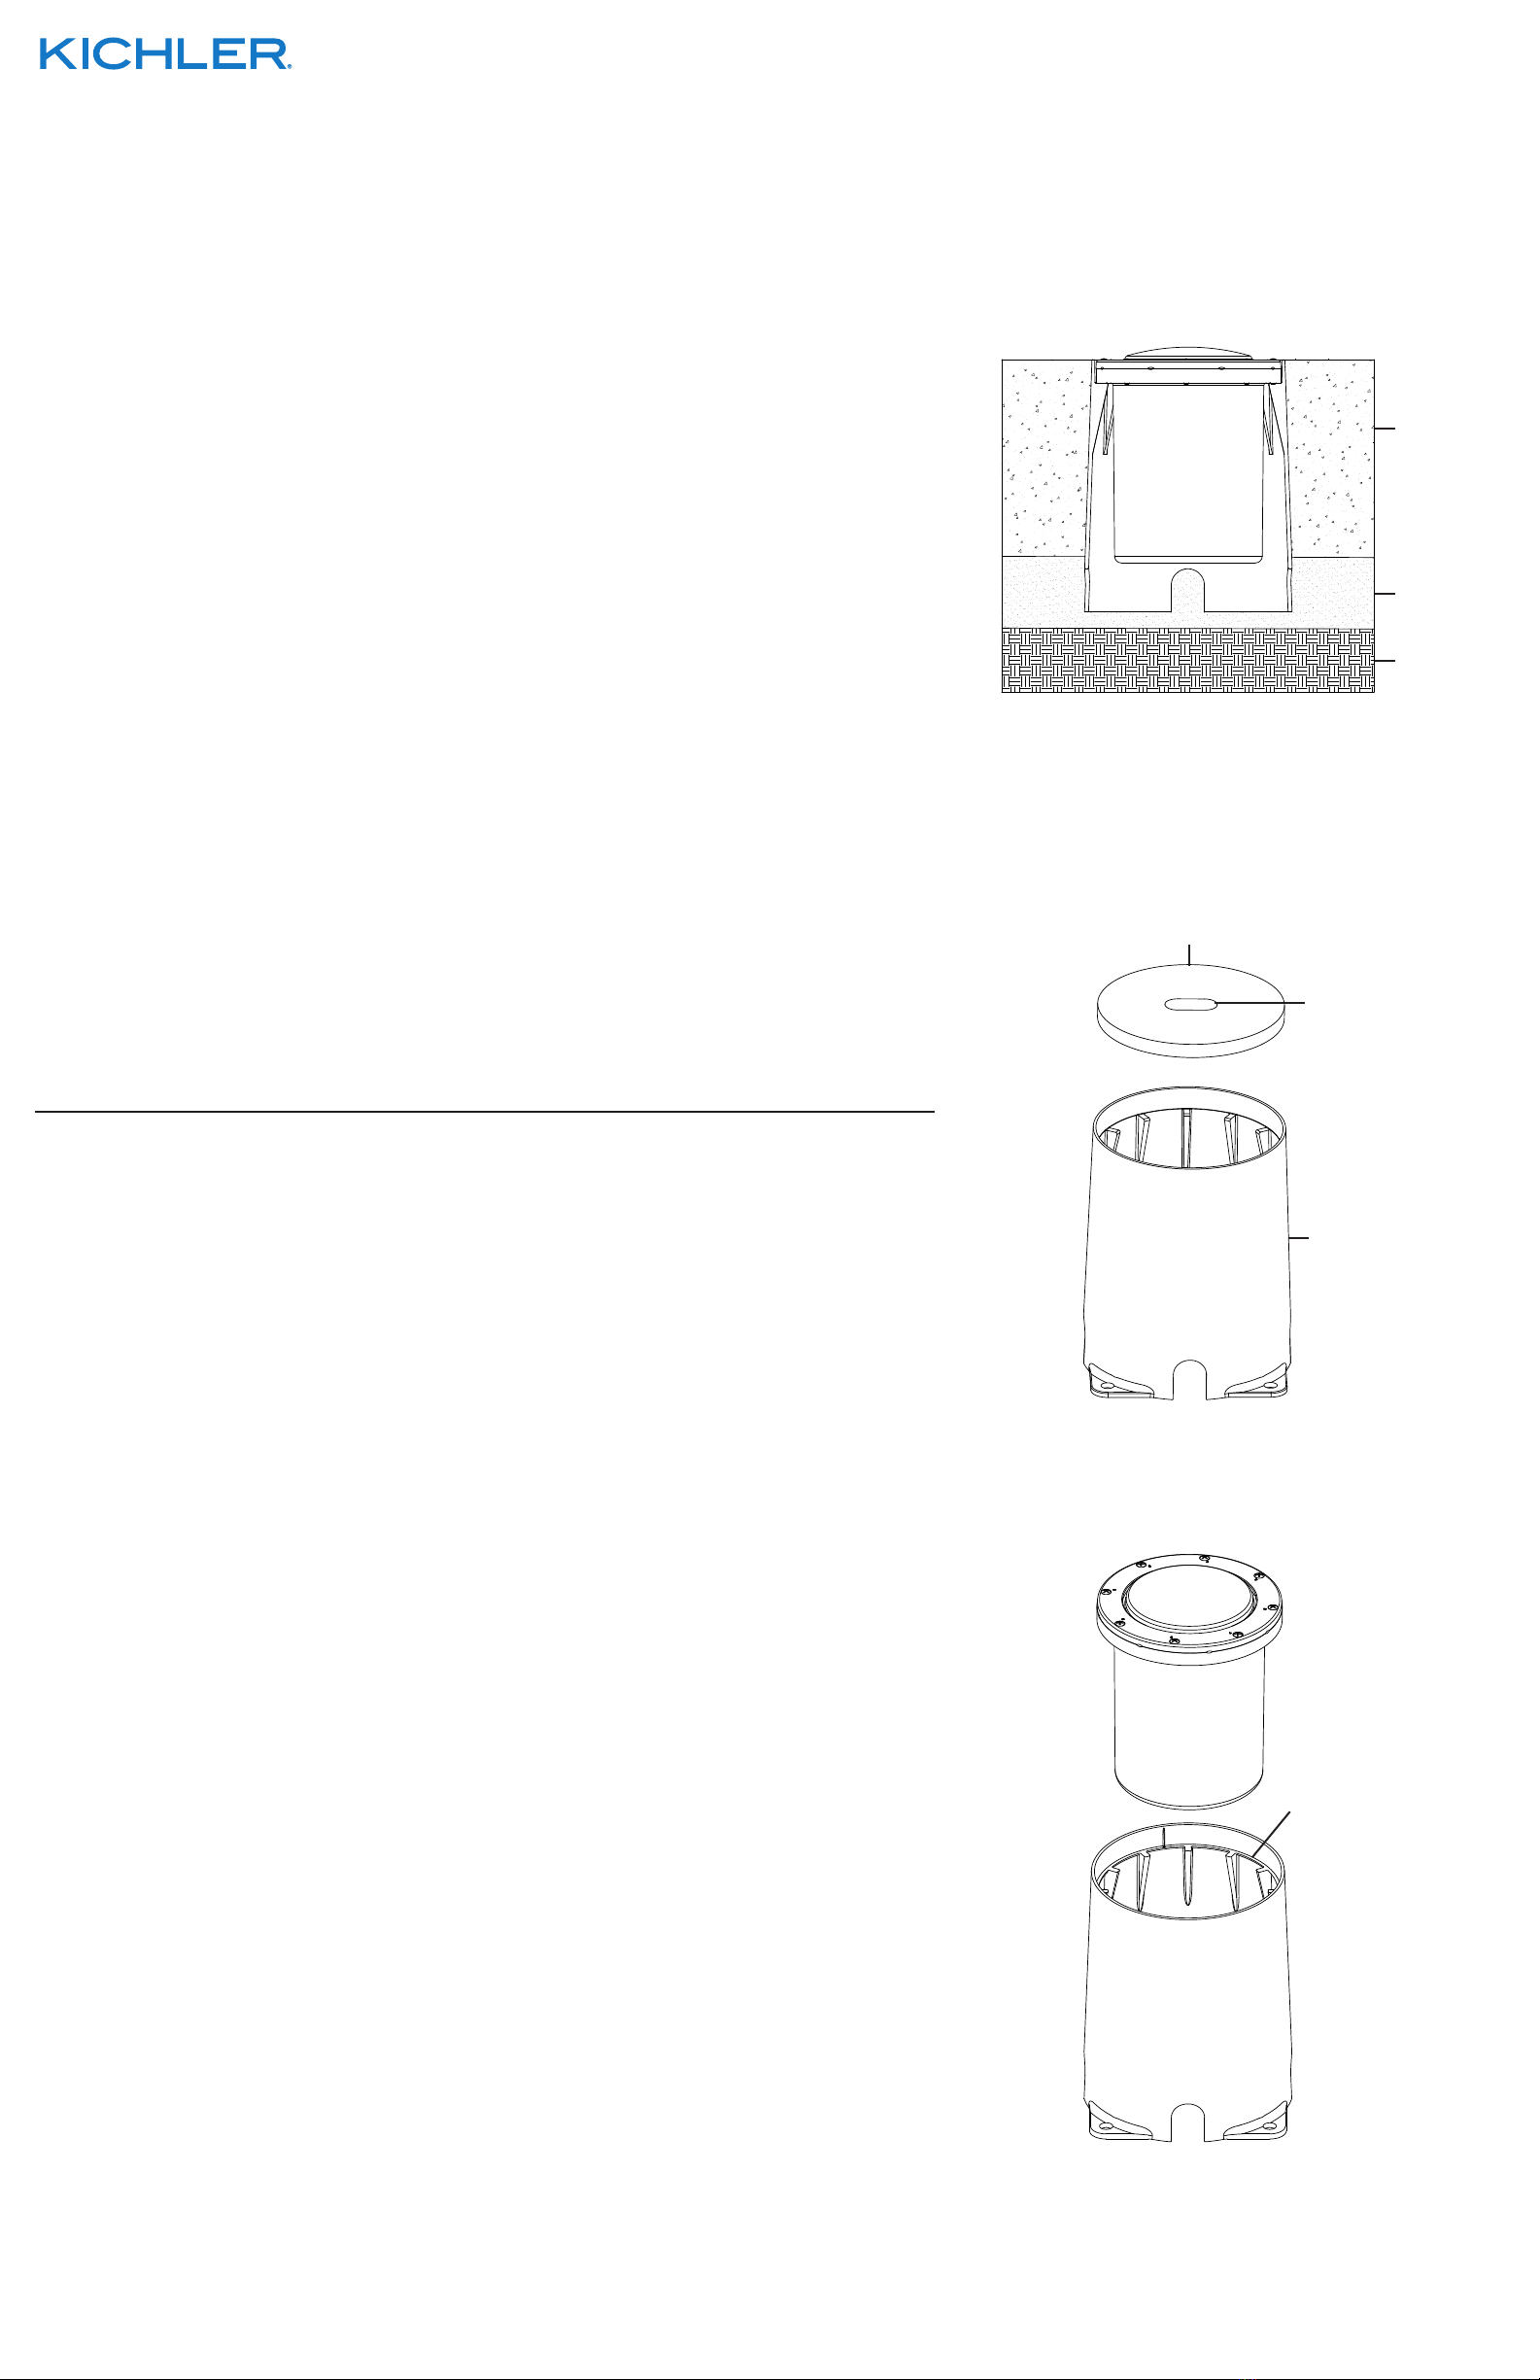
1) Determinedesiredlocationofkitanddighole.Holeshouldbe11”diameterwithadepthappropriate
fortopofkit(includingcover)tobeushwithnishedgrade.Itisrecommendedthatsandorpea
gravelisusedtosethousingandaidpositioning.Leaveapproximately6”oflooseleadwirefrom
transformer inside housing (see Fig. 1).
2) Securethecoverontothehousingandpouraminimum4”ofconcrete,ensuringgradeisushwithkit.
Letcure.Donotremovecoveruntiljustbeforeinstallingthexturetopreventsedimentfromcollection.
3) Knockoutthecenterholeinsertofthecoverandinsertngersthroughcenterhole,removeanddiscard
cover and wipe away any sediment that has gathered on inner ring of the housing (see Fig. 2).
4) Beforeplacingxtureintohousing,makewireconnectionsusingsuppliedwireconnectorsfollowing
the instructions included, or using other approved wiring connection method (not supplied).
Thexturewireisnotintendedfordirectburial.AccordingtotherequirementsoftheNationalElectricCode
(NEC),directburialratedwireistobeburiedaminimumof6”[152mm]beneaththesurfaceoftheground.
5) Installxture,makingsurextureiscompletelynestedinhousing(seeFig.3).
6) Foranti-theft,placeacontinuousbeadofliquidnailorequivalentontopofthehousingledgebefore
placing the well light in housing (see Fig. 3).
CONSIGNES DE SÉCURITÉ À LIRE EN PREMIER CONSERVER CES CONSIGNES
ATTENTION – RISQUE DE DÉCHARGES ÉLECTRIQUES –
Couper le courant au niveau du panneau du disjoncteur du circuit principal ou de la boîte à
fusibles principale avant de procéder à l’installation.
Cet appareil est prévu pour l’installation conformément au Code électrique National (NEC) et les
spécications du code Local. Ne pas respecter ces codes et instructions peut entraîner des
blessures graves et/ou des dommages matériels et annulera la garantie. Si vous ne connaissez
pas les exigences de ces codes, il est recommandé de coner l’installation à un électricien
certié.
A UTILISER UNIQUEMENT POUR LES SYSTÈMES D’ÉCLAIRAG PAYSAGER
1) Ledispositifestacceptéentantquecomposantd’unsystèmed’éclairagepaysagerlorsquela
compatibilitédelacombinaisonétiquetéeULouCSA(ACNOR)doitêtredéterminéeparCSA,UL
respectivement ou les autorités d’inspection locales ayant compétence.
2) L’appareil doit étre connecté à un transformateur supplémentaire à basse tension approuvé pour
une utilisation avec les systémes d’éclairage paysager.
3) Cet apareil doit étre connecté à un câblage secondaire du type suivant:
12GA 60°C type minimum;
SPT-3 combatible pour utilisation extreme;
ou câble d’éclairage paysager agréé.
AVERTISSEMENT - RISQUE DE CHOC ÉLECTRIQUE
• Ne pas installer le luminaire dans les 3 m de piscine, spa ou fontaine.
• Celuminairenedoitêtreutiliséqu’avecuneunitéd’alimentationhomologuée (transformateur) à
basse tension d’une capacité nominale de 15 V, 300 W par secondaire (25 A).
REMARQUE : KitavecluminaireLEDdanslesolpourpassagepiétonnieretenvéhiculepourune
voitureouuncamionpesant2000kg.
REMARQUE : sideslssupplémentairessontnécessairespourl’installationsouterraine,contacterle
distributeurlocaldesproduitspaysagistesKichler®.
• Unl8GApeutêtreachetédansunelongueurde76m(15503-BK).
• Unl10GApeutêtreachetédansunelongueurde76m(15504-BK).
• Unl12GApeutêtreachetédansunelongueurde30m(15501-BK);
76m(15502-BK);152m(15505-BK);et304m(15506-BK).
Instructionspourlekitd’installationdanslebéton,réf.16099BKavecluminairesLEDenterrésdansle
sol16023CBR27,16023CBR30,16024CBR27,16024CBR30,16025CBR27et16025CBR30.
INSTALLATION
1) Déterminezl’emplacementdukitetcreusezuntrou.Lediamètredutroudoitêtrede28cmavec
uneprofondeurappropriéepermettantd’alignerlereborddukit(ycomprislecouvercle)aubéton
ni.Ilestrecommandéd’utiliserdusableoudesgravillonspourmaintenirleboîtieretfaciliterle
positionnement.Laissezenviron15cmdelconducteurdutransformateuràl’intérieurduboîtier
(voir Fig. 1).
2) Fixezlecouverclesurleboîtieretversez10cmminimumdebétonengarantissantqueleproduit
niestalignéaukit.Laissezdurcir.Neretirezlecouverclequ’aumomentdel’installationdu
luminaire pour ne pas accumuler d’impuretés.
3) Enfoncez la garniture du trou central du couvercle et introduisez les doigts dans le trou central,
retirezensuitelecouverclequevousjetez.Essuyeztoutsédimentaccumulésurlabagueintérieure
duboîtier(voirFig.2).
4) Avantdeplacerleluminairedansleboîtier,eectuezlesconnexionsdeslsfournisensuivantles
instructions jointes ou selon une autre méthode de connexion de câblage approuvée (non fournie).
Lelduluminairen’estpasdestinéàuneinstallationsouterraine.Conformémentauxconditionsdu
Codenationaldel’électricité(NEC),unldestinéàuneinstallationsouterrainedoitêtreenterréàun
minimum de 15 cm sous la surface du sol.
5) Installezleluminaireenvousassurantqu’ilestbienlogédansleboîtier(voirFig.3)..
6) Pourlaprotectionantivol,placezuncordoncontinudeclouliquideouunproduitéquivalentsurle
rebordduboîtieravantdeplacerlalumièredepuitsdansleboîtier(voirFig.3).
Fig. 3
Fig. 2
CONCRETE
BÉTON
SAND OR
PEA GRAVEL
SABLE OU
GRAVILLONS
SOIL
TERRE
COVER
COUVERCLE
CENTER HOLE INSERT
GARNITURE DU TROU
CENTRAL
HOUSING
BOÎTIER
FOR INSTALLATION IN CONCRETE
POUR UNE INSTALLATION DANS LE BÉTON
HOUSING LEDGE
(SEE STEP 6)
REBORD DU BOITIER
(VOIR ÉTAPE 6)


