Kicker ZK500 User manual


f.fKICKER®
DigifalStereoSysfem
forZune™
Owner'sManual
Model: ZK500
Congratulations
on
your
KICKER purchase!
Please record your purchase
information and keep your sales
receipt for validation of warranty.
Authorized Kicker Dealer:
Purchase Date:
Model Number:
Serial Number:
ZK500
The Kicker zKICK ZK500 Stereo System for Zune
is
designed for livin' loud with your Zune device
in
the home environment. The ZK500
is
fully featured with dual full-range 5" (127mm) Kicker drivers and
3/4"
(20mm) silk dome tweeters driven by apowerful amplifier with digital signal processing. The
6"
(152mm) square passive radiator (subwoofer) on the back of the ZK500 balances the sonic output,
adding the punchy low-frequency response that put Kicker subwoofers on the map The rotary control
and infrared remote allow simple, streamlined control of your ZK500 Stereo System. The
ZK500
can be
used with any existing Zune device.
In
addition, the ZK500 boasts awide range of connectivity options
including acomposite video output, stereo RCA outputs, and
an
1/8" stereo auxiliary input
for
incorporating additional audio/video devices with your ZK500 Stereo System.
Note: The ZK500
is
compatible with Zune Firmware Version 1.4 and beyond. Before docking your Zune device to tile
ZK500
Stereo
System. update to the latest Zune firmware by syncing your Zune device to your Zune software and checking for the
most
recent updates
DockingYourZuneOevice
Zune 30 Gb Digital Media Player
Zune
80
Gb Digital Media Player
ZuneDeviceModel
Zune 4, 8Gb Digital Media Player
~_
SoundGdte
2. B
1.
A
3.e
ZK500DockAdapter
4.
Plug the power cable into the DC input
on
the
back of the ZK500.
5.
Plug the 2-prong electrical plug into asurge
protected electrical outlet.
2.
Attach the adapter to the ZK500's docking
bay.
3.
Connect your Zune device to the ZK500's dock
connector.
1.
Choose the dock adapter that best fits your Zune
device. See the table below.
AThe
Zune
Device
should
be
mounted
on
the
docking
bay
before
,
connecting
any
power
cables to the
Kicker
Stereo System.
Visit www.soundgate.com to learn more about
Soundgate products designed for enjoying your Zune
device
in
the mobile environment. Soundgate
products offer awide range of options for connecting
your Zune device to your factory car stereo system.
Note:
To
prevent vibration during playback, use the
enclosed vibration isotation pad as shown in Fig.
2.
2
ZK500STEREOSYSTEM

3/4" (20mm)
Silk Dome
,'Tweeters
5" (127mm)
Full-Range
Drivers
I
Square
- - - - .Passive
Radiator
@@®
II
II
___
Il
___
II
II
DC
Power
1/8"
Stereo
22
Volts Auxiliary Input
I
IR
Remote
Receiver
LCD
Display
I
I
I
I I
I 1 _
I I
I I
L R
Stereo
RCA
Output
Rotary
Contro!"
................
000
I I I
I
___
I
I
I
Composite
Video Out
~
- -
_L
- - -Skid Resistant/Non-Marking Feet
Transport
Handle'"
...
Figure 2
Figure 3
ImportantSatetylnstructions
Read and follow
all
the instructions listed
in
this manual. Follow
all
safety and procedural recommendations to prevent
damage to your self, your Kicker product, or your portable entertainment device.
The ZK500 should not be used near water or
in
an
environment where exposure to liquids
is
possible. This includes but
is
not exclusive to areas where splashing, dripping, leaks, spills, and exposure to
rain
can occur. Liquid containers should
not be placed on or near the ZK500 Stereo System. The ZK500 Stereo System should not be cleaned with liquid
cleaners. Use only adry cloth to clean the ZK500. Only use the ZK500
in
areas with adequate open ventilation allowing
at least 4" of space
on
all
sides of the ZK500. Do not set the ZK500 on any surface or cover the ZK500 with any object
that could impede the airflow to and from the ZK500 Stereo System. The ZK500 should not be placed near any source
of heat. This includes but
is
not limited to stoves, radiators, heating elements, electronic heat sources, and areas where
excessive solar heat can be generated.
Do
not install the ZK500 near any flame or place any flammable objects near the
device. The power outlet used to provide power to the ZK500 should
be
accessible at
all
times. The polarized 2-prong
electrical plug has awide blade and narrow blade that should fit into the corresponding wide and narrow receiving
connections of your electrical outlet. Do not force the plug into the outlet.
If
the plug provided with the unit does not
fit,
consult with
an
electrician to upgrade the electrical outlet accordingly. The power cord should be situated
in
away that
protects
it
from being pinched, walked on, tripped
over,
or accidentally pulled from the electrical outlet or the electrical
input
on
the ZK500.
Do
not run the cable through doorways or underneath objects that could damage the wire or tear
the insulating material surrounding the wire. Only use the manufacturer supplied power supply with the ZK500.
We
recommend using asurge protector/power conditioner and unplugging the ZK500 during any electrical storms or
situations that could cause voltage fluctuations
in
the electrical system. 3

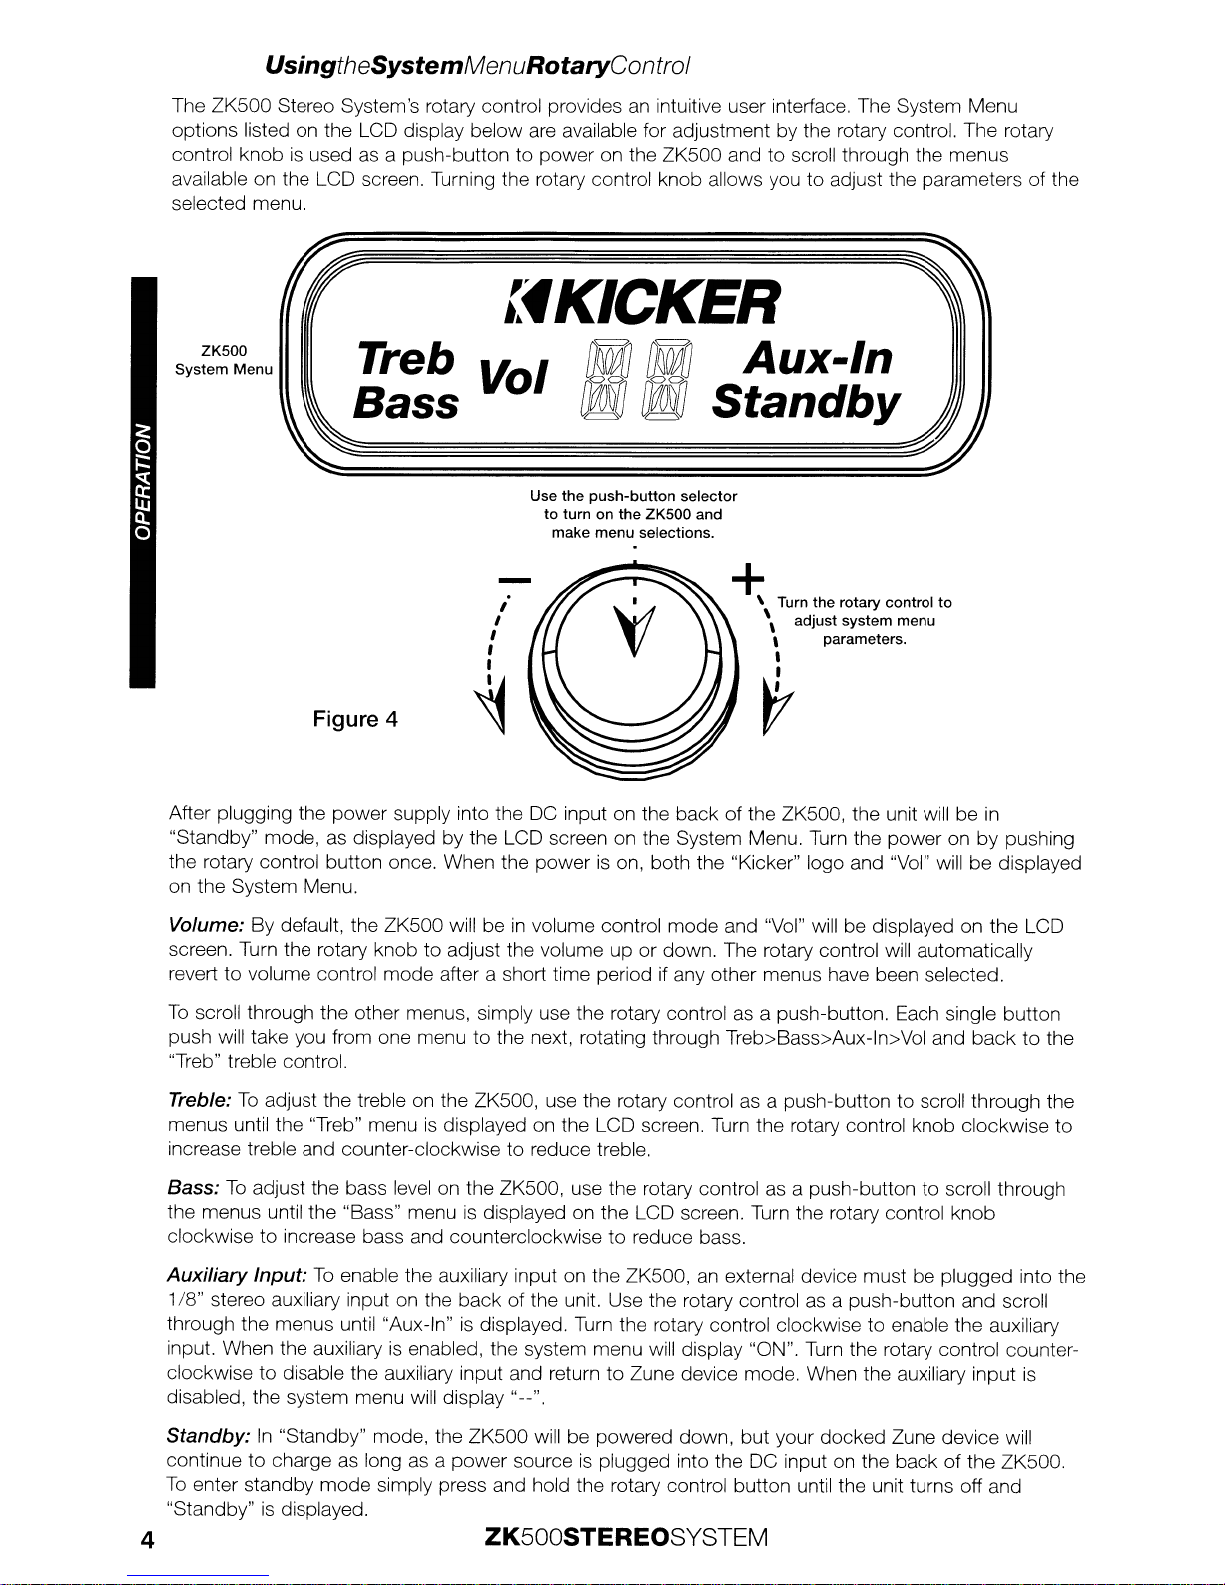
UsingtheSystemMenuRotaryControl
The ZK500 Stereo System's rotary control provides
an
intuitive user interface. The System Menu
options listed
on
the LCD display below
are
available for adjustment by the rotary control. The rotary
control knob
is
used
as
apush-button to power on the ZK500 and to scroll through the menus
available on the LCD screen. Turning the rotary control knob allows
you
to adjust the parameters of the
selected menu.
+\Turn the rotary control
to
"adjust system menu
,parameters.
,
~
,
,
I
,
,
~
-
Use the
push-button
selector
to
turn
on
the ZK500 and
make
menu
selections.
lfKICKER
Treb Vol
Of{]
0JlJ
Aux-In
Bass
D@,V
0MlJ
Standby
Figure 4
ZK500
System Menu
After plugging the power supply into the
DC
input on the back of the ZK500, the unit will be
in
"Standby" mode, as displayed by the LCD screen on the System Menu.
Turn
the power on by pushing
the rotary control button once. When the power
is
on, both the "Kicker" logo and "Vol"
will
be displayed
on the System Menu.
Volume: By default, the ZK500 will be
in
volume control mode and "Vol"
will
be displayed on the LCD
screen.
Turn
the rotary knob to adjust the volume up or down. The rotary control
will
automatically
revert to volume control mode after ashort time period if any other menus have been selected.
To
scroll through the other menus, simply use the rotary control
as
apush-button. Each single button
push will take you from one menu to the next, rotating through Treb>Bass>Aux-ln>Vol and back to the
"Treb" treble control.
Treble:
To
adjust the treble
on
the ZK500, use the rotary control as apush-button to scroll through the
menus until the "Treb" menu
is
displayed
on
the LCD screen.
Turn
the rotary control knob clockwise to
increase treble and counter-clockwise to reduce treble.
Bass:
To
adjust the bass
level
on the ZK500, use the rotary control as apush-button to scroll through
the menus until the "Bass" menu
is
displayed
on
the LCD screen. Turn the rotary control knob
clockwise to increase bass and counterclockwise to reduce bass.
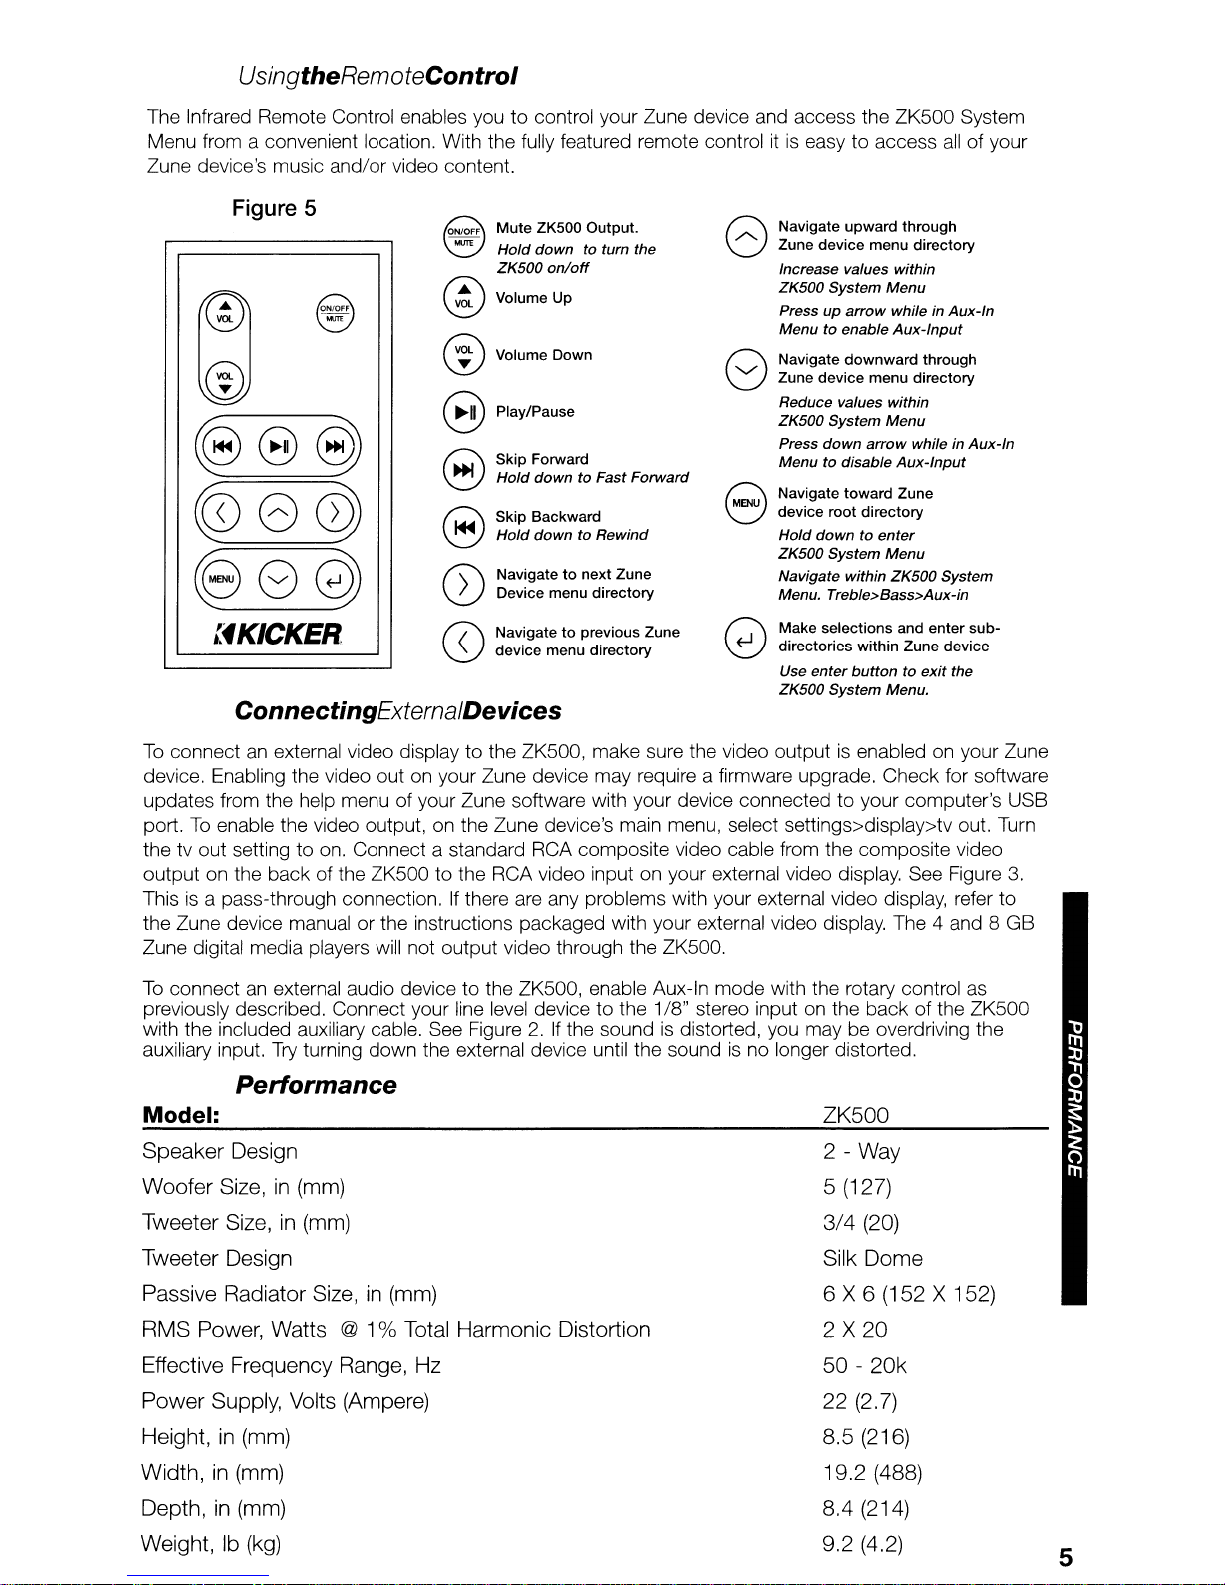
Auxiliary
Input:
To
enable the auxiliary input on the ZK500,
an
external device must be plugged into the
1/8"
stereo auxiliary input on the back of the unit. Use the rotary control
as
apush-button and scroll
through the menus until "Aux-In"
is
displayed.
Turn
the rotary control clockwise to enable the auxiliary
input. When the auxiliary
is
enabled, the system menu will display "ON".
Turn
the rotary control counter-
clockwise to disable the auxiliary input and return to Zune device mode. When the auxiliary input
is
disabled, the system menu
will
display "
__
".
Standby:
In
"Standby" mode, the ZK500
will
be powered down, but your docked Zune device will
continue to charge
as
long
as
apower source
is
plugged into the
DC
input
on
the back of the ZK500.
To
enter standby mode simply press and hold the rotary control button until the unit turns off and
"Standby"
is
displayed.
4ZK500STEREOSYSTEM

UsingtheRemoteControl
The Infrared Remote Control enables you
to
control your Zune device and access the ZK500 System
Menu from aconvenient location. With the fully featured remote control
it
is
easy to access
all
of your
Zune device's music and/or video content.
e
ConnectingExternalDevices
Figure 5
~8c®
~8@
~8~
:'fKICKER
@Mute
lK500
Output.
MtJre
Hold down to turn the
ZK500
on/off
®Volume Up
®Volume Down
ePlay/Pause
Skip Forward
Hold
down to Fast Forward
Skip Backward
Hold down to Rewind
Navigate
to
next
lune
Device menu directory
((\
Navigate
to
previous Zune
"J
device menu directory
C\
Navigate upward through
o
lune
device menu directory
Increase values within
ZK500 System Menu
Press
up
arrow
while in Aux-In
Menu to enable Aux-Input
QNavigate downward through
'0
lune
device menu directory
Reduce values within
ZK500 System Menu
Press down
arrow
while in Aux-In
Menu to disable Aux-Input
Navigate toward
lune
device root directory
Hold down to enter
ZK500 System Menu
Navigate within ZK500 System
Menu. Treble>Bass>Aux-in
Make selections and enter sub-
directories within
lune
device
Use enter
button
to
exit
the
ZK500 System Menu.
To
connect
an
external audio device to the ZK500, enable Aux-In mode with the rotary control as
previously described. Connect your line
level
device to the 1/8" stereo input
on
the back of the ZK500
with the included auxiliary cable. See Figure
2.
If
the sound
is
distorted, you may be overdriving the
auxiliary input.
Try
turning down the external device until the sound
is
no longer distorted.
Performance
To
connect
an
external video display
to
the ZK500, make sure the video output
is
enabled
on
your Zune
device. Enabling the video out
on
your Zune device may require afirmware upgrade. Check for software
updates from the help menu of your Zune software with your device connected to your computer's USB
port.
To
enable the video output, on the Zune device's main menu, select settings>display>tv out.
Turn
the tv out setting to
on.
Connect astandard RCA composite video cable from the composite video
output on the back of the ZK500 to the RCA video input on your external video display. See Figure
3.
This
is
apass-through connection.
If
there are any problems with your external video display, refer to
the Zune device manual or the instructions packaged with your external video display. The 4and 8GB
Zune digital media players will not output video through the ZK500.
Model:
Speaker Design
Woofer Size,
in
(mm)
Tweeter Size,
in
(mm)
Tweeter Design
Passive Radiator Size,
in
(mm)
RMS Power, Watts @1% Total Harmonic Distortion
Effective Frequency Range, Hz
Power
Supply, Volts (Ampere)
Height,
in
(mm)
Width, in (mm)
Depth, in (mm)
Weight, Ib (kg)
ZK500
2 - Way
5(127)
3/4
(20)
Silk
Dome
6 X 6 (152 X152)
2X
20
50
-
20k
22 (2.7)
8.5 (216)
19.2 (488)
8.4 (214)
9.2 (4.2) 5

Table of contents
Other Kicker Docking Station manuals