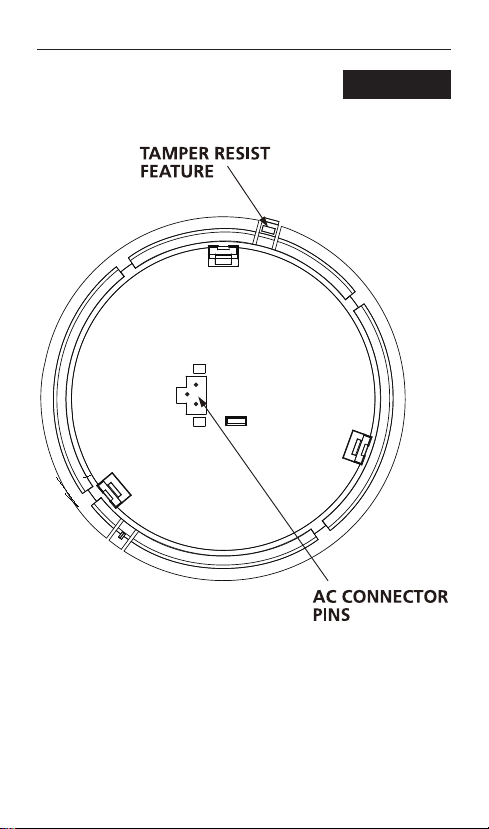
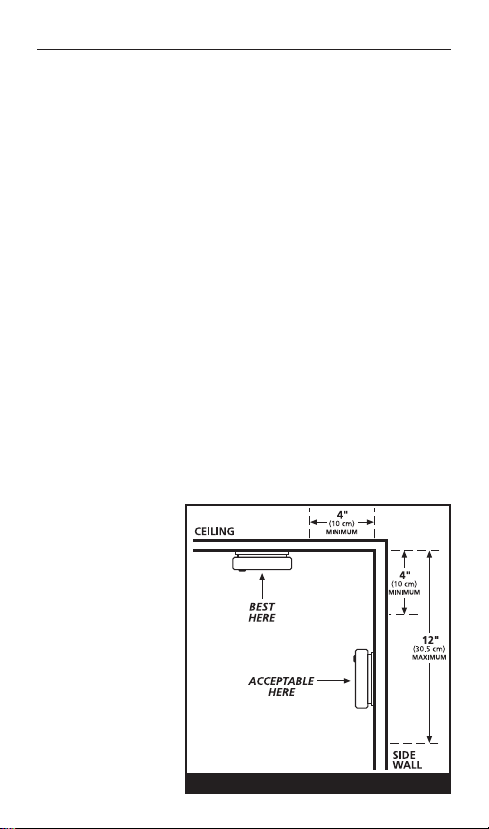
Kidde KN-COSM-IBA User manual

Combination
Smoke and
Carbon Monoxide
Alarm
P/N 2544-7201-03 EN 07/18
For qu stions conc rning your Smok and Carbon Monoxid
Alarm, pl as call our Product Support Lin at 1-800-880-6788.
User Gui e for Mo el KN-COSM-IBA
O
F
F
-
T
W
I
S
T
-
O
N
MOVE TO
FRESH AIR
RED-ALARM
GREEN-STANDBY
P
U
S
H
TO HUSH
PUSH TO
T
E
S
T
W
E
E
K
L
Y
For your conven ence, wr te down the follow ng nformat on. If you call
our Product Support L ne, these are the f rst quest ons you w ll be asked:
Alarm Mod l Numb r
(located on back of the alarm):
Dat of Manufactur
(located on back of the alarm):
Dat of Purchas :
Wh r Purchas d:
READ AND SAVE THIS USER GUIDE
• 120V AC
• 2 - AA Battery Backup
• 2-LED D splay
• Peak Level Memory
• Test/Hush®button
• Vo ce Message System
2544-7201-03(KN-COSM-IBA)_V1.qxd:_ 2018.5.11 11:33 AM Pa e 1

Introduction ............................Page1
Product Vi w ...........................Pages2-3
F atur s ................................Pages4-7
Installation Instructions
Step 1: Installation Instructions:
A. Recommen e Installation Locations . . Pages 8-10
B. Where Not to Install . . . . . . . . . . . . . . . Page 10
Step 2: Wiring Instructions . . . . . . . . . . . . . . . . Page 11-12
Step 3: Mounting Instructions.. . . . . . . . . . . . . . Page 13-14
Step 4: Testing the Alarm. . . . . . . . . . . . . . . . . . Page 14
Op rating Instructions
Interconnect Feature . . . . . . . . . . . . . . . . . . . . . Page 15
HUSH Control Feature . . . . . . . . . . . . . . . . . . . . Page 15-16
ResetFeature...........................Page16
Peak Level Memory . . . . . . . . . . . . . . . . . . . . . . Page 16
LED In icator Operation. . . . . . . . . . . . . . . . . . . Page 17
Tamper Resist Feature . . . . . . . . . . . . . . . . . . . . Page 17-18
What to do if th Alarm Sounds
SmokeAlarm...........................Pages18-19
Carbon Monoxi e Alarm . . . . . . . . . . . . . . . . . . Pages 20
Alarm R moval/Batt ry R plac m nt . . . . . . . . Pages 21-22
G n ral Alarm Maint nanc ...............Pages23-24
En of Pro uct Life Notification . . . . . . . . . . . . . Page 23
Carbon Monoxid Saf ty Information
General CO Information . . . . . . . . . . . . . . . . . . Page 24
PossibleSources ........................Page24
COSafetyTips .........................Page25
Symptoms of CO Poisoning . . . . . . . . . . . . . . . Page 25-26
Fir Saf ty Information
EscapePlan............................Page26
FirePrevention..........................Page27
Industry Saf ty Standards
National Fire Protection Association . . . . . . . . . Page 27-28
California State Fire Marshall . . . . . . . . . . . . . . . Page 28
Consumer Pro uct Safety Commission. . . . . . . . Page 28
NRC .................................Page28
Limit d Warranty and S rvic Information. . . . Pages 29-30
Product R gistration ......................Page30
Table of Contents
2544-7201-03(KN-COSM-IBA)_V1.qxd:_ 2018.5.11 11:33 AM Pa e 2

Thank you for purchasing the Ki e Combination Smoke an
Carbon Monoxi e Alarm mo el # KN-COSM-IBA. This alarm is
suitable as a Single Station an /or Multiple Station (24 evices)
alarm. This alarm has a ten-year limite warranty. Please take a
few minutes to thoroughly rea this user gui e, an save for
future reference. Teach chil ren how to respon to the alarms,
an that they shoul never play with the unit. Your Ki e
Smoke/CO Alarm was esigne to etect both smoke an
carbon monoxi e from any source of combustion in a resi ential
environment. It is not esigne for use in a recreational vehicle
(RV) or boat. If you have any questions about the operation or
installation of your alarm, please call our toll free Pro uct Support
Line at 1-800-880-6788. The gui e on Page 27 will help you
etermine the correct location of safety pro ucts that will help
keep your home a safer place.
Introduction
1
2544-7201-03(KN-COSM-IBA)_V1.qxd:_ 2018.5.11 11:33 AM Pa e 3

Product View
FRONT
2
RED AND GREEN LED
VOICE SPEAKER ALARM SOUNDER
O
F
F
-
T
W
I
S
T
-
O
N
MOVE TO
FRESH AIR
RED-ALARM
GREEN-STANDBY
P
U
S
H
TO HUSH
PUSH TO
T
E
S
T
W
E
E
K
L
Y
2544-7201-03(KN-COSM-IBA)_V1.qxd:_ 2018.5.11 11:33 AM Pa e 4

Product View
BACK
3
R
2544-7201-03(KN-COSM-IBA)_V1.qxd:_ 2018.5.11 11:33 AM Pa e 5

• Lou 85 ecibel alarm.
• Permanent in epen ent smoke an carbon monoxi e sensors.
•Smok alarm tak s pr c d nc when both smoke an
carbon monoxi e are present.
• Powere by 120V AC (60 Hz, 45mA max) wire-in connector
an two AA battery backup.
• Interconnectable to other Ki e/Nighthawk bran smoke an
CO alarms (see page 15 for etails).
• Alarm/Voice message warning system that alerts you of the
following con itions in the manner escribe below, thus
eliminating any confusion over which alarm is soun ing:
FIRE: The alarm/voice pattern is three long alarm beeps
followe by the verbal warning message “FIRE!” This pattern
is repeate until the smoke is eliminate . The re LED light will
flash while in alarm/voice mo e.
CARBON MONOXIDE: The alarm/voice pattern is four short
alarm beeps followe by the verbal warning message
“WARNING! CARBON MONOXIDE!". This continues until the
unit is reset or the CO is eliminate . While powere by battery
only, after four minutes the alarm/voice pattern will soun
once every minute. The re Light Emitting Dio e (LED) light will
flash while in alarm/voice mo e.
LOW BATTERY: When the batteries are low an nee
replacing the re LED light will flash an the unit will “chirp”
one time, followe by the warning message “LOW BATTERY.”
This cycle will occur once every minute an will continue for at
least seven ays. In a ition, while on AC power, the green
LED will flash rapi ly to allow easier location of the low battery
chirping unit. In a ition, while on AC power, the green LED
will flash rapi ly to allow easier location of the low battery
chirping unit. Un er battery power, the "LOW BATTERY" voice
only occurs once every 15 minutes.
• Voice Message System that alerts user to the following
con itions:
– Only for smoke alarm Hush
System announces “HUSH MODE ACTIVATED” when
the unit is first put into HUSH Mo e.
Features
2544-7201-03(KN-COSM-IBA)_V1.qxd:_ 2018.5.11 11:33 AM Pa e 6

– Only for smoke alarm Hush
System announces “HUSH MODE CANCELLED” when
unit resumes normal operation after Hush Mo e has
been cancelle .
– Only if button is pushe
System announces “CAUTION, CARBON CONOXIDE PREVIOUSLY
DETECTED” when the unit has etecte CO concentrations of
100 ppm or higher.
– System announces “PUSH TEST BUTTON” when the unit
is powere up, remin ing user to activate the Test
Button.
• En of Life Hush. At en of pro uct life, the button can be pushe
to silence the en of life "chirp" for approximately 3 ays at a
time, for a maximum of 30 ays life extension.
• One “chirp” every 30 secon s couple with a green LED flash
twice a secon is an in ication that the alarm is malfunctioning. If
this occurs call the Pro uct Support Line at 1-800-880-6788.
• Test/Reset button performs functions.(See page 14).
• HUSH Control Feature that silences the unit uring nuisance alarm
situations (see page 15).
• Peak Level Memory Feature which alerts user when the unit has
etecte CO concentrations of 100 ppm or greater (see page 16).
• Alarm Memory Feature that gives visual in ication when an alarm
has sense a hazar ous con ition.
• Green an re LED lights that in icate normal operation an
alarm status (see page 16 an 17 for etails).
• Tamper Resist Feature that eters chil ren an others from
removing the alarm (see page 17).
• Battery remin er flag that prohibits installation when batteries are
not present.
Features
5
2544-7201-03(KN-COSM-IBA)_V1.qxd:_ 2018.5.11 11:33 AM Pa e 7

Smoke Alarm
The smoke alarm monitors the air for pro ucts of combustion
that are pro uce when something is burning or smol ering.
When smoke particles in the smoke sensor reach a specifie
concentration, the alarm/voice message warning system will
soun , an be accompanie by the flashing re LED light. The
smoke alarm takes prece ence when both smoke an carbon
monoxi e are present.
WARNING: PLEASE READ CAREFULLY AND
THOROUGHLY
NFPA 72 states: Life safety from fire in resi ential occupancies is
base primarily on early notification to occupants of the nee to
escape, followe by the appropriate egress actions by those
occupants. Fire warning systems for welling units are capable of
protecting about half of the occupants in potentially fatal fires.
Victims are often intimate with the fire, too ol or young, or
physically or mentally impaire such that they cannot escape
even when warne early enough that escape shoul be possible.
For these people, other strategies such as protection-in-place or
assiste escape or rescue are necessary.
• Smoke alarms are evices that can provi e early warning of
possible fires at a reasonable cost; however, alarms have
sensing limitations. Ionization sensing alarms may etect
invisible fire particles (associate with fast flaming fires) sooner
than photoelectric alarms. Photoelectric sensing alarms may
etect visible fire particles (associate with slow smol ering
fires) sooner than ionization alarms. Home fires evelop in
ifferent ways an are often unpre ictable. For maximum
protection, Ki e recommen s that both Ionization an
Photoelectric alarms be installe .
• A battery powere alarm must have a battery of the specifie
type, in goo con ition an installe properly.
• Smoke alarms must be teste regularly to make sure the
batteries an the alarm circuits are in goo operating
con ition.
• Smoke alarms cannot provi e an alarm if smoke oes not
reach the alarm. Therefore, smoke alarms may not sense fires
starting in chimneys, walls, on roofs, on the other si e of a
close oor or on a ifferent floor.
Features and General Information
6
!
2544-7201-03(KN-COSM-IBA)_V1.qxd:_ 2018.5.11 11:33 AM Pa e 8

• If the alarm is locate outsi e the be room or on a ifferent
floor, it may not wake up a soun sleeper.
• The use of alcohol or rugs may also impair one’s ability to hear
the smoke alarm. For maximum protection, a smoke alarm
shoul be installe in each sleeping area on every level of a
home.
• Although smoke alarms can help save lives by provi ing an
early warning of a fire, they are not a substitute for an
insurance policy. Home owners an renters shoul have
a equate insurance to protect their lives an property.
Carbon Monoxide (CO) Alarm
The Carbon Monoxi e (CO) alarm monitors the air for the
presence of CO. It will alarm when there are high levels of CO
present, an when there are low levels of CO present over a
longer perio of time (see page 21 for alarm times). When a CO
con ition matches either of these situations, the alarm/voice
message warning system will soun , an be accompanie by the
flashing re LED light. The carbon monoxi e sensor uses an
electrochemical technology.
CAUTION: This alarm will only indicat th pr s nc of
carbon monoxid gas at th s nsor. Carbon monoxid gas
may b pr s nt in oth r ar as.
In ivi uals with me ical problems may consi er using warning
evices which provi e au ible an visual signals for carbon
monoxi e concentrations un er 30 ppm.
Features and General Information
7
!
2544-7201-03(KN-COSM-IBA)_V1.qxd:_ 2018.5.11 11:33 AM Pa e 9

Step 1
Installation Guid :
IMPORTANT: THIS ALARM MUST BE MOUNTED ON A
CEILING OR WALL. IT WAS NOT DESIGNED FOR USE AS A
TABLETOP DEVICE! INSTALL ONLY AS DETAILED!
A. R comm nd d Installation Locations:
Ki e Safety recommen s the installation of a Smoke/CO Alarm
in the following locations. For maximum protection we suggest
an alarm be installe on each level of a multilevel home,
inclu ing every be room, hallways, finishe attics an
basements. Put alarms at both en s of be room, hallway or large
room if hallway or room is more than 30 ft (9.1m) long. If you
have only one alarm, ensure it is place in the hallway outsi e of
the main sleeping area, or in the main be room. Verify the alarm
can be hear in all sleeping areas.
Locate an alarm in every room where someone sleeps with the
oor close . The close oor may prevent an alarm not locate
in that room from waking the sleeper. Smoke, heat an
combustion pro ucts rise to the ceiling an sprea horizontally.
Mounting the alarm on the ceiling in the center of the room
places it closest to all points in the room.
Ceiling mounting is
preferre in or inary resi ential construction. When mounting an
alarm on the ceiling,
locate it at a minimum
of 4” (10cm) from the
si e wall (see figure
1).
If installing the
alarm on the wall, use
an insi e wall with the
top e ge of the alarm
at a minimum of 4”
(10cm) an a maximum
of 12” (30.5cm) below
the ceiling (see figure
1).
Installation Instructions
8FIGURE 1
2544-7201-03(KN-COSM-IBA)_V1.qxd:_ 2018.5.11 11:33 AM Pa e 10

Slop d C iling Installation:
The following information is from the National Fire Protection
Association an is liste in Fire Co e 72.
Install Smoke Alarms on slope , peake or cathe ral ceilings at,
or within 3 ft (0.9m) of the highest point (measure horizontally).
NFPA 72 states “Smoke alarms in rooms with ceiling slopes
greater than 1 ft to 8 ft (.3 m-2.4 m) horizontally shall be locate
on the high si e of the room”.
NFPA 72 states “A row of alarms shall be space an locate
within 3 ft (0.9 m) of the peak of the ceiling measure
horizontally” (see figure 2).
Mobil Hom s:
Mo ern mobile homes have been esigne an built to be
energy efficient. Install Smoke/CO alarms as recommen e
above (refer to Recommen e Installation Instructions an figure
1). In ol er mobile homes that are not well insulate , extreme
heat or col can be transferre from the outsi e to the insi e
through poorly insulate walls an roof. This may cause a
thermal barrier, which can prevent smoke from reaching an alarm
mounte on the ceiling. In such mobile homes install your
Smoke/CO Alarm on an insi e wall with the top e ge of the
alarm at a minimum of 4 inches (10cm) an a maximum of 12
inches (30.5cm) below the ceiling (see figure 2). If you are not
sure about the insulation in your mobile home, or if you notice
that the outer walls an ceiling are either hot or col , install your
alarm on an insi e wall ONLY!
Installation Instructions
9
ANYWHERE IN
THIS AREA
3
FIGURE 2
2544-7201-03(KN-COSM-IBA)_V1.qxd:_ 2018.5.11 11:33 AM Pa e 11

THIS EQUIPMENT SHOULD BE INSTALLED IN ACCORDANCE
WITH THE NATIONAL FIRE PROTECTION ASSOCIATION’S
STANDARD 72 (National Fir Prot ction Association,
Batt rymarch Park, Quincy, MA 02269).
B. Wh r Not to Install:
Do not install in garag s, kitch ns, furnac rooms or
bathrooms! INSTALL AT LEAST 5 FEET AWAY FROM ANY
FUEL BURNING APPLIANCE.
Do not install within 3 ft (.9m) of the following: The oor to a
kitchen, or a bathroom that contains a tub or shower, force air
supply ucts use for heating or cooling, ceiling or whole house
ventilating fans, or other high air areas. Avoi excessively usty,
irty or greasy areas. Dust, grease or househol chemicals can
contaminate the alarm's sensors, causing it to not operate
properly.
Place the alarm where rapes or other objects will not block the
sensor. Smoke an CO must be able to reach the sensors to
accurately etect these con itions. Do not install in peaks of
vaulte ceilings, “A” frame ceilings or gable roofs. Keep out of
amp an humi areas.
Install at least one (1) foot away from fluorescent lights,
electronic noise may cause nuisance alarms. Do not place in
irect sunlight an keep out of insect infeste areas. Extreme
temperatures will effect the sensitivity of the Smoke/CO Alarm.
Do not install in areas where the temperature is col er than 40
egrees Fahrenheit (4.4˚ Celsius) or hotter than 100 egrees
Fahrenheit (37.8˚ Celsius), such as garages an unfinishe attics.
Do not install in areas where the relative humi ity (RH) is above
85%. Place away from oors an win ows that open to the
outsi e.
Installation Instructions
10
WARNING -This product is int nd d for
us in ordinary indoor locations of family
living units. It is not d sign d to m asur
complianc with Occupational Saf ty and
H alth Administration (OSHA) comm rcial
or industrial standards.
!
2544-7201-03(KN-COSM-IBA)_V1.qxd:_ 2018.5.11 11:33 AM Pa e 12

Step 2
Wiring Instructions:
WIRING REQUIREMENTS
• This smoke alarm shoul be installe on a U.L. liste or
recognize junction box. All connections shoul be ma e by a
qualifie electrician an all wiring use shall be in accor ance
with articles 210 an 300.3(B) of the U.S. National Electrical
Co e ANSI/NFPA 70, NFPA 72 an /or any other co es having
juris iction in your area. The multiple station interconnect
wiring to the alarms must be run in the same raceway or cable
as the AC power wiring. In a ition, the resistance of the
interconnect wiring shall be a maximum of 10 ohms.
• The appropriate power source is 120 Volt AC Single Phase
supplie from a non-switchable circuit, which is not protecte
by a groun fault interrupter.
• Smoke alarms are not to be use with etector guar s unless
the combination (alarm an etector guar ) have been
evaluate an foun suitable for that purpose.
•WARNING: The alarm cannot be operate from power
erive from a square wave, mo ifie square wave or mo ifie
sine wave, inverter. These types of inverters are sometimes
use to supply power to the structure in off gri installations,
such as solar or win erive power sources. These power
sources pro uce high peak voltages that will amage the
alarm.
WIRING INSTRUCTIONS FOR AC QUICK CONNECT HARNESS
CAUTION! TURN OFF THE MAIN POWER TO THE
CIRCUIT BEFORE WIRING THE ALARM.
• For alarms that are use as single station, DO NOT CONNECT
THE RED WIRE TO ANYTHING. Leave the re wire insulating
cap in place to make certain that the re wire cannot contact
any metal parts or the electrical box.
• When alarms are interconnecte , all interconnecte units must
be powere from a single circuit.
Installation Instructions
11
!
!
!
2544-7201-03(KN-COSM-IBA)_V1.qxd:_ 2018.5.11 11:33 AM Pa e 13

• A maximum of 24 Ki e Safety evices may be interconnecte
in a multiple station arrangement. The interconnect system
shoul not excee the NFPA interconnect limit of 12 smoke
alarms an /or 18 alarms total (smoke, CO, Smoke/ CO
Combination, heat, etc.). This Smoke/CO combination alarm
must be counte as a smoke alarm when etermining the
number of units on an interconnect line. With 18 alarms
interconnecte , it is still possible to interconnect up to a total
of 6 remote signaling evices an /or relay mo ules (see page
15 for etails on interconnecting Ki e evices).
• The maximum wire run istance between the first an last unit
in an interconnecte system is 1000 feet.
•NOTE: This alarm is not compatible with Ki e CO-relays an
Strobes manufacture before Nov. 1, 2011.
• Figure 3 illustrates interconnection wiring. Improper
connection will result in amage to the alarm, failure to
operate, or a shock hazar .
• Make certain alarms are wire to a continuous (non-switche )
power line. NOTE: Use stan ar UL Liste househol wire (as
require by local co es) available at all electrical supply stores
an most har ware stores.
Installation Instructions
12
FUSE OR CIRCUIT BREAKER
REDBLACK
WHITE
CONNECTOR
REDBLACK
WHITE
CONNECTOR
First
Alarm
Additional
Alarm
Kidde
Relay Module
SM120X
Additional
Alarm
Optional
Accessory
WIRES ON ALARM HARNESS CONNECTED TO
Black Hot Si e of AC Line
White Neutral Si e of AC Line
Re Interconnect Lines (Re Wires) of
Other Units in the Multiple Station
Set up
FIGURE 3 Int rconn ct Wiring Diagram
2544-7201-03(KN-COSM-IBA)_V1.qxd:_ 2018.5.11 11:33 AM Pa e 14

Step 3
Mounting Instructions:
CAUTION: YOUR SMOKE/CO ALARM IS SEALED AND
THE COVER IS NOT REMOVABLE!
1. To help i entify the ate to replace the unit, write the "Replace
by" ate (10 years from initial power up) in permanent marker
in the space provi e on the si e of the alarm. See Alarm
Replacement section for a itional information.
2. Remove the mounting bracket from the back of the alarm by
hol ing the mounting bracket an twisting the alarm in the
irection in icate by the “OFF”arrow on the alarm cover.
3. After selecting the proper location for your Smoke/CO Alarm,
as escribe on Pages 8-10, an wiring the AC QUICK
CONNECT harness as escribe in the WIRING INSTRUCTIONS
(NOTE: AC power shoul be turne off at this stage), attach
the mounting bracket to the electrical box. To ensure
aesthetic alignment of the alarm with the hallway, or wall, the
“A” line on the mounting bracket must be parallel with the
hallway when ceiling mounte , or horizontal when wall
mounte .
4. Pull the AC QUICK CONNECTOR through the center hole in
the mounting bracket an secure
the bracket, making sure that the
mounting screws are positione
in the small en s of the keyholes
before tightening the screws.
5. Remove the car boar square
from the connector pins an plug
the AC QUICK CONNECTOR into
the back of the alarm (see figure
4), making sure that the locks on
the connector snap into place.
Then push the excess wire back
into the electrical box through the hole in the center of the
mounting bracket.
6. Install the alarm on the mounting bracket an rotate the
alarm in the irection of the “ON” arrow on the cover until
the alarm ratchets into place (this ratcheting function allows
for aesthetic alignment). Note: The alarm will mount to the
bracket in 4 positions (every 90 egrees). 13
Installation Instructions
!
FIGURE 4
Installing AC Quick
Conn ct
2544-7201-03(KN-COSM-IBA)_V1.qxd:_ 2018.5.11 11:33 AM Pa e 15

7. Turn on the AC power. The green AC Power On In icator
shoul be lit when the alarm is operating from AC power.
8. Two labels are inclu e with your alarm. They have important
information on what to o in case of an alarm. A the
phone number of your emergency service provi er (Fire
Department or 911) in the space provi e . Place one label
next to the alarm after it is mounte , an one label near a
fresh air source such as a oor or win ow.
9. Remove the re car boar from the battery compartment,
install batteries, close battery oor.
Step
T sting th Alarm
CAUTION: Du to th loudn ss (85 d cib ls) of th
alarm, always stand an arms l ngth away from th unit
wh n t sting.
After installation, TEST THE UNIT’S ELECTRONICS by pressing an
releasing the test/reset button. You will then hear the following
sequence of "beeps" an verbal warnings:
Three long beeps.
Verbal warning: "FIRE!"
Three long beeps.
Four quick beeps.
Verbal warning: “WARNING! CARBON MONOXIDE”
Four quick beeps
Single beep to reset
Weekly testing is require ! If at anytime it oes not perform as
escribe , verify power is connecte correctly an that the
battery oesn’t nee replacing. Clean ust an other buil up off
the unit. If it still oesn’t operate properly call the Pro uct
Support Line at 1-800-880-6788.
Interconnect Feature
Your Combination Smoke/CO Alarm is interconnectable to other
multiple station Ki e, Nighthawk an Ki e/Fyrnetics pro ucts:
• When compatible smoke alarms an heat alarms are
interconnecte to your Smoke/CO Alarm, they will only
respon to a smoke relate event.
Installation Instructions
1
!
2544-7201-03(KN-COSM-IBA)_V1.qxd:_ 2018.5.11 11:33 AM Pa e 16

•
When mixing compatible mo els with battery backup with mo els
without battery backup, be a vise that the mo els without battery
backup will not respon uring an AC power failure.
• This unit is only approve to interconnect with other
Ki e/Nighthawk pro ucts. It is NOT approve to interconnect
with any other bran of etection pro uct.
• This alarm is interconnect compatible with the following alarms
an accessories:
–Smoke alarms: 1235, 1275, 1276, 1285, i12020, i12020A,
i12040, i12040A, i12060, i12060A, i4618, i4618A,
KN-SMFM-I, RF-SM-ACDC, PE120, P12040, Pi2000, Pi2010,
KN-COSM-I, KN-COSM-IB,
Ki e/Firex: i4618, i4618A
– Heat alarm: HD135F
– CO alarms: KN-COB-IC, KN-COP-IC, KN-COPE-I
– Relay mo ules: SM120X, CO120X
– Strobe Light: SL177i, SLED177i
• For more information about compatible interconnect units an
their functionality in an interconnect system, visit our web site
at www.ki e.com.
Smoke HUSH Control Feature
The HUSH feature has the capability of temporarily esensitizing
the smoke alarm circuit for approximately 9 minutes. This feature
is to be use only when a known alarm con ition, such as smoke
from cooking, activates the alarm. When the unit is in alarm,You
can put your Smoke/CO Alarm in HUSH mo e by pushing the
test/reset button. If the smoke is not too ense, the alarm will
silence imme iately, the unit will verbally announce “HUSH
MODE ACTIVATED”, an the green LED will flash every 2
secon s for approximately 9 minutes. This in icates that the
smoke alarm is in a temporarily esensitize con ition. Your
Smoke/CO Alarm will automatically reset after approximately 9
minutes. When the unit returns to normal operation after being
in HUSH mo e, it will verbally announce “HUSH MODE
CANCELLED”, an soun the alarm if smoke is still present. The
HUSH feature can be use repeate ly until the air has been
cleare of the con ition causing the alarm. While the unit is in
HUSH mo e, pushing the test/reset button on the alarm will also
en the HUSH perio .
NOTE: DENSE SMOKE WILL OVERRIDE THE HUSH CONTROL
FEATURE AND SOUND A CONTINUOUS ALARM.
15
Operating Instructions
2544-7201-03(KN-COSM-IBA)_V1.qxd:_ 2018.5.11 11:33 AM Pa e 17

Operating Instructions
16
CAUTION: BEFORE USING THE ALARM HUSH FEATURE,
IDENTIFY THE SOURCE OF THE SMOKE AND BE CERTAIN A
SAFE CONDITION EXISTS.
Reset Feature
If the the Smoke/CO Alarm is soun ing a CO alarm, pressing the
test/reset button will silence the alarm.
If the CO con ition that cause the alert continues, the alarm will
reactivate within 200 secon s (follow the action plan on page
20).
CO Peak Level Memory
If the green LED is blinking once every 10 secon s, the unit has
etecte a hazar ous CO con ition. If the CO sensor has etecte a
CO level of 100 PPM or higher since last reset, it will be recor e by
the Peak Level Memory function. To access the Peak Level Memory
press the test/reset button. If a rea ing of 100 PPM or higher has
been recor e , the unit will announce “Caution,Carbon Monoxi e
Previously Detecte .” If you’ve been away from home this feature
allows you to check if there was a CO rea ing of 100, or higher,
uring your absence. Pushing the test/reset button resets the
memory. It’s also reset when the power is remove . Note: the green
LED blinking portion of CO Peak Level Memory is isable when the
unit is on battery power only.
LED Indicator Operation
R d LED
The re LED will flash as escribe below un er the following
con itions:
--During smoke or CO alarm, with every beep
--During testing (same as alarm)
--Low battery, single flash with chirp
--En of pro uct life, ouble flash every 30 secon s with chirp
--Unit error mo e, single flash with chirp every 30 secon s
--Unit error mo e, a Fault Co e is flashe every 30 secon s (can
be observe an reporte to customer service for
troubleshooting).
!
2544-7201-03(KN-COSM-IBA)_V1.qxd:_ 2018.5.11 11:33 AM Pa e 18

Operating Instructions
17
Gr n LED
The green LED will flash as escribe below un er the following
con itions:
– Stan by Con ition (powere by AC an battery backup):
The LED will be constantly on.
– Stan by Con ition (powere by only battery backup):
The LED will flash every 60 secon s..
– Alarm Memory Con ition: The LED will flash every
secon uring alarm. When the alarm con ition goes
away, the originating alarm unit will flash the LED every
16 secon s until the test/reset button is presse , thus
resetting the alarm.
– CO Peak Memory (10 secon flash rate), AC powere
only. In icates CO greater than 100PPM was etecte .
Press Test button to announce Peak message an clear
Peak Memory.
– Initiating Alarm con ition (1 secon flash rate), in icates
the unit initiate an alarm.
– Trouble Fault/Error mo e (1/2 secon flash rate), AC
powere only. Helps owner locate the mysterious
chirping unit
– HUSH MODE Con ition: The LED will flash every 2
secon s while the alarm is in HUSH mo e.
-LOW BATTERY LOCATOR (rapi flash), AC powere only.
Helps owner locate the low battery chirping unit.
Tamper Resist Feature
To make your smoke/CO alarm tamper resistant, a tamper resist
feature has been provi e . Activate the tamper resist feature by
breaking off the four posts in the square holes in the trim ring
(see figure 5A). When the posts are broken off, the tamper resist
tab on the base is allowe to engage the mounting bracket.
Rotate the alarm onto the mounting bracket until you hear the
tamper resist tab snap into place, locking the alarm on the
mounting bracket. Using the tamper resist feature will help eter
chil ren an others from removing the alarm from bracket.
NOTE: To remove the alarm when the tamper resist tab is
2544-7201-03(KN-COSM-IBA)_V1.qxd:_ 2018.5.11 11:33 AM Pa e 19

engage , press own on the tamper resist tab, an rotate the
alarm off of the bracket (see figure 5B).
NEVER IGNORE THE SOUND OF THE ALARM!
Determining what type of alarm has soun e is easy with your
Combination Smoke/CO Alarm. The voice message warning
system will inform you of the type of situation occurring. Refer
to the Features section on pages 4-7 for a etaile escription of
each alarm pattern.
What To Do If The Alarm Sounds
When the smoke alarm sounds:
Smoke alarms are esigne to minimize false alarms. Cigarette
smoke will not normally set off the alarm, unless the smoke is
blown irectly into the alarm. Combustion particles from cooking
may set off the alarm if locate too close to the cooking area.
Large quantities of combustible particles are generate from
spills or when broiling. Using the fan on a range hoo which
vents to the outsi e (non recirculating type) will also help remove
these combustible pro ucts from the kitchen.
Operating Instructions
18
FIGURE 5A
FIGURE 5B
AA
Posts
2544-7201-03(KN-COSM-IBA)_V1.qxd:_ 2018.5.11 11:33 AM Pa e 20
Other manuals for KN-COSM-IBA
1
Table of contents
Other Kidde Smoke Alarm manuals

Kidde
Kidde 123I Assembly instructions

Kidde
Kidde I4618 User manual

Kidde
Kidde P4010ACLEDS-2 User manual

Kidde
Kidde 900-CUAR User manual

Kidde
Kidde KN-COSM-ICA User manual

Kidde
Kidde 916 User manual

Kidde
Kidde RF-SM-DC User manual

Kidde
Kidde 0915 User manual

Kidde
Kidde P1235CA User manual

Kidde
Kidde P4010DCS-W User manual