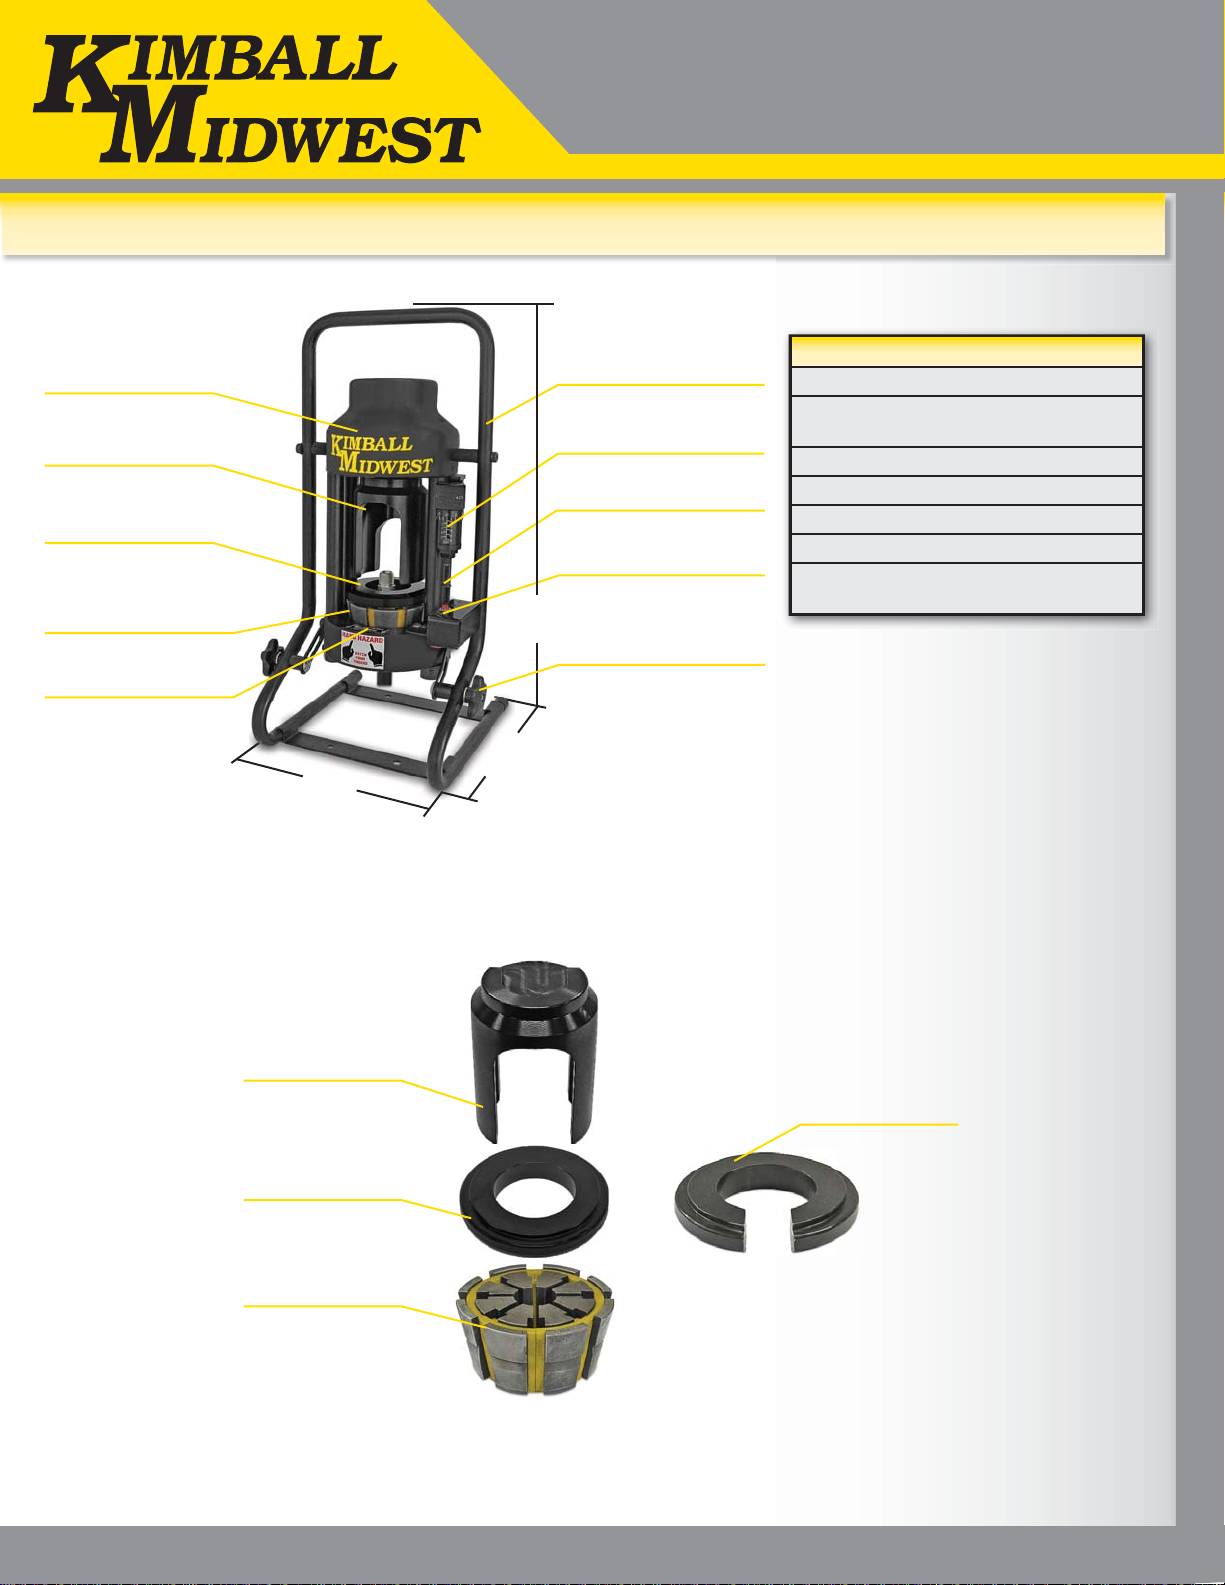
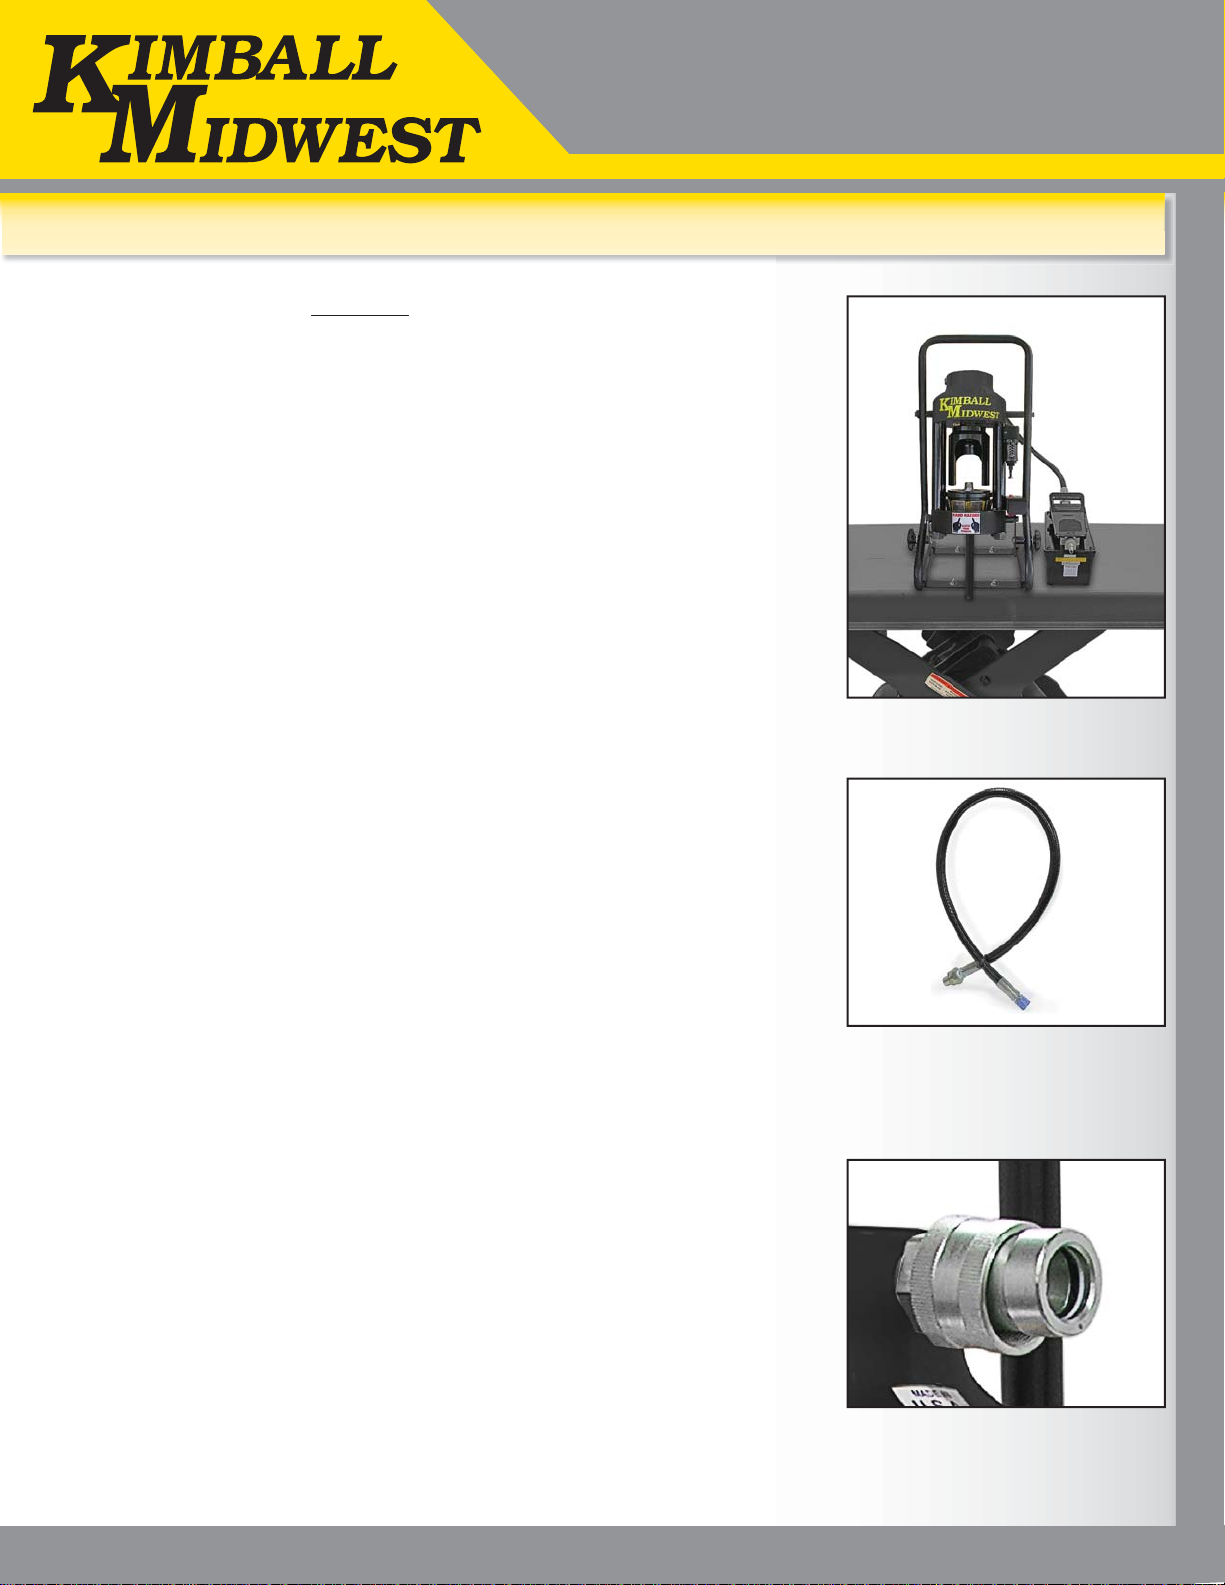
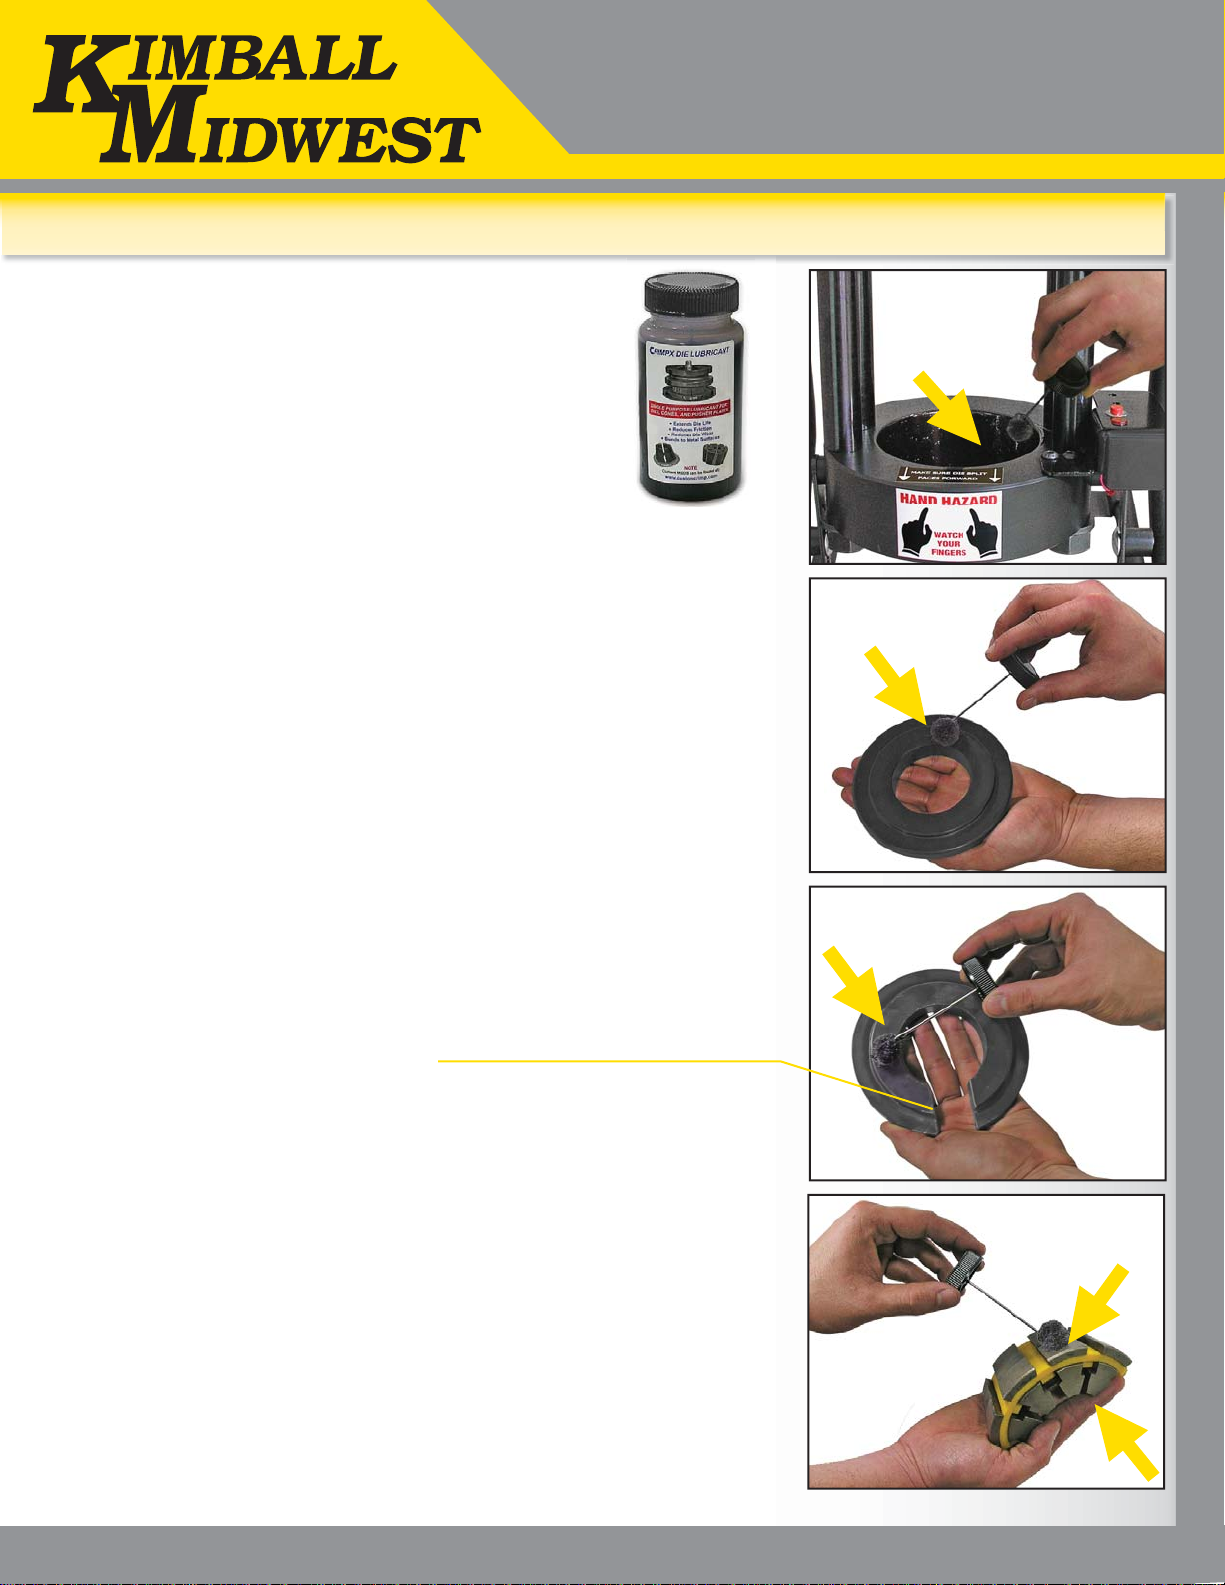
KIMBALL MIDWEST K100 Portable User manual

K100 Portable
Hydraulic Hose Crimper
Copyright © 2018 Kimball Midwest Updated 5/2018 Kimball Midwest Proprietary - All Rights Reserved
K100 PORTABLE SERIES HYDRAULIC HOSE CRIMPER
WITH LED INDICATOR LIGHT OPERATORS MANUAL
The K100 Portable series hose crimper with Micrometer Style Adjustment and 35 tons of crimping force has the capability to
crimp hoses up to 1" 2 wire and 3/4" 4 wire.
UNIQUE USER FRIENDLY MICROMETER STYLE ADJUSTMENT
• Easy to use and read, ideal for repetitive crimps.
• Fully adjustable micrometer for a precise crimp.
• Simple to calibrate and minimum maintenance.
• Micrometer style adjustment permits crimping a wide variety of hose and fittings.

2
K100 Portable
Hydraulic Hose Crimper
Copyright © 2018 Kimball Midwest Updated 5/2018 Kimball Midwest Proprietary - All Rights Reserved
SAFETY PRECAUTIONS
• READ INSTRUCTIONS AND IDENTIFYALL COMPONENT PARTS BEFORE USING THE CRIMPER.
• K100 PORTABLE SERIES CRIMPER CAN PRODUCE 35 TONS OF CRIMPING FORCE.
• KEEP BOTH HANDS AWAY FROM PINCH POINTS.
• CONSULT HOSE AND FITTING MANUFACTURER FOR CORRECT MACHINE SETTINGS
AND CRIMP MEASUREMENTS.
• ALWAYS WEAR EYE PROTECTION.
SAFETY PRECAUTIONS
! !

3
K100 Portable
Hydraulic Hose Crimper
Copyright © 2018 Kimball Midwest Updated 5/2018 Kimball Midwest Proprietary - All Rights Reserved
SAFETY PRECAUTIONS-------------------------------------------------------------------------------------------------------------2
COMPONENT PARTS & TECHNICALDATA-----------------------------------------------------------------------------------------------------------4
FEATURES-----------------------------------------------------------------------------------------------------------------------5
K100 PUMP SERIES------------------------------------------------------------------------------------------------------------------------6
INITIAL SETUP-----------------------------------------------------------------------------------------------------------------------------------7
LUBRICATION PROCEDURE--------------------------------------------------------------------------------------------------8
CRIMPING WITH THE STANDARD K100 PRESSURE PLATE--------------------------------------------------------------------------------9
CRIMPING WITH THE NOTCHED K100 PRESSURE PLATE--------------------------------------------------------------------------13
CALIBRATION CHECK PROCEDURE-----------------------------------------------------------------------------------17
HOW TO REPLACE THE LED INDICATOR LIGHT BATTERIES------------------------------------------------------------------------20
INCLUDED ACCESSORIES---------------------------------------------------------------------------------------------21
AVAILABLE ACCESSORIES----------------------------------------------------------------------------------------22
TROUBLESHOOTING----------------------------------------------------------------------------------------------------------23
COMPONENT PARTS BREAKDOWN-----------------------------------------------------------------------------------------------24
WARRANTY STATEMENT------------------------------------------------------------------------------------------------------------27
TABLE OF CONTENTS

4
K100 Portable
Hydraulic Hose Crimper
Copyright © 2018 Kimball Midwest Updated 5/2018 Kimball Midwest Proprietary - All Rights Reserved
K100 Pusher
Standard
Pressure Plate
Notched
Pressure Plate
K100 Rubber Caged
Die Series
Powerful 35 Ton
Hydraulic Cylinder
Mounted on a convenient
carrying frame
Removable Pusher
K100 Micrometer
Fully Adjustable
LED Indicator Light
Crimper position
can be adjusted
Pressure Plate
Adjustable
Calibration Screw
12-½"
12-½"
24"
Die Orientation Decal
K100 Rubber Caged
Die Series
Technical Data
Crimping Force: 35 Ton
Crimping Capacity: 1" - 2 Wire
3/4" - 4 Wire
Dimensions: L: 12-½" x W: 12-½" x H: 24"
Weight: 38 lbs
Micrometer Style Adjustment: Metric
Die series: K100 Rubber Caged
Available Pumps: Hand Pump
Pneumatic Pump
K100 COMPONENT PARTS & TECHNICAL DATA
Small Footprint for minimum
space requirements.
Note: Dies are supplied separately - not included with the crimper.

5
K100 Portable
Hydraulic Hose Crimper
Copyright © 2018 Kimball Midwest Updated 5/2018 Kimball Midwest Proprietary - All Rights Reserved
FEATURES
Easy calibration adjustment to
increase or decrease the crimp
OD.
LED indicator light will illuminate to
indicate that the crimp is complete.
Lightweight Portable Unit.
Truly “portable” crimper can be
carried to almost any location
where service is required.
Crimper orientation can be
adjusted for optimum crimping
position, or set to vertical posi-
tion for better balance when the
crimper is being carried.
Micrometer with “Micro-Crimp
Adjuster” is fully adjustable to
make precise and repeatable
crimps.
Two piece rubber caged dies
designed for heavy duty
environments. The design
facilitates lubrication on the
critical surfaces, an important
part of the crimping process.

6
K100 Portable
Hydraulic Hose Crimper
Copyright © 2018 Kimball Midwest Updated 5/2018 Kimball Midwest Proprietary - All Rights Reserved
The K100 Portable Series hydraulic hose crimper can be paired with either a Hand Pump or Pneumatic
Pump to make the ideal combination for any portable crimping application.
PERFORMANCE SPECIFICATIONS
Pump Model K1HP
Reservoir Capacity 14 Fluid ounces (410cc)
Weight 8 Lb (3.6 Kg)
Max Hydraulic Pressure 10,000 psi (680 bar)
Low Pressure Flow .2 ounce per stroke
High Pressure Flow .04 ounce per stroke
Maximum Handle Effort 100 Lb (45 Kg)
PERFORMANCE SPECIFICATIONS
Pump Model K1AH
Reservoir Capacity 55 Fluid ounces (1,639 cc)
Weight 20 Lb (9 Kg)
Flow @ 0 psi 40 fl. oz. / min
Flow @ 5,000 psi 13 fl. oz. / min
Flow @ 10,000 psi 3.3 fl. oz. / min
Required air pressure
@ 10,000 psi 85 psi
dynamic
Air Inlet Port Size 1/4" NPT Industrial
Interchange Nipple Provided

7
K100 Portable
Hydraulic Hose Crimper
Copyright © 2018 Kimball Midwest Updated 5/2018 Kimball Midwest Proprietary - All Rights Reserved
INITIAL SETUP
FOLLOW THESE STEPS BEFORE YOU USE THE CRIMPER
FOR THE FIRST TIME.
3/8 Quick Disconnect
Female Installed
10,000 psi Hose Assembly
W/ 3/8 Quick Connect Male Tip
The K100 Portable Series hydraulic hose crimper can be paired
with either a Hand Pump or Pneumatic Pump to make the ideal
combination for any portable crimping application.
Lightweight portable unit, mounted on a convenient carrying frame,
can be carried to almost any location where service is required.
• If the K100 series crimper is going to be used in the shop it is recom-
mended to mount the crimper on a sturdy workbench in a well-lit area.
The workbench should be able to support the crimper, pump, and all
component weight.
• The crimper should be mounted close enough to the edge of the work
surface that the hose being crimped will not contact the bench or work
surface. There must be enough clearance for the hose to align perpen-
dicular with the cone base, or the dies will not seat properly and the
crimp will not be accurate.
• TheHandPumporPneumaticPumpofferruggedheavydutyhydraulic
power that meet the demanding requirements of industrial users. Both
manual and the pneumatic pump have aluminum reservoirs to withstand
the temperature and service conditions of heavy duty use.
• A 10,000 psi hose, and quick disconnect fitting, have been included
with the crimper to connect any of the optional power units to the K100
cylinder port.

8
K100 Portable
Hydraulic Hose Crimper
Copyright © 2018 Kimball Midwest Updated 5/2018 Kimball Midwest Proprietary - All Rights Reserved
Photo # 3
Photo # 1
Photo # 2
Notched Pressure Plate:
For use with 90 degree fittings only.
LUBRICATION PROCEDURE
Grease Point # 1
Apply a thin layer of CrimpX oil (supplied with the
crimper), or a molybdenum disulfide high pressure
grease on the surface of the cone base.
(as shown in photo # 1).
Grease Point # 2
Beforeslidingthestandardpressure plate (or thenotched
pressure plate) over the correct dies, apply a thin layer of
CrimpX oil (supplied with the crimper), or a molybdenum
disulfide high pressure grease, on the entire area that the
dies come in contact with (as shown in photo # 2).
If dies are sticking on the surface of the cone base:
Continuetolubricate/greaseasexplainedabove,inaddition
to lubricating each die finger individually.
(as shown in photo # 3).
Note: The die fingers must be lubricated at both positions
that come in contact with the pressure plate and the
bottom flange.
Note: Lubrication is not required before each crimp.
Typical lubrication is after 100 crimp cycles.

9
K100 Portable
Hydraulic Hose Crimper
Copyright © 2018 Kimball Midwest Updated 5/2018 Kimball Midwest Proprietary - All Rights Reserved
Note: Follow the lubrication procedure prior to crimping.
CAUTION: Failure to lubricate the die set and pressure plate could
result in the die seizing in the cone base.
Step 1: Make certain that the Cone Base is clean and lubricated prior
to inserting the die set.
Step 2: Select the Correct Die Set for the combination of hose and
fitting being crimped.
Note: Consult your hose and fitting manufacturer for the correct die size
for the combination of hose and fitting being crimped.
Note: The number etched on the OD of the die ring represents the fully
closed diameter of the die set in millimeters. In addition, rubber caged
die sets are color-coded for easier identification.
Step 3: Lubricate the contact surfaces, both the top and the outside
edges of the die fingers, with CrimpX oil (supplied with the crimper), or
a molybdenum disulfide high pressure grease.
Failuretolubricatethecontactsurfaceswith the correct lubricant
will cause the dies to seize in the cone base, causing damage
to the die set as well as possibly damaging the crimper.
CRIMPING WITH THE STANDARD K100 PRESSURE PLATE

10
K100 Portable
Hydraulic Hose Crimper
Copyright © 2018 Kimball Midwest Updated 5/2018 Kimball Midwest Proprietary - All Rights Reserved
Step 4: Place the Lubricated Die Set squarely in the cone base.
Note: Make sure the split of the die cage is facing the operator.
(as shown).
Step 6: Place the Lubricated Standard Pressure Plate over the die set.
Step 5: Align the fitting in the die set according to the hose and fitting
manufacturer’s recommendation.
Note: Compress the die set by hand to hold the hose and fitting in place.
CRIMPING WITH THE STANDARD K100 PRESSURE PLATE

11
K100 Portable
Hydraulic Hose Crimper
Copyright © 2018 Kimball Midwest Updated 5/2018 Kimball Midwest Proprietary - All Rights Reserved
Note: Make sure the pusher is positioned correctly as shown.
Step 7: Slide the Pusher onto the pusher retaining ring on the hydraulic
cylinder.
Note: Make sure the slot in the pusher goes over the lip on the pusher
retaining ring.
CAUTION: Damage to the pusher and retaining ring can occur
if they are misaligned.
Rear View
SlotSlot
Front View
Lip Lip
Pusher
Retaining Ring
CRIMPING WITH THE STANDARD K100 PRESSURE PLATE

12
K100 Portable
Hydraulic Hose Crimper
Copyright © 2018 Kimball Midwest Updated 5/2018 Kimball Midwest Proprietary - All Rights Reserved
CRIMPING WITH THE STANDARD K100 PRESSURE PLATE
Step 8: Set the Micro-Crimp Adjuster to the setting recommended by
the hose and fitting manufacturer for the combination of hose and fitting
being crimped.
For example: With a 23mm die set and the Micro-Crimp Adjuster set at
3.0, the finished crimp diameter would be 26.0 mm (23mm + 3.0mm).
Note:Eachdieset has a limitedrangeofdiameters for which asatisfactory
crimpcan be obtained. Alwaysconsult your hoseand fitting manufacturer
for the correct die set for the hose and fitting being crimped.
Step 9:Actuate the Hand or Pneumatic Pump to bring the pusher in con-
tact with the pressure plate until the hose and fitting are held in position
with very light pressure.
• Check to make sure the pressure plate is evenly placed on the die set
and the die set is correctly aligned.
• Recheck the fitting for alignment.
Step 10: Continue to supply pressure so the pusher travels downward,
compressing the pressure plate onto the die set to crimp the coupling.
As the micrometer moves down, it will touch the red
button and the LED indicator light will turn on to indicate
that the crimp is complete.
Release pressure so the pusher will retract.
Step 11: Check the final crimp diameter with calipers to confirm that it
is within the manufacturer’s specifications.
Note: Always consult with your hose and fitting manufacturer to obtain
the most current crimp specifications.

13
K100 Portable
Hydraulic Hose Crimper
Copyright © 2018 Kimball Midwest Updated 5/2018 Kimball Midwest Proprietary - All Rights Reserved
Note: Follow the lubrication procedure prior to crimping.
CAUTION: Failure to lubricate the die set and pressure plate could
result in the die seizing in the cone base.
Step 1: Make certain that the Cone Base is clean and lubricated prior
to inserting the die set.
Step 2: Select the Correct Die Set for the combination of hose and
fitting being crimped.
Note: Consult your hose and fitting manufacturer for the correct die size
for the combination of hose and fitting being crimped.
Note: The number etched on the OD of the die ring represents the fully
closed diameter of the die set in millimeters. In addition, the rubber
caged die sets are color-coded for easier identification.
Step 3: Lubricate the contact surfaces, both the top and the outside
edges of the die fingers, with CrimpX oil (supplied with the crimper), or
a molybdenum disulfide high pressure grease.
Failuretolubricatethecontactsurfaceswith the correct lubricant
will cause the dies to seize in the cone base, causing damage
to the die set as well as possibly damaging the crimper.
WHEN USING THE NOTCHED PRESSURE PLATE,
FOR USE WITH 90 DEGREE FITTINGS ONLY,
FOLLOW THESE PROCEDURES:
CRIMPING WITH THE NOTCHED K100 PRESSURE PLATE

14
K100 Portable
Hydraulic Hose Crimper
Copyright © 2018 Kimball Midwest Updated 5/2018 Kimball Midwest Proprietary - All Rights Reserved
Step 4: Place the Lubricated Die Set squarely in the cone base.
Note: Make sure the split of the die cage is facing the operator.
(as shown).
Step 6: Place the Lubricated Notched Pressure Plate over the die set.
Note: The notched pressure plate MUST be covering
all 8 die fingers as shown.
Step 5: Align the 90 degree fitting in the die set according to the hose
and fitting manufacturer’s recommendation.
Note: Compress the die set by hand to hold the hose and fitting in place.
CRIMPING WITH THE NOTCHED K100 PRESSURE PLATE

15
K100 Portable
Hydraulic Hose Crimper
Copyright © 2018 Kimball Midwest Updated 5/2018 Kimball Midwest Proprietary - All Rights Reserved
Step 8: After placing the notched pressure plate, covering all 8 die
fingers as shown, slide the Pusher onto the pusher retaining ring on
the hydraulic cylinder.
Note: Make sure the slot in the pusher goes over the lip on the pusher
retaining ring.
Refer to page 11 for details if needed.
CAUTION: Damage to the pusher and retaining ring can occur if they
are misaligned.
Note: Recheck that the notched pressure plate is covering all 8 die
fingers.
Step 7: CAUTION: DO NOT MISALIGN THE NOTCHED
PRESSURE PLATE OR DAMAGE WILL OCCUR.
Note: You MUST follow these steps when crimping
with the notched pressure plate.
A. The die split must face the operator.
B. The notched Pressure Plate MUST cover all
8 die fingers.
Damage can occur to the die fingers if the parts
aren’t aligned properly.
Broken Die Finger
Wrong Alignment
R
.
CRIMPING WITH THE NOTCHED K100 PRESSURE PLATE

16
K100 Portable
Hydraulic Hose Crimper
Copyright © 2018 Kimball Midwest Updated 5/2018 Kimball Midwest Proprietary - All Rights Reserved
CRIMPING WITH THE NOTCHED K100 PRESSURE PLATE
Step 9: Set the Micro-Crimp Adjuster to the setting recommended by
the hose and fitting manufacturer for the combination of hose and fitting
being crimped.
For example: With a 23mm die set and the Micro-Crimp Adjuster set at
3.0, the finished crimp diameter would be 26.0 mm (23mm + 3.0mm).
Note:Eachdieset has a limitedrangeofdiameters for which asatisfactory
crimpcan be obtained. Alwaysconsult your hoseand fitting manufacturer
for the correct die set for the hose and fitting being crimped.
Step 10: Actuate the Hand or Pneumatic Pump to bring the pusher in
contact with the notched pressure plate until the hose and fitting are held
in position with very light pressure.
• Check to make sure the notched pressure plate is evenly placed on the
die set and the die set is correctly aligned.
• Recheck the fitting for alignment.
Step 11: Continue to supply pressure so the pusher travels downward,
compressing the notched pressure plate onto the die set to crimp the
coupling.
As the micrometer moves down, it will touch the red
button and the LED indicator light will turn on to indi-
cate that the crimp is complete.
Release pressure so the pusher will retract.
Step 12: Check the final crimp diameter with calipers to confirm that it
is within the manufacturer’s specifications.
Note: Always consult with your hose and fitting manufacturer to obtain
the most current crimp specifications.

17
K100 Portable
Hydraulic Hose Crimper
Copyright © 2018 Kimball Midwest Updated 5/2018 Kimball Midwest Proprietary - All Rights Reserved
THE CRIMPER IS CALIBRATED PRIOR TO SHIPMENT, BUT A
CALIBRATION CHECK IS RECOMMENDED PRIOR TO USING
THE CRIMPER FOR THE FIRST TIME.
Note: Follow the lubrication procedure prior to the calibration check.
CAUTION: Failure to lubricate the die set and pressure plate could
result in the die seizing in the cone base.
Step 1: Make certain that the Cone Base is clean and lubricated prior to
inserting the die set.
Step 2: Place Any Lubricated Die Set squarely in the cone base.
Note: Make sure the split of the die cage is facing the operator.
(as shown).
Step 3: Place the Lubricated Pressure Plate over the die set.
Note: A hose and fitting are not required for a calibration check.
CALIBRATION CHECK PROCEDURE

18
K100 Portable
Hydraulic Hose Crimper
Copyright © 2018 Kimball Midwest Updated 5/2018 Kimball Midwest Proprietary - All Rights Reserved
CALIBRATION CHECK PROCEDURE
Step 4: Slide the Pusher onto the pusher retaining ring on the hydraulic
cylinder.
Note: Make sure the slot in the pusher goes over the lip on the pusher
retaining ring. Refer to page 11 for details if needed.
CAUTION: Damage to the pusher and retaining ring can occur if they
are misaligned.
Step 5: Set the Micro-Crimp Adjuster to “0”.
Step 6: Actuate the Hand or Pneumatic Pump to bring the pusher in
contact with the pressure plate.

19
K100 Portable
Hydraulic Hose Crimper
Copyright © 2018 Kimball Midwest Updated 5/2018 Kimball Midwest Proprietary - All Rights Reserved
CALIBRATION CHECK PROCEDURE
Step 7: Continue to supply pressure. As the ram extends fully, the die
will completely close, and the micrometer will touch the red button.
At this point the LED indicator light is turned on as shown, the crimper
is correctly calibrated. Release pressure so the pusher will retract.
Note: If the LED Indicator Light becomes faint, replace the (2) AA
batteries. (Refer to instructions on page 20).
Step 8: If the above conditions are not met, the crimper requires
recalibration. Hold the micrometer barrel with a 5/16 inch open end
wrenchand rotate thestem eitherin or outwith a 5/32inch hexkey wrench.
Note: 1/4 turn of the screw will change the crimp diameter approximately
0.008".
• Recheck calibration. Repeat until the LED light does not illuminate until
the ram is fully extended.

20
K100 Portable
Hydraulic Hose Crimper
Copyright © 2018 Kimball Midwest Updated 5/2018 Kimball Midwest Proprietary - All Rights Reserved
HOW TO REPLACE THE LED INDICATOR LIGHT BATTERIES
Note: If the LED Indicator Light becomes dim, weak and / or if the LED indicator does not illuminate,
replace the (2) AA batteries.
1. Use a # 0 Phillips-head screwdriver to remove the screw.
2. Slide the cover back to remove it.
3. Replace the (2) AA batteries.
4. Slide the cover toward the front until it locks into place, and secure it with the screw.
The LED Indicator Light
beginning to dim.
234
Table of contents
Other KIMBALL MIDWEST Crimping Tools manuals

KIMBALL MIDWEST
KIMBALL MIDWEST 82-223 Instruction Manual

KIMBALL MIDWEST
KIMBALL MIDWEST K300 Series User manual

KIMBALL MIDWEST
KIMBALL MIDWEST 84-013 Instruction Manual

KIMBALL MIDWEST
KIMBALL MIDWEST 27-798 Instruction Manual

KIMBALL MIDWEST
KIMBALL MIDWEST 27-799 User manual

KIMBALL MIDWEST
KIMBALL MIDWEST 84-023 Instruction Manual
Popular Crimping Tools manuals by other brands

Staubli
Staubli PV-CZM Operating instruction

Stanley
Stanley DUBUIS KW Hydraulik BPE130 instruction manual

Gates
Gates MC3001 OPERATING AND CALIBRATION INSTRUCTIONS

Trick-tools
Trick-tools Roper Whitney 0585 Operation, parts & maintenance manual

Emerson
Emerson Klauke UAP332CFM manual

Astro Tool
Astro Tool 613214 quick start guide