King Champion MA-80 User manual

PORTABLE INTERNET RADIO
IR-80
User Manual
Please read this user manual carefully before using the receiver

Functional Modes and Features
The product is a small, lightweight and stylish design battery operated Internet Radio. This product incorporate an
Internet radio and Music streaming features to be use with a Lan orWi-Fi network. Other features include a Music
Player and a FM radio. Powered by an external battery and optional DC Power Adaptor, the product provides
hours of network audio streaming from Internet radio stations and music steaming from your own networked PC
connected to your Lan or Wi-Fi access point.
A brief description of the features is listed below:
Internet Radio gets you connected to various radio stations around the world
through the Lan or Wi-Fi .
Media Stream play music streams from your Windows media player version11
application in your PC or Notebook running Windows XP or Vista OS over the Lan or
Wi-Fi connection.
FM, connects to the local FM Radio Stations
Setting, used for performing all the settings in your product
1
12 3
456
7
11 12
8
9
10
13
14

Product Button Definition
7 Power Power On/Off
10 Volume NAVI
3 MENU Press this button to bring you back to top main menu
14 DC input +9V DC Input
9NAVI knob/
Enter II
Turn to scroll through the menu listing in down or up directions / play previous or
next song / go down or up in pop up menu list and use to as Enter key to select an
item. / To select an item
8 Dot Matrix 2X16 dot matrix LCM display
4 FM Press this button to enter the “FM” mode directly
5 PC Press this button to enter the “Media stream” mode directly
6 Internet Press this button to enter the “Internet Radio” mode directly
11 Battery
Compartment
To hold 6 X AA-size battery dry cell or rechargeable NiMH/NiCd (External battery
charger required)
12 Telescopic Antenna
2
3.5 Earphone Jack, For connecting the Earphones. Insert the Jack pin until it clicks it
the place.
13 Earphone Jack
2 BACK Press to go up one list screen level or to return to previous menu
Preset Station Buttons. Press and hold to save a station to that preset number, and
press particular Preset button to call back the saved station.
1 P1 – P5
Turn to increase or decrease volume level this button to bring you back to top main
menu

Getting Started
Package contents
Your product package includes:
Product
Adaptor
User Manual
Powering ON your product
To Power on your product, press and hold the Power key, you will see the “ ” screen.
To Power off your product, press and hold Power key, you will see the “ ” screen.
After the startup is complete, you will see the Main Menu screen that shows you the Internet Radio, Media Stream,
FM Radio and Setting modes as option in a list. Use the Navigation Knob to scroll through the list as you like and
press the Navigation Knob to confirm the selection.
At any time in any of this mode, if you press the Menu button it will bring you back to the Main Menu.
Setting up the Wi-Fi
Your product can be easily connected to the Wi-Fi networks. When a Wi-Fi connection is required (for instance, to
play Internet Radio or Media stream) the product will automatically look for a network and try to connect to it.
When you are connecting the product for the first time, you will have to setup the network by select the Network
Configure option from the Setting mode in the Main Menu. To do this pleases following the steps listed below:
From the main menu select the Setting option by using the NAVI
Knob to navigate and select it.
Next select the Network Configure option from the list using the
NAVI Knob.
Select Wi-Fi Setup from the menu list by using the NAVI Knob to
navigate and select it.
Of course, if you directly enter into the “Internet radio” menu, the unit can pop up the wizard also as below
For the case of using the Wi-Fi network you will see this screen that
list two options for you, the Load profile and Search network option
respectively.
The Load profile option let you load back a profile that you have
saved in the previous section, please use the NAVI Knob to navigate
and select it. If the saved profile has the correct information that
match to the current AP you are going to connect to, product will try
to connect to it and put a tick beside the AP name once the product
successfully connected to the AP.
To search for a new wireless Access Point before using the Wi-Fi
connectivity, please select the Search network from the above screen.
Then you will see a screen showing “Searching” while the product
trying to search and show you all the available Access Points that the
product able to find. The product will then show all the Wi-Fi
networks SSID in the range as shown in the screen for example.
3
King Champion
Internet Radio
Internet Radio
Power off
< Use Wi-Fi >
Use Lan

Once you have gets the list of Wi-Fi networks AP SSID use the NAVI
Knob to navigate and select the AP SSID that you wish to use. Once
the network AP is selected the product will prompts you for the Default
Network key which is the WEP/WPA default secure key of the Wi-Fi
Access point.
Use NAVI to key in the network key. Turning the NAVI knob left and
right will change the numbers, characters and symbols that you wish to
have to show in the center of upper line of the screen, in this example,
the number ‘5’ is the current active number, to select it press the NAVI
knob once. Turning the NAVI knob to the left (counter clock wise) or
right will shift the ‘character’ to the center of the screen for selection
and pressing the NAVI Knob will select it.
Use the Back button to delete the selected character.
Once the Network Key has been completed key in, next press-and-
holds the NAVI Knob to confirm the Network key.
Now the product should try to access the Access point that you have
selected.
Once the product managed to connect to the AP it will now put a star
next to the network AP SSID name that you have selected. Press the
NAVI Knob and save the profile. So that the future connection to this
Wi-Fi AP you don’t have to go through the Wi-Fi AP selection process
again, if you are using the same Wi-Fi AP for Internet Radio or Media
Streaming
Once you select to save the profile, it will prompt where to save as
shown. Use the NAVI Knob to select Yes or No.
Now your Wi-Fi AP connection is setup.
Setting up the LAN
Select LAN Setup from the menu list by using NAVI Knob to Select it.
If you directly enter into use lan,the unit will connect to network automatical with
DHCP server.
Use Wi-Fi
< Use LAN >
4

Internet Radio
Internet radio gives you the access to all the Radio stations available worldwide. Once your product is connected to
the lan or Wi-Fi, you can listen to either all the preset channels by direct press the preset buttons, P1 to P5 listen to
the Internet Radio station worldwide from Radio Search option, from which it has all your favorite Radio channels
being arranged in different categories, please refer to Radio Search section below for details.
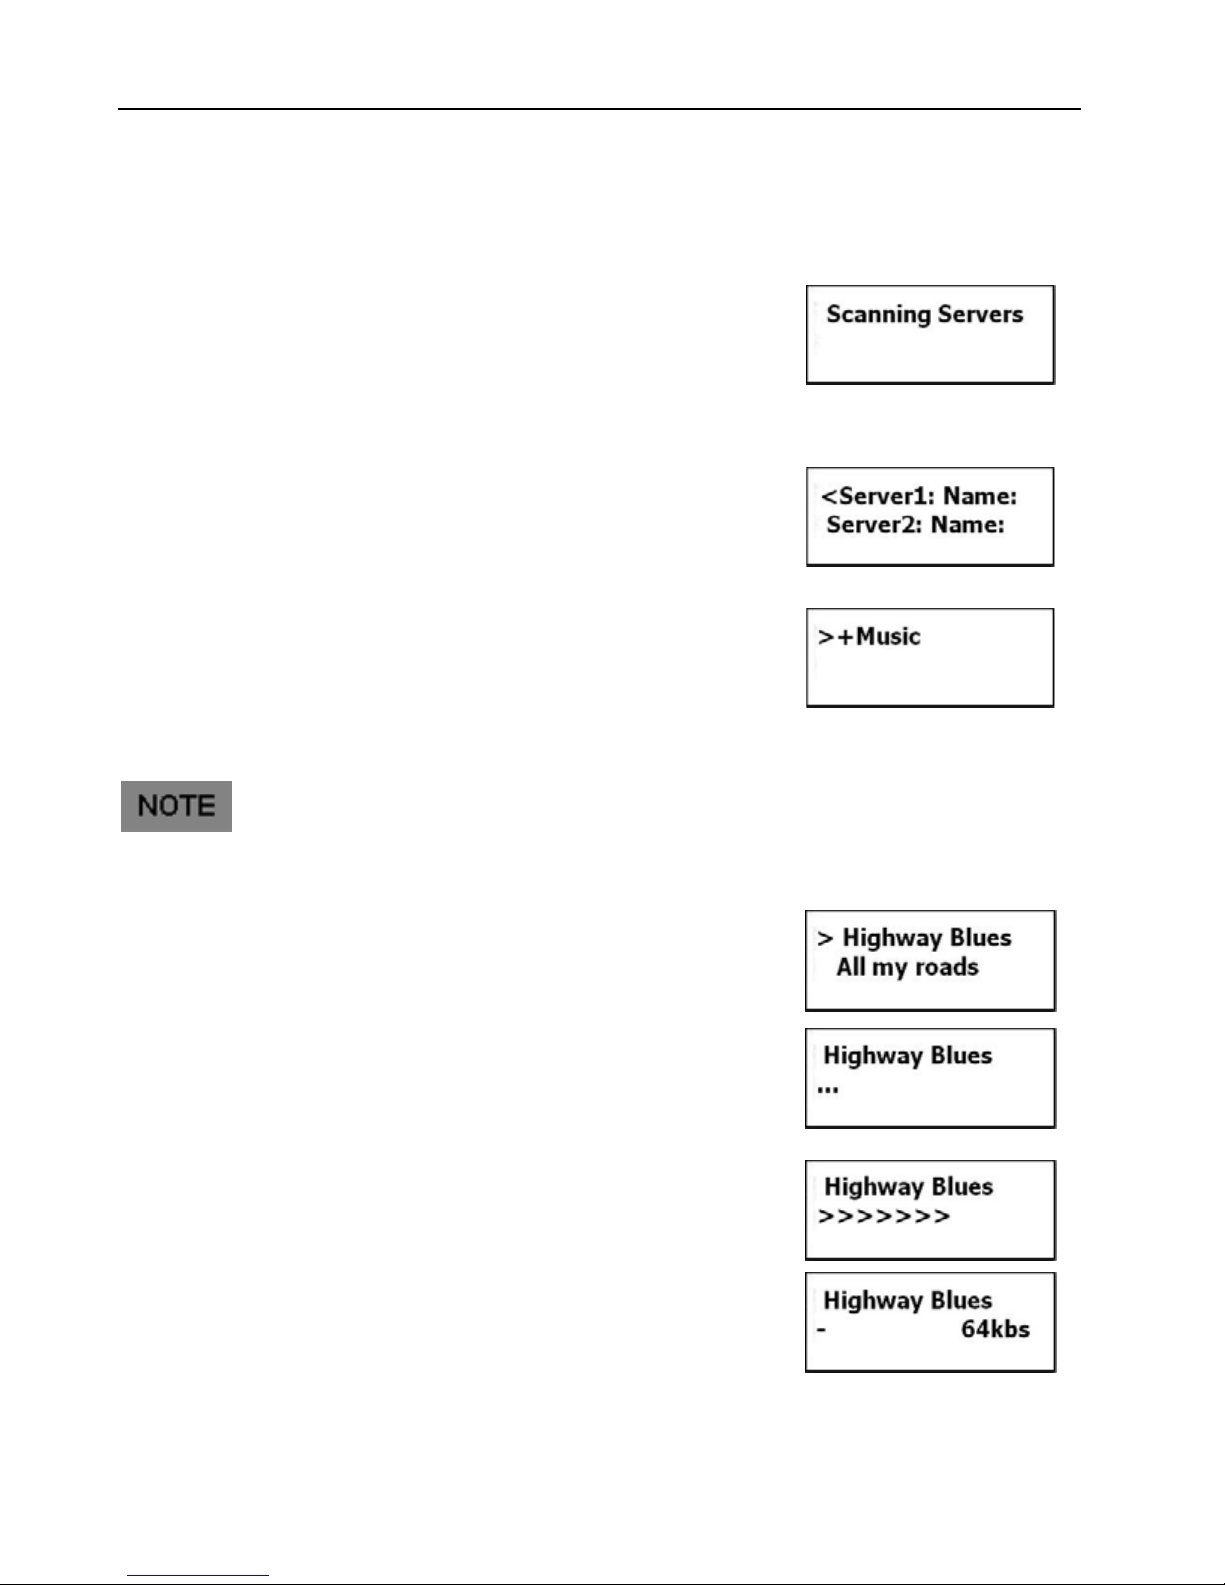
Listening to the Internet Radio
To listen to the Internet Radio, first the product must connected to Internet as explained on the above section, then
select Internet Radio, from the Main Menu.
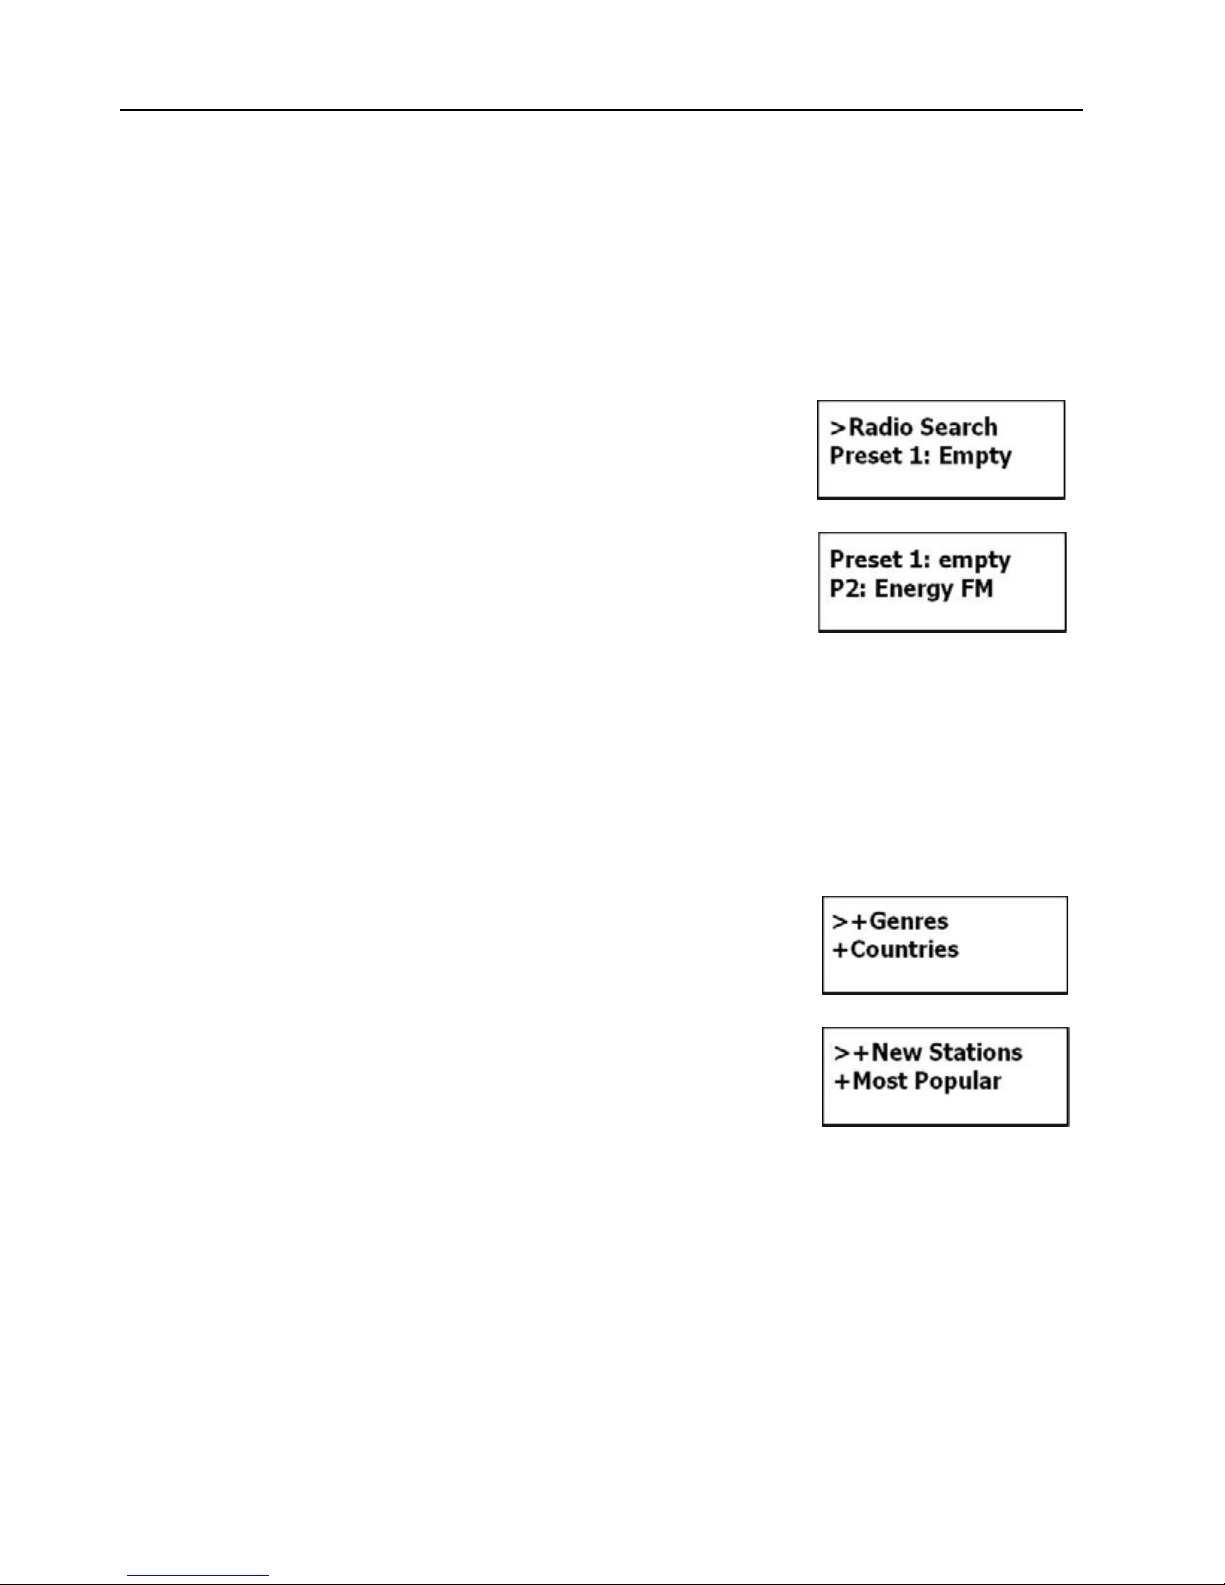
Radio Search
The Radio Search is organized to search the stations in the following groups:
Genres includes stations organized by the type of music played (e.g. Ambient
Big Band, Blues, Classic Rock, Classical, Country, Dance, Electronic, Folk,
Hard Rock, Hip Hop, Jazz, New Age, News, Oldies, Public, Religious, RnB,
Rock, Soft Rock, Soundtracks, Sports, Talk, Weather, Web Audio and World).
Local stations includes stations organized by the type of stations( All stations,
Adult contemparory, Business news, Classical, Comedy, News , News Talk,
Sports , Talk, Top 40, Varity, World Asia)
Countries are a search based on the different geographical locations of the
world.
New Stations Contains list of new Radio Stations.
Most Popular Stations include stations based on the popularity.
Note: All above listings are Music Portal side dependent it may vary from time
to time.
In the Internet Radio mode, if you turn the NAVI knob, it will show the options - Radio Search and Preset 1 to 5.
5
Radio Search is an advance search which is organized into different
categories. Please read on the below section on Radio Search for details.
Press “Preset” to access to the saved preset station, then you turning NAVI knob
button to the left or right to select one preset station, then pressing NAVI knob
button to confirm.If you want to save the cuttent station to preset., you can turn
NAVI knob button to the left or right and select the position, then press NAVI
knob button to save it.

Media Streaming
Now that your connection is setup, you can access any songs from your PC that running Windows Media Player Version
11 in Windows XP or Vista OS.
Listening to Media Stream
Select the Media Stream from the Main Menu. It will access the lan or Wi-Fi
scans for the PC server. It will prompt you the menu screen as shown
after successful connection to PC. If previously you already successfully
managed to scan some server than the product will directly shown you the list
of found servers.
Now you can select the server that you want to access to by using NAVI Knob
to scroll through it and lastly confirm by pressing it.
Depend on the Media Server you are accessing it may be organized into a few
folders and you can select the Music or Playlists to stream your favorite music
Select the folder using NAVI Knob and confirm by pressing the same Knob.
Below may be the folder that you may see:
Music, has the list of the Music
Make sure that you have your PC or Notebook turned-on and it is running the Windows Media Player (Version 11) in
Windows XP or the Vista OS. You should also share the Music streaming to new device in your PC or Notebook
Media Player. [See Setting up PC Media Player 11.
Or it will display “sever” id not available after scanning, then back to previous menu.
Streaming the Music
Once you select the Music folder in your PC server, you can stream and
listen to all the music from your PC’s Media Player over the lan or Wi-Fi.
Select the Music Folder or Song that you wish to listen to by turn and press
the NAVI Knob and the product will start to play the song as shown.
After a song has finished it will continue to play the next song under the same
folder.
Now you can stream your favorite music from your PC, acting as your Juke Box for the product.
6

Setting up Windows Media Player version 11
You should be running Wind ows XP OS on your PC/Laptop, and Windo ws Media Player version 11. Now open the
Windo ws Media Player, and choose Library. From the drop down list of the menu select the Media sharing.
Now tick the ‘Share my media to’ and select settings
7

To select the folders for monitor and for sharing, choose Library.
From the drop down list of the menu select the Add to Library.
Select the folders to monitor as below
After selected the folders to monitor and share in the Player Library, click OK
8
Please un-tick Pictures and video under Media type.
Next tick the ‘Allow new devices and computers automatically and press OK

FM Radio
FM Radio connects you to the local radio channels available in your city. To listen to the FM Radio, select the FM
Radio, from the main menu and it will start playing the last played channel.
To change the channels use NAVI Knob. Press the NAVI knob once you will
get the “Auto Scan” appear at the bottom line of the screen, this show you that
currently you are in the “Auto Scan” Mode and if you press the second time
you will get the “Fine Tune” option, from there you can enter to the Auto or
Fine tune option respectively.
Auto Scan, allows you to do auto scan for available channel by using the
NAVI Knob to scan forward or backward from a current channel to next
available channel.
Fine tune, allows you to do fine tuning on a channel by using the NAVI Knob
to adding or subtracting by 0.1MHz from a channel station.
Preset Station Buttons allow you save and call back those prefer stations:
To save a station while listening to a radio station to a preset number just
press and hold that preset button.
Press a particular Preset button to call back the saved station and listen to it.
To play next available station just turns the NAVI knob.
9

Setting
Setting allow you to customize the settings of your product. Select the Setting from the main menu and you will
see the settings menu. It includes the following categories:
Network Configuration, helps you set up and disconnect from the Wi-Finetwork
and show you the current network status of the product, for more details on how to
do Wi-Fi Setup p lease refer Setting up the Wi-Fi s ection above.
Disconnect, will disconnect product from the W-Fi Network and Lan Connection.
Networks Status, show you the below:
-SSID:the SSID of the APthat c urrently the product is connected to
-IP:the IPof the product assigned to by the Wi-Fi APand can configue
-MAC:the MAC Address of your product
Sample Screens shown the SSID, IP and MAC address of the product that
connected to an AP
Language, let you choice the prefer Langu ages to use
10
< User Wi-Fi >
Use Lan

11
Factory Reset, allow you set bring back all the setting to the default factory
settings. Use the NAVI knob to select the Yes or No option.
About, details of the player Model name and the firmware version.
See the sample screen shot shown.
HW:IR-80
SW:999.999.999

Glossary
Wi-Fi
Wi-Fi, popularly known as an acronym for wireless fidelity, was originally a brand licensed by the Wi-Fi Alliance to
describe the embedded technology of wireless local area networks (WLAN) based on the IEEE 802.11 specifications.
Use of the term has now broadened to generically describe the wireless interface of mobile computing devices, such
as laptops in LANs. Wi-Fi is now increasingly used for more services, including Internet and VoIP phone access,
gaming, and basic connectivity of consumer electronics such as televisions, DVD players, and digital cameras.
Source - http://en.wikipedia.org/wiki/Wi-Fi
WEP
Wired Equivalent Privacy (WEP) is a scheme to secure IEEE 802.11 wireless networks. It is part of the IEEE 802.11
wireless networking standard. Because wireless networks broadcast messages using radio, they are susceptible to
eavesdropping.
Source - http://en.wikipedia.org/wiki/Wired_Equivalent_Privacy
WPA – Enterprise Version
Wi-Fi Protected Access (WPA and WPA2) is a class of Settings to secure wireless (Wi-Fi) computer networks. It
was created in response to several serious weaknesses researchers had found in the previous Setting, Wired
Equivalent Privacy (WEP). WPA implements the majority of the IEEE 802.11i standard, and was intended as an
intermediate measure to take the place of WEP while 802.11i was prepared. WPA is designed to work with all
wireless network interface cards, but not necessarily with first generation wireless access points. WPA2 implements
the full standard, but will not work with some older network cards. Both provide good security, with two significant
issues:
Source - http://en.wikipedia.org/wiki/Wi-Fi_Protected_Access
DHCP
DHCP is a set of rules used by communications devices such as a computer, router or network adapter to allow the
device to request and obtain an IP address from a server which has a list of addresses available for assignment.
DHCP is a protocol used by networked computers (clients) to obtain IP addresses and other parameters such as the
default gateway, subnet mask, and IP addresses of DNS servers from a DHCP server. It facilitates access to a
network because these settings would otherwise have to be made manually for the client to participate in the network.
Source - http://en.wikipedia.org/wiki/Dynamic_Host_Configuration_Protocol
SSID
In Wi-Fi Wireless LAN computer networking, a service set identifier (SSID) is a code attached to all packets on a
wireless network to identify each packet as part of that network. The code is a case sensitive text string which
consists of a maximum of 32 alphanumeric characters. All wireless devices attempting to communicate with each
other must share the same SSID. Apart from identifying each packet, SSID also serves to uniquely identify a group of
wireless network devices used in a given "Service Set".
Source - http://en.wikipedia.org/wiki/SSID
12

Troubleshooting and FAQ
Question: When browsing the Internet Radio I got the message ‘Unformatted Channel’. What does that mean?
Answer: That’s because the station is closed.
Question: Why can’t I play the Music even when I have selected my Media Player?
Answer: Please check whether you have shared the Music streaming of the entire new device in the Media Player
11 in Windows XP or Vista. Please read setting the Windows media player 11 on page 8
Question: Why is my player not streaming even I have done the setup of the Windows media player 11?
Answer: Please check if your PC or Notebook has gone to Hibernate mode. The Media streaming does not work in
the hibernate mode.
Question: Can I download the music folder or music file to my Music Player?
Answer: No the device do not support music file download
Question: What is Radio search? And am I required to subscribe to Radio search service for my product in order to
listen to Internet Radio?
Answer: Radio search service provides online internet radio directory which aggregates tens of thousands of radio
stations and podcasts. The directory maintained by Radio search are updated time to time in order to make sure the
maximum level of accessibility of individual Internet Radio channel. Your product product is shipped with bundling
Radio search service to make sure customer have seamless user experience. So, customer needs not have
individual subscription for Radio search service.
Question: How do I connect my product to a Wi-Fi network?
Answer: When you use a feature that requires an internet connection, like Internet Radio and Media Stream, the
product will automatically connect to available network. This process is called “Wi-Fi zero-configuration”. Once the
network is connected, you can automatically enter into the function modes.
Question: What is product Wi-Fi zero-configuration? How does it work?
Answer: product Wi-Fi zero-configuration is an intelligent service used to provide end customer like you a harass-
free user experience on Wi-Fi setup. It will automatically connect to open Wi-Fi access point or load saved profiles.
Question: What is product Wi-Fi profile?
Answer: product Wi-Fi profile is a configuration set for your Wi-Fi connection. It contains all the information you need
to access a Wi-Fi access point. The profile helps you to ease the trouble to remember all the details regarding access
point.
Question: What is Wi-Fi setup wizard?
Answer: Wi-Fi setup wizard will help you setup up Wi-Fi network in step by step manner in certain special case, like
when you access a fresh access point with security protection for the very first time.
Question: How do I bring up Wi-Fi setup wizard?
Answer: When Wi-Fi zero-configuration is in progress, you can switch it to choose Wi-Fi setup wizard by press the
“NAVI” Knob once. Also, you may like to go into “Setting” then “Network” menu then choose the “Use LAN” or “Use
WIFI” option from there.
13

Question: How do I input password for Wi-Fi security?
Answer: An input screen (Soft keypad) will automatically come up when necessary. Simple soft keypad interface
gives a quick way to key in letters, numeric and symbols. You can also do simple editing like cursor locating, delete,
etc.
Question: What wireless standards are compatible with my product?
Answer: product is an 802.11 wireless b/g compatible device. It includes support for WEP and WPA/WPA2
Personal authentication security standards. WPA/WPA2 Enterprise authentication security is not supported.
Question: Why does my product only have Wi-Fi antenna icon but no signal bar?
Answer: Please check your Wi-Fi access point and network server configuration on DHCP portion. This indicates
there is no DHCP server is presented in the network environment.
Question: Can I connect to public access Wi-Fi networks (hot-spot)?
Answer: You can not connect to hot-spot access point because it usually needs an application level web-based
authentication.
Question: Which bit rate will my product player support?
Answer: The product player will support 64-320Kbps for MP3 and 32-320 Kbps for WMA.
14
Changes or modifications not expressly approved by the party responsible for compliance could void the user’s authority
to operate the equipment.”

Remote control
IR controller
1. Power:Only power off button
2. 1-10: preset button
3. Mute: mute the voice
4. Internet: internet mode
5. pc: Media player mode
6. FM: FM mode
7. back: Press to back pre_menu
8. menu:Press to display main menu
9. vol+:Increase the volume
10. vol-: decrease the volume
11. Select: Press to select a displayed option
12. UP/Down: Use to search for stations,and use
to change the option showed on the disp
15
Table of contents
Other King Champion Radio manuals