Enjoy your work
INTELLIGENT AUTOMATIC
BATTERY CHARGER
INTELLIGENT AUTOMATIC
BATTERY CHARGER
NO.9DS31
●Fully automatic multi-cycle switch mode chargers and maintainers designed for charging a variety of
batteries: SLA, WET, AGM/GEL and VRLA.
●Chargers will recover slightly sulphated batteries and may rescue drained batteries.
●The digital display lets you know exactly how the charger is performing and indicates the
charging or maintenance phase and battery voltage.
●Suitanle for motorcycles and cars.
OPERATION MANUALOPERATION MANUAL
OPERATION
FAULT CODES
MAINTENANCE
INTRODUCTION
SPECIFICATIONS
9DS311
AC 220~240
9DS312
50/60Hz
AC 220~240
50/60Hz
Output 6/12V 12V
0.48A 0.6A
Charging Current 4A 8A
Ambient Temperature
Weight 0.66KG 0.80KG
KT NO.
Type 9-Cycle 6/12V 9-Cycle12V
-20°C ~ 50°C -20°C ~ 50°C
Input
Input Current
1. Connect the (+) red clamp to the positive (+) battery post and connect the (-) black clamp
to the negative (-) battery pos.
2. Plug the charger into the power supply and switch on and the LCD screen will light up.
3. Press the “MODE button” to select charging program. Settings are made by pressing the “
MODE-button” and stepping forward by pressing the button one step at a time, releasing
the button when the required mode is reached.
4. Stop charging at any time by disconnecting the mains cable from the wall socket.
Description
1 CLAMP CLIP
2 UPPER COVER
3 BOTTOM COVER
4 SEALING RING
5 PCB
6 CONTROL PCB
No.No. Description
7 AC PLUG WITH CABLE
8 POSITIVE & NEGATIVE CLAMP ASS'Y
9 SCREW 3x16mm
10 SCREW 3x12mm
11 SCREW 3x6mm
1.No clamps connected
2.Short circuit
3.Reverse polarity connection
F2 Loose clamps during charging
F3 Battery voltage is too high
F4 Bad Battery
F1
● After each use, clean the battery charger clamps be sure to remove any battery fluid that will cause
corrosion of the copper clamps. Clean the outside case of the charger with a soft cloth and, if necessary,
mild soap solution.
● Keep the charger cords loosely coiled during storage to prevent damage to the cords.
● Do not use the charger if cords or clamps have been damaged in any way.
● If the power supply cord is damaged, it must be replaced by the manufacturer, its service agent or
qualified person in order to avoid a hazard.
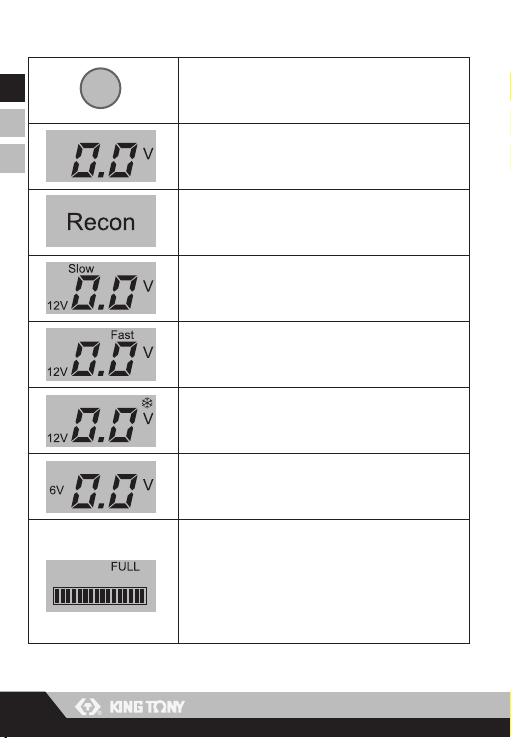
To select charging mode or re-set during charging
Battery voltage
Battery Repairing
12V Slow mode:14.4V/1.0A
This mode is normally used for all types of 12V batteries<20Ah
12V Fast mode: 14.4V/4.0A
This mode is normally used for all types of 12V batteries<80Ah
Winter mode:14.7V/4.0A
This setting is recommended for batteries at temperatures below 5°C.
It is also recommended for many AGM batteries
NOTE: This charger has a Memory Function. It will return to last mode you chose, next time the charger is connected.
Mode 7.5V/4.0A
This is normally used for all types of 6V batteries.(Only applies to 9DS311)
Charging Status indicator
This will show the charging status. When the battery is fully charged,
the word “FULL” will show up
Mode
0.0
v
0.0
v
Slow
12V
0.0
v
Fast
12V
Recon
0.0
v
12V
0.0
v
6V
FULL
°C
Do not use the product in bathroom or other damp places or places near the water.
Disconnect the main cable before connecting or disconnecting the clamps.
Do not remodel or dismantle the device.
Keep the product away from the children.
Keep the product away from fire.
Do not charge the device with higher voltage.
The temperature should be kept between -20°C to 50°C when the device is being charged.
Do not hit or throw the product.
Warning:
1
2
WARNING
Please wear proper safety gear while working.
1
NOTE: the charger should be connected to the battery before connecting to the mains supply.