10
• The Freeze Bowl must be completely
frozen to make ice cream or other
frozen desserts.
• For best results, store the Freeze Bowl
in the back of your freezer where the
temperature is coldest for at least
16hours. Adjusting your freezer to its
coldest setting will help the Freeze
Bowl make firmer ice cream faster.
• Storing the Freeze Bowl in the freezer
at all times allows you the flexibility to
make your favorite frozen desserts on
a whim.
• For recipes that need to be pre-
cooked, allow the mixture to cool
completely in the refrigerator.
• All batter recipes need to be
completely chilled in the refrigerator
before making ice cream.
• When mixing an ice cream recipe
that calls for solid ingredients such
as fruits, nuts, candies, or chocolate
chips, it is best to wait until the final
two minutes of the mixing process to
add them.
• Ice cream making is a two-part
process: conversion and ripening.
Mixing batter into ice cream is the
conversion process in which the ice
cream consistency will be similar to
soft serve. The ripening process takes
place in the freezer, where the ice
cream will harden over a period of
2-4 hours.
• Follow recommended mixer speeds.
Faster speeds will slow the conversion
process.
• Batter volume grows significantly
during the conversion process.
• Initial batter volume should not
exceed 46 oz. (1.4 L) to produce
2 quarts (1.9 L) of ice cream.
• Keep in mind that freezing subdues
sweetness, so recipes won’t taste
quite as sweet once they are frozen.
PRODUCT USAGE
TIPS FOR GREAT RESULTS
FOR DETAILED INFORMATION ON USING THE ICE CREAM MAKER ATTACHMENT
Visit www.kitchenaid.com for additional instructions with videos, inspiring recipes, and
tips on how to use your Ice Cream Maker Attachment.
CARE AND CLEANING
CLEANING THE ICE CREAM MAKER ATTACHMENT
IMPORTANT: Allow the Freeze Bowl to reach room temperature before attempting to
clean it.
FOR DETAILED INFORMATION ON CLEANING THE ICE CREAM MAKER
ATTACHMENT
Visit www.kitchenaid.com for additional instructions with videos, inspiring recipes, and
tips on how to use your Ice Cream Maker Attachment.
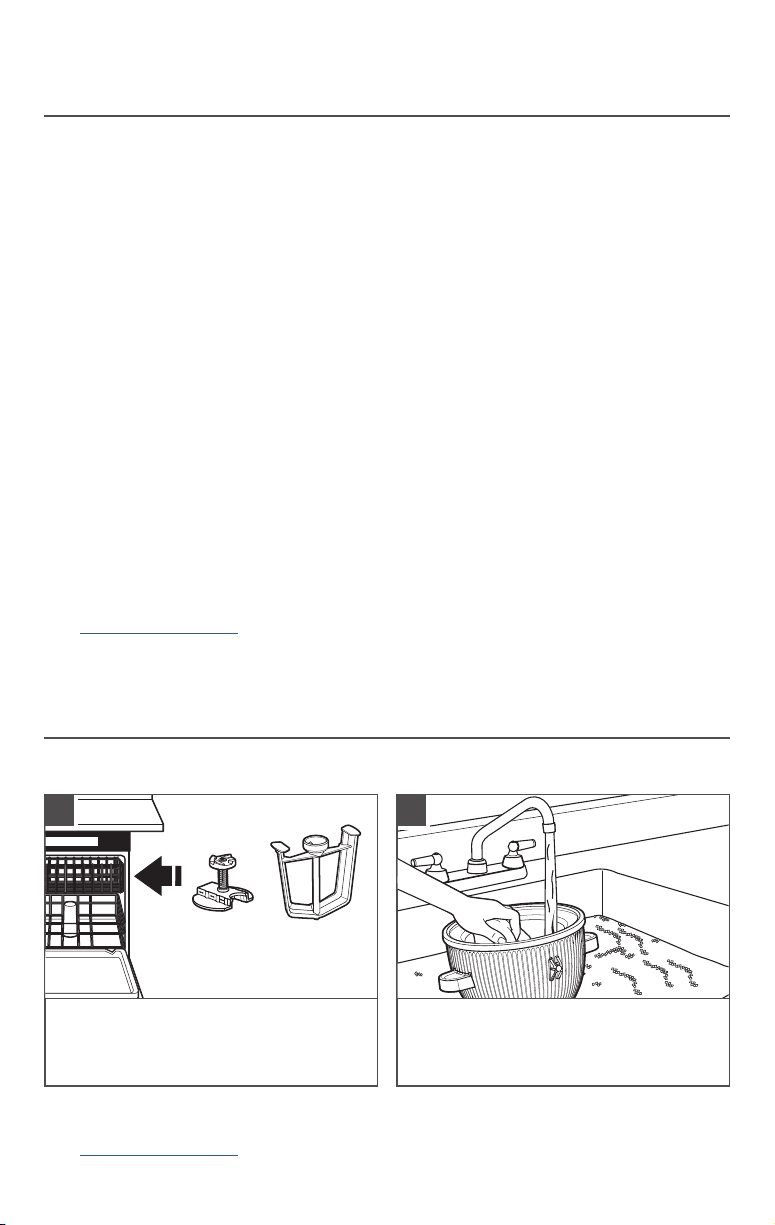
The Dasher and Drive Assembly are
dishwasher-safe, top rack only.
Hand wash the Freeze Bowl in warm
water with mild detergent. Never wash
it in the dishwasher. Thoroughly dry the
Freeze Bowl before storing in freezer.
1 2