KitchenAid KICA User manual

1
1
ICE CREAM MAKER
ATTACHMENT
INSTRUCTIONS
FOR THE WAY IT’S MADE.
™
®
1-800-541-6390
Details Inside
This attachment is designed exclusively for use
with all KitchenAid®household stand mixers.
Model KICA

1
Table of Contents
Hassle-Free Replacement Warranty...........................................Inside Front Cover
Product Registration Card ........................................................Inside Front Cover
Important Safeguards........................................................................................2
Warranty...........................................................................................................3
For the 50 United States and District of Columbia.......................................3
For Puerto Rico ...........................................................................................4
Arranging for Service After the Warranty Expires.........................................4
Arranging for Service Outside the 50 United States and Puerto Rico...........4
Ordering Accessories and Replacement Parts .....................................................4
Ice Cream Maker Attachment............................................................................5
Assembling the Ice Cream Maker Attachment ...................................................6
For Tilt-Head Mixer......................................................................................6
For Bowl-Lift Mixer......................................................................................8
Tips for Making Perfect Ice Cream ...................................................................10
Using the Ice Cream Maker Attachment..........................................................11
Care and Cleaning...........................................................................................12
Recipes............................................................................................................13
We’re so confident
the quality of our
products meets the
exacting standards of
KitchenAid that, if your
Ice Cream Maker
Attachment should fail within the first
year of ownership, KitchenAid will
arrange to deliver an identical or
comparable replacement to your door
free of charge and arrange to have
your “failed” Ice Cream Maker
Attachment returned to us. Your
replacement unit will also be covered
by our one-year full warranty. Please
follow these instructions to receive
this quality service.
If you reside in the 50 United
States and your KitchenAid®Ice
Cream Maker Attachment should fail
within the first year of ownership,
simply call our toll-free Customer
Satisfaction Center at
1-800-541-6390
,
8 a.m. to 8 p.m., Monday through
Friday, 10 a.m. to 5 p.m., Saturday,
Eastern Time. Give the consultant your
complete shipping address. (No P.O.
Box Numbers, please.)
When you receive your replacement
Ice Cream Maker Attachment, use the
carton and packing materials to pack-
up your “failed” Ice Cream Maker
Attachment. In the carton, include
your name and address on a sheet of
paper along with a copy of the proof
of purchase (register receipt, credit
card charge slip, etc.).
For a detailed explanation of warranty
terms and conditions, including how to
arrange for service outside the United
States, see pages 3 and 4.
Hassle-Free Replacement Warranty
Proof of Purchase and Product Registration
Always keep a copy of the sales
receipt showing the date of purchase
of your Ice Cream Maker Attachment.
Proof of purchase will assure you of
in-warranty service.
Before you use your Ice Cream
Maker Attachment, please fill out and
mail your product registration card
packed with the unit. This card will
enable us to contact you in the
unlikely event of a product safety
notification and assist us in complying
with the provisions of the Consumer
Product Safety Act. This card does not
verify your warranty.
Please complete the following for
your personal records:
Model Number _______________________________________________________
Serial Number ________________________________________________________
Date Purchased _______________________________________________________
Store Name __________________________________________________________

32
Length of
Warranty:
One Year Full Warranty
from date of purchase.
KitchenAid Will Pay
For Your Choice of:
Hassle-Free Replacement
of your Ice Cream
Maker Attachment. See
inside front cover for
details on how to
arrange for service, or
call the Customer
Satisfaction Center
toll-free at
1-800-541-6390.
OR
The replacement parts
and repair labor costs
to correct defects in
materials and
workmanship. Service
must be provided by an
Authorized KitchenAid
Service Center. See the
KitchenAid®Ice Cream
Maker Attachment
Warranty for Puerto
Rico on page 4 for
details on how to
arrange for service.
KitchenAid Will Not
Pay For:
A. Repairs when
Ice Cream Maker
Attachment is
used in other than
normal single family
home use.
B. Damage resulting
from accident,
alteration, misuse
or abuse.
C. Any shipping or
handling costs to
deliver your
Ice Cream Maker
Attachment to
an Authorized
Service Center.
D. Replacement parts
or repair labor
costs for Ice Cream
Maker Attachment
operated outside
the 50 United States
and District of
Columbia.
KITCHENAID DOES NOT ASSUME ANY RESPONSIBILITY FOR INCIDENTAL
OR CONSEQUENTIAL DAMAGES. Some states do not allow the exclusion or
limitation of incidental or consequential damages, so this exclusion may not
apply to you. This warranty gives you specific legal rights and you may also
have other rights which vary from state to state.
This warranty extends to the purchaser and any succeeding owner for Ice Cream
Maker Attachments operated in the 50 United States and District of Columbia.
KitchenAid®Ice Cream Maker Attachment
Warranty for the 50 United States
and District of Columbia
Your safety and the safety of others are very important.
We have provided many important safety messages in this manual and on your
appliance. Always read and obey all safety messages.
This is the safety alert symbol.
This symbol alerts you to potential hazards that can kill or hurt you
and others.
All safety messages will follow the safety alert symbol and either
the word “DANGER” or “WARNING.” These words mean:
You can be killed or seriously injured
if you don’t immediately follow
instructions.
You can be killed or seriously injured
if you don’t follow instructions.
All safety messages will tell you what the potential hazard is, tell you how to
reduce the chance of injury, and tell you what can happen if the instructions are
not followed.
DANGER
WARNING
IMPORTANT SAFEGUARDS
When using electrical appliances, basic safety precautions should always be
followed including the following:
1. Read all instructions.
2. To protect against risk of electrical shock, do not put mixer in water or
other liquid.
3. Close supervision is necessary when any appliance is used by or near
children.
4. Unplug mixer from outlet when not in use, before putting on or taking off
parts and before cleaning.
5. Avoid contacting moving parts. Keep fingers out of discharge opening.
6. Do not operate the mixer with a damaged cord or plug or after the mixer
malfunctions, or is dropped or damaged in any manner. Return the mixer
to the nearest Authorized Service Center for examination, repair or
electrical or mechanical adjustment.
7. The use of attachments not recommended or sold by KitchenAid may
cause fire, electric shock or injury.
8. Do not use the mixer outdoors.
9. Do not let the cord hang over the edge of table or counter.
10. Do not let cord contact hot surface, including the stove.
11. This attachment should not be operated by children and the unit should
be out of reach of children during operation.
12. This product is designed for household use only.
SAVE THESE INSTRUCTIONS

Dasher — engages with the Drive
Assembly to spread, scrape, and mix ice
cream batter within the Freeze Bowl.
NOTE: Freeze Bowl must be
completely frozen to make ice cream.
IMPORTANT: Never wash the Freeze
Bowl in dishwasher.
5
Ice Cream Maker Attachment
Freeze Bowl — once completely
frozen, liquid within the double walls
of the bowl provides thorough, even
freezing of ice cream batter
throughout the mixing process.
Freeze Bowl Adapter Ring —
attaches to the bottom of the Freeze
Bowl to fit select Tilt-Head models.
Drive Assembly — attaches to the
Motor Head; drives the Dasher on all
KitchenAid®Stand Mixers.
4
KitchenAid®Ice Cream Maker Attachment
Warranty for Puerto Rico
A limited one year warranty extends
to the purchaser and any succeeding
owner for Ice Cream Maker
Attachments operated in Puerto Rico.
During the warranty period, all service
must be handled by an Authorized
KitchenAid Service Center. Please
bring the Ice Cream Maker
Attachment, or ship it prepaid and
insured, to the nearest Authorized
Service Center. Call toll-free 1-800-
541-6390 to learn the location of a
Service Center near you. Your repaired
Ice Cream Maker Attachment will be
returned to you prepaid and insured.
For service information, call toll-free
1-800-541-6390 or write to:
Customer Satisfaction Center,
KitchenAid Portable Appliances, P.O.
Box 218, St. Joseph, MI 49085-0218.
Arranging for Service
After the Warranty Expires
Consult your local KitchenAid dealer
or the store where you purchased the Ice Cream Maker Attachment for
information on how to obtain service.
Arranging for Service Outside
the 50 United States and Puerto Rico
To order accessories or replacement
parts for your Ice Cream Maker
Attachment, call toll-free
1-800-541-6390 or write to:
Customer Satisfaction Center,
KitchenAid Portable Appliances, P.O.
Box 218, St. Joseph, MI 49085-0218.
Ordering Accessories and Replacement Parts
WARNING
Electrical Shock Hazard
Unplug before servicing.
Failure to do so can result in
death or electrical shock.

To Attach Drive Assembly:
1. Be sure speed-control is still OFF
and the mixer is unplugged.
2. Motor Head should still be tilted,
and the Freeze Bowl and Dasher
should be in place.
3. Determine your mixer model by
checking for a spring on the
Beater Shaft, then position the
Drive Assembly as illustrated for
proper placement.
4. Slip the Drive Assembly onto the
Motor Head and press upward
until it is securely in place.
5. Lower the Motor Head to engage
the Drive Assembly with the Dasher.
6. Make sure the Motor Head is
down completely.
7. Place locking lever in the LOCK
position.
8. Before mixing, test the lock by
attempting to raise the Motor Head.
9. Plug the mixer into a grounded
3-prong outlet.
76
Assembling the Ice Cream Maker Attachment
for Tilt-Head Mixer* Assembling the Ice Cream Maker Attachment
for Tilt-Head Mixer*
To Assemble Freeze Bowl and Dasher:
NOTE: Use the Freeze Bowl immediately
upon removal from freezer, as it begins
to thaw once removed.
IMPORTANT: Do not pour ice cream
batter into the Freeze Bowl until all parts
are assembled and the mixer is running.
1. Be sure speed-control is OFF, mixer is
unplugged, motor head is tilted, and
mixing bowl is removed.
2. Place the Dasher inside the
Freeze Bowl.
3. Place the Freeze Bowl on the
Bowl-Clamping Plate.
Off/0Stir 246810
C
A
U
T
I
O
N
:
U
n
p
l
u
g
b
e
f
o
r
e
i
n
s
e
r
t
i
n
g
o
f
r
e
m
o
v
i
n
g
p
a
r
t
s
4. Gently turn the Freeze Bowl in
counterclockwise direction (opposite
direction of mixing bowl) to secure.
The Freeze Bowl should fit the
Bowl-Clamping Plate tightly. If the
bowl feels loose, follow instructions
in the following note.
NOTE: Some Tilt-Head models will
require the adapter ring to fit
properly. First, attach the Freeze Bowl
Adapter Ring to the bottom of the
Freeze Bowl with a counterclockwise
turn, then follow steps 3-4.
Off/0 Stir 2 4 6 8 10
C
A
U
T
I
O
N
:
U
n
p
l
u
g
b
e
f
o
r
e
i
n
s
e
r
t
i
n
g
o
f
r
e
m
o
v
i
n
g
p
a
r
t
s
C
A
U
T
I
O
N
:
U
n
p
l
u
g
b
e
f
o
r
e
i
n
s
e
r
t
i
n
g
o
r
r
e
m
o
v
i
n
g
p
a
r
t
s
CAUTION: Unp lug beforeinse
r
t
i
n
g
o
r
r
e
m
o
v
i
n
g
p
a
r
t
s
.
Off/0 Stir 2 4 6 8 10
O
ff
S
tir
2 4 6 8 10
MOTOR HEAD
BOWL-
CLAMPING
PLATE
BEATER
SHAFT
Spring No Spring
No Step Step
*For Bowl-Lift Mixer, see page 8 and 9. *For Bowl-Lift Mixer, see page 8 and 9.

5. Raise the bowl to engage the
Dasher with the Drive Assembly
before mixing.
6. Plug the mixer into a grounded
3-prong outlet.
To Attach Drive Assembly:
1. Be sure the speed-control is still
OFF and the mixer is unplugged.
2. Make sure the bowl-lift handle is still
in the down position, and the Freeze
Bowl and Dasher are in place.
3. Determine your mixer model by
checking for a spring on the
Beater Shaft, then position the
Drive Assembly as illustrated for
proper placement.
4. Slip the Drive Assembly onto the
Motor Head and press upward
until it is securely in place.
98
Assembling the Ice Cream Maker Attachment
for Bowl-Lift Mixer* Assembling the Ice Cream Maker Attachment
for Bowl-Lift Mixer*
To Assemble Freeze Bowl and Dasher:
NOTE: Use the Freeze Bowl immediately
upon removal from the freezer, as it
begins to thaw once removed.
IMPORTANT: Do not pour ice cream
batter into the Freeze Bowl until all parts
are assembled and the mixer is running.
1. Be sure the speed-control is OFF,
mixer is unplugged, bowl-lift
handle is in the down position,
and the mixing bowl is removed.
2. Fit the Freeze Bowl into place over
the Locating Pins.
OFF/010
2468
STIR
RESET
3. Press down on the back of the
Freeze Bowl until the bowl pin
snaps into the spring latch.
NOTE: The Freeze Bowl is designed
to fit all bowl-lift mixers. If the
bowl pin at the back of the bowl is
too short or too long to snap into
the spring latch, remove and rotate
the bowl so the opposite bowl pin
faces the spring latch. Repeat steps
2 and 3.
4. Place the Dasher inside the Freeze
Bowl.
NOTE: The Adapter Ring is not used for
Bowl-Lift models.
Pin too
short
Correct
pin fit
LOCATING
PIN
MOTOR
HEAD
BEATER
SHAFT
Spring No Spring
No Step Step
*For Tilt-Head Mixer, see page 6 and 7. *For Tilt-Head Mixer, see page 6 and 7.

11
NOTE: If the Dasher begins to slip and
make a clicking noise, this is an audible
indicator that the ice cream is done.
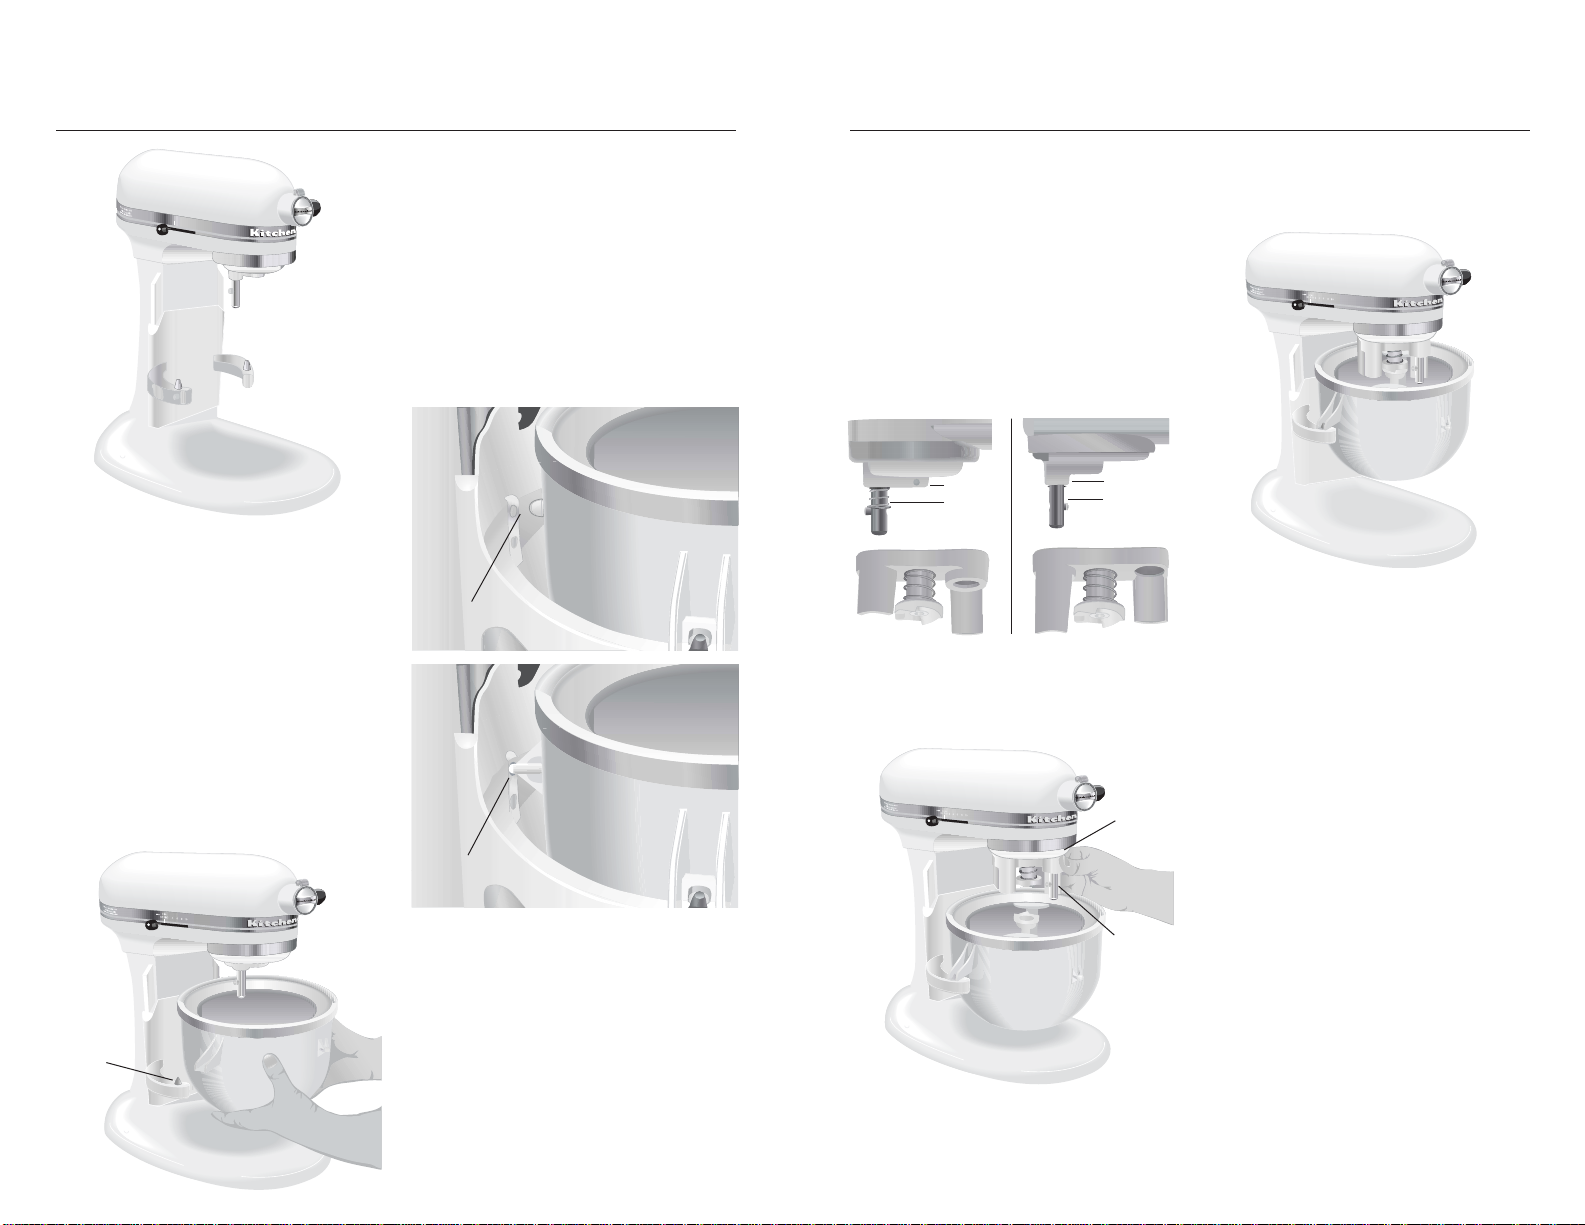
5. Remove the Dasher and Freeze
Bowl and, using a rubber spatula or
a plastic or wooden spoon, transfer
ice cream to dessert dishes or to an
airtight container for storage.
NOTE: The Ice Cream Maker
Attachment will create a soft-
consistency ice cream. For firmer
consistency, store ice cream in an
airtight container in the freezer for
2-4 hours.
IMPORTANT: Do not store ice cream
in the Freeze Bowl in the freezer.
Prying hard ice cream out of the
Freeze Bowl with metal scoops or
utensils may damage the Freeze Bowl.
Using the Ice Cream Maker Attachment
To Use:
IMPORTANT: Pouring batter into the
Freeze Bowl before starting the mixer
may cause the batter to freeze
prematurely and lock the dasher.
1. Store the Freeze Bowl in the freezer
for a minimum of 15 hours.
2. Prepare ice cream batter in advance
(see “Tips for Perfect Ice Cream”).
3. Assemble and engage the Freeze
Bowl, Dasher, and Drive Assembly.
4. Set the mixer to “stir” speed and
pour the ice cream batter into the
Freeze Bowl; mix 20-30 minutes, or
to desired consistency. Add any
solid ingredients such as fruits,
nuts, candies, or chocolate chips,
after 12-15 minutes of the mixing
process.
10
Tips for Making Perfect Ice Cream
•The Freeze Bowl must be
completely frozen to make ice
cream or other frozen desserts.
•For best results, store the Freeze
Bowl in the back of your freezer
where the temperature is coldest
for at least 15 hours. Adjusting
your freezer to its coldest setting
will help the Freeze Bowl make
firmer ice cream faster.
•Storing the Freeze Bowl in the
freezer at all times allows you the
flexibility to make your favorite
frozen desserts on a whim.
•For recipes that need to be
pre-cooked, allow the mixture to
cool completely in the refrigerator.
•All batter recipes need to be
completely chilled in the refrigerator
before making ice cream.
•Most ice cream recipes call for a
combination of cream, milk, eggs,
and sugar. The type of cream you
choose will determine how rich in
flavor and how creamy the texture
of the finished result. The higher
percentage of fat in the cream, the
richer and creamier your ice cream
will be. Any combination can be
used, as long as the liquid
measurement stays the same.
Lighter ice creams can be made by
using more milk than cream, or by
eliminating cream. Skim milk will
work, but there will be a
noticeable difference in texture.
TYPE OF CREAM FAT %
Heavy Cream...............................36%
Whipping Cream.........................30%
Light Cream................................18%
Half and Half ..............................10%
•When mixing an ice cream recipe
that calls for solid ingredients such
as fruits, nuts, candies, or
chocolate chips, it is best to wait
until the final two minutes of the
mixing process to add them.
•Ice Cream making is a two-part
process: conversion and ripening.
Mixing batter into ice cream is the
conversion process in which the ice
cream consistency will be similar to
soft serve. The ripening process
takes place in the freezer, where
the ice cream will harden over a
period of 2-4 hours.
•Follow recommended mixer
speeds. Faster speeds will slow the
conversion process.
•Batter volume grows significantly
during the conversion process.
Initial batter volume should not
exceed 46 oz. to produce 2 quarts
of ice cream.
•Keep in mind that freezing subdues
sweetness, so recipes won’t taste
quite as sweet once they are frozen.

13
12
Care and Cleaning
Allow the Freeze Bowl to reach room
temperature before attempting to
clean it.
The Drive Assembly, Dasher, and Bowl
Adapter Ring are dishwasher-safe.
Wash the Freeze Bowl in hot water
with mild detergent. Thoroughly dry
the Freeze Bowl before storing it in
the freezer.
IMPORTANT: Never wash the Freeze
Bowl in the dishwasher. Hand-wash
with warm water and mild detergent
only.
French Vanilla Ice Cream
21⁄2cups half-and-half
8 egg yolks
1 cup sugar
21⁄2cups whipping cream
4 teaspoons vanilla
1⁄8teaspoon salt
In medium saucepan over medium heat, heat
half-and-half until very hot but not boiling, stirring
often. Remove from heat; set aside.
Place egg yolks and sugar in mixer bowl. Attach
bowl and wire whip to mixer. Turn to Speed 2 and
mix about 30 seconds, or until well blended and
slightly thickened. Continuing on Speed 2, very
gradually add half-and-half; mix until blended.
Return half-and-half mixture to medium saucepan;
cook over medium heat until small bubbles form
around edge and mixture is steamy, stirring
constantly. Do not boil. Transfer half-and-half
mixture into large bowl; stir in whipping cream,
vanilla, and salt. Cover and chill thoroughly, at least
8 hours.
Assemble and engage freeze bowl, dasher, and
drive-body interface as directed in attachment
instructions. Turn to STIR Speed (Speed 1). Using a
container with a spout, pour mixture into freeze
bowl. Continue on STIR (Speed 1) for 15 to 20
minutes or until desired consistency. Immediately
transfer ice cream into serving dishes, or freeze in
an airtight container.
Yield: 16 servings (1⁄2cup per serving).
Per Serving: About 260 cal, 3 g pro, 16 g carb, 20 g
total fat, 12 g sat fat, 165 mg chol, 50 mg sod.
VARIATIONS
Fresh Strawberry Ice Cream
In medium bowl, combine 2 cups chopped, fresh
strawberries (or other fresh fruit) and 2 to 3
teaspoons sugar, if desired. Let stand while ice
cream is processing. Add during last 3 to 5 minutes
of freeze time.
Yield: 20 servings (1⁄2cup per serving).
Per Serving: About 210 cal, 3 g pro, 14 g carb, 16 g
total fat, 10 g sat fat, 135 mg chol, 40 mg sod.
Cookies ’n Cream Ice Cream
Add 11⁄2cups chopped, cream-filled chocolate
sandwich cookies (or other cookies, nuts, or candy)
during last 1 to 2 minutes of freeze time.
Yield: 19 servings (1⁄2cup per serving).
Per Serving: About 230 cal, 3 g pro, 16 g carb, 18 g
total fat, 10 g sat fat, 140 mg chol, 70 mg sod.

1514
Minted Mango Sherbet
1 cup sugar
3 cups whole milk
1⁄4cup light corn syrup
3 ripe mangoes, peeled,
seeded, and chopped
(about 3 cups)
2 tablespoons fresh
lime or lemon juice
2 teaspoons finely
chopped fresh mint,
if desired
In medium saucepan, combine sugar, milk, and corn
syrup. Heat over medium heat, stirring often, until
very hot but not boiling. Remove from heat; set aside.
Place mangoes and lime juice in food processor
work bowl; use the multipurpose blade to process
until smooth. Add mango mixture and mint to milk
mixture. Cover and chill thoroughly, at least 8 hours.
Assemble and engage freeze bowl, dasher, and
drive-body interface as directed in attachment
instructions. Turn to STIR Speed (Speed 1). Using a
container with a spout, pour mixture into freeze
bowl. Continue on STIR (Speed 1) for 7 to 12
minutes or until desired consistency. Immediately
transfer sherbet into serving dishes, or freeze in an
airtight container.
Yield: 14 servings (1⁄2cup per serving).
Per Serving: About 130 cal, 2 g pro, 29 g carb, 2 g
total fat, 1 g sat fat, 5 mg chol, 30 mg sod.
Triple Chocolate Ice Cream
2 cups whipping
cream, divided
2 squares (1 oz. each)
semisweet baking
chocolate, cut into
chunks
2squares (1 oz. each)
unsweetened baking
chocolate, cut into
chunks
2 cups half-and-half
1 cup sugar
1⁄3cup unsweetened
cocoa powder
8 egg yolks
4 teaspoons vanilla
1⁄8teaspoon salt
4 bars (1.55 oz. each)
milk chocolate,
chopped (about
11⁄2cups)
In small saucepan, place 1⁄2cup whipping cream,
semisweet chocolate, and unsweetened chocolate.
Heat over medium-low heat until chocolate melts,
stirring frequently. Remove from heat; set aside.
In medium saucepan over medium heat, heat
half-and-half until very hot but not boiling, stirring
often. Remove from heat; set aside.
In small bowl, combine sugar and cocoa powder. Set
aside. Place egg yolks in mixer bowl. Attach bowl and
wire whip to mixer. Turn to Speed 2 and gradually add
sugar mixture; mix about 30 seconds, or until well
blended and slightly thickened. Continuing on
Speed 2, very gradually add chocolate mixture and
half-and-half; mix until well blended.
Return half-and-half mixture to medium saucepan;
stirring constantly, cook over medium heat until small
bubbles form around edge and mixture is steamy.
Do not boil. Transfer half-and-half mixture into large
bowl; stir in remaining 11⁄2cups whipping cream,
vanilla, and salt. Cover and chill thoroughly, at least
8 hours.
Assemble and engage freeze bowl, dasher, and drive-
body interface as directed in attachment instructions.
Turn to STIR Speed (Speed 1). Using a container with
a spout, pour mixture into freeze bowl. Continue on
STIR (Speed 1) for 10 to 15 minutes or until desired
consistency, adding milk chocolate during last 1 to 2
minutes of freeze time. Immediately transfer ice cream
into serving dishes, or freeze in an airtight container.
Yield: 16 servings (1⁄2cup per serving).
Per Serving: About 340 cal, 5 g pro, 30 g carb, 24 g
total fat, 15 g sat fat, 160 mg chol, 50 mg sod.

1716
Fresh Pineapple Sorbet
1 cup cold water
1 cup sugar
1⁄4cup light corn syrup
1⁄8teaspoon salt
51⁄2cups chilled fresh
pineapple chunks
(about 1 pineapple),
divided
1 tablespoon fresh lime
or lemon juice
In medium bowl, combine water, sugar, corn syrup,
and salt. Mix well to dissolve sugar; set aside. Finely
chop 1⁄2cup pineapple; set aside.
Place remaining 5 cups pineapple in food processor
work bowl with multipurpose blade; add lime juice
and process until smooth. Add sugar mixture; process
until blended. (Process in batches if necessary.)
Assemble and engage freeze bowl, dasher, and drive-
body interface as directed in attachment instructions.
Turn to Stir Speed (Speed 1). Using container with
spout, pour mixture into freeze bowl. Continue on
STIR (Speed 1) for 15 to 20 minutes or until desired
consistency, adding reserved 1⁄2cup chopped pineapple
during last 2 to 3 minutes of freeze time. Immediately
transfer sorbet into serving dishes, or freeze in an
airtight container.
Yield: 16 servings (1⁄2cup per serving).
Per Serving: About 80 cal, 0 g pro, 20 g carb, 0 g
total fat, 0 g sat fat, 0 mg chol, 25 mg sod.
VARIATION
Peach Sorbet
Substitute 51⁄2cups sliced, peeled, and pitted
peaches (fresh or frozen, thawed) for pineapple.
Prepare and freeze as directed.
Yield: 16 servings (1⁄2cup per serving).
Per Serving: About 90 cal, 1 g pro, 22 g carb, 0 g
total fat, 0 g sat fat, 0 mg chol, 25 mg sod.
Caramel Pecan Ice Cream
31⁄2cups whole milk
1 can (14 oz.)
sweetened
condensed milk
1 cup prepared hot
caramel or
butterscotch caramel
topping (about
12 oz.)
1 package (3.4 oz.)
instant cheesecake
pudding and pie
filling mix
1 teaspoon vanilla
1⁄8teaspoon salt
1-11⁄2cups coarsely
chopped pecans
In medium bowl, place all ingredients except pecans.
Whisk until well blended and pudding is dissolved.
Cover and chill thoroughly, at least 6 hours.
Assemble and engage freeze bowl, dasher, and drive-
body interface as directed in attachment instructions.
Turn to STIR Speed (Speed 1). Using container with
spout, pour mixture into freeze bowl. Continue on
STIR (Speed 1) for 15-20 minutes or until desired
consistency, adding pecans during last 1 minute of
freeze time. Immediately transfer ice cream into
serving dishes, or freeze in an airtight container.
Yield: 16 servings (1⁄2cup per serving).
Per Serving: About 240 cal, 5 g pro, 35 g carb, 10 g
total fat, 3.5 g sat fat, 15 mg chol, 230 mg sod.

® Registered trademark/™ Trademark/
the shape of the mixer is a trademark of KitchenAid, U.S.A.
9708409 ©2004. All rights reserved. (dZw304)
FOR THE WAY IT’S MADE.
™
®
Other manuals for KICA
1
Table of contents
Other KitchenAid Ice Cream Maker manuals

KitchenAid
KitchenAid KICA0WH User manual

KitchenAid
KitchenAid KSMICM User manual

KitchenAid
KitchenAid KICA User manual

KitchenAid
KitchenAid 5KSMICM User manual

KitchenAid
KitchenAid KPFD200 User manual

KitchenAid
KitchenAid KICA0WH User manual

KitchenAid
KitchenAid 5KICA0WH User manual

KitchenAid
KitchenAid 5KICA0WH Quick guide