manuals.online logo
Brands
  1. Home
  2. •
  3. Brands
  4. •
  5. KitchenAid
  6. •
  7. Range
  8. •
  9. KitchenAid KDRS407V Configuration guide

KitchenAid KDRS407V Configuration guide

30" (76.2 cm) models
A. Optional backguard may be installed.
B. 27¾" (70.5 cm) depth with control panel, see NOTE*.
C. 35¾" (90.8 cm) cooktop height when setting on the wheels
D. 30" (76.2 cm) width
E. Model/serial rating plate location
D
C
A
B
E
30", 36" and 48" (76.2, 91.4 and 121.9 cm) Commercial Style
Dual Fuel Convection Ranges
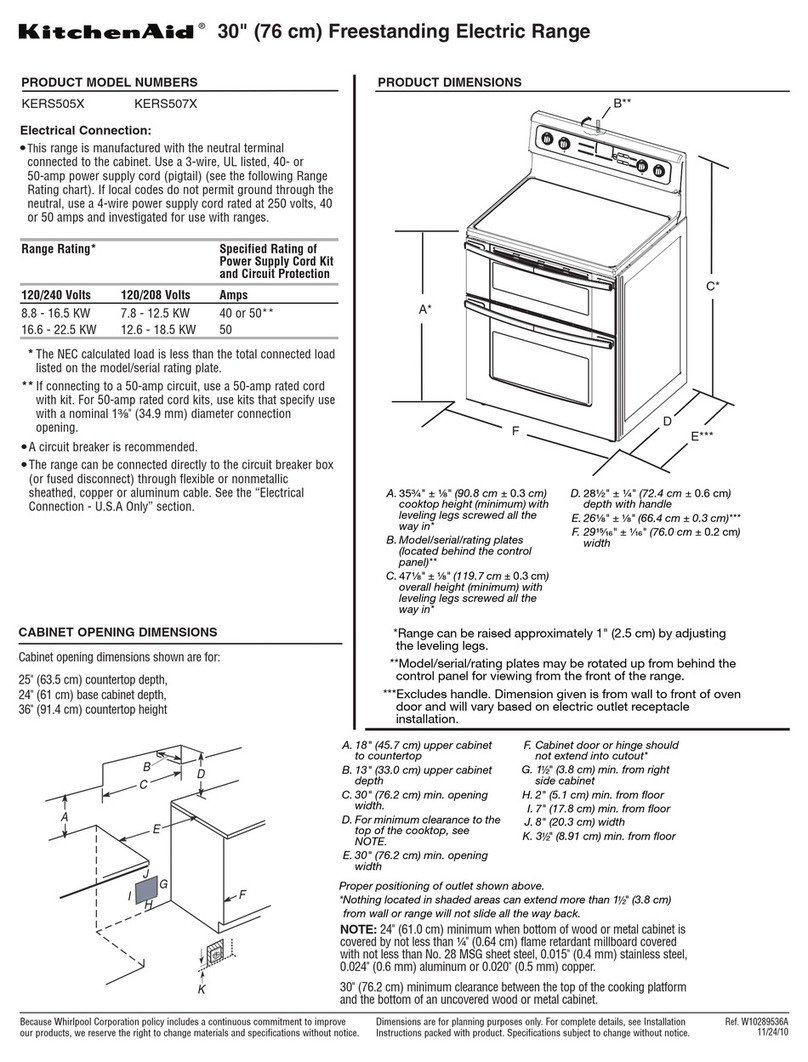
PRODUCT MODEL NUMBERS
PRODUCT DIMENSIONS
KDRS407V
KDRS462V
KDRS463V
KDRS467V
KDRS483V
KDRU707V
KDRU763V
KDRU767V
KDRU783V
Because Whirlpool Corporation policy includes a continuous commitment to improve
our products, we reserve the right to change materials and specifications without notice. Dimensions are for planning purposes only. For complete details, see Installation
Instructions packed with product. Specifications subject to change without notice. Ref. W10526083B
3/19/13
Range Rating* Specified Rating of Power Supply
Cord Kit and Circuit Protection
120/240 Volts 120/208 Volts Amps Range Size
8.8 - 16.5 KW 7.8 - 12.5 KW 40 or 50** 30" (76.2 cm)
36" (91.4 cm)
16.6 - 22.5 KW 12.6 - 18.5 KW 50 48" (121.9 cm)
*The NEC calculated load is less than the total connected load listed on the
model/serial rating plate.
**If connecting to a 50-amp circuit, use a 50-amp rated cord with kit. For
50-amp rated cord kits, use kits that specify use with a nominal 1³⁄₈"
(34.9 mm) diameter connection opening.
● A circuit breaker is recommended.
Page 1 of 2
Electrical Connection
● Range must be connected to the proper electrical voltage and frequency as
specified on the model/serial number rating plate. The model/serial number
rating plate is located on the right vertical surface of the oven door frame.
Refer to the illustrations in the “Product Dimensions” section of the
“Location Requirements” section.
● This range may be manufactured with a 4-wire power supply cord, or it may
not include a power supply cord. If your range does not include a power
supply cord, use a 4-wire power supply cord rated at 250 volts, 40 or
50 amps and investigated for use with ranges.
†®TEFLON is a registered trademark of E.I. Du Pont Nemours and Company.
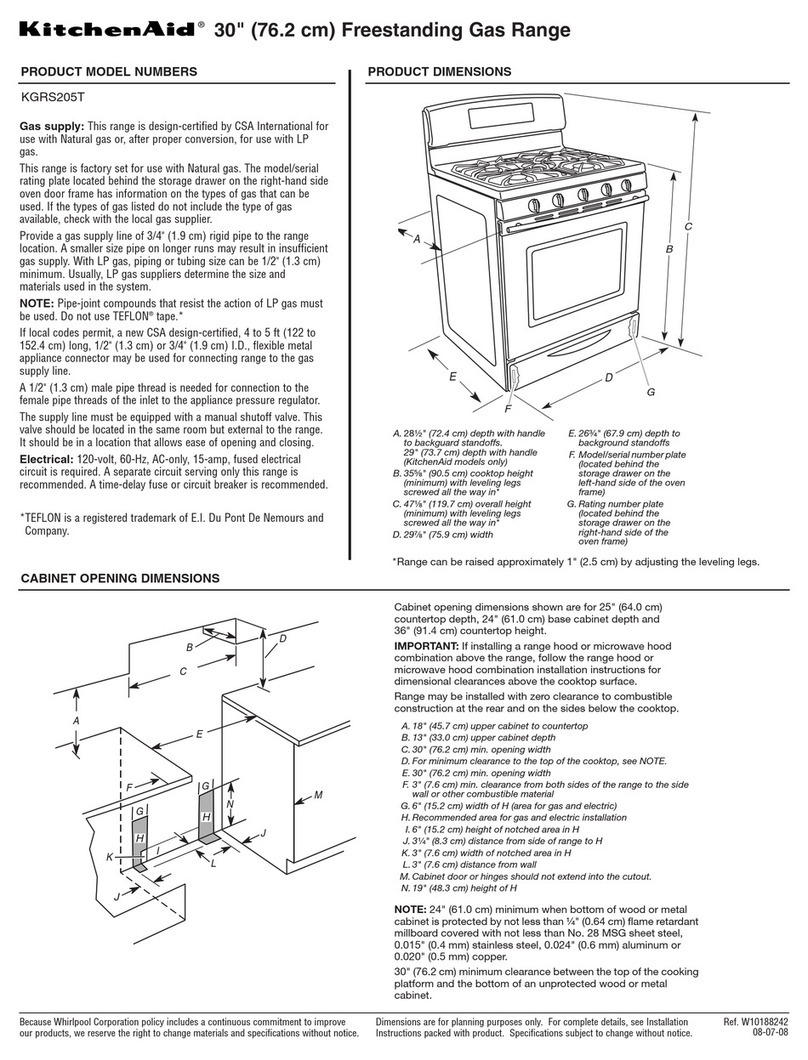
Gas Supply Requirements:
Type of Gas
Natural gas:
This range is design-certified by CSA International for use with Natural
gas or, after proper conversion, for use with LP gas.
● This range is factory set for use with Natural gas. See “Gas
Conversions” section. The model/serial rating plate located on the
oven frame behind the left side of the broiler door has information on
the types of gas that can be used. If the types of gas listed do not
include the type of gas available, check with the local gas supplier.
LP gas conversion:
Conversion must be done by a qualified service technician.
No attempt shall be made to convert the appliance from the gas
specified on the model/serial rating plate for use with a different gas
without consulting the serving gas supplier. See “Gas Conversions”
section.
Gas Supply Line
● Provide a gas supply line of ³⁄₄" (1.9 cm) rigid pipe to the range
location. A smaller size pipe on longer runs may result in insufficient
gas supply. With LP gas, piping or tubing size can be ¹⁄₂" (1.3 cm)
minimum. Usually, LP gas suppliers determine the size and materials
used in the system.
NOTE: Pipe-joint compounds that resist the action of LP gas must
be used. Do not use TEFLON®† tape.
Flexible metal appliance connector:
● If local codes permit, a new CSA design-certified, 4 to 5 ft (122 to
152.4 cm) long, ⁵⁄₈" (1.6 cm) or ³⁄₄" (1.9 cm) I.D., flexible metal
appliance connector may be used for connecting range to the gas
supply line.
● A ¹⁄₂" (1.3 cm) male pipe thread is needed for connection to the
female pipe threads of the inlet to the appliance pressure regulator.
● Do not kink or damage the flexible metal tubing when moving the
range.
Rigid pipe connection:
The rigid pipe connection requires a combination of pipe fittings to
obtain an in-line connection to the range. The rigid pipe must be level
with the range connection. All strains must be removed from the
supply and fuel lines so range will be level and in line.
● Must include a shutoff valve:
The supply line must be equipped with a manual shutof valve. This
valve should be located in the same room but external to the range
opening, such as an adjacent cabinet. It should be in a location that
allows ease of opening and closing. Do not block access to shutoff
valve. The valve is for turning on or shutting off gas to the range.
A. Gas supply line
B. Shutoff valve “open”position
C. To range
A
B
C
Because Whirlpool Corporation policy includes a continuous commitment to improve
our products, we reserve the right to change materials and specifications without notice. Dimensions are for planning purposes only. For complete details, see Installation
Instructions packed with product. Specifications subject to change without notice. Ref. W10526083B
3/19/13
Page 2 of 2
36" (91.4 cm) models
A. Optional backguard may be installed.
B. 27¾" (70.5 cm) depth with control panel, see NOTE*.
C. 35¾" (90.8 cm) cooktop height when setting on the wheels
D. 36" (91.4 cm) width
E. Model/serial rating plate location
AB
D
C
E
48" (121.9 cm) models
NOTE: The following illustration is for dimension planning
purposes only, and the locations and appearances of the features
shown may not match those of your model.
*NOTE: When installed in a 24" (61.0 cm) base cabinet with
25" (63.5 cm) countertop; front of oven door protrudes
1⁷⁄₈" (4.8 cm) beyond 24" (61.0 cm) base cabinet.
A. Optional backguard may be installed.
B. 27¾" (70.5 cm) depth with control panel, see NOTE*.
C. 35¾" (90.8 cm) cooktop height when setting on the wheels
D. 48" (121.9 cm) width
E. Model/serial rating plate location
A
D
C
B
E
CABINET DIMENSIONS
A. 18" (45.7 cm) upper cabinet to countertop
B. 30" (76.2 cm) model: 30" (76.2 cm) min. upper cabinet width
36" (91.4 cm) model: 36" (91.4 cm) min. upper cabinet width
48" (121.9 cm) model: 48" (121.9 cm) min. upper cabinet width
C. 13" (33 cm) max. upper cabinet depth
D. For minimum clearance to top of range, see NOTE**.
E. 30¼" (76.8 cm) on 30" (76.2 cm) models
36¼" (92.1 cm) on 36" (91.4 cm) models
48¼" (122.6 cm) on 48" (121.9 cm) models
F. 6" (15.2 cm) min. clearance from both sides of range to side
wall or other combustible material
G. 15" (38.1 cm)
H. 22" (55.9 cm) on 30" (76.2 cm) models
28" (71.1 cm) on 36" (91.4 cm) models
40" (101.6 cm) on 48" (121.9 cm) models
I. 1½" (3.8 cm)
J. 3" (7.6 cm)
K. 5" (12.7 cm)
L. 6" (15.2 cm) on 30" (76.2 cm) models
14" (35.5 cm) on 36" (91.4 cm) models
24" (61.0 cm) on 48" (121.9 cm) models
M. 10½" (26.7 cm)
N. 6" (15.2 cm)
O. 6" (15.2 cm), see NOTE***
M
KN
G
I
F
D
E
B
C
**
A
H
I
L
J
Electrical
installation
area*
Gas
installation
area
J
F
O***
Cabinet opening dimensions shown are for 25" (64 cm) countertop depth, 24"
(61 cm) base cabinet depth and 36" (91.4 cm) countertop height. Dimensions
must be met in order to ensure a flush fit to back wall.
IMPORTANT: If installing a range hood or a hood liner above the range,
follow the range hood or hood liner installation instructions for dimensional
clearances above the cooktop surface.
***NOTE: Receptacle must be rotated 90°for Canadian installation.
*** NOTE: Minimum Clearances
30" (76.2 cm) models: 30" (76.2 cm) minimum clearance between the
top of the cooking platform and the bottom of an uncovered wood or
metal cabinet.
36" (91.4 cm) models: 42" (106.7 cm) minimum clearance between
the top of the cooking platform and the bottom of an uncovered wood or
metal cabinet.
48" (121.9 cm) models: 42" (106.7 cm) minimum clearance between
the top of the cooking platform and the bottom of an uncovered wood or
metal cabinet.
*** NOTE: If backwall is constructed of a combustible material and a
backguard is not installed, a 6" (15.2 cm) minimum clearance is required
for all models.

This manual suits for next models

8

Other KitchenAid Range manuals

KitchenAid ARCHITECT II KERS206X User manual

KitchenAid

KitchenAid ARCHITECT II KERS206X User manual

KitchenAid KFDD500ESS User manual

KitchenAid

KitchenAid KFDD500ESS User manual

KitchenAid 8101P120-60 User manual

KitchenAid

KitchenAid 8101P120-60 User manual

KitchenAid KEDH207Y User manual

KitchenAid

KitchenAid KEDH207Y User manual

KitchenAid KEDT105 User manual

KitchenAid

KitchenAid KEDT105 User manual

KitchenAid KDRP467KSS04 User manual

KitchenAid

KitchenAid KDRP467KSS04 User manual

KitchenAid KERS502 User manual

KitchenAid

KitchenAid KERS502 User manual

KitchenAid YKGRT607HW5 User manual

KitchenAid

KitchenAid YKGRT607HW5 User manual

KitchenAid W10440551A User manual

KitchenAid

KitchenAid W10440551A User manual

KitchenAid KERC507 User manual

KitchenAid

KitchenAid KERC507 User manual

KitchenAid KDRP487MSS03 User manual

KitchenAid

KitchenAid KDRP487MSS03 User manual

KitchenAid KDRP407 User manual

KitchenAid

KitchenAid KDRP407 User manual

KitchenAid KERA807 User manual

KitchenAid

KitchenAid KERA807 User manual

KitchenAid Thermal-Convection 9751683 User manual

KitchenAid

KitchenAid Thermal-Convection 9751683 User manual

KitchenAid KFED500EWH User manual

KitchenAid

KitchenAid KFED500EWH User manual

KitchenAid KEDH207WHO User manual

KitchenAid

KitchenAid KEDH207WHO User manual

KitchenAid KSEG950ESS User manual

KitchenAid

KitchenAid KSEG950ESS User manual

KitchenAid KERC500 User manual

KitchenAid

KitchenAid KERC500 User manual

KitchenAid KDRP462LSS0 User manual

KitchenAid

KitchenAid KDRP462LSS0 User manual

KitchenAid YKDRP707 User manual

KitchenAid

KitchenAid YKDRP707 User manual

KitchenAid KESC300H WH User manual

KitchenAid

KitchenAid KESC300H WH User manual

KitchenAid ARCHITECT SERIES II User manual

KitchenAid

KitchenAid ARCHITECT SERIES II User manual

KitchenAid KERC608LSS0 User manual

KitchenAid

KitchenAid KERC608LSS0 User manual

KitchenAid KDRP407HSS - 30" Pro-Style Dual-Fuel Range User manual

KitchenAid

KitchenAid KDRP407HSS - 30" Pro-Style Dual-Fuel Range User manual

Popular Range manuals by other brands

Vulcan-Hart MG48 Specifications

Vulcan-Hart

Vulcan-Hart MG48 Specifications

Whirlpool RF386PXD Use and care guide

Whirlpool

Whirlpool RF386PXD Use and care guide

Electrolux 316520101 Use and care guide

Electrolux

Electrolux 316520101 Use and care guide

Viking F20543 installation guide

Viking

Viking F20543 installation guide

Smeg CPF30UGMX manual

Smeg

Smeg CPF30UGMX manual

Bosch HES5053U installation instructions

Bosch

Bosch HES5053U installation instructions

Jenn-Air PRO-STYLE JGS8860BDP17 Use & care guide

Jenn-Air

Jenn-Air PRO-STYLE JGS8860BDP17 Use & care guide

Frigidaire GCRE302LAFA Use & care guide

Frigidaire

Frigidaire GCRE302LAFA Use & care guide

Whirlpool RF3010XEW parts list

Whirlpool

Whirlpool RF3010XEW parts list

Atosa AGR-4B operating instructions

Atosa

Atosa AGR-4B operating instructions

Jenn-Air DUAL-FUEL SLIDE-IN RANGE user guide

Jenn-Air

Jenn-Air DUAL-FUEL SLIDE-IN RANGE user guide

Whirlpool CGS365H Troubleshooting

Whirlpool

Whirlpool CGS365H Troubleshooting

Avanti DG20CSS instruction manual

Avanti

Avanti DG20CSS instruction manual

Samsung FE-R300SX user manual

Samsung

Samsung FE-R300SX user manual

GE JBP35SMSS Dimensions and installation information

GE

GE JBP35SMSS Dimensions and installation information

Forno FFSGS6187-48 installation guide

Forno

Forno FFSGS6187-48 installation guide

Fisher & Paykel OR36LDBGX1 installation instructions

Fisher & Paykel

Fisher & Paykel OR36LDBGX1 installation instructions

Bosch HDS256U use and care manual

Bosch

Bosch HDS256U use and care manual

manuals.online logo
manuals.online logoBrands
  • About & Mission
  • Contact us
  • Privacy Policy
  • Terms and Conditions

Copyright 2025 Manuals.Online. All Rights Reserved.