KitchenAid Pro Line KPWB100 User manual

PRo LINE TM SERIES
ii i :iiiiTM_
_ _i _ _i_i_i_!i_iiiii_i_

ove lwo 7
the ones you'll
tOaOwith
1tne design of cdmmercial
But of the story.
TheWaffle Bakerfeatures a aurable die-cast metal basear ainlesssteel baker precisely
controlled with a digital timer; a reliable dial thermometer and ready light serveas pre-heat indicators. THe
non-stick wefile Dlateswide clean with a dam_ cloth, and the Waffle Bakerstdres easilyon the countertoD
or in a cabinet
The KitchenAia'' PROLINE,,.iSeries:commercial quality for tne discriminating nome chef. Fromthe company
distingui its legenda ansnip.

BLE c; i--CQN FEN F
BYT't_;O©,;!CT Oh/
Introduction .......................................................................... 2
Waffle Baker Safety ................................................................ 4
Important Safeguards ............................................................ 5
Proof of Purchase & Product Registration .............................. 6
Electrical Requirements .......................................................... 7
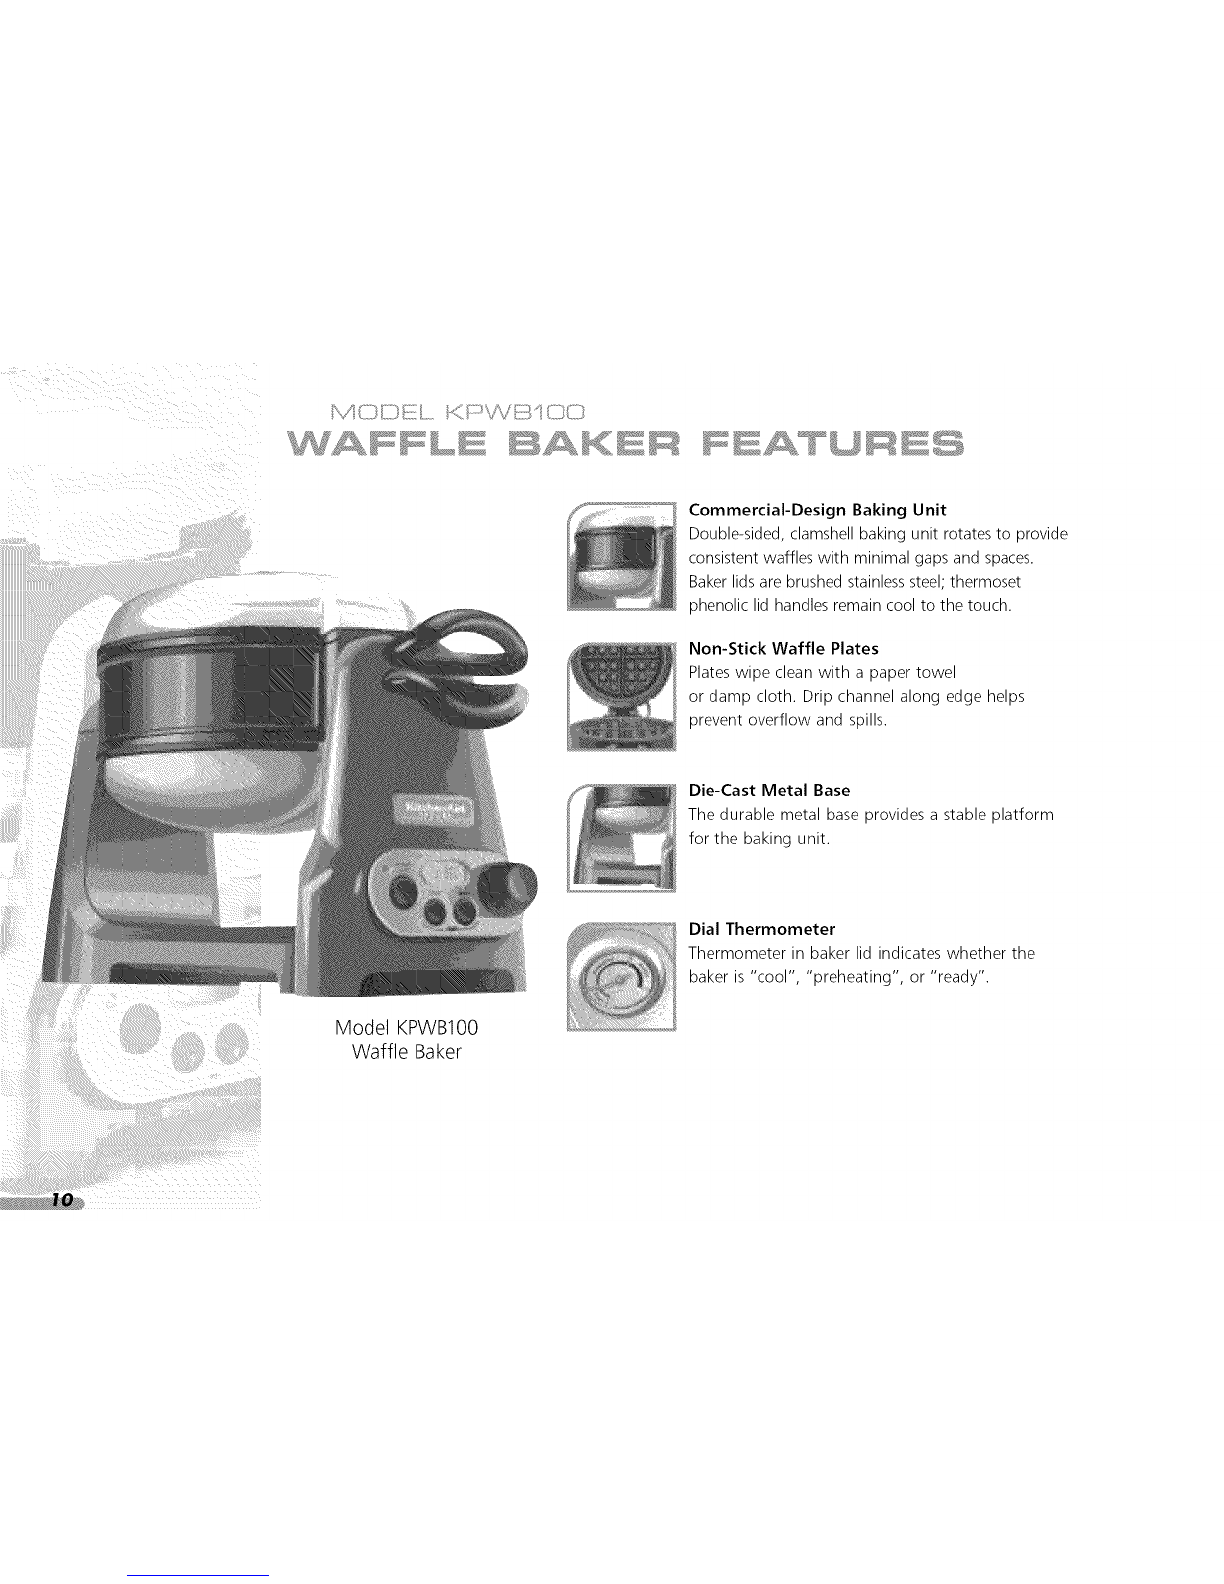
Waffle Baker Features ............................................................ 10
Using the Waffle Baker
First Use of the Waffle Baker .......................................... 13
Operating the Waffle Baker ............................................ 13
Canceling a Baking Timer Countdown ............................ 17
Recipe Tips ............................................................................ 18
Baking & Serving Tips ............................................................ 20
Care & Cleaning .................................................................... 22
Troubleshooting .................................................................... 23
WAFFLe}} BAKEF( REC PES
Banana Macadamia Waffles with Toasted Macadamia Butter 26
Cherry Sour Cream Waffles .................................................... 27
Chocolate Chip Waffles with Chocolate Whipped Cream ...... 28
Spiced Pecan Waffles with Cinnamon Syrup .......................... 29
Cranberry Brie Waffles ........................................................ 30
Hearty Grain Waffles with Honey Butter ............................ 31
Sun-dried Tomato Carbonara Waffles with Parmesan Butter 32
Cornmeal Cheddar Waffles ................................................ 33
WAPS_A/_,_XYA:_,_S[4!RVCE NFOF_;M£Y Ob_
Warranty for the 50 United States & District of Columbia .... 36
Warranty for Puerto Rico ...................................................... 37
Arranging for Hassle-Free Replacement ................................ 37
Ordering Accessories & Replacement Parts ............................ 38
Arranging for Service After the Warranty Expires .................. 38
Arranging for Service Outside the 50 United States
& Puerto Rico ........................................................................ 39
Z
c)
_j
o
i,
Z

Your safety and the safety of others are very important.
We have provided many important safety messages in this manual and on your appliance. Always read
and obey all safety messages.
This is the safety alert symbol.
This symbol alerts you to potential hazards that can kill or hurt you and others.
All safety messages will follow the safety alert symbol and either the word "DANGER" or
"WARNING." These words mean:
You can be killed or seriously injured if you don't immediately
follow instructions.
You can be killed or seriously injured if you don't follow
instructions.
All safety messages will tell you what the potential hazard is, tell you how to reduce the chance of injury,
and tell you what can happen if the instructions are not followed.
The California Safe Drinking Water and Toxic Enforcement Act requires the Governor of California to
publish a list of substances known to the State of California to cause cancer, birth defects, or other
reproductive harm, and requires businesses to warn of potential exposure to such substances.
WARNING: This product contains a chemical known to the State of California to cause cancer, birth
defects, or other reproductive harm.
This appliance can cause low-level exposure to one of the substances listed: formaldehyde.

When using electrical appliances, basic safety precautions
should always be followed, including the following:
i Readall instructions.
2 Do not touch hot surfaces. Use handles or knobs.
To protect against electrical shock, do not immerse cord,
plugs, or Waffle Baker in water or other liquids.
Close supervision is necessary when any appliance is used
by or near children.
Unplug Waffle Baker from outlet when not in use and
before cleaning. Allow to cool before putting on or taking
off parts.
_: Do not operate any appliance with a damaged cord or plug,
or after the appliance malfunctions or has been damaged in
any manner, Return appliance to the nearest authorized
servicefacility for examination, repair, or adjustment.
:; The use of accessoryattachments not recommended by the
appliance manufacturer may cause injuries.
;::. Do not use outdoors.
_! Do not let cord hang over edge of table or counter, or
touch hot surfaces.
Do not place on or near a hot gas or electric burner, or in a
heated oven.
When finished baking waffles, press the On/Off Button to
turn the Waffle Baker off, then remove plug from outlet.
2 Do not use appliance for other than intended use.
! This product has been UL Listed for household and
commercial use.
2
©
©
7"
Z

Always keep a copy of the sales receipt showing the date of
purchase of your Waffle Baker. Proof of purchase will assureyou
of in-warranty service.
Before you use your Waffle Baker, please fill out and mail your
product registration card packed with the unit. This card will
enable us to contact you in the unlikely event of a product
safety notification and assist us in complying with the provisions
of the Consumer Product Safety Act. This card does not verify
your warranty.
Pleasecomplete the following for your personal records:
Model Number: KPWBIO0
Serial Number
Date Purchased
Store Name

Volts:120V.A.C.only.
Hertz:60 Hz
NOTE:TheWaffleBakerhasa
3pronggroundedplug.Toreduce
theriskofelectricalshock,thisplug
willfit inanoutletonlyoneway.Ifthe
plugdoesnotfit intheoutlet,contact
aqualifiedelectrician.Donotmodifythepluginanyway.
Ashortpower-supplycordisprovidedto reducetherisk
resultingfrombecomingentangledinortrippingoveralonger
cord.Donotuseanextensioncord.Ifthepowersupplycordis
tooshort,haveaqualifiedelectricianorservicemaninstallan
outletneartheappliance.
ElectricalShockHazard
Pluginto a grounded 3 prong outlet.
Do not remove ground prong.
Do not use an adapter,
Do not use an extension cord,
Failure to follow these instructions can result in death,
fire, or electrical shock.
2
©
t_J
©
_hL
Z


Model KPWBIO0
Waffle Baker
Commercial-Design Baking Unit
Double-sided, clamshell baking unit rotates to provide
consistent waffles with minimal gaps and spaces•
Bakerlids are brushed stainlesssteel; thermoset
phenolic lid handles remain cool to the touch.
Non-Stick Waffle Plates
Plates wipe clean with a paper towel
or damp cloth. Drip channel along edge helps
prevent overflow and spills.
Die-Cast Metal Base
The durable metal base provides a stable platform
for the baking unit.
Dial Thermometer
Thermometer in baker lid indicates whether the
baker is "cool", "preheating", or "ready".

PowerOn/OffButton
Pressingthepoweron/offbuttonturnsthebaking
unitheatingelementsonoroff.Whenthebakeris
on,theindicatorlightwillbeilluminated.
StartButton
Oncethewafflebakerispre-heated,pressthestart
buttontobeginatimercountdown.
Pre-HeatIndicator
Theindicatorlightflashesuntilthebakerisfully
pre-heated.Whentheoptimumtemperatureis
reached,atonewillsoundandtheindicatorlight
willglowcontinuously.
TimerAdjustmentDial
Turnthedialtosetthebakingtimein 15second
increments,fromaminimumof2minutes,30
secondsto amaximumof5minutes,30seconds.
Turnthedialclockwisetoincreasethebakingtime,
counter-clockwisetodecreasethetime.
BakingTimerDisplay
Showstheremainingbakingtimeinminutes
andseconds.
OverbakeIndication
Whenthebakingtimerreacheszero,thewafflebakerproducesa
seriesoftones,thetimerdisplaybackgroundturnsred,andthe
timerbeginstocountup.Ifyourwafflesarenotquitedone,the
count-upwilltracktheextratimeyouletthewafflesbake.
ResetButton
Afterthebakingtimerisactivated,pressthereset
buttontostopthecountandresetthebakingtimer
display.Pressingtheresetbuttonwillalsohaltthe
messagetonesafterthetimerreacheszero.
AutomaticShutoff
Unlessthebakingtimerisreset,thebakingunitwillautomaticalh
shutoff5 minutesafterthetimerreacheszero.Afterthebaking
timerisreset,thebakingunitisprogrammedto shutoffin2
hoursif anewtimercountdownisn'tstarted.
2
o
Z
<£
<{

_I II, I _II,), I III I III_!
Timer Memory
Baking timer will remember the last time set, even when the baker
is unplugged.
Message Tones
Convenient tones instantly convey waffle baker status. A tone will
sound when the baker is fully pre-heated. When the baking timer
reaches zero, the baker will produce a series of tones.
Constant Temperature Baking
Baker has no adjustable thermostat: waffles bake at a constant
temperature optimized for the best results. Browning of waffle is
controlled with the baking timer.

First Use of the Waffle Baker
The waffle baker may emit a slight odor or smoke the first time it
is used. This is a normal result of the manufacturing process. The
odor or smoke is harmless and will dissipate quickly, but it may flavor
the first waffle prepared on each side of the baker. For the best
results, it is recommended that these initial waffles be discarded.
Steam will be produced during every baking cycleand condensation
may form on the baker lids. This is normal.
NOTE: Always use the handles to rotate the baking unit and open
the baking lids.
Electrical Shock Hazard
Plug into a grounded 3 prong outlet.
Do not remove ground prong.
Do not use an adapter.
Do not use an extension cord.
Failure to follow these instructions can result in death,
fire, or electrical shock.
Operating the Waffle Baker
Plug the waffle baker cord into a grounded 3 prong outlet.
zRotate the baking unit so the baker lid with the dial thermometer
faces upwards.
Pressthe Power On/Off Button to turn the baking unit on. The
indicator light will flash and the waffle baker will begin heating.
2
©
_43
0
O,
2
s
,%
<]
,/

Wait for the waffle baker to pre-heat When the waffle baker
has reached operating temperature, a tone will sound and the
indicator light will stop flashing and glow continuously. The
needle on the dial thermometer will also be in the "ready" range.
Set the baking timer by turning the Timer Adjustment Dial.
Rotate the dial clockwise to increase the time on the baking
timer display; rotate the dial counter<lockwise to decrease the
time. The baking time can be set in 15 second increments from
a minimum of 2 minutes, 30 seconds (2:30) to a maximum of
5 minutes, 30 seconds (5:30). Longer baking times will
produce darker, crispier waffles. For your first waffles, a good
starting time is 3 minutes, 30 seconds (3:30).
_: Open the baker lid by lifting the topmost handle. Make certain
the lid is securely seated against the base before releasing the
handle: if this is not done, the baking unit may rotate
unexpectedly when the handle is released.

:,"Fillthewaffleplateevenlywithbatter.Thebattershould
almostcoverthepeaksofthewafflegrid.Close the baker lid. Rotate the baking unit so the opposite lid istopmost.
NOTE: Do not use metal utensils with the waffle baker. Metal may
scratch the non-stick waffle plates.
NOTE: Whether one or two waffles are being prepared, always
rotate the baking unit after filling a waffle plate. This coats both
the upper and lower waffle plates with batter and ensures the
finest consistency.
2
©
©
2
<4
<_

Pressthe Start Button to begin the baking timer countdown. When the baking timer display reaches zero, a series of tones
will sound, the baking timer display background will turn red,
and the timer will begin to count up.
Open the baker lid and remove the waffle using a non-metallic
utensil. If another waffle is in the baker, rotate the baking unit
so the opposite lid is topmost, open the baker lid, and remove
the waffle. If additional baking is planned, close the baker lid
to retain heat.
NOTI:: The Start Button will not activate a timer countdown
unless the waffle baker is fully Dre-heated.
If a second waffle is desired open the baker lid and fill the
waffle plate evenly with batter. Close the baker lid.
i Rotate the baking unit so the lid with the dial thermometer
again faces upward.

;To preparemorewaffles,resetthebakingtimerbypressing
theResetButton.Thedisplaybackgroundwillreturnto blue
andthetimerwillreverttotheprevioustimeset.Thenrepeat
steps5 12.
NOTE:Unlessthebakingtimerisreset,thewafflebakerwill
automaticallyshutoff5minutesafterthetimerreacheszero.
Canceling a Baking Timer Countdown
To cancel a timer countdown, press the Reset Button. The baking
timer display will revert to the previous time set. After the timer
has been reset, use the Timer Adjustment Dial to change the
baking time, if desired, and press the Start Button to begin a new
timer countdown. If a timer countdown is not started within
2 hours, the baking unit will automatically shut off.
2
©
©
2
<4
<_
}J:When baking is finished, press the Power On/Off Button to turn
the baking unit off. Leavea baker lid open to speed cooling of
the baking unit.

Donotover-mixthebatterAfewlumpsarefine Smoothbattersproducetough,
heavywaffles
Wafflesmadefromlow-fatrecipescanbedifficulttoremoveIfyourwafflestendto stick _
q i!_i'ii ii_;f'riP!_Yl-i4a_a rIit,tlloetmr_irrneg_uttt;_e_rw°i'llltpr:_re_PguDm°_°btu_:_tu_hthaV_afwfill_be
.............. i

For a hearty, full-grain flavor, try using whole grain flour in place of white flour.
2
©
©
2
L/J

Whether one or two waffles are being prepared, always rotate the
baking unit after filling a waffle plate. This coats both the upper and
lower waffle plates with batter and ensures the finest consistency.
Don't overfill the waffle plates. Pour the batter onto the center of the plate, then evenly
spread it out to the edges using a soft spatula or the bottom of a non-metallic ladle.
The batter should almost cover the peaks of the waffle grid.
Other manuals for Pro Line KPWB100
4
Table of contents
Other KitchenAid Waffle Maker manuals
Popular Waffle Maker manuals by other brands

Unold
Unold 48235 Instructions for use

Spinmaster
Spinmaster Bestron nickelodeon PAW PATROL APP500P instruction manual

Silvercrest
Silvercrest 78948 operating instructions

Beper
Beper BT.603Y use instructions

STARFRIT
STARFRIT ECO COPPER Instructions for use and care

Star
Star SWCBE Installation and operation instructions