KiwitalL KU1120 Series User manual

1
Netphone
KU1120 Series
User’s Manual

2
1. Overview ............................................................................................................................................................... 3
2. Package Contents................................................................................................................................................... 3
3. Installation and Configuration............................................................................................................................... 3
3.1 Setup Requirements..................................................................................................................................... 3
3.2 Installation................................................................................................................................................... 3
3.3 Configuration............................................................................................................................................... 3
4. Phone Function...................................................................................................................................................... 4
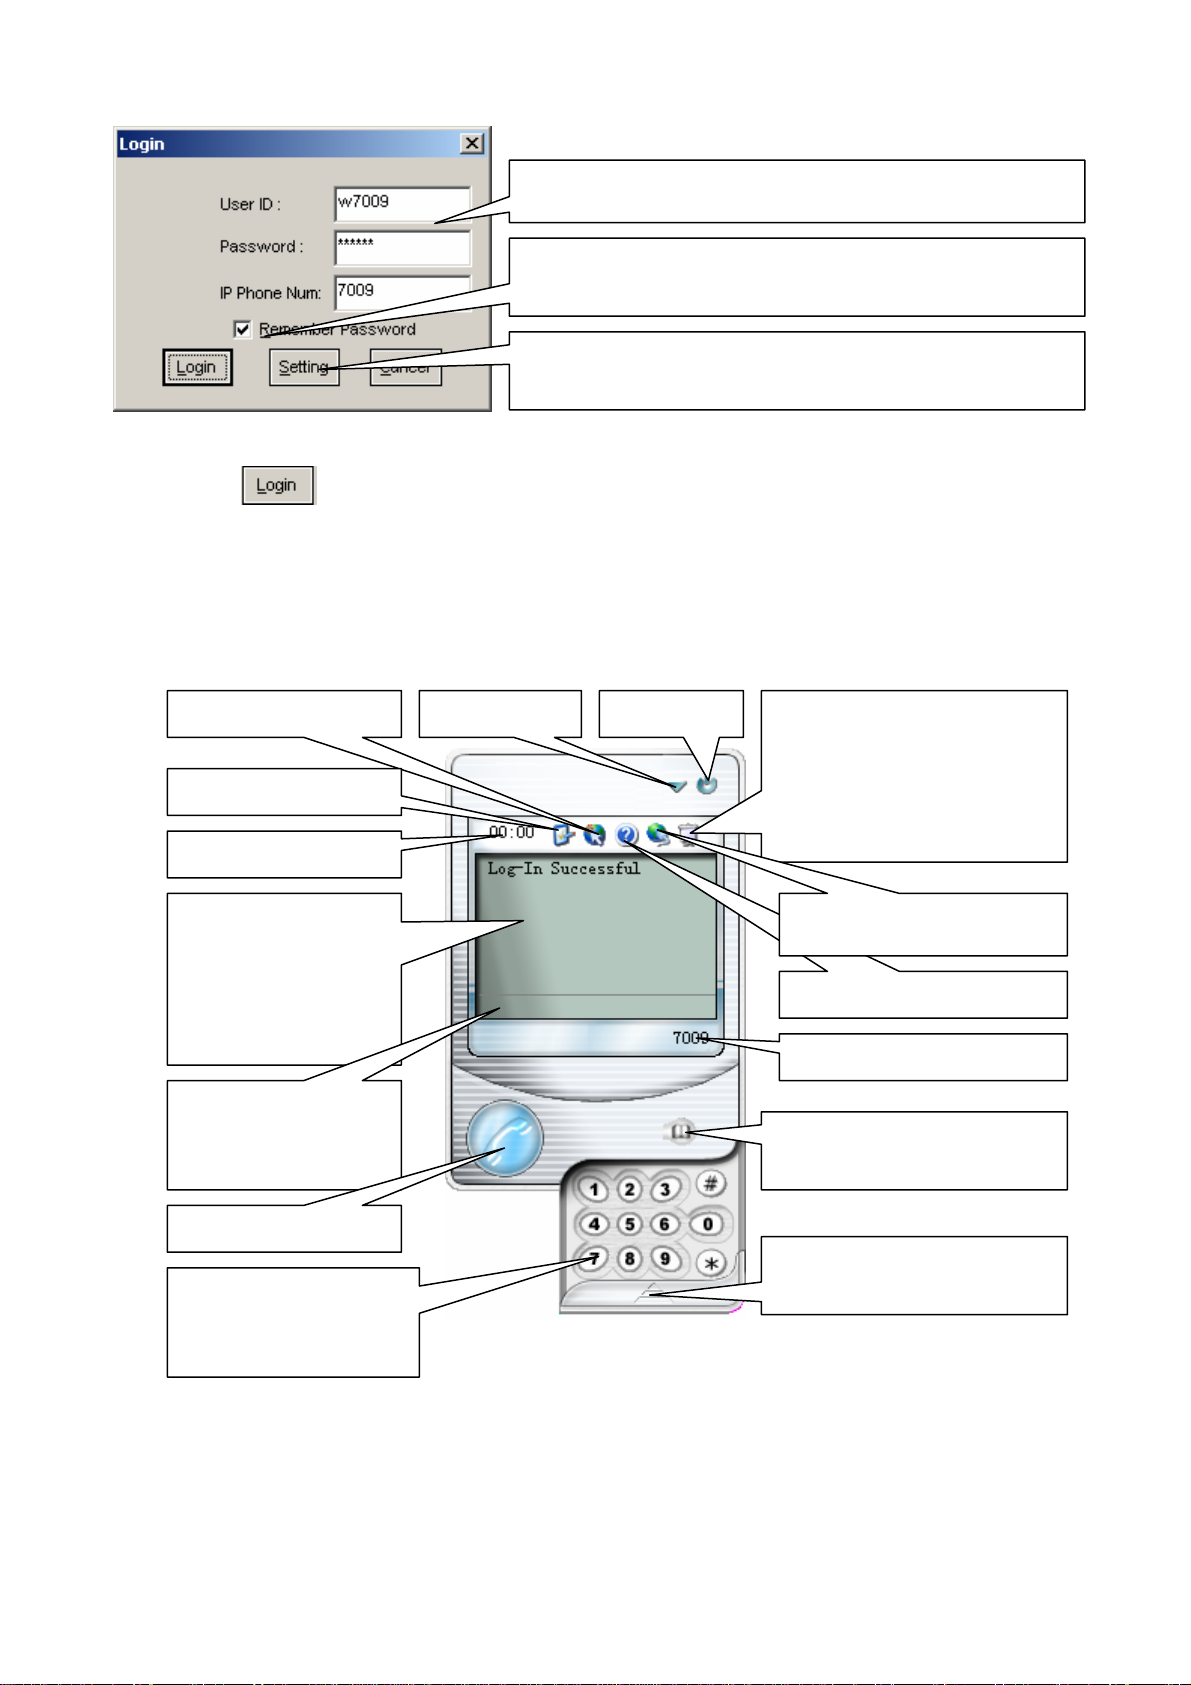
4.1 Netphone-KU1120 window......................................................................................................................... 4
4.2 Functions ..................................................................................................................................................... 4
4.2.1 Dialing.............................................................................................................................................. 5
4.2.2 Answering and refusing.................................................................................................................... 5
4.2.3 Hang up............................................................................................................................................. 5
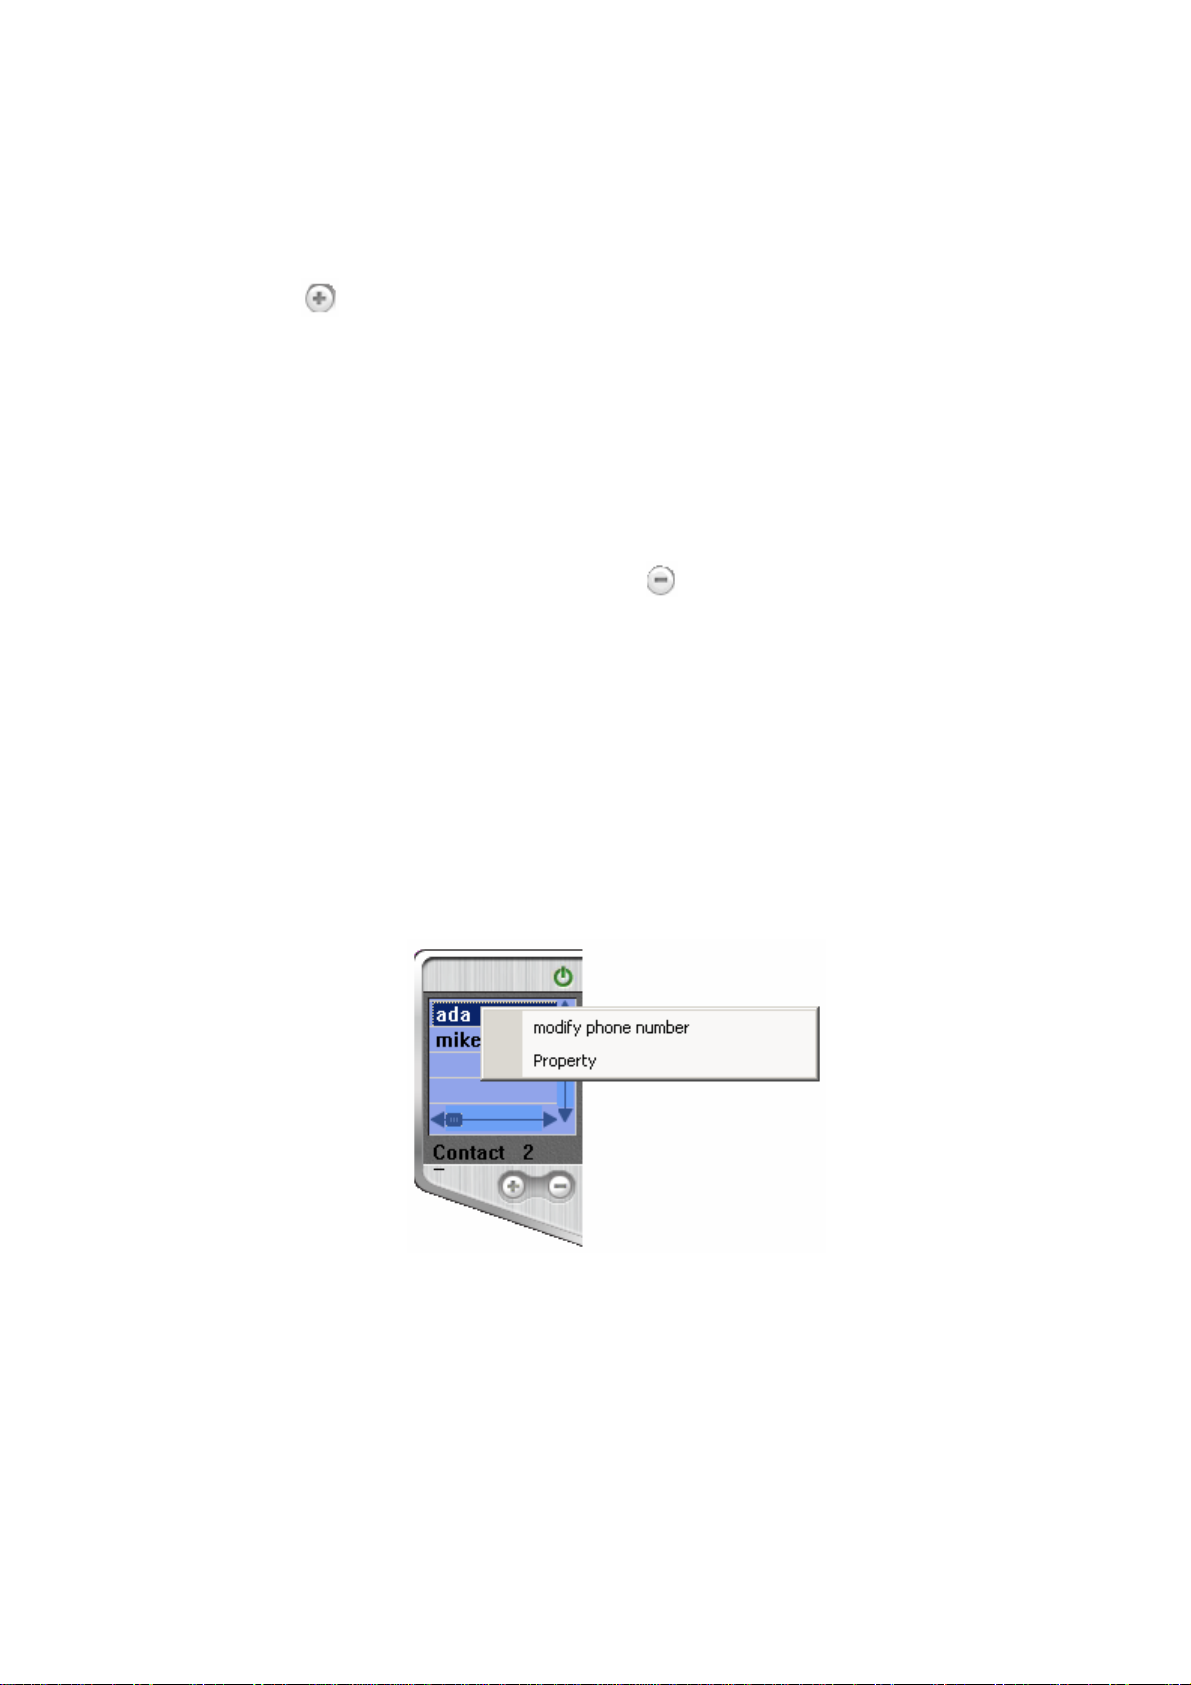
4.2.4 Phonebook ........................................................................................................................................ 5
4.2.5 Volume adjustment ........................................................................................................................... 7
4.2.6 Redial................................................................................................................................................ 7
4.2.7 Mute.................................................................................................................................................. 7
4.2.8 Use C key to clear what you have input ........................................................................................... 7
4.2.9 Caller ID display............................................................................................................................... 7
4.2.10 Use * to correct a number............................................................................................................... 7
5. Service Features..................................................................................................................................................... 7
5.1 Netphone Calling Netphone ........................................................................................................................ 7
5.2 Netphone Calling Regular Phone ................................................................................................................ 8
5.3 Call Forwarding........................................................................................................................................... 8
5.4 Regular Phone calling Netphone ................................................................................................................. 9
5.5 Conferencing ............................................................................................................................................... 9
6. Frequent Problems and Answer........................................................................................................................... 11
7. Others .................................................................................................................................................................. 12
7.1 Features...................................................................................................................................................... 12
7.2 Standards and agreements.......................................................................................................................... 12
7.3 Dimensions................................................................................................................................................ 12
7.4 The electrical specifications....................................................................................................................... 12
7.5 Working/storing environment.................................................................................................................... 12
7.6 Recommend usage net condition............................................................................................................... 12

3
1. Overview
The Netphone-KU1120 is an exquisite and portable VoIP phone which is used just like a regular telephone. It
connects with your computer using the USB interface and transmits voice over the Internet. The KU1120 will
greatly reduce your international long distance costs.
2. Package Contents
The following items are included in the box:
zNetphone-KU1120 phone set
zUSB Cable
zUser’s Manual
3. Installation and Configuration
3.1 Setup Requirements
You must supply:
z233MHz Intel Pentium II or above, 32MB of RAM (Recommend 64MB or more), 10MB Hard drive
zComputer must have USB 1.1 interface or above
zMicrosoft Windows 98 SE/ME/2000/XP
zInternet access with a connection speed above 28.8kbps
NOTE: If your system has a firewall (e.g. Windows XP’s Internet firewall), or you are using a proxy to
provide Internet access then you may experience difficulties getting the Netphone to connect to our
server. If so, please contact your network administrator or our technical support.
Here we make our announcement formally. If you use SIS chipset on the main board, you might hear
distorted voice and noise. In this kind of situation, we suggest installing our SIS patch, however, our SIS
patch can not take effect on Windows 98 SE and some type of SIS chipset.
3.2 Installation
A. Download the Netphone-KU1120 from service carrier’s website or insert the Netphone-KU1120 installation
CD. (If your CD-ROM does not run it automatically, you can run the exe. File manually).
B. Select language version and start installation.
C. If you have ever installed Netphone-KU1120 on your computer, you should first shut down the client
software by the indication during installation and uninstall it, then run the installation software once again.
D. Please follow the instructions in the pop up windows to install Netphone-KU1120’s installation software.
E. Restart your computer.
F. Connect the Netphone-KU1120 USB cable to the USB interface on your computer.
G. Windows will automatically detect Netphone. Your computer would recognize Netphone, if you are asked to
confirm the new device, please accept it.
3.3 Configuration
(1) Double click the white icon, which will now be on your desktop and complete your name, password and
Netphone-KU1120 number.

Fill in your username, password and phone number
If no notice, you do not need to change any setting.
If you are using a public computer don’t check “Keep
Password”. Otherwise check it to save retyping next time.
(2) Click
4. Phone Function
4.1 Netphone-KU1120 window
Buttons on Netphone-KU1120 window are illustrated in the following figure.
4
Minimize
Settings
Call length
Update Close About
1. About Netphone
2. Dialed number
3. Received calls
4. Missed calls
My account
Help
<Status bar> :
Displays the phone
status and the status
of connecting to the
server
<Number bar>:Shows
the number being dialed
<Dial pad>:Has the
same function as the
keypad on your phone.
Call/end button
Your phone number
Phone book button :
show/hide the phone book
Dial pad button :Show/hide
keyboard
4.2 Functions
● Dialing
● Answering and refusing
● Hang up
● Phonebook

● Volume adjustment
● Redial
● Mute
● Use C key to clear what you have input
● Caller ID display
● Use * to correct a number
4.2.1 Dialing
zPress to enter dialing state and key in the phone number followed by ‘#’ key or . Refer to the
dialing rules in item 5.
zIf you prefer to use the on-screen dialing interface: Click the numbers on the on-screen dial pad then click the
‘Call / end’ button.
4.2.2 Answering and refusing
●Press to answer an incoming call while to refuse it.
4.2.3 Hang up
zWhen you finish a call, simply press .
zAlternatively, when you finish a call, click ‘Call / end’ in the on-screen window.
4.2.4 Phonebook
Click the button on the client program interface to open the phonebook pad. The program uses the Outlook
Express.
Close/exit
Display the contact If the contact’s
phonenumber has
been added,it will
be displayed when
mouse points to the
contact.
Delete contactAdd contact
5

zAdd contact
(1)Click the button ,enter the Property Dialogue
(2)Fill in the item about the contact,then click “ok” to finish appending.the new entry will be displayed in the
phonebook.You information you can edit includes:name,email,home information,business information,personal
information and other information related to the contact.
(3) Repeat until finish appending.
zDelete contact
(1) Choose the contact you want to delete, click the button
(2) A notice dialogue box will be appeared ,click “ok” to finish deleting, click ”cancel” to quit
zModify contact
(a) Double click the contact, the property dialogue box will be appeared, you can modify the contact’s
property .The information you can edited include:contact’s name,email,home information, business
information, personal information and other related information.After finish editing,click ”ok” to save the
modification ,click “cancel”to give up modifying.
(b) The mouse points to the contact and click the right button to show the below interface,click the left button
to choose what you want to edit “phonenumber” or “property”
(i)Modify phonenumber:click the left button to choose the phone number you want to edit,the edit dialogue
appears. you can modify the contact’s mobile phone、office phone、home phone.after finished editing,you click
“ok” to save the modification,click “cancel” to give up modifying.
(ii)Property:click the left button to open the property dialogue ,you can modify the contact’s property and add
other property. The property you can edit include: :contact’s name,email,home information, business information,
personal information and other related information. After finish editing,click ”ok” to save the modification ,click
“cancel”to give up modifying.
zCall the contact who has added the phonenumber
6

Pick up the handset, open the phonebook after you hear the dial tone,point to the contact you want to call and
click the right button to choose the phonenumber to call,then the phonenumber will be automatically called out.
Note :
(1) This function is only suitable for the contact who has added the contact phonenumber in the phonebook
(2) To ensure the call to be carried out successfully,you must accord to the rule that the service provider has
made when you edit the contact’s phonenumber.
Instruction:this program uses the the Outlook Express program,so the contact that has been added in the
Outlook Express will be automatically showed in the phonebook,it is also true when you do the same
operation in the phonebook program.Any change made in either program will be effective in both.
4.2.5 Volume adjustment
You can also adjust the volume on the handset – this is a three level adjustment, which includes minimum,
mediate, maximum.
4.2.6 Redial
Press to enter dialing state, Press or ‘#’ to redial the latest number you dialed.
4.2.7 Mute
Press ‘Mute’ to use mute function.
4.2.8 Use C key to clear what you have input
Press C key to clear what you have input.
4.2.9 Caller ID display
You can see the incoming caller’s number in the on-screen status bar.
4.2.10 Use * to correct a number
If you make an error while dialing a phone number you can use the * key to back up one number. For example, if
you dialed 620, but you meant to dial 621, just hit the “*” key to backspace then correct and continue.
5. Service Features
zNetphone calling Netphone
zNetphone calling Regular Phone
zCall Forwarding
zRegular Phone Calling Netphone (As for Access Number, please refer to the service carrier’s website)
zConferencing
5.1 Netphone Calling Netphone
Every Netphone will be assigned a Netphone number. Netphone users can directly call each other’s number.
Example:A user with the number 6667777 calling another user with the number 7778888.
The 6667777 simply press to enter dialing state and dial 7778888 .
7

5.2 Netphone Calling Regular Phone
Every Netphone user can call any land or mobile phone anywhere in the world. Please dial with the service
carrier’s dialing rule. Press or # key after inputting the telephone number.
Example 1: If a U.S service carrier’s dialing rule: To call a U.S or Canada number, please first dial 1, then the
telephone number.
Netphone calling a U.S/Canada regular number 213-666-8888.
Press to enter dialing state and dial 1-213-666-8888 .
Example 2: If a U.S service carrier’s dialing rule: To call other countries’ regular numbers, please first dial
011, then the country code (no ‘0’as prefix), and dial the telephone number at last.
Netphone user calling a China regular number 0755-88889999.
Press to enter dialing state and dial 0118675588889999 .
Example 3: If a China service carrier’s dialing rule: To call other countries’ regular numbers, please dial the
district code, and dial the telephone at last.
Netphone user calling a China regular number 0755-88889999.
Press to enter dialing state and dial 075588889999 .
5.3 Call Forwarding
8
¾Online Call Forwarding
The incoming call will unconditional
/always forward to the number you
have set here
If this "always” function is effective,
the below two don’t work
NOTE: Call forwarding target number must be a PSTN number, with more than 7 digits.
When the phone is busy, the
incoming call will automatically
forward to the number you have set
here before
If the no answer time excesses the
time value you have set, the
incoming call will automatically
forward to the number you set here
before
¾Offline Call Forwarding
Netphone also has call forwarding feature, when the user is not online, the incoming call can be forwarded to
a preset telephone number.

Settings:
Enter my account page on service website to set the forwarded number. The number must accord with service
carrier’s dialing rule.
Please type in the target number, which will be forwarded to.
NOTE: Call forwarding target number must be a PSTN number, with more than 7 digits.
Example 1: If a U.S service carrier’s dialing rule: To forward to a U.S or Canada number, please first dial 1,
then the telephone number.
Netphone user wants to make a call forward to 213-666-8888, please fill in 12136668888.
Example 2: If a U.S service carrier’s dialing rule: To forward to other countries’ regular numbers, please first
dial 011, then the country code (no ‘0’as prefix), and dial the telephone at last.
Netphone user wants to make a call forward to 0755-88889999, please fill in 0118675588889999.
Example 3: If a China service carrier’s dialing rule: To call other countries’ regular numbers, please dial the
district code, and dial the telephone at last.
Netphone user want to make a call forward to 0755-88889999. Netphone user can fill in 075588889999.
5.4 Regular Phone calling Netphone
This is an optional service. Only areas that provides Netphone access numbers allow calls from a regular
phone to Netphone, for detail please refer to ‘Access Number List’on the Carrier Service page.
5.5 Conferencing
How it Works
Once the conferencing call feature has been set-up on your account, you can initiate a conference and have a
conference with different parties simultaneously. You will act as a ‘Host’ and invite ‘Participants’ into the
conference that you initiated.
Setting yourself up for conference calling now
9

zGo to “My Account” interface
zEnter your IP Phone Number, Password and the digits displayed then click Submit.
zClick “My Conference Call” in the grey menu bar to view the Conference Call Setup:
zEnter the maximum number of people you will likely be conferencing with at one time.
zIn some circumstances a password will be required for the Host and Participant to be involved in the
conference.
zClick on the check boxes to select the defaults of 1234 and 4321 to be the password or change them to
something else you will remember easily. (If you do not click on the check boxes a random password will be
chosen and advised to you.)
zClick Submit and your conference feature will be established.
How to initiate a conference call and invite others.
You, as the Host, enter the conference and bring the other participants into the call:
Steps in Detail:
A. Dial access number, followed by # from your Phone.
B. You will hear a beep tone confirming that you have entered the conference room. Now press # to invite a
Participant to the conference room. After hearing the voice prompt ‘Please enter the destination phone number
followed by the pound key’, dial the phone number of the person you want to bring into the conference and
then press #. After the Participant answers, press # to add this participant to the conference. Alternatively if
you dialed the wrong number or the Participant does not answer just press the “*” key and you will be
returned to the conference without the Participant.
10

11
C. To invite another participant, press #, wait for prompt, dial next participant’s phone number followed by #,
wait for answer and then press # to join them into conference. Repeat this process to invite more participants
into the conference. Remember you can use * if you want to return to the conference without the Participant.
Note: You can conference other users by simply dialing their Phone number followed by #. For Participants
with regular phone just dial the international dialing prefix followed by their regular telephone number
and then press #.
How to have participants to enter the conference room themselves
Any participant that has a Netphone can dial our participant access number to enter an active conference
himself or herself. However the conference call needs to have already been initiated by the Host before the
participant can join.
Steps in Detail:
A. The Host must setup the Participant Password on the “My Account” web site. The Host must then tell the
Participants the conference ID and the Participant password.
B. Host initiates the Conference by dialing, host access number + #.
C. Participant dials participant access number + #. Participant will hear the prompt ‘To join a conference, press 1.
To listen to a conference recording, press 2. To access your messages, press 3. To leave a voice mail, press the
star key’. Participant should then press 1 and will hear the prompt “Please enter conference ID”. Participant
should then enter the conference ID (Host’s Phone number) followed by #. Finally Participant will hear the
prompt “Please enter the conference password followed by the # key” and should then enter the Participant
password followed by # to enter the conference.
D. Other participants can follow the same process as mentioned in C. to join the conference.
Note: Participants who only have a regular phone and are located in USA, Hong Kong or Taiwan can enter the
conference from their regular phone by dialing the local access number (contact us for details) and once
connected can dial participant access number + # as above. Otherwise the participant can only be invited into
the conference by host
6. Frequent Problems and Answer
Problem Possible Cause Solution
The account is being used Somebody else is using your
account or you did not log out
properly last time you used it.
Please make sure your account number is not
being used by anyone else. Restart your
computer and log in again.
Either the USB driver is not
properly installed, your computer
does not support USB 1.1 devices
Check that your USB device driver has been
properly installed. If not, upgrade the USB
driver and try again, or you can call customer
service center for help
Can not find device
Your Netphone is not plugged into
your computer.
Check whether your Netphone is connected
successfully
Please check your
password or phone
number.
Wrong ID, password or phone
number
Please contact the service carrier’s customer
center

12
Check your server
address, click ‘Edit’
button to edit
Port UDP1719, 1710 is blocked Please contact your Network Administrator
Your network might have
firewall
Port UDP1719, 1710 is blocked or
data are modified
Please contact your Network Administrator
7. Others
7.1 Features
zAccess to gatekeepers
zOnline update
zSilence detect
zCNG (Comfort noise generation)
zDynamic voice jitter buffer
zCan be used in locking and screen saving status
zOptional dialing-tone and ring-tone
7.2 Standards and agreements
zUSB 1.1 or above
zG.711 A-law & µ-law、GSM6.10、G.729
zH.323 v2
zTCP/IP
7.3 Dimensions
z125 x 45 x 17 mm (L x W x H)
7.4 The electrical specifications
zVoltage: 5V
zPower: 600mW
zEMC: FCC Part15 CLASS B
7.5 Working/storing environment
zWorking temperature: 0°C to 50°C (32°F to 122°F)
zStoring temperature: -30°C to 65°C (-22°F to 149°F)
zWorking humidity: 10% to 90%
7.6 Recommend usage net condition
zDelay: Less than 400ms
zJitter: Less than 100ms
zPackage lost percent: Less than 10%
zBandwidth: More than 28.8Kbps
Safety Warning: Please do not place this product under fire and high temperature. Avoid heavy impact,
and do not leave the product in rainy or highly humid environments!
Current user manual is made based on the functions of present products, if any content change has made,
no further notice.
Table of contents