Klark Teknik DN9620 User manual

DN9620
Dual-port AES50 Extender
User Manual
DOC02-DN9620UM Issue B

2DN9620
Contents
1. Introduction ................................................................................................4
1.1 Key features ..........................................................................................................................4
1.2 About this manual................................................................................................................4
2. Getting Started ...........................................................................................5
2.1 Unpacking.............................................................................................................................5
2.2 Installation............................................................................................................................5
2.3 Connecting up ......................................................................................................................5
2.4 Powering the unit on/o......................................................................................................5
3. Front panel ..................................................................................................6
4. Rear panel....................................................................................................6
5. Connections.................................................................................................7
6. Technical Specications .............................................................................8
7. Service Information ....................................................................................8
7.1 Routine maintenance...........................................................................................................8
7. 2 Cleaning the unit ..................................................................................................................8
7. 3 Cleaning the optical connectors .........................................................................................8
7.4 Replacing the mains fuse.....................................................................................................8
7. 5 Equipment disposal .............................................................................................................9

3
Terminals marked with this symbol carry
electrical current of sucient magnitude
to constitute risk of electric shock.
Use only high-quality professional speaker cables with
¼"TS or twist-locking plugs pre-installed. Allother
installation or modication should be performed only
by qualiedpersonnel.
This symbol, wherever it appears,
alertsyou to the presence of uninsulated
dangerous voltage inside the
enclosure-voltage that may be sucient to constitute a
risk ofshock.
This symbol, wherever it appears,
alertsyou to important operating and
maintenance instructions in the
accompanying literature. Please read the manual.
Caution
To reduce the risk of electric shock, donot
remove the top cover (or the rear section).
No user serviceable parts inside. Refer servicing to
qualied personnel.
Caution
To reduce the risk of re or electric shock,
do not expose this appliance to rain and
moisture.The apparatus shall not be exposed to dripping
or splashing liquids and no objects lled with liquids,
suchas vases, shall be placed on the apparatus.
Caution
These service instructions are for use
by qualied service personnel only.
Toreduce the risk of electric shock do not perform any
servicing other than that contained in the operation
instructions. Repairs have to be performed by qualied
servicepersonnel.
1. Read these instructions.
2. Keep these instructions.
3. Heed all warnings.
4. Follow all instructions.
5. Do not use this apparatus near water.
6. Clean only with dry cloth.
7. Do not block any ventilation openings. Install in
accordance with the manufacturer’s instructions.
8. Do not install near any heat sources such as
radiators, heat registers, stoves, or other apparatus
(including ampliers) that produce heat.
9. Do not defeat the safety purpose of the polarized
or grounding-type plug. A polarized plug has two blades
with one wider than the other. A grounding-type plug
has two blades and a third grounding prong. The wide
blade or the third prong are provided for your safety. Ifthe
provided plug does not t into your outlet, consult an
electrician for replacement of the obsolete outlet.
10. Protect the power cord from being walked on or
pinched particularly at plugs, convenience receptacles,
and the point where they exit from the apparatus.
11. Use only attachments/accessories specied by
themanufacturer.
12. Use only with the
cart, stand, tripod, bracket,
or table specied by the
manufacturer, orsold with
the apparatus. When a cart
is used, use caution when
moving the cart/apparatus
combination to avoid
injury from tip-over.
13. Unplug this apparatus during lightning storms or
when unused for long periods of time.
14. Refer all servicing to qualied service personnel.
Servicing is required when the apparatus has been
damaged in any way, such as power supply cord or plug
is damaged, liquid has been spilled or objects have fallen
into the apparatus, the apparatus has been exposed
to rain or moisture, does not operate normally, or has
beendropped.
15. The apparatus shall be connected to a MAINS socket
outlet with a protective earthing connection.
16. Where the MAINS plug or an appliance coupler is
used as the disconnect device, the disconnect device shall
remain readily operable.
TECHNICAL SPECIFICATIONS AND APPEARANCES
ARE SUBJECT TO CHANGE WITHOUT NOTICE AND
ACCURACY IS NOT GUARANTEED. BEHRINGER,
KLARKTEKNIK, MIDAS, BUGERA, ANDTURBOSOUND
ARE PART OF THE MUSIC GROUP MUSICGROUP.COM.
ALL TRADEMARKS ARE THE PROPERTY OF THEIR
RESPECTIVE OWNERS. MUSICGROUP ACCEPTS NO
LIABILITY FOR ANY LOSSWHICH MAY BE SUFFERED
BY ANY PERSONWHO RELIES EITHER WHOLLY OR
IN PART UPON ANY DESCRIPTION, PHOTOGRAPH
OR STATEMENT CONTAINED HEREIN. COLORS AND
SPECIFICATIONS MAY VARY FROM ACTUAL PRODUCT.
MUSIC GROUP PRODUCTS ARE SOLDTHROUGH
AUTHORIZED FULLFILLERS AND RESELLERS ONLY.
FULLFILLERSAND RESELLERS ARE NOT AGENTS OF
MUSICGROUP AND HAVE ABSOLUTELY NO AUTHORITY
TO BIND MUSICGROUP BY ANY EXPRESS OR IMPLIED
UNDERTAKING OR REPRESENTATION. THIS MANUAL
IS COPYRIGHTED. NO PART OF THIS MANUAL MAY
BE REPRODUCED OR TRANSMITTED IN ANY FORM
OR BY ANY MEANS, ELECTRONIC OR MECHANICAL,
INCLUDING PHOTOCOPYING AND RECORDING OF ANY
KIND, FOR ANY PURPOSE,WITHOUT THE EXPRESS
WRITTEN PERMISSION OF MUSICGROUPIPLTD.
ALL RIGHTS RESERVED.
© 2013 MUSICGroupIPLtd.
Trident Chambers, Wickhams Cay, P.O. Box 146,
Road Town, Tortola, British Virgin Islands
For the applicable warranty terms and conditions
and additional information regarding MUSIC Group’s
LimitedWarranty, please see complete details online at
www.music-group.com/warranty.
Important Safety
Instructions
LEGAL DISCLAIMER
LIMITED WARRANTY
User Manual

4DN9620
DN9620 Dual-port AES50 Extender
1. Introduction
Welcome!
Thank you for purchasing a KLARK TEKNIK DN9620 Dual-port AES50 Extender.
The DN9620 is a premium quality Dual-port AES50 Extender designed to take
one or two AES50 connections, convert them to HyperMAC for transport over
distances of up to 100m (copper snake) or 500m (optical snake) and then convert
them back to AES50 on a port-for-port basis.
The DN9620, which is 1U high and half of the width of a 19" rack, can be stand
alone or tted in a rack. In stand alone mode the DN9620 rests on four feet
(supplied loose). However, there is an option for the DN9620 to be rack mounted
via a special bracket, which houses two DN9620s side by side.
The DN9620 will operate at sample rates of either 48 kHz or 96 kHz. At 96kHz,
each AES50 port carries a maximum of 24 bi-directional audio channels plus
control data and the HyperMAC ports carry a maximum of 192 bi-directional
audio channels plus control data. While, at 48kHz each AES50 port carries
a maximum of 48 bi-directional audio channels plus control data and the
HyperMAC ports carry a maximum of 384 bi-directional audio channels plus
control data. The AES50 input format is suitable for products in the Midas digital
console range and future AES50-enabled Behringer digital consoles.
Two DN9620s are required in a typical system set-up, each one being congured
via a simple utility that is based on hypertext transfer protocol (http) and
accessed through an Ethernet control port on the front panel.
The DN9620 was conceived by KLARK TEKNIK to oer audio professionals high
performance audio equipment, designed to provide no-compromise sonic
quality with a feature set that oers all essential facilities and functions. It
represents the very best of British design and engineering combined with
contemporary, ecientmanufacturing methods, and will give you many years of
reliableservice.
So, to obtain the best results with a minimum of eort, please read this manual
and, nally, enjoy your KLARK TEKNIK DN9620 Dual-port AES50 Extender!
1.1 Key features
The DN9620 has the following key features:
• 2 x AES50 etherCON® input ports.
• 2 x HyperMAC ports, giving the option of connecting an optical bre snake
via an opticalCON® port or copper snake via an etherCON port.
• Sample rate options of 96 kHz or 48 kHz.
• Three clock options: internal; external AES50; and external snake.
• Snake, sample rate and clock source selection and current status indication.
• AES50 audio and snake health status indication.
• Ethernet control port for unit conguration (IP address, sample rate, clock
options, etc.) via on-board web-based application.
• Unit is transparent when connected to console (cannot be detected), so that
any device connected at an AES50 port will have its signalling information
(port and redundancy information, diagnostics, discovery, etc.) mirrored at
the other DN9620.
• Mains input is a switch mode power supply (SMPS) with IEC mains cable
socket, on/o switch and fuse drawer for easy fuse replacement.
• Internal fan.
1.2 About this manual
This is the user manual for the DN9620 Dual-port AES50 Extender. It is intended
to help get your unit installed and in operation as quickly as possible by giving
you unpacking, installation, connection, setting up and operating instructions.
To help familiarise you with the DN9620 there is a description of the front and
rear panels and maintenance instructions to ensure your DN9620 gives you
optimum performance.

5User Manual
2. Getting Started
This section shows you how to unpack, install, connect up, power up and
congure the DN9620 unit.
◊ This equipment is supplied by a mains voltage that can cause electric shock
injury.
◊ This equipment is supplied with a bre optic connection system. Beware of
laser radiation. Do not stare into the beam!
◊ Before installing, setting up or operating this equipment, make sure that you
have read and fully understand all of this section and the “Important safety
instructions” at the front of this manual.
2.1 Unpacking
Carefully unpack your DN9620 equipment package.
Then, inspect the DN9620 unit carefully for any signs of damage that may have
occurred during transit and notify the courier immediately if you discover any.
Check the contents of your DN9620 equipment package. If there are any parts
missing, incorrect or faulty, please contact your local distributor or Midas at the
address at the front of this manual.
Please retain the original packing in case you should need to return the
equipment to the manufacturer or supplier, or transport or ship the unit later.
2.2 Installation
Before installing and operating this equipment, make sure it is correctly
connected to the protective earth conductor of the mains voltage supply socket
outlet through the mains lead.
Do not install the equipment in places of poor ventilation.
Do not install this equipment in a location subjected to excessive heat, dust or
mechanical vibration. Allow for adequate ventilation around the equipment,
making sure that its fans and vents are not obstructed. Wheneverpossible,
keepthe equipment out of direct sunlight.
Power
◊ The supply cord must be unplugged to ensure complete de-energisation of
the unit.
The internal power supply is of the switch mode type that automatically senses
the incoming mains voltage and will work where the nominal voltage is in the
range 110V AC to 230V AC.
A mains inlet is provided on the rear panel. The correct lead for your geographical
area is supplied with the unit. The equipment should only be plugged into the
mains outlet using the supplied lead.
Handling the equipment
When lifting or moving the equipment, always take its size and weight into
consideration.
Completely isolate the equipment electrically and disconnect all cables from the
equipment before moving it.
Do not insert your ngers or hands in any gaps or openings on the equipment,
forexample, vents.
Electric elds
In accordance with Part 15 of the FCC Rules & Regulations, “… changes or
modications not expressly approved by the party responsible for compliance
could void the user's authority to operate the equipment.”
Should this product be used in an electromagnetic eld that is amplitude
modulated by an audio frequency signal (20 Hz to 20 kHz), the signal to
noise ratio may be degraded. Degradation of up to 60dB at a frequency
correspondingto the modulation signal may be experienced under extreme
conditions (3V/m,90% modulation).
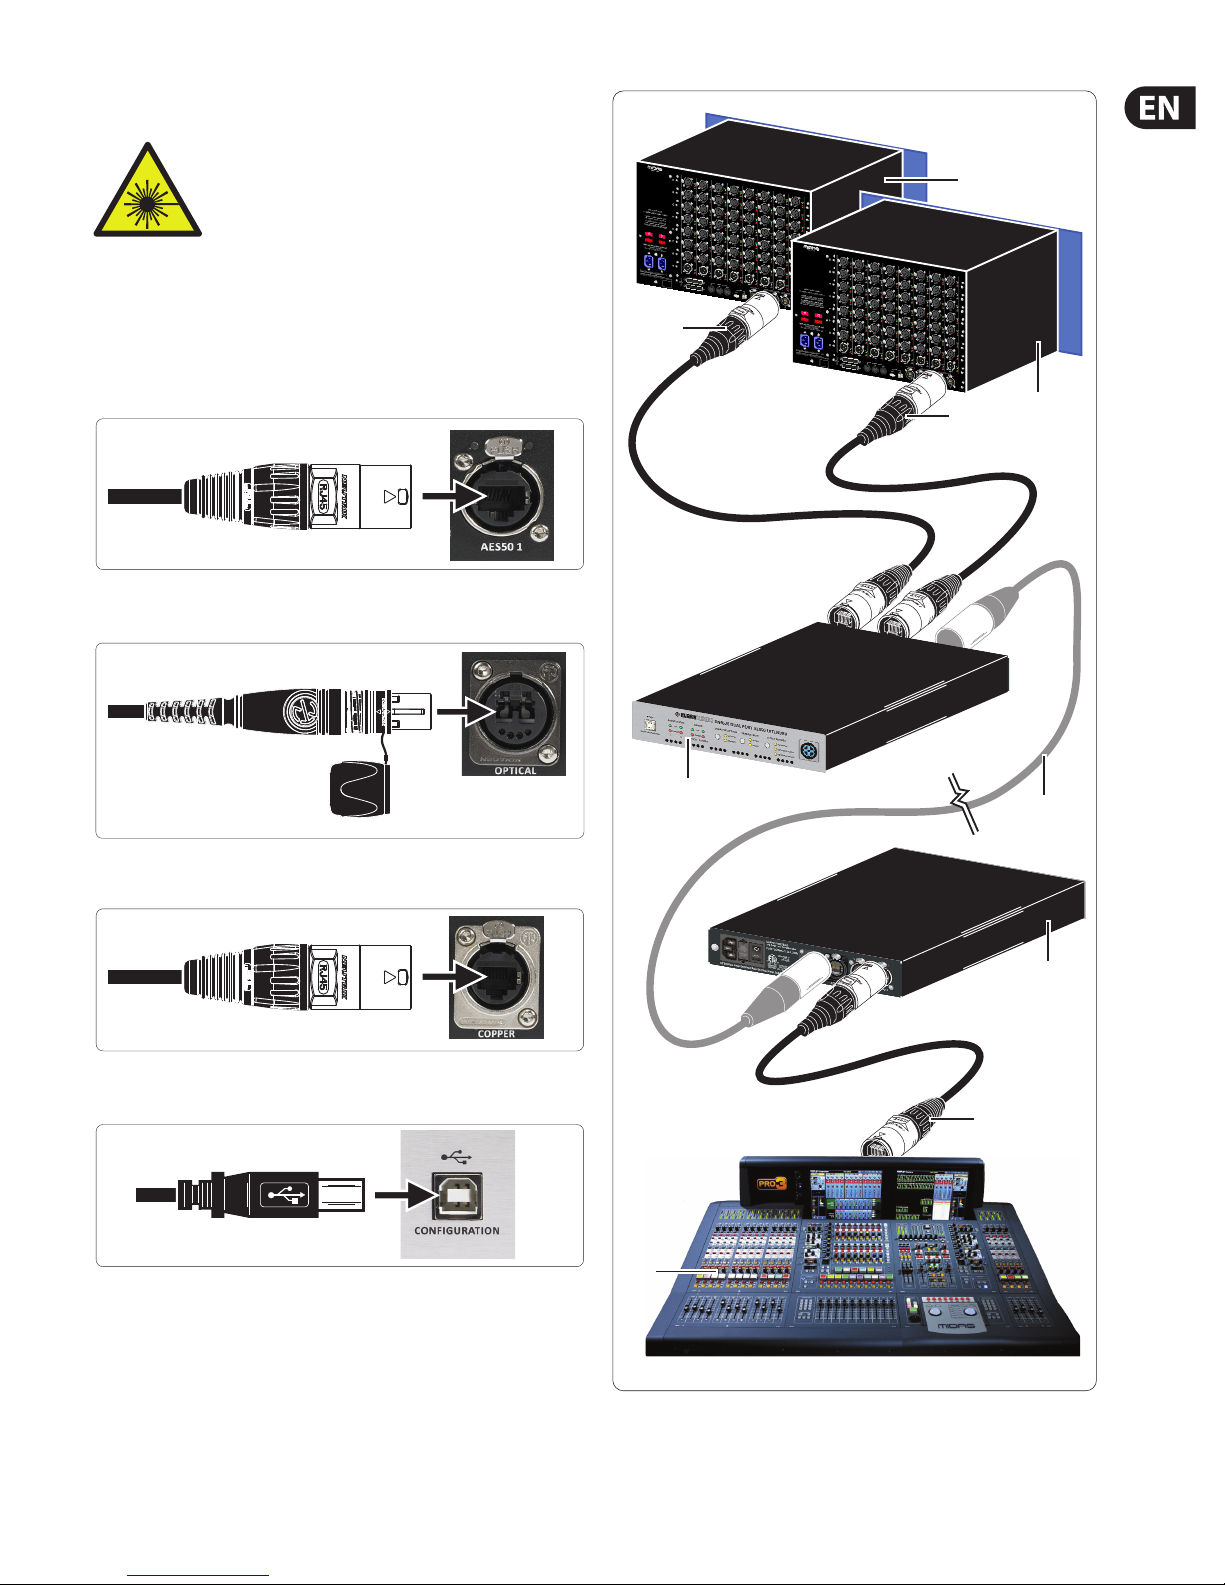
2.3 Connecting up
Connect up the unit(s) as required:
• AES50 cables from AES50-equipped device (for example, a console) to rst
DN9620.
• Optical/copper snake from rst DN9620 to second DN9620.
• AES50 from second DN9620 to other AES50-equipped device (for example,
an I/O unit).
• Mains power IEC connectors to both DN9620s.
For an example, see section 5 - Connections.
2.4 Powering the unit on/o
Switch on the mains on/o switch of both DN9620s (rear panel). The blue
roundel on the front panel of the unit should illuminate to show that power is on.
.

6DN9620
3. Front panel
1 7
2 5 6
8
3 4
(1) USB type B CONFIGURATION port to update the unit's software by
connecting a PC/Mac.
(2) AES50 audio status LEDs show the status of each AES50 port, where OK
pulsates to show good communication and ERROR ashes to show a
communication error.
(3) Snake status LEDs. Show the status of the connected snake (optical or
copper), where OK pulsates when link is synchronised between router and
end point, and ERROR ashes to show no communications or a fault.
(4) SNAKE SELECTION setion lets you choose which type of snake is currently
tted (optical or copper).
(5) SAMPLE RATE setion lets you choose the sample rate (96kHz or 48kHz).
(6) CLOCK SOURCE setion lets you choose the clock source, where: INTERNAL
= the DN9620's internally generated clock is used; EXTERNAL AES50 = the
DN9620 automatically searches the AES50 ports for the rst valid clock; and
EXTERNAL SNAKE = the clock on the snake connection is used.
(7) Backlit Klark Teknik roundel, which illuminates light blue to show that the
unit is powered up.
(8) Ventilation grill.
4. Rear panel
9
10a 10b
9b
9c9a
11
10
12
(9) Mains power inlet. This is a switch mode power supply that has a mains IEC
socket (9a), power on/o switch (9c) and a fuse drawer (9b) that houses an
easily replaceable mains fuse.
(10) Snake connectors for connecting the DN9620 to another AES50-enabled
device. You can connect a bre optic connector to the opticalCON connector
of the OPTICAL port (10a) or a Cat5e or Cat6 copper snake to the etherCON
connector of the COPPER port (10b).
Caution
Laser radiation; do not stare into beam!
(11) Two AES50 connectors.
(12) Fan

7User Manual
5. Connections
Caution: Laser radiation; do not stare into beam!
To ensure the correct and reliable operation of the equipment, only high quality
balanced, screened, twisted pair audio cable should be used.
XLR connector shells should be of metal construction so that they provide
a screen when connected and, where appropriate, they should have Pin 1
connected to the cable screen.
5
1
1
2
2
3
4
3
2
Typcial connection diagram.
A. Two DL351 modular I/O units. B. Up to 100m AES50 cables (console to DN9620).
C. DN9620 units. D. DN9620 snake (option of optical or copper). E. Digital console
(for example, PRO3).
AES50 etherCON connector
DN9620 snake - optical opticalCON connector option to OPTICAL socket
DN9620 snake - copper etherCON connector option to COPPER socket
PC/Mac RJ45 connector to ETHERNET CONTROL socket

8DN9620
7. Service Information
This section gives you servicing information for your unit.
If you are in any doubt or have queries about any of the procedures in this section,
contact Midas Technical Support. Contact details can be found at the front of
thismanual.
7.1 Routine maintenance
To help keep your unit in good working order and to make sure it gives you
optimum performance, we recommend that you carry out the following every
month.
• Clean the unit (see "7.2 Cleaning the unit").
• Check the functionality of the LEDs and the power on/o indicator.
• Check the functionality of the equipment.
• Clean the optical chassic connector and also, if necessary, the optical snake
connectors (see "7.3 Cleaning the optical connectors").
7. 2 Cleaning the unit
◊ Switch o the unit and electrically isolate it from the mains beforecleaning.
Clean the unit using a dry, lint-free cloth. Don’t use harsh abrasives or solvents.
7. 3 Cleaning the optical connectors
Caution: Laser radiation; do not stare into beam!
◊ Before cleaning the optical chassis connector on the rear panel of the
DN9620, electrically isolate the unit by switching it o and removing the
mains cable from the rear of the unit.
◊ Before cleaning an optical connector on the snake, disconnect the snake at
both ends for safety reasons. Invisible laser radiation may be emitted from
disconnected bres or connectors. Do not stare into the beams or view
directly with optical instruments.
To clean an optical connector on the rear of the DN9620 or on the snake, see the
“HANDLING INSTRUCTION, opticalCON/Fiber Optic Connection System”, which is
downloadable from the Neutrik webiste at "http://www.neutrik.co.uk/zoolu-
website/media/download/163/opticalCON+Handling+Instruction".
7.4 Replacing the mains fuse
◊ Switch o the power to the unit and electrically isolate it from the mains
before replacing the mains fuse.
To replace the mains fuse, carry out the following (see Figure 1):
1) Switch o the power to the DN9620 unit at the mains power outlet.
2) Remove the mains IEC connector from the rear of the unit.
3) Pull out the fuse drawer and remove the faulty fuse.
4) Fit a new fuse, ensuring it conforms to the correct rating and specication.
5) Fit the fuse drawer back into its compartment.
6. Technical Specications
© 2013 MUSIC Group IP Ltd. Technical specications and appearances are subject
to change without notice and accuracy is not guaranteed. MIDAS and KLARK
TEKNIK are part of the MUSIC Group (music-group.com).
DN9620 general specications
Dimensions 1.8 (1U) x 8.6 x 10.1"
45 x 218 x 257 mm
Net weight 5.8 kg
Shipping weight 7.4 kg
Power consumption 50W
Power requirement 100-240V~, 50-60Hz
Operating temperature range +5°C to 45°C
Storage temperature range -20°C to +60°C
Inputs and outputs
Audio 2 x AES50 etherCON ports with integral
status LEDs
Snake (options) 1 x copper HyperMAC port (cable can
be up to 100 m long)
1 x optical HyperMAC port (cable can
be up to 500 m long)
Unit conguration port 1 x Ethernet control port for RJ45
connector
Mains power inlet 3-pin IEC connector

9User Manual
Figure 1: Mains fuse compartment on rear panel.
A. Mains IEC socket. B. Fuse compartment. C. Spare fuse. D. Mains fuse.
E. Fuse holder.
7. 5 Equipment disposal
When this equipment has come to the end of its useful life, its disposal may
come under the DIRECTIVE 2002/96/EC OF THE EUROPEAN PARLIAMENT
AND OF THE COUNCIL of 27 January 2003 on waste electrical and electronic
equipment(WEEE).
Hazardous substances in WEEE contaminate water, soil and air and ultimately put
at risk our environment and health. The directive aims to minimize the impacts of
WEEE on the environment during their life times and when they become waste.
The WEEE directive addresses the disposal of products when they have reached
the end of their life and contributes to the reduction of wasteful consumption of
natural resources. This will help to reduce pollution, and protect the environment
and ourselves.
If this equipment carries a ‘crossed-out wheelie bin’
(shown left), please do not dispose of WEEE as unsorted
municipal waste but collect and dispose of in accordance
with local WEEE legislation. The horizontal bar underneath
indicates that the product was placed on the EU market
after 13th August 2005.
For WEEE disposal, see our website at midasconsoles.com
for information.
A
B
CD
E

10 DN9620
Other important information
1. Register online. Please register your new Klark
Teknik equipment right after you purchase it by visiting
klarkteknik.com. Registering your purchase using our
simple online form helps us to process your repair claims
more quickly and eciently. Also, read the terms and
conditions of our warranty, if applicable.
2. Malfunction. Should your MUSIC Group
Authorized Reseller not be located in your vicinity,
youmay contact the MUSIC Group Authorized Fulller
for your country at
klarkteknik.com
. If your country is
not listed please contact the “United Kingdom (Midas/
KT mainoce)” located under “ServiceService/
Repairs” on the
klarkteknik.com
website. Alternatively,
pleasesubmit the online warranty return form found
under “ServiceWarranty Registration” on
klarkteknik.
com
BEFORE returning the product. All enquires must be
accompanied by the description of the problem and the
serial number of the product. Thewarranty eligibility will
be veried from the original sales receipt.
3. Power Connections. Before plugging the
unit into a power socket, please make sure you are using
the correct mains voltage for your particular model.
Faultyfuses must be replaced with fuses of the same type
and rating without exception.
Important information

11User Manual
FEDERAL COMMUNICATIONS
COMMISSION COMPLIANCE
INFORMATION
Responsible Party Name: MUSIC Group Research
UK Limited
Address: Klark Industrial Park,
Walter Nash Road,
Kidderminster. Worcestershire.
DY11 7HJ. England.
Phone/Fax No.: Phone: +44 1562 741515
Fax: +44 1562 745371
DN9620
complies with the FCC rules as mentioned in the following paragraph:
This equipment has been tested and found to comply with the limits for a Class A
digital device, pursuant to Part 15 of the FCC Rules. These limits are designed to
provide reasonable protection against harmful interference when the equipment
is operated in a commercial environment. This equipment generates, uses, and can
radiate radio frequency energy and, if not installed and used in accordance with
the instruction manual, may cause harmful interference to radio communications.
Operation of this equipment in a residential area is likely to cause harmful
interference in which case the user will be required to correct the interference at his
own expense.
Important information:
Changes or modications to the equipment not expressly approved by MUSIC Group
can void the user’s authority to use the equipment.
DN9620
MUSIC Group Research UK Limited

Klark Industrial Park, Walter Nash Road,
Kidderminster. Worcestershire. DY11 7HJ. England.
Tel: +44 1562 741515, Fax: +44 1562 745371
Email: mkt.info@music-group.com
Website: klarkteknik.com
© 2013 MUSIC Group IP Limited
Other manuals for DN9620
1
Table of contents
Other Klark Teknik Extender manuals