KLIM 10U User manual

User’s Guide
www.klim.com
for Klim Krios Helmets
English

10U
© 1998-2016 Sena Technologies, Inc. All rights reserved.
Sena Technologies, Inc reserves the right to make any changes and improvements to its product without providing prior notice.
Sena™ is a trademark of Sena Technologies, Inc. or its subsidiaries in the USA and other countries. Prism™, Bluetooth Audio Pack for GoPro®,
Tufftalk™, 20S™, 10S™, 10C™, 10U™, 10R™, 3S™, SMH10™, SMH10R™, SMH5™, SMH5-FM™, SMH3™, SPH10™, SPH10H™, SPH10H-FM™,
SPH10S™, Expand™, Bluetooth Mic&Intercom™, Handlebar Remote™, Wristband Remote™, SM10™, SR10™, SR10i™ are trademarks of Sena
Technologies, Inc. or its subsidiaries. These trademarks may not be used without the express permission of Sena.
GoPro® is a registered trademark of Woodman Labs of San Mateo, California. Sena Technologies, Inc. (“Sena”) is not afliated with Woodman
Labs. The Sena Bluetooth Pack for GoPro®is an after-market accessory specially designed and manufactured by Sena Technologies, Inc. for the
GoPro®Hero3 and Hero4 allowing for Bluetooth capabilities.
The Bluetooth®word mark and logos are owned by the Bluetooth SIG, Inc. and any use of such marks by Sena is under license. iPhone, iPod
touch are registered trademarks of Apple Inc. Zumo™ is a trademark of Garmin Ltd. or its subsidiaries. TomTom™ is the trademark or registered
trademark owned by TomTom International B.V. Other trademarks and tradenames are those of their respective owners.

English
10U
CONTENTS
1 INTRODUCTION .......................................................................................................5
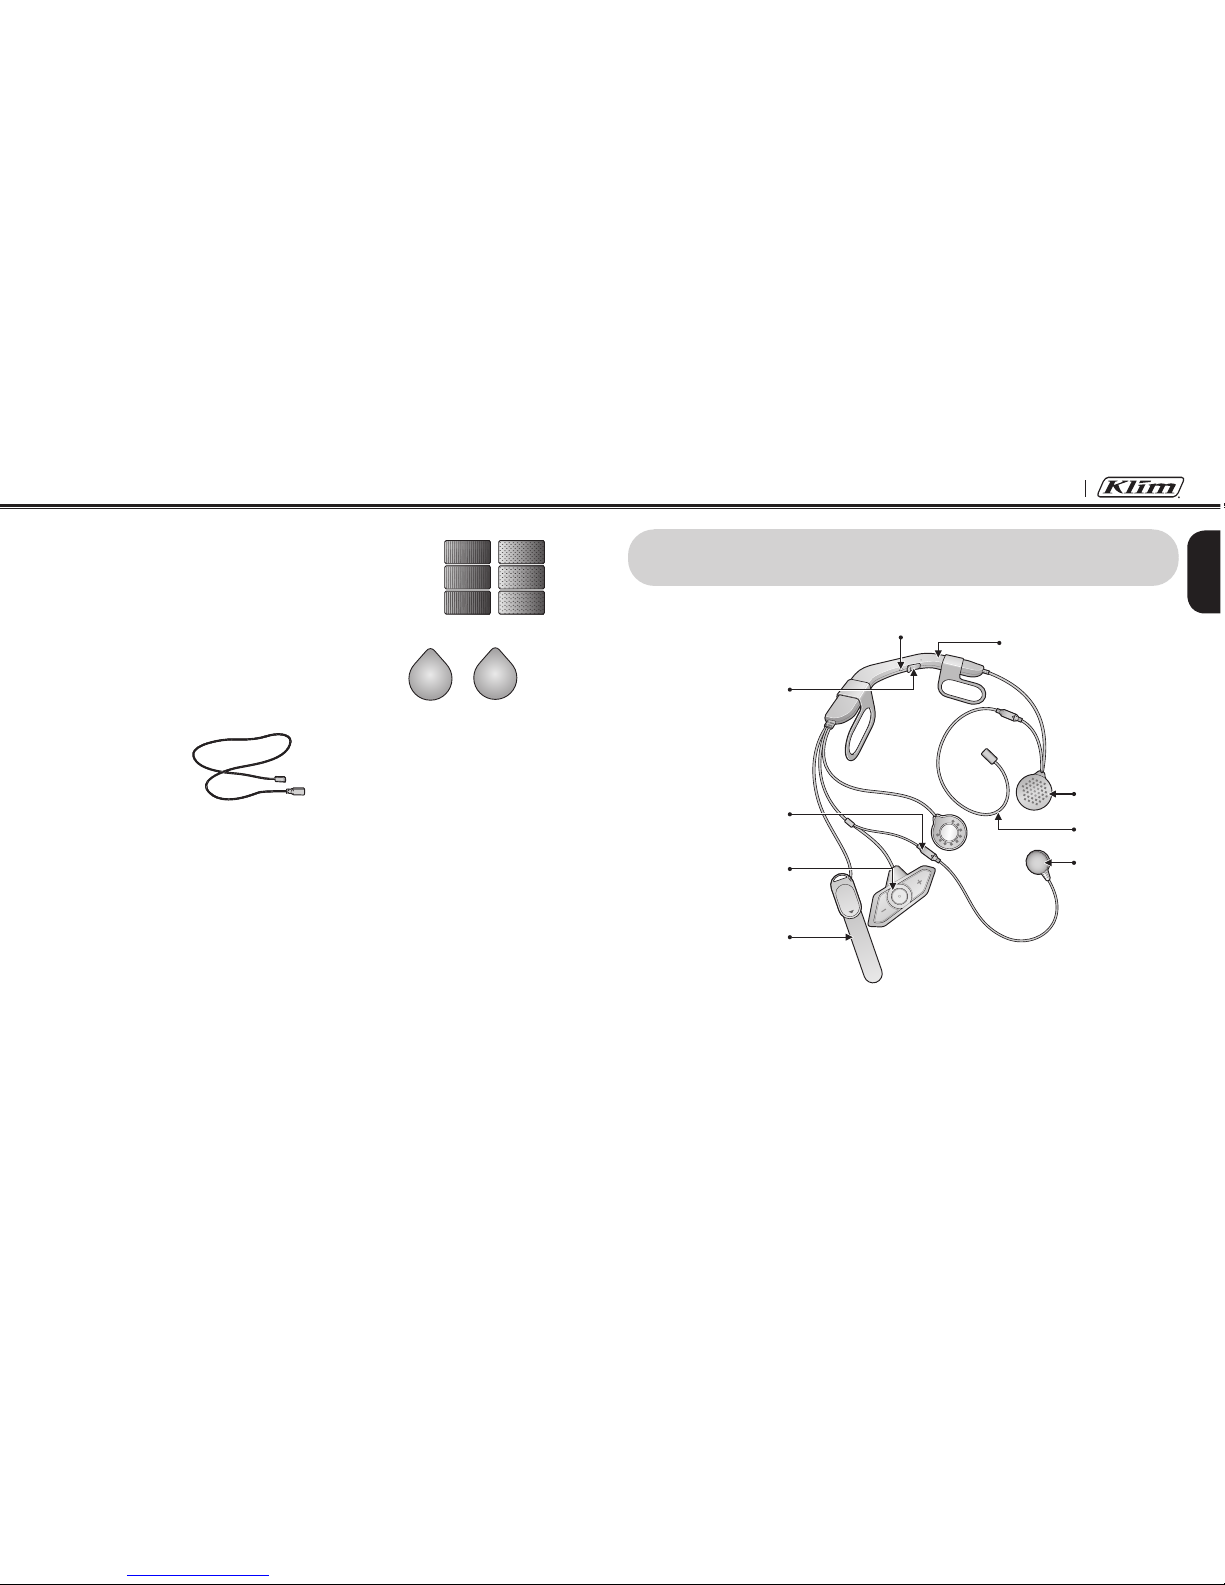
2 PACKAGE CONTENTS ............................................................................................6
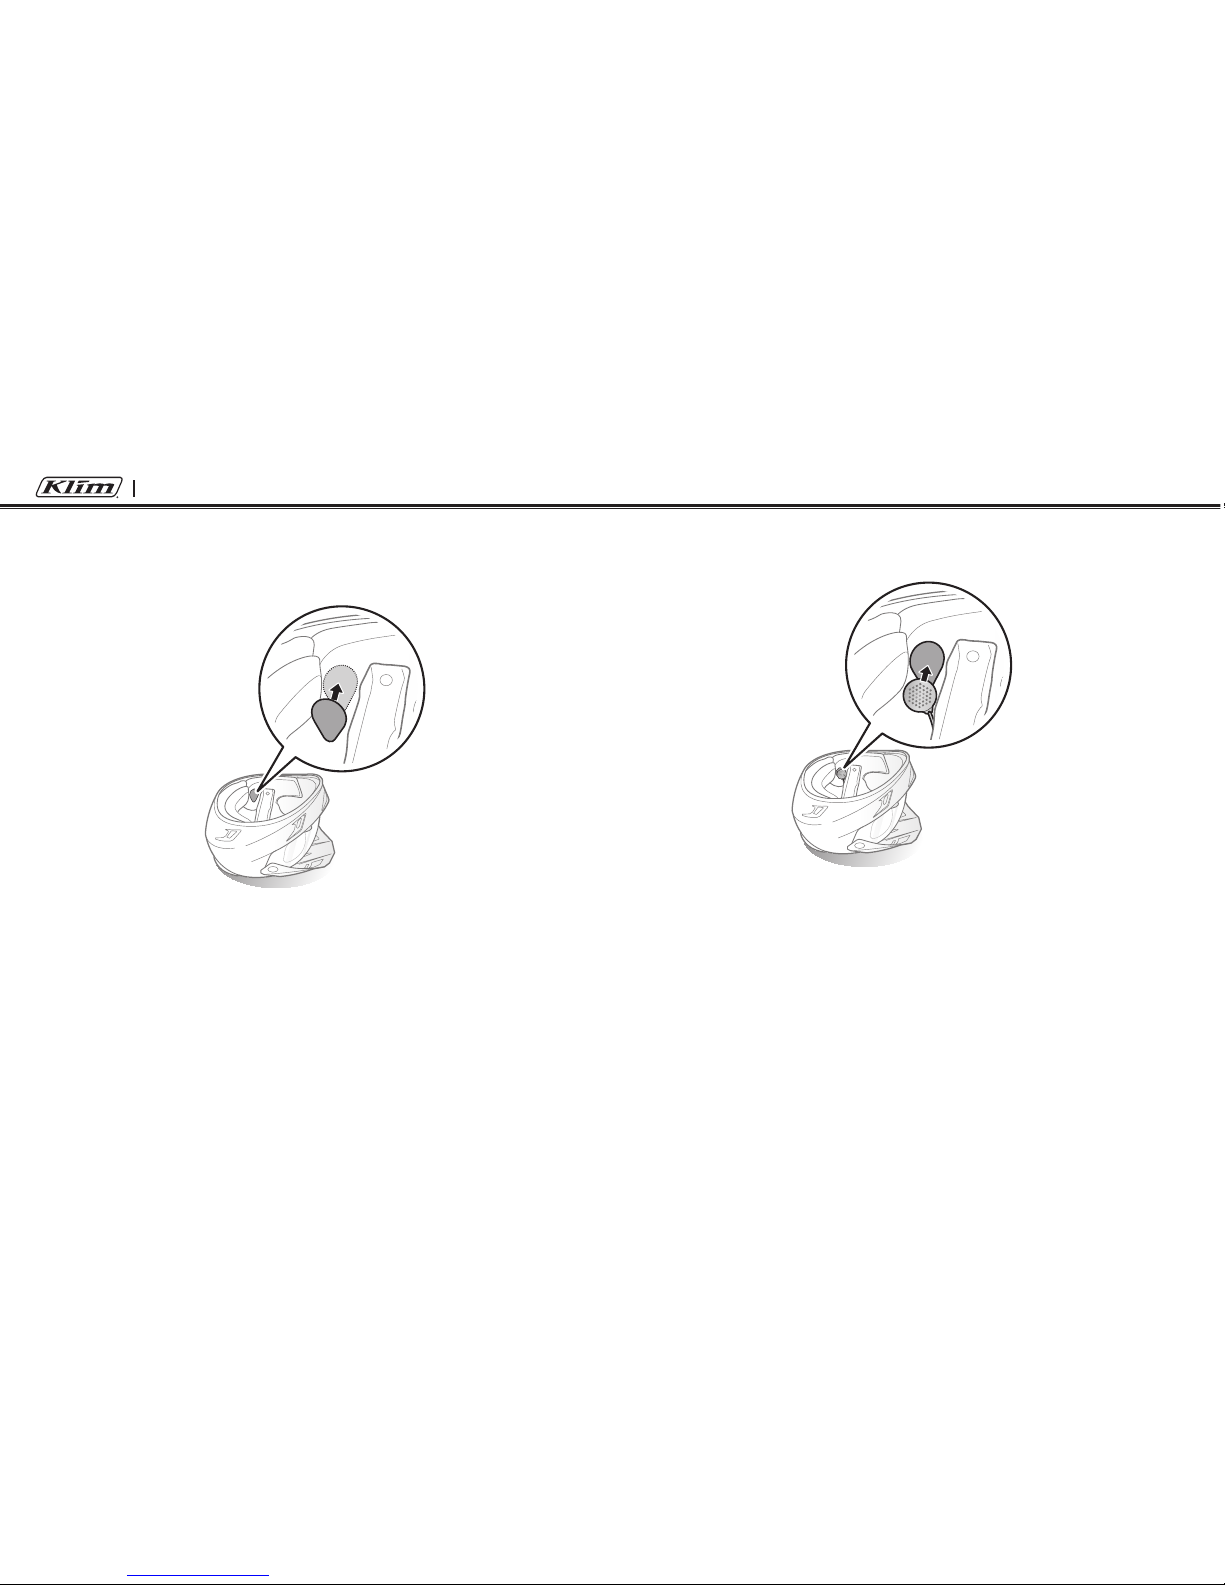
3 INSTALLING THE 10U ON YOUR HELMET............................................................7
3.1 Installing the Main Unit............................................................................................................8
4 GETTING STARTED.............................................................................................. 11
4.1 Button Operation...................................................................................................................11
4.2 Powering On and Off.............................................................................................................11
4.3 Charging................................................................................................................................12
4.4 Checking the Battery Level...................................................................................................12
4.5 Volume Adjustment ...............................................................................................................13
4.6 Sena Softwares .....................................................................................................................13
5 PAIRING THE 10U WITH BLUETOOTH DEVICES .............................................. 14
5.1 Mobile Phone Pairing - Mobile Phone, Bluetooth Stereo Device .........................................14
5.2 Second Mobile Phone Pairing - Second Mobile Phone, GPS, and SR10............................15
5.3 Advanced Selective Pairing - A2DP Stereo or Handsfree ...................................................16
5.4 Intercom Pairing ....................................................................................................................17
6 MOBILE PHONE, GPS, SR10 ............................................................................... 19
6.1 Mobile Phone Call Making and Answering...........................................................................19
6.2 Speed Dialing........................................................................................................................20
6.3 GPS Navigation.....................................................................................................................21
6.4 Sena SR10, Two-Way Radio Adapter ...................................................................................21
7 STEREO MUSIC .................................................................................................... 21
7.1 Bluetooth Stereo Music .........................................................................................................21
7.2 Music Sharing .......................................................................................................................22
8 INTERCOM............................................................................................................. 22
8.1 Two-way Intercom .................................................................................................................22
8.2 Three-way Intercom ..............................................................................................................23
8.3 Four-way Intercom.................................................................................................................25
9 THREE-WAY CONFERENCE PHONE CALL WITH INTERCOM
PARTICIPANT........................................................................................................ 26
10 GROUP INTERCOM .............................................................................................. 28
11 UNIVERSAL INTERCOM....................................................................................... 28
11.1 Universal Intercom Pairing....................................................................................................29
11.2 Two-way Universal Intercom .................................................................................................30
11.3 Three-way Universal Intercom ..............................................................................................30
11.4 Four-way Universal Intercom ................................................................................................32
12 FM RADIO .............................................................................................................. 34
12.1 FM Radio On and Off ............................................................................................................34
12.2 Preset Stations.......................................................................................................................34
12.3 Seek and Save ......................................................................................................................34
12.4 Scan and Save ......................................................................................................................35
12.5 Temporary Preset ..................................................................................................................35
12.6 Region Selection ...................................................................................................................36
13 FUNCTION PRIORITY........................................................................................... 36

10U
14 CONFIGURATION SETTING ................................................................................ 37
14.1 Mobile Phone Pairing ............................................................................................................38
14.2 Second Mobile Phone Pairing ..............................................................................................38
14.3 Phone selective pairing.........................................................................................................39
14.4 Media Selective Pairing ........................................................................................................39
14.5 Assigning Speed Dial ...........................................................................................................39
14.6 Enabling/Disabling Audio Boost ...........................................................................................40
14.7 Enabling/Disabling Voice Activated Phone Answering........................................................40
14.8 Enabling/Disabling Voice Activated Intercom ......................................................................41
14.9 Enabling/Disabling HD Intercom ..........................................................................................41
14.10 Setting Intercom Vox Sensitivity ........................................................................................42
14.11 Enabling/Disabling Voice Prompts....................................................................................42
14.12 Enabling/Disabling RDS AF ..............................................................................................42
14.13 Enabling/Disabling Sidetone.............................................................................................43
14.14 Enabling/Disabling Advanced Noise Control™ ...............................................................43
14.15 Delete All Bluetooth Pairing Information ...........................................................................43
14.16 Remote Control Pairing .....................................................................................................43
14.17 Universal Intercom Pairing ................................................................................................44
14.18 Factory Reset ....................................................................................................................44
14.19 Exit Voice Conguration Menu ..........................................................................................44
15 REMOTE CONTROL ............................................................................................. 46
16 FIRMWARE UPGRADE......................................................................................... 47
17 TROUBLESHOOTING ........................................................................................... 48
17.1 Intercom Failure.....................................................................................................................48
17.2 Intercom Reconnection.........................................................................................................48
17.3 Fault Reset.............................................................................................................................48
17.4 Factory Reset ........................................................................................................................48
18 QUICK OPERATION REFERENCE ...................................................................... 49
CERTIFICATION AND SAFETY APPROVALS ........................................................... 50
• FCC Compliance Statement......................................................................................................50
• FCC RF Exposure Statement.....................................................................................................50
• FCC Caution ..............................................................................................................................50
• CE Declaration of Conformity ....................................................................................................51
• Industry Canada Statement ......................................................................................................51
• Bluetooth License .....................................................................................................................51
• WEEE (Waste Electrical and Electronic Equipment).................................................................51
SAFETY INFORMATION.............................................................................................. 52
• Product Storage and Management...........................................................................................52
• Product Use ...............................................................................................................................52
• Battery........................................................................................................................................53
PRODUCT WARRANTY AND DISCLAIMER .............................................................. 54
• Limited Warranty ........................................................................................................................54
• Warranty Exclusions ..................................................................................................................56
• Warranty Service........................................................................................................................57
• Return for Full Refund................................................................................................................57

10U
5
English
1 INTRODUCTION
Thank you for choosing the 10U for Klim Krios Helmets. With the 10U,
you can call handsfree on your Bluetooth mobile phone, listen to
stereo music or voice instructions of GPS navigations wirelessly, and
have intercom conversations in full duplex with a passenger or other
motorcycle riders.
The 10U is compliant with the Bluetooth 4.1 supporting the following
proles: Headset Prole, Hands-Free Prole (HFP), Advanced Audio
Distribution Prole (A2DP), and Audio Video Remote Control Prole
(AVRCP). Please check with the manufacturers of other device to
determine their compatibility with this headset.
Please read this User’s Guide carefully before using the headset. Also
check www.klim.com for the latest version of the User’s Guide and
additional information related to Sena Bluetooth products.
The 10U features:
• Bluetooth 4.1
• Invisible beauty with custom design
• Safe and easy operations by Bluetooth Low Energy Handlebar Remote
• Bluetooth intercom up to 1.6 kilometer (1.0 miles)*
• Four-way intercom
• Voice prompts
• Smartphone App for iPhone and Android
• Built-in FM radio tuner with a station scan and save function
• Universal Intercom™
• Music sharing
• Advanced Noise Control™
• Firmware upgradeable
* in open terrain

10U
6
Key Specications:
• Bluetooth 4.1
• Supporting proles: Headset Prole, Hands-Free Prole (HFP),
Advanced Audio Distribution Prole (A2DP), and Audio Video
Remote Control Prole (AVRCP).
2 PACKAGE CONTENTS
•10UHeadset
•WiredMicrophone
•AdhesiveTapesfortheControlUnit
•HookandLoopFastenerforWiredMicrophone

10U
7
English
3 INSTALLING THE 10U ON YOUR HELMET
DCPowerCharging&
FirmwareUpgradePort
Microphoneconnector
StatusLED
Speakers
FMAntenna
Wired
Microphone
Antenna
MainUnit
HeadsetButtons
•HookandLoopFastenersfortheMainUnit
•HookandLoopFastenersforSpeakers
•FMAntenna

10U
8
3.1 Installing the Main Unit
1. Before you install the 10U, remove the cheek pads and the
neckroll.
2. Insert the battery unit between the external shell and the inner
shell. Align its snap holders with the rear snaps, then click them
through the snap holders.
3. Slide in the antenna between the external shell and the rear left
inner shell.

10U
9
English
4. Peel off the cover of the adhesive tape of the control unit and
attach it to the helmet.
5. Peel off the cover of the adhesive tape of the hook and loop
fastener for microphone and attach it on the inside of the helmet’s
chin guard. Attach the wired microphone on the hook and loop
fastener and insert the microphone cable into the microphone
connector.

10U
10
6. Peel off each cover of the hook and loop fasteners for speakers
to expose the adhesive surface. Then, attach the fasteners inside
the helmet where your ears will be located at.
7. Attach the speakers to the hook and loop fasteners for speakers
inside the helmet.

10U
11
English
4 GETTING STARTED
4.1 Button Operation
(+) Button
Center Button
(-) Button
4.2 Powering On and Off
To power on the headset, press the Center Button and the (+) Button
at the same time while hearing ascending beeps and a voice prompt,
“Hello”. To power off the headset, press the Center Button and the (+)
Button at the same time while hearing descending beeps and a voice
prompt, “Goodbye”.
8. Place the FM antenna between the outer shell and the comfort
lining around the top shell of the helmet. Make sure the end of the
FM antenna is placed at front left part of the helmet away from
the antenna.
9. Reinstall the cheek pads and the neckroll.

10U
12
4.3 Charging
You can charge the headset by connecting the supplied USB power &
data cable into a computer’s USB port or USB wall charger. You can
use any standard micro USB cable to charge the unit. You can also
charge it on the road using the cigarette charger. The charging LED
turns red while charging and turns blue when fully charged. It takes
about 2.5 hours to be completely charged.
or
AC Adapter
4.4 Checking the Battery Level
4.4.1 LED Indicator
When the headset is powering on, the red LED ashes rapidly
indicating the battery level.
4 ashes = High, 70 ~ 100%
3 ashes = Medium, 30 ~ 70%
2 ashes = Low, 0 ~ 30%
4.4.2 Voice Prompt Indicator
When you power on the headset, keep pressing the Center Button and
the (+) Button simultaneously for about 3 seconds until you hear three,
high toned beeps. Then you will hear a voice prompt indicating the
battery level. However, if you release the buttons as soon as the
headset turns on, you will not hear a voice prompt for the battery level
indication.

10U
13
English
4.5 Volume Adjustment
You can easily adjust the volume by tapping the (+) Button or the (-)
Button. You will hear a beep when the volume reaches the maximum or
minimum level. The volume is set and maintained independently at
different levels for each audio source even when you reboot the
headset. For example, once you set the volume for mobile phone
handsfree, it will not change even if you adjust the volume for your
Bluetooth MP3 music. However, if you adjust the volume during stand-
by mode, it will affect volume levels of every audio source.
4.6 Sena Softwares
4.6.1 Sena Device Manager
The Sena Device Manager allows you to upgrade the rmware and
congure the device settings directly from your PC. Using this
software, you can assign speed dial presets, FM radio frequency
presets and more. It is available for both Windows and Mac. For more
information on downloading the Device Manager, please visit www.
sena.com.
4.6.2 Sena Smartphone App
The Sena Smartphone App allows you to congure device settings
and read the User’s Guide and the Quick Start Guide. Pair your phone
with your 10U headset (please refer to
section 5.1, “Mobile Phone
Pairing - Mobile Phone, Bluetooth Stereo Device”
). Run the Sena
Smartphone App and you can congure its settings directly from your
smartphone. You can download the Sena Smartphone App for Android
or iPhone from www.sena.com/headset-app.

10U
14
5 PAIRING THE 10U WITH BLUETOOTH
DEVICES
Before using the 10U Bluetooth headset with any other Bluetooth
devices for the rst time, you will need to pair them together. You can
pair the 10U with Bluetooth mobile phones, Bluetooth stereo devices
such as MP3 players, or motorcycle specic Bluetooth GPS navigation,
and with other Sena Bluetooth headsets. The pairing operation is
required only once for each Bluetooth device. The headset remains
paired with the devices and automatically reconnects to them when
they are within range. You will hear a high toned single beep and a
voice prompt whenever the headset reconnects to the paired device:
“Phone connected” to a mobile phone, “Media connected” to a
Bluetooth stereo device.
5.1 Mobile Phone Pairing - Mobile Phone, Bluetooth
Stereo Device
1. Press and hold the Center Button for 10 seconds until you hear
the voice prompt, “Conguration menu”.
2. Tap the (+) Button until you hear a voice prompt, “Phone pairing”.
3. Search for Bluetooth devices on your mobile phone. Select the
10U in the list of the devices detected on the mobile phone.
4. Enter 0000 for the PIN. Some mobile phones may not ask for the
PIN.
5. The mobile phone conrms that pairing has completed and the
10U is ready to use. You will hear a voice prompt, “Your headset
is paired”.
6. If the pairing process is not completed within three minutes, the
10U will return to stand-by mode.
Note:
1. If a Bluetooth connection between the headset and a mobile phone is
disconnected, press the Center Button for 3 seconds until you hear a
high tone single beep to recover the Bluetooth connection immediately.
2. If the Bluetooth connection between the headset and a media player is
disconnected, press the Center Button for 1 second to recover the
Bluetooth connection and play.

10U
15
English
5.2 Second Mobile Phone Pairing - Second Mobile
Phone, GPS, and SR10
Typical Bluetooth headsets can connect with only one Bluetooth
device, but a second mobile phone pairing allows the headset to
connect with another Bluetooth device such as a second mobile
phone, an MP3 Player, or the Sena SR10, the Bluetooth adapter.
1. To enter the voice conguration menu, press and hold the
Center Button for 10 seconds until you hear the voice prompt,
“Conguration menu”.
2. Tap the (+) Button until you hear a voice prompt, “Second mobile
phone pairing”.
3. Search for Bluetooth devices on your mobile phone. Select the
10U in the list of the devices detected on the mobile phone.
4. Enter 0000 for the PIN. Some mobile phones may not ask for the
PIN.
5. The mobile phone conrms that the pairing has completed and
the 10U is ready to use. You will hear a voice prompt, “Your
headset is paired”.
Note:
1. If you have two audio (A2DP) devices connected to your headset then
the audio from one device will interrupt the audio from the other device.
For example, if you are playing music from the primary mobile phone,
then it can be interrupted by playing music from the secondary mobile
phone and vice versa.
2. You have to use a motorcycle specific GPS, which transmits turn-by-turn
voice instructions to the headset by Bluetooth. Most automotive GPS
systems do not have this feature.
3. The Sena SR10 is a Bluetooth two-way radio adapter for group
communication, and uses Hands-Free Profile. The incoming audio from
the two-way radio via SR10 is heard in the background while having an
intercom conversation or a mobile phone call.
4. The GPS navigation or a radar detector could be connected to the SR10
by wire. The GPS voice instruction or the radar detector alarm is also
heard in the background via SR10 while having an intercom conversation
or a phone call. Please refer to the SR10 User’s Guide for details.

10U
16
5.3 Advanced Selective Pairing - A2DP Stereo or
Handsfree
When you are using a smartphone, sometimes you may need to
selectively use the 10U for A2DP stereo music only or for mobile phone
handsfree only. These instructions are for advanced users who want to
pair the 10U to their smartphones with only one selective prole: A2DP
for stereo music of HFP for phone calls.
If you have previously paired a mobile phone to the 10U, you must
clear the previous pairing list on both devices: the mobile phone and
the 10U. To clear the pairing list on the 10U, please do a factory reset
or following the pairing list clearing procedure described in
section
14.18, “Factory Reset”
or
14.15, “Delete All Bluetooth Pairing
Information”
. To clear the pairing list on the mobile phone, please refer
to the mobile phone manual. For most smartphones, delete the 10U
from the list of Bluetooth devices in the settings menu.
5.3.1 A2DP Stereo Music Only
1. To enter the voice conguration menu, press and hold the
Center Button for 10 seconds until you hear the voice prompt,
“Conguration menu”.
2. Tap the (+) Button until you hear the voice prompt, “Media
selective pairing”.
3. Search for Bluetooth devices on your smartphone. Select the 10U
in the list of devices detected on your phone.
4. Enter 0000 for the PIN. Some mobile phones may not ask for the
PIN.
5.3.2 HFP for Phone Call Only
1. To enter the voice conguration menu, press and hold the
Center Button for 10 seconds until you hear the voice prompt,
“Conguration menu”.
2. Tap the (+) Button until you hear the voice prompt, “Phone
selective pairing”.
3. Search for Bluetooth devices on your smartphone. Select the 10U
in the list of devices detected on your phone.
4. Enter 0000 for the PIN. Some mobile phones may not ask for the
PIN.

10U
17
English
5.4 Intercom Pairing
5.4.1 Pairing with Other 10U Headsets for Intercom
Conversation
The 10U can be paired with up to three other headsets for Bluetooth
intercom conversation.
1. Turn on the two 10U headsets (A and B) that you would like to pair
with each other.
2. Press and hold the Center Button for 5 seconds, then you will
hear a mid-tone single beep and the voice prompt, “Intercom
pairing”.
3. Simply tap the Center Button of any one of the two headsets A or B
and wait until the LEDs of both headsets turn to blue and intercom
connection is automatically established. The two 10U headsets A
and B are paired with each other for intercom conversation. If the
pairing process is not completed within one minute, the 10U will
return to stand-by mode.
A
B
C
D
Pairing A & B

10U
18
4. You can make other pairing between headsets A and C, and
between headsets A and D by following the same procedure as
above.
5. The intercom pairing queue is ‘Last-Come, First-Served ’. If a
headset has multiple paired headsets for intercom conversations,
the last paired headset is set as rst intercom friend. The
previous intercom friend becomes second intercom friend, and
third intercom friend.
Note:
For example, after the pairing procedures listed above, headset D is the
rst intercom friend of headset A. Headset C is the second intercom
friend of headset A, and headset B is the third intercom friend of headset
A.
5.4.2 Pairing with Other Sena Headset Models for Intercom
Conversation
The 10U can be paired with all other Sena headset models such as the
20S, SMH10 and the SMH5 for intercom conversation. Please follow
the same procedure as above to pair with these headset models.
Note:
The SMH5 cannot participate in three-way or four-way conference intercom
with the 10U. The SMH5 has a limited capability of having two-way intercom
with other Sena headsets.

10U
19
English
6 MOBILE PHONE, GPS, SR10
6.1 Mobile Phone Call Making and Answering
1. When you have an incoming call, tap the Center Button to answer
the call.
2. You can also answer the incoming call by loudly speaking any
word of your choice if
Voice Activated Phone Answering
(VOX
Phone) is enabled, unless you are connected to intercom.
3. To end a call, press the Center Button for 2 seconds until you
hear a mid-tone single beep, or wait for the called person to end
the call.
4. To reject a call, press the Center Button for 2 seconds until you
hear a beep while the phone is ringing.
5. There are several ways to make a phone call:
– Enter numbers on your mobile phone’s keypad and make a call.
Then the call is automatically transferred to the headset.
– In stand-by mode, press the Center Button for 3 seconds, to
activate the voice dialing of your mobile phone. For this, the
voice dialing function must be available on the mobile phone.
Refer to your mobile phone manual for further instruction.
Note:
1. If you have two phones connected to your headset and you have an
incoming call from the second phone during the call of the first phone,
then you may still receive the call from the second phone. In this case,
the call from the first phone is on waiting mode. If you end a call, then it
will automatically guide you to the first phone call.
2. If you have a mobile phone and a GPS connected to your headset, you
may not be able to listen to the GPS voice instruction during the phone
call.

10U
20
6.2 Speed Dialing
You can quickly make a phone call by using the voice speed dial
menu.
1. To enter into the voice speed dial menu, press and hold the (+)
Button for 3 seconds and you will hear a mid-tone single beep
and a voice prompt saying “Speed dial”.
2. Tap the (+) Button or the (-) Button to navigate between the
menus. You will hear voice prompts for each menu item.
3. Tap the Center Button to select a voice menu among the followings:
(1) Last number redial (4) Speed dial 3
(2) Speed dial 1 (5) Cancel
(3) Speed dial 2
4. After selecting the last number redial menu, you will hear a voice
prompt, “Last number redial”. Then, to redial the last phone call
number, tap the Center Button.
5. To call one of the speed dials, tap the (+) Button or the (-) Button
to navigate between the menus until you hear a voice prompt
saying “Speed dial (#)”. Then, tap the Center Button.
6. If you want to exit the speed dial immediately, tap the (+) Button
or the (-) Button until you hear a voice prompt saying “Cancel”,
and tap the Center Button. If you do not press any button within
15 seconds, the 10U will exit the voice speed dial menu and go
back to stand-by mode.
Note:
1. Make sure that you connect the mobile phone and the headset to use the
speed dial function.
2. You need to assign speed dial numbers before using the speed dial
(please refer to section 14.5, “Assigning Speed Dial”).
Table of contents
Other KLIM Headset manuals
Popular Headset manuals by other brands

Philips
Philips VOX150 Instructions for use

Plantronics
Plantronics SupraPlus CS351N Setup guide

Jabra
Jabra BT2010 - ANNEXE 746 quick start guide

Midland
Midland BT RIDER Instruction guide

Plantronics
Plantronics AVAYA AWH-65-USB Declaration of conformity

Creative
Creative SOUND BLASTER TACTIC360 ION - quick start guide