Knight 99RZ177 User manual

PnoToFAcr* FolJ"t KNIGHT
MODETS 99RZl77, 99R2936
€
(9
6
N
4,
o.
o\
E*
IN
9F
79,
vor
-o.
r^
J
lr|
A
o
=
3
o
E'
lr|
F
UI
8x
nZ
iF
J=
€
€
F
N
€
G)
6
GENERAL INFORMAT ION
TheKnight Models96RZ936 and ggRZlTTfeatures pushbutton controlfor playback, record,
stop, fast forwardand fast reverse. Double trackrecording is used doublingthe recording time
on a singlereel of tape" Any reel size up to 7" can be used. Two neon indicatorlights simplify
the recording level setting. Recordings can be made from a radio, phonograph or television in
addition to those made directly with the microphone. New recordings may be rnade on pre-
viously recorded tape because the erase head is automatically positioned when pressing the
record button. Recordings may be played back through the built in speal<ers or an external
speaker may be plugged into one of the External Speaker Jacks.
Using both tracks of the tape the recording time is as follows:
7 L/ 2" Speed
I/ 2 hour
I hour
The Knight is designed to operate on 115V, 60 cy. AC supply only. Before connecting to
a line supply be absolutely certain it agrees with the above specifications.
Supplied By:
Allied Radio Corporation
833 West Jackson Boulevard
Chicago 7, lllinois
Size Reel 3 3/ 4" Speed
5" reel (600 ft. ) t hour
?" reel (1200 ft. ) 2 hours
fhis moteriol compiled ond published by
& co., lNG.,. INDIANAPOIlS, INDIANA
Copydghi 1957 . All Righb Rccrvcd
stf 372
HOWARD w" sAtf,s
0[TE g - 57 TOTDER 8

f.:::.:-1-=
f: '' .r .,",,
L, r.,
F,
Figure I
OPERATI NG I NSTRUCTIONS
Prgparation For Operation:
l. Remove the AC power cord, microphone,
reel of tape and empty reel from the storage com-
partment.
2. Depress the stop button.
3. Plug the AC cord into a convenient wall re-
ceptacle of the proper rating.
4. Set speed control knob to 3. ?5 or 7.50 as
desired.
5. Place rrRemote-Normalr' switch in rtNormalil
position.
CAUTION: Donotturn speed changeknobunless rrStop"
button is depressed.
When the Forward or Reverse buttons are de-
pressed the Record and Playback buttons are locked
so they cannot be depressed. This eliminates the
possibility of spilling tape. The buttons must be de-
pressed firmly until they latch, and the I'Stoprt button
must be depressed before changing functions or speed
of the recorder.
IMPORTANT: Always depressthe "Stopt' button when
the unit is not in use. This prevents
the pinch roller from becoming flat-
tened against the capstan.
Page 2
Speed Change Knob:
This recorder has two speeds 3. ?5 inches per
second or 7.5 inches per second. The arrow on the
speed change knob should point at 3. ?5 or ?.50 ac-
cording to the speed desired.
CAUTION: Always depress the ttStopt'button before
attempting to change speed. Turning the
speed change knob while the unit is run-
ning will not change speed and can result
in damage to the mechanism.
Threading The Tape:
1. Place a full reel of tape on the left (supply)
spindle, being certain the slots in the reel engage the
protrusions on the spindle pan. Unwind about 14" of
tape from the supply spindle.
2. Insert free section of tape into the tape slot.
Place empty reel on the right (take-up) spindle.
3. Insert free end of tape into one of the slots
in the empty reel hub. Hold the tape in place and turn
the reel two or three turns until the tape is secured.
4. The dull side of the tape should face away
from the operator and toward the rear of the unit.
To Record From Microphone:
1. Turn the On-Off Volume control to the right

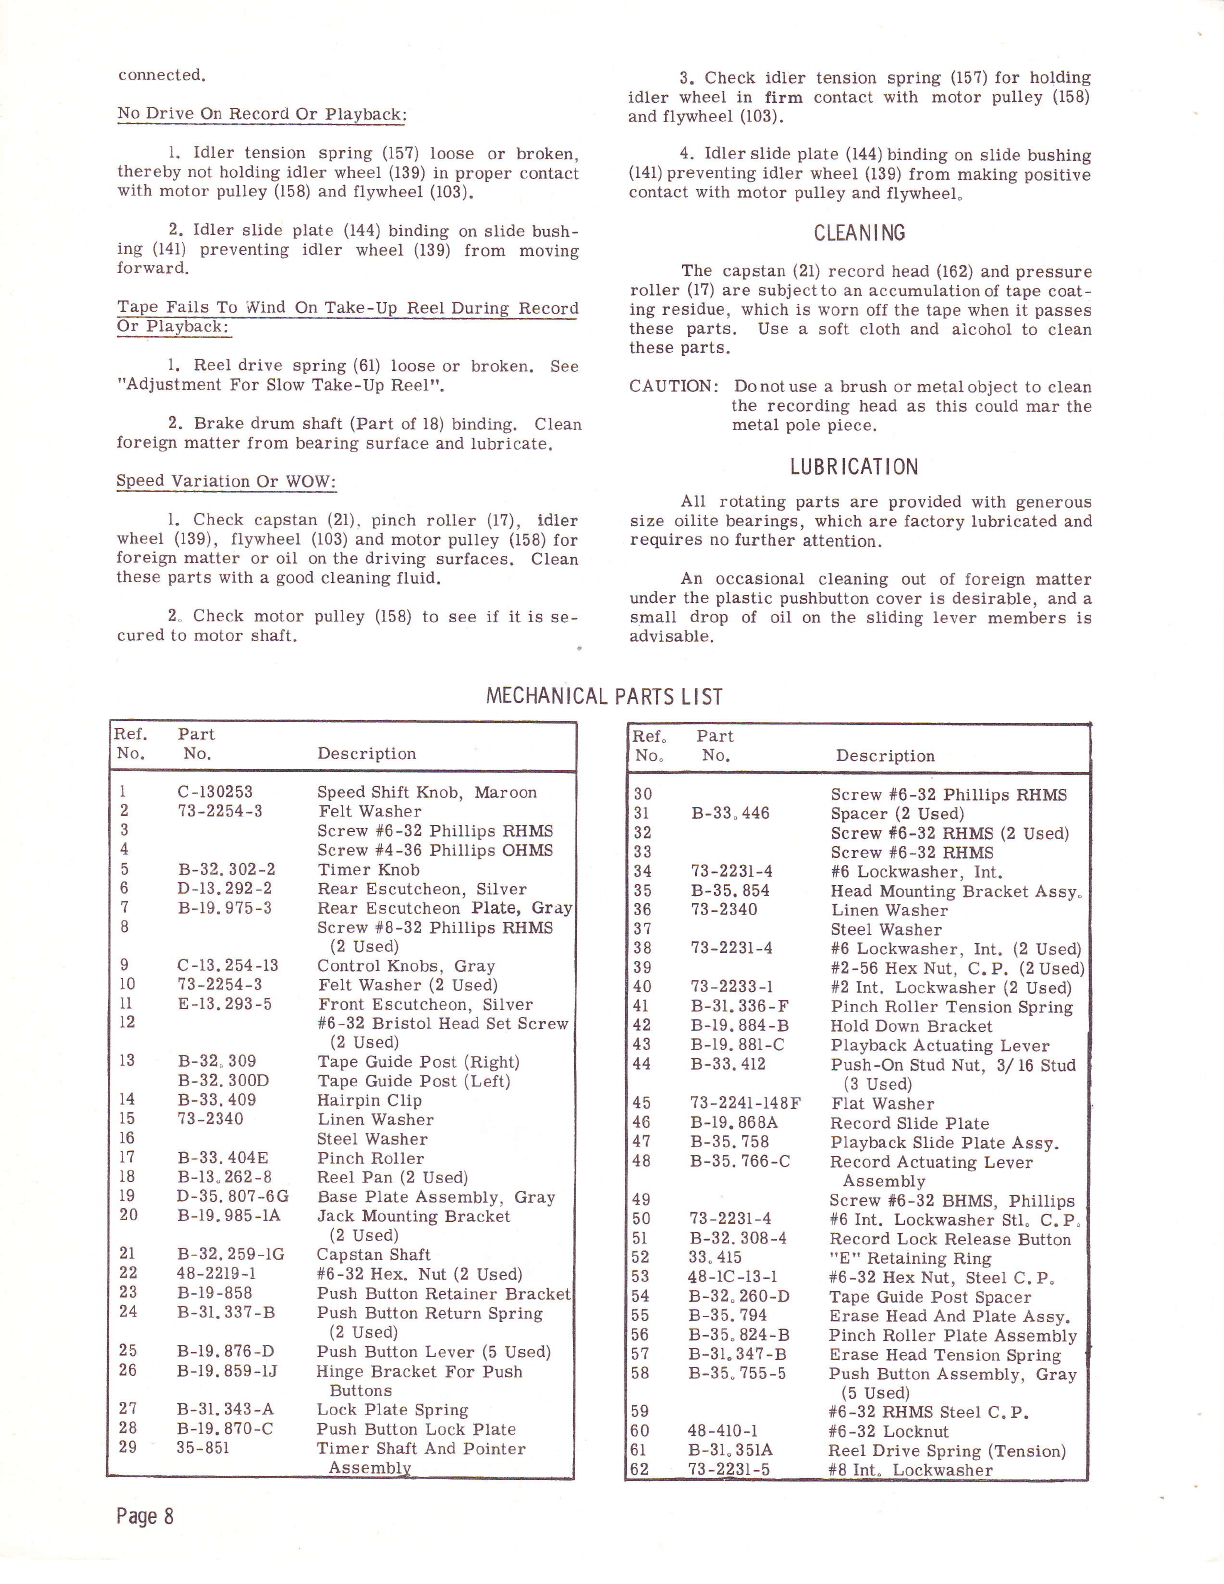
until a click is heard and then allow 30 seconds for
the unit to warm up. The pilot light located above the
"Stop" button will glow when the unit is turned on.
2. Insert the microphone plug into the t'Micro-
phone" jack.
3. Push the record lock button down with the
left handand hold. Thisreleases thesafetylock which
prevents accidental erasure of recorded material.
4. Depress the I'Record" button with the right
hand until it latches. Release the lock button.
5. Adjust the "Volume" control until the rNor-
mal" indicator just flashes while speaking into the
microphone. If the "Volume" control is advanced too
far the "Overload" indicator will flash and the re-
cording will be distorted. To prevent overload and
distortion turn the volume control down to a point
where the "Overload" indicator does not flash.
6. The "Tone" control does not function during
recording. When recording from a radio, set the
radio tone control for maximum treble.
To Record From Radio, TV, Or Phonograph:
1. Insert the phonograph pick-up plug into the
"Radio-P. A. -Phono" jack.
2. For radio or TV recording, connect patch
cord, Part No. 96R674, tothe voice coil of the radio
or TY speaker by means of the alligator clips. Plug
into the "Radio-P.A. -Phono" jack.
3. Proceedas describedunder t'ToRecordFrom
Microphone""
NOTE: Remove patch cord when recording is com-
pleted.
To Use Second Track:
1. Depress "Stop" button when all tape is wound
on the take-up reel.
2. Remove reel containing tape and empty reel.
Place full reel on left (supply) spindle and empty reel
on right (takeup) spindle.
3. Thread tape and proceed as previously de-
scribed.
To Play Recordings:
l. Turn unit on with volume control knob"
2. Thread tape as described under t'Threading
The Tape".
3. Set the speed change knob (1) to the speed at
which the recording was made.
4. Depress the I'Playt' button until it latches.
5. Adjust "Volume" and "Tone" Controls to de-
sired listening levels.
High Speed Forward Or Reverse:
When it is desirable to play a section of tape
over again it is not necessary to play or rewind the
entire tape. By depressing the "Forwardil or ilRe-
verse" button the tape will advance or rewind at a
rapid speed.
Several minutes of normal recording can be
skipped in a few seconds by the "Forqrard" or IRe-
verse" buttons.
Tape Timer:
If, when maling recordings or playing a re-
corded tape, you wish to play back a certain record-
ing, note the reading on the time scale when a par-
ticular recording is being made or heard. Rewind the
tape until that number appears on the scale, press
the "Stop" button, then press the "Playtr button and
you will be listening to the desired recording.
When starting a new reel of tape or re-recording
a reel, reset the indicator pointer to *Orr by rotating
the reset knob (5). By starting at IOri on all tapes,
the number location can be catalogued for each se-
lection on any reel.
To Edit And Splice Tape:
NOTE: It is impossible to edit and splice one track
without affeeting the second track of recorded
material, therefore recordings to be edited
should be limited to one track only.
l. The tape may be edited by cutting out un-
wanted sections, or by joining selections into another
sequence. Announcements can be added between se-
lections, etc. Unused sections of tape may be spliced
together for re-use.
2. For best results cuttape at a slight diagonal,
join ends togetherwith splicing tape on theglossy side
and trim off any excessive width.
Erasing Recorded Material:
When the "Record"button is depressedthe erase
head is automatically positionedto erase any previous
recording before a new one is made. Material may
be erased when no longer needed, without recording,
by turning the volume control to the extreme counter-
clockwise position, or minimum volume position, and
depress the "Record" button. To erase the second
track, reverse the reels and repeat the above opera-
tion.
To Use Recorder As A Public Address System:
Insert the Microphone into the rrMicrophonerr
input jack. Plugin an extensionspeaker, or speakers
if desired, and depress the "Record" button" Set the
"Volume" and "Tone" controls to the desired listening
level. A recording can be made at the same time with
a tape placed on the unit in the normal manner.
CAUTION: When using the unit as a public address
system, the Microphone must be kept as
far away from the speakers as possible to
prevent "feedback" squeal.
Remote Control Operation:
A socket and switch are provided to allow re-
mote operation up to a distance of 18 feet on either
recording or playback" This is accomplished by re-
mote control cable No. 96R636" Connect remote con-
trol cable as follows:
=
o
I
Ill
F
la
€-
€/\
FZ
!a
\-
J=
I
€
v
N
€
(.,
o\
Page 3

1. Set remote control cable switch at end of
cable to "Standby'* position.
2. Insert cable plug into remote socket.
3. Set the control switch on the remote socket
to the 'Normalrr position. Start the recorder in the
usual manner and set the "Volumet, control to the
proper level.
4. Set the control switch on the set to the.',Re-
mote" position. The tape witl stop.
The recorder may now be operated (start and
stop) by means of the remote cable switch. When
starting the recorder by means of the remote control,
the switch should be rotated to the "Motor" position
and then to the "Record-Playb4ck" position after a
slight pause in the "Motor" position. To stop record-
ing or playback, rotate the control switch direcily to
the "Standby" position, with just a slight pause at the
"Motor" position.
ADJUSTMENTS
Record-PIay Head Adiustment:
lSee E-;pfaaaEw: ftr. =af
To adjust the record-play head (162) for maxi-
mum frequency response, adjust as follows:
l. Remove the rear escutcheon (6) and rear
escutcheon plate (?).
2. Thread an alignment tape or a good recorded
tape on the machine.
3. Set the controls as described under ITo play
Recordings".
4. Adjust screw (33) by turning it in and out
until the maximum highfrequenciesare obtained. Re-
place escutcheon and plate.
Pressure Pad Adjustment:
l. Remove front escutcheon (ll).
2" Depress the 'tPlay" button. Do not turn the
recorder on.
3. Using a pencil type postal scale, .check the
amount of pressure required to just pull the pad away
from the tape. The test should be made on the end oi
the pressure pad mounting spring (60). Adjust the
pressure pad for I 3/ 4 oz. + I/ 4 oz. pressure.
(a) Therecord head pressurepad is adjusted
by locked adjusting screw (b9).
(b) The guide post pressure pad is adyustetl
by bending the pressure pad spring. It must be ad-
justed for minimum pressure against the tape"
4. After the adjustments depress the "Stop"
button and replace the front escutcheon.
Erase Head Adjustment:
1. With tape properly threaded, turn on re-
corder and depress the "Record,rbutton" Allow tape
to run for a few seconds and turn recorder off, leav-
ing the "Record" button depressed.
Page 4
2. With the escutcheons removed check the
erase head (55) to see if it is parallel with the tape"
3. Check to see if the top edge of the tape coin-
cides with the top end of the long diagonal slot in the
erase head (Junction o{ long diagonal slot and short
vertical slot). To adjust level of tape, loosen set
screw (12) in left tape guide post, and rotate guide
post to move tape up or down. Tighten set screw.
Brake Shoe Adjustment:
1. In order to adjust the brake shoes it is
necessary to remove the mechanism from the carry-
ing case and disconnect the speaker.
2. With ail buttons in the up position the brake
shoes (91) should clear the drums (6?) approximately
l/ 8 inch.
3, Depress the stop button while observing the
brakeshoes. Bothbrake shoesmustcontactthe drums
at the same time and with equal pressure.
4. Adjustment is made by bending the spring
arms.
Adjustment For Slow Take-Up ReeL:
There are instances where the spring drive belt
(61) stretches after a period of time. When this
occurs the takeup torque will be insufficient to wind
the tape properly on the take-up reel. In this case
the belt should be replaced as follows:
1. Remove the rear escutcheon (6) and rear
escutcheon plate (?). Remove the mechanism from
the carrying case.
2. Loosen set screw (68) on brake drum (6?)
and slide take-up spindle (18) upward until the belt
can be removed from the groove on the spindle"
3. Remove the belt from around the spindle and
remove spindle. Remove the belt from around the
pinch roller (17), and from the recorder.
4" Install new belt by reversing the above pro-
cedure.
Bias Adjustment:
Turn the recorder on and depress the "Record"
button using no tape. To determine if the bias is
withln satisfactory limitswithout dismantling the unit,
merely connect a VTVM from the top lug of the re-
cording head tochassis. If ?5 to 100 voltsare present
no adjustment is necessary.
If the readings are outside of this range, proceed
as follows:
l. Try a new 6AQ5T, l2AX?, 6Aeb, and by3.
2. If still not within range, remove the chassis
and connect a low capacity VTVM from test point '4"
to ground. Adjust trimmer (C4B) for maximum read-
ing. Adjust trimmer(C4A)to obtain areading of Z.2i
volts. This provides the optimum in performance.
Neon Record Level Indicators:
The neon record indicator firing level adjust-

"g
.F
\g \9.
\s"
..:
#d
Figu re 2
=
o
I
EI
F
tt
€_
€/\
-Z
iF
J=
€
€
F
N
€
(.)
o\
ment is required only if a bulb is replaced. The two
neon indicators are adjusted for correct firing level
by means of two trimmer capacitors, one for each
indicator. Adjust as follows:
1. Turn recorder on and depress "Recordf'
button.
2" Connect a short jumper lead across the bias
oscillator coil, Ll, to disable the oscillator.
3. Connect an audio oscillator, set at 1000
cycles, into the microphone input jack. Output of the
audio oscillator should be approximately .01 volt"
(A I volt output may be used with a 100 to I resistor
reduction pad inserted between the audio oscillator
and the Microphone jack).
4. Connect low capacity type AC VTVM to test
point "8" (Junction of two 330K resistors, R28 and
R29, mounted on a terminal strip near the volume
control).
5. Adjust volume control to obtain a reading of
36 volts on the VTVM and leave control set and VTVM
connected.
6. Disconnect shorting jurnper from across bias
oscillator coil.
7. Adjust "Normal" trimmer (C26A) fufly clock-
wise and then turn slowly counterclockwise so that
upon loosening the trimmer the "Normal" bulb barely
lights. This adjustment must be made loosening the
trimmer.
8. Again short out the bias oscillator coil and
increase the volume control until a reading of 88 volts
is obtained on the VTVM.
9. Remove short from bias oscillator coil.
10. Adjust the "Overload" trimmer (C268)as in
step 7 to just barely light the "Overload" indicator
bulb.
IMPORTANT: Do not adjust the recording bias os-
cillator after settingthe indicator light
adjustments.
TROUBLES
Push Buttons Fail To Latch In Position:
Lock plate spring (2?) loose
ing in lock plate (28) not being
bracket (26).
Fails To Erase:
or broken, result-
held against hinge
I. Spring (5?) loose or broken, not pulling the
erase head forward against the tape.
2. Erase headnot properlyaligned. See I'Erase
Head Adjustment").
No Fast Forward Or Reverse:
1. Idler lever tension spring (90), may be loose
or broken, not actuati.ng idler lever.
2" Check drive belt (100) to see if it is properly
Page 5

E
$
A PHOTOFACT "EXPLODED" VIEW
@ Howard W. 5"rr & Co., lnc. 1957 @-mffiffiffiffi
Figure 3A. Exploded View 0f Parts Above The Baseplate
Page 6

A PHOTOFACT "EXPLODED" VIE\T
O Howard W. S"rr & Co., lnc. 1957
Figure 38. Exploded View 0f Parts Below The Baseplate
=
o
E,
Irt
F
tn
t^
FZ
iF
ST
€
€
v
N
€
(.)
o\
Page 7

connected.
No Drive On Record Or Playback:
l. Idler tension spring (t5?) toose or broken,
thereby not holding idler wheel (139) in proper contact
with motor pulley (158) and flywheel (103).
2. Idler slide plate (144) binding on slide bush-
ing (141) preventing idler wheel (139) from moving
lorward.
Tape Fails To Wind On Take-Up Reel During Record
l. Reel drive spring (61) loose or broken. See
"Adjustment For Slow Take-Up Reel".
2. Brake drum shaft (Part of 18) binding. Clean
foreign matter from bearing surface and lubricate.
Speed Variation Or WOW:
l. Check capstan (21), pinch roller (1?), idler
wheel (139), flywheel (103) and motor pulley (158) for
foreign matter or oil on the driving surfaces. Clean
these parts with a good cleaning fluid,
2" Check motor pulley (158) to see if it is se-
cured to motor shaft.
3. Check idler tension spring (15?) for holding
idler wheel in firm contact with motor pulley (158)
and flywheel (103).
4. Idler slide plate (144) binding on slide bushing
(l4l) preventing idler wheel (139) from making positive
contact with motor pulley and flywheel"
CLEAN I NG
The capstan (21) record head (162) and pressure
roller (1?) are subjectto an accumulationof tape coat-
ing residue, which is worn off the tape when it passes
these parts. Use a soft cloth and alcohol to clean
these parts.
CAUTION: Donotuse a brush or metalobject to clean
the recording head as this could mar the
metal pole piece.
LUBR ICAT ION
All rotating parts are provided with generous
size oilite bearings, which are factory lubricated and
requires no further attention.
.An occasional cleaning out of foreign matter
under the plastic pushbutton cover is desirable, and a
small drop of oil on the sliding lever members is
advisable.
MECHAN ICAL PARTS L I ST
Ref.
No.
I
2
3
4
5
6
I
8
25
26
27
2B
29
I
l0
ll
T2
l3
T4
15
t6
I7
1B
I9
20
2t
22
23
24
Part
No.
c -130253
73-2254-3
B-3?.302-2
D-13.292-2
B-19.9?5-3
c -13. 254 -13
73-2254-3
E-13.293-5
B-32" 309
B-32. 300D
B-33.409
73-2340
B-33.404E
B-13.262-8
D-35. 807-6G
B-19.985-1A
B-32.259-rc
48-2219-r
B-19 -858
B-3r.33?-B
B-19" 876-D
B-19.859-lJ
B-3r.343-A
B-r9. 870-C
35-851
Description
Speed Shift Knob, Maroon
Felt Washer
Screw #6-32 Phillips RHMS
Screw #4-36 Phillips OHMS
Timer Knob
Rear Escutcheon, Silver
Rear Escutcheon Plate, Gra
Screw #B-32 Phillips RHMS
(2 Used)
Control Knobs, Gray
Felt Washer (2 Used)
Front Escutcheon, Silver
#6-32 Bristol Head Set Screw
(2 Used)
Tape Guide Post (Right)
Tape Guide Post (Left)
Hairpin Clip
Linen Washer
Steel Washer
Pinch Roller
Reel Pan (2 Used)
Base Plate Assembly, Gray
Jack Mounting Bracket
(2 Used)
Capstan Shaft
#6-32 Hex. Nut (2 Used)
Push Button Retainer B
Push Button Return Spring
(2 Used)
Push Button Lever (5 Used)
Hinge Bracket For Push
Buttons
Lock Plate Spring
Push Button Lock Plate
Timer Shaft And Pointer
Asse
Ref"
No"
30
31
32
33
34
35
36
37
38
39
40
4I
42
43
44
4g
50
5r
52
53
54
55
56
57
5B
59
60
6l
62
45
46
47
48
Part
No.
B-33.446
73-223t-4
B-35.854
73-2340
73-2231-4
73-2233-r
B-31.336-F
B-19.884-B
B-19. BBr-C
B-33- 412
?3 -224i-148F
B-19.868A
B-35. ?58
B-35. ?66-C
73-223r-4
B-32. 308-4
33" 415
48-lC-13-1
B-32.260-D
B-35.794
B-35. 824-B
B-31.34?-B
B-35.755-5
48 -410-l
B-31.35rA
Description
Screw #6-32 Phillips RHMS
Spacer (2 Used)
Screw #6-32 RHMS (2 Used)
Screw #6-32 RHMS
#6 Lockwasher, Int.
Head Mounting Bracket Assy"
Linen Washer
Steel Washer
#6 Lockwasher, Int. (2 Used)
#2-56 Hex Nut, C. P. (2 Used)
#2 Int. Lockwasher (2 Used)
Pinch Roller Tension Spring
Hold Down Bracket
Playback Actuating Lever
Push-On Stud Nut, 3/ 16 Stud
(3 Used)
Flat Washer
Record Slide Plate
Playback Slide Plate Assy.
Record Actuating Lever
Assembly
Screw #6-32 BHMS, Phillips
#6 Int. Lockwasher Stl. C. P.
Record Lock Release Button
t'8" Retaining Ring
#6-32 Hex Nut, Steel C. P.
Tape Guide Post Spacer
Erase Head And Plate Assy.
Pinch Roller Plate Assembly
Erase Head Tension Spring
Push Button Assembly, Gray
(5 Used)
#6-32 RHMS Steel C.P.
#6-32 Locknut
Reel Drive Spring (Tension)
73 -22 3l -5 #8 Int. Lockwasher
Page 8

3
o
u
m
F
ta
€r
€/\
vz
iF
J=
I
€
7
N
s
GI
s
p
CU
ft-
o0
v
F
t!
I
\JF
vrI
O.;
F_
5;
z4
o-
d.E
x.;
i>
F'!
UOL
F}
L,,' o
{-
L
o
F
o
-r
4
j
^->u)
v(A
OO
Nd
z.Q
Ia U
=o.
O=
N, a/)
rr<
a!J
UA
* <_>
=<.
s=
=€i
o
r
F
z
(9
U1
U
o
U
Ll1
=
e.
U
r
F
o
tt
v'\
U
J
z
=
z.
o
F
U1
o
o_
5
a/,
(9
z.
o
U
e.
U
q)
z.
F
6
U
e.
(.,
o
o
c')
=t'
@
r0To\
r-@l
&-r0URL-d
v
o
o
@
e.
,o
=E
E9
O6
=2,
r-\ ?5
\e =3
9;
oz
o
=
o
-
o_
lv
<ii
+E
o
;
t
^6\
(E/
F
z.
O
o-co
F
r!
F
r- r/)
RO
=<
o\o
e
o
O
u
e.
L
=
e5
o€
*.t
Vu
:F
_U
t'6 =
=
lr)
o
E
E
n.q, e e*e
E
E
o
r\
d
co
\z >'
O-
Ai-
--\
\E/
c!
-
s
6
ots
NC
NE
-J Ht,'
@
@
@
6
r$
>1
.o
3
V
o
N
N
o=
UC E
H=
-\I^,-
@
(w9
niP
e
@
o
o
E
N
OE
Oc
lHt,'
/6\
\E/
@+E @
E
E
Ht''
:z
oo
€
A
\€5l
@lx
N
o.)
*
OE=
n--
@
\Z
O
N
<i'
Oh
,oc
nb
>
c./
YJ
==
$=
r- 11)
=o
=<
O€
@
>
=.
trJ
=>
S
co
A
\y
O
r
sl
@
o-
=
TJJ
o-
<J
=
N
S
@
F
z.
5
3=
v1
U
F
@
c
o
h
c
o
z.
=
\Z
c)
cv
o
o
E
no
=
N
st :Z
o
N
N
O
(\J
No-
F
Y
o
rr\ :Z
R
C\
+
o
o
C\l
+
c
o
o
No
o
o- c
oc
oo
+
o
O
n
to_
F
c
o
Lr\ c
o
tf\ O o c
o
O
:Z
NOo_
F
c\,
.=
o-
o
=
ts
s
o
o
E
A; O
r
N
O
(v
z.
=
\Z
O
N
F
=u
=
u
d.
c\Z
AJ
\Z
o
c^
+u
o
N
c\l
:Z
o
N
GI
(J
z. J
J
U
co
=N
N
r
X
No
€lr\
q
€
=
rN.it
@
E;
o=
J=
R lile N. ,, Nl.- B
-pl e= ;l-.i
a:= lt
H=5 /G\
iir \E/ @
= fi lp€ ==
lr
R
d
U
=
O
>=
c
ctl
.o
\
et
U
(-)
d
=
o
6
z.
=
o
-
V'F U
-:Z
(-) CJ
FO
3z 6
6o /
l!F e
Ovt >
Eo o
UL ']
e. JU
r<F
:E O
<d >
E2P
Qz.
.6
trq',(
-h5
@"1
sl
Page 9

3
tr|
-
a
o
l-I
I
ln
la
I
I
(,
b
(Lc;
f!
otl
!3
rn E.:
e,.9E
oEl
F od
I E..lq
<'E
r9.
{ o.!
e€E
OL
o:€
trr -E -:
X=t
t!cE
.i .s
oT
6E
go
E!,
>6
>.:
'oo
oo
cLo
o9
(J
.tl
c,
o
=
{J
G
I
(.)
F
o
d,
(J
IIJ
llr
I,l
za
o2
trs
L3
Ql v't
tJ Li
EE
oH
oil
7#
l-z
tl lt
I\J
J-
!nn
Fco
4r
4
H
ADJ 12AYV
v,
u
F
o
z
z
o
tr
J
ts
tn
z
@
n
Fii
t1
o
6
@
o
d
F
o
a
o
'eo
oz
=3
w.9- "E 3
VqN E *
-r+ t@- +
F O@S ON C
DZ>>Z?2
o
uZ
ets
A
X: i
r ? o ?o
6?:: 6:o
Tk -r*r
9ts.1 =ts=c
GZI GZGg
F
<d
Or
dd
d'
9!o
E J2^S
' N; 5:
5',N
FTF]JTJi
$@B$@<l
4l&7^4.h.49
o
<c;
<z-
eF
z<
UC
UrE<-r<
r.tofto
AZ|4caZ<
Fro
9*
ts
NT
'T
fir
NOo
NNd
66@
ttt
OOO
o
z
F
e
q
F
F
>alN ilN 4lN
pu
oQl
6z
H< q4i:vEcr
Jg d =o do d
>< t6<o4
;aada6u
E, Itro*cq*s
d&!d
N 8E s E
r t,iH - l
rrr
aaa
FFF
rnnr
= S--S
a aooFa
i *.iilJ
o F()()gE
6 N6666
Hd
Oz
4F
rt
OL
izs
oL
JF
4e
1-<
o
z
U
ct
4
'
Jd I
iY2
E;,r
o?:
uuo
-E-
<d
<L
#e
=4
6t
r r rrr
. 3-n* r i - !=3 - :
F YFF;- --.E68;Y;F lYY F Y
T >frr; ilSsrrrr>+r it*it i? >
9 T+OOOO OOOOOOUG]OO E]T'L] O ']
> opp>Q oQQpppFo>p ()L5(, i o
a
O
9Y
oa
Q OO^ O O
A OO9 E OOOO OO
- .^,Ar-
= ::+5 55359== 99
rrrttrrrrrtt
or AAAQ QOQAAoo{ AA
O OOOrl] T.]LTbJOOOg) OO
a
oo
o
pi
m
r''i
iN
oo
OO
OO
O
@
@
@
a
r
N
m
-R
5 n Aono
a ooo ^ a _oaoo
a-Y- ! -9 r r r r
A AAAFNSSAHHOQOQ
o. eqAa=.io.=-o.o.o.q
cD di d n7,i;67, sdG z Eo cri o
-F-q99o9o=5==Faaa
T i TTT , ' '
,a€,a,a,^OOOO@OOO@66
-s--::oooo$ooo+vs
s$vs$$$s$<$sssvs trrtrt
OQUOOOUO(JOOOOOOO
oo
OO
OO
H
tr
t0
o
@
o
O
o
O
a
o
o
O
5e
9a
u{
<4
FC;
9-
fi<
F @ r rrr
- ;E-Ia 6aA5---;-e^;;#, = u?x
F HAaHH€q?tEsbfiEEnfrtrHE asHE
F PFFF> >>>F{FFF>FF=pppg 5t i>
I uJ,rJa orQc0JlJJU,.r,:"roor.rJ F;c uL
s Hssrs 33H;asaEasFEEEo q f
T liiTYi ll:'TiiT-iiiT'i'i','+ 3 i
I !tql.9i9Q QQQ.qrq.qrqtsoootrlrFeci e O
a Qaaaa oaanaaaaaaaQaoa o o
- S F - - * oo 9 = g ! I *9 = * 9 R s N * X S R
O O O Q O O O O O (-) O OC) O O O O O O OO O (J O
^O
.^o
OO
O
O
rr=X
nnYl-i
v
r
SO
ON
o
r
o
^f-r
O
v
Put
o=m
r=o
O
N
O
5o-ma
5e
9t
u<
<4
FC;
3z
ze
cs
N'-
F6
J,l
FF
,a:
=3
s 66
$ io
A AL)
h faF{
.NNNM
at< I
<ooa*
U
F
o
z
u
d
F
Fr
3;
(>
o6
4
q
=0
-=i
cd
E2 tt,
-l
.o
,c,
:F
3Z
ao
a'L,
.2
;
O
O
@
a)
\Y
:
d
o
d
-
?
d
o
ia
a
a
o
a
e
U
F
o
z
Urr -
>xx
<<Y
EE;
H
f
o
cn.
P>
.o
.:6
Efi
.B dd
OE
o{
.9q
cq<
{:
i; :NO
PAGE IO

3
lr|
I
-
o
F
F
o
€
I
g
|n
|a
I
4
tr,
=
o
E'
m
F
la
s-
€
FZ
!6
S=
€
€
-
N
€
(,
o
cJ7
=
o
trl
z
J
J
trl
L/
I
F
f
c
:)
o
I
o
:)
4
tlt
=
d,
o
t!
v,
z
e,
l-
4,
ttt
=
o
o.
u,
lrJ
=
;u,
io
xl iE
i9 tn
E.a z
>s <
1.= d,
X$ t-
Nt
Or
gs.
drd
oo
qq
cdd
tt
Q@
EE
oo
oo
EE
oo
av)
-'di
oo
oo
zz
a^
u
ts
o
zN
o
o
z
F
o
F
z
u
=
U
U
J
e
q
d
d
vz
dF
-4 e
5S558*voX SXEs-
NrNNN66rX .66roN
TYTTTT.iT;YTTYTT
<o<@a<<cQa,-aqa<A
FFFFFFFFF=FFFFF
moracqlatqpqoeo.otr|Qlao
LO
'cz
ax
Es!=fss 3 ;sFsnl
'lTT-i' ' -i TT?r I'i
Niii<NN6! ;H:Nmd
OOOOOOONO OOOOOC
<ai6
rrrrrrr';r rrrrrr
tttttt
oQQQAOAiT;A aOAQAC
Itr
t<
ol)
zl
3i#
lo EgEKHxTHH-HHHERe
E: o:N4$6@[email protected]$(
NNNNNNNNNNOOOOOC
&&fr&&&frfroddcddddda
L
o
€
=
o
U
F
o
zao
oo
zz
F
o
F
z
q
=
q
U
J
q
u
4
o
uz
qF
d
6tshDbO
oa2oo
5-.,v!1vE!4 .-!45v,,5
+qqqT?''qH$q;*ql
m<<< aaaaaqaoaAcit
E_. l_.FFtsFtF.FFFFFFF
a rq la cq @ pa o ca ca lq 9q a ca cq o
tti
fr,2
;e
(i< :NAEE:EEU
<im;-
OOOOOOOOC
rrrrrrrrr
rrttttttt
aQaaQooac
N-3
-N6
OOO
rrr
ttt
ooo
Itr
t<
oli
zl
F16
sl;
lo
N
bo !p q! b!
*'*855#5,"gFx**
. r r N o @ . N ai @ r , N O .
iv$-m@vN=@$<NmN
Fi $6@roo9=E=199=c9
E
o
.:3
o)
'=
o
Lo
g
C
:t
o
^
!o
3
tr
.I-
c
o
I
v
tn
z
o
I
l-
4vr
- 3y!,
c,o
eh
NE
6c
o
2
l-
la
I
J
|n
F
&,
o.
u
b
o
z
F{
o
A
a
6r
Po
tl>
k[i
-Qo
i' 'i
?@
!o
g€
oc
dr
;d
1t
o o* c r
o o; f o
ZZ+l\ Z
t3
gE
at I
6
r6
N.
to
tt
pq cq
cii
JJ@@
ilTT
j66
q
z
F
e
c
ra
q t,-
\ bnba
aits o
;'rJ: ?
o r r'Fn q
!C o o.n H
oHE!g+'q
:.:.: oe!!
k9::;.>;*
tiJ:5Ar;aiDdD
fi: -NoSrn@r
>>>>>:>
c,
gt
Y
ltt
r
u
F
z
F
o
F
z
U
=
u
U
L
u
d
*2
{-
dx
L
@G
NF.
rr
ko
EZ
()*
;&
gf d
I
o
U
q
F
c
=
U
j@d
@<
o
UAP
U
NX
6
fit AP
aa
a
o
!
o
@
nP
iF
d
r,6
=7
2E
=f
F
6
I
a
tt
u
F
o
z
z
.d
F
o
o
C)
o-"
oo
zq
..p
F
o
F
z
u
a.
U
U
L
U
d
d
aZ
.9r
rd
F<L
c-
Oo
'L
o.
TE
6<
€4
F
-d
8z
CL
oiv
6<
dtt
J
6
()
d
+z
OF
tx
d
c-
oo
!z
o.
:d
Ef
ko
iz
=d
gf !
:
N
D
I
J
u
U
z
o
u
4
=
N
:_
i5H;
)k
Et
o
d
4
F
o
F
z
U
t
oo
?7
EF
9<
'C;
o2
c!
oiv
6<
A
d
<z
(Ju
EC
ts
eo
tr
N
N
b0
E
6F
t>
€pq"i
q -(
D bio
-g ^
oa=
3!D h
egE
>So
co8.
;@d
tr>t
* ra6t
o
OF
<e d
c.
oo
tz
TE
E<
o
o
A
o
z
F
4
4
O
I
@
r
N
I
o
o
z
F
e
l"
a{ li
@1"
U
u
F{< I
x5 l.
Eci It >c
o\5
l"
lL
l'
O<
<o
>6
r.
=@
>o
dG
fr: Ei
PAGE II

MECHANICAL PARTS LIST (CONTINUED)
Part
No"
No.
0
I
3
4
5
77
78
?9
B-19. 862C
B-28. 163
73-224t-r34
c-35.823-lE
D-35. ?53 -1
B-28. 159
c-r9.83?-F
B-33.411-A
48. 409-l
D-36.153-E
D-36.154G
B-33.418
73.224r-t43
73-2254-3
c-119.88?-l
73-2254-3
73-2241-143
33.415
Description
#B-32 Screw, RHMS Phillips
Angle Bracket For Mounting
Drive Assembly
Linen Washer
Flat Washer (l or 2 Used)
Brake Drum And Bushing
Assembly (2 Used)
#8-32 BHM Screw (2 Used)
Drive Mounting Plate
#8-32 BHM Screw
Spacer, Motor Mounting (Pa
of Item ?2)
Shock Mount
Motor Adapter Plate
Flat Washer
Hex Nut
Motor, Round Type (Fasco)
Motor, Square Type (GI and
Alliance)
Truanc Retaining "E" Ring
Flat Washer
Felt Washer
Fan Blade
Felt Washer
Flat Washer
Push-On Fastener (Presthole
#B-32 RHM Screw, Phillips
(2 Used)
#B-32 RHM Screw, Phillips
(2 Used)
Brake Slide Plate Assembly
Linen Washer
Push-On-Stud Nut, 3/16't St
Pressure Pad Spring Assy.
Idler Lever Tension Spring
Brake Pad, Felt (2 Used)
Idler Lever Assembly
Bent Washer
#8-32 HH Shoulder Screw
Phenolic Washer
Phenolic Washer
Idler Drive. Sheave
Felt Washer (1 or 2 Used)
Steel Washer (1 or 2 Used)
Idler Drive Belt
Truarc Retaining t'Et' Ring
#8-32 BHS Screw
Flywheel
Idler Drive Belt
Record Interlock Assembly
Switch Arrn Link
Switch Lever Assembly
Brake Return Spring
Shift Plate Assembly
Sub Idler Plate Assembly
Bent Washer
#B-32 HH Shoulder Screw
Phenolic Washer
t03
r04
105
r06
l0?
r08
t09
ll0
tll
112
[3
c-35.835
B-28" 163
B-33.4i2
B-35" ?64
B-31.339-C
B-31.335A
B-35. 834-2
B-32.2?5-lE
28.t73
28. 1?3
B-33.406-D
73-2254-6
73-224t-150
B-28.181
B-33.418
c-13.25?-lC
B-28.181
B-35. ??4
B-31.333
B-35" 859-r
B-31.338-B
B-35. ?59-l
B-35. ?5?D
B-32.2?5-lE
28" 1?3
llB
ll9
120
T2T
t22
123
124
125
i26
r27
128
i29
130
Part
No. No.
[4 28.173
115 B-35.405-F
116 73-2254-6
ll? 73-224t-150
B-33.418
D-33.445
?3 -233r-4
D-33.445-A
73 -2331-4
B-19. 863
72-223t-5
B-28.163
73-2241-143
Description
Phenolic Washer
Sub Idler
Felt Washer (l or 2 Used)
Flat Washer, Steel (1 or 2
Used)
Truarc Retaining "E" Ring
Timer Drive Belt
Gear Train Mounting Bracket
Tape Index
#6 Int. Lockwasher
#6-32 Phillips RHM Screw
Tape Index Gear Train
#6 Int. Lockwasher
#6-32 Phillips RHM Screw
Drive Mounting Plate Bracket
#8 Int. Lockwasher
#8-32 RHM Screw, Phillips
Linen Washer
Flat Washer, Steel (1 or 2
Used)
#6-32 Phillips RHM Screw
(2 Used)
#6 Int. Lockwasher
Shift Plate For Fast Speed
Hairpin Ciip
Steel Washer (1 or 2 Used)
Linen Washer (1 or 2 Used)
Phenolic Washer (l or 2
Used)
Rubber Bonded Idler Wheel
2 r/ 2,, Dia.
"C" Washer
Idler Slide Bushing
Linen Washer
Steel Washer
Idler Slide Plate Assembly
Idler Lift Spring
#8-32 RHM Screw
Steel Washer
Shoulder Washer
Steel Washer
Idler -Throw -Out-Lever
Idler Tension Spring Clip
#6-32 RHM Screw, Phillips
#6 Int. Lockwasher
Speed Control Shaft Detent
Spring
Speed Control Shaft Assembl
Truarc Retaining Ring
Idler Tension Spring (2 Used)
Motor Drive Pulley
#8-32 B.H.S. Screw
Phenolic Washer
Motor Mounting Screw
(3 Used)
Tape Recording Head/Shure
TRI6A
132
r33 73-2231-4
r34 51-3182
135 B-33.409
136 73-2241-t50
t3? B-28.163
138 ?3-2238-49
139 B-33.408C
140 B-33.40?-1
141 B-32.264-F
r42 B-28.163
143
r44 B-35. ?68-A
145 B-31.327-D
146
r47 73-224t-r50
148 B-32.291-1
149
150 110-4?
151
r52
153 73-223t-4
154 B-19.961
155 C-35.816-l
156 33" 469
15? B-3r.324-A
158 B-32.288-D
159
160 73-2238-49
161
162 C-36.156-E
Page 12
This manual suits for next models
1
Other Knight Tape Deck manuals