manuals.online logo
Brands
  1. Home
  2. •
  3. Brands
  4. •
  5. Knurr
  6. •
  7. Indoor Furnishing
  8. •
  9. Knurr Dacobas User manual

Knurr Dacobas User manual

Assembly Instructions
Dacobas – Unterbauleuchte
Dacobas – Pedestal lamp
Dacobas – Eclairage inférieur
■Technical Furniture
General information
Refer to the other
documentation
Consignes générales
Respecter les indications
ci-dessous
1Allgemeine Hinweise
Weitere Dokumentation
beachten
Identification
The model plate is fitted on the bottom left
of the pedestal lamp housing.
Identification
La plaque d’identification est placée en bas
à gauche du boîtier de l’éclairage inférieur.
Identifikation
Das Typenschild ist unten links am Gehäuse
der Unterbauleuchte angebracht.
Achtung!
Montageanleitung „Dacobas
– Arbeitsplatz“ oder „Dacobas
– Leitwartentisch“ unbedingt
beachten.
Warning
See assembly instructions “Dacobas –
Workstation” or “Dacobas – Control
room desk”.
Attention !
Respecter impérativement les
instructions de montage “ Dacobas
– Poste de travail ” ou “ Dacobas –
Bureau pour poste de contrôle ”.
Validity
This document applies to the following
Dacobas components from Knürr AG:
Pedestal lamp–
Tools required
5mm Allen key–
Philips screwdriver–
Validité
Le présent manuel concerne les éléments
Dacobas de Knürr AG suivants :
Eclairage inférieure–
Outils nécessaires
clé Allen 5mm–
tournevis cruciforme–
Gültigkeit
Diese Anleitung gilt für folgende Dacobas-
Komponenten der Knürr AG:
Unterbauleuchte–
Notwendiges Werkzeug
Innensechskantschlüssel 5 mm–
Kreuzschlitzschraubendreher–
DEUTSCH ENGLISH FRANÇAIS
Dacobas Unterbauleuchte Dacobas Pedestal lamp Eclairage inférieur Dacobas
Attach pedestal lamp Fixer l’eclairage inférieureUnterbauleuchte befestigen
B
5
B2
B3
B1
B
Unterbauleuchte neigen
Alle Schrauben lockern.•
Leuchte innerhalb von ±5° in die•
gewünschte Neigung bringen und
ausrichten.
Alle Schrauben wieder sicher festziehen.•
Adjust the angle of the pedestal
lamp
Undo all the screws.•
Move the lamp to the required angle•
within the maximum of ±5° and align it.
Retighten all the screws.•
Inclinaison d’eclairage inférieure
Desserrer toutes les vis.•
Placer et fixer l’eclairage inférieure•
à l’inclinaison souhaitée dans l’intervalle
de ±5° possible.
Resserrer toutes les vis.•
A
A
Installation
Attach the adapters
Montage
Montage des profilés de maintien
2Montage
Halteprofile montieren
A2
A3
A1
A
2
DEUTSCH ENGLISH FRANÇAIS
Dacobas Unterbauleuchte Dacobas Pedestal lamp Eclairage inférieur Dacobas
D
Maintenance
Replace the fluorescent tube
Switch off the pedestal lamp and discon-•
nect it from the mains supply.
Maintenance
Remplacer le tube néon
Eteindre l’éclairage du caisson inférieur et•
le couper de l’alimentation en courant.
4Wartung
Leuchtstoffröhre wechseln
Unterbauleuchte ausschalten und•
von der Stromversorgung trennen.
D1
D2
D3
D4
4x
D
Operation
Switch on/off
C1: Switch the socket strip on or off
C2: Switch the light on or off
Utilisation
Allumer/éteindre
C1 : Allumer et d’éteindre la réglette de
prise.
C2 : Allumer et d’éteindre l’éclairage.
3Bedienung
Ein-/Ausschalten
C1: Steckdosenleiste ein- oder ausschalten.
C2: Beleuchtung ein- oder ausschalten.
0
1
0
1
C1 C2
C
Prescribed fluorescent tube:
18W for 800mm, 1000mm and–
1200mm lengths
36W for 1400mm, 1600mm, 1 800mm–
and 2000mm lengths.
Reassemble in reverse order.•
Tubes néon prescrits :
18W pour les longueurs 800mm,–
1000mm et 1200mm
36W pour les longueurs 1400mm,–
1600mm, 1800 mm et 2000mm.
Le montage s’effectue dans l’ordre•
inverse.
Vorgeschriebene Leuchtstoffröhre:
18W für Längen 800mm, 1000mm und–
1200mm
36W für Längen 1400mm, 1600mm,–
1800mm und 2000 mm.
Montage in umgekehrter Reihenfolge•
3
DEUTSCH ENGLISH FRANÇAIS
Dacobas Unterbauleuchte Dacobas Pedestal lamp Eclairage inférieur Dacobas
Emerson Network Power
The global leader in enabling business-critical continuity EmersonNetworkPower.com
Knürr logo, Emerson Network Power and the Emerson Network Power logo are trademarks and service marks of Emerson Electric Co. ©2008 Emerson Electric Co.
01.321.706.0 • 01/09 • Thewald Kommunikation
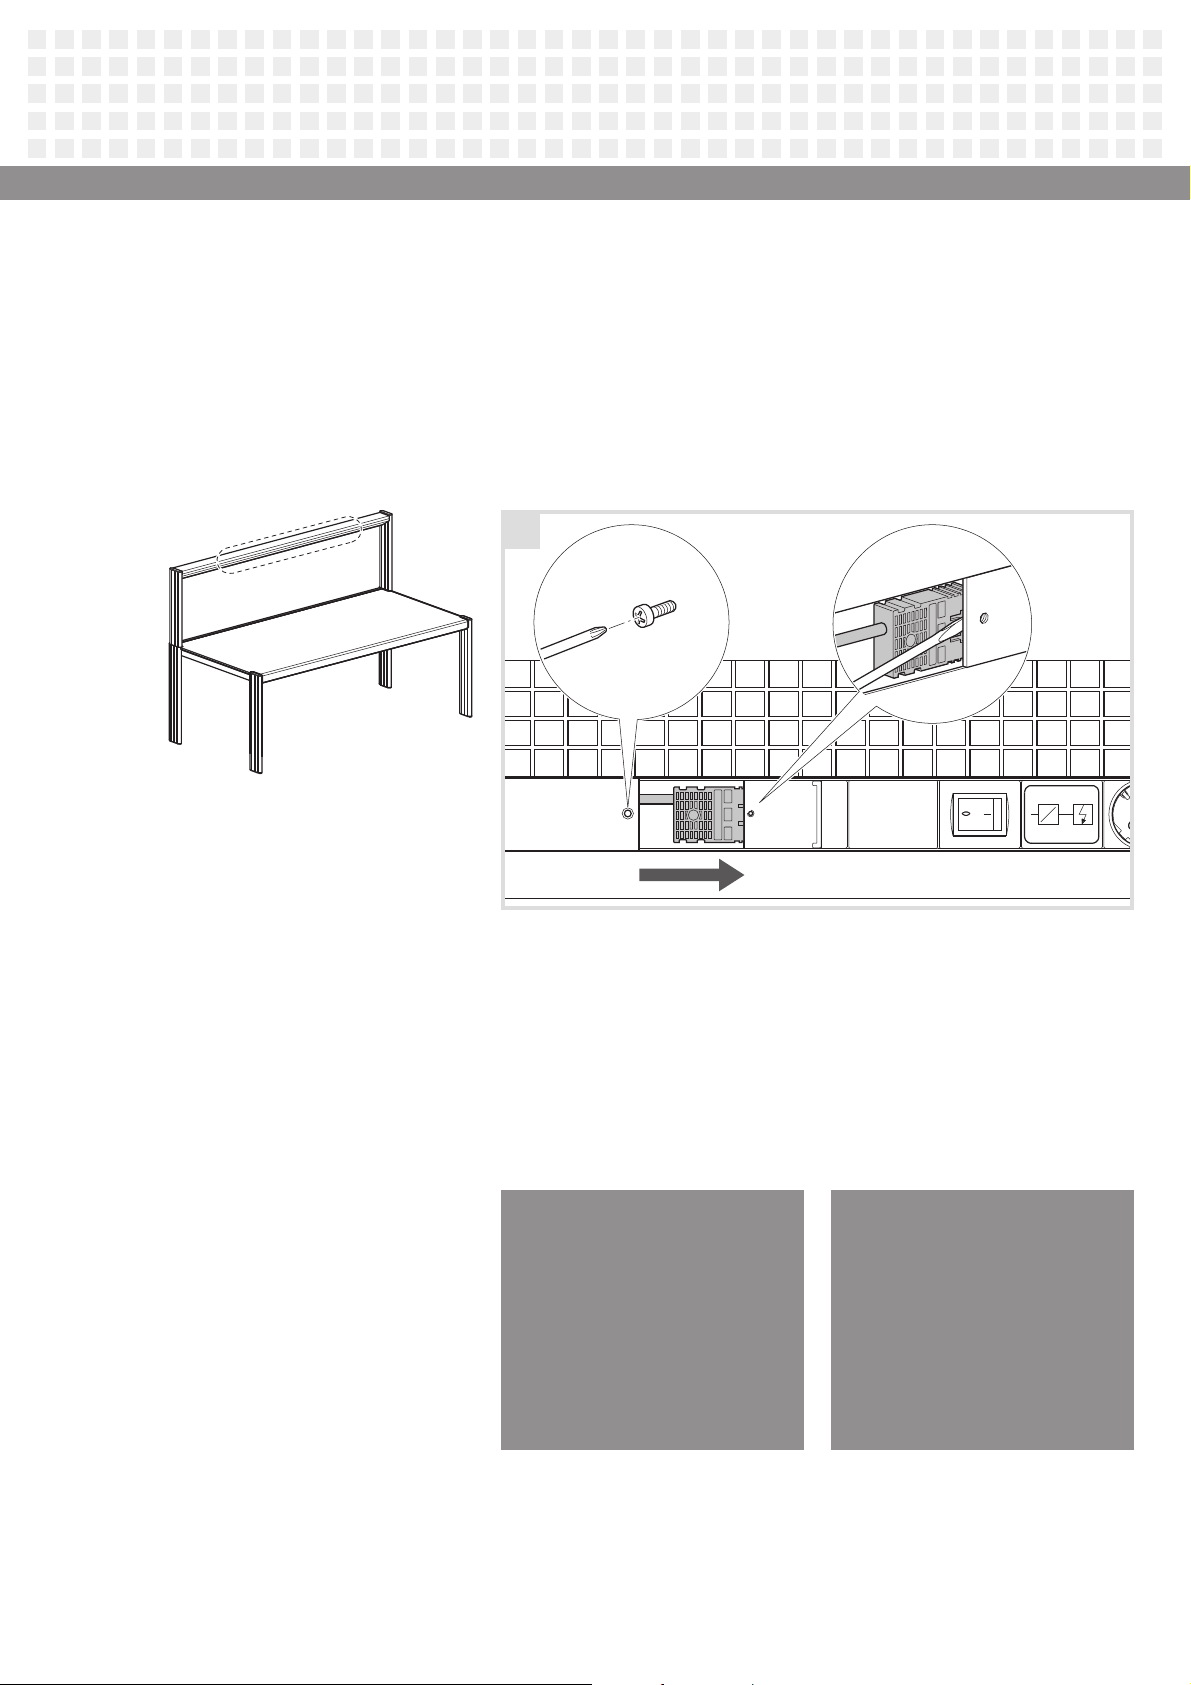
Replace the power cable
Switch off the pedestal lamp and•
disconnect it from the mains supply.
Remove the Philips screws E1.•
Push the socket strip gently inwards and•
slide it to the right E2 until the plug on
the connection cable can be accessed.
Unlatch and release the connector E3.•
Carefully pull out the connection cable.•
Remplacer la conduite de
raccordement
Eteindre l’éclairage du caisson inférieur et•
le couper de l’alimentation en courant.
Desserrer les vis à tête cruciforme E1.•
Appuyer légèrement la réglette de prise•
vers l’intérieur puis pousser vers la droite
E2 jusqu’à ce que la prise de la conduite
de raccordement soit accessible.
Déverrouiller la prise E3 et la détacher.•
Retirer avec précaution la conduite de•
raccordement.
Zuleitung auswechseln
Unterbauleuchte ausschalten und•
von der Stromversorgung trennen.
Kreuzschlitzschrauben lösen E1.•
Steckdosenleiste leicht nach innen•
drücken und nach rechts schieben E2,
bis der Stecker der Anschlussleitung
zugänglich ist.
Stecker entriegeln E3 und lösen.•
Anschlussleitung vorsichtig herausziehen.•
E
E2
2x
E1 E3
E
Insert a new connection cable.•
Push in the connector until it audibly and•
mechanically locks in.
Remount the socket rail.•
The socket strip can be replaced using the
same procedure.
Introduire la nouvelle conduite de raccor-•
dement.
Enficher la prise jusqu’à sentir et entendre•
le verrou s’enclencher.
Rassembler la réglette de prise.•
La réglette de prise peut être remplacée de
la même manière
Neue Anschlussleitung einführen.•
Stecker einstecken, bis die Verriegelung•
hör- und fühlbar einrastet.
Steckdosenleiste wieder montieren.•
In gleicher Weise kann die Steckdosenleiste
gewechselt werden.
While every precaution has been taken to ensure accuracy
and completeness in this literature, Knürr AG assumes no
responsibility, and disclaims all liability for damage resulting
from use of this information or for any errors or omissions.
©2008 Knürr AG. All rigths reserved throughout the world.
Specifications subject to change without notice.
All names referred to are trademarks or registered trade-
marks of their respective owners.
®Knürr and the Knürr logo are registered trademarks
of Knürr AG.
Knürr
Technical Furniture GmbH
Business Unit
Hauptstraße 35
94439 Münchsdorf • Germany
Tel. +49 (0) 87 23/28-0
Fax +49 (0) 87 23/28-138
www.technical-furniture.com
Knürr AG
Global Headquarters
Mariakirchener Straße 38
94424 Arnstorf • Germany
Tel. +49 (0) 87 23/27-0
Fax +49 (0) 87 23/27-154
info@knuerr.com
www.knuerr.com
4

Other manuals for Dacobas

2

Other Knurr Indoor Furnishing manuals

Knurr Elicon User manual

Knurr

Knurr Elicon User manual

Knurr Elimobil Rear panel User manual

Knurr

Knurr Elimobil Rear panel User manual

Knurr Elimobil User manual

Knurr

Knurr Elimobil User manual

Knurr Elimobil Drawer module User manual

Knurr

Knurr Elimobil Drawer module User manual

Knurr Dacobas User manual

Knurr

Knurr Dacobas User manual

Knurr SOHO User manual

Knurr

Knurr SOHO User manual

Popular Indoor Furnishing manuals by other brands

Baby Relax DOREL ASIA DA7757W manual

Baby Relax

Baby Relax DOREL ASIA DA7757W manual

HABYS Sigma User guide and assembly instructions

HABYS

HABYS Sigma User guide and assembly instructions

Forte WNPS123E1 Assembling Instruction

Forte

Forte WNPS123E1 Assembling Instruction

Axor Uno Specification sheet

Axor

Axor Uno Specification sheet

StyleWell FDS40081-ST Use and care guide

StyleWell

StyleWell FDS40081-ST Use and care guide

modway MOD-5472 quick start guide

modway

modway MOD-5472 quick start guide

Classic Exhibits VISIONARY DESIGNS MOD-1594 Setup instructions

Classic Exhibits

Classic Exhibits VISIONARY DESIGNS MOD-1594 Setup instructions

Argos Mia 3 Drawer Chest Assembly instructions

Argos

Argos Mia 3 Drawer Chest Assembly instructions

meychair AF4R manual

meychair

meychair AF4R manual

GFW LANCASTER WARDROBE Assembly instructions

GFW

GFW LANCASTER WARDROBE Assembly instructions

Pitarch 14069 Assembly instructions

Pitarch

Pitarch 14069 Assembly instructions

Hülsta hs.420 Important product information

Hülsta

Hülsta hs.420 Important product information

IMMAX FACE 08970L user manual

IMMAX

IMMAX FACE 08970L user manual

BENE P2 Assembly and operating instructions

BENE

BENE P2 Assembly and operating instructions

Diagone COUCHAGE JUNIOR E12 manual

Diagone

Diagone COUCHAGE JUNIOR E12 manual

Rauch M9979 Assembly instructions

Rauch

Rauch M9979 Assembly instructions

Lightolier LLP100 installation instructions

Lightolier

Lightolier LLP100 installation instructions

LumiSource BOOMCHAIR SVC owner's manual

LumiSource

LumiSource BOOMCHAIR SVC owner's manual

manuals.online logo
manuals.online logoBrands
  • About & Mission
  • Contact us
  • Privacy Policy
  • Terms and Conditions

Copyright 2025 Manuals.Online. All Rights Reserved.