WhenInstallingComponents
●When inserting the batteries of the transmitter and receiver, do not
mistake the polarity.
※The product will be damaged.
NotesforUsage
NotesAfterUsage
1. Extremely hot (over 40ºC) or cold (below 10ºC) temperatures.
2.Locationsindirectsunlight. 3. Locations with high humidity.
4. Locations subject to vibrations. 5.Locationswithlotsofdust.
Installation
<To be fixed to Master Unit EX-NEXT>
Names of Parts
LCD Xpansion Unit 2 EXP-201
StartupGuide V e r.1. 0 0 KONDOKAGAKUCo.,Ltd.
www.kopropo.co.jp
PartsList:No.10672
LCD Xpansion Unit 2
EXP-201
LCDXpansionUnit2EXP-201 -------------------------------- x1
MonitorBracket/NutHolder ------------------------------------ x1
M2.6-8BHSelftappingscrews ------------------------------- x4
M2-6Capscrews -------------------------------------------------- x1
ServoTwinExtensionWireII ----------------------------------- x1
Thankyouforpurchasingourproducts.Pleasereadthis
Startu singitandreadtheInstruction
manual KOPROPOsite(referbelowURL).
EX-NEXT
https://www.kopropo.co.jp/en/supports/view/283
Items that you should especially should pay attention to.
When the installation of each unit (Sterring unit / Xpansion
unit / Grip unit) or disassembing, please make sure that the
power is switched off.
If the Xpansion unitis not assembled or used, do not use a
LiFe/LiPo battery.
○When using Xpansion unit
No,10546 Battery Stand Unit
can be used along with a
LiFe/LiPo battery.
①
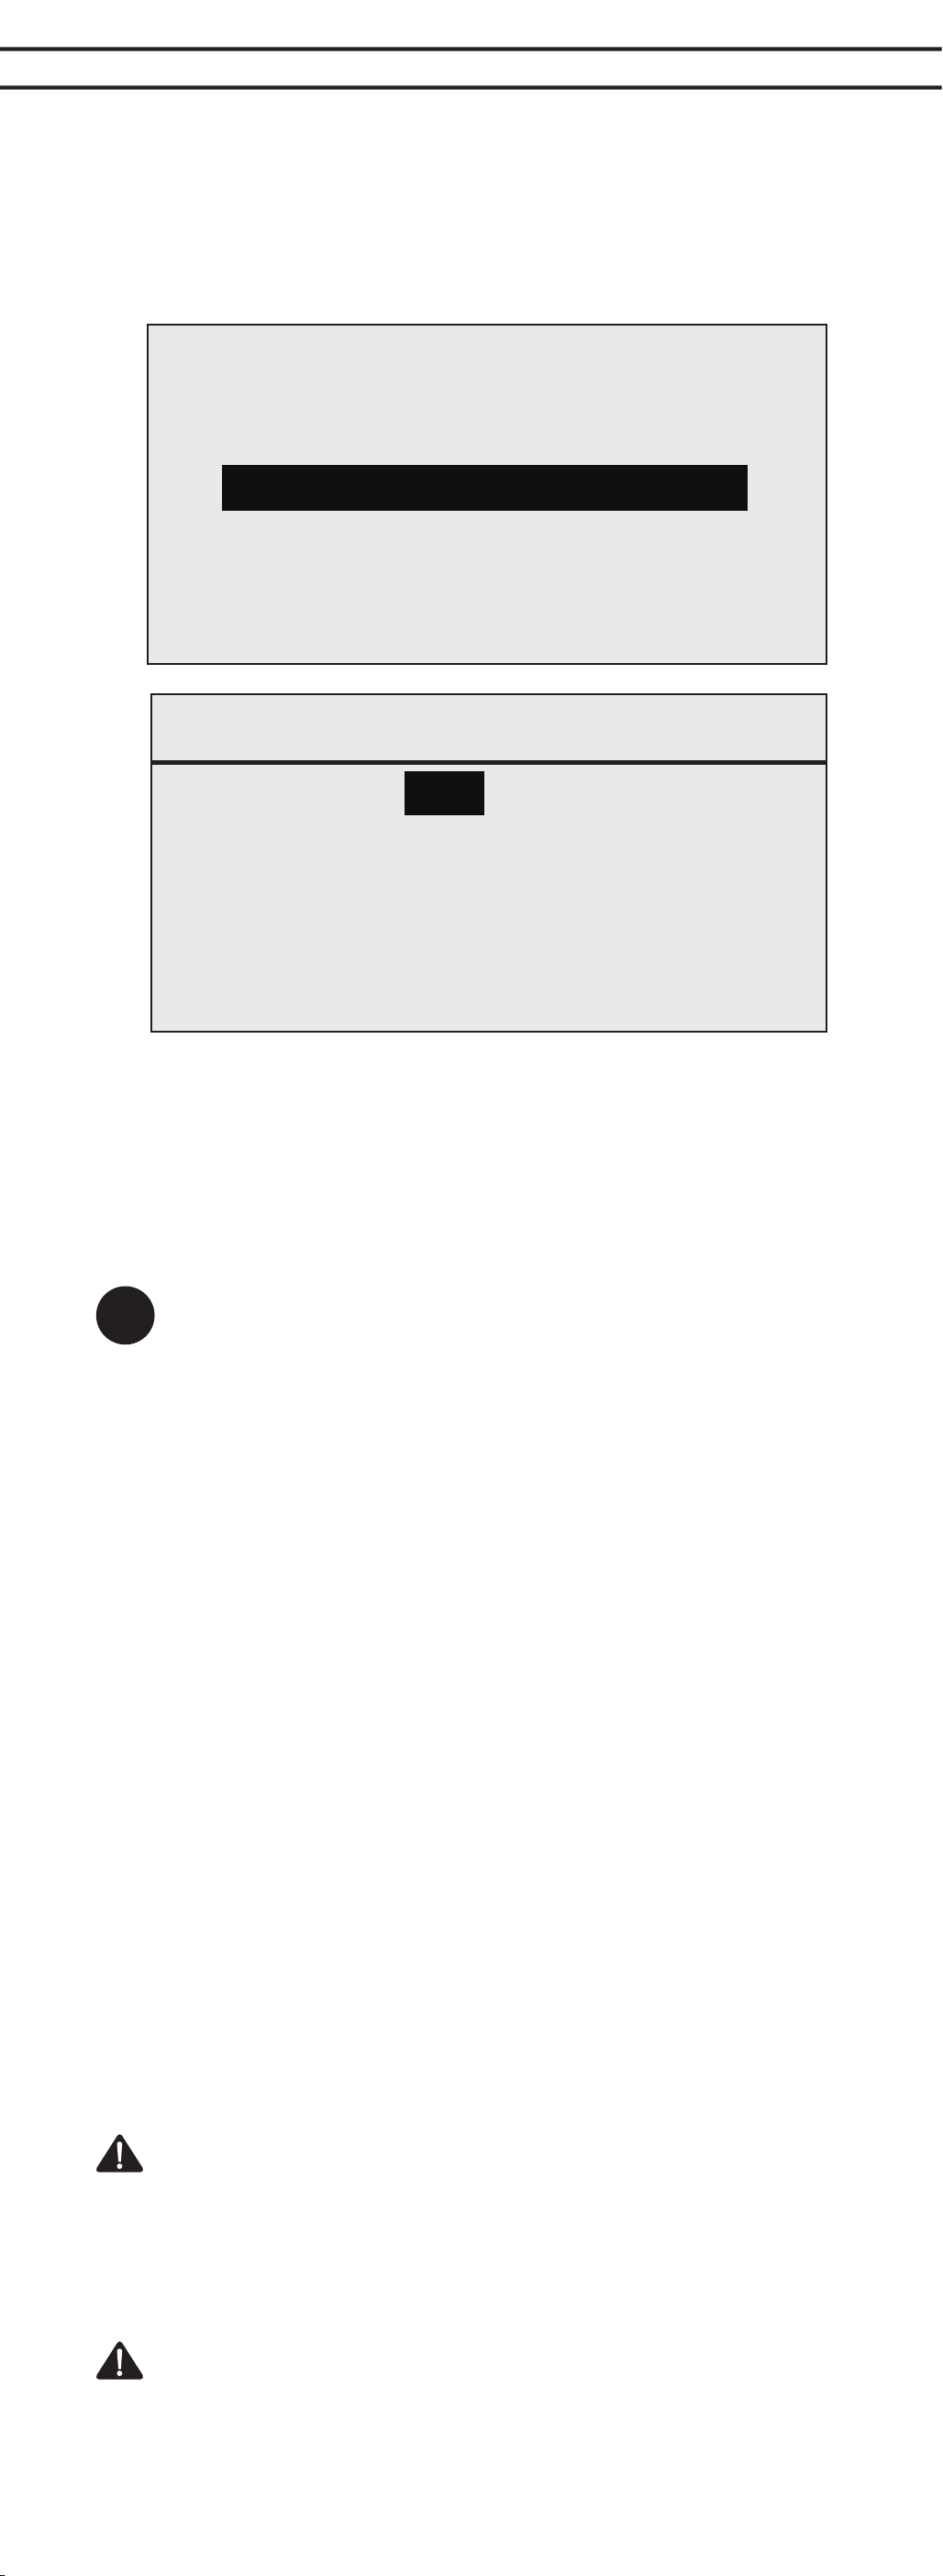
Move the cursor to [SYSTEM] > [BATTERY] on the Function Menu
<For overdischarge protection, please be sure to configurate“the battery”>
screen, then press the ENTER key.
②Use LR key to move cursor over using battery type, then
press the ENTER key.
When setting the battery type by mistake, cancel the
warning message by pressing and holding the BACK key.
The initial display screen will be shown and please set it to
the correct battery type again.
Operation alarm acts when leaving EX-NEXT unattended for three
minutes when assenbling Xpansion unit. When an operation key
is pressed the sound will stop.
1)
2)
*
3)
4)
5)
EXP-201 is for EX-NEXT only.
EX-NEXT cannot use analog servos (old product such as PS-401).
There is a possibility of the servo breaking.
KondoKagakuco.ltdguaranteeafter-saleserviceandothersaboutthis
product.However,pleaseunderstandthatitcannotguaranteeabout
thefollowingpointsonthecharacterofthisproduct.
1)Breakageofthepartbyassembly.
2)Damagejudgedtobebasedontheoperationafterassembling.
3)Whenreconstructionofthisproductandanalysisareconducted.
Explanation of product warranties
Thecompanynameorthebrandnameforeachreferenceinthe
textisaregisteredtrademark.Downloadingthesoftwarefrom
theattachmentorfromourhomepageforthisproductand
beingusedforthesolepurposeofthisproductisaccepted.
Pleasedonotusethisforanyotheruse.Thisproduct,software
andtheintellectualpropertyrightsarethelegalrightsofKondo
KagakuCo.ltd.Theactofwhichbreaksthelaw,canresultin
penalregulationsandotherapplicablelawsintheregionthat
theviolationtakesplace.
Explanation of Licensing
Duetothenatureofradiocontrolledmodels,improperhandling
mayleadtodangeroussituations.Thereforepleasereadthe
followinginformationcarefullyinordertoensuresafeoperation.
PleasealsounderstandthatKOPropoisnotresponsibleforany
injuriesordamagewhichresultfromnoncomplianceofthese
cautionsandnotices.
Improperhandling/usagemayleadtoahighprob-
abilityofmaterialdamageaswellasapossibilityof
seriouspersonalinjuryorevendeath.
Improperhandling/usagemayleadtopersonal
injuryormaterialdamage.
Warning
Caution
ForSafeOperation
Warning
Prohibited
matters
Warning
Prohibited
matters
●
Within Japan, this product is limited to usage with models which
operateonthegroundorinthewater.
●
KOPropoisnotresponsibleforanydamagesorinjurieswhichresult
fromuseofthisproductincombinationwithothermanufacturer's
products.
Warning
Enforcement
matters
Warning
Enforcement
matters
●
Do not use when there is thunder.
* It is possible for lightning to strike the antenna.
●
Do not use in the rain or in areas where water has accumulated.
*Ifwaterenterstheproductitmayleadtoanuncontrollablemodel.
●
Do not use in the following locations:
1. Near R/C circuits (within 3km)
2.Nearcrowds,onstreets,ornearactualvehiclesorships.
3. Near high-voltage power lines or communication facilities.
●
D o not use when your conc entration leve ls are compromised by
tiredness,alcohol,medication,etc.
* Mistakes in judgment may result in serious accidents.
●
D o n ot allow glow engine fuel or engine exhaust to contact the
product.
* These may attack the plastic and damage the product.
●
Check to ensure that the selected model memory matches the model
tobecontrolled.
* Using an incorrect memory may lead to an uncontrollable model.
●
Ma ke sure to sto p the engine (disconnect m otor ca b les) before
changingtransmittersettings.
Caution
Prohibited
matters
Caution
Prohibited
matters
●
Remove batteries from transmitter if it will not be used for a consider-
abletime.
* If batteries are left in the transmitter, battery leakage may result in
damage.
●
Do not store transmitter/receiver in the following conditions:
* Theseconditionsmaycausethecasetodeformanddamagethe
product.
Caution
Enforcement
matters
●
When switching on, always turn on the transmitter first, followed by
the receiver. Follow the reverse order when switching off.
*Ifthewrongorderisfollowed,itmayleadtoanuncontrollablemodel.
●
Dismantling or modifying the RF Module (internalized in the case of
the EX-NEXT) is prohibited and is punishable by law.
*DoingsomayleadtoaccidentssuchasshortcircuitsandKOPropo
Customer Service Department may not accept dismantled/modified
productsforrepair.
●
Do not use this product in aircraft, hospitals, or near fire alarms or
medicalequipment.
* This may lead to malfunctions and result in serious accidents. Also, by
lawyoumustceaseoperationiftheproductaffectsotherwirelessor
electricaldevices.
●
2.4GHz transmitters must be registered with the Japan Radio Control
Safety Association.
* Thetransmitterwhichyouhavepurchasesisalread yregistered.
Productswhichdonothaveproofofregistrationareillegal.
*KONDOKAGAKUCO.,LTD.
Servicedepartment
ADDRESS:4-17-7Higashi-Nippori,Arakawa-kuTokyo
Japan116-0014Japan
TEL : 03-3807-7648(service)
9 :0 0 -12 :0 0 &13: 0 0 -17:0 0 M - Fex c e p t
nati ona lholidaysSaturdaya ndSunday
closed
Latestinformationcanbeaccessedhere.
>>http://www.kopropo.co.jp
Contactinformationforrepairinggoods
Installationisnotnecessaryifyouareonly
usingtheservosetting.
Basic Operations to Change Settings
BACK key
※Pleaserefertoaninstructionmanualforthe
detailedfunctionandoperation.
L(<)key R(>)key
ENT key
Controllingofthesettingadjustmentsisdoneviathe
L(<)key,R(>)key,ENTER(ENT)key,andBACKkey.
ENT Key:
Selectingitemtobemodified;Confirmingachange
afterasettingchange.
L(<)Key:
Usedtomovecursorbetweenmenuchoicesandto
changeasettingvalue.Loweringavalue
(forL/R
cases:raisingtowardL);
Returntoapreviousmenuitem.
R(>)Key:
Usedtomovecursorbetweenmenuchoicesandto
changeasettingvalue.Raisingvalue(forL/Rcases:
raisingtowardR);Proceedtonextmenuitem.
BACK Key:
Returningtopreviousscreen;Cancelingchange
L(<)Key・R(>)Key
Pressingsimultaneously
:
Resetsthevaluetodefaultsetting.
1
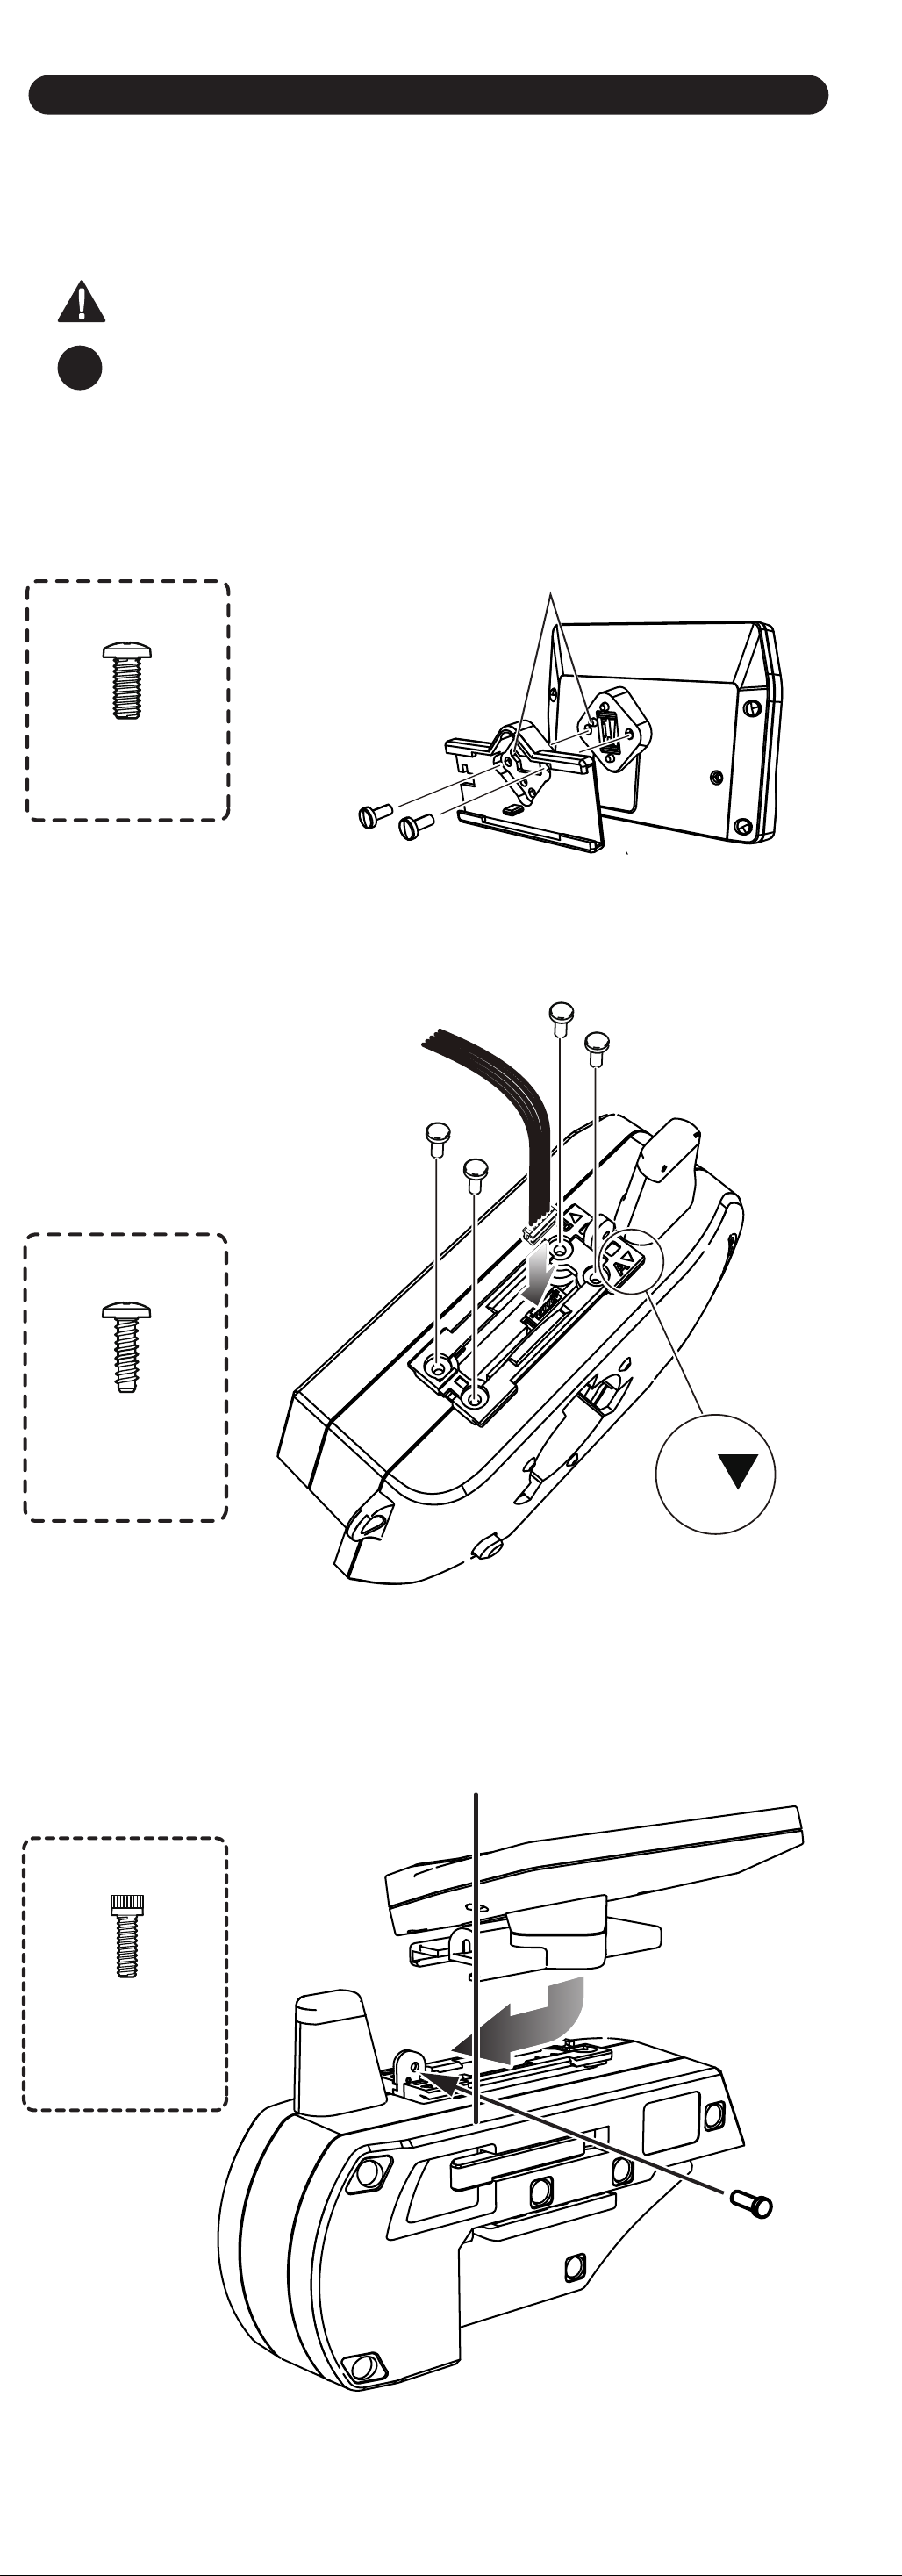
M2-6capscrew
A
② Attachthemonitorbrackettothemaster
unit. ※[A▼]marktothesteeringside
① AttachamonitorbaseparalleltoXpansion
unit.※Factorysetting.
Attentiontothemarker.
M2.6-6BH
x2
x4
TP2.6-8BH
Selftappingscrews
Connectthewireofthe
Xpansionunittothe
masterunit.
③ Attachexpansionunittoamasterunit.
Whilematchingtheedgeofthebasewith
thedentofthebracket,slideituntilthe
Xpansionunitlocks.
A ▼:settingtothefront
Xpansionunitcanbemountedfacingthe
frontortheside.Fordetails,pleaserefer
totheEX-NEXTUser'sManual.
BecarefultonotmisusetheM2.6-6BHandTP2.6-
8BHscrews.
directionsusingthemonitorbaseandbracket..
P
M2.6-6BH
x2
Usage
2.6-8BH
selftapping
screwx4
Usage
M2-6
capscrew
x1
Usage
WhenInstallingComponents
●When inserting the batteries of the transmitter and receiver, do not
mistake the polarity.
※The product will be damaged.
NotesforUsage
NotesAfterUsage
1. Extremely hot (over 40ºC) or cold (below 10ºC) temperatures.
2.Locationsindirectsunlight. 3. Locations with high humidity.
4. Locations subject to vibrations. 5.Locationswithlotsofdust.
Installation
<To be fixed to Master Unit EX-NEXT>
Names of Parts
LCD Xpansion Unit 2 EXP-201
StartupGuide Ve r.1. 0 0 KONDOKAGAKUCo.,Ltd.
www.kopropo.co.jp
PartsList:No.10672
LCD Xpansion Unit 2
EXP-201
LCDXpansionUnit2EXP-201 -------------------------------- x1
MonitorBracket/NutHolder ------------------------------------ x1
M2.6-8BHSelftappingscrews ------------------------------- x4
M2-6Capscrews -------------------------------------------------- x1
ServoTwinExtensionWireII ----------------------------------- x1
uforpurchasingourproducts.Pleasereadthis
GuidebeforeusingitandreadtheInstruction
manualdownloadedfromKOPROPOsite(referbelowURL).
EX-NEXT
https://www.kopropo.co.jp/en/supports/view/283
Items that you should especially should pay attention to.
When the installation of each unit (Sterring unit / Xpansion
unit / Grip unit) or disassembing, please make sure that the
power is switched off.
If the Xpansion unitis not assembled or used, do not use a
LiFe/LiPo battery.
○When using Xpansion unit
No,10546 Battery Stand Unit
can be used along with a
LiFe/LiPo battery.
①
Move the cursor to [SYSTEM] > [BATTERY] on the Function Menu
<For overdischarge protection, please be sure to configurate“the battery”>
screen, then press the ENTER key.
②Use LR key to move cursor over using battery type, then
press the ENTER key.
When setting the battery type by mistake, cancel the
warning message by pressing and holding the BACK key.
The initial display screen will be shown and please set it to
the correct battery type again.
Operation alarm acts when leaving EX-NEXT unattended for three
minutes when assenbling Xpansion unit. When an operation key
is pressed the sound will stop.
1)
2)
*
3)
4)
5)
EXP-201 is for EX-NEXT only.
EX-NEXT cannot use analog servos (old product such as PS-401).
There is a possibility of the servo breaking.
KondoKagakuco.ltdguaranteeafter-saleserviceandothersaboutthis
product.However,pleaseunderstandthatitcannotguaranteeabout
thefollowingpointsonthecharacterofthisproduct.
1)Breakageofthepartbyassembly.
2)Damagejudgedtobebasedontheoperationafterassembling.
3)Whenreconstructionofthisproductandanalysisareconducted.
Explanation of product warranties
Thecompanynameorthebrandnameforeachreferenceinthe
textisaregisteredtrademark.Downloadingthesoftwarefrom
theattachmentorfromourhomepageforthisproductand
beingusedforthesolepurposeofthisproductisaccepted.
Pleasedonotusethisforanyotheruse.Thisproduct,software
andtheintellectualpropertyrightsarethelegalrightsofKondo
KagakuCo.ltd.Theactofwhichbreaksthelaw,canresultin
penalregulationsandotherapplicablelawsintheregionthat
theviolationtakesplace.
Explanation of Licensing
Duetothenatureofradiocontrolledmodels,improperhandling
mayleadtodangeroussituations.Thereforepleasereadthe
followinginformationcarefullyinordertoensuresafeoperation.
PleasealsounderstandthatKOPropoisnotresponsibleforany
injuriesordamagewhichresultfromnoncomplianceofthese
cautionsandnotices.
Improperhandling/usagemayleadtoahighprob-
abilityofmaterialdamageaswellasapossibilityof
seriouspersonalinjuryorevendeath.
Improperhandling/usagemayleadtopersonal
injuryormaterialdamage.
Warning
Caution
ForSafeOperation
Warning
Prohibited
matters
Warning
Prohibited
matters
●
Within Japan, this product is limited to usage with models which
operateonthegroundorinthewater.
●
KOPropoisnotresponsibleforanydamagesorinjurieswhichresult
fromuseofthisproductincombinationwithothermanufacturer's
products.
Warning
Enforcement
matters
Warning
Enforcement
matters
●
Do not use when there is thunder.
* It is possible for lightning to strike the antenna.
●
Do not use in the rain or in areas where water has accumulated.
*Ifwaterenterstheproductitmayleadtoanuncontrollablemodel.
●
Do not use in the following locations:
1. Near R/C circuits (within 3km)
2.Nearcrowds,onstreets,ornearactualvehiclesorships.
3. Near high-voltage power lines or communication facilities.
●
Do not use when your concentration levels are compromised by
tiredness,alcohol,medication,etc.
* Mistakes in judgment may result in serious accidents.
●
Do not allow glow engine fuel or engine exhaust to contact the
product.
* These may attack the plastic and damage the product.
●
Check to ensure that the selected model memory matches the model
tobecontrolled.
* Using an incorrect memory may lead to an uncontrollable model.
●
Make sure to stop the engine (disconnect motor cables) before
changingtransmittersettings.
Caution
Prohibited
matters
Caution
Prohibited
matters
●
Remove batteries from transmitter if it will not be used for a consider-
abletime.
* If batteries are left in the transmitter, battery leakage may result in
damage.
●
Do not store transmitter/receiver in the following conditions:
* Theseconditionsmaycausethecasetodeformanddamagethe
product.
Caution
Enforcement
matters
●
When switching on, always turn on the transmitter first, followed by
the receiver. Follow the reverse order when switching off.
*Ifthewrongorderisfollowed,itmayleadtoanuncontrollablemodel.
●
Dismantling or modifying the RF Module (internalized in the case of
the EX-NEXT) is prohibited and is punishable by law.
*DoingsomayleadtoaccidentssuchasshortcircuitsandKOPropo
Customer Service Department may not accept dismantled/modified
productsforrepair.
●
Do not use this product in aircraft, hospitals, or near fire alarms or
medicalequipment.
* This may lead to malfunctions and result in serious accidents. Also, by
lawyoumustceaseoperationiftheproductaffectsotherwirelessor
electricaldevices.
●
2.4GHz transmitters must be registered with the Japan Radio Control
Safety Association.
* Thetransmitterwhichyouhavepurchasesisalreadyregistered.
Productswhichdonothaveproofofregistrationareillegal.
*KONDOKAGAKUCO.,LTD.
Servicedepartment
ADDRESS:4-17-7Higashi-Nippori,Arakawa-kuTokyo
Japan116-0014Japan
TEL : 03-3807-7648(service)
9:0 0 -12:0 0&13:0 0 -17:0 0 M - Fex c e pt
nationalholidaysSaturdayandSunday
closed
Latestinformationcanbeaccessedhere.
>>http://www.kopropo.co.jp
Contactinformationforrepairinggoods
Installationisnotnecessaryifyouareonly
usingtheservosetting.
Basic Operations to Change Settings
BACK key
※Pleaserefertoaninstructionmanualforthe
detailedfunctionandoperation.
L(<)key R(>)key
ENT key
Controllingofthesettingadjustmentsisdoneviathe
L(<)key,R(>)key,ENTER(ENT)key,andBACKkey.
ENT Key:
Selectingitemtobemodified;Confirmingachange
afterasettingchange.
L(<)Key:
Usedtomovecursorbetweenmenuchoicesandto
changeasettingvalue.Loweringavalue
(forL/R
cases:raisingtowardL);
Returntoapreviousmenuitem.
R(>)Key:
Usedtomovecursorbetweenmenuchoicesandto
changeasettingvalue.Raisingvalue(forL/Rcases:
raisingtowardR);Proceedtonextmenuitem.
BACK Key:
Returningtopreviousscreen;Cancelingchange
L(<)Key・R(>)Key
Pressingsimultaneously
:
Resetsthevaluetodefaultsetting.
1
M2-6capscrew
A
② Attachthemonitorbrackettothemaster
unit. ※[A▼]marktothesteeringside
① AttachamonitorbaseparalleltoXpansion
unit.※Factorysetting.
Attentiontothemarker.
M2.6-6BH
x2
x4
TP2.6-8BH
Selftappingscrews
Connectthewireofthe
Xpansionunittothe
masterunit.
③ Attachexpansionunittoamasterunit.
Whilematchingtheedgeofthebasewith
thedentofthebracket,slideituntilthe
Xpansionunitlocks.
A ▼:settingtothefront
Xpansionunitcanbemountedfacingthe
frontortheside.Fordetails,pleaserefer
totheEX-NEXTUser'sManual.
BecarefultonotmisusetheM2.6-6BHandTP2.6-
8BHscrews.
directionsusingthemonitorbaseandbracket..
P
M2.6-6BH
x2
Usage
2.6-8BH
selftapping
screwx4
Usage
M2-6
capscrew
x1
Usage