Koalaty GM320PP User manual

Low Back Pain Relief System
To ensure the best results and long term satisfaction with your Low Back Pain Relief System we
recommend that you read the following operating and maintenance instructions carefully before use.
Over-The-Counter Use TENS which does not need doctor’s prescription
OPERATION MANUAL
Operational Manual

2
Model: GM320PP
Low Back Pain Relief System
Intended Use
The Low Back Pain Relief System is intended for temporary relief of pain associated with sore and
aching muscles in the lower back due to strain from exercise or normal household and work activities.
About TENS Technology
Transcutaneous Electrical Nerve Stimulation (TENS) relieves pain by sending small electrical impulses
through electrodes placed on the skin to underlying nerve fibers. TENS is believed to work by two
different mechanisms. First, electrical stimulation of the nerve fibers can block a pain signal from being
carried to the brain. If the signal is blocked, pain is not perceived. Secondly, the body has its own

3
mechanism for suppressing pain. It does this by releasing natural chemicals called endorphins in the
brain which act as analgesics. TENS may activate this mechanism.
Table of Contents
Important Safety Instructions………….…………………………………………….…5-6
Introduction to your Low Back Pain Relief System……………………………….……7
Parts of Stimulator………………………………………………………….……….…….7
How your Low Back Pain Relief System works………………………………….…….7
Conditions that may affect your Low Back Pain Relief System………………………8
Quick Operation Guide……………………………………………………...……………8
Operating Instructions………………………………………………………..……….9-13
How to clean your Low Back Pain Relief System…………………………………….14
Maintaining your Low Back Pain Relief System………………………………………14
How to store your Low Back Pain Relief System……………………………..………14
When to Order New Pads………………………………………………………….……14
Check the Low Back Pain Relief System before Using…………………………..….14
Warranty………………………………………………………………………………..…15
Replacement Parts……………………………………………………………………....15
Conformity to Standards………………………………………………………………...15
Troubleshooting Guide…………………………………………………....……………..15
Stimulator Technical Specifications …………..……………………..………….……..16

4
READ AND SAVE THESE INSTRUCTIONS:
IMPORTANT SAFETY IFORMATION:
Read instruction manual before operation. Be sure to comply with all “CAUTIONS” and
“WARNINGS” in the manual. Failure to follow instructions can cause harm to user or device.
CAUTION: Indicates matters in which bodily harm or material damage can occur.
WARNING: Indicates what you cannot do with device.
Please read the following information carefully before using this Low Back Pain Relief System.
WARNNING: DO NOT USE THIS SYSTEM IF ANY OF THE FOLLOWING CONDITIONS ARE
PRESENT.
•Do not use this System if you have a cardiac pacemaker, implanted defibrillators or any other
implanted metallic or electronic device.
•Do not use this System if you have undiagnosed chronic pain.
•If you are under the care of a physician, consult with your physician before using this System.
•Do not use during pregnancy.
•Do not place the pads on or close to your heart.
• Do not place the pads around or close to your neck. Do not apply stimulation over the neck.
Severe spasm of the muscles may occur and the contractions may be strong enough to close the
airway or cause difficulty in breathing. Stimulation over the neck could also have adverse effect heart
rhythm or blood pressure.
•Do not apply stimulation across the chest because the introduction of electrical current into the chest
may cause rhythm disturbances to the patient’s heart, which could be lethal.
•Do not place the pads on or around your head. The effects of stimulation of the brain are unknown.
•Do not use this System while sleeping.
•Do not use if you feel numbness.
•Do not use this System in or close to water.
•Do not place the pads over or close to skin cancer.
•Use the pads only on normal, healthy, clean and dry skin. Do not use the pads on open wounds or
rashes, or over swollen, red, infected or inflamed skin.
•If you have ever had back surgery, consult your physician before using this System.
•If you have had medical or physical treatment for your muscle pain, consult with your treatment
provider before using this System. You should contact your physician prior to using the System

5
following recent surgical procedures. Stimulation may disrupt the healing process.
• Never use the stimulator and pads without the belt.
CAUTION: DISCONTINUE USE AND CONSULT YOUR PHYSICIAN IF ANY OF THE FOLLOWING
CONDITIONS APPLY TO YOU.
•If you have suspected or diagnosed heart problems.
•If you have suspected or diagnosed epilepsy.
•If you have a tendency to bleed internally following an injury.
•If areas of skin lack normal sensations, such as skin that tingles or is numb.
•During menstruation.
•The long-term effects of this System are not known.
CAUTION:
•The System is intended for individual person use for the temporary relief of lower back pain.
•The System is not effective for pain associated with Central Pain Syndromes, such as headaches.
•The System is for pain caused by muscle soreness, and should be placed only around muscles where
pain originates on the lower back pain area.
•The pain may indicate that you have some other health problem. You should know the reason and
source of your pain before using this System. Do not solely rely on the treatment of this System for
pain.
•Some people may feel skin irritation or experience a very sensitive feeling in the skin due to electrical
stimulation. If this occurs, stop using your System and consult your physician.
•Some people may feel skin irritation from the adhesive on the self-adhesive pads. If this occurs, stop
using your System.
•Minor redness at stimulation placement is a normal skin reaction. It is not considered as skin irritation,
and it will normally disappear within 30 minutes after the electrodes are removed. If the redness does
not disappear after 30 minutes from the removal of electrodes, do not use the stimulator again until
after the excessive redness has disappeared.
• Turn off the stimulator if the stimulation feels unpleasant or does not provide pain relief.
•Keep your System out of the reach of children.
•Do not use this System when driving, operating machinery or when swimming.
•The effectiveness of the System depends greatly on a person’s individual physical condition. It may
not always be effective for every user.
•Clean any adhesive residue left on the skin with soap and water. Do not use alcohol or solvent based
cleaning products on your skin.
•If skin under one of more pads feels irritated after using the stimulator for a long period of time, use
the stimulator for a shorter period of time.
•Use your stimulator only with the pads, snap cables and accessories recommended by the
manufacturer.
•Before removing the belt and pads, be sure to turn OFF both power knobs to avoid unpleasant
stimulation.
• If your pain does not improve, becomes more than mild, or if it continues for four to six days,
stop using the device and consult your physician.
Adverse Reactions
•Skin irritation and burns under the pads have been reported by some people who have applied
electronic stimulators to their skin.
SAVE THESE INSTRUCTIONS
Introduction to your Low Back Pain Relief System
Your System includes the following parts:

6
Parts of Stimulator
How Your Low Back Pain Relief System works:
The main function of pain relief comes from the continuous stimulation pulse generated from the dual
channel stimulator. We can not ensure that the pain relief is 100% effective for everyone. However,
when used according to our instruction, it can be a safe, non-addictive, non-invasive lower back pain
reliever.
Conditions that may affect your Low Back Pain Relief System
Since the stimulator is a battery-operated electronic system, its output performance and safety may be
affected greatly in extreme humidity. Therefore, it is very important to keep the stimulator dry to ensure
the safety and performance of the stimulator.
Quick Operation guide
Your may use the following simple operation steps to operate this System.
Step 1. Insert the 9-volt battery into your stimulator
Step 2. Prepare your support belt
Step 3. Apply electrode pads to the belt
Step 4. Connect the snap cables
Step 5. Adjust the length of the support belt
Step 6. Put on the support belt
Step 7. Turn the stimulator “ON”, adjusting the amplitude adjustment knobs to the desired stimulation
strength
Step 8. Select the therapy mode
Step 9. Select the stimulation time
Step 10. Enjoy the benefits
Step 11. Turn off stimulator
Step 12. Locking and unlocking the stimulator settings
Step 13. Viewing the therapy timer
For the details of operation, please see the following operating instructions.

7
Description of Operation Diagram
Step 1 – Insert the 9-volt battery into your
stimulator
Make sure both power knobs on stimulator are
turned OFF. To insert the battery, slide front cover
downward until the cover pops off, by pushing on the
top with both thumbs. Insert a 9-volt battery
according to the diagram in the battery compartment.
Close the cover on the stimulator by sliding from the
bottom up.
IMPORTANT: Match the positive terminal of battery
to the positive marking shown.
Step 2 – Prepare your support belt •Square Marked Areas for Pads
Lay your Support Belt open on a flat surface, with the
electrode side facing up. You will see four square
marked areas for the self-adhesive pads.
• Metal Snaps on Belt
This side facing upward.
Step 3 – Apply electrode pads to the belt
Electrode Pads deliver stimulation pulses through
your skin and into the nerves in your lower back. The
pads are designed to fit within the four square
marked areas on the Support Belt. Open the
package of four electrode Pads. Remove the smaller
plastic liner from the double side pad and then place
the pad on the belt with the glue side down. Repeat
this process with the other three pads.
IMPORTANT: Leave the larger plastic liners on the
other side of the electrodes until step 5.
IMPORTANT: Each electrode pad should be placed
exactly on the square Marked Areas, and pressed
firmly onto the belt.
CAUTION: Never use without all four pads on the
support belt when using the Low Back Pain
Relief System.
Four electrode pads attached
to the Square Marked Areas.
Small plastic liner on the top of pad
Larger plastic liner on the bottom of pad
Description of Operation Diagram
Step 4 – Connect the snap cables
Turn the support belt over, with the electrode pads
facing down. The belt should be lying horizontally in
front of you. You will see four metal snaps.
Take one cable and snap two connectors onto the
metal snaps as shown in the diagram. Repeat with
the second cable.

8
Then plug each cable into one socket on the top of
the stimulator. It does not matter which cable goes
into which socket.
IMPORTANT: Make sure both channel 1 and
channel 2 are turned “OFF” prior to plugging in the
load cable.
Step 5 – Adjust the length of the support belt Fit for all support belt
For this System, the length of the belt is designed for
one size fits all. The belt length can be adjusted
using the Velcro patch of neoprene bands, as shown
in the diagram.
Description of Operation Diagram
Step 6 – Put on the support belt
Remove the remaining plastic liners from the pads.
Keep these liners so they can be replaced after each
use after the Low Back Pain Relief System has
been used. You may now put on the belt:
1. Choose and place the support belt on the
intended treatment area as described below.
2. If your lower-back pain is closer to your waist
level than it is to the bottom of your back, place
the support belt so the middle of the belt rests at
your waist.
3. If feel pain closer to the lower part of your back,
place the support belt so that the middle of the
belt resting an inch or two below your waist.
4. Once you have the support belt in position, fasten
the elastic band firmly around your torso with the
Velcro, pulling both ends of elastic band.
5. You can tighten or loosen the belt by adjusting
the ends of the black strap on the outside of the
belt and fastening them with their Velcro patches.
Putting on the support belt to your lower back
pain position.
Step 7 – Turn the stimulator “ON”, adjusting the

9
amplitude adjustment knobs to the desired
stimulation strength
Turn both knobs on the top of stimulator to a position
where you can feel the stimulation coming from each
channel. The strength of stimulation should be
comfortable.
The strength of stimulation may be adjusted
depending upon the individual condition of user. The
stimulation output will increase as the adjustment
knob is rotated toward higher output numbers
(clockwise).
1 = Weaker
8 = Stronger
Description of Operation Diagram
Step 8 – Select the therapy mode
The stimulation effect can be different for different
therapy modes. For this Low Back Pain Relief
System you may select the therapy mode by
following the instructions described below:
MODE = Therapy mode selection / setting.
With these buttons you can select one of eight preset
modes. With each depression of the key, you switch
to the next mode. The selected mode will be shown
on the LCD screen.
Step 9 – Select the stimulation time
The “TIME” button is used to set the stimulation time.
You can select between 15 min, 30 min and 60min.
Press the “TIME” button to toggle between 15, 30, 60
minute or continuous stimulation times.
The time will be shown on the pie diagram, on the
LCD screen. If continuous mode, the 15 and 30
symbols will on and 60 symbol will flash.
Step 10 – Enjoy the benefits
After setting the stimulator, you can cover the belt
with clothing, being careful not to unsnap or damage
the cables. The stimulator can be clipped to your belt
for portable, hands-free lower back pain relief.
The stimulator will turn off automatically after the
time has expired. To restart the stimulator: turn
the adjustment knobs to the “OFF” position, wait
for 7 seconds for the stimulator to reset and turn
the stimulator back “ON” with the amplitude
control knobs.
Try the stimulator at different setting combinations to
find the setting that is the most effective for you.
Everyone is different. For some people, the
stimulator may begin to feel less effective if it is used
for hours on the same settings. This can happen if
your body becomes used to the intensity or therapy
mode of stimulation. You can prevent this by
Clip the stimulator to your belt for portable.

10
changing the intensity and/or therapy mode.
CAUTION: While stimulating, the pads must
always cover all four metal snaps.
Description Operation Diagram
Step 11 – Turning off the stimulator
IMPORTANT REMINDER: When you are finished
using your stimulator, turn “OFF” both adjustment
knobs (counter clockwise) before removing your
support belt to avoid unpleasant stimulation. Replace
the plastic covers on all four pads.
Step 12 – Locking and unlocking the stimulator
settings
It is possible to lock the therapy settings of the
stimulator, so they can’t be changed. Make sure the
stimulator is set to the settings you want to lock. Turn
both power knobs on the stimulator OFF. While the
stimulator is OFF, hold down the “TIME” button, then
turn the stimulator ON. The unit will display the
current elapsed therapy time. If the unit has not been
used, “0 hr” will be displayed. In order to lock the
settings of the stimulator, press the UP arrow button.
A lock symbol will be displayed on the screen. The
stimulator can be unlocked by pressing the UP arrow
again. Turn the stimulator OFF. If the lock symbol is
displayed when you turn the stimulator back on, you
will not be able to change the therapy settings.
Step 13 – Viewing the therapy timer
There is a timer built into the stimulator that keeps
track of the amount of time the stimulator has been
used. You can view this timer by turning both power
knobs on the stimulator OFF. While the stimulator is
OFF, hold down the “TIME” button, then turn the
stimulator ON. The unit will display the current
elapsed therapy time. If the unit has not been used,
“0 hr” will be displayed. The therapy timer can be
reset to “0 hr” by pressing the DOWN arrow button.
The timer only records hours of therapy completed. If
the stimulator has been used for less than an hour,
“0 hr” will be displayed. After resetting the timer, turn
the stimulator off. If you turn the stimulator back on
without depressing the TIME button, the stimulator
will function as shown in steps 7 through 10.
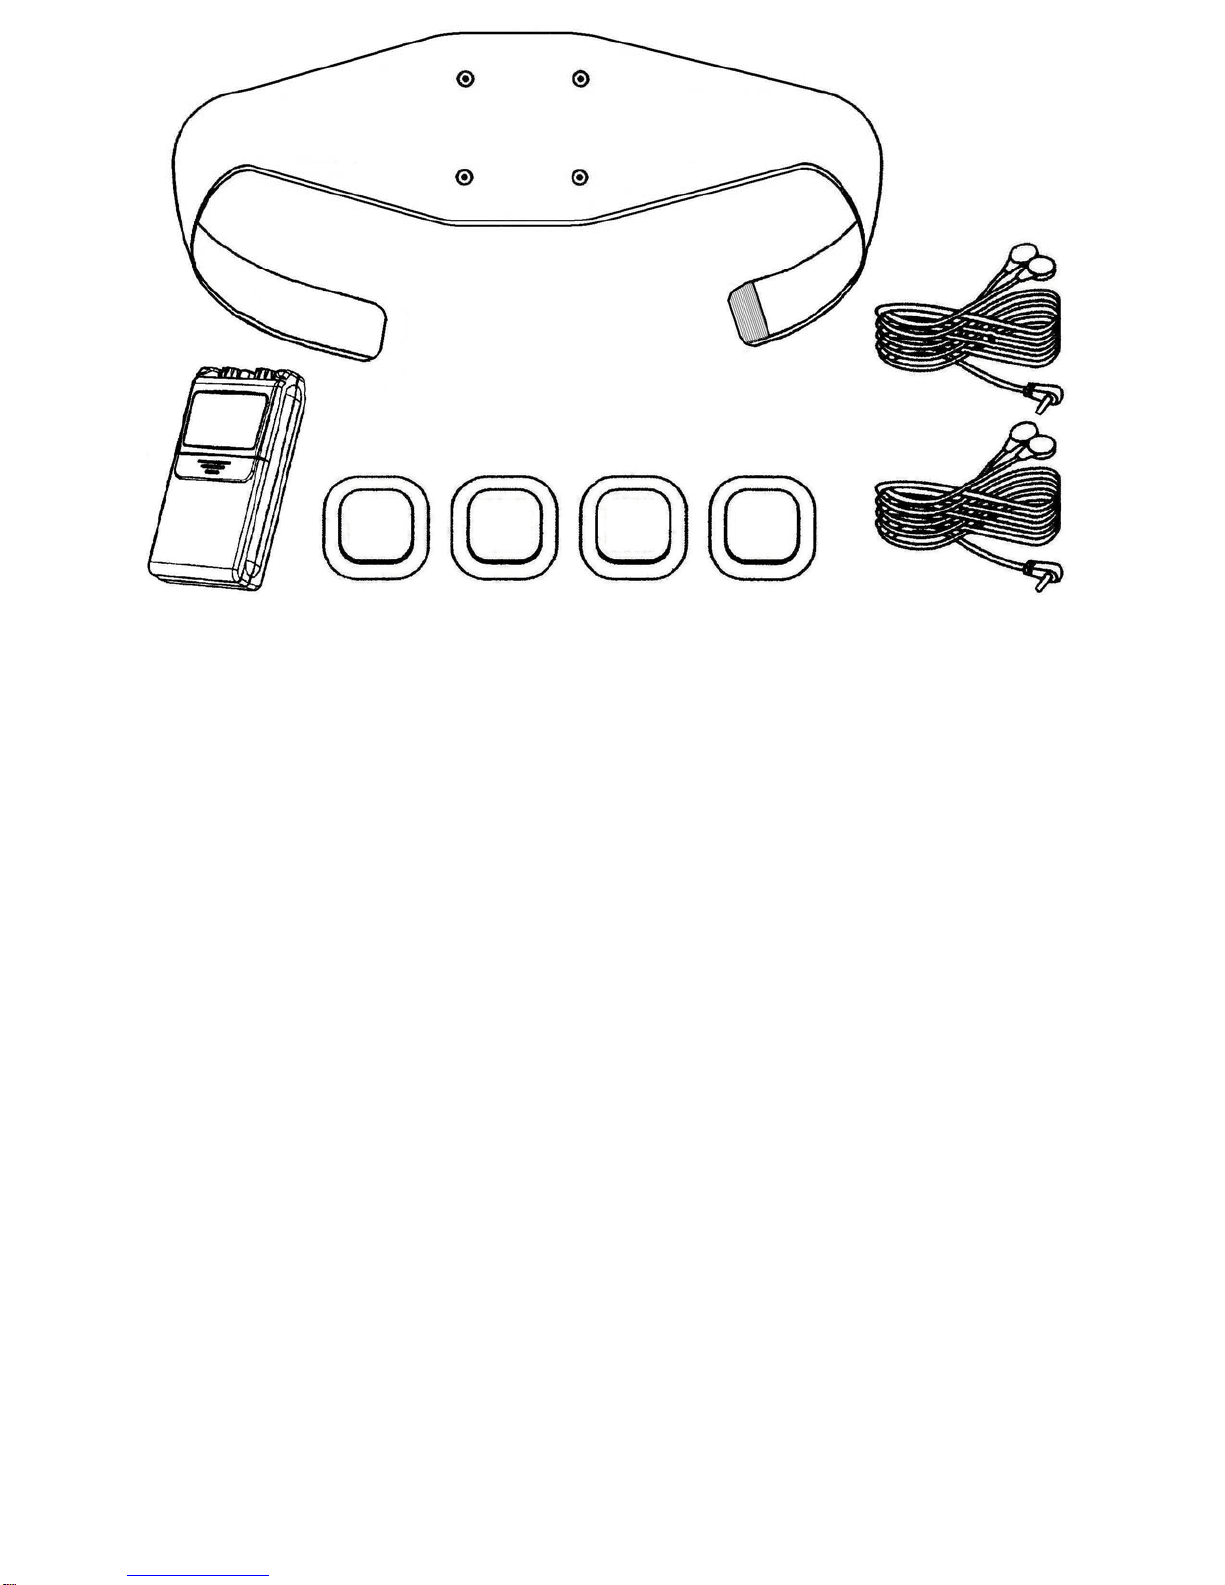
How to clean Your Low Back Pain Relief System Support Belt
Before washing the belt, remove the pads and put them on the storage liners. Remove the snap cables
and the stimulator from the belt. Hand-wash your Support Belt in cool water. Do not wash the belt in the
washing machine.
The support belt should be air-dried, lying flat or hanging. Do not put the belt in a clothes dryer.
Snap Cables
Disconnect the snap cables from the belt and the stimulator. Then snap cables may be wiped with a
clean, damp cloth. When re-connecting, take one snap cable, and snap its two connectors onto the
metal snaps on one side of the support belt. Repeat for other side of support belt.
Stimulator

11
The stimulator may be wiped clean with a small amount of soapy water on a clean cloth. Do not
submerge the stimulator in liquids or expose it to ANY amount of water.
Maintaining Your Low Back Pain Relief System
1. Your stimulator uses a standard 9-volt battery. If stimulation seems to be weak, or the stimulator will
not turn on, check the battery. To replace the battery, make sure both amplitude control knobs are
turned “OFF”. Slide the stimulator cover open by pushing on the top with both thumbs until the cover
slides open. Remove the old battery. Insert a 9-volt battery according to the diagram in the battery
compartment. To close the cover, slide from the bottom up.
2. Be sure to put the larger storage liners on the pads when not using your Low Back Pain Relief
System. You may use the storage liners provided. Replace the pads on your support belt if they no
longer stick to your skin or to the belt.
3. If your support belt is damp after use, allow it to air-dry before re-applying.
4. When connecting and disconnecting a snap cable, hold it by the molded end and pull. Do not pull on
the cable itself. Replace the snap cable if worn or broken.
How to Store Your Low Back Pain Relief System
1. Store your Low Back Pain Relief System at room temperature in a dry place, out of the reach of
children.
2. If the stimulator will not be used for more than a week, remove the battery from the stimulator.
When to Order New Pads
The electrode pads are disposable and use an adhesive that will dry after prolonged usage or storage.
Pads should be replaced when they lose their adhesive quality, or you sense a change in stimulation
sensation. If you doubt the integrity of the pads, order new pads.
To order new pads, see replacement Parts on page 15.
Check the system before using
Before using your Low Back Pain Relief System, always check all of the parts to be sure they are in
good working order. Make sure of the following:
1. The battery still has power and it is not corroded.
2. All four pads are in the proper place on the support belt, covering the metal snaps.
3. Both snap cables are in good condition.
4. Both snap cables are properly connected to the belt and the stimulator.
Warranty
This stimulator carries a one-year warranty from the date of purchase.
The warranty applies to the stimulator and necessary parts and labor relating thereto. The distributor
reserves the right to replace or repair the unit at their discretion.
The warranty does not apply to belt, electrode, lead wires, battery and stimulator if damage resulting
from failure to follow the operating instructions, accidents, abuse, alterations or disassembly by
unauthorized individuals.
Replacement Parts
Contact your distributor to order replacement parts. Be sure to use only distributor’s Low Back Pain
Relief System parts. You can check your distributor for more product information.
Stimulator – Part # GM320PP
Support Belt – Part # Belt01 Snap Cables – Part # LW02
Pads – Part # Double side 5050
Conformity to Standards
The Stimulator is in compliance with:
•EN 60601-1 : 1990 – Safety of medical electrical equipment – General safety.
• EN 60601-1-2 : EMC test
•ANSI/AAMI NS 4 – 1985; Transcutaneous Electrical Nerve Stimulators.
Troubleshooting Guide
If you have a problem using your Back Pain Relief System, review the following table to find a
solution.
Problem Solution

12
The stimulator will not turn on. Check the battery – be sure it is firmly in place.
Change the battery if necessary.
The stimulator turns on and then off quickly. Replace the battery.
The stimulator is on, but there is no stimulation. a. Check the snap cables for breakage. If
broken, replace.
b. Make sure the snap cables are securely
snapped onto the support belt and into the
stimulator socket.
The display is frozen in some mode and the lock
symbol appears. You are in “Lock” function now. The following steps
will reset the unit to normal function.
1. With unit off, press and hold down the TIME
Button.
2. With the TIME button pressed, turn the unit on.
3. Press the UP arrow once to turn the “LOCK”
symbol off.
4. Turn unit off.
5. Turn the unit on normally, it will back to normal
function.
The stimulator has a new 9-volt battery, but will
not turn on. Please consult or return the device to your dealer.

13
Stimulator Technical Specifications
Power Source: 9 Volt battery.
Dimensions: 108 x 61.5 x 25mm.
Weight: Approx. 140 grams (battery included)
Program Max. Phase Duration Rate Function Mode
P1…………….80mA……………260µs……………..….15Hz………….Constant
P2…………….80mA……………260µs………………….2Hz… ………Burst
P3…………….80mA……………260µs………………..120Hz…………Constant
P4…………….80mA……………260~150µs………….2~100Hz………Modulated
P5…………….80mA……………260µs……………..….100Hz………...Modulated
P6…………….80mA…………….260µs……………….80<->7 Hz…….Modulated
P7…………….80mA………..…. 260µs………………...120Hz………..Modulated
P8…………….80mA……………..P1〜P7………………………………….Cycle
Timer: 15, 30, 60 minutes, and continuous mode selectable.
Manufacturer for:
Koalaty Products, Inc.
Tampa, FL. 33614, USA
www.koalatyproducts.com
Distributor/Dealer:
Table of contents