Kobalt SGY-AIR211 User manual

ITEM #0498349
MODEL #SGY-AIR211
Français p. 13
Español p. 25
GARAGE AIR LINE KIT
Questions, problems, missing parts? Before returning to your retailer, call our
customer service department at 1-888-3KOBALT, 8:00 a.m.-8:00 p.m.,EST,
Monday-Friday.
ATTACH YOUR RECEIPT HERE
Serial Number Purchase Date
1
kobalttools.com
KOBALT and the K Design are registered
trademarks of LF, LLC. All Rights Reserved.
® ®
AB13791

2
..................................................................................................................
Assembly Instructions 6
..................................................................................................................8
Operating Instructions
........................................................................................................................ 3
Safety Information
...........................................................................................................................
Troubleshooting 12
.....................................................................................................................................
Warranty 12
TABLE OF CONTENTS
BEFORE USING THIS PRODUCT, PLEASE READ AND FOLLOW ALL SAFETY RULES
AND OPERATING INSTRUCTIONS. SAVE THIS MANUAL FOR FUTURE REFERENCE.
......................................................................................................................... 3
Package Contents
kobalttools.com

3
QUANTITY
1
1
6
1
3
3
3
4
2
A
B
C
D
E
F
G
H
I
DESCRIPTION
1/4 in. Female Industrial Plug
Check Valve
90° Elbow
Inline Shut-off Valve
T-Connector
Union
Tubing Cutter
1/4 in. Female Industrial Coupler
Wall-Mounted Outlet
Tubing Clamps
3/8 in. Nylon Tubing
K
L
1
3
1
16
3
J
M
N
SAFETY INFORMATION
PART
FOR YOUR OWN SAFETY, READ AND UNDERSTAND THE OWNER’S MANUAL BEFORE
USING ITEM. FAILURE TO OBSERVE AND FOLLOW SAFETY INSTRUCTIONS COULD
RESULT IN INJURY.
Please read this entire manual carefully before attempting to operate this product. If you have
any questions regarding the product, please call customer service at 1-888-3KOBALT, 8:00
a.m, - 8:00 p.m., EST, Monday - Friday.
PACKAGE CONTENTS
H
I
K
L
N
J
M
A
B
C
E
F
G
D
kobalttools.com
1/4 in. Male Connector
1/4 in. Female Connector
Reducer

4
WARNING
IMPROPER INSTALLATION, OPERATION, OR MAINTENANCE OF THIS PRODUCT COULD
RESULT IN SERIOUS INJURY AND PROPERTY DAMAGE. WHENEVER USING TOOLS, BASIC
SAFETY PRECAUTIONS SHOULD ALWAYS BE FOLLOWED TO REDUCE THE RISK OF
PERSONAL INJURY.
KEEP CHILDREN AWAY FROM WORK AREA AND TOOL:
Keep tool out of reach of children and never allow children to handle equipment or tool.
Keep work area clear from clutter and other work hazards.
Do not use this product in unsafe work conditions.
ALWAYS FOLLOW LOCAL AND STATE REGULATIONS FOR PROPER OPERATION OF THIS
ITEM. CONSULT YOUR LOCAL RETAILER FOR FURTHER INFORMATION REGARDING
ANY SPECIFIC REGULATIONS WITH THE USE OF COMPRESSED AIR.
SAFETY INFORMATION
H
Only use a tool for its intended function.
Air hose cutter has multiple sharp edges.
Always use tube cutter with caution.
Improper operation of air hose cutter could result in personal injury.
Never operate tool if under the influence of drugs or alcohol.
Never operate any tool if you are tired or unable to keep control of tool at all times.
It’s always recommended to have a fire extinguisher and first aid kit near work area.
Keep proper footing at all times. Do not overreach, as slipping, tripping, and/or falling can be a
major cause of serious injury and/or death.
Be aware of excess hose left in working area or work surface.
Do not abuse hoses or connectors.
Never yank on the air hose system.
Keep hoses away from heat, oil, and sharp edges.
Check hoses for weak or worn connections before each use and make sure that all connections
are secure before use.
Do not spray acids, corrosive materials, toxic chemicals, fertilizers or pesticides through system.
Never spray flammable materials in vicinity of open flame or near ignition sources.
Never store flammable liquids or gases near air compressor, or other compressed materials
under pressure.
Use a face mask/respirator and protective clothing whenever spraying with this system.
Always spray in a well ventilated area to prevent health and fire hazards.
Always disconnect a tool from air system before performing any maintenance.
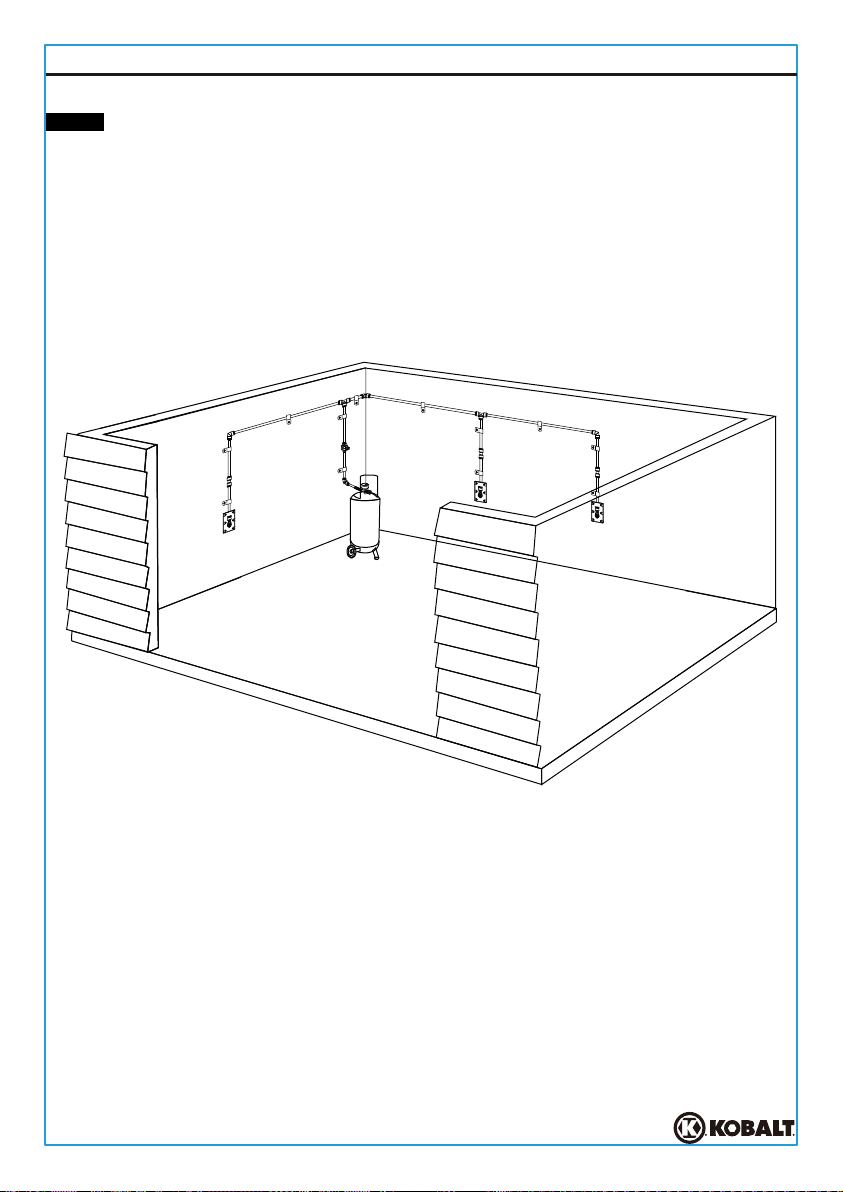
Always turn off compressor and release air from system before performing any maintenance or
making any configuration changes to your garage air line system.
Never use a tool which is leaking air, has missing or damaged parts, or requires repair.
Only use parts and accessories recommended by the manufacturer.
kobalttools.com
ADDITIONAL SAFETY GUIDELINES
Every tool has a unique function, and is designed to operate in a specific way.
Make sure that any air tool accessory used with this system is compatible with the air system.
Never exceed the maximum 150 PSI of the garage air line system, or of any air tool, or accessory
which may be connected to the garage air line system.
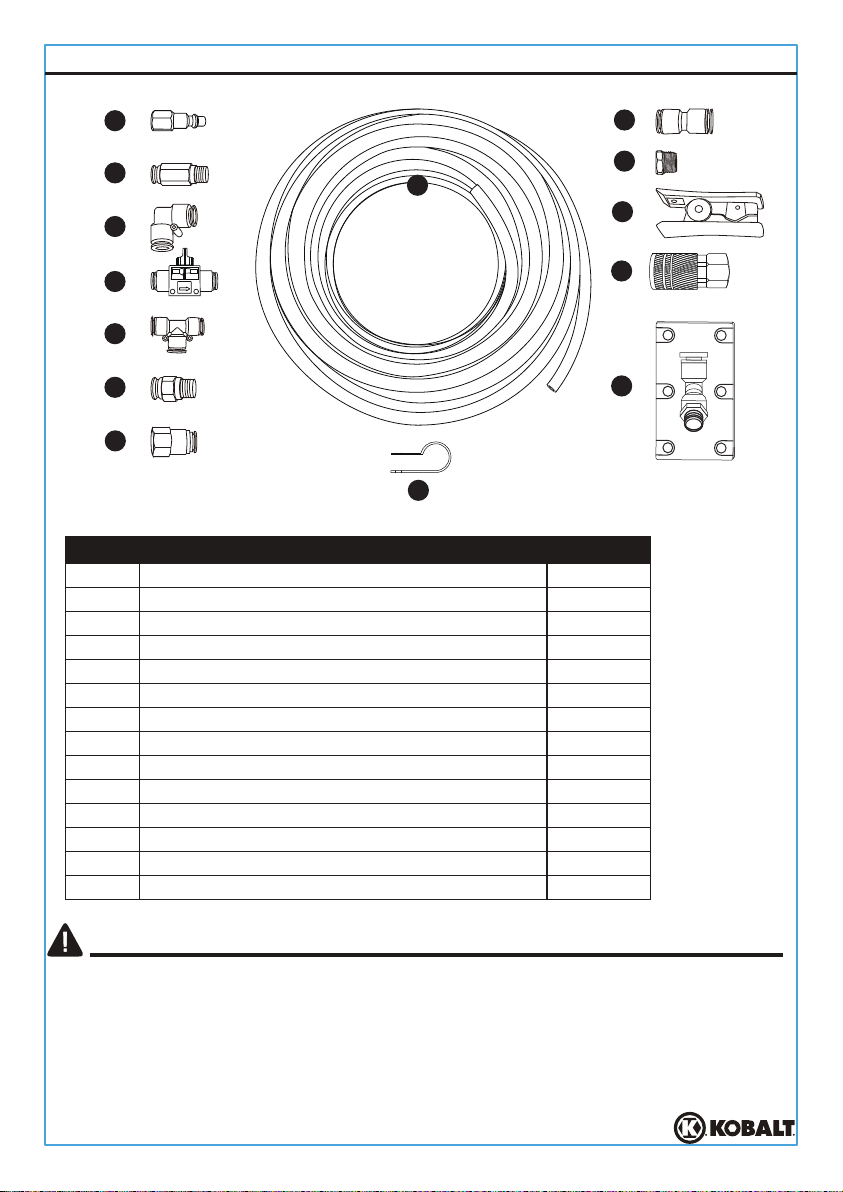
This kit includes multiple small components that may present a choking hazard to children.
This is not a toy.

5
SAFETY INFORMATION
●LEAD FROM LEAD BASED PAINTS
●CRYSTALLINE SILICA FROM BRICKS, CEMENT AND OTHER MASONRY PRODUCTS
●ARSENIC AND CHROMIUM FROM CHEMICALLY TREATED LUMBER
YOUR RISK FROM THESE EXPOSURES VARIES, DEPENDING ON HOW OFTEN YOU DO
THIS TYPE OF WORK. TO REDUCE YOUR EXPOSURE TO THESE CHEMICALS WORK IN A
WELL VENTILATED AREA, AND WORK WITH APPROVED SAFETY EQUIPMENT, SUCH AS
A RESPIRATOR OR DUST MASKS THAT ARE SPECIALLY DESIGNED TO FILTER
MICROSOPIC PARTICLES.
WARNING
SOME DUST CREATED BY PAINT SPRAYING, POWER SANDING, SAWING, GRINDING,
DRILLING, AND OTHER RELATED ACTIVITIES IS KNOWN TO THE STATE OF CALIFORNIA
TO CAUSE CANCER, BIRTH DEFECTS, AND OTHER REPRODUCTIVE HARM. A LISTING OF
CHEMICALS CAN BE OBTAINED FROM www.oehha.ca.gov UNDER PROPOSITION 65. SOME
EXAMPLES OF THESE CHEMICALS ARE:
kobalttools.com

6
GETTING STARTED WITH THE QUICK CONNECT SYSTEM.
Estimated assembly time 30-45 minutes
1
2
Cutting
To cut the hose, simply place the tubing cutter (J) at the
proper location for your desired length. Press down firmly.
ASSEMBLY INSTRUCTIONS
Insert
Pull
NOTE:
3
M
C
C
kobalttools.com
Always use the tubing clamps to properly secure the air
tube. As there can be multiple surface areas in which the tubing clamps
can be connected, consult your local hardware retailer for the proper
fasteners needed for your specific application.
To remove any component from the air tube, make sure the
compressor is turned off, and that all air has been released out
of the system.
Push in the connection ring. Pull out the air tube from the connection
fitting (See Figure 2).
Caution: Keep fingers and other body parts away from the sharp
edges of the tube cutter.
1.Use the Basic Layout drawing as your guide for setting up your air line kit.
2.Cut the hose to your desired length taking into account the size of your garage.
3.Remember to use the tubing clamps to mount your system the wall. It is recommended to
use a tubing clamps on each side of your fittings and for the every 4 ft. of length.
BASIC LAYOUT
Press on
NOTE: The manufacturer recommends that you measure the hose
length before cutting the air tubing.
Air line accessory
sold separately
NOTE: There are multiple installation configurations for the garage air
line kit. The basic layout showcases what a standard set up may look
like. As each installation is unique, some accessories may not be
needed. Please also be aware that for certain applications, additional
accessories may be required. Please consult your local hardware
retailer for further assistance.
Press
To attach any fitting to air tubing firmly insert air tube into fitting. Pull on
the air tube and connector to make sure it is connected securely
(See Figure 1).
After cutting inspect the cut edge of hose to make sure it is straight
and even.

7
ASSEMBLY INSTRUCTIONS
RECOMMENDED LAYOUT FOR 3 DROP DOWN AIR LINES
DETSEGGUSS'RERUTCAFUNAMEHTROFEVOBAEGAMIEHTOTREFERESAELP
SYSTEM LAYOUT. NEVER INSTALL THIS SYSTEM WITH AIR RUNNING THROUGH THE
SYSTEM DURING THE INSTALLATION PROCESS. ALWAYS MAKE SURE THAT YOU
PRESS THE FITTING IN PROPERLY AND THERE IS A SECURE / TIGHT CONNECTION
WITH THE AIR TUBE AND FITTING. WITHOUT A PROPER CONNECTION AIR WILL LEAK.
kobalttools.com
NOTE:
The manufacturer recommends that the air compressor being used is able to provide enough CFM
air output to power your tool(s) properly.
If the air compressor used is unable to provide enough CFM, the air tool(s) connected to the
garage air line kit may not work properly. Please consult your local hardware retailer for further
assistance if needed.

OPERATING INSTRUCTIONS
Connecting to the air compressor
3
A
5
8
kobalttools.com
1. Connect the 1/4 inch female industrial plug (A) with the quick
coupling outlet of the air tank (not included) (See Figure 3).
2. Screw the check valve (B) into the 1/4 inch female industrial
plug (A). Tighten turning clockwise (See Figure 4).
3. Insert the air tubing (M) into the check valve (B)
(See Figure 5).
Going into fitting
4
B
Clockwise
CAUTION: MAKE SURE THAT YOU FOLLOW STEPS 1 THROUGH 4 PROPERLY. If these steps
are not followed, the additional safety devices supplied may not work properly. Consult your local
hardware retailer for further assistance.

NOTE: Always use tubing clamps to properly secure the air
tube. As there can be multiple surface areas in which the
tubing clamps can be connected, consult your local hardware
retailer for the proper fasteners needed for your specific
application.
7. For middle or drop down sections, the manufacturer suggests
the use of the in line shut off valve (D) (See Figure 9). Make
NOTE: Always use tubing clamps to properly secure the air
tube. As there can be multiple surface areas in which the
tubing clamps can be connected, consult your local hardware
retailer for the proper fasteners needed for your specific
application.
4. After connecting the air tubing to end of check valve, run your
air tubing away from your compressor to the area in which
you intend to run your air line.
8
9
D
Same direction
with air flow
9
kobalttools.com
OPERATING INSTRUCTIONS
7
EC
6. At the top, use either a T connection fitting (E) or a 90 degree
angle (C) (See Figure 8).
CONNECTING TUBING FROM AIR COMPRESSOR:
NOTE:
PROPERLY CONNECTING T AND 90° CONNECTION
FITTINGS.
Always use tubing clamps to properly secure the air
tube. As there can be multiple surface areas in which the
tubing clamps can be connected, consult your local hardware
retailer for the proper fasteners needed for your specific
application.
6
M
5. Secure the air tube using tubing clamps. To secure: Press the
air tube into the tube clamp so that round bracket wraps
around the air tube. Secure the tube clamp using mounting
hardware (not included) and secure. The manufacturer
recommends tubing clamps be used every 4 ft. to keep
air tube straight (See Figure 7).
NOTE: Consult your local hardware retailer when selecting
fastener hardware (not included).
PROPERLY SECURING TUBING CLAMPS
Clip in
sure the arrow on the in line shut off valve is pointing in the
same direction that the air is flowing through the air tube. The
manufacturer recommends the in line shut off valve is easily
accessible to turn air flow off as needed.

11
10
12
10
L
H
10. At the bottom, or where you intend to have your air tube end,
connect a tube clamp to secure the air tube.
CONNECTING TUBING CLAMPS AND WALL MOUNTS
NOTE: Always use tube clamps to properly secure the air
tube. As there can be multiple surface areas in which the
tube clamps can be connected, consult your local hardware
retailer for the proper fasteners needed for your specific
application.
NOTE: Never secure wall mounted outlet near electrical
outlets. Avoid any wires, pipes or other obstructions behind
wall, which may present a hazard. Make sure wall mounted
outlet end has enough clearance to attach fittings or air hose
properly. Consult your local hardware retailer for the proper
fasteners needed for your specific application.
kobalttools.com
OPERATING INSTRUCTIONS
N
Please use the manufacturer's recommended fittings guide to properly secure tube clamps and
wall mounted outlet to the various surface applications:
Securing to drywall:
#8 x 2.5 in. drywall screws.
Additional mounting accessories
may be required.
Securing to wooden wall studs:
#8 x 1.5 in. wood screws
Securing to masonry:
3/16 x 5 1/2 in. masonry drill bit
3/16 x 5 1/2 in. masonry screws
Securing to metal:
#8 1 1/2 in. sheet metal screws
CONNECTING TUBING CLAMPS
8. The manufacturer recommends that tubing clamps be
attached at either end of a connection fitting for a proper and
secure connection of both the air tube and fitting
(See Figure 10).
CONNECTION OF UNION CONNECTIONS
9. For drop down air line sections, the manufacturer
recommends the use of a union connector. From the top hose
connection, use either a T connection, or a 90° angle
connection (See Figure 8). Run the air line down. At the
desired height, cut the air tubing and connect a union
connection (See Figure 11).
NOTE: Contact your local hardware retailer for proper
fasteners needed for your specific application. The use of
multiple types of fasteners may be needed for proper
installation.
Air accessories
not included
Secure the wall mounted outlet (L) with mounting hardware
(not included) (See Figure 12). The manufacturer
recommends that a quick connect coupler be secured into the
threaded end of the wall mounted outlet for proper operation.
Wrench(es) (not included) may be needed to properly secure.
8 x 2.5 inch
8 x 1 1/2 inch
8 x 1.5 inch
3/16 x 5 1/2 inch

11
13
12. For adding additional air tool accessories, (e.g. a filter
(not included)), use the 3/8 in. tube to 1/4 in. male thread
fitting and 3/8 in. tube to 1/4 in. female thread fitting.
(See Figure 13)
12
I
G
F
kobalttools.com
OPERATING INSTRUCTIONS
ATTACHING AIR LINE ACCESSORIES WITH GARAGE AIR LINE KIT:
NOTE: Always turn off the compressor and release any air within the system before changes,
modifications, or maintenance is performed to the air line system. Once the air in
the system has been released, remove the union connection (if used per manufactures
recommendations).
11. Connect the 3/8 in. NPT to the 1/4 in. NPT reducer bushing
(I) when connecting a 1/4 in. device to this system,
(See Figure 12).
Air accessories
not included

12
TROUBLESHOOTING
If you have any questions regarding the product, please call our customer service
at 1-888-3KOBALT, 8:00 a.m. - 8:00 p.m., EST, Monday - Friday.
Tool not
working at all.
Tool spins slow.
Cannot get air
out of tank.
PROBLEM POSSIBLE CAUSE CORRECTIVE ACTION
Air leaking at connection.
Air compressor
pressure insufficient.
1. Low tank pressure.
2. Hose shutoff valve
closed.
3. Air chuck damaged.
Ensure that all hoses have been
inserted properly.
Purchase air compressor with a
capacity above 10 gallons.
1. Tank pressure must exceed tire
pressure. Increase tank pressure.
2. Turn discharge control wheel
counterclockwise to fully open.
3. Replace hose/air tire chuck
assembly.
WARRANTY
This tool is warranted by the manufacturer to the original purchaser from the original purchase
date for three (3) years subject to the warranty coverage described herein.
This tool is warranted to the original user to be free from defect in material and workmanship.
If you believe that a tool is defective, return the tool, with proper proof of purchase to the point of
purchase. If it is determined that the tool is defective and covered by this warranty, the distributor
will replace the tool or refund the purchase price.
This warranty is void if: defects in materials or workmanship or damages result from repairs
or alterations which have been made or attempted by others or the unauthorized use of
nonconforming parts; the damage is due to normal wear, damage is due to abuse (including
overloading of the tool beyond capacity), improper maintenance, neglect or accident; or the
damage is due to the use of the tool after partial failure or use with improper accessories or
have other rights that vary from state to state.
For warranty questions, call our customer service department at 1-888-3KOBALT,
8:00 a.m.-8:00 p.m. EST, Monday-Friday.
Printed in China
KOBALT and the K Design are registered
trademarks of LF, LLC. All Rights Reserved.
®®
kobalttools.com

ARTICLE #0498349
Des questions, des problèmes, des pièces manquantes? Avant de retourner
l'article au détaillant, communiquez avec notre service à la clientèle au
1 888 3KOBALT, entre 8 h et 20 h (HNE), du lundi au vendredi.
JOIGNEZ VOTRE REÇU ICI
Numéro de série Date d'achat
13
kobalttools.com
ENSEMBLE DE
CONDUITES D’AIR
POUR LE GARAGE
MODÈLE #SGY-AIR211
KOBALT et le motif de K sont des marques de
commerce déposées de LF, LLC. Tous droits réservés.
® ®

14
....................................................................................................
Instructions pour l'assemblage 18
............................................................................................................................. 20
Mode d'emploi
................................................................................................................. 15
Consignes de sécurité
..................................................................................................................................
Dépannage 24
......................................................................................................................................
Garantie 24
TABLE DES MATIÈRES
LISEZ ET SUIVEZ TOUTES LES CONSIGNES DE SÉCURITÉ ET LE MODE D’EMPLOI AVANT
D’UTILISER CET ARTICLE. VEUILLEZ CONSERVER CE GUIDE POUR VOUS Y RÉFÉRER
ULTÉRIEUREMENT.
.............................................................................................................. 15
Contenu de l'emballage
kobalttools.com

15
QUANTITÉ
1
1
6
1
3
3
3
4
2
A
B
C
D
E
F
G
H
I
DESCRIPTION
Embout industriel femelle de 1/4 po
Check Valve
Robinet d’arrêt en ligne
Connecteur en T
Raccord union
Coupe-tuyau
Coupleur industriel femelle de 1/4 po
Sortie d’air murale
Pinces pour tuyau
Tuyau en nylon de 3/8 po
K
L
1
3
1
16
3
J
M
N
CONSIGNES DE SÉCURITÉ
PIÈCE
POUR VOTRE SÉCURITÉ, ASSUREZ-VOUS DE LIRE ET DE COMPRENDRE LE GUIDE
D’UTILISATION AVANT D’UTILISER LE PRODUIT. LE NON-RESPECT DES CONSIGNES DE
SÉCURITÉ PEUT ENTRAÎNER DE GRAVES BLESSURES.
Veuillez vous assurer de lire attentivement l’intégralité de ce manuel avant de tenter d’assembler
ou d’utiliser le produit. Si vous avez des questions, veuillez communiquer avec notre service à la
clientèle au 1 888 3KOBALT, entre 8 h et 20 h (HNE), du lundi au vendredi.
CONTENU DE L'EMBALLAGE
H
I
K
L
N
J
M
A
B
C
E
F
G
D
kobalttools.com
Connecteur mâle de 1/4 po
Connecteur femelle de 1/4 po
Raccord réduit
Coude à 90°

16
AVERTISSEMENT
UNE INSTALLATION, UNE UTILISATION OU UN ENTRETIEN INADÉQUATS DE CE PRODUIT
PEUVENT CAUSER DES DOMMAGES MATÉRIELS ET DES BLESSURES GRAVES. LORSQUE
VOUS UTILISEZ UN OUTIL, APPLIQUEZ TOUJOURS LES MESURES DE SÉCURITÉ DE BASE
AFIN DE RÉDUIRE LES RISQUES DE BLESSURE.
ASSUREZ-VOUS QUE LES ENFANTS NE S’APPROCHENT PAS DE L’AIRE DE TRAVAIL ET
GARDEZ L’OUTIL HORS DE LEUR PORTÉE:
Gardez l’outil hors de la portée des enfants et ne laissez jamais les enfants manipuler l’équipement
ou l’outil.
Gardez l’aire de travail dépourvue de débris et de toute autre source de danger.
N’utilisez pas cet article dans des conditions de travail dangereuses.
RESPECTER TOUJOURS LES RÈGLEMENTS LOCAUX ET PROVINCIAUX RELATIFS À
L’UTILISATION APPROPRIÉE DE CET ARTICLE. VEUILLEZ COMMUNIQUER AVEC VOTRE
DÉTAILLANT LOCAL POUR EN SAVOIR DAVANTAGE SUR LES RÈGLEMENTS RELATIFS À
L’UTILISATION D’AIR COMPRIMÉ.
CONSIGNES DE SÉCURITÉ
H
Utilisez uniquement un outil pour l’usage auquel il est destiné.
Le coupe-tuyau comporte plusieurs bords coupants.
Le coupe-tuyau doit toujours être utilisé avec prudence.
Une utilisation inappropriée du coupe-tuyau peut causer des blessures graves.
N’utilisez jamais le produit lorsque vous êtes sous l’effet de l’alcool ou de drogues.
N’utilisez jamais un outil, quel qu’il soit, si vous êtes fatigué ou si vous n’êtes pas en mesure d’en
garder le contrôle en tout temps. Il est toujours recommandé d’avoir un extincteur d’incendie et
une trousse de premiers soins à proximité de l’aire de travail.
Gardez une posture sécuritaire en tout temps. Ne vous étirez pas pour étendre votre portée; vous
risqueriez de glisser, de trébucher ou de tomber et de subir des blessures graves ou mortelles.
Faites attention à l’excédent de tuyau laissé dans l’aire de travail ou sur la surface de travail.
Ne faites pas un usage abusif des tuyaux ou des raccords.
Ne tirez jamais brusquement sur le système de tuyau à air.
Tenez les tuyaux éloignés des sources de chaleur, de l’huile et des objets coupants.
Vérifiez l’état des tuyaux avant chaque utilisation et assurez-vous qu’ils sont correctement
raccordés.
Ne pulvérisez pas d’acide, de matières corrosives, de produits chimiques toxiques, de fertilisants ni
de pesticides à l’aide du système.
Ne pulvérisez jamais de matières inflammables à proximité d’une flamme nue ou d’une source
d’inflammation.
Ne rangez jamais de liquides ni de gaz inflammables à proximité d’un compresseur d’air ni d’autres
matériaux comprimés.
Portez un masque facial ou un appareil respiratoire (ou les deux) ainsi que des vêtements de
protection chaque fois que vous utilisez ce système de pulvérisation.
Utilisez toujours le pistolet de pulvérisation dans un endroit bien aéré afin de prévenir les risques
d’incendie et les dangers pour la santé.
Débranchez toujours l’outil du système à air avant d’effectuer tout entretien.
kobalttools.com
CONSIGNES DE SÉCURITÉ SUPPLÉMENTAIRES
Chaque outil a une fonction unique et est conçu pour être utilisé de manière précise.
Assurez-vous que les accessoires pour outils pneumatiques que vous utilisez avec ce système lui
sont compatibles.
Ne dépassez jamais la pression en 150 lb/po maximum pour le système de conduites d’air pour le
garage, pour les outils pneumatiques ou pour les accessoires pouvant être raccordés au système
de conduites d’air pour le garage.
2

17
CONSIGNES DE SÉCURITÉ
●LE PLOMB PROVENANT DES PEINTURES À BASE DE PLOMB;
●LA SILICE CRISTALLINE PROVENANT DE LA BRIQUE, DU CIMENT OU D’AUTRES
MATÉRIAUX DE MAÇONNERIE;
●L’ARSENIC ET LE CHROME PROVENANT DU BOIS D’ŒUVRE TRAITÉ AVEC UN PRODUIT
CHIMIQUE.
LES RISQUES LIÉS À L’EXPOSITION À CES PRODUITS VARIENT SELON LE NOMBRE DE
FOIS OÙ VOUS PRATIQUEZ CES ACTIVITÉS. AFIN DE LIMITER VOTRE EXPOSITION À CES
PRODUITS CHIMIQUES, TRAVAILLEZ DANS UN ENDROIT BIEN VENTILÉ ET UTILISEZ DE
L’ÉQUIPEMENT DE SÉCURITÉ APPROUVÉ, TEL QU’UN RESPIRATEUR OU UN MASQUE
ANTIPOUSSIÈRE CONÇU SPÉCIALEMENT POUR FILTRER LES PARTICULES
MICROSCOPIQUES.
AVERTISSEMENT
LA POUSSIÈRE CRÉÉE PENDANT LA PULVÉRISATION DE PEINTURE, LE PONÇAGE
MÉCANIQUE, LE SCIAGE, LE MEULAGE, LE PERÇAGE ET LES AUTRES ACTIVITÉS
CONNEXES EST RECONNUE PAR L’ÉTAT DE LA CALIFORNIE COMME ÉTANT LA CAUSE DE
CANCERS, D’ANOMALIES CONGÉNITALES ET D’AUTRES PROBLÈMES LIÉS AUX
FONCTIONS REPRODUCTRICES. VOUS POUVEZ OBTENIR LA LISTE DES PRODUITS
CHIMIQUES AU www.oehha.ca.gov, CONFORMÉMENT À LA PROPOSITION 65. VOICI
QUELQUES-UNS DE CES PRODUITS CHIMIQUES :
kobalttools.com
Mettez toujours le compresseur hors tension et évacuez l’air du système avant d’effectuer tout
entretien ou d’apporter quelque modification que ce soit au système de conduites d’air du garage.
N’utilisez jamais un outil qui présente une fuite d’air, auquel il manque des pièces, dont des pièces
sont endommagées ou qui nécessite une réparation.
N’utilisez que des pièces et des accessoires recommandés par le fabricant.
Cet ensemble comprend plusieurs petites pièces qui peuvent présenter un risque d’étouffement
pour les enfants. Cet article n’est pas un jouet.

18
PREMIERS PAS AVEC LE SYSTÈME À RACCORD RAPIDE.
Temps d’assemblage approximatif : de 30 à 45 minutes.
1
2
Pour fixer un raccord au tuyau à air, insérez fermement ce dernier dans
le raccord. Tirez sur le tuyau à air et le raccord afin de vous assurer
qu’ils sont branchés correctement. (consultez la figure 1)
Coupe
Pour couper le tuyau, vous n’avez qu’à placer le coupe-tube(J) fourni à
l’endroit voulu, Appuyez fermement. Une fois le tuyau coupé, vérifiez
que le bord coupé est droit et égal.
INSTRUCTIONS POUR L'ASSEMBLAGE
Insérez
Tirez
REMARQUE: Utilisez toujours les pinces pour tuyau afin de fixer
adéquatement le tuyau à air. Comme il peut y avoir plusieurs surfaces
auxquelles les pinces pour tuyau peuvent être installées, consultez votre
quincailler local afin de vous procurer les fixations qui conviennent le
mieux à votre tâche.
Pour retirer un composant du tuyau à air,
assurez-vous que le compresseur est hors tension et que tout l’air a été
évacué du système. 3
M
C
C
kobalttools.com
Appuyez sur l’anneau de raccord. Retirez le tuyau à air du raccord
(consultez la figure 2).
Attention: Gardez vos doigts et les autres parties de votre corps à
distance des bords coupants du coupe-tuyau.
1. Utilisez l’illustration de la configuration de base comme guide pour l’installation de votre
ensemble de conduites d’air.
2. Coupez le tuyau à la longueur désirée en tenant compte de la taille de votre garage.
3. N’oubliez pas d’utiliser les pinces pour tuyau afin d’installer le système au mur. Il est
recommandé d’utiliser une pince de chaque côté des raccords ainsi qu’à tous les 1,22 m.
CONFIGURATION
DE BASE
Appuyez
REMARQUE: Le fabricant recommande de mesurer la longueur du
Accessoires pour
conduite d’air vendus
séparément
REMARQUE: L’ensemble de conduites d’air pour le garage peut être
installé selon différentes configurations. La configuration de base
montre à quoi peut ressembler une installation standard. Comme toutes
les installations sont uniques, certains accessoires peuvent ne pas être
nécessaires. Prenez note que des accessoires supplémentaires sont
nécessaires pour accomplir certaines tâches. Pour obtenir de l’aide,
communiquez avec votre quincailler local.
Appuyez
tuyau avant de couper le tuyau à air.

19
INSTRUCTIONS POUR L'ASSEMBLAGE
Disposition recommandée pour l’installation de tuyaux à air descendant vers 3 endroits différents.
DISPOSITION DU SYSTÈME RECOMMANDÉE PAR LE FABRICANT. NE LAISSEZ JAMAIS
D’AIR PARCOURIR LE SYSTÈME LORSQUE VOUS PROCÉDEZ À SON INSTALLATION.
ASSUREZ-VOUS DE TOUJOURS BIEN INSÉRER LES RACCORDS, ET QUE CEUX-CI SONT
BRANCHÉS AU TUBE D’AIR DE FAÇON SÉCURITAIRE ET ÉTANCHE. SI LES RACCORDS NE
SONT PAS EFFECTUÉS DE FAÇON APPROPRIÉE, L’AIR FUIRA.
kobalttools.com
REMARQUE:
Le fabricant recommande d’utiliser un compresseur d’air doté d’une sortie d’air capable de fournir
assez de pi3/min pour alimenter adéquatement vos outils.
Si le compresseur d’air que vous utilisez est incapable de fournir un débit d’air en pi3/min suffisant,
les outils pneumatiques branchés sur l’ensemble de conduites d’air pour le garage peuvent ne pas
fonctionner correctement. Pour obtenir de l’aide, communiquez avec votre quincailler local, au
besoin.

MODE D'EMPLOI
Branchement au compresseur d’air
3
A
20
kobalttools.com
1. Raccordez l’embout industriel femelle de 1/4 po (A) à la sortie
à branchement rapide du réservoir d’air (non inclus)
(consultez la figure 3).
2. Vissez le clapet de non-retour (B) à l’embout industriel femelle
de 1/4 po (A).
Serrez en tournant dans le sens des aiguilles d’une montre
(consultez la figure 3).
3. Insérez le tuyau à air (M) dans le clapet de non-retour (B)
(consultez la figure 5). 5
Installez dans le
raccord
4
B
Sens des aiguilles
d’une montre
ATTENTION:
ASSUREZ-VOUS DE BIEN SUIVRE LES ÉTAPES 1 À 4. Si vous ne suivez pas ces
étapes, les dispositifs de sécurité supplémentaires fournis peuvent ne pas fonctionner
correctement. Pour obtenir de l’aide, communiquez avec votre quincailler local.
This manual suits for next models
1
Table of contents
Languages:
Other Kobalt Power Tools Accessories manuals