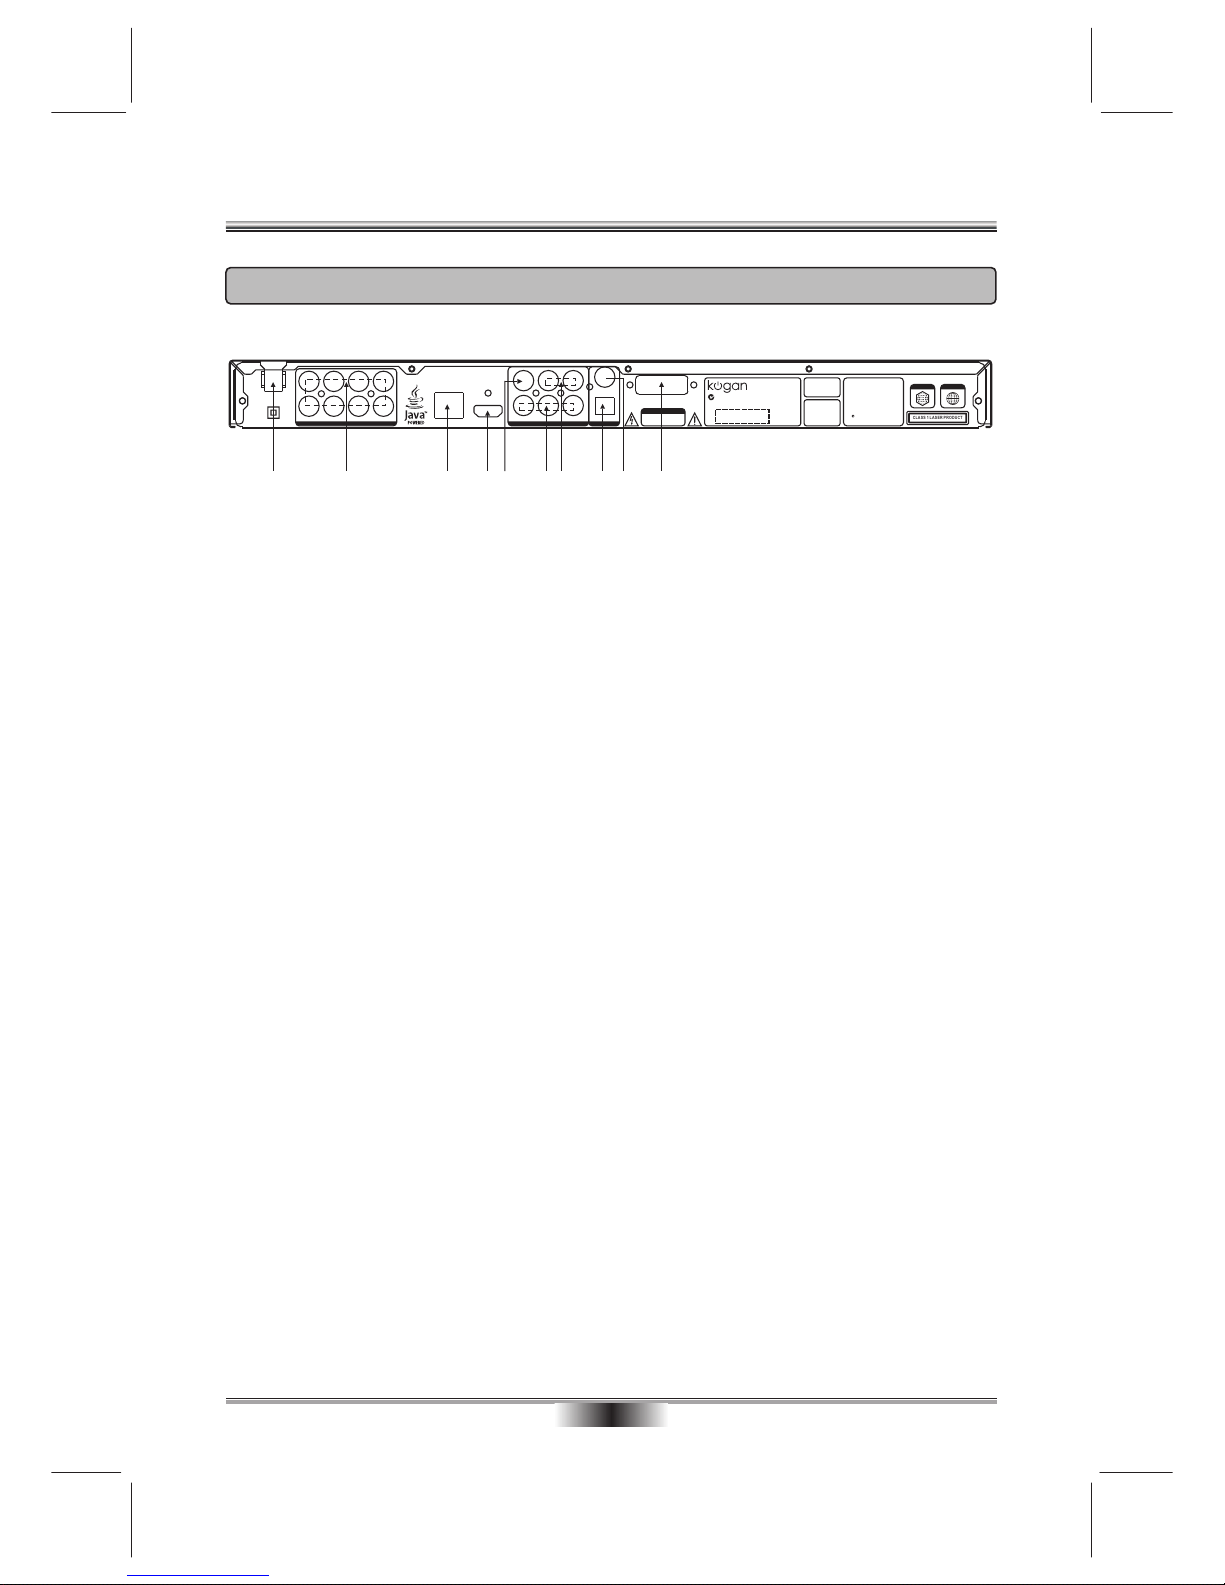
Kogan KGNBD2VBA User manual


TABLE OF CONTENTS
SAFETY PRECAUTIONS 01
IMPORTANT SAFETY INSTRUCTIONS 03
NOTICE 04
PLAYABLE DISCS
05
ACCESSORIES AND PANEL 06
REAR PANEL 07
BASIC CONNECTION 08
REMOTE CONTROL 11
BASIC PLAYBACK 12
ADVANCED PLAYBACK 13
SPECIAL FUNCTION PLAYBACK
14
SYSTEM SETUP 16
FREQUENTLY ASKED QUESTIONS 21
TROUBLE SHOOTING 22
SPECIFICATIONS 26

SAFETY PRECAUTIONS
01
TO REDUCE THE RISK OF FIRE OR ELECTRIC SHOCK, DO NOT EXPOSE THIS
APPLIANCE TO RAIN OR MOISTURE, DANGEROUS HIGH VOLTAGES ARE
PRESENT INSIDE THE ENCLOSURE. DO NOT OPEN THE CABINET. REFER
SERVICING TO QUALIFIED PERSONNEL ONLY.
When replacing the unit's plug or power cord, the replacement must be the exactly
the same; or one recommended by the manufacturer.
The lightning flash with arrowhead symbol, within an equila-
teral triangle, is intended to alert the user to the presence
of uninsulated "dangerous voltage " within the product's en-
closure that may be of sufficient magnitude to constitute a
risk of electric shock to persons.
The exclamation point within an equilateral triangle is
intended to alert the user to the presence of important
operating and maintenance (servicing) instructions in the
literature accompanying the appliance.
This Digital Video Disc player employs a laser system.
The symbol for CLASS II (Double Insulation).
Use of controls, adjustments or the performance of procedures other than those
specified may result To prevent direct expo-
sure to laser beam, do not try to open the enclosure.
DO NOT STARE INTO BEAM.
in hazardous exposure to radiation.
WARNING:
CAUTION:

SAFETY PRECAUTIONS
02
Manufactured under license from Dolby Laboratories. Dolby and the double-D symbol
are trademarks of Dolby Laboratories.
This product incorporates copyright protection technology that is protected by U.S.
patents and other intellectual property rights. Use of this copyright protection technology
must be authorized by Macrovision, and is intended for home and other limited viewing
uses only unless otherwise authorized by Macrovision. Reverse engineering or
disassembly is prohibited.
Disposal of your old appliance
1. When this crossed-out wheeled bin symbol is attached to a product, it means the
product is covered by the European Directive 2002/96/EC.
2. All electrical and electronic products should be disposed of separately from the
municipal waste stream via designated collection facilities appointed by the government
or the local authorities.
3. The correct disposal of your old appliance will help prevent potential negative
consequences for the environment and human health.
4. For more detailed information about disposal of your old appliance, please contact
your city office, waste disposal service or the shop where you purchased the product.
Manufactured under license under U.S. Patent #’s: 5,451,942; 5,956,674;5,974,380;
5,978,762;6,487,535 & other U.S. and worldwide patents issued & pending. DTS is a
registered trademark and the DTS logos, symbol, DTS-HD and DTS-HD Advanced
Digital Out are trademarks of DTS, Inc. 1996-2008 DTS, Inc. All rights reserved.

03
Slots and openings in the cabinet are provided for ventilation
and to ensure correct operation of the product. These protect
it from overheating. These openings must not be blocked or
covered. The openings should never be blocked by placing
the product on a bed, sofa, rug or other.
must
must ever
placed
power boards
do this
18.where the MAINS plug or an appliance coupler is
used as the disconnect device, the disconnect device
shall remain readily operable.

04
an vehicle
ELECTRICAL DISTURBANCE
following situations.
suffer from condensation under the
connecting will ensure

PLAYABLE DISCS
05
The following types of discs can play in the REF player:
Notes:
Writeable DVD disks (DVD-RAM, DVD-RW, DVD-R) must be finalized, VR-mode only.
This Blu-ray disc player supports discs that are compatible with DVD-RAM Standard Version 2.0.
Playback may not work for some types of discs, or when specific operations, such as angle change and
aspect ratio adjustment, are being performed. Information about the discs is written in detail on the box.
Please refer to this if necessary.
Do not allow the disc to become dirty or scratched. Fingerprints, dirt, dust,
scratches or deposits of cigarette smoke on the recording surface may make it impossible to use the disc
for playback.
CD-R/-RW, DVD-RAM/-RW/-R recorded with UDF or ISO9660 format can be played back.
Windows Media Audio (WMA) files must be written to the disc with a .wma file extension in order to be
recognized and played back properly.
JPEG picture files must be written to the disk with an .jpeg or .jpg file extension in order to be recognized
and played back properly
Features
Full high-definition video playback at up to 1080p resolution for an amazing viewing experience.
Upconversion of standard definition DVDs for enhanced picture quality at up to 1080p over an HDMI
connection.
Rich multi-channel surround sound.
Easy and simple HDTV connection using a single HDMI cable (cable not included).
Multiple outputs for connecting your home theater system or amplifier.
PIP functionality that lets you display primary and secondary video at the same time (if available on the Blu-ray
Disc).
Pop-up menu display without interrupting playback (if available on the Blu-ray Disc).
HDMI 1080p/fps output (Blu-ray Disc only) that provides smooth playback of video with a frame rate of 50
frames per second (TV must be connected with an HDMI cable and be compatible with an HDMI cable and
be compatible with 1080p 50 frame).
Disc type Logo
Blu-ray Disc
DVD-video Disc
(DVD-ROM)
Audio CDs
(CDDA)
DVD-RAM
DVD-RW
DVD+RW
DVD-R
WMA
RW
Disc type Logo
MPEG4
CD-R
CD-RW
DVD+R
TM
Designed for
TM
Windows
Media
JPEG
MP3

OPEN/CLOSESTANDBY/ON
ACCESSORIES and PANEL
06
FRONT PANEL
ACCESSORIES
Batteries......................................
Audio/Video cable .....................
Remote control ..........................
2
1
1
AUDIO
RETURN
MUTE
SECONDARY
AUDIO
ENTER
123
456
7 8 9
0
A B C D
DISCMENU
SEARCH
SETUP
POPUPMENU
TITLEMENU
REPEAT A-B
SUBTITLE
ANGLE
STANDBY/ON OPEN/CLOSE
RESOLUTION PIP
OSD
VOL
2
1. STANDBY/ON Turns the Blu-ray disc player on or off.
2. TRAY Opens to accept a disc.
3. LED SCREEN Display the playing status, time, etc.
4. REMOTE CONTROL SENSOR Receive the signal from the remote control.
5. PLAY Play: playback a disc.
PAUSE Pause:
STOP
9. OPEN/CLOSE Opens or closes the disc tray.
6. Temporarily pauses BD disc playback.
7. Stop playback.
8. for file playback or BD-Live storage.USB INTERFACE
1 3 4 5 6 7 8 9

REAR PANEL
07
REAR PANEL OUTPUT
Region codes:
If the Region number of a BD or DVD disc does not correspond to the Region number of this Blu-ray disc player,
the Blu-ray disc player cannot play the disc. The region code is called out on the rear panel of the BD player.
1
CENTER
SUB-WOOFER
RL
RR
SL
SR FR
FL
7.1-CH AUDIO OUT HDMIETHERNET VIDEO OUT / AUDIO OUT
VIDEO LR
Y CB/ PB CR / PR
DIGITAL AUDIO OUT
OPTICAL
COAXIAL
S/N:
POWER: 15WMODEL: KGNBD2VBA
BLU-RAY DISC PLAYER
MADE IN CHINA
AC: 110V-240V~ 50/60Hz
N15486
Manufactured under license under U.S.
Patent #'s: 5,451,942; 5,956,674; 5,974,
380; 5,978,762; 6,487,535 & other U.S.
and worldwide patents issued & pending.
DTS is a registered trademark & the DTS
logos and Symbol are trademarks of DTS,
Inc. 1996-2008 DTS, Inc. All Rights
Reserved.
Manufactured under
license from Dolby
Laboratories. Dolby
and the double-D
symbol are trademarks
of Dolby Laboratories.
U.S. Patent Nos. 6,836,
549; 6,381,747; 7,050,
698; 6,516,132; and
5,583,936.
RISK OF ELECTRIC SHOCK
DO NOT OPEN
CAUTION
CLASS 1 LASER PRODUCT
Blu-ray DVD-Video
4
2 3 4 5 76 8 9 10
1. POWER LINE INPUT
Isolates Mains supply
2. ANALOG 7.1 AUDIO OUTPUTS
Connect these outputs to the analog inputs of a surround sound speaker. (If surround sound speaker is 5.1
channel, leave the surround channels disconnected).
3. ETHERNET INTERFACE
4. HDMI OUTPUT
If your surround-sound audio receiver does not have an HDMI input (or if you are not using a surround-sound
receiver), connect this output directly to the HDMI input of the TV. One of the other audio outputs can be
connected to the audio receiver.
Otherwise, connect the HDMI output of the player to the HDMI input of the audio receiver. (You will need to
connect a second HDMI cable from the HDMI output of the audio receiver to the HDMI input of the television)
5. VIDEO OUTPUT
If your TV does not have component or HDMI video inputs, connect this output to the composite video input
of the HD television.
6. Y, CB/PB, CR/PR OUTPUT
Connect these outputs to the YUV inputs of the television, if the television does not have an HDMI input.
NOTE: The component video output has a maximum resolution of 1080i.
7. L/R AUDIO OUTPUT
C
8. OPTICAL OUTPUT
This is another digital audio output. If you have a surround-sound receiver with a digital optical input, connect
this output to the digital optical input of the surround sound receiver.
9. COAXIAL OUTPUT
This is a digital audio output. If you have a surround-sound receiver with a digital coaxial input, connect this
output to the digital coaxial input of the surround sound receiver.
10. WIFI ANTENNA
onnection for external equipment using the Red/White Audio (RCA) Cables.

CENTER
SUB-WOOFER
RL
RR
SL
SR FR
FL
7.1-CH AUDIO OUT HDMIETHERNET VIDEO OUT / AUDIO OUT
VIDEO LR
Y CB / PB CR / PR
DIGITALAUDIO OUT
OPTICAL
COAXIAL
BASIC CONNECTION
08
BASIC CONNECTION
Connecting to a TV with Audio/Video cable
Connecting to a audio system and TV equipped with YUV video input
To video input(yellow)
To audio inputs(red, white)
To audio inputs of the amplifier
To Y video input
To CB/PB video input
To CR/PR video input
To Y video output
To CB/PB video output
To CR/PR video output
Connecting to an amplifier equipped with 7.1ch audio input and TV
To 7.1ch audio inputs
Audio cable
BD Player
BD Player
BD Player
CENTER
SUB-WOOFER
RL
RR
SL
SR FR
FL
7.1-CH AUDIO OUT HDMIETHERNET VIDEO OUT / AUDIO OUT
VIDEO LR
Y CB / PB CR / PR
DIGITALAUDIO OUT
OPTICAL
COAXIAL
CENTER
SUB-WOOFER
RL
RR
SL
SR FR
FL
7.1-CH AUDIO OUT HDMIETHERNET VIDEO OUT / AUDIO OUT
VIDEO LR
Y CB / PB CR / PR
DIGITALAUDIO OUT
OPTICAL
COAXIAL

CENTER
SUB-WOOFER
RL
RR
SL
SR FR
FL
7.1-CH AUDIO OUT HDMIETHERNET VIDEO OUT / AUDIO OUT
VIDEO LR
Y CB / PB CR / PR
DIGITALAUDIO OUT
OPTICAL
COAXIAL
CENTER
SUB-WOOFER
RL
RR
SL
SR FR
FL
7.1-CH AUDIO OUT HDMIETHERNET VIDEO OUT / AUDIO OUT
VIDEO LR
Y CB / PB CR / PR
DIGITALAUDIO OUT
OPTICAL
COAXIAL
BASIC CONNECTION
09
BD Player
Connecting to a devices with HDMI terminal
Connecting to an amplifier equipped with a digital audio input and TV
Coaxial cable
To COAXIAL
type digital
audio input
To Y video input
To CB/PB video input
To CR/PR video input
To Y video output
To CB/PB video output
To CR/PR video output
To OPTICAL
type digital
audio input
Optical digital cable
BD Player
HDMI (High-Definition Multimedia Interface) setup:
Can only be achieved using HDMI. HDMI is the only REF output capable of 1080i/1080p video, and the
highest definition audio codecs. Connect the HDMI output of the player to the HDMI input of the audio receiver.
(You will need to connect a second HDMI cable from the HDMI output of the audio receiver to the HDMI input
of the television)

BASIC CONNECTION
10
Connecting to your Home Network
This player can be connected to a local area network (LAN) via the LAN port on the rear panel or the internal
wireless module.
Wired network
Connect the player’s LAN port to the corresponding
port on your Modem or Router using a commercially
available LAN or Ethernet cable (CAT5 or better with
RJ45 connector).
Using a wired network provides the best performance,
because the attached devices connect directly to the
network and are not subject to radio frequency
interference.
Note:
When plugging or unplugging the LAN cable, hold
the plug portion of the cable. When unplugging, do
not pull on the LAN cable but unplug while pressing
down on the lock.
Do not connect a modular phone cable to the LAN
port.
Since there are various connection configurations,
please follow the specifications of your telecomm-
unication carrier or internet service provider.
See “settings for wired network”on page 19
Wireless network
Another connection option is to use an Access Point
or an wireless router.
l
o
Modem/Router
Broadband
Service
Access Point/
Wireless router
Broadband
Service
BD player
The network configuration and connection method
may vary depending on the equipment in use and the
network environment. This player is equipped with
an IEEE 802.11n wireless module, which also supports
the 802.11b/g standards. For the best wireless perf-
ormance, we recommend using a IEEE 802.11n
certified Wi-Fi network (access point or wireless router).
See “settings for wired network”on page 19
BD player
Wireless
Communication
HDMIETHERNET VIDEO OUT / AUDIO OUT
VIDEO LR
Y CB / PB CR / PR
DIGITALAUDIO OUT
OPTICAL
COAXIAL
OPEN/CLOSESTANDBY/ON

REMOTE CONTROL
REMOTE CONTROL
11
FunctionFunction
1. STANDBY
2. DIGITS 0-9 BUTTONS
3. SEARCH
4. FAST REVERSE
5. FAST FORWARD
6. STOP
7. PAUSE
8. REPEAT
9. SUBTITLE
10. On Screen Display (OSD)
11. DISC MENU
12. CURSOR
13. ENTER
14. SETUP
15. AUDIO
16. COLOR Buttons:
RED(A),GREEN(B),YELLOW(C),BLUE(D)
17. RESOLUTION
18. Secondary Video (Picture-in-picture)
19. OPEN/CLOSE DISC TRAY
20. RETURN
21. NEXT
22. PREVIOUS
23. STEP
24. PLAY
25. A-B REPEAT
26. ANGLE
27. POPUP MENU/TITLE MENU
28. VOLUME+/- (Volume Control)
29. MUTE
30. SECONDARY AUDIO
123
456
7 8 9
0
A B C D
DISC MENU
SEARCH
SETUP
POPUP MENU
TITLE MENU
REPEAT A-B
SUBTITLE
ANGLE
AUDIO
RETURN
STANDBY/ON OPEN/CLOSE
RESOLUTION PIP MUTE
SECONDARY
AUDIO
OSD
VOL
ENTER
1
2
3
4
5
6
7
8
9
10
11
12
13
14
15
16
17
19
20
21
22
23
24
25
26
27
28
29
18 30

BASIC PLAYBACK
12
Fast forward and Fast reverse
1. Press F.FWD to fast forward through the disc.
Each time the F.FWD button is pressed, the
fast forward motion speed changes. The speed will
increase through the following sequence: Fast x 2,
Fast x 4, Fast x 8, Fast x 16, Fast x32, Fast x 64,
Fast x 128.
2. Press PLAY to resume normal playback.
3. Press F.REV to fast reverse through the disc.
Each time the F.REV button is pressed, the
fast reverse motion speed changes. The speed will
increase through the following sequence: Fast x 2,
Fast x 4, Fast x 8, Fast x 16, Fast x 32, Fast x 64,
Fast x 128.
4. Press PLAY to resume normal playback.
Stop playback
1. Press STOP button to go to stop mode, the TV
screen will show the setup menu. As some disc
the player can recall the location where stopped,
such as DVD.
2. Press CURSOR button to select DVD, and then
Press ENTER to playback to resume playback from
the location where playback is stopped or from the
beginning of the disc.
3. Press STOP twice to stop completely.
Pause playback
1. Press PAUSE to pause playback . The sound
will be muted .
2. Press PAUSE or PLAY to resume normal playback.
Basic playback
1. Press STANDBY/ON switch on the front panel or
the remote, your player turns on.
2. Turn on the TV, then select the input setting on the
TV that matches the connection method you used to
connect your player.
3. Press OPEN/CLOSE to open the disc tray.
4. Place a disc on the disc tray with the label facing
up, then press OPEN/CLOSE to close the disc
tray. It may take a few seconds for the disc to load.
5. If a Blu-ray Disc or DVD menu opens, press
CURSOR button to select PLAY, then press ENTER.
6. To eject the disc, press OPEN/CLOSE .
Single step playback
1. Press STEP continuous to single step forward
to the next frame in the video.
2. Press PLAY to resume normal playback.
NOTES:
1.
Previous and Next
Within playing five seconds, press PREV key can
back to the previous of the chapter. After playing five
seconds, press PREV key can back to the start
of the chapter.
Each press of NEXT during playing will skip
the current chapter and play the next one.
key

ADVANCED PLAYBACK
13
IMPORTANT NOTE:
THE FOLLOWING FUNCTIONS ARE APPLICABLE ONLY TO BD DISCS. IF OTHER DISC FORMATS ARE
PLAYED, SCREEN DISPLAY AND OPERATION WILL BE DIFFERENT.
SEARCH
During playback,Press this button repeatedly to select
a search mode, then press digits button into menu,
for example:
first Go to Title - - -
twice Go to Chapter - - -
third Go to Time --: -- : --
Then press ENTER key on the remote, you could
choose point that you want to play. The fourth pressed
will cancel search.
POPUP MENU/TITLE MENU
During Blu-ray Disc playback, Press MENU.
To open the pop-up menu opens.
1. Press UP/DOWN/LEFT/RIGHT button to select an
option, then press ENTER.
2. Press POPUP MENU to close the menu.
During DVD playback, press TITLE MENU to open
the disc menu.
POP-UP
ANGLE
During playback, press this button to change the angle
of the picture. This screen will display
.
" Angle X of X "
the first "X" indicates the current number of angle;
the second "X" indicates total number of angle
COLOR BUTTONS(red, green,yellow,blue)
These buttons are used when operating a BD-Video
disc that includes JavaTM applications (BD-J). For
more information about operating this kind of disc,
please read the instructions that came with the disc.
RETURN
Press this button to return to the previous on-screen
menu.(The option is only used with WMA/JPEG/MP3
MPEG4 disc).
A-B
Press " A-B " to begin start-point after two seconds,
press again to set an end point and complete
setting. The selected section A-B will be repeated.
The third press will cancel this function.
Note: this key is invalid to BD-JAVA disc.
SUBTITLE
Press this button and the screen will display inform-
ation menu. Press the RIGHT button to select subtitle
language. Such as: "01/08 ENG", and " Off " .
"01" indicates the current number of this language;
"08" indicates total number of languages;
"ENG" indicates the language.
(The number of language depends on disc).
the
1. Press this button and the screen will display " Root
Menu ", select item according to your preference.
(This key is valid to DVD disc possessing multi-layer
menu.)
2. Press Disc Menu button on remote control during
picture playing, to open SLIDE SHOW selection menu,
then you can select “slide show effects” and “slide
show delay”.
DISC MENU
OSD
Press this button and the screen will display some
information about disc, such as : " Type of Disc ",
"Current elapsed time in title ", "total amount of time
in title ", "current chapter " , " Total of chapters " and
so on.
Example:
Title 1 Chapter 1/13
0:10:00 Off Play
0:00:05
BD-ROM
REPEAT
Press one or more times to select a repeat mode.
Follow this operation :
Repeat off
Repeat Title
Repeat chapter
Press this button repeatedly to display circular the
above operation.
Note: this key is invalid to BD-JAVA disc.
SETUP
Press this button to get back to the root menu.
Note: The root menu will display on the screen
automatically, under No Disc or Stop situations.
VOLUME and MUTE
Press " + " at the right of VOLUME to increase
volume, " - " to decrease to volume. Pressing MUTE
once will display VOLUME MUTE (no voice), the
second press will display VOLUME MUTE OFF (return
to normal playback).

SPECIAL FUNCTION PLAYBACK
14
SPECIAL FEATURES OF BLU-RAY DISCS
INTRODUCTION
The massive storage capacity of a Blu-Ray (BD)
disc allows a far higher standard of picture and
audio quality and a wealth of special effects and
enhanced features.
BLU-RAY AND JAVA.
This player features Java support so enabling you
to get the most out of the latest Blu-Ray discs.
When a BD disc loads always explore the title
menu to enjoy these extra features.
BLU-RAY AND HDMI
HDMI is the only domectic medium capable of
transmitting the huge volumes of data required by
the very high picture resolutions and advanced
digital audio codecs that make Blu-Ray such an
exciting medium.
PLAYING A BLU-RAY DISC
Blu-Ray discs play very much like standard DVDs
but with a very much higher level of interactivity.
All the standard features of DVD play operate
exactly the same but there are some differences.
PLAY RESUME: This feature is not available on
BD-Java discs.
A-B repeat is disabled on some BD discs.
RESOLUTION
This sets the video output resolution.
PAL: 576i, 576p, 720p,1080i, 1080p(HDMI),
HDMI AUTO
NTSC: 480i, 480p, 720p, 1080i, 1080p(HDMI),
HDMI AUTO
NOTE: Setting a resolution your TV cannot support
could result in an unstable picture or a loss of picture.
Check your TV manual for guidance.
Primary video
Secondary video
ENHANCED FEATURES
SECONDARY VIDEO (PICTURE IN PICTURE)
During Play:
Press the PIP key to turn on Secondary Video
(Picture in picture)
SECONDARY AUDIO
To turn audio on/off with the secondary video,
Press the SECONDARY AUDIO button the screen
will display information menu, Use
Note: Only the primary video is played during
search or frame-by-frame play.
P-I-P functionality is also known as BonusView.
COLOUR BUTTONS
The RED, GREEN, YELLOW and BLUE buttons
are used with interactive menus when operating a
BD-Video disc that includes JavaTM applications
(BD-J). For more information about operating this
kind of disc,please read the instructions that came
with the disc.
CURSOR button
and then ENTER button to select ON and OFF.
AUDIO CHANNEL CHOOSE
Press the AUDIO button and the screen will display
information menu. Press the RIGHT button to select
the mode of audio. Such as: "01/03 Stereo" .
"01" indicates the current number of audio;
"03" indicates total number of audio;
"Stereo" indicates the description of the current audio.

SPECIAL FUNCTION PLAYBACK
15
Controlling audio CD playback
To start or pause playback, press .
The sound is muted when your player is in pause
mode. To resume normal playback, press .
To stop playback completely, press To start
playback again, press . Playback starts at the
beginning of the CD.
To fast-forward, press . To resume normal
playback, press .
To fast reverse, press . To resume normal
playback, press .
To go to the previous track, press . To go to the
next track, press .
To select a track, press SEARCH, enter the track
number with the number buttons, then press
ENTER. Or, Enter the track number by pressing
the appropriate number buttons.
When you insert a data disc or USB memory stick
containing picture, music, or video files into your
player, icons are added to the menu to indicate that
video, music, or picture files are available for playback.
To play audio or video files:
1. Press or to select Music, Pictures or Videos,
then press ENTER. A menu opens.
2. Press or to select Play Files, then press
ENTER. The following display appears
Videos
Muisc
Pictures
Settings
Random Indicator
Repeat Indicator
Play Indicator
File 1/5 song1.mp3
Title: Cool Track
Artist: Ricardo Funiccio
Album: Dead Dux
0:02:00 0:30:00 Off Off Play
Playing files on a data disc or USB memory
stick
Videos
Muisc
Pictures
Settings
Viewing photographs
Your player can display digital photograph files that
have been burned onto a data disc, DVD+/-R,
DVD+/-R/(W), or Blu-ray Disc.
To view photographs:
1. Insert the disc with photographs into your Blu-ray
player. The following menu opens:
2. Press or to select Pictures, then press ENTER.
A menu opens.
Main Menu - Returns to the main menu.
Start slide show - to play all files at slide show.
Browse Music -Opens the music playing menu
where you can select music files to play while
you view photographs.
Repeating a CD track
To repeat a title or chapter, press REPEAT one or
more times to select a repeat mode. You can select
Off, Repeat track, Repeat all,or Random.
Creating a playback loop on a audio CD
1. Play the disc until you reach the point where you
want the loop to start, then press A-B.
2. Play the disc until you reach the point where you
want the loop to stop, then press A-B. Your player
plays the loop you created repeatedly.
3. Press A-B to cancel the loop and return to normal
playback.

SYSTEM SETUP
16
1. DISPLAY MENU
The settings menu will be displayed automatically
on the screen, press ENTER button on the remote
control to next menu. It includes display, audio ,
speaker, language, parental, other, network menu.
1.Within the setup menu, you can use UP, DOWN,
LEFT and RIGHT buttons on the remote control
to move the cursor, and then press the
ENTER button to make your selection.
Press LEFT can return the previous menu.
2.To exit setup menu, you can press LEFT button.
1.1 HDMI Status
HDMI Status: to show if the HDMI is connected or
not
1.2 HDMI preferred Format
HDMI preferred Format: to show HDMI best format
of TV Set.
1.5 TV Aspect
TV Aspect: Select the picture size according to the
aspect ratio of the connected TV. You can select:
16:9 Pillarbox, 4:3 Pan & Scan, 4:3 Letter Box, 16:9
wide.
If your TV has a very rectangular (16:9) aspect ratio,
you will need to choose one of the 16:9 aspect ratios.
If your TV has a relatively square (4:3) aspect ratio,
you will need to choose one of the 4:3 aspect ratios.
Note: Setting the player for one of the 16:9 settings
when connected to a 4:3 TV, or setting the player for
one of the 4:3 settings when connected to a 16:9 TV
will result in unpredictable results.
In the standard-definition(480i/576i/576p/480p) mode,
the BD player have 16:9 and 4:3 aspect ratio.
In the high-definition(720p/1080i/1080p) mode, the
BD player have only 16:9 aspect ratio.
1.6 Film Mode(1080p24)
Film Mode(1080p24): Movies are recorded on film
at a rate of 24 pictures, or frames, per second. Many
of the movies on BD discs are placed on the disc at
this frame rate. However, not all TVs can display 24
progressive frames/second of video. The UP/DOWN
menu keys can then be used to select Off or On for
50 frames/second output format.
Note: Only the HDMI output of the player is capable
of supporting 1080p video output at any frame rate.
The component outputs are limited to 1080i, regardless
of the Film Mode setting.
1.4 Resolution
Resolution: select the output resolution based on
the type of TV connected to the player, as described
in the table below:
Settings
Audio
Network
Display
Display
HDMI Status
HDMI preferred Format
TV Type
Resolution
TV Aspect
Film Mode(1080p24)
Deep Color
Connected
Not Avaliable
PAL
HDMI Auto
16:9 Wide
Off
Off
System
Language
Parental
1.3 TV Type
TV Type: This player supports different TV output,
including NTSC and PAL systems.
Note: if playing the disc of the PAL type , please
select PAL option. If playing the disc of the NTSC
type, please select NTSC option.
TV TYPE Correct Resolution
Setting
If your TV is a standard-definition
PAL TV (American,Asian SD TV)
If your TV is an enhanced-definition
TV (EDTV)
If your TV is a high-definition TV
(HDTV) capable of 720p only
If your TV is a high-definition TV
(HDTV) capable of 1080i only
If your TV is HDMI equipped, and if
your TV is a high-definition TV (HDTV)
capable of 1080p [any frame rate], and
you are connected to your TV via HDMI,
If your TV is HDMI equipped, and you
are connected to your TV via HDMI, and
you wish the BD player to set the output
based on information exchanged between
the TV and the player over the HDMI cable.
576i
576p
720p
1080i
1080p (HDMI)
HDMI auto
Note: Setting the player for an output resolution not
supported by your TV will result in unpredictable
results. Only the HDMI output of the player is capable
of supporting 1080p video output at any frame rate.
If the HDMI cable is not connected, the component
outputs are limited to 1080i.
Speaker

Settings
System
Parental
Display
Audio
Network
Audio
Speaker
Language
PCM Downsampling
Digital Output
Dynamic Range Control
48 Khz
PCM 7.1
Off
SYSTEM SETUP
17
2.1 PCM Downsampling
PCM Downsampling: To set the player’s digital output
PCM sampling rate. Such as 48KHz, 96KHz,Off.
Note: Incorrectly setting the digital audio output’s
PCM sampling rate may result in unpredictable audio
playback.
2.2 Digital Output
Digital Output: set the digital audio outputs, such as
PCM: Mixed digital audio sent over HDMI in PCM
(if supported by HDMI device) and SPDIF in two-
channel PCM format.
Bitstream HD: Original bitstream from disc is passed
over HDMI and SPDIF using highest quality possible.
HDMI has higher quality capabilities with advanced
audio codecs like TrueHD and DTS-HD. BD audio
limited to soundtrack for main movie (i.e. no PiP audio,
no effects audio).
Bitstream Legacy: Original bitstream from disc is
passed over HDMI and SPDIF using legacy audio
formats. BD audio limited to soundtrack for main
movie (i.e. no PiP audio, no effects audio).
Bitstream mixed: BD audio streams are mixed and
encoded into a single bitstream. Primarily intended
for customers with SPDIF 5.1CH receivers who want
to enjoy mixed BD audio in surround sound.
PCM, Bitstream HD, Bitstream Legacy, Bitstream
mixed.
2.3 Dynamic Range Control
Dynamic Range Control: this is only active when
a Dolby Digital signal is detected.
Off: you can enjoy the movie with the standard
Dynamic Range.
On: When Movie soundtracks are played at low
volume or from smaller speakers, the system can
apply appropriate compression to make low-level
content more intelligible and prevent dramatic
passages from getting too loud.
Auto: the system turns on the Dynamic range
control for all BD movie soundtracks except Dolby
TruHD. If you have selected a Dolby TruHD track on
the BD disc, Auto tells the BD player to only turn on
dynamic range control if information embedded in
the Dolby TruHD sound track tells it to do so.
2. Audio Menu
1.7 Deep Color
Select Deep Color: Auto, 30 bits, and 36bits.
Note: HDMI 1.3 supports 10-bit, 12-bit and 16-bit
(RGB or YCbCr) color depths while 8-bit depths in
previous versions. This expands the colors displayed
from millions to billions, which is much more vivid
than the previous.
Settings
System
Parental
Display
Speaker
Network
Audio
Speaker
Language
Front L
large
Front R
large
Center
large
Surrond L
large
Surrond R
large
Rear L
large
Rear R
large
Subwoofer
120Hz
3.3 Surround L-R
Surround L-R: Sets the player’s output frequency
response and downmixing characteristics by setting
the surround speakers to Small (surround speakers
have no subwoofers) or Large (surround speakers
have subwoofers).
3. Speaker Menu
3.1 Front L-R
Front L-R: Sets the player’s output frequency
response and downmixing characteristics by setting
the front speakers to Small (Front speakers have no
subwoofers) or Large (front speakers have subwoofers).
3.2 Center
Center: Sets the player’s output frequency response
and downmixing characteristics by setting the center
speaker to Small (Center speaker has no subwoofers)
or Large (center speaker has subwoofers), or Off
(no center speaker).

Settings
Language
Network
Display
Audio
Speaker
Language
Parental
System
OSD
Menu
Audio
Subtitle
English
Auto
Auto
None
4.1 OSD Language
OSD Language: Users can select the whole setup
menu and on-screen display language.
4.2 Menu Language
Menu Language: Sets the preferred menu language
as the default language for the disc.
Note:
Not all languages are available on all discs.
Most discs only have one menu language available.
4. LANGUAGE MENU
SYSTEM SETUP
18
3.4 Subwoofer
Subwoofer: Sets the player’s output frequency
response and downmixing characteristics by setting
the subwoofer to 80Hz/100Hz/120Hz (Subwoofer
Present) or Off (no subwoofer).
Rear L-R: Sets the player’s output frequency
response and downmixing characteristics by setting
the rear speakers to Small (rear speakers have no
subwoofers) or Large (rear speakers have subwoofers),
or Off (no rear speakers).
3.5 Rear L-R
4.3 Audio Language
Audio Language: Sets the preferred audio language
as the default language for the disc.
Note:
Not all languages are available on all disc.
Some disc to not allow the user to select the audio
language from the BD-player setup menus. The audio
language can only be selected from the BD/DVD disc
setup menu. (The menu that appears after the disc
has been inserted)
4.4 Subtitle Language
Subtitle Language: Sets the preferred subtitle
language as the default language for the disc.
Note:
Not all languages are available on all disc.
Some disc to not allow the user to select the audio
language from the BD-player setup menus. The audio
language can only be selected from the BD/DVD disc
setup menu. (The menu that appears after the disc
has been inserted)
5.2 Parental Level
5.1 Parental Control
Settings
Parental
Parental Control
Parental Level
Parental Password
On
8[Adult]
Display
Audio
Speaker
Language
Parental
System
Network
Parental Control: The parental control function works
inconjunction with the different censorship classes
assigned to BD. These classes help to control the
types of BD that the family watches, There are up
to 8 censorship classes for BD.
Note:
The PARENTAL is changeable when PASSWORD
MODE set to OFF.
After setting the level of parental control. please
set the password as ON to perform the lock of
changing.
Parental Level: sets different censorship classes
assigned to DVDs.
1[Kid Safe] - Suitable for all children.
2[G] - General audiences.
3[PG] - Parental guidance suggested.
4[PG-13] - Not suitable for anyone under 13.
5[PGR] - Parental guidance recommended.
6[R] - Not suitable for anyone under 17 unless
supervised by a parent or adult guardian.
7[NC-17] - Not suitable for anyone under 17.
8[Adult] - All DVDs can be played.
5. Parental Control Menu
Table of contents
Other Kogan Blu-ray Player manuals

Kogan
Kogan KABRP21X3DB User manual

Kogan
Kogan KABRP3D4KUA User manual

Kogan
Kogan KABRP21SLMB User manual

Kogan
Kogan KABRP3DWFIA User manual

Kogan
Kogan KGNBD2A User manual

Kogan
Kogan KABRP3D4KUA User manual

Kogan
Kogan KABRP21WFIAA User manual

Kogan
Kogan KABRP21SLMA User manual

Kogan
Kogan KABRP21X3DAA User manual

Kogan
Kogan KABRP21WFIA User manual