Kogan KABRP21X3DB User manual

KABRP21X3DB
USER MANUAL

2
+)=<176":MIL\PQ[JMNWZMWXMZI\QVOaW]Z=61<
WARNING
TO REDUCE THE RISK OF FIRE, ELECTRIC SHOCK OR
PRODUCT DAMAGE,
=DO NOT EXPOSE THIS APPARATUS TO RAIN, MOIS-
TURE, DRIPPING OR SPLASHING AND THAT NO OB-
JECTS FILLED WITH LIQUIDS, SUCH AS VASES, SHALL
BE PLACED ON THE APPARATUS.
=USE ONLY THE RECOMMENDED ACCESSORIES.
=DO NOT REMOVE THE COVER (OR BACK); THERE
ARE NO USER SERVICEABLE PARTS INSIDE. REFER
SERVICING TO QUALIFIED SERVICE PERSONNEL.
=DO NOT INSTALL OR PLACE THIS UNIT IN A BOOK-
CASE, BUILT-IN CABINET OR IN ANOTHER CONFINED
SPACE. ENSURE THE UNIT IS WELL VENTILATED. TO
PREVENT RISK OF ELECTRIC SHOCK OR FIRE HAZARD
DUE TO OVERHEATING, ENSURE THAT CURTAINS AND
ANY OTHER MATERIALS DO NOT OBSTRUCT THE VEN-
TILATION VENTS.
CLASS 1 LASER PRODUCT
KLASSE 1 LASER PRODUKT
LUOKAN 1 LASER LAITE
KLASS 1 LASER APPARAT
PRODUCTO LÁSER CLASE 1
CAUTION
THIS PRODUCT UTILIZES A LASER. USE OF
CONTROLS OR ADJUSTMENTS OR PERFOR-
MANCE OF PROCEDURES OTHER THAN THOSE
SPECIFIED HEREIN MAY RESULT IN HAZARD-
OUS RADIATION EXPOSURE. DO NOT OPEN
COVERS AND DO NOT REPAIR YOURSELF.
REFER SERVICING TO QUALIFIED PERSONNEL.
NOTE
=Do not install this unit in a confined space such as a
bookcase or similar unit.
=This unit can be used only where the power supply is
AC 110-240V, 50/60 Hz. It cannot be used elsewhere.
=The socket outlet shall be installed near the equip-
ment and easily accessible. The mains plug of the power
supply cord shall remain readily operable. To completely
disconnect this apparatus from the AC Mains, disconnect
the power supply cord plug from AC receptacle.
=ʻCONSUMERS SHOULD NOTE THAT NOT ALL HIGH
DEFINITION TELEVISION SETS ARE FULLY COMPATIBLE
WITH THIS PRODUCT AND MAY CAUSE ARTIFACTS TO
BE DISPLAYED IN THE PICTURE. IN CASE OF 525 OR 625
PROGRESSIVE SCAN PICTURE PROBLEMS, IT IS RECOM-
MENDED THAT THE USER SWITCH THE CONNECTION
TO THE ʻSTANDARD DEFINITIONʼ OUTPUT. IF THERE ARE
QUESTIONS REGARDING OUR TV SET COMPATIBILITY
WITH THIS MODEL 525p AND 625p DVD PLAYER, PLEASE
CONTACT THE KOGAN CUSTOMER SERVICE CENTER.ʼ
CAUTION
Danger of explosion if battery is incorrectly replaced.
Replace only with the same or equivalent type recom-
mended by the manufacturer. Dispose of used batteries
according to the manufacturerʼs instructions.
Manufactured under license under U.S. Patent Nos: 5,956,674;
5,974,380; 6,226,616; 6,487,535; 7,212,872; 7,333,929;
7,392,195; 7,272,567 & other U.S. and worldwide patents issued
& pending. DTS-HD, the Symbol, & DTS-HD and the Symbol
together are registered trademarks & DTS-HD Master Audio is a
trademark of DTS, Inc. Product includes software. © DTS, Inc. All
Rights Reserved.
This product incorporates copyright protection technology that is
protected by U.S. patents and other intellectual property rights.
Use of this copyright protection technology must be authorized
by Rovi Corporation, and is intended for home and other limited
viewing uses only unless otherwise authorized by Rovi Corpora-
tion. Reverse engineering or disassembly is prohibited.
IMPORTANT SAFETY GUARD
The lightening flash and
Arrowhead within triangle is
a warning sign alerting you of
dangerous voltage inside the
product.
The exclamation point within
the triangle is a warning sign
alerting you of important
instructions accompanying the
product.
To reduce the risk of electric shock,
do not remove the cover (or back).
No user-serviceable parts are inside.
Refer servicing to qualified service
personnel.
Information on Disposal in other Countries
outside the European Union
This symbol is only valid in the European
Union. If you wish to discard this product,
please contact your local authorities or dealer
and ask for the correct method of disposal.
Region management information
BD-Video
This unit plays BD-Video marked
with labels containing the region
code “ B ” or “ABC”.
DVD-Video
This unit plays DVD-Video marked
with labels containing the region
number “ 4 ” or “ALL”.

3
CAUTION 2
Table of Contents 3
Safety Information 4
Features and Accessories 5
Disc Information 6
About Discs, Remote control and USB 7
Product Overview 8~9
Front panel, Right Side panel 8
Back panel 8
Remote Control 9
Connections and Preparations 10~14
Quick Guide 10
Connecting to a TV (HDMI) 10
Connecting to a TV (Component) 11
Connecting to a TV (Video) 11
Connecting to an Audio System (2 Channel Ampli-
fier / receiver) 12
Connecting to an Audio System (HDMI
compatible Amplifier / receiver) 12
Connecting to an Audio System (Dolby*
Digital, MPEG2 or DTS* Amplifier) 13
Connecting to USB device 13
Connecting to Network 14
Connecting the power cord 14
Preparations and Easy Setup 15
Preparations 15
Easy Setup 15
Settings -- Changing settings with the Home
menu 16~23
Home menu operations 16
What you can change with the Home Menu 17
General Setting 16~20
Display Setting 20~21
Audio Setting 22~23
System Information 23
Video Output format (PAL) 23
Playback24~29
Normal Playback 24
Convenient Playback 24~26
Advanced Playback 27~29
Media Center Playback 30~31
Normal Playback 30
Advanced Playback - Photo files 31
Playlist 31
Frequently Asked Questions(FAQ32
Setting 32
Disc 32
USB 32
Network 32
Troubleshooting 33
Specifications 34
Glossary35
<IJTMWN+WV\MV\[

4
;INM\a1VNWZUI\QWV
disc player. If this occurs, turn the Blu-ray disc player
off and on again with the POWER button, or disconnect
and then reconnect the AC power cord to the AC power
outlet. The Blu-ray disc player will operate normally.
• Be sure to remove the disc and turn off the Blu-ray
disc player after use.
• Disconnect the AC power cord from the AC outlet
when you donʼt intend to use the Blu-ray disc player
for long periods of time.
• Clean the disc by wiping in a straight line from the
inside to the outside of the disc.
• Apparatus shall not be exposed to dripping or
splashing and no objects filled with liquids, such as
vases, shall be placed on the apparatus.
• The Mains plug is used as a disconnect device and
should remain accessible at all times.
Maintenance of Cabinet
For safety reasons, be sure to disconnect the AC power
cord from the AC outlet.
• Do not use benzene, thinner, or other solvents for
cleaning.
• Wipe the cabinet with a soft cloth.
Restrictions on Playback
•This player may not respond to all operating commands
because some BD, DVD or CD discs allow specific or
limited operation and features during playback. Please
note that this is not a defect in the player.
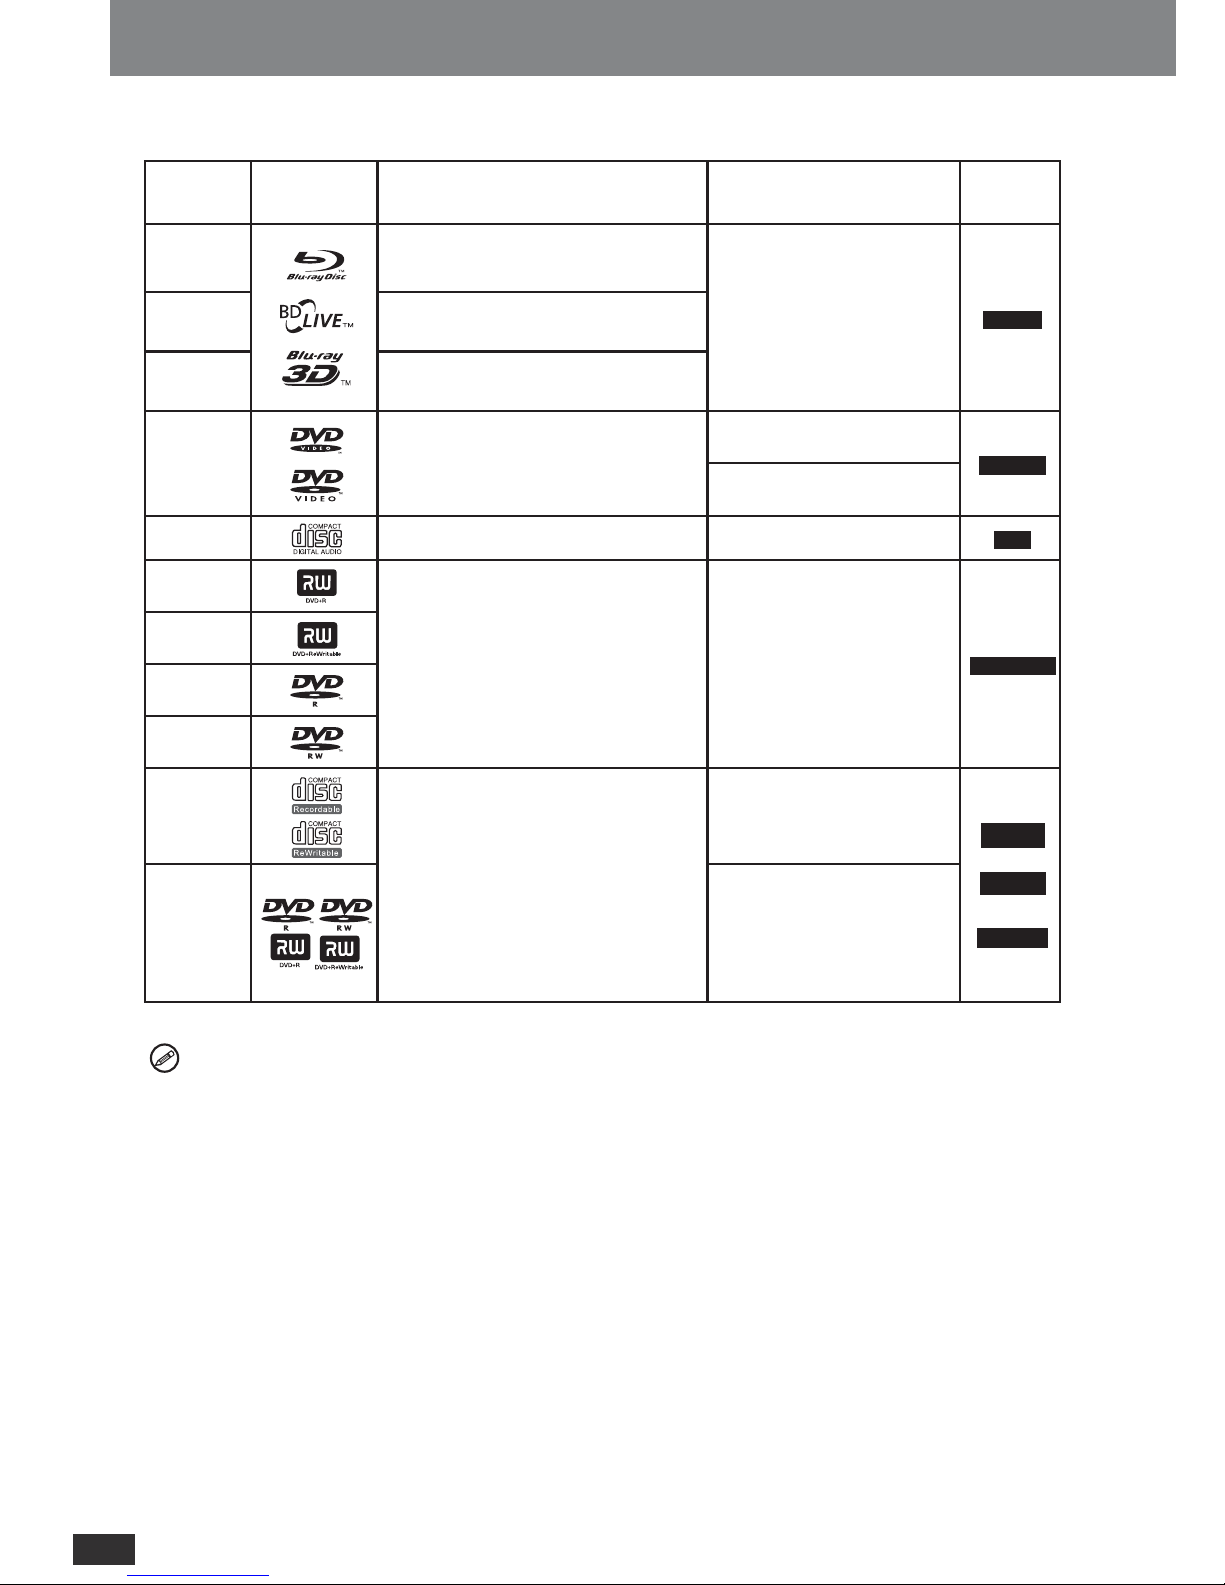
•We cannot assure that this player will play every disc
bearing the BD, DVD and CD logos because disc
formats may evolve, and problems and errors can occur
during the creation of BD, DVD and CD software and /
or the manufacture of discs. This player also operates
differently than a standard DVD Player or other AV equip-
ment.
Please refer to the rest of this Manual for additional infor-
mation on playback restrictions.
Notice for watching 3D video Images
• Some people may experience discomfort (such as
eye strain, fatigue, or nausea) while watching 3D
video images. We recommend that all viewers take
regular breaks while watching 3D video images.
• If you experience any discomfort, stop watching the
3D video images until the discomfort subsides.
Consult a doctor if you experience severe discomfort.
• Read the userʼs manuals (Blu-ray disc and TV)
and/or the caution messages that appear on the TV
carefully.
• The vision of young children (especially those under
six years old) is still under development. Consult
your doctor (such as a pediatrician or eye doctor)
before allowing young children to watch 3D video
images.
• Adults should supervise young children to ensure
they follow the recommendations described above.
Important Safety Instructions
Read these operating instructions carefully before using
the unit. Follow all the safety instructions listed below.
Keep these operating instructions handy for future refer-
ence.
1) Read these Instructions - All the safety and operat-
ing instructions should be read before the product is
operated.
2) Keep these Instructions - The safety and operating
instructions should be retained for future reference.
3) Heed all Warnings - All warnings on the product and
in the operating instructions should be adhered to.
4) Follow all Instructions - All operating and use instruc-
tions should be followed.
5) Do not use this apparatus near water.
6) Clean only with dry cloth.
7) Do not block any ventilation openings. Install in ac-
cordance with the manufacturerʼs instructions.
8) Do not install near any heat sources such as radia-
tors, heat registers, stoves, or other apparatus (including
amplifiers) that produce heat.
9) Do not defeat the safety purpose of the polarized or
grounding-type plug. A polarized plug has two blades
with one wider than the other. A grounding type plug
has two blades and a third grounding prong. The wide
blade or the third prong are provided for your safety. If
the provided plug does not fit into your outlet, consult an
electrician for replacement of the obsolete outlet.
10) Protect the power cord from being walked on or
pinched particularly at plugs, convenience receptacles,
and the point where they exit from the apparatus.
11) Only use attachments/accessories specified by the
manufacturer.
12) Use only with the cart, stand, tripod,
bracket, or table specified by the manufac-
turer, or sold with the apparatus. When the
cart is used, use caution when moving the
cart/apparatus
combination to avoid injury from tip-over.
13) Unplug this apparatus during lightning storm or when
unused for long periods of time.
14) Refer all servicing to qualified service personnel.
Servicing is required when the apparatus has been dam-
aged in any way, such as power-supply cord or plug is
damaged, liquid has been spilled or objects have falling
into the apparatus, the apparatus has been exposed to
rain or moisture, doesnot operate normally, or has been
dropped.
Handling Cautions
• Before connecting other components to this Blu-ray
disc player, be sure to turn them all off.
• Do not move the Blu-ray disc player while a disc is
being played, or the disc may be scratched or broken,
the Blu-ray disc player internal parts may be damaged.
• Do not put a flower vase filled with water or any small
metal objects on the Blu-ray disc player.
• Be careful not to put your hand into the disc tray.
• Do not place anything other than the disc in the disc
tray.
• Exterior interference such as lightning and static
electricity can affect normal operation of this Blu-ray

5
Player Features
gBD-ROM disc Playback
gBD-J disc Playback
g3D Blue-ray disc Playback
gDVD-Video disc Playback
gAudio files Playback (MP3, WMA)
gVideo files Playback (MKV, TS, AVI, MPG,
AVCHD)
Note: MKV and AVI files not support DivX.
gVideo files Playback (JPEG)
gUSB Playback (Hard Disc, USB stick)
gLPCM
gDolby Digital (AC3)
gDolby True HD, Dolby Lossless, Dolby
Digital Plus 2 channels original output
gDTS
gHDMI interface
gDigital Audio output interface
(coaxial,optical)
gOSC (On Screen Control)
Blu-ray disc Features
gIntroduction
Blu-ray Discs can store 25 GB (single layer) or 50 GB
(dual layer) on a single-sided disc - about 5 to 10 times
the capacity of DVD. As a result, Blu-ray Disc supports
the highest quality HD video available in the industry (up
to 1920 x 1080 at 40 Mbit/sec). Large capacity means
no compromise on video quality. Furthermore, a Blu-ray
Disc has the same familiar size and look as DVD, allow-
ing for compatibility with existing discs.
gCompatibility across full family
Users can play home-recorded discs on this Blu-ray
Disc Player; there are no playback compatibility issues
as with rewritable DVD formats. The Video Distribution
format was widely expanded to offer content producers a
full range of additional features unavailable in the home
recording format.
gVideo highlights
The BD-ROM format for movie distribution supports three
highly advanced video codecs, including AVC, VC-1 and
MPEG-2.
All consumer video resolutions are available:
- 1920 x 1080 HD (50i, 60i and 24p)
- 1280 x 720 HD (50p, 60p and 24p)
gAudio highlights
The BD-ROM format for movie distribution supports vari-
ous advanced audio codecs, so an author can choose
the most suitable for a particular application. The high
capacity and data rate of Blu-ray Disc allow for extreme
high quality audio in up to 8 channels to accompany
High Definition video. Final audio specifications include
DTS (DTS 5.1), Dolby Digital and LPCM (up to 96/24) .
Optionally.
gFor High-Definition Playback
To view high-definition contents in BD discs, an
HDTV (High Definition Television) is required. Some
discs may require using the playerʼs HDMI OUT to
view high-definition content. The ability to view
high-definition content on BD discs may be limited
depending on the resolution of your TV.
g“HDMV” mode
“HDMV” mode was designed to offer exciting new
features, while keeping the authoring process as simple
as possible. It streamlines the production of both Blu-
ray Disc as well as DVD-Video titles, as the production
process incorporates many identical phases. It offers
improved navigational and menu features, improved
graphics and animation, improved subtitling support and
new features like browsable slide shows.
Offers all features of DVD-Video and more. The author-
ing process is in line with DVD-Video creation
g“BD-J” mode
“BD-J” mode was designed to offer the content provider
almost unlimited functionality when creating interactive
titles. It is based on Java 2 Micro Edition, so program-
mers will quickly be familiar with the programming
environment for BD-J. Every Blu-ray Disc player will be
equipped with a Java interpreter, so that it is capable of
running discs authored in BD-J mode.
gGraphic planes
Two individual, full HD resolution (1920x1080) graph-
ics planes are available, on top of the HD video plane.
One plane is assigned to video-related, frame accurate
graphics (like subtitles), and the other plane is assigned
to interactive graphical elements, such as buttons or
menus. For both planes, various wipes, fades and scroll
effects are available, for example to present a menu.
gBD-LIVE
BD-LIVE is a newly developed Blu-ray feature that en-
ables you to access content via your internet-connected
Blu-ray player. BD-LIVE can allow you to download a
variety of up-to date content (e.g., refreshed previews,
ringtones, exclusive special features and events), and is
an entirely new experience for interactive content.
Accessories
ƽRemote Control h1
ƽBatteries for Remote Control (AAA type) h2
ƽAudio/Video cable h1
.MI\]ZM[IVL)KKM[[WZQM[

6
gDisc types that can be played
Disc Type Disc Logo Recorded Contents
Disc
(12cm)
Capacity
Indicated
as
BD-ROM,
BD-R,
BD-RE
High Definition (HD) movie and music
discs
Single layer(25GB)
Double layer(50GB) BD-V
BD-LIVE BD-LIVE
Blu-ray 3D 3D Video
DVD-ROM High quality movie and music discs
Single layer (4.7GB)
DVD-V
Double layer (8.5GB)
CD-ROM CDDA 650M; 700M CD
D V D + R
(Finalized)
DVD-Video
(AUDIO+VIDEO) 4.7GB
DVD-VR
D V D + R W
(Finalized)
DVD-R
(Finalized)
DVD-RW
(Finalized)
CD-R/RW
(Finalized)
Data disc.
Supported Audio File format: MP3, WMA,
AAC
Supported Video File format: MKV, TS,
AVI, MPG
Supported Picture File format: ˖JPEG
Supported others File format: AVCHD
650M; 700M
AU
DIO
VIDEO
PHOTO
DVD-R/RW;
D V D + R / R W
(Finalized)
4.7GB
Note
ƽIt may not be possible to play the above discs in some cases due to the type of discs, the condition of the
recording, the recording method and how the files were created. When these discs are played, “Unknown Disc”
will be displayed.
ƽDisc diameter: 12cm, 8cm. The Disc Shape and Max. Playing minute in the above figure is for the 12 cm disc.
ƽ“Finalized” means you must finalize the disc with the DVD recorder, etc. before playback. For details about
finalizing, refer to the operating instructions for your equipment.
ƽ
MKV and AVI files can not support DivX.
,Q[K1VNWZUI\QWV

7
)JW]\,Q[K[:MUW\MKWV\ZWTIVL=;*
USB Information
gSupport USB type: FAT32, NTFS
gSupport data format in USB memory
Supported Audio File format: *.MP3 / *.WMA
Supported Video File format: *.AVI / *.WMV
Supported Picture File format: *.JPEG / *.JPG
Supported Other File format: AVCHD
gSupport USB version: 1.1 / 2.0
Note
=Donʼt pull out the USB devise from the unit when
the USB light is flickering (such as updating process,
saving process for BUDA, playing recordings.)
=As a BUDA information storage, the USB type
must be FAT32.
Using Remote Control
gBatteries
Insert so the poles (+ and
-
) match those in the remote
control.
• Do not use rechargeable type batteries.
• Batteries shall not be exposed to excessive heat such
as direct sunlight, fire or the like.
• Do not mix old and new batteries.
• Do not use different types at the same time.
• Do not heat or expose to flame.
• Do not take apart or short circuit.
• Do not attempt to recharge alkaline or manganese
batteries.
• Do not use batteries if the covering has been peeled
off.
• Mishandling of batteries can cause electrolyte leakage
which can damage items the fluid contacts and may
cause a fire.
• Remove batteries if the remote control is not going to
be used for a long period of time.
• Store in a cool, dark place.
gUse
Disc Storage & Management
gDisc Handling
• Use discs with regular shapes. If an irregular disc
(a disc with a special shape) is used, this Blu-ray disc
player may be damaged.
• Avoid touching the surface of a disc where recording is
performed.
• Do not attach a bit of paper or sticky tape on it.
• If the player is not used for a long period of time, re-
move the Disc from the player and store it in its case.
• Be careful not to leave fingerprints or scratches on the
surface of the Disc, especially for the Blu-ray Disc.
Note
• Do not write on the printed side with a ball-point pen or
pencil.
• Do not use scratch-proof protectors or covers.
• Do not use discs printed with label printers available
on the market.
• Do not load warped or cracked discs.
gDisc Cleaning
• Before using it, please rub it from center toward outside
with clean clothes.
• Do not use any type of solvent such as thinner, benzol
(benzene), commercial cleaning goods or antistatic sprays.
gDisc Storage
Be careful not to harm the disc because the data on
these discs is highly vulnerable to the environment.
• Do not keep under direct sunlight.
• Keep in a cool ventilated area.
• Store vertically.
• Keep in a clean protection jacket.
• If you move your Blu-ray disc player suddenly from a
cold place to a warm place, condensation may generate
on the operating parts and lens and cause abnormal disc
playback. If this occurs, do not connect the plug to the
power outlet and wait for two hours. Then insert the disc
and try to play back again.
1 2 3
4 5 6
7 8
0
9
A B C D
٩ս࢟؎
౩ԩ ෳ
Ӹ࿄
ᇽҙ֍
߉ᇖ߉
ૉ฿ᇖྖ
ڳ߉
მင
ᇞڶ
A-BA-B
ಙ
௧ଥᇌ
ફ٩ ๛ᆿ ѳ٩
ᄧ๛
ഏ၉౾ ༶၉౾
ঀ ঀ࣐
ٙߴ
൜
ඇభ
ሺଥ მင
ხলᇍ߷
֗Ԣ൛
ҙ֍
ע
ҙ֍
30˚30˚
1:
7 U

8
gFront Panel, Right Side Panel
6<STOP
7POWER
8USB interface
9SD Card
8ZWL]K\7^MZ^QM_
123456798
78-6
1Disc tray
2IR
3
/
4OPEN or CLOSE
5
/
PLAY/PAUSE
123456987
gRear Panel
1POWER CORD SOCKET
2COMPONENT VIDEO OUT (Y, Pb, Pr)
3VIDEO OUT
4AUDIO OUT (L, R)
5HDMI OUT
6DIGITAL AUDIO OUT (COAXIAL)
7DIGITAL AUDIO OUT (OPTICAL)
8USB Interface
9LAN Interface

9
1. POWER Turns the BD player on or sets it to the standby mode.
2. ANGLE
Changes the camera angle if video is recorded with multiple angles. (28)
3. Color Buttons
The color buttons are used to implement disc-specific features on some BD
discs. These buttons have no effect for DVDs and CDs.
4. 0~9
- Selects a title/chapter/track number in Search function.(27)
- Inputs the search time in Search function.(27)
- Inputs password and IP settings.(19)
5. CLEAR Clears entered number/set item.
6. PIP Turns on.off the picture in picture mode.(31)
7. HOME Displays the Home menu.(16)
8. 2nd AUDIO Selects the 2nd picture audio.(31)
9. MEDIA CENTER Displays the Media center menu(32)
10. POP MENU Displays pop-up menu.
11. 3456 Direction Buttons
12. ENTER Confirms an entry or a selection.
13. DISC MENU
Displays BD/DVD disc menu
14. PREV.9
Skips to previous chapter / track or the beginning of the current chapter.
15. NEXT :Skips to next chapter / track.
16. SLOW
<
4
Pressing this button will cause the video to playback at ½, ¼, ¹/8speed.
17. STOP <Stops playback.
18. BOOKMARK Sets bookmarks.(28)
19. Not available.
20. OSC Displays On screen menu. (29)
21. SUBTITLE
Enable/disable subtitles during BD/DVD playback. If
the disc has more than one subtitle language, it can also be used to cycle
through the subtitle languages. (28)
Note: Not all discs have subtitles.
22. OPEN/CLOSE Opens/closes the disc tray.
23. ZOOM
Enlarges scenes during playback. (Not available for BD Discs.)(27)
24. SEARCH
This button is used with the numeric buttons to jump to a specific chapter/
title/track or time.(27)
25. REPEAT Changes repeat mode.(26)
26. PROGRAM Sets program order.(28)
27. A-B Plays back a specific part you want to repeat. (27)
28. RETURN Returns to the previous menu or screen, etc.
29. DISPLAY Opens/closes Display menu. (30)
30. F.F 8
Fast forward. Each time the button is pressed, the speed of fast forwarding
will increase in the following order: 2x, 8x, 16x, 32x, 150x, normal speed, 2x
(repeat).
Note: To resume normal (1x forward) playback at any time, press the
[PLAY
4
] button.
31. F.R 7
Fast reverse. Each time the button is pressed, the speed of fast reversing
will increase in the following order: 2x, 8x, 16x, 32x, 150x, normal speed, 2x
(repeat).
Note: To resume normal (1x forward) playback at any time, press the
[PLAY
4
] button.
32. PLAY 4 Starts normal audio and video playback.
33. PAUSE ;Pauses audio and video playback. Press [SLOW
<
4]
button during PAUSE mode can skip forward one frame.
34. DIGEST Shows the preview thumbnails on screen. You can
preview 12 thumbnails once. This function is only available during photos
playback.
35. AUDIO Changes the audio language or format.(26)
8ZWL]K\7^MZ^QM_
gRemote Control
1 2 3
4 5 6
7 8
0
9
A B C D
٩ս࢟؎
A-B
A-B
1
3
4
6
5
8
9
10
11
12
13
14
15
16
2
7
17
18
19
20
21
22
26
24
28
29
31
32
33
34
35
30
23
25
27
POWER
POWER
PROGRAM
PROGRAM
OPEN/CLOSE
OPEN/CLOSE
ZOOM
ZOOM
HOME
HOME
ENTER
ENTER
OSC
OSC
CLEAR
CLEAR
SLOW
SLOW
STOP
STOP
PAUSE
PAUSE
PLAY
PLAY
PREV.
PREV.
NEXT
NEXT
REW
REW F
.F
.F
PIP
PIP
RETURN
RETURN
DISPLAY
DISPLAY
POP-UP
POP-UP
MENU
MENU
TOP
TOP
MENU
MENU
2nd
2nd
Audio
Audio
GOTO
GOTO
ANGLE
ANGLE
BOOKMARK
BOOKMARK
MEDIA
MEDIA
CENTER
CENTER
SUBTITLE
SUBTITLE
DIGEST
DIGEST
AUDIO
AUDIO
REPEAT
REPEAT

10
+WVVMK\QWV[IVL8ZMXIZI\QWV[
gQuick Guide
Please choose one of the following connection methods
that fits your TV viewing environment best according to
your TV setʼs jacks.
Connecting to a TV with HDMI Jack
Ú
Ú
Connecting to a TV (Component)
Connecting to a TV(Video)
You can use your TV set to output Audio, also you can
use an individual Audio system to output Audio.
If you use an individual Audio system, please choose one
of the following connection methods that fits your Audio
system best.
Connecting to an Audio System
(2 Channel Amplifier)
Ú
Ú
Connecting to an Audio System
(Dolby Digital, MPEG2 or DTS Amplifier)
Connecting to an Audio System
(HDMI supported Amplifier)
Note Before Connections
=Always turn off the Blu-ray disc player, TV and other
components before you connect or disconnect any
cables.
=Refer to the userʼs manual of additional components
(such as a TV) you are connecting for more information
on those particular components.
gConnecting to a TV (HDMI) - Best
1. Using the HDMI-HDMI cable (not included) connect
the HDMI OUT terminal on the rear of the Blu-ray disc
player to the HDMI IN terminal of your TV.
2. Press the input selector on your TV remote control un-
til the HDMI signal from the Blu-ray disc player appears
on your TV screen.
HDMI IN
Back of the unit
HDMI
compatible
television
HDMI cable
Note
=If your TV set supports HDMI, please select HDMI
jack first.
=If use HDMI jack to connect, please set the video
and audio settings in Home menu, please refer to page
21~22.
=Depending on your TV, certain HDMI output
resolutions may not work. Please refer to the userʼs
manual of your TV.
=HDMI connection supports video and digital audio
data (LPCM or Bitstream).
=HDMI outputs only a pure digital signal to the TV.
=After detected that HDMI jack has been connected,
the unit will use the HDMI jack to output video signal
automatically.
Connection for the playback of 3D discs
To enjoy Blu-ray 3D discs on this Player, you need
the following equipments and connections:
=You need a TV and an AV Receiver (if you need) that
have 3D functionality.
=All the components must be connected with HDMI
cables.
=Blu-ray disc should contain 3D images.
=Please refer to the userʼs manual of your TV and AV
Receiver.

11
+WVVMK\QWV[IVL8ZMXIZI\QWV[
gConnecting to a TV (Video)
1. Using video/audio cables, connect the VIDEO
(yellow)/AUDIO (red and white) OUT terminals on the
rear of the Blu-ray disc player to the VIDEO (yellow)
/AUDIO (red and white) IN terminals of your TV.
AUDIO INVIDEO INR L
Back of the unit
Television
Audio/Viedo +IJTM
(1VKT]LML)
Note
=If your TV set supports HDMI, please select HDMI
jack first, then select Component as the second choice.
=Noise may be generated if the audio cable is placed
too close to the power cable.
=The number and position of terminals may vary
depending on your TV set. Please refer to the userʼs
manual of your TV.
=The video output resolution should always be 576i
(PAL) if you select this connection mode. You need not
to set the resolution in Home menu anymore.
=If you select another resolution by mistake, the
screen will be black and display: “Please connect HDMI
cable”. At that time, please keep pressing the [HOME]
button for more than 5 seconds, then the screen will
return normal again.
gConnecting to a TV (Component)
Connecting to your TV using Component video cables.
- You will enjoy high quality and accurate color
reproduction images. Component video separates the
picture element into black and white (Y), blue(PB), red
(PR) signals to present clear and clean images. (Audio
signals are delivered through the audio output.)
1. Using component video cables (not included),
connect the COMPONENT VIDEO OUT terminals on the
rear of the Blu-ray disc player to the COMPONENT IN
terminals of your TV.
2. Using the AV cables (included), connect the AUDIO
(red and white) OUT terminals on the rear of the Blu-ray
disc player to the AUDIO (red and white) IN terminals of
your TV.
COMPONENT
VIDEO IN
AUDIO IN
R L
Back of the unit
Television
Audio/Video cable
(included)
Component
Video cable
Note
=If your TV set supports HDMI, please select
HDMI jack first.
=Depending on the manufacturer, the compo-
nent terminals on your TV may be marked “R-Y,
B-Y, Y” or “Cr, Cb, Y” instead of “PR, PB, Y”. The
number and position of terminals may vary de-
pending on the TV set.
Please refer to the userʼs manual of your TV.
=If using Component jacks to connect, please set
the “Video-Resolutions” settings in Home menu,
please refer to page 21.
Notice
ʻCONSUMERS SHOULD NOTE THAT NOT ALL HIGH DEFINI-
TION TELEVISION SETS ARE FULLY COMPATIBLE WITH THIS
PRODUCT AND MAY CAUSE ARTIFACTS TO BE DISPLAYED
IN THE PICTURE. IN CASE OF 525 PROGRESSIVE SCAN
PICTURE PROBLEMS, IT IS RECOMMENDED THAT THE
USER SWITCH THE CONNECTION TO THE ʻSTANDARD DEFI-
NITIONʼ OUTPUT. IF THERE ARE QUESTIONS REGARDING
OUR TV SET COMPATIBILITY WITH THIS MODEL 525p DVD
PLAYER, PLEASE CONTACT OUR CUSTOMER SERVICE
CENTER.ʼ

12
+WVVMK\QWV[IVL8ZMXIZI\QWV[
Note Before Connect an Audio System
=When connected to an HDMI compatible television with HDMI cable, please set the television Audio to “Off”, (Other-
wise, the sound is output from the television.)
=Please turn the volume down when you turn on the Amplifier. Sudden loud sound may cause damage to the speakers
and your ears.
gConnecting to an Audio System (2 Channel Amplifier / receiver)
1. Using the audio cables, connect the AUDIO (red and white) OUT terminals on the rear of the Blu-ray disc player to the
AUDIO (red and white) IN terminals of your Amplifier.
AUDIO IN
R L
Back of the unit
Audio/Video cable
(included)
2ch Amplifier/receiver
gConnecting to an Audio System (HDMI compatible Amplifier / receiver)
When connected to a compatible amplifier / receiver, you can enjoy surround sound recorded with Dolby Digital Plus,
Dolby TrueHD or DTS-HD.
1. Using the HDMI-HDMI cable (not included), connect the HDMI OUT terminal on the rear of the Blu-ray disc player to
the HDMI IN terminal of your Amplifier.
2. Using the HDMI-HDMI cable connect the HDMI OUT terminal of the Amplifier to the HDMI IN terminal of your TV.
Note
=The position of terminals may vary depending on the Amplifier. Please refer to the userʼs manual of your Amplifier.
=Please set the video and audio settings in the Home menu according to the Amplifier, please refer to page 22~23.
=Depending on how the disc was recorded, the audio may not be output properly on the number of channels desired.
HDMI IN
HDMI OUT
HDMI IN
HDMI KIJTM
Back of the unit
HDMI
compatible
television
HDMI compatible
amplifier/receiver

13
+WVVMK\QWV[IVL8ZMXIZI\QWV[
gConnecting to an Audio System (Dolby* Digital, MPEG2 or DTS* Amplifier)
1. If using an optical cable (not included), connect the DIGITAL AUDIO OUT (OPTICAL) terminal on the rear of the Blu-ray
disc player to the DIGITAL AUDIO IN (OPTICAL) terminal of your Amplifier.
OR,
If using a coaxial cable (not included), connect the DIGITAL AUDIO OUT (COAXIAL) terminal on the rear of the Blu-ray
disc player to the DIGITAL AUDIO IN (COAXIAL) terminal of the Amplifier.
OPTICAL IN
COAXIAL IN
Back of the unit
Coaxial cable
Optical cable
Amplifier/receiver with a built-in decoder
or a decoder-amplifier/receiver combination
Note
=The position of terminals may vary depending on the Amplifier. Please refer to the userʼs manual of your Amplifier.
=Please set the digital audio output settings in the Home menu according to the Amplifier, please refer to page 23.
=Depending on how the disc was recorded, the audio may not be output properly on the number of channels desired.
gConnecting to USB device
1. Using the USB cable (if necessary), connect the USB device to the unit.
Front of the unit
USB,M^QKM
Back of the unit
USB,M^QKM
Note
=Donʼt pull out the USB devise from the unit when the USB device is in use.
=Donʼt pull out the USB devise or power off the USB devise during BD-J discsʼ playback.

14
+WVVMK\QWV[IVL8ZMXIZI\QWV[
gConnecting to Network
1. Using the LAN cable (not included), connect the unit to the Network.
Back of the unit
Lan cable
Connect to Internet
Note
=After connect the LAN cable to Network, you should setup the Network Settings in Home menu before use the Network
features, please refer to page 19~20.
gConnecting the power cord
1. Using the power cord (included), connect the 100-240V 50/60Hz socket on the rear of the Blu-ray disc player to the
wall power socket.
Back of the unit
AC power supply cord
(included)
Note: Connect only after
all other connections are
completed.
To a household AC outlet
(AC 100-240 V, 50/60 Hz)
Note
=Turn off all equipment before changing connections and read the appropriate operating instructions.

15
8ZMXIZI\QWV[IVL-I[a;M\]X
+PIVOM_QTTJMIXXTQMLQUUMLQI\MTaaW]
PI^M[\WLM\MZUQVM_PM\PMZ\W[I^M\PM
[M\\QVOWZZWTTJIKS\WXZQWZZM[WT]\QWV*M\\MZ
XMZNWZUIVKM_QTTJMXZW^QLMLJaI0,51
KWVVMK\QWV
+PWW[M
IZM[WT]\QWV\PI\NQ\aW]Z<>
88
8
1
8
)]\W
8IOM"31VQ\QIT?QbIZL
6M`\8ZM^QW][ -6<-:
Select the aspect ratio
Press [5] / [6] to select a aspect ratio that
fit your TV, then press [ENTER] to confirm.
4
+PIVOM_QTTJMIXXTQMLQVVM`\XIOMaW]
[PW]TLLM\MZUQVM_PM\PMZ\W[I^M\PM
[M\\QVOWZZWTTJIKS\WXZQWZI[XMK\ZM\QW
+PWW[M
IVI[XMK\ZI\QW\PI\NQ\aW]Z<>
"!6WZUIT
"8IV;KIV
"4M\\MZJW`
"!.]TT
8IOM" 1VQ\QIT?QbIZL
6M`\8ZM^QW][ -6<-:
Finish the Easy Setup
Press [ENTER] to finish the Easy Setup.
Press ˷9˹can return to the previous
menu.
5
6W_XZM[[.QVQ[PJ]\\WV\WOW\W0WUM
5MV]8TMI[MMVRWaQ\
;M\\QVO
_QbIZLQ[JMNQVQ[PMLƌ
8IOM" 1VQ\QIT?QbIZL
.QVQ[P8ZM^QW][ -6<-:
Note
= After Easy Setup, you have no need to set these
settings in the following operations.When you want to
change these settings, please press [HOME] to enter
the Home Menu / General Setting / System and then
select the Easy Setup option.
NOTE
= Instructions for operations are generally
described using the remote control in these
operating instructions.
gPreparations
Turn on the television and select the appro-
priate video input (the input the Blu-ray disc
player is connected to) on the television.
If you connected an external Audio System,
turn on your Audio System and set it to the
correct Audio Input.
Press [POWER / I] button to turn on the
Blu-ray disc player.
gEasy Setup
When you use the unit for the first time, the Easy
Setup menu will display on the screen automati-
cally.You can set the OSD language, resolution,
aspect ratio with the Easy Setup quickly.
Welcome screen
Press˷ENTER˹to start the Easy Setup.
1VQ\QIT?QbIZL
6M`\
-6<-:
;WUM[QUXTM[M\\QVO[IZMVMMLMLJMNWZM
aW]MVRWaQ\8TMI[MUISMLM\IQT[M\\QVO[WN
PWUMUMV]TI\MZ
?MTKWUM
\W][M*,8TIaMZ;M\\QVO?QbIZLƌ
8IOM"
Select the OSD language
Press [5] / [6] to select OSD language,
then press [ENTER] to set the next setting.
Select the resolution
Press [5] / [6] to select a resolution that fit
your TV, then press [ENTER] to set the next
setting.Operate according to the instruc-
tions on the screen.
2
3
3
15
1
2
4

16
;M\\QVO[+PIVOQVO[M\\QVO[_Q\P\PM0WUMUMV]
gHome menu operations
For your convenience, configure proper settings
for the external device to connect or any other
environment before using the BD Player.
Press [HOME] button to display the Home
Menu.
0WUM5MV]
/MVMZIT;M\\QVO
;a[\MU
4IVO]IOM
8TIaJIKS
;MK]ZQ\a
6M\_WZS
=[MK]Z[WZSMa\WUW^MNWK][][M
õ-V\MZöSMa\W[MTMK\ -`Q\
;-<=8
Note
=Depending on the condition of the unit (play-
ing, stopped, etc.), sometimes you need to press
[HOME] twice to display the Home Menu.
Select the setting column
Press [3] or [4] to select the column, then
press [ENTER] to confirm.
The four columns you can select are:
General Setting: contains five sub-
menus, they are “System“, “Language“,
“Playback“, “Security” and “Network”.
Display Setting: contains two sub-
menus, they are “TV” and “Video Process”.
Audio Setting: contain two submenu,
they are “Audio Output” and “Speaker Setting”.
System Information: shows the soft-
ware version and MAC adress.
1
2
Press [5] or [6] to select the sub-menu
and press [ENTER]. For example, select
“System” then press [ENTER], the following
menu will display.
Press[3] / [4] / [5] / [6] to select the
settings in the sub-menu and press [ENTER]
to confirm.
7V
7NN
;KZMMV;I^MZ
,Q[K)]\W8TIaJIKS
=XOZILM
,Q[K)]\W=XOZILM
4WIL,MNI]T\
4IVO]IOM
8TIaJIKS
;MK]ZQ\a
6M\_WZS
;a[\MU
0WUM5MV]
/MVMZIT;M\\QVO
=[MK]Z[WZSMa\WUW^MNWK][][M
õ-V\MZöSMa\W[MTMK\ -`Q\
;-<=8
Note
=Depending on the condition of the unit (playing,
stopped, etc.) and disc contents, there may be
some items that you cannot select or change.
Press[3] to return to the previous menu,
then press [3] / [4] / [5] / [6] to select
the next setting, then repeat step 2~4 to set
it.
Press [HOME] button again to quit the Home
Menu; Press [RETURN] or [3] button to go
back one level in the Home menu.
5
3
4
7V
7V
5WZM
7V
5WZM
;KZMMV;I^MZ
,Q[K)]\W8TIaJIKS
=XOZILM
,Q[K)]\W=XOZILM
4WIL,MNI]T\
4IVO]IOM
8TIaJIKS
;MK]ZQ\a
6M\_WZS
;a[\MU
0WUM5MV]
/MVMZIT;M\\QVO
=[MK]Z[WZSMa\WUW^MNWK][][M
õ-V\MZöSMa\W[MTMK\ -`Q\
;-<=8
7V
7NN
0WUM5MV]
/MVMZIT;M\\QVO
=[MK]Z[WZSMa\WUW^MNWK][][M
õ-V\MZöSMa\W[MTMK\ -`Q\
;-<=8
;KZMMV;I^MZ
,Q[K)]\W8TIaJIKS
=XOZILM
,Q[K)]\W=XOZILM
4WIL,MNI]T\
4IVO]IOM
8TIaJIKS
;MK]ZQ\a
6M\_WZS
;a[\MU
6

17
;M\\QVO[+PIVOQVO[M\\QVO[_Q\P\PM0WUMUMV]
gWhat you can change with the Home Menu
Menu Setting
column
Sub-Menu Settings and Explanation
General
Setting System
Screen Saver = On
This function will turn the unit to “Screen Saver” mode when there
is no operation during STOP mode for more than 3 minutes.
This function will turn the unit to “Standby” mode when there is no
operation during “Screen Saver” mode for more than 6 minutes.
= Off
Shuts down this function.
Disc Auto Playback = On
This function will activate the unit to auto playback when a disc has
been loaded.
= Off
Shuts down this function.
Load Default This function will restore the unit to default settings.
4WIL,MNI]T\
,WaW]_IV\\WTWILLMNI]T\ƪ
73 +IVKMT
Use[3] / [4] keys to selectǏOKǐˈthen press [ENTER] to re-
store the default settings. SelectǏCancelǐto quit the dialog box.
Upgrade = Disc
Insert a USB Storage with upgrade data, then activate this function
to upgrade the unit software.
= USB Storage
Insert a USB Storage with upgrade data, then activate this function
to upgrade the unit software.
=XOZILM
6W^ITQL]XOZILMNQTMQ[NW]VL
8TMI[MQV[MZ\\PMZQOP\WVM
+IVKMT
=XOZILM
=XOZILM
Easy Setup Select this function will activate the “Easy Setup” Menu. Please to
refer to page 14.
BUDA
˄Only for BD-J discs˅
= BUDA Information
*=,)1VNWZUI\QWV
.ZMM[QbMQ[" 5*
.U\J]LI
USB Storage can save the BD-J discʼs BUDA information. If the stor-
age is insufficient, you can select ǏFmt budaǐto release space
= BUDA Setup
Select USB: Use a USB disc (FAT 32 format) as the BUDA memory.

18
;M\\QVO[+PIVOQVO[M\\QVO[_Q\P\PM0WUMUMV]
Menu Setting
column
Sub-Menu Settings and Explanation
General
Setting
Language
OSD = English = Japan
Set the on-screen display language.
Menu = English = More
Sets the Menu/Audio language.
If the desired language is not Japanese, you can select “More“ to
display a language select dialog box to select more languages.
Audio
Subtitle = English = More = Off
Sets the subtitle language.
If the desired language is not Japanese, you can select “More“ to
display a language select dialog box to select more languages.
If you dontʼt need any subtitle, select “Off“.
Playback
Angle Mark = On
= Off
Sets to display the Angle Mark when BD/DVD with multiple angles
is played back.
PIP Mark = On
= Off
Sets to display the PIP Mark when BD/DVD with picture in picture
is played back.
Secondary Audio = On
= Off
Sets to display the Secondary Audio Mark when BD/DVD with
secondary audio is played back.
Last Memory = On
This function will activate the unit to store 6 discʼs playback posi-
tion. When you load these discs again, you can select to start
playback from the stored position or not.
= Off
Shut down this function.
Security
Change Password Select this function and press [ENTER], the following dialog box
displays. Use the [0] - [9] keys to enter the current password.
+PIVOM8I[[_WZL
8TMI[MMV\MZK]ZZMV\XI[[_WZL"
Then the following dialog box displays. Use the [0] - [9] keys to
enter the new password for two times.
+PIVOM8I[[_WZL
6M_XI[[_WZL"
+WVNQZUXI[[_WZLƥ
The initial password is˖0000DŽ
HINT:
< Once a new Parental Password is saved, it must be re-entered
any time someone attempts to change an item in the parental
setup menu category.
< If you reset the settings to the factory default settings, refer to
page 17, the ʻParental Passwordʼ you have set will remain.

19
;M\\QVO[+PIVOQVO[M\\QVO[_Q\P\PM0WUMUMV]
Menu Setting
column
Sub-Menu Settings and Explanation
General
Setting
Security
Parental Control If you want to change the Parental Control setting, you need to ent-
ter the Password first.
Then following dialog box displays, use [5] / [6] to select Paren-
tal Control Rating lever, and press [ENTER] to confirm.
8IZMV\IT+WV\ZWT
;MTMK\4M^MZƥ
31,;).-
Ʋ
7NN
MPAA moving Rating
Rating
KID SAFE
G
PG
PG-13
PGR
R
NC-17
ADULT
Country Code If you want to change the Country Code setting, you need to enter
the Password first.
Then following dialog box displays, use [5] / [6] to select country,
and press [ENTER] to confirm.
+W]V\Za+WLM
;MTMK\:MOQWVƥ
=VQ\ML;\I\M[
=VQ\ML;\I\M[
=VQ\ML3QVOLWU
Network
Internet Connection = Enable
= Disable
This item will turn on the network. If you want to use BD-Live
function, turn on the network first.
Interface = Ethernet
= Wireless
Selects the network interface mode. If you use lan cable to connect
network, please select “Ethenet”; if you use a Wireless network
adapter to connect network, please select “Wireless”.
Information Displays the Network information.
Connection Test Performs the Network connection test.

20
;M\\QVO[+PIVOQVO[M\\QVO[_Q\P\PM0WUMUMV]
Menu Setting
column
Sub-Menu Settings and Explanation
General
Setting Network
IP Setting = Auto
Select to automatically configure the network settings of the unit .
= Manual
Select to configure the network settings (IP address, Subnet Mask,
Default Gateway, and DNS) manually. Use the numeric buttons,
direction buttons, [CLEAR] button and [ENTER] button.
Press [RETURN] to quit the IP Settings.
Network Information
Interface Ethernet
Address Type Manual
18 Address
Subnet Mask
Default Gateway
DNS1
DNS2
192. 168. 0. 102
255. 255. 0
168. 0. 1
168. 0. 1
0.
255.
192.
168.
0. 0. 0
Wireless Setting = Search
Select to search available wireless networks, then input password
if necessary.
BD-Live Connection Sets the BD-LIVE connection mode.
= Permitted
Allows all BD-Live discs to connect the network.
= Partial Permitted
Allows only discs with owner certification.
= Prohibited
Prohibits all BD-Live discs to connect the network.
Display
Setting
TV
TV Screen If the aspect ratio of you TV screen is 16:9.
= 16:9 Full--------------------------------------------
= 16:9 Normal---------------------------------------
If the aspect ratio of you TV screen is 4:3.
= 4 : 3 Pan@Scan----------------------------------
= 4 : 3 Letterbox-------------------------------------
Resolution Selects the video output resolution. When set to Auto, resolution is
set to the maximum resolution according to the connected TV. For
more details on output formats, refer to table in page 23.
= Auto
= 480P/576P
= 720P
= 1080I
= 1080P
TV System = NTSC
= PAL
= Multi
Select the same TV System as your TV set.
Table of contents
Other Kogan Blu-ray Player manuals

Kogan
Kogan KGNBD2VBA User manual

Kogan
Kogan KABRP21X3DAA User manual

Kogan
Kogan KABRP21WFIA User manual

Kogan
Kogan KABRP21SLMB User manual

Kogan
Kogan KABRP21WFIAA User manual

Kogan
Kogan KABRP21SLMA User manual

Kogan
Kogan KABRP3DWFIA User manual

Kogan
Kogan KABRP3D4KUA User manual

Kogan
Kogan KABRP3D4KUA User manual

Kogan
Kogan KGNBD2A User manual