manuals.online logo
Brands
  1. Home
  2. •
  3. Brands
  4. •
  5. Kogan
  6. •
  7. Blu-ray Player
  8. •
  9. Kogan KABRP3D4KUA User manual

Kogan KABRP3D4KUA User manual

Other manuals for KABRP3D4KUA

1

This manual suits for next models

1

Other Kogan Blu-ray Player manuals

Kogan KABRP21WFIAA User manual

Kogan

Kogan KABRP21WFIAA User manual

Kogan KABRP3DWFIA User manual

Kogan

Kogan KABRP3DWFIA User manual

Kogan KGNBD2VBA User manual

Kogan

Kogan KGNBD2VBA User manual

Kogan KABRP21SLMB User manual

Kogan

Kogan KABRP21SLMB User manual

Kogan KABRP21SLMA User manual

Kogan

Kogan KABRP21SLMA User manual

Kogan KABRP21X3DAA User manual

Kogan

Kogan KABRP21X3DAA User manual

Kogan KABRP21WFIA User manual

Kogan

Kogan KABRP21WFIA User manual

Kogan KABRP3D4KUA User manual

Kogan

Kogan KABRP3D4KUA User manual

Kogan KABRP21X3DB User manual

Kogan

Kogan KABRP21X3DB User manual

Kogan KGNBD2A User manual

Kogan

Kogan KGNBD2A User manual

Popular Blu-ray Player manuals by other brands

Samsung HT-E5200 user manual

Samsung

Samsung HT-E5200 user manual

Memorex MVBD2535 user guide

Memorex

Memorex MVBD2535 user guide

Insignia NS-BRDVD Faqs

Insignia

Insignia NS-BRDVD Faqs

Philips BDP3380K Specifications

Philips

Philips BDP3380K Specifications

Samsung BD-P4600 Service manual

Samsung

Samsung BD-P4600 Service manual

Sharp BD-HP17U - AQUOS 1080p Blu-ray DiscTM Player Service manual

Sharp

Sharp BD-HP17U - AQUOS 1080p Blu-ray DiscTM Player Service manual

Pioneer BDP-140 Features & specifications

Pioneer

Pioneer BDP-140 Features & specifications

LG HLX50W owner's manual

LG

LG HLX50W owner's manual

Sony BDP-S300 - Blu-Ray Disc Player operating instructions

Sony

Sony BDP-S300 - Blu-Ray Disc Player operating instructions

Panasonic DMR-HCT230 operating instructions

Panasonic

Panasonic DMR-HCT230 operating instructions

LG BD611 owner's manual

LG

LG BD611 owner's manual

Panasonic Diga DMR-PWT420 operating instructions

Panasonic

Panasonic Diga DMR-PWT420 operating instructions

LG UBK80.DUSALLK owner's manual

LG

LG UBK80.DUSALLK owner's manual

Marantz BD7004 Guide de l'utilisateur

Marantz

Marantz BD7004 Guide de l'utilisateur

Toshiba BDX2700 Specifications

Toshiba

Toshiba BDX2700 Specifications

Samsung BD-E5400 user manual

Samsung

Samsung BD-E5400 user manual

Sony BDP-S185 Specifications

Sony

Sony BDP-S185 Specifications

Philips BDP7100 quick start guide

Philips

Philips BDP7100 quick start guide

manuals.online logo
manuals.online logoBrands
  • About & Mission
  • Contact us
  • Privacy Policy
  • Terms and Conditions

Copyright 2025 Manuals.Online. All Rights Reserved.

Table of Contents
Safety Notices...........................................................................................................................................................................................2
Notice....................................................................................................................................................................................................2
Placement............................................................................................................................................................................................2
Power Supply.....................................................................................................................................................................................2
Adjusting Volume.............................................................................................................................................................................2
Cleaning................................................................................................................................................................................................2
Cleaning discs.....................................................................................................................................................................................2
Connecting to the HD I OUT port............................................................................................................................................2
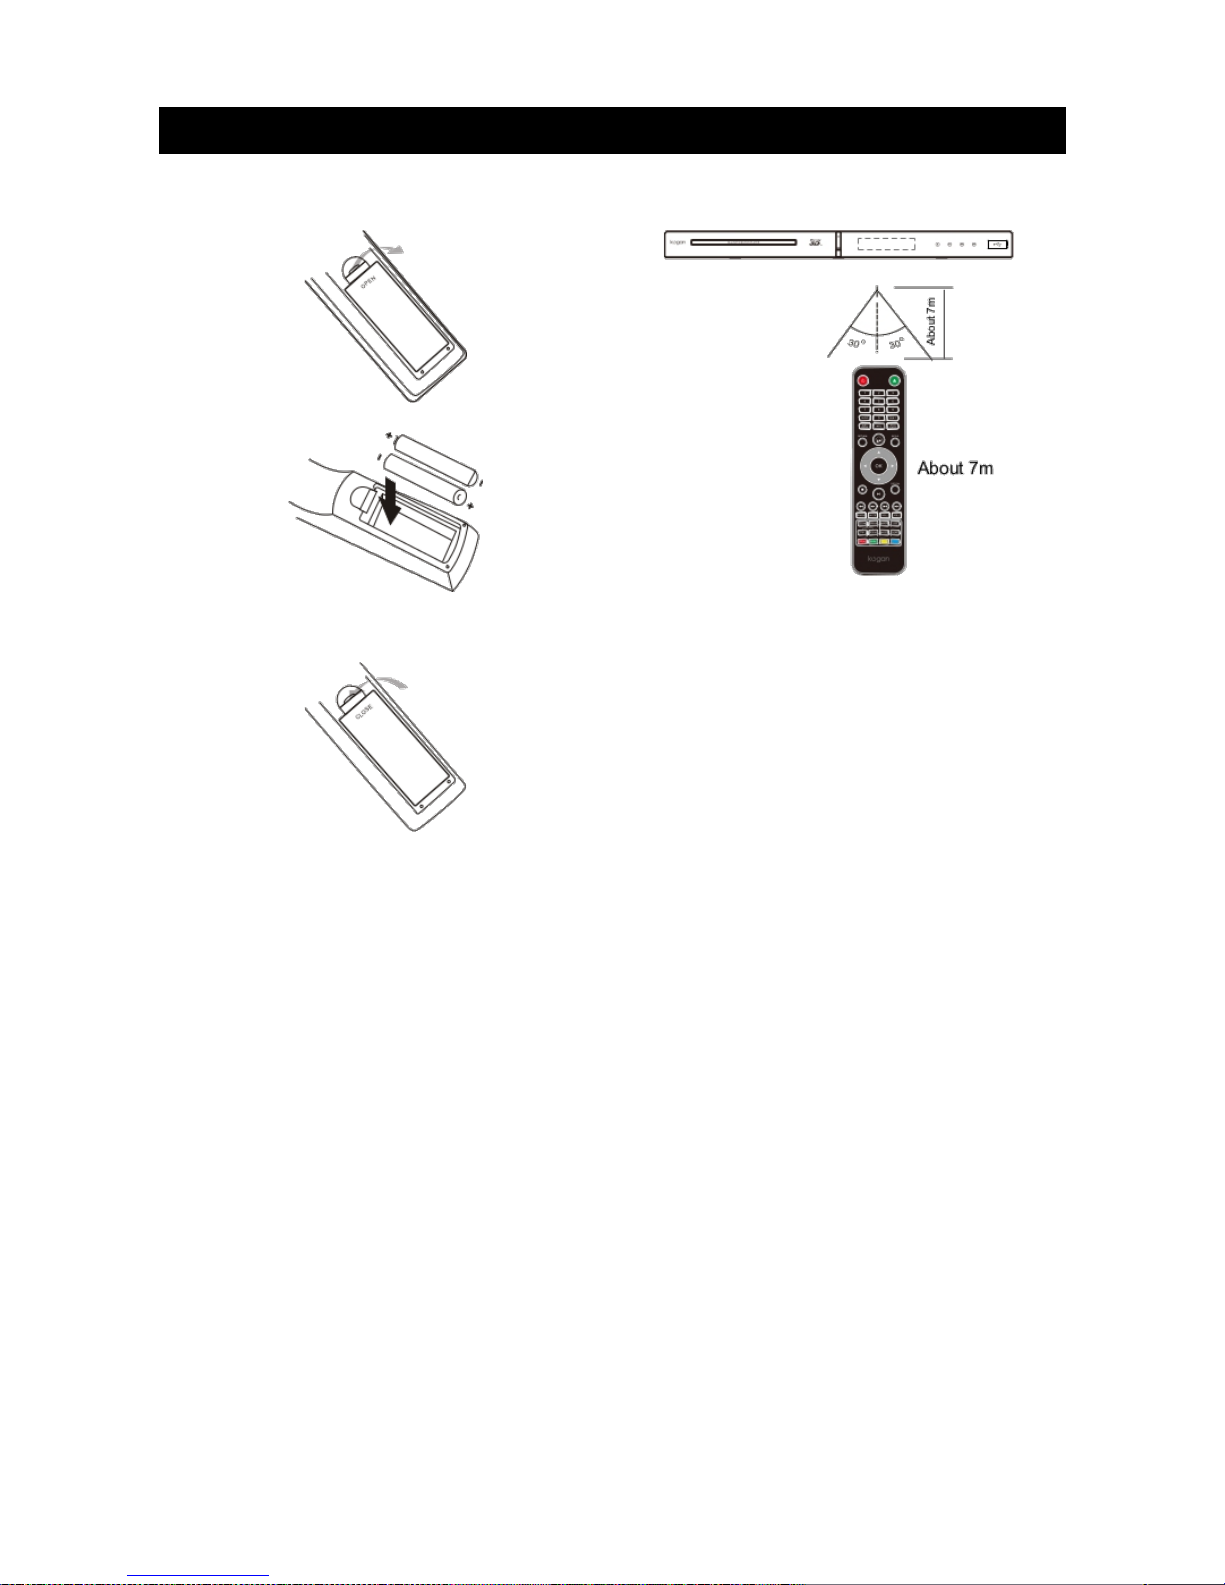
Using the Remote Control & Battery...............................................................................................................................................3
Notes for remote control operation..........................................................................................................................................3
Using Discs................................................................................................................................................................................................4
Product Description...............................................................................................................................................................................5
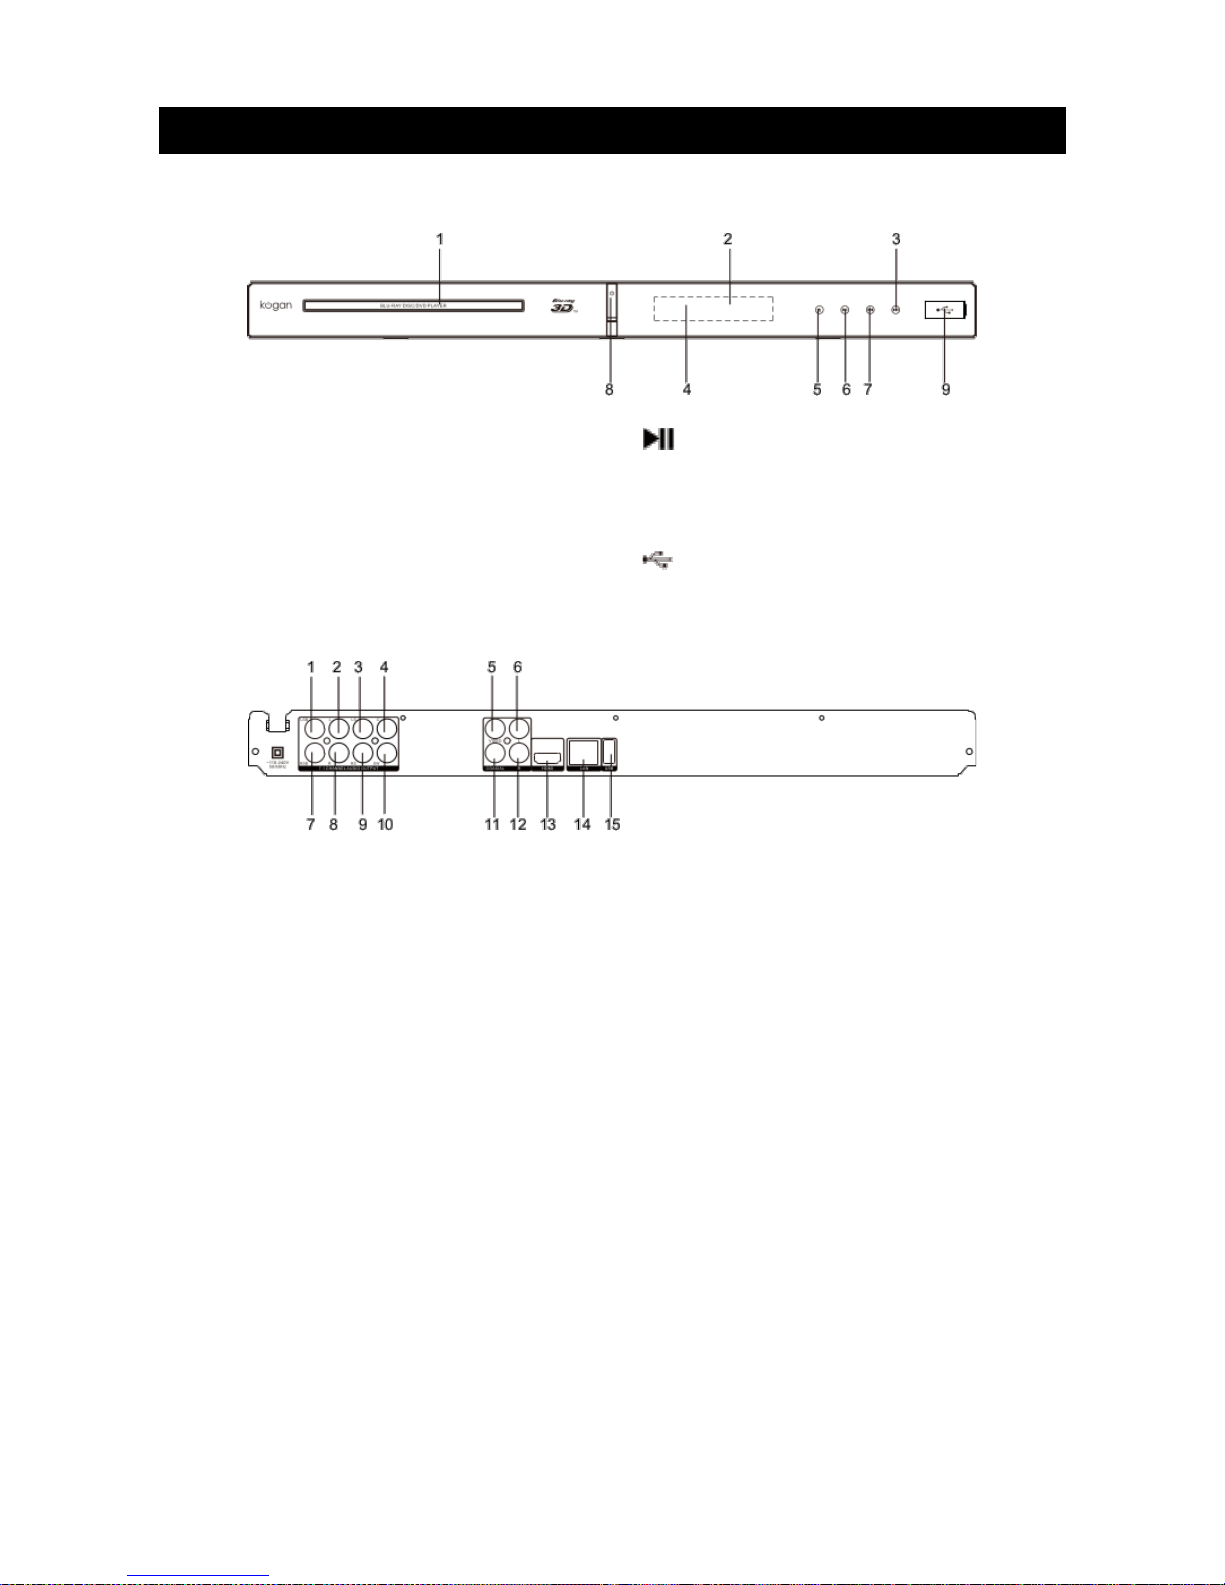
Front panel..........................................................................................................................................................................................5
Rear panel............................................................................................................................................................................................5
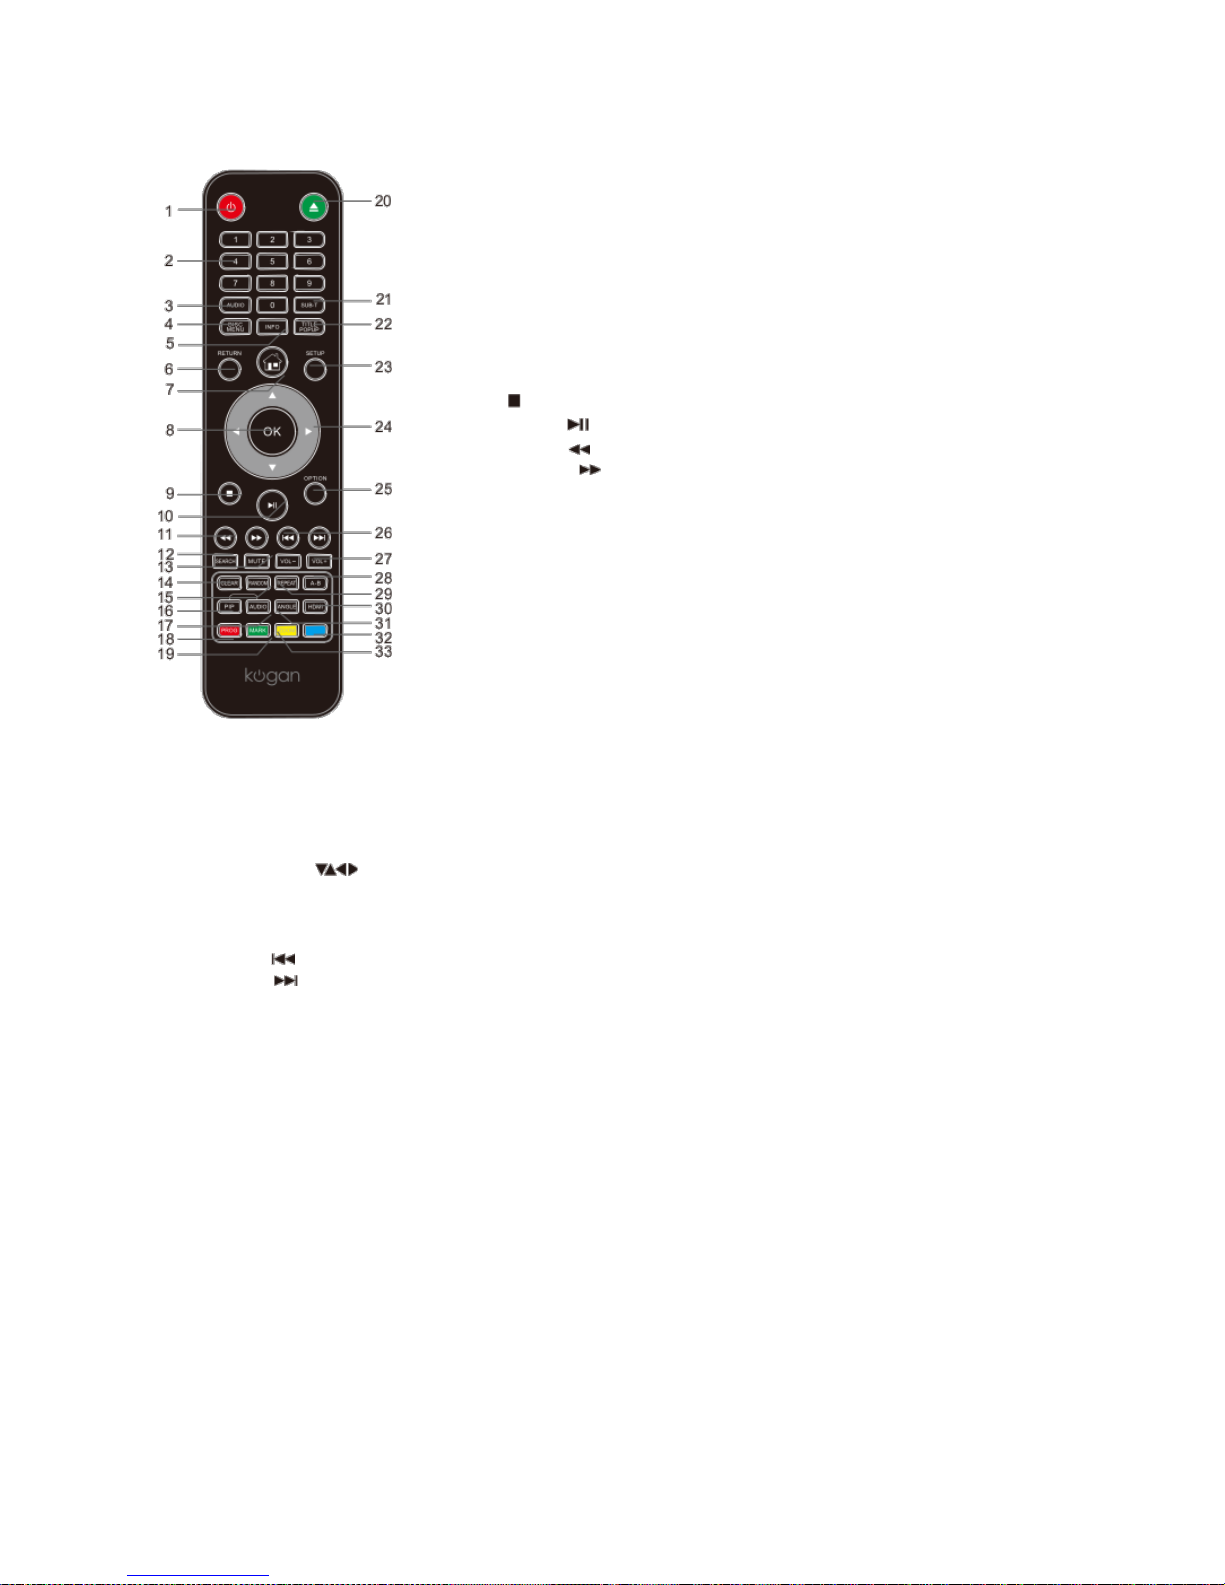
Remote Control.................................................................................................................................................................................6
Device Connections................................................................................................................................................................................7
Video and component input.........................................................................................................................................................7
Connecting 7.1 channel analog input amplifier......................................................................................................................7
Coaxial and Optical connection .................................................................................................................................................7
HD I connection .............................................................................................................................................................................8
Network connection .......................................................................................................................................................................8
Playing – Advanced Playing Operations........................................................................................................................................9
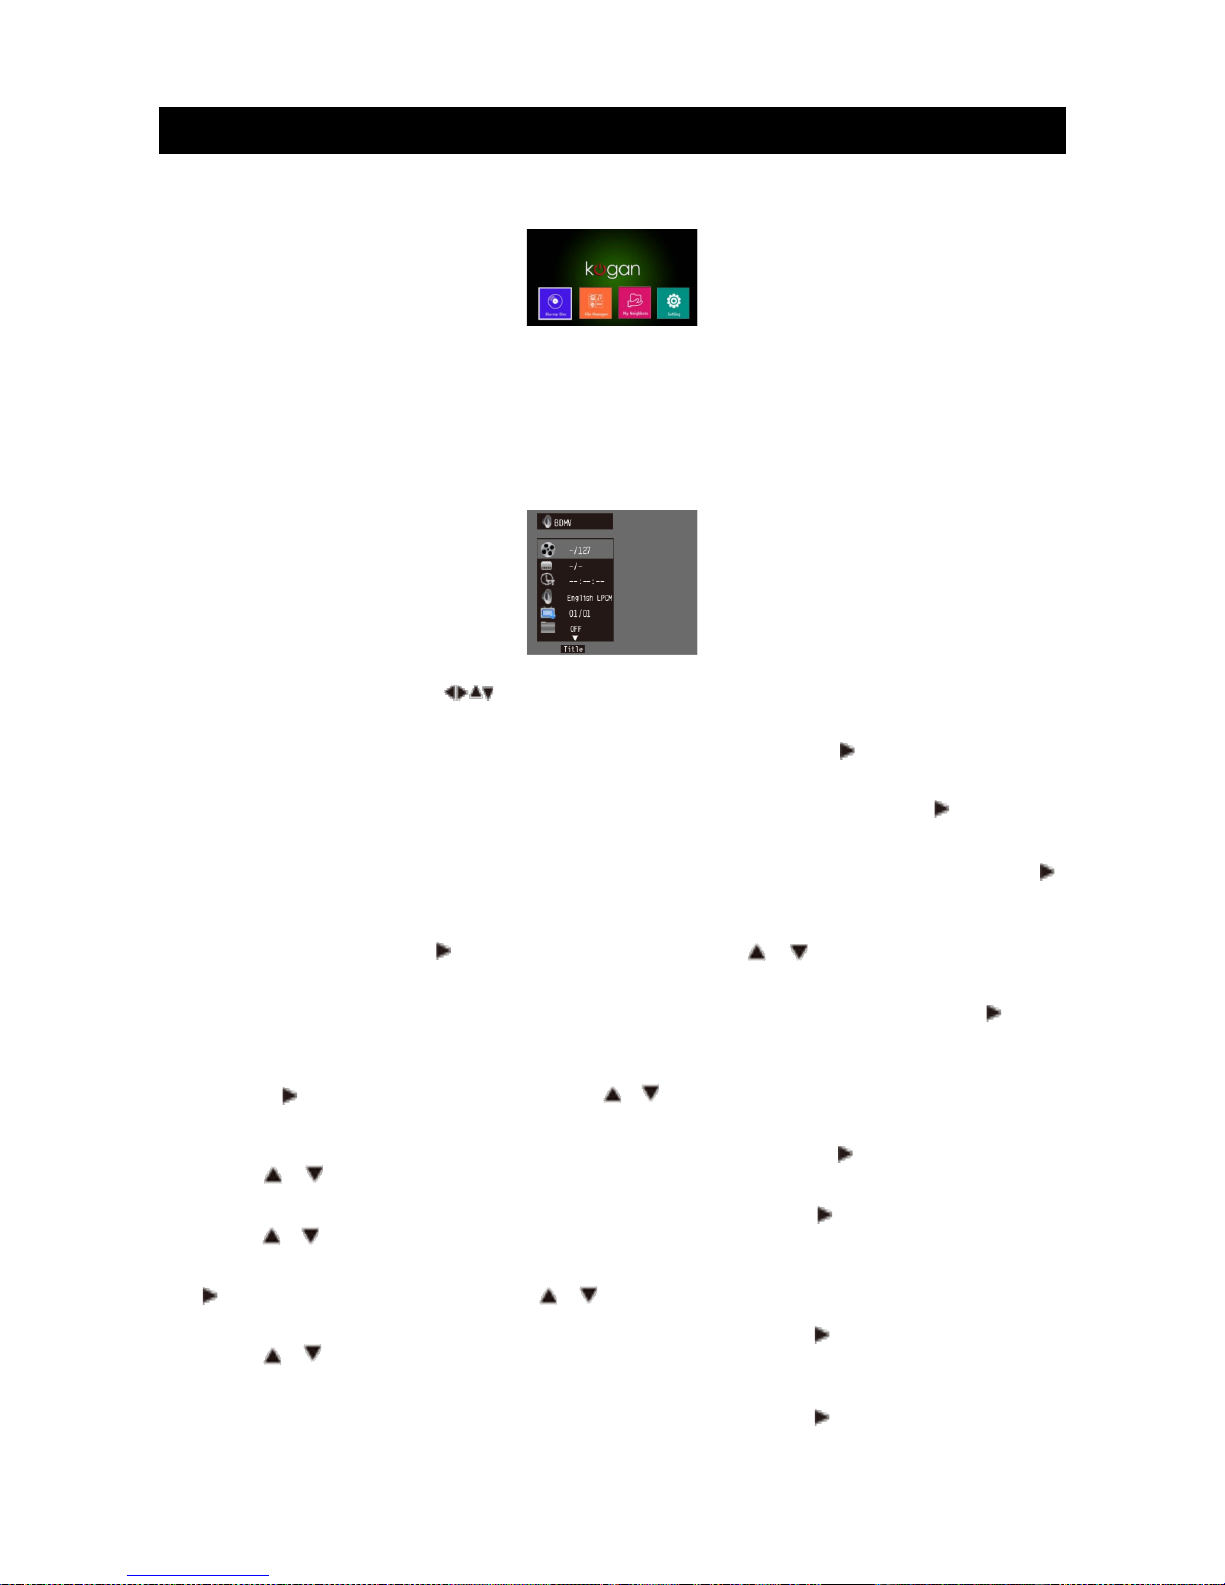
Screen control menu.......................................................................................................................................................................9
Using the OSD menu.....................................................................................................................................................................10
BD-Live.................................................................................................................................................................................................11
edia Player – Using Data Discs and USB Files..........................................................................................................................11
Selecting and playing data files..................................................................................................................................................11
Special operations when playing picture files.....................................................................................................................12
Network Neighbourhood....................................................................................................................................................................13
DLNA Function and S B..............................................................................................................................................................13
Setup – customising settings in the main menu........................................................................................................................15
Network Connection Settings..........................................................................................................................................................22
LAN Connection ............................................................................................................................................................................22
Wi-Fi Connection............................................................................................................................................................................22
Troubleshooting....................................................................................................................................................................................23
Technical Specifications.....................................................................................................................................................................25
Region settings...............................................................................................................................................................................25
Compatible media..........................................................................................................................................................................25
Video...................................................................................................................................................................................................25
Audio...................................................................................................................................................................................................25
HD I output.....................................................................................................................................................................................25
USB......................................................................................................................................................................................................25
aster device...................................................................................................................................................................................25
1
Safety Notices
Notice
The player complies with the limit regulation on using connection cables within 3 metres in the E C
directive.
Placement
•Please put the player in a ventilated place to avoid heat accumulation in the player.
•Do not put the player on soft surfaces such as carpets or bedspreads to avoid blocking the vents.
•Do not install the player in a narrow location (such as on a bookshelf).
•Do not place the player near heat sources or a location where it will receive direct sunlight.
•Do not use the player outdoors, in a vehicle or in a boat.
•If the player is carried into a warm location from a cool location, the lens in the player may have
condensation on it. If the player does not function correctly after this occurs, please take the disc
out, disconnect the power and set aside for an hour to allow the moisture to evaporate.
•The player should be installed in a horizontal position rather than vertical.
•The player should be installed and operated at least 20cm away from your body.
•Do not place any heavy or unstable objects on the player.
•Do not place any objects other than discs on the disc tray.
•When you move the player, please take out any discs, or else they may be damaged.
•When you move the player, please disconnect it from the power socket.
Power Supply
•As long as the power cord of the player is connected to the wall, the AC power supply is still
connected, even if the power supply is turned off.
•If you will not be using the player for a long time, please disconnect the power plug from the wall
socket.
•Please unplug by holding the plug. Never pull on the cable.
•If the power cable is damaged, do not use the player. Contact the Kogan customer support team.
Adjusting Volume
When you listen to any material with low input levels or no audio signals, do not turn the volume up, as you
may hurt your ears or damage the speakers when the volume returns to peak level.
Cleaning
Please wipe the shell, panel and remote control with a soft cloth. Do not use sandpaper, polish or any
cleaning solutions.
Cleaning discs
Do not use cleaning discs or disc cleansers (either wet or spray kinds), as this may damage the player.
Connecting to the HD I OUT port
Improper operation may damage the HD I out port and the connection. Please follow the instructions
below.
Check the shape of the port and connector, then align and connect to the HD I port and HD I connector
in the rear of the unit. ake sure that the connector is not upside-down or inclined.
When you move the player, please disconnect the HD I cable first.
When you connect or disconnect the HD I cable, please hold the HD I connector firmly. Do not twist or
force the HD I plug into the jack.
2
Using the Remote Control & Battery
Installing the battery Using remote control
Open the battery cover.
Aim the remote control at the receiver on the panel,
then operate.
Insert the 2 x AAA batteries.
Ensure you align the +/- polarity of the battery to
the markings in the slot.
Put the battery cover back on.
Notes for remote control operation
•Do not use the remote control under strong lighting, as the signals may not function or they may
be received incorrectly.
•Do not drop the remote control or hit it against other objects.
•Do not put the remote control in hot or moist surroundings, or it may oxidise the components and
rust the metal parts quickly.
•Do not disassemble the remote control. If there is a problem with the remote, please contact the
Kogan customer service team.
•If the remote control isn't effective or the usage range decreases significantly, please replace the
batteries. Do not mix old batteries with new ones.
•Check the batteries regularly to ensure they aren't leaking. If you see signs of leakage, please clean
the battery slot before replacing them with new batteries as the metal may erode.
•The effective range of the remote control is 7m from the front of the remote.
•The effect angle of the remote control is 30° from the front of the remote.
3
Using Discs
Holding the disc:
Do not touch the data/playing side of the disc.
Do not stick paper or adhesive tape to the playing side of the disc.
Cleaning the disc:
Fingerprints and dirt on the disc surface may affect the audio and
video quality. Use a soft cloth to wipe the disc from the centre out
to the outside.
Disc storage:
If dirt/stains cannot be removed with a dry cloth, then wipe with a wet cloth, followed by a dry cloth. Do
not use any solvents such as thinners, alcohol or detergents, as these will damage the disc.
Do not place the discs in locations that receive direct sunlight or strong heat.
Place the discs securely in their cases when not being used.
About the user manual:
This manual describes the basic specifications of the Blu-ray player. Certain Blu-ray discs may have
special requirements or limitations that may not be compatible with this player.
Over time, the manufacturing of the players may be improved and upgraded. If the operation of the
player is different to that described in this manual, please refer to the actual functioning of the player.
If the player isn't going to be used for a long period, please put a disc in the tray to avoid affective the
performance of the laser head.
4
Data side
Product Description
Front panel
1. Disc tray 6. Play/Pause
2. Remote receiver 7. Prev
3. Next 8. Power (ON/OFF/Standby)
Turn player on/off, or put into standby.
4. LED
5. Eject/Insert 9. USB port
Rear panel
1. Rear left surround channel output 8. Right front channel output
2. Left front channel output 9. Right surround channel output
3. Left surround channel output 10. Subwoofer output
4. Centre channel output 11. Digital audio output (coaxial)
5. Composite video output 12. Audio output (R)
6. Audio output (L) 13. HD I output
7. Right rear surround channel output 14. LAN input
15. USB input
5
Remote Control
While playing, press the following buttons to operate.
1. Power: turn player on/off.
2. 0-9: select and enter numbers.
3. Audio: select audio language or channel.
4. Disc menu: access the main menu of the disc.
5. Info: access main menu of disc. Information of the video.
6. Return: return to previous menu.
7. Home: return to home.
8. OK: confirm
9. Stop: stop playing.
10. Play/Pause: press once to pause, press again to resume.
11. Fast rewind: fast rewind by 1x, 2x, 3x, 4x or 5x.
Fast forward: fast forward by 1x, 2x, 3x, 4x or 5x.
12. Search: select the search time, chapter etc. ethod: press the search
button to enter the interface, then press the left/right keys to select
time or chapter and press OK. Press the up/down key or enter numbers
directly and press OK to confirm.
13. ute: mute or cancel mute.
14. Clear: clear error.
15. Random: random playback.
16. PIP: turn picture-in-picture on or off.
17. Audio: select audio language or channel.
18. Program/Red button: set a program of chapters/tracks to play.
19. Bookmark/Green button: mark the disk being played, set bookmark, or
press and hold to display bookmark list.
20.Eject/Insert: eject or insert the disc tray.
21. Subtitle: select the subtitle language.
22. Title popup: enter or exit disc menu.
23. Setup: display setup menu.
24. Direction: arrow keys.
Left: during play, hold down left arrow to display the search time.
Right: during play, hold down right arrow to display the search time.
25. Option: access more options while playing.
26. Prev: go to previous chapter/track, or the chapter start of the disc.
Next: go to next chapter/track on the disc.
27. Vol+ : turn the volume up.
Vol- : turn the volume down.
28. A-B: while playing, press once to select a starting point. Press it again at the end point, and the
player will repeatedly play the selected segment.
29. Repeat: repeat playing the title, chapter, track or disc.
30.HD I: HD I output.
31. Angle: select a different viewing angle (if available)
32. Blue button: performs blue button action according to menu display.
33. Zoom/yellow button: zoom image.
6
Device Connections
Video and component input
Connecting 7.1 channel analog input amplifier
Coaxial and Optical connection
7
TV
HD I connection
Network connection
Connect the network cable then configure the network in the setup menu (refer to page XX). The network
functionality will now be available.
8
Playing – Advanced Playing Operations
Home (picture 1)
The corresponding functions of the 4 icons on the main menu.
Picture 1
Advanced Playing Operations
Screen control menu
With the screen control menu, you can set and select certain playing statuses.
While playing, press the [Option] key to show the screen control menu, as shown below.
In the screen control menu, press to select an item, then press [OK] to select and set. The screen
control menu contains the following items:
Title [BD-V DVD-V]: display current title and total titles. Press the direction key [ ] to open the title
selection bar, select the desired title, then press [OK] to play from the selected title.
Chapter [BD-V DVD-V]: display current chapter and total chapters. Press the direction key [ ] to open the
chapter selection bar, select the desired chapter, then press [OK] to play from the selected chapter.
File [VIDEO AUDIO PHOTO]: display current file and total files in current folder. Press the direction key [ ]
to open the selection bar, select the desired file, then press [OK] to play from the selected file.
Time [BD-V DVD-V CD VIDEO AUDIO]: displays the playing time of the current title, chapter, disc, track
and file. Press the direction key [ ] to open the time bar, then press [ ] [ ] to switch between playing
time and remaining time.
Playing mode [CD VIDEO AUDIO PHOTO]: display current playing mode. Press the direction key [ ] to
open the selection bar, then switch playing mode between 'Normal', 'Random' and 'Shuffle'.
Audio [BD-V DVD-V]: display the language and audio signal decoding mode of the audio output. Press the
direction key [ ] to open the audio bar, then press [ ] [ ] to switch the audio.
Angle [BD-V DVD-V]: display the current playing angle. Press the direction key [ ] to open the angle bar,
then press [ ] [ ] to switch the playing angles.
Subtitle [BD-V DVD-V]: display current caption state. Press the direction key [ ] to open the caption bar,
then press [ ] [ ] to switch the caption language.
Subtitle type [VIDEO]: only available during video play; displays current caption state. Press the direction
key [ ] to open the caption bar, then press [ ] [ ] to switch the caption language.
Second video [BD-V]: display secondary video state. Press the direction key [ ] to open the selection bar,
then press [ ] [ ] to switch to full screen video output, and show secondary video window
simultaneously (PIP).
Second audio [BD-V]: display secondary audio state. Press the direction key [ ] to open the selection bar,
9