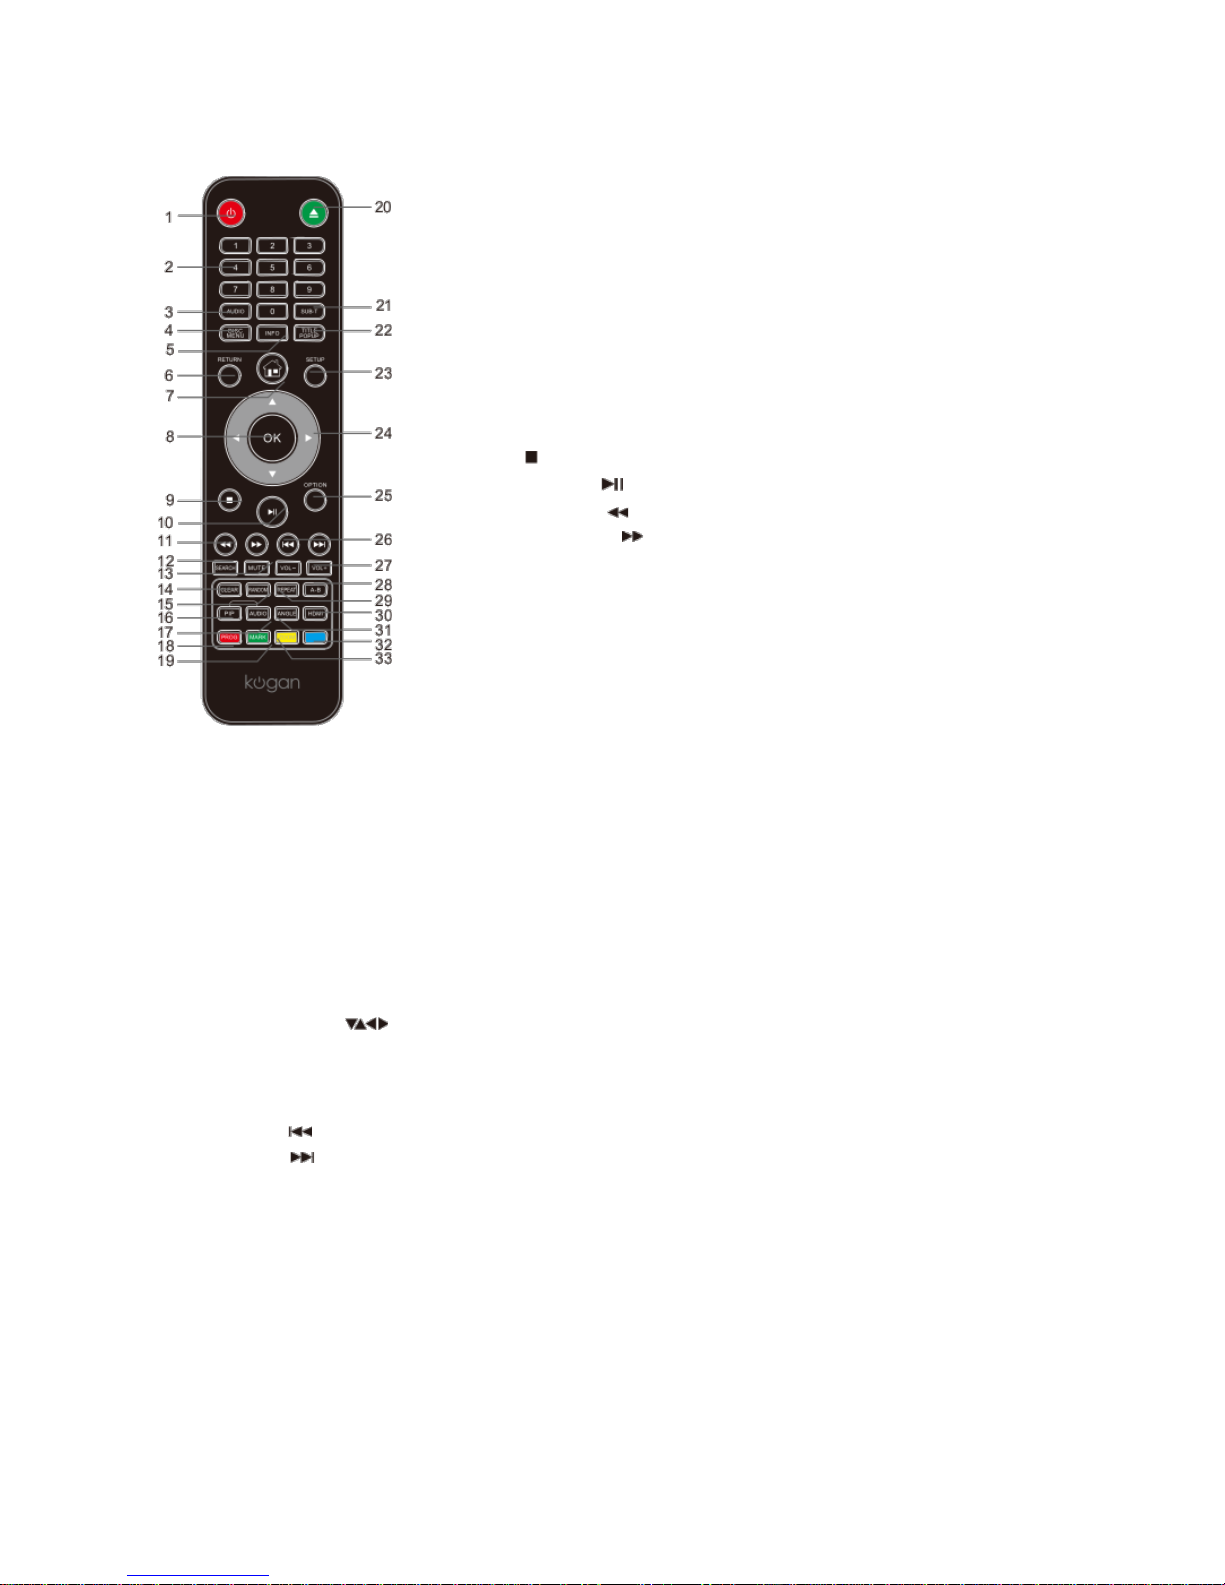
Kogan KABRP3D4KUA User manual


Table of Contents
Safety Notices.....................................................................................................................................2
Notice.................................................................................................................................................2
Placement.........................................................................................................................................2
Power Supply..................................................................................................................................2
Adjusting Volume..........................................................................................................................2
Cleaning............................................................................................................................................2
Cleaning discs.................................................................................................................................3
Connecting to the H MI OUT port........................................................................................3
Using the Remote Control & Battery.........................................................................................3
Notes for remote control operation......................................................................................3
Using iscs...........................................................................................................................................4
Product escription..........................................................................................................................5
Front panel.......................................................................................................................................5
Rear panel........................................................................................................................................5
Remote Control.............................................................................................................................6
evice Connections..........................................................................................................................7
Video and component input.....................................................................................................7
Connecting 7.1 channel analog input amplifier.................................................................7
Coaxial and Optical connection .............................................................................................7
H MI connection ..........................................................................................................................8
Network connection ...................................................................................................................8
Troubleshooting.................................................................................................................................9
Technical Specifications.................................................................................................................11
Region settings..............................................................................................................................11
Compatible media........................................................................................................................11
Video..................................................................................................................................................11
Audio..................................................................................................................................................11
H MI output....................................................................................................................................11
USB.....................................................................................................................................................11
Master device.................................................................................................................................11
1

Safety Notices
Notice
The player complies with the limit regulation on using connection cables within
3 metres in the EMC directive.
Placement
•Please put the player in a ventilated place to avoid heat accumulation in
the player.
•o not put the player on soft surfaces such as carpets or bedspreads to
avoid blocking the vents.
•o not install the player in a narrow location (such as on a bookshelf).
•o not place the player near heat sources or a location where it will
receive direct sunlight.
•o not use the player outdoors, in a vehicle or in a boat.
•If the player is carried into a warm location from a cool location, the lens
in the player may have condensation on it. If the player does not function
correctly after this occurs, please take the disc out, disconnect the power
and set aside for an hour to allow the moisture to evaporate.
•The player should be installed in a horizontal position rather than vertical.
•The player should be installed and operated at least 20cm away from your
body.
•o not place any heavy or unstable objects on the player.
•o not place any objects other than discs on the disc tray.
•When you move the player, please take out any discs, or else they may be
damaged.
•When you move the player, please disconnect it from the power socket.
Power Supply
•As long as the power cord of the player is connected to the wall, the AC
power supply is still connected, even if the power supply is turned off.
•If you will not be using the player for a long time, please disconnect the
power plug from the wall socket.
•Please unplug by holding the plug. Never pull on the cable.
•If the power cable is damaged, do not use the player. Contact the Kogan
customer support team.
Adjusting Volume
When you listen to any material with low input levels or no audio signals, do not
turn the volume up, as you may hurt your ears or damage the speakers when the
volume returns to peak level.
Cleaning
Please wipe the shell, panel and remote control with a soft cloth. o not use
sandpaper, polish or any cleaning solutions.
2

Cleaning discs
o not use cleaning discs or disc cleansers (either wet or spray kinds), as this
may damage the player.
Connecting to the HD I OUT port
Improper operation may damage the H MI out port and the connection. Please
follow the instructions below.
Check the shape of the port and connector, then align and connect to the H MI
port and H MI connector in the rear of the unit. Make sure that the connector is
not upside-down or inclined.
When you move the player, please disconnect the H MI cable first.
When you connect or disconnect the H MI cable, please hold the H MI
connector firmly. o not twist or force the H MI plug into the jack.
Using the Remote Control & Battery
Installing the battery Using remote control
Open the battery cover.
Aim the remote control at the receiver
on the panel, then operate.
Insert the 2 x AAA batteries.
Ensure you align the +/- polarity of the
battery to the markings in the slot.
Put the battery cover back on.
Notes for remote control operation
•o not use the remote control under strong lighting, as the signals may
not function or they may be received incorrectly.
•o not drop the remote control or hit it against other objects.
3

•o not put the remote control in hot or moist surroundings, or it may
oxidise the components and rust the metal parts quickly.
•o not disassemble the remote control. If there is a problem with the
remote, please contact the Kogan customer service team.
•If the remote control isn't effective or the usage range decreases
significantly, please replace the batteries. o not mix old batteries with
new ones.
•Check the batteries regularly to ensure they aren't leaking. If you see signs
of leakage, please clean the battery slot before replacing them with new
batteries as the metal may erode.
•The effective range of the remote control is 7m from the front of the
remote.
•The effect angle of the remote control is 30° from the front of the remote.
Using Discs
Holding the disc:
o not touch the data/playing side of the disc.
o not stick paper or adhesive tape to the playing
side of the disc.
Cleaning the disc:
Fingerprints and dirt on the disc surface may
affect the audio and video quality. Use a soft cloth
to wipe the disc from the centre out to the
outside.
Disc storage:
If dirt/stains cannot be removed with a dry cloth, then wipe with a wet cloth,
followed by a dry cloth. o not use any solvents such as thinners, alcohol or
detergents, as these will damage the disc.
o not place the discs in locations that receive direct sunlight or strong heat.
Place the discs securely in their cases when not being used.
About the user manual:
This manual describes the basic specifications of the Blu-ray player. Certain
Blu-ray discs may have special requirements or limitations that may not be
compatible with this player.
Over time, the manufacturing of the players may be improved and upgraded. If
the operation of the player is different to that described in this manual, please
refer to the actual functioning of the player.
If the player isn't going to be used for a long period, please put a disc in the
tray to avoid affective the performance of the laser head.
4
ata side

Product Description
Front panel
1. isc tray 6. Play/Pause
2. Remote receiver 7. Prev
3. Next 8. Power (ON/OFF/Standby)
Turn player on/off, or put into standby.
4. LE
5. Eject/Insert 9. USB port
Rear panel
1. Rear left surround channel output 8. Right front channel output
2. Left front channel output 9. Right surround channel output
3. Left surround channel output 10. Subwoofer output
4. Centre channel output 11. igital audio output (coaxial)
5. Composite video output 12. Audio output (R)
6. Audio output (L) 13. H MI output
7. Right rear surround channel output 14. LAN input
15. USB input
5

Remote Control
While playing, press the following buttons to operate.
1. Power: turn player on/off.
2. 0-9: select and enter numbers.
3. Audio: select audio language or channel.
4. Disc menu: access the main menu of the disc.
5. Info: access main menu of disc. Information of the
video.
6. Return: return to previous menu.
7. Home: return to home.
8. OK: confirm
9. Stop: stop playing.
10. Play/Pause: press to pause, then again to resume.
11. Fast rewind: fast rewind by 1x, 2x, 3x, 4x or 5x.
Fast forward: fast forward by 1x, 2x, 3x, 4x or 5x.
12. Search: select the search time, chapter etc. Method:
press the search button to enter the interface, then
press the left/right keys to select time or chapter and
press OK. Press the up/down key or enter numbers
directly and press OK to confirm.
13. ute: mute or cancel mute.
14. Clear: clear error.
15. Random: random playback.
16. PIP: turn picture-in-picture on or off.
17. Audio: select audio language or channel.
18. Program/Red button: set a program of chapters/tracks to play.
19. Bookmark/Green button: mark the disk being played, set bookmark, or
press and hold to display bookmark list.
20.Eject/Insert: eject or insert the disc tray.
21. Subtitle: select the subtitle language.
22. Title popup: enter or exit disc menu.
23. Setup: display setup menu.
24. Direction: arrow keys.
Left: during play, hold down left arrow to display the search time.
Right: during play, hold down right arrow to display the search time.
25. Option: access more options while playing.
26. Prev: go to previous chapter/track, or the chapter start of the disc.
Next: go to next chapter/track on the disc.
27. Vol+ : turn the volume up.
Vol- : turn the volume down.
28. A-B: while playing, press once to select a starting point. Press it again at
the end point, and the player will repeatedly play the selected segment.
29. Repeat: repeat playing the title, chapter, track or disc.
30.HD I: H MI output.
31. Angle: select a different viewing angle (if available)
32. Blue button: performs blue button action according to menu display.
33. Zoom/yellow button: zoom image.
6

Device Connections
Video and component input
Connecting 7.1 channel analog input amplifier
Coaxial and Optical connection
7
TV

(USB Wi adapter is not included in accessary)


Reset the unit from setup menu. The password will be reset to “0000”

Technical Specifications
Note: Specifications are subject to change without notice.
Region settings
The player supports the following area codes.
DVD Blu-ray Country-Region
Australia
Compatible media
B -Video
V -Video, V +R/+RW, V -R/-RW, V +R/-R L ( ouble layer)
VC /SVC
Audio C , C -R-/C -RW, MP3, JPEG
MKV
USB evices
Video
Signal system: PAL/NTSC
Composite video output: 1 Vp-p (75)
H MI output: 480p, 576p, 720p, 1080i, 1080p, 1080p24, 4K*2K
Audio
7.1 channel analog output
Front left/right channel: 2Vrms (>1000)
igital output: 0.5 Vp-p (75)
Coaxial cable
HD I output
Sampling frequency:
MP3: 32KHZ, 44.1KHZ, 48KHZ
Fixed bit rate:
MP3: 112kpbs-320kpbs
USB
Compatibility: high speed USB 2.0
Category support: USB mass storage
File system: FAT16, FAT32, NTFS
Support H (portable hard disks): may require external power supply.
aster device
Rated power: AC 110V-240V, 50Hz-60Hz
Power consumption: 15W
Size (LxWxH): 430x201x40mm
Net weight: 1.6kg
11
Other manuals for KABRP3D4KUA
1
Other Kogan Blu-ray Player manuals

Kogan
Kogan KABRP21X3DAA User manual

Kogan
Kogan KABRP21SLMA User manual

Kogan
Kogan KABRP21X3DB User manual

Kogan
Kogan KABRP21WFIAA User manual

Kogan
Kogan KABRP21SLMB User manual

Kogan
Kogan KGNBD2VBA User manual

Kogan
Kogan KABRP21WFIA User manual

Kogan
Kogan KGNBD2A User manual

Kogan
Kogan KABRP3D4KUA User manual

Kogan
Kogan KABRP3DWFIA User manual