Kogan KAPRSCOOKZA User manual


Table of Contents
Important Safeguards................................................................................................................................................... 2
Specifications.................................................................................................................................................................. 3
Product Diagram...................................................................................................................................................... 3
Usage................................................................................................................................................................................. 4
Control Panel............................................................................................................................................................. 4
Anti-Block S ield and Gasket Maintenance....................................................................................................4
Cooking Preparation..................................................................................................................................................... 5
Function Selection......................................................................................................................................................... 5
General Functions.................................................................................................................................................... 5
Safe Cover Opening................................................................................................................................................ 6
Cooking Examples......................................................................................................................................................... 7
Texture Selection...................................................................................................................................................... 7
Timer Function.......................................................................................................................................................... 7
Slow Cook................................................................................................................................................................... 8
Saute/Brown.............................................................................................................................................................. 8
Cooking Rice.............................................................................................................................................................. 8
Keep Warm Function.................................................................................................................................................... 9
Care and Maintenance.................................................................................................................................................. 9
Safety Warnings............................................................................................................................................................. 9
Cleaning........................................................................................................................................................................... 10
Warranty.......................................................................................................................................................................... 10
Troubles ooting............................................................................................................................................................. 11
1

Important Safeguards
Read all instructions.
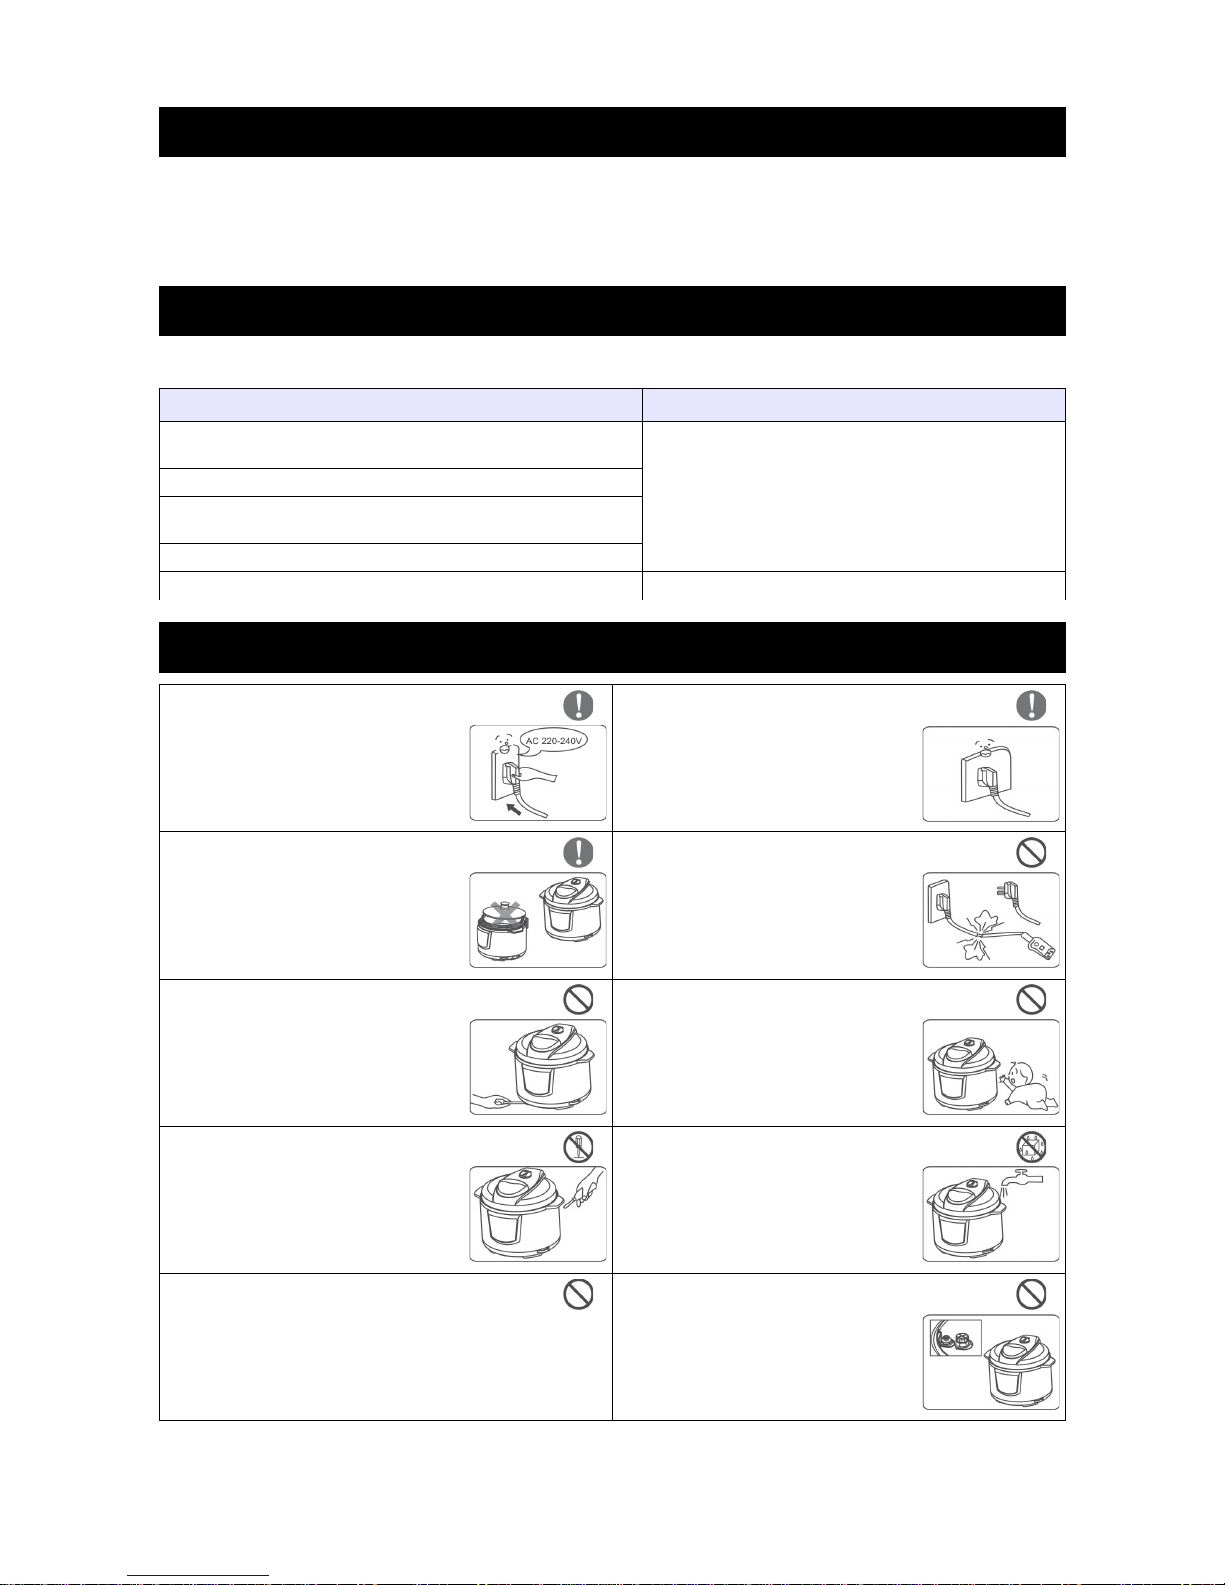
1. Do not let c ildren near t e pressure cooker w en it is in use.
2. Do not put t e pressure cooker into a eated oven.
3. W en t e pressure cooker is under use, please move t e pressure cooker wit t e utmost
care, and only if it is absolutely necessary to move it. Do not touc ot surfaces, and use
gloves or similar eat protection.
4. Do not use t e pressure cooker for any purposes ot er t an t e one for w ic it is
intended.
5. T is appliance cooks food under pressure. Scalds may result from inappropriate use of
t e pressure cooker. Make sure t at t e cooker is properly closed before applying eat.
See "instructions for use" for more information.
6. Never force t e pressure cooker open. Do not open before making sure t at t e internal
pressure as completely dropped.
7. Never use t e pressure cooker wit out adding water, as t is can lead to serious damage.
8. Do not fill t e cooker beyond 2/3 of it's capacity. W en cooking food products w ic
expand during cooking (suc as rice or de ydrated vegetables), do not fill t e cooker to
more t an alf of it's capacity.
9. After cooking meat wit a skin (suc as sausages) w ic may swell under t e effects of
pressure, do not prick t e meat w ile t e skin is swollen. You may be burned.
10. W en cooking doug y food, gently s ake t e cooker before opening t e lid to avoid food
ejection.
11. Before eac use, c eck t at t e valves are not obstructed.
12. Never use t e pressure cooker in its pressurized mode for deep or s allow frying of food.
13. Do not tamper wit any of t e safety systems beyond t e maintenance instructions
specified in t e instructions.
14. Only use spare parts sourced from Kogan.com. Use of t ird-party replacement parts
including lids or valves can be extremely dangerous.
15. Keep a copy of t ese instructions andy for future reference.
16. NEVER ATTEMPT TO OPEN THE LID WHILE THE UNIT IS OPERATING.
a) T is appliance is intended to be used in ouse old and similar environments suc as:
•staff kitc en areas in s ops, offices and ot er working environments;
•farm ouses;
•by clients in otels, motels and ot er residential type environments;
•bed and breakfast type environments
b) T is appliance is not intended for use in a commercial environment.
17. T is appliance is not intended for use by persons (including c ildren) wit reduced
p ysical, sensory or mental capabilities, or lack of experience and knowledge, unless t ey
ave been given supervision or instruction concerning use of t e appliance by a person
responsible for t eir safety.
18. C ildren s ould be supervised to ensure t at t ey do not play wit t e appliance.
19. Before using t is product, please read t e user manual carefully.
20. Do not place t e unit in an unstable location. It is strictly pro ibited to use it on a
newspaper, foam or any ot er object t at may easily block t e vent ole at t e bottom.
21. Never use it in a location near fire or water. Do not use it in direct suns ine or w ere oil
may splas .
22. Ensure t e product, and power cords, are all out of reac of c ildren.
23. Never place t e product, power cord or plug in water or any ot er liquids.
24. If t e unit, power cord or plug are damaged, stop use and contact t e Kogan.com
customer support team immediately. T e unit is not able to be repaired by t e customer.
25. T is appliance is not intended to be operated by means of an external timer or by a
separate remote-control system.
26. Cooking appliances s ould be positioned in a stable location wit t e andles positioned
to avoid t e spilling of ot liquids.
27. Be mindful t at after use, surfaces of t e appliance will be subject to residual eat.
2

Specifications
Model Power Supply Power Usage Volume Diameter of
Pot
Working
Pressure
Heating
Temperature
KAPRSCOOKZA 220-240V
50-60Hz 840 – 1000W 6L 22cm 70kPa 60°C - 80°C
Accessories
Rice Paddle Ladle Manual Measuring Cup Power Cord Components
T is product s ould not be disposed of wit ot er ouse old waste. To prevent possible arm to
t e environment or uman ealt due to uncontrolled waste disposal, recycle it responsibly to
promote t e sustainable reuse of material resources. Please contact your local municipal waste
disposal service for information.
Product Diagram
Diagram of
Float Valve
Warming Tip:
1. Before eac use, inspect t e float
valve and ex aust valve.
2. Before inserting t e inner pot
into t e exterior pot, be sure to
remove any debris or water from
eit er pot.
3. W en moving t e unit, please lift
t e unit by t e andles.
4. T e outer casing can be wiped
clean wit a clot wipe.
Rice Paddle
Attac ment Met od
Before first use, please take out all accessories from t e cooker body and read t e User Manual
carefully. Special care must be taken to follow directions and eed warnings to avoid damage to
property and also to avoid injury or burns.
3
Handle Cover
Cover
Float Valve
Exhaust Valve
Gasket
Inside of Cover
Gasket Ring of
Float Valve
Anti-block Shield
Inner ot
Exterior ot
Handle
Housing
Rice addle Shelf
Base
Control anel

Usage
Control Panel
"Saute/Brown" "Slow/Cook" Function
T is function is for braising and stewing
foods. Regulate t e pressure- olding
time according to personal preference.
Press + or – to adjust.
Timer Function
Set t e timer for t e cooking function to
end.
Press + or – to adjust.
Anti-Block Shield and Gasket aintenance
Disassembly and Installation
of Anti-Block S ield
Disassembly – screw off upwards
counterclockwise.
Assembly – screw back on
downwards clockwise. 1. Prior to eac use, inspect
to ensure t at t e gasket
and anti-block s ield are
mounted to t e upper
cover.
2. After use, remove any
foreign objects from t e
gasket and anti-block
s ield. Keep t ese clean
to avoid odours.
3. Never pull t e gasket wit
force, as deformation may
affect sealing and
pressure effects.
4. A damaged gasket s ould
not be used. Please
contact t e Kogan.com
customer support team
for information.
Disassembly and Installation
of Gasket
Disassembly – pull up Assembly – press down
4
"Start/Cancel" indicator
"Soup" indicator
"Texture" indicator
"Rice" indicator
"Beans/Chili" indicator
" oultry" indicator
"Meat/Stew" indicator "Yoghurt" indicator
"Saute/Brown" indicator
Display Screen
"Cake/Bake" indicator
"Slow Cook" indicator
"Timer" indicator
"Texture" key

Cooking Preparation
1. Open t e cover correctly
Hold t e cover andle wit one and, t en turn t e
cover counterclockwise approximately 30 degrees
until t e cover marking is aligned wit t e outer▼
case marking OPEN, t en lift t e cover.
2. C eck t at all parts on t e cover are mounted properly
C eck t e float valve and ex aust valve for obstruction, and confirm t at parts suc as
gasket and anti-block s ield are installed correctly.
3. Remove t e stainless steel inner pot, t en put food and water in
t e inner pot
T e total amount of food and water s ould not exceed t e MAX level
of inner pot eig t.
4. Put t e inner pot into t e electric pressure cooker
Before reinserting t e inner pot, remove any foreign objects
and water droplets from t e exterior of t e inner pot and
from t e inside of t e ousing.
After putting inner pot in, rotate t e inner pot slig tly left and
rig t to ensure a good contact between t e inner pot and t e
eating plate.
5. Close t e cover completely
Before closing, c eck w et er t e gasket as been
put into t e steel rim inside t e cover.
Hold t e cover andle wit one and, t en rotate t e
cover clockwise approximately 30 degrees until t e
cover marking is aligned wit t e outer case▼
marking CLOSE.
6. Position t e ex aust valve properly
During operation, align t e small andle of t e ex aust
valve wit t e small closed icon, indicating t at t e
pressure cooker is in t e airtig t condition.
W en manual venting of pressure is needed, align t e
small andle on t e ex aust valve wit t e small open
icon, indicating t at t e pressure cooker is in t e
ex aust mode.
Function Selection
General Functions
1. Complete t e cooking preparation steps as s own above
2. Switc t e unit on
T e display wit flas and display red orizontal line "---", indicating t at t e electric
pressure cooker as entered t e preparation state.
3. Select a required function level
•Once a function key is pressed, t e indicator of t e corresponding function level will
illuminate on t e control panel in red;
5

•T e rice porridge and cake functions are only applicable to products matc ing t ose
descriptions;
•Cooking times vary wit eac different function level. T e bigger t e food amount,
t e longer t e cooking time will be. T e cooking times listed in t e table below are
only for reference (e.g food amount + water = 8 scales):
Cooking time = eating time + olding time.
Function Key Meat/Stew Poultry Beans/C ili Rice
Cooking time (min) Approx 55 Approx 55 Approx 45 Approx 35
Soup Yog urt Saute/Brown Cake/Bake Slow Cook
Approx 50 Approx 360 Approx 30 Approx 60 120 ~ 600
4. Press a function key. 10 seconds later t e pressure cooker will perform t e selected
program
•Wit in 10 seconds, you can re-select t e Timer and function level, t en finally confirm
t at t e electric pressure cooker will start working 10 seconds after selection.
•T e red orizontal line "---" on t e display screen is brig t, indicating t at t e
pressurecooker as entered it's working state.
•Take into account t e warm up cycle of 10-15 minutes.
•During operation, you can cancel t e current working state and return t e unit to
standby mode by pressing t e "Start/Cancel" key.
5. After cooking, unit will go into warming state automatically
•After cooking, t e corresponding function indicator will go out, and t e warm
indicator will illuminate in yellow. T e display will s ow "0.0" and will give out a
prompting sound (10 beeps). At t is time, t e electric pressure cooker will go into
warming state.
•In standby mode, press t e "Start/Cancel" key, t e warm indicator will illuminate in
yellow and a single beep prompt sound will occur, indicating t at t e pressure cooker
as gone into warming state.
Safe Cover Opening
1. Disconnect t e power or disconnect t e plug
2. Ex aust met od
•A – Quick opening met od (for non-fluid food)
Slide t e ex aust valve to t e ex aust position until t e float valve falls.
Put a wet towel on t e cover to quicken t e cooling until t e float valve falls.
•B – General opening met od
Have t e pressure cooker cool naturally until t e float valve falls.
3. Open t e cover
Hold t e cover andle firmly, t en turn t e cover clockwise to t e spacing edge, t en lift
t e cover upwards.
Never open t e cover until t e pressure inside t e pot as released adequately.
Never pull out t e ex aust valve w ile t e unit is still venting.
For fluid/liquid foods, do not slide t e ex aust valve to t e ex aust position w en
cooking as finis ed, as t e contents will be ejected from t e ex aust valve core,
causing a mess and possible serious burns. Be sure to disconnect t e power supply,
t en allow t e unit to cool naturally. To asten t e process, a wet towel can be
wrapped around t e cover to speed up t e cooling process until t e valve falls, at
w ic point you can open t e cover.
6

Cooking Examples
Texture Selection
1. Finis cooking preparation as explained on page 5.
2. Select t e corresponding function level
•W en any function key is pressed after preparation, a corresponding function
indicator illuminates, and t e pressure cooker will perform t e cooking procedure
corresponding to t e function level. Texture default is "standard".
•Once t e function level is selected, you can also select anot er function level wit in 10
seconds, and t e pressure cooker will perform t e cooking procedure of t e
ultimately selected function level.
•If selection of anot er function is impossible once t e pressure cooker as entered it's
working state, you can cancel t e operation by pressing t e "Cancel" button.
3. Select texture by pressing t e "texture" key
Once "texture" as been pressed, t e screen will display "Standard" and "Strong"
cyclically. W en one texture is selected, t e corresponding text will appear on t e screen;
"Soup", "Porridge", "Meat/C icken", "Beans/Tendons".
4. After cooking, t e unit will go into warming state automatically
After cooking, t e warming indicator will illuminate and t e unit will go into warming
state. It is not recommended t at you keep food in warming mode for extended periods
of time.
Timer Function
1. Finis cooking preparation as explained on page 5.
2. Select t e corresponding function level
W en any function key is pressed after preparation, t e corresponding function indicator
will illuminate; you can also select anot er function wit in 10 seconds. (To cancel t e
operation, press t e "Cancel" key).
No timer function is available wit t e "Cake" function.
3. Press TIMER to set t e end time for cooking
T e unit is equipped wit a 24- our timer function, w ic can be operated as follows:
•Wit in 10 seconds after selecting t e function, press t e TIMER key to set t e cooking
end time.
•Once t e key is pressed, t e screen will display "Timer End Time 2.0". T e our
portion will flas , and + or – can be used to adjust t e our setting. Once you ave t e
correct our set, press TIMER and you can t en edit t e minute section.
Press + or – to adjust t e minutes.
4. After cooking, t e unit will go into warming state automatically
Once t e timer as elapsed, t e warm indicator will illuminate and t e unit will go into
warming state. It is not recommended t at you keep food in warming mode for extended
periods of time.
7

Slow Cook
T e following is an example of usage. Please alter as required.
Ingredients: Beef, onion, carrot, potato, rice wine, salt, olive oil, peanut oil
Met od
1. Was t e vegetables, t en cut t e beef, onion, carrot and potato into small pieces.
2. Put t ese ingredients into t e inner pot. Add t e salt, rice wine, olive oil and water.
3. Insert t e inner pot into t e unit. Close t e cover completely. Press "Texture" twice to
select t e "Slow Cook" function, t en press "Timer" to select a suitable cooking time from
2 ours to 10 ours, t en press "Start/Cancel" to start t e unit working.
Once finis ed, you can open t e lid and enjoy t e food. Refer to t e c apter on Safe Opening.
Saute/Brown
Turn on t e power supply wit t e lid off. Press t e "Saute/Brown" button to enable t e setting.
Make sure t at t e total cooking time does not exceed 20 minutes (if t e cooking time DOES
exceed 20 minutes, you will receive a reminder tone to cover wit t e lid.) If you don't cover t e
unit wit t e lid w en t is tone is sounding, t en t e unit will return to standby mode.
After finis ing, you can cover wit t e lid, allowing t e food to continue cooking.
Cooking Rice
1. Measure t e rice portion wit a measuring cup, t en was it
One serving of rice is about 150g, w ic will make a portion
serving for one person. It is recommended t at you don't
was t e rice inside t e inner pot.
2. Add water to t e correct corresponding level
Put all of t e clean rice into t e inner pot, t en fill it wit water up until t e corresponding
water level.
T e scale line inside t e inner pot is a cooking reference water level. For example, to cook
2 cups of rice, fill t e inner pot up to t e scale line "2".
Water quantities can vary due to different rice varieties and ardness, but please do not
exceed t e MAX water level inside t e inner pot.
3. Place t e inner pot into t e cooker body
Once you ave inserted t e inner pot into t e unit, please rotate t e pot slig tly left and
rig t to ensure full contact between t e inner pot and t e eating plate.
4. Place t e lid on t e unit, and t en switc it on.
5. Press t e "Rice" key
T e "rice" function indicator will illuminate, and t e cooker will begin cooking after 10
seconds.
6. Once complete, t e unit will go into warming state automatically
T e cooking time will be approximately 35min, owever t is time may vary depending on
t e amount of rice and t e quality of rice.
7. Open t e cover and enjoy!
Make sure you follow t e Safe Cover Opening instructions. After cooking is complete, it is
recommended t at you serve t e rice up wit in 1-3 minutes. Keeping t e rice in t e
warming state for longer t an t is will ave an effect on t e rice quality.
8

Keep Warm Function
•After cooking, t e electric pressure cooker goes into t e Keep Warm state automatically; in t is state, t e Warm
indicator will be lit and "0H" will be s own on t e display screen.
•You can also start t e Keep Warm function w ile in standby mode by pressing t e "Start/Cancel" key.
•T e Keep Warm temperature is 60-80C
•For optimal results, do not use t e Keep Warm function for longer t an 8 ours.
Care and aintenance
Regular care and maintenance is essential to ensure t at t is product is safe for use.
Problem Solution
Power cord and plug suffer from expansion, deformation,
cracking, damage etc..
Stop use immediately. Unplug t e unit from t e power
supply and contact t e Kogan.com customer support
team.
A portion of t e power cord or plug is otter t an usual.
T e pressure cooker is functioning abnormally or emitting a
burning smell.
W en t e power is on, t ere is unexpected sounds or sparking.
T ere is dust or dirt on t e power plug. Remove wit a dry brus .
Safety Warnings
Please use a 240V 60Hz socket Do not s are power sockets
Fire or electric s ock may
occur if a 220-240V AC-50
or 60Hz socket is not used.
Do not s are power sockets
wit ot er devices via adapters
or power boards.
Do not use non-original covers Stop use if t e power cord becomes damaged
T e use of non-original covers may
result in fire, burns or ot er mis aps.
A damaged power cord is a fire and
s ock risk. Contact t e Kogan.com
customer support team.
Do not insert foreign objects Keep unit away from c ildren
Do not insert foreign objects suc as
pins or paperclips into vents or cavities.
Doing so may cause electric s ock or a
fire.
Keep t e unit and power cords out of
reac of c ildren.
No modifications Do not was or immerse in water
It is pro ibited to modify or repair t e
unit yourself. For repairs please contact
t e Kogan.com customer support team.
T is may lead to electric s ock, fire or
t e unit being s ort-circuited.
Cover lifting warnings Regular Inspections
W en t e electric cooker is safe to open, t ere is no
pressure inside t e pot and t e valve will be lowered.
W en t e electric cooker is not safe to open, t ere is
pressure inside t e pot and t e valve will ave risen. Do
not open t e cover until t e pressure as completely
disc arged.
Carry out regular inspections of t e
valve and anti-block s ield to ensure
t at t ey are unobstructed.
Do not place any eavy objects on t e
ex aust valve.
9

Do not touc t e plug wit wet ands Do not pull on t e cord w en unplugging
T is can lead to electric s ock. W en unplugging t e cord, be sure to
pinc t e plug andle.
Never pull on t e power cord, as t is
may cause damage to t e cord.
W en not in use, unplug unit from socket Keep ands away from t e ex aust valve
T is will stop damage to t e unit in t e
event of a power surge.
W en cooking, never put any part of
your body near t e ex aust valve to
prevent burns. Never cover t e valve
wit a rag during use.
Never touc t e cover during operation Do not exceed t e MAX level
W en t e unit is operating, t e cover
will quickly rise in temperature. Never
touc it wit your and.
Doing so may lead to serious burns.
Food to be cooked s ould not exceed
t e MAX level, as t is may result in t e
food only being partially cooked, or t e
unit may over eat and fail.
Only use t e supplied inner pot Do not eat t e inner pot via ot er means
Do not substitute t e inner pot for a
replacement pot of similar dimensions.
T e supplied pot is designed especially
for t is product and misuse may lead to
over eating or abnormal operation.
Heating t e inner pot via any met od
ot er t an t e pressure cooker may
result in t e pot deforming w ic will
lead to failure w en using it wit t e
pressure cooker.
W en moving unit, use t e cooker andles. Never use t e unit in t e following locations:
W en t e unit needs to be relocated
eit er w ile ot or cold, never lift it via
t e cover andle, as t is may result in
t e cover coming free and t e unit
dropping to t e floor.
•Unstable surfaces
•Near water or fire
•Adjacent to walls or furniture
•Places exposed to direct suns ine or splas ing oil
Cleaning
1. After eac use, it is important to clean t e cooker.
2. Before cleaning, unplug t e unit and carry out t e cleaning and maintenance after t e unit as
cooled down completely.
3. Remove t e cover and inner pot. Was t em in detergent, t en rinse t em clean wit fres water.
Wipe t em down wit a soft clot .
4. Using clean water, clean t e cover, including t e valve, gasket, anti-block s ield, ex aust valve core
and float valve, t en wipe clean wit a clot . After cleaning, install t e cover correctly.
5. Clean t e cooker body wit a soft clot . Do not immerse t e unit in water or was it down wit
running water.
Warranty
T e Kogan.com warranty is valid only w en t is unit is used for ouse old use.
In any of t e following situations, t e warranty is invalidated:
•Damage by unsuitable operation, storage or maintenance by t e consumer
•Damage due to use of a non-specified accessory by any person ot er t an a Kogan.com service
tec nician
•Damage due to undue force being exerted on t e cooker
•T e pressure cooker is used in a commercial environment
10

Troubleshooting
Problem Possible Reason Solution
1Difficulty in closing
t e cover
Gasket positioned badly Locate t e gasket
Pus rod jammed by valve Pus t e rod lig tly by and
2Difficulty in opening
t e cover
Float valve fails to fall after steam release Press t e float valve gently wit c opsticks
Pressure exists inside cooker Open t e cover once t e pressure as lowered
3 Leakage from cover
No gasket Place t e gasket in position correctly
Food deposits attac ed to gasket Clean t e gasket ring
Gasket worn Replace t e gasket ring
Cover not firmly closed Close t e cover correctly
4Leakage from float
valve
Food deposits attac ed to t e float valve
gasket ring Clean t e float valve gasket
Float valve gasket ring worn Replace t e float valve gasket
5 Float valve unable to
rise
Insufficient food and water inside t e pot Put more food and water into t e pot
Small leakage from cover or ex aust valve Contact t e Kogan.com customer support team
6 Ex aust from valve
does not stop
Ex aust valve not in t e closed position Slide t e ex aust valve to t e closed position
Press control failure Contact t e Kogan.com customer support team
7 Lamp power low Bad power contact C eck t e power cord is plugged in fully
8
Error
codes
flas ing
C1 Sensor failure Contact t e Kogan.com customer support team
C2
C5
Temperature too ig due to not enoug
water being inside t e pot Add water as required
Temperature too ig due to inner pot not
being positioned correctly Reposition t e inner pot correctly
C6 Press switc failure Contact t e Kogan.com customer support team
9Rice alf cooked/too
ard
Not enoug water in t e pot Add more water
Cover closed prematurely Once t e time finis es, release t e steam and
open t e cover for 5 minutes
10 Rice too soft Too muc water Reduce t e water level
If you ave any furt er questions or concerns, please contact t e Kogan.com customer support team.
11
Other manuals for KAPRSCOOKZA
1
Other Kogan Electric Pressure Cooker manuals