Kogan Atlas KAL14N300HA User manual

USER GUIDE
KOGAN ATLAS 14.1” N300 NOTEBOOK
4GB, 64GB (KAL14N300HA)

2
Safety and warnings ................... 02 - 03
Components..........................................03
Product overview...........................04 - 05
Getting started......................................06
Installing SSD expansion .................... 07
Using Windows 10 S mode ................. 07
Using Windows 10.................................08
Specifications.........................................09
Troubleshooting...................................... 10
CONTENTS
Thank you for buying this Kogan product. Please read all safety instructions before
using your notebook computer.
• Read all instructions before using the device and retain for reference.
• This device must be used in an environment where the ambient temperature is
between 5°C (41°F) and 35°C (95°F ).
• Do not expose the device to rain or humidity and keep it away from liquids. If water
or other liquid is spilled on the unit, switch o the unit immediately and wait until it is
completely dry before turning it back on.
• Do not expose the device to solar radiation.
• Do not use strong solvents, liquid detergents or other chemicals on or near the
surface of the device to prevent corrosion or deterioration of the surface.
• Do not expose the device to dusty environments.
• Do not use the device during a gas leak.
• Do not expose the device to strong magnetic or electrical fields.
• You can pass the device through airport X-ray detectors. However, it is recommended
that you do not pass your device through the magnetic detection portals or expose it
to portable detectors.
• Do not place any objects on the device.
• Do not place the device on an uneven or unstable surface.
• Ensure that the device is protected from falls or other shocks that may damage it.
• Do not leave the device on or in change on your knees or any other part of your body
to avoid the risk of heat-related injuries.
• Turn o the unit before transporting or covering it with materials that do not allow for
optimum air circulation.
• Do not use damaged power cords, accessories or other peripherals with your device.
• We recommend exclusively using the accessories (power supply. etc.) supplied with
the device. Use only original batteries. Replacing the battery with an incorrect battery
can lead to an explosion. Do not disassemble, modify or repair the device yourself,
otherwise, your warranty may be voided.
• Please back up your important content regularly to avoid data loss.
• Only a technician authorized by Kogan is allowed to remove and handle the battery.
• Your battery may present a fire or burn hazard if removed or disassembled.
• Please observe the information on the device’s warning labels to prevent injury.
• There is a risk of explosion if the battery is replaced by an incorrect model.
• Do not throw the battery into the fire.
• Do not attempt to short-circuit the battery.
THIS USER GUIDE COVERS THE FOLLOWING MODELS
Kogan Atlas 14.1” N300 Notebook (KAL14N300HA)
SAFETY AND WARNINGS

3
• Do not attempt to disassemble the battery or reassemble the battery.
• Stop using the battery if it leaks.
• The battery and its components must be recycled or disposed of properly.
• Keep the battery and its components out of the reach of children.
Proper Disposal
Do not throw your Notebook PC in municipal waste. The symbol of the
crossed out wheelie bin indicates that the product (electrical, electronic
equipment and mercury-containing button cell battery) should not be
placed in municipal waste. Check local regulations for disposing for
electronic products.
Do not throw the battery in municipal waste. The symbol of the crossed out
wheelie bin indicates that the battery should not be placed in municipal
waste.
SAFETY AND WARNINGS cont’d
CAUTION
WARNING: SHOCK HAZARD. DO NOT OPEN.
CAUTION: TO REDUCE THE RISK OF ELECTRIC SHOCK DO NOT REMOVE COVER (OR BACK).
NO USER SERVICEABLE PARTS INSIDE. REFER TO QUALIFIED SERVICE PERSONNEL.
The lightning flash with arrowhead symbol, within an equilateral triangle, is
intended to alert the user to the presence of uninsulated “dangerous voltage”
within the products enclosure that may be of sucient magnitude to constitute
a risk of electric shock to persons.
The exclamation point within an equilateral triangle is intended to alert the user
to the presence of important operating and maintenance (servicing) instructions
in the literature accompanying the appliance.
At full volume, prolonged listening to audio can damage the user’s hearing.
A Atlas 14.1” N300 Notebook
B Power adapter
C Quick-start guide
D Warranty card
C DB
A
COMPONENTS

4
PRODUCT OVERVIEW
1
2
7
6
5
4
8
3
1 Camera
This built-in camera can be used to take photos, record video, or for use in video
chats.
2 Display
High-definition LCD display panel.
3 Microphones
The built-in twin microphones can be used to record voice memos and for use in
calls.
4 Indicator lights
Indicators for caps lock on, charging and working notices.
5 Power button
Press to turn notebook on. You can also use this button to enter sleep mode, and to
wake it from sleep mode. If the notebook is unresponsive, holding down the power
button for an extended period of time will shut down the device.
6 Keyboard
QWERTY keyboard with Windows key and function options. Hold the ‘Fn’ key while
pressing function buttons (example, Fn + F10 to increase display brightness).
7 Trackpad
The touchpad allows for onscreen navigation and use of gestures. Think of this as
your computer’s built-in mouse.
8 Le/right trackpad buttons
Much like the le and right buttons on a traditional mouse, the trackpad features
the same functionality.

5
PRODUCT OVERVIEW (cont’d)
12
11
13 14
10
15 1716
9 SSD expansion slot
Slot for expandable storage. This notebook fits an M.2 2280 SSD
(22mm x 80mm) and is not compatible with other sizes.
10 Speakers
Two built-in speakers allowing for stereo audio output.
11 Charge indicator light
Lights up red when charger is in use.
12 Power input port
DC charging base for 12V/2A power supply (adapter supplied). Do not use with any
other power supply or charger.
13 USB 3.0 input
Input for flash drives, additional keyboard and mouse, and any other devices with
USB 3.0 connectivity. This input also supports 2.0 and below.
14 Mini HDMI input
Supports HDMI cable (not supplied) for linking with a TV or external monitor.
15 3.5mm audio out
Line audio out port for use with headphones, amplifier, external speakers or any
other audio device via an AUX cable (not supplied).
16 microSD card slot
Card reader slot with microSD format support, ideal for importing photographs.
17 USB 2.0 input
Input for flash drives, additional keyboard and mouse, and any other devices with
USB 2.0 connectivity. This input is not compatible with USB 3.0 or above.
9

6
1. Connecting power supply
a. Plug the power adapter into a suitable
power outlet.
b. Insert adapter into the notebook’s
power input port. The indicator light will
show if power is being received.
2. Power on the notebook
a. Li to open the display panel.
b. Press the power button.
When connected, the notebook will
automatically begin to charge.
Ensure the battery has been charged for
at least 3 hours before using without a
power supply for the first time.
1b 2a
2b
GETTING STARTED

7
3a. Flip the unit over and remove the two
screws holding the SSD (M.2 2280)
cover in place.
3b. Remove the cover and place your SSD
with the contacts facing the right as this
is where the contacts in the notebook
are located. Slide it to the right to install.
3c. Use the existing threading to screw
the SSD into place. Once inserted and
secured into position, place the cover
back into position, and screw down with
the screws removed in step 1.
INSTALLING SSD EXPANSION
NOTE
Your SSD may be able to be inserted with
either side facing up, however, only one
orientation will work with the unit. If you
are not able to detect your SSD with one
orientation, try to change the orientation of
the SSD to show the other side. Be careful
not to damage any contacts.
NOTE
This notebook fits an M.2 2280 SSD
(22mm x 80mm) and is not compatible
with other sizes.
3a
3c
3b
This unit may arrive in S Mode, meaning that no external .exe files can be
directly installed onto the unit. You may still install apps downloaded from the
Microso Store.
This is intended for higher security and performance of the unit.
If you want to install an app that isn’t available on the Microso Store, you’ll
need to switch out of S Mode.
You can easily switch out of S Mode, however, keep in mind that you cannot go
back to S Mode once switched.
Switching out of S Mode
1. On your notebook running Windows 10 in S Mode, open Settings >
Update & Security > Activation.
2. In the Switch to Windows 10 Home or Switch to Windows 10 Pro section,
select Go to the Store. (If you also see an “Upgrade your edition of
Windows” option, be careful not to click the “Go to the Store” link that
appears there).
3. On the Switch out of S Mode (or similar) page that appears in the
Microso Store, select the Get button. Aer you see a confirmation
message on the page, you’ll be able to install apps from outside of the
Microso Store.
USING WINDOWS 10 S MODE

8
3a. Start menu
Clicking in the lower-le corner of the
homescreen will open Windows 10’s
Start menu. Here you’ll be able to find
all of your applications, shortcuts to the
Documents and Pictures folders, as well
as a shortcut to your notebook’s settings
menu.
Using Function keys
Function keys are keys with an additional function, accessible when pressed
while holding the “Fn” key (lower le corner, between “Ctrl” and the Windows
logo key, “ ”). Similar to holding the “Shi” key for an upper case character
or symbol, hold the “Fn” can provide quick access to toggling volume on/o,
pausing or skipping media, putting the laptop into sleep mode, and many
more functions.
3d. Power options, shutting down
Also in the Start menu, you’ll find the
power options. Here you’ll be able to
select either sleep, shut down, or restart.
To turn o your notebook safely, select
shut down from this list.
3b. Pinned apps
Some of the applications are “pinned”
to the start menu, appearing in the large
grid on the right-hand side of the start
menu. This list can be customised to
your preference at any time.
3c. Action centre
In the lower-right corner of the
homescreen, you will be able to expand
the action centre. This includes many
adjustable settings and any notifications
and messages from apps.
4a
4b
4d
4c
USING WINDOWS 10
Fn
Other keyboard shortcuts
Maximize Window: F11 or Windows logo key (“ ”) + Up Arrow
Task View: Windows logo key (“ ”) + Tab
Hide all applications, return to desktop: Windows logo key (“ ”) + D
Open Quick Access Menu: Windows logo key (“ ”) + X
Lock your PC: Windows logo key (“ ”) + L

9
SPECIFICATIONS
Note:
• Design and specifications are subject to change without notice.
• Weight and dimension shown are approximate.
Audio
Microphone Yes
Speakers 2 x 1.0W
Body
Form Factor Notebook
Camera
Camera Type Front Facing 0.3MP
Connectivity
Bluetooth 4.0
Wi-Fi 802.11b/g/n
Dimensions
Dimensions 332.6 x 223.5 x 21.6mm
Inputs/ Outputs
Headphone Jack 3.5mm
Mini HDMI 1
USB 2.0 1
USB 3.0 1
Laptop
RAM 4GB
Resolution 1366 x 768
Screen Size 14.1”
Storage Capacity 64GB
Storage Type eMMC
Memory
Memory Card Support Micro SD Card
Performance
CPU Intel® Celeron® dual-core processor N4000
GPU Intel HD Graphics 600
OS Version Windows 10 Home (S Mode)
Processor Speed 1.10 GHz - 2.60 GHz (Burst)
Power
Battery Capacity 5000mAh
Battery Life 4-5hrs
Battery Type Lithium-ion Polymer Battery
Storage
SSD Slot M.2 2280 512GB (Max.)

10
BASIC TROUBLESHOOTING
My notebook isn’t turning on
/ isn’t charging
• Leave the unit on charge for at least
an hour before attempting to turn the
unit on
• The battery may have naturally
depleted and may take some time to
recharge. If in storage for extended
periods of time, it is recommended to
periodically charge the unit to keep
the battery capacity high, as batteries
naturally deteriorate and eventually
completely die over time.
• Make note if any lights turn on, or if
any internal components like fans turn
on
• Inspect the unit, charging port and
power cord for any physical damage,
or debris. If you notice any damage to
the power cord, please do not use it,
and contact help.kogan.com
Wi-Fi connection isn’t working
• Restart your modem/router, or both if
you have separate units.
• Reconnect any range extenders that
may be in use
• Restart the device that is having issues
• Try moving the device closer to the
source
• If you cannot connect at all, double
check that all passwords are correct
• If you can connect but are getting
weak or slow data, try disconnecting
the device from the network manually
and reconnect
Why isn’t my battery lasting long?
• The advertised battery life is
calculated with the laptop in Airplane
mode (i.e. no active connections
including WiFi, Bluetooth, etc.) the
screen brightness at its lowest and the
laptop sitting idle.
• This is the standard method of
determining battery life as it’s the only
way to show comparisons between
different models.
• If you feel there is an issue with your
battery, please test the battery using
software (such as Passmark Battery
Monitor) and contact help.kogan.com
with a screenshot of your findings.
• When testing the unit, please ensure
brightness is turned down to the
lowest setting, and all connections are
turned off.
• To assist with the long-term health of
your battery, do not leave it plugged in
constantly. Only charge the unit when
required.
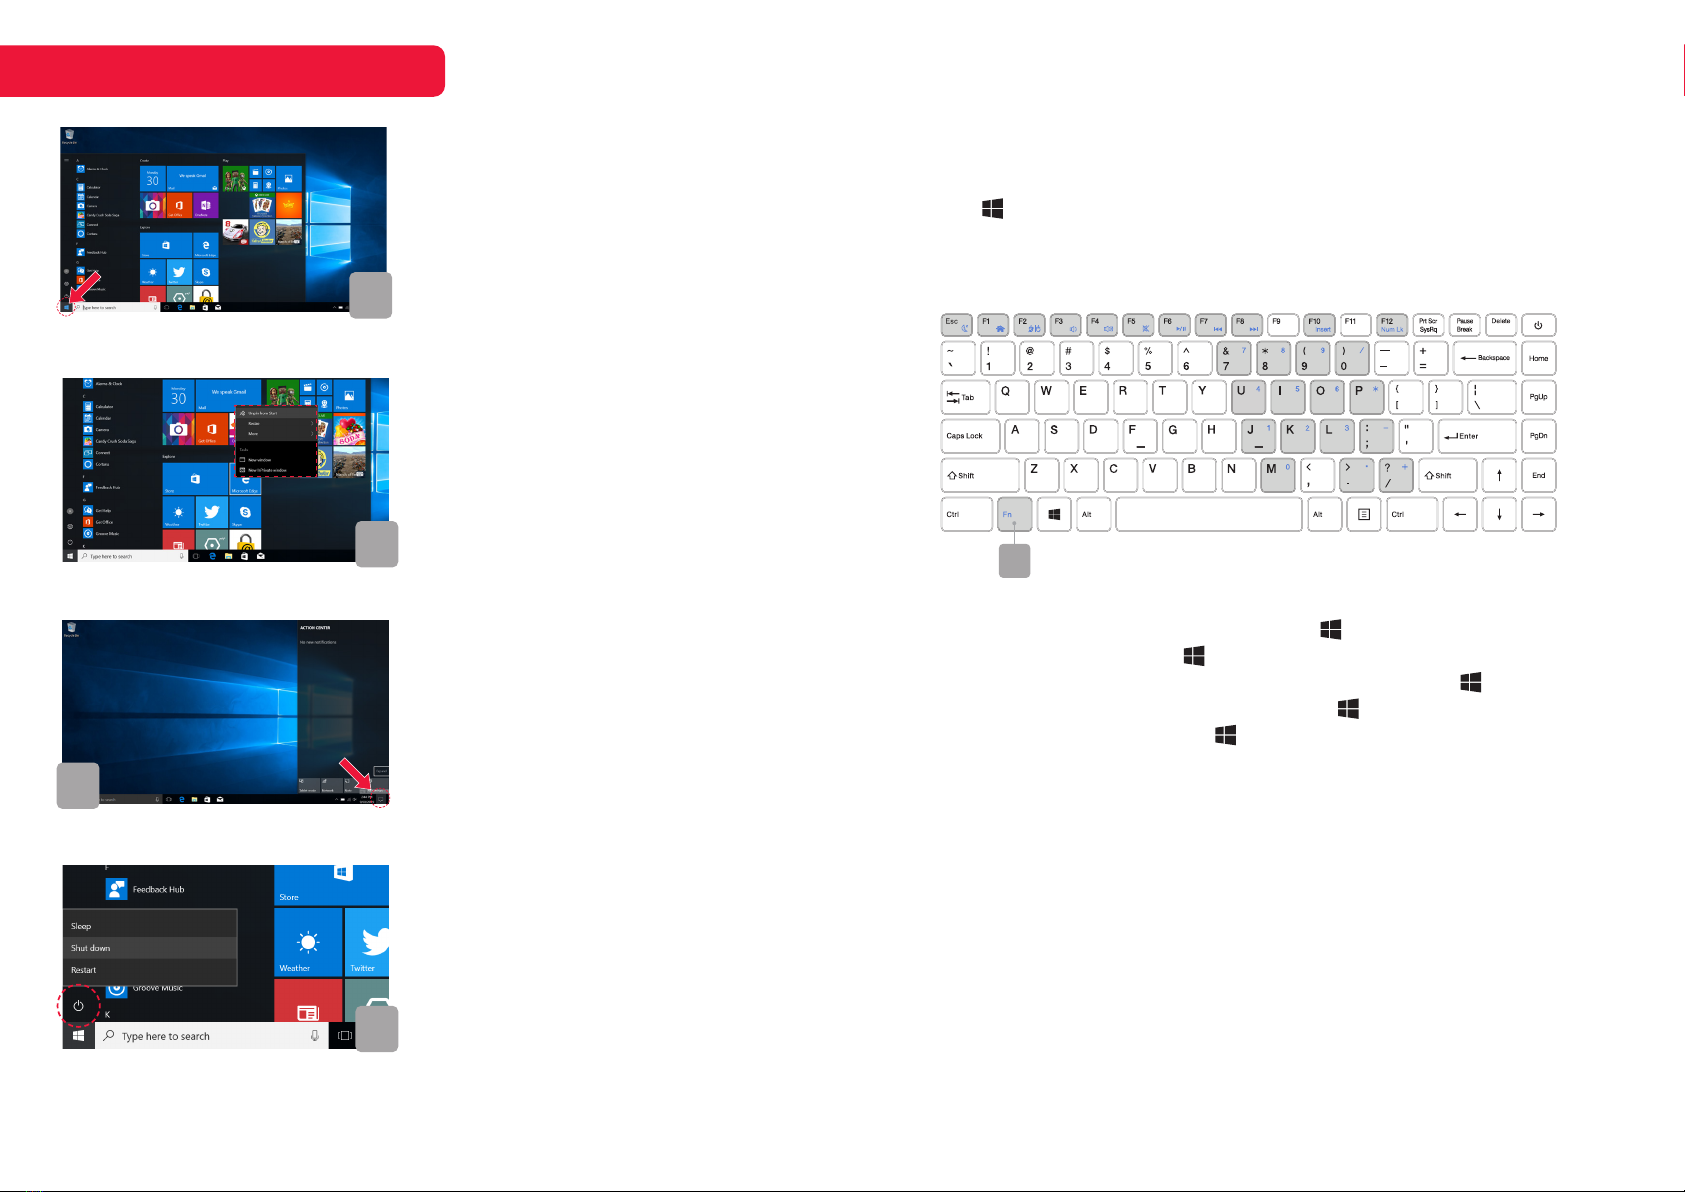
Reinstalling Windows 10 on my laptop
• Reboot to the login screen.
• Where your user is displayed and your
password requested, click the power
icon on the bottom right of the screen.
The options to “Sleep”, “Shut Down” or
“Restart” will appear.
• Hold the shift key and press “Restart”.
You will be taken to a light blue screen
with several options to choose from
• Select “Troubleshoot”, followed by
“Reset this PC”
• You are presented with the two options
“Keep my files” or “Remove everything”
• If you select “Keep my files”, you
will need to provide the login and
password for an administrator
account. If you do not know this
password, you will be unable to use
this option.
• If you select “Remove everything”,
you will be asked if you want to “Just
remove my files” or “Fully clean the
drive”. Choose “Just remove my files”.
• Confirm on the next screen to proceed
with the reset process.
Screen gets dark when unplugged
• This will be occurring due to your
power plan settings.
• You can adjust your power plan
settings through your control panel.
How to connect Android phone to
Windows 10
• When you plug in your phone to your
PC via USB, you’ll see a notification
up top with an option to select USB
transfer options on your phone.
• Please check that you have selected
either “Transfer files (MTP)” or “Transfer
photos (PTP)” from the USB transfer
options.
I’ve forgotten my password
• There are several options to reset a
Microsoft password.
• Use a password reset disc via USB.
• Reset Microsoft account password
online with another device.
• Reset Windows back to the factory
default. Please note, this will delete all
personal files and settings.
My screen has bubbles/scratches
• Does your screen have a pre-applied
screen protector? Any bubbles or
scratches would be affecting the
screen protector, not the screen itself.
• This screen protector is intended
to protect the screen from damage
during manufacture, packing and
transit and can be safely removed
after it has been received.
For more troubleshooting advice, and any
additional help you may need for this notebook,
head online to help.kogan.com
© Copyright 2019, Kogan.com – KAL14N300HA UM 12-19
Table of contents
Other Kogan Laptop manuals

Kogan
Kogan ATLAS User manual

Kogan
Kogan ATLAS 11.6 CELERON D700 User manual

Kogan
Kogan ATLAS User manual

Kogan
Kogan KHLAP15I78GFHA User manual

Kogan
Kogan D600 User manual

Kogan
Kogan ATLAS L700 User manual

Kogan
Kogan ATLAS User manual

Kogan
Kogan Atlas KAL11C250SB User manual

Kogan
Kogan ATLAS D500 User manual

Kogan
Kogan ATLAS 14.1" N370 User manual
Popular Laptop manuals by other brands

Toshiba
Toshiba Qosmio X870 Series user manual

Lenovo
Lenovo ThinkPad Edge E530 Benutzerhandbuch

Compaq
Compaq 1700 - Armada - PII 266 MHz Frequently asked questions

Fujitsu
Fujitsu P1610 - LifeBook - Core Solo 1.2 GHz Technical Procedure

Dell
Dell G15 5511 Service manual

Lenovo
Lenovo ThinkPad T420 4177 reference guide