manuals.online logo
Brands
  1. Home
  2. •
  3. Brands
  4. •
  5. Kogan
  6. •
  7. Quadcopter
  8. •
  9. Kogan KARCTUFOMNA User manual

Kogan KARCTUFOMNA User manual

Micro Remote Control UFO Quadcopter
KARCTUFOMNA
Quick Start Guide
Please read this guide carefully before use.
Product Layout
attery Installation
To load the batteries:
Open the battery cover on the back of the
transmitter, then load 6 x AA batteries
correctly as sho n by the polarity
markings.
CAUTION
•Make sure the battery polarities are
correct. Do not load batteries upside-
do n.
•Please do not mix old and ne
batteries.
•Please do not mix batteries of different
types.
Charging Aircraft attery
Please remove the lithium battery from the aircraft as sho n, disconnecting the po er
plug. Plug the USB charger into the po er plug, and the LED lights ill illuminate to
sho that the battery is receiving charge. The LED lights should go out after approx. 45
minutes, at hich point the battery is fully charged.
1
Lithium attery Notes
•In the event of misuse, the batteries may catch fire, leak or explode. The user
should be a are of the risks of using batteries. Kogan.com do not bear any
responsibility for accidents that occur through misuse or accidents.
•If during use of during charging you notice smoke or a strange smell, unplug the
cord immediately.
•Please follo these instructions.
Lithium attery Charging
•Please use the original supplied charger to ensure your safety.
•Do not charge damaged or orn out batteries.
•Do not overcharge your batteries. Once the charging LEDs go out, please unplug
the charging cord.
•Do not charge the batteries next to flammable gases, liquids or objects.
•If the batteries become hot to the touch during use or charging, immediately
stop charging or use.
Use and Storage
•Do not insert or remove batteries hile product is in use.
•Do not use damaged batteries.
•Do not expose the batteries to rain, excessive heat or sudden impacts.
•Do not allo children or babies to play ith the batteries.
•Do not thro batteries into a fire.
•Do not dismantle, drill or cut the batteries.
•Do not clean charger ith alcohol or any flammable solvents.
•Do not attempt to short circuit the batteries or charger.
•Please store product at room temperature.
•Please remove the batteries from the unit if unit is not being used for an
extended period of time.
Disposal
•At the end of it's useful life, do not dispose of the batteries ith the household
aste. The batteries should be recycled as per your local municipal recycling
operations.
2
Use and Control
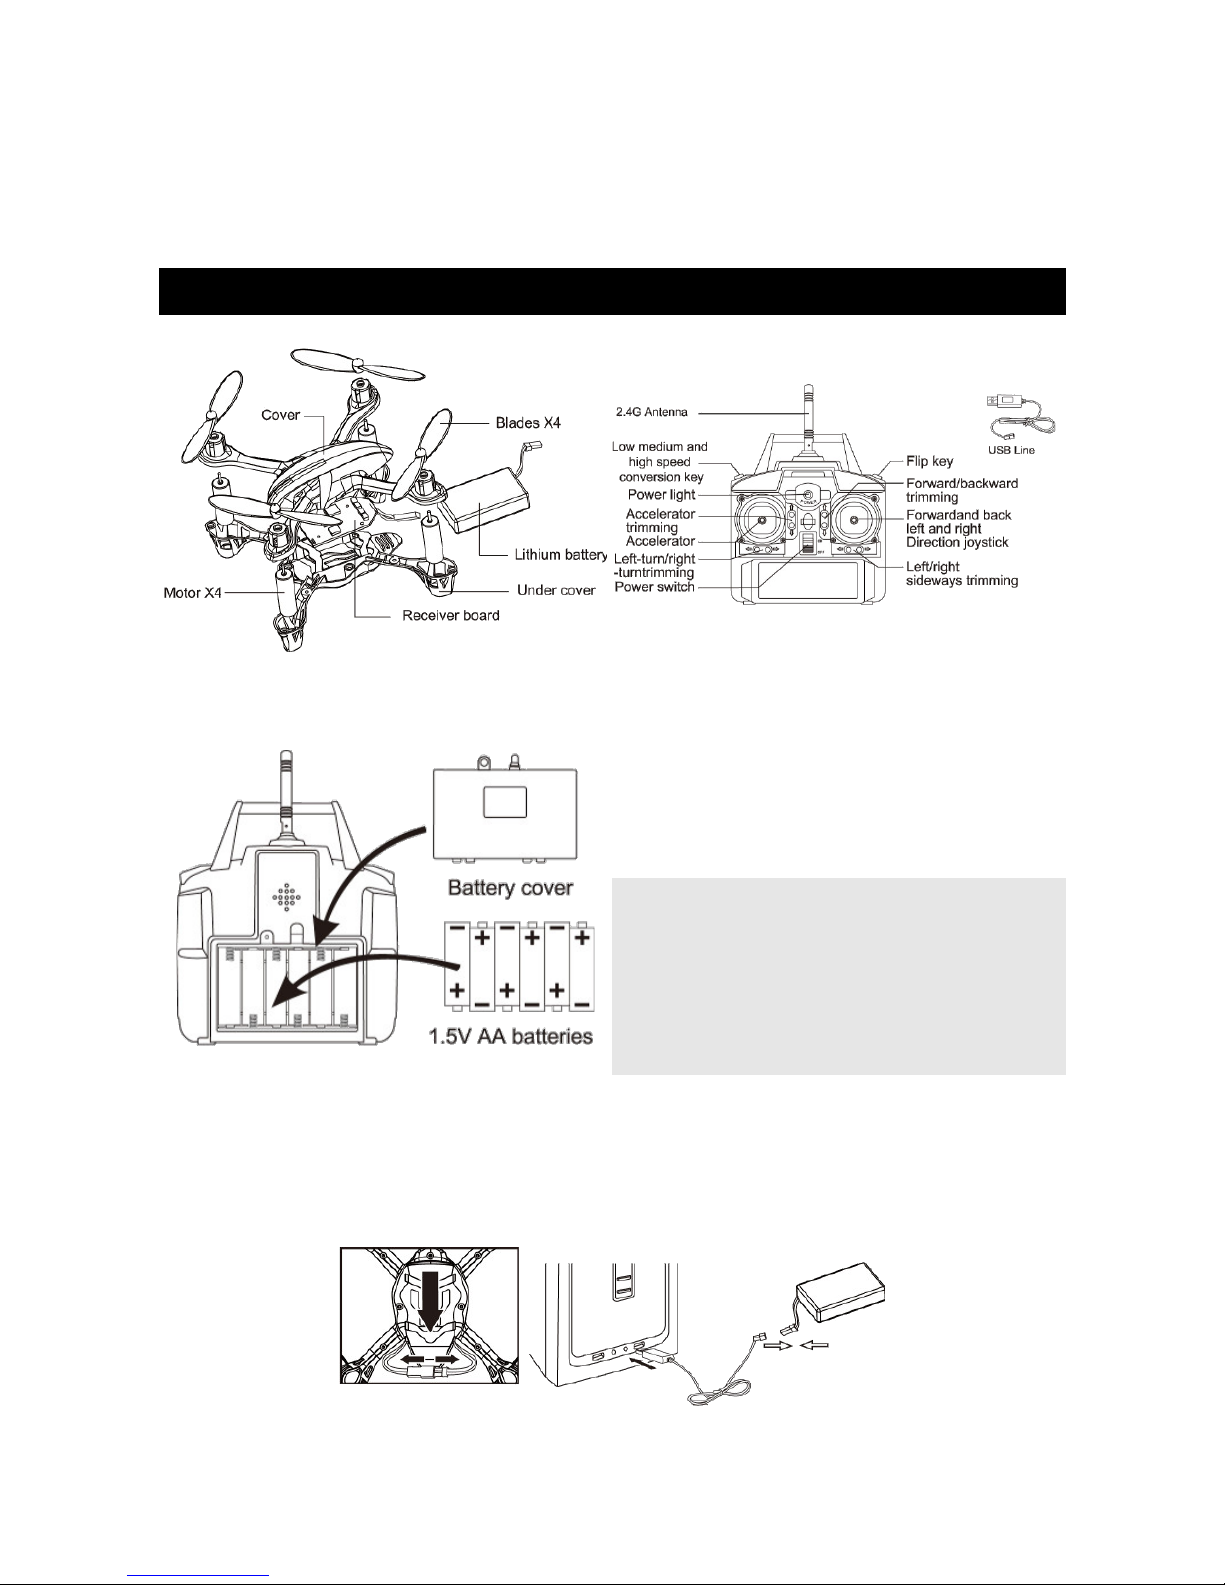
1. The aircraft po er cord and the battery cord
should be connected as sho n on page 1. Correct
these together hile the helicopter is sitting on flat
ground.
2. After about 6 seconds, the LED lights ill be
flashing. To pair the controller and the helicopter,
push the throttle stick to the bottom, then turn the
po er s itch to ON. Immediately push the throttle
stick up to the maximum, then back do n to the
bottom. Upon completion of these steps, the
aircraft can be operated.
IMPORTANT: The hite blades should be on the front side of the copter, hile the black
blades should be on the rear side.
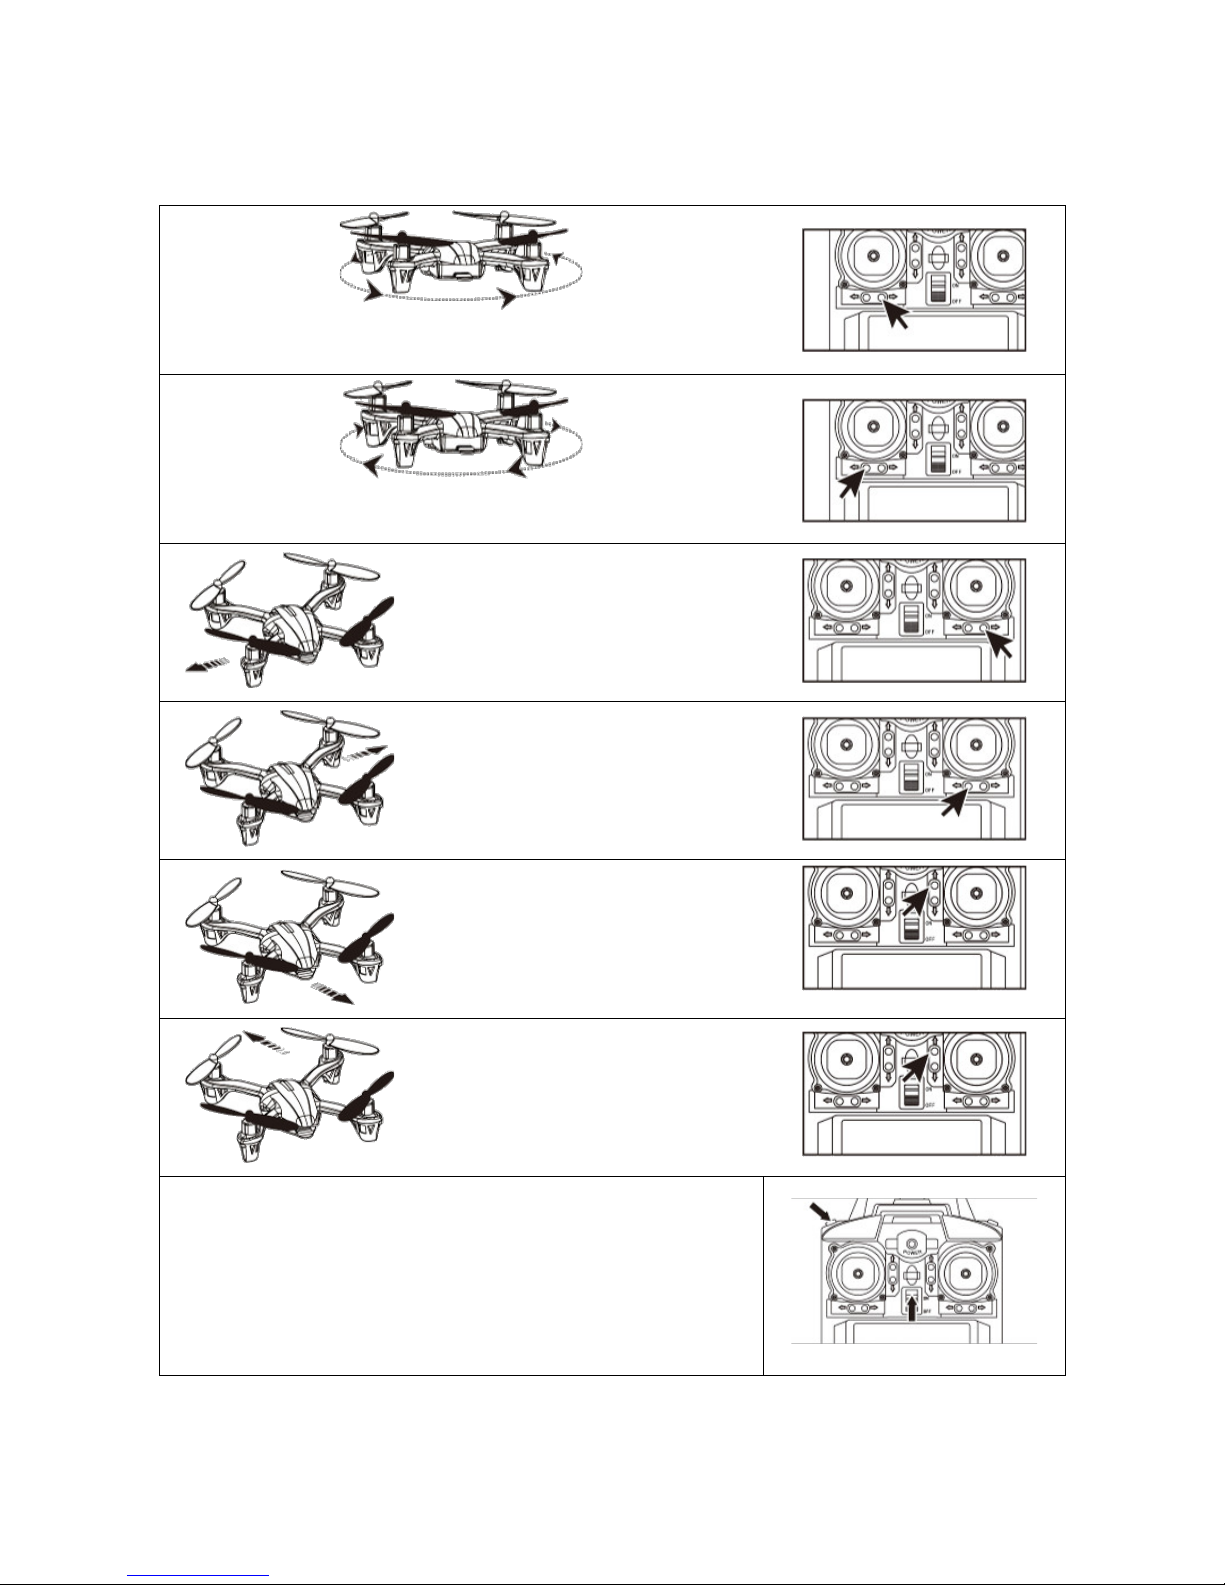
Push the throttle up, and the
speed of the blades ill
increase. The copter ill begin
to ascend.
Pull the throttle back, and the
speed of the blades ill
decrease. The copter ill
begin to descend.
Push the rudder stick to the
left, and the copter ill turn
left.
Push the rudder stick to the
right, and the copter ill turn
right.
When the rudder stick is
pressed up ard, the copter
ill tilt and move for ard.
When the rudder stick is
pulled back, the copter ill
tilt back and reverse.
When the rudder is pressed
to the right, the copter ill
fly to the right.
When the rudder is pressed
to the left, the copter ill fly
to the left.
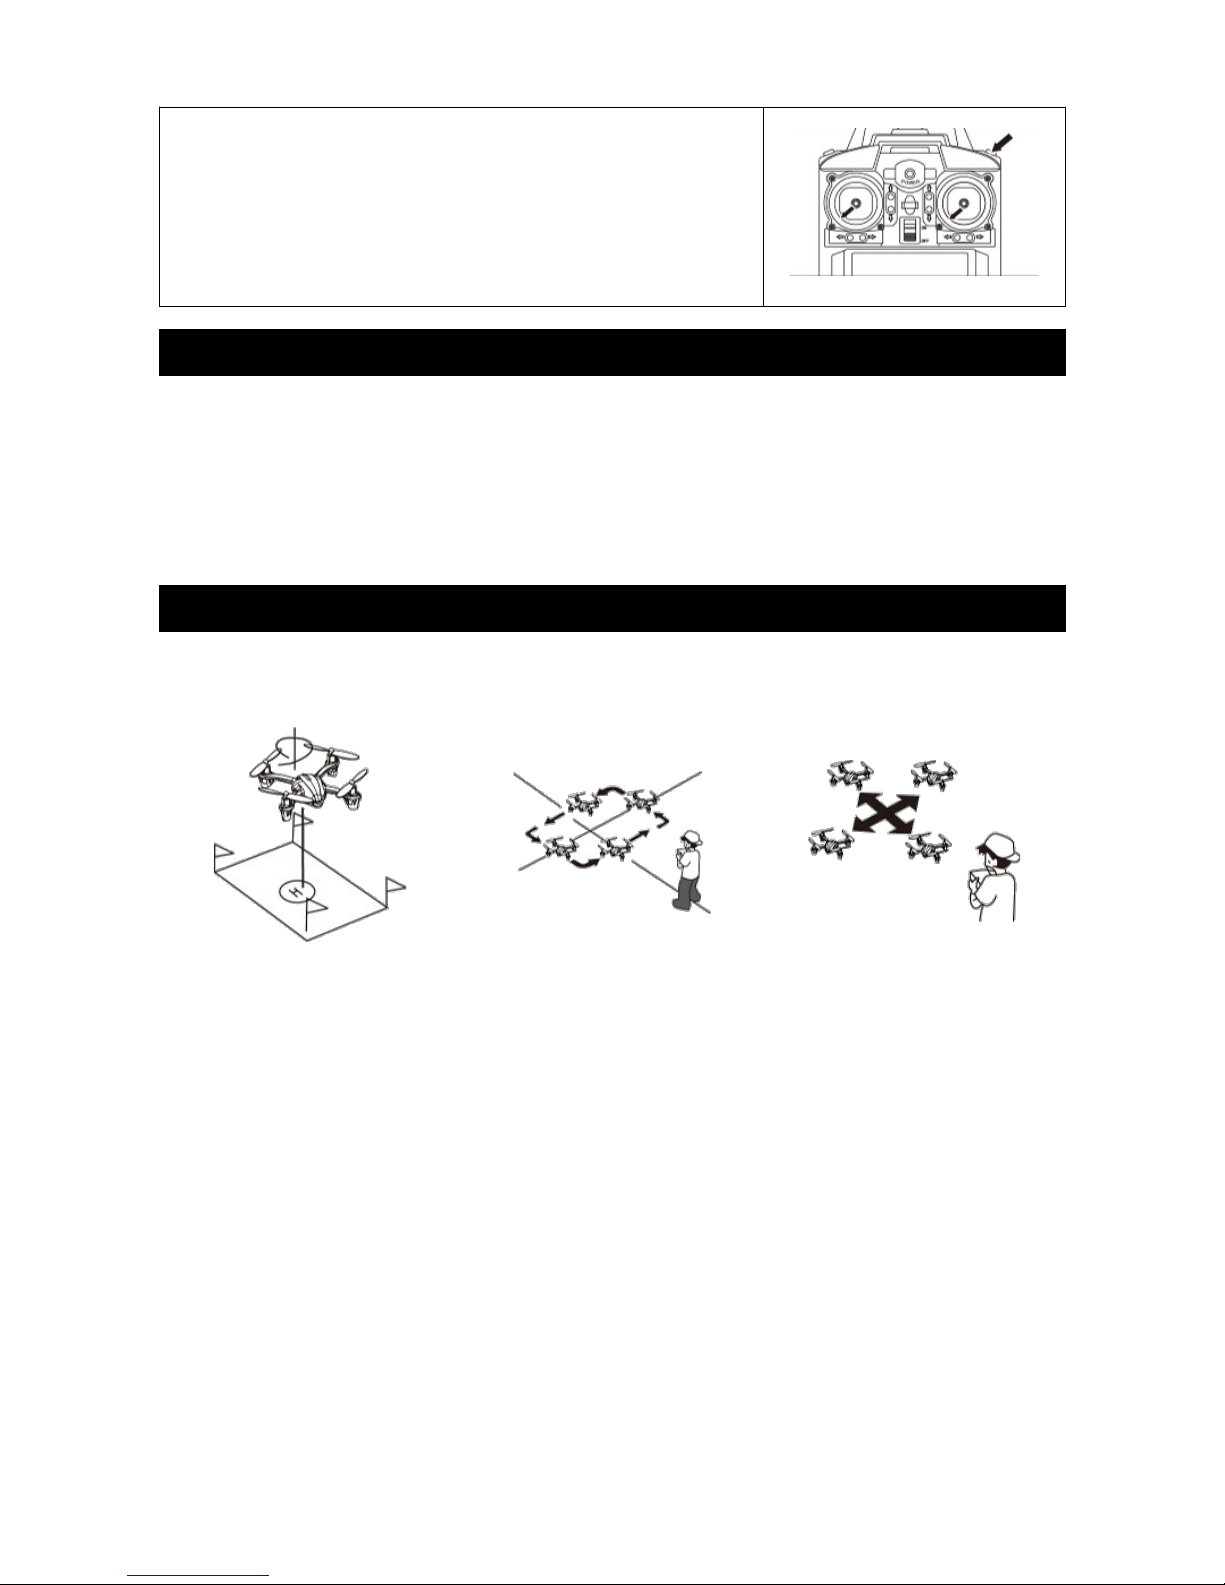
Push the controls slo ly to ensure you have adequate control of the copter.
3
Note: once the copter ascends to a height of 30cm or above, it ill suffer from the
"ground effect" and the performance ill become unstable. With practice you ill be
able to control this.
When the copter continually spins to the left, please
press the right trimming button until it stops spinning.
When the copter continually spins to the right, please
press the left trimming button until it stops spinning.
When the copter flies side ays
(to ards the left) in the process
of hovering, please press the
right-hover trimming button
until it stops.
When the copter flies side ays
(to ards the right) in the
process of hovering, please
press the left-hover trimming
button until it stops.
When the copter flies
back ards in the process of
hovering, please press the
for ard-hover trimming button
until it stops.
When the copter flies for ards
in the process of hovering,
please press the back ard-
hovering trimming button until
it stops.
Press and hold the speed conversion button hile turning
on the po er s itch. This ill reset the trim settings.
4
If the copter is not easily controllable, this may require a
full reset of the controller so that it can be recalibrated.
Press both joysticks back and to the left, then press the
throttle lever. The lights on the copter ill flash, at hich
point you should release all of the controls. The
controller ill then be recalibrated to the copter.
Flying Environment
•Indoor flying: choose a ide, spacious location ith no barriers, pets or people.
•Outdoor flying: choose a arm, sunny and indless day.
•Do not fly in extreme temperatures. Flying in extreme temperatures may affect
the performance and lead to damage to the product.
•Do not fly in indy eather. The performance and control of the copter ill be
affected by inds. Windy conditions may cause loss of control hich ill
damage the copter.
Flying Practice
To master the copter, please attempt the follo ing practices before attempting any
skilled flight patterns.
When you can perform a take-off, rotation and return landing to the point of take off,
you can then attempt square and cross pattern flight actions.
3D Flip Flying
Users can control the copter to perform some breathtaking operations hen mastering
the basics. First, fly the copter up to a height of 3m. Then press the flip button and push
the right rudder to one direction, then release it. The copter ill flip over.
5
Fixed-point revolving
Fixed-point landing
Square pattern flight Cross-action flight
Problems and Solutions
Problem Cause Solution
Transmitter not orking
Transmitter is OFF Turn transmitter ON
Batteries not installed correctly Reinstall batteries, paying attention to
the polarity markings
Batteries are flat Replace batteries
Control failure
Transmitter is OFF Turn transmitter ON
Copter battery is disconnected Reconnect the battery cables
Wind is too strong Do not fly the copter during extremely
indy eather
Take-off failure
Rotation of blades is too slo Push the throttle stick up ards
Copter battery is flat Recharge the copter battery
Landing too soon Throttle stick as pulled back too fast Pull the throttle stick back slo ly to
perform a smooth landing
Out of control Beyond the effective control distance
Ensure that there are no other
transmitters ithin 30m that are using
the same frequency, and ensure you
are ithin 30m of the copter hile
controlling it.
Precautions
•The remote controlled distance ill be shorter hen the batteries in the copter
or the controller themselves are lo .
•It ill be difficult to take off hen the batteries are lo .
•If the copter is damaged, please stop using it immediately.
•If you ill not be using the transmitter for a long time, please remove the
batteries to avoid leakage.
6

Other Kogan Quadcopter manuals

Kogan KARTUFONNA User manual

Kogan

Kogan KARTUFONNA User manual

Kogan KAHELMISSLA User manual

Kogan

Kogan KAHELMISSLA User manual

Popular Quadcopter manuals by other brands

PILOTAGE UFO user manual

PILOTAGE

PILOTAGE UFO user manual

GEPRC Cinebot30 user manual

GEPRC

GEPRC Cinebot30 user manual

Xaircraft X600-D Assembling manual

Xaircraft

Xaircraft X600-D Assembling manual

REVELL X SPY 2.0 user manual

REVELL

REVELL X SPY 2.0 user manual

Carrera RC CA XL Assembly and operating instructions

Carrera RC

Carrera RC CA XL Assembly and operating instructions

dji MATRICE 300 RTK Maintenance manual

dji

dji MATRICE 300 RTK Maintenance manual

Eachine E010S Pro quick start guide

Eachine

Eachine E010S Pro quick start guide

dji Phantom 3 Advanced quick start guide

dji

dji Phantom 3 Advanced quick start guide

SYMA X8W instruction manual

SYMA

SYMA X8W instruction manual

QIMMIQ FREON Quick start manual

QIMMIQ

QIMMIQ FREON Quick start manual

DRONE-HOBBY PIONEER UFO 509 instruction manual

DRONE-HOBBY

DRONE-HOBBY PIONEER UFO 509 instruction manual

DELTA-SPORT 345898 2004 operating instructions

DELTA-SPORT

DELTA-SPORT 345898 2004 operating instructions

Reely DIY X-79 operating instructions

Reely

Reely DIY X-79 operating instructions

4DRC 4D-F9 operating instructions

4DRC

4DRC 4D-F9 operating instructions

Reely Foldable Drone G-Sense quick start guide

Reely

Reely Foldable Drone G-Sense quick start guide

Guardian NH90118 User handbook

Guardian

Guardian NH90118 User handbook

Nine Eagles Galaxy Visitor 3 NE2529M1 operating instructions

Nine Eagles

Nine Eagles Galaxy Visitor 3 NE2529M1 operating instructions

TBS Xraser Micro FPV Racer Quick start guide and manual

TBS Xraser

TBS Xraser Micro FPV Racer Quick start guide and manual

manuals.online logo
manuals.online logoBrands
  • About & Mission
  • Contact us
  • Privacy Policy
  • Terms and Conditions

Copyright 2025 Manuals.Online. All Rights Reserved.