Kohler 10-Jet K-1000-H2 User manual

Installation Guide
10-Jet Corner Hydro-Massage System
Mproduct numbers are for Mexico (i.e. K-12345M)
Los números de productos seguidos de Mcorresponden a México
(Ej. K-12345M)
Français, page “Français-1”
Español, página “Español-1”
K-1000-H2, K-1005-H2, K-5162
1032108-2-D

Important Information
WARNING: When using electrical products, basic precautions should always be followed,
including the following:
DANGER: Risk of electric shock. Connect only to a circuit protected by a Ground-Fault
Circuit-Interrupter (GFCI) or Earth-Leakage Circuit-Breaker (ELCB).
Two dedicated 220-240 V, 20 A, 50/60 Hz services are required. Each must be protected by a GFCI or ELCB.
A pressure wire connector marked ″Ground″is provided within each wiring compartment. To reduce the risk
of electric shock, connect this connector to the grounding terminal of your electric service or supply panel
with a copper wire equivalent in size to the circuit conductors supplying this equipment.
A pressure wire connector is provided on the exterior of the pump or control within this unit. Use this
connector as a bonding conductor between this unit and all of the exposed metal in the vicinity, as needed to
comply with local requirements.
Provide access to components for servicing.
Grounding is required. The unit should be installed and grounded by a qualified service representative.
WARNING: Risk of electric shock. A licensed electrician should make all electrical connections.
WARNING: Risk of electric shock. Disconnect power before servicing.
WARNING: Risk of injury or property damage. Please read all instructions thoroughly before
beginning installation, including the following requirements.
NOTICE: Follow all local plumbing and electrical codes.
Product Information
Product Modifications
WARNING: Unauthorized modifications may cause unsafe operation and poor performance of
the custom system. Do not remove the pump from the pump box or make non-recommended
modifications to the system. Unauthorized modifications could adversely affect the performance
and safe operation of the unit. Kohler Co. shall not be liable under its warranty, or otherwise, for
personal injury or damage caused by any unauthorized modification.
The system is not designed for steam applications, and may not perform in a satisfactory manner as a steam
unit.
Product Inspection
Carefully unpack and inspect all components for damage. Return all materials to the cartons during
construction to prevent damage.
Factory-Assembled Features
Some components have been factory installed and others will require assembly. Components include a tower
with ten pre-assembled jets, a waterfall, a pump, a heater, a control, a footbath and an enclosure.
Connections and Service Access
Before installation, ensure proper access to the final connections.
NOTICE: Provide unrestricted service access to the pump. You must provide access for servicing the
pump, heater and control. The access must be located immediately next to the pump.
1032108-2-D 2 Kohler Co.

Product Information (cont.)
Electrical Requirements
The installation must have two Ground-Fault Circuit-Interrupters (GFCI) or Earth-Leakage Circuit-Breakers
(ELCB). The GFCI or ELCB protects against line-to-ground shock hazard. Use a 220-240 V, 20 A, 50/60 Hz
dedicated service for the pump and control. Use a separate 220-240 V, 20 A, 50/60 Hz dedicated service for
the heater.
Table of Contents
Important Information .............................................................. 2
Product Information ............................................................... 2
Product Modifications ............................................................ 2
Product Inspection .............................................................. 2
Factory-Assembled Features ...................................................... 2
Connections and Service Access ................................................... 2
Electrical Requirements .......................................................... 3
Before You Begin ................................................................. 4
Tools and Materials ............................................................... 4
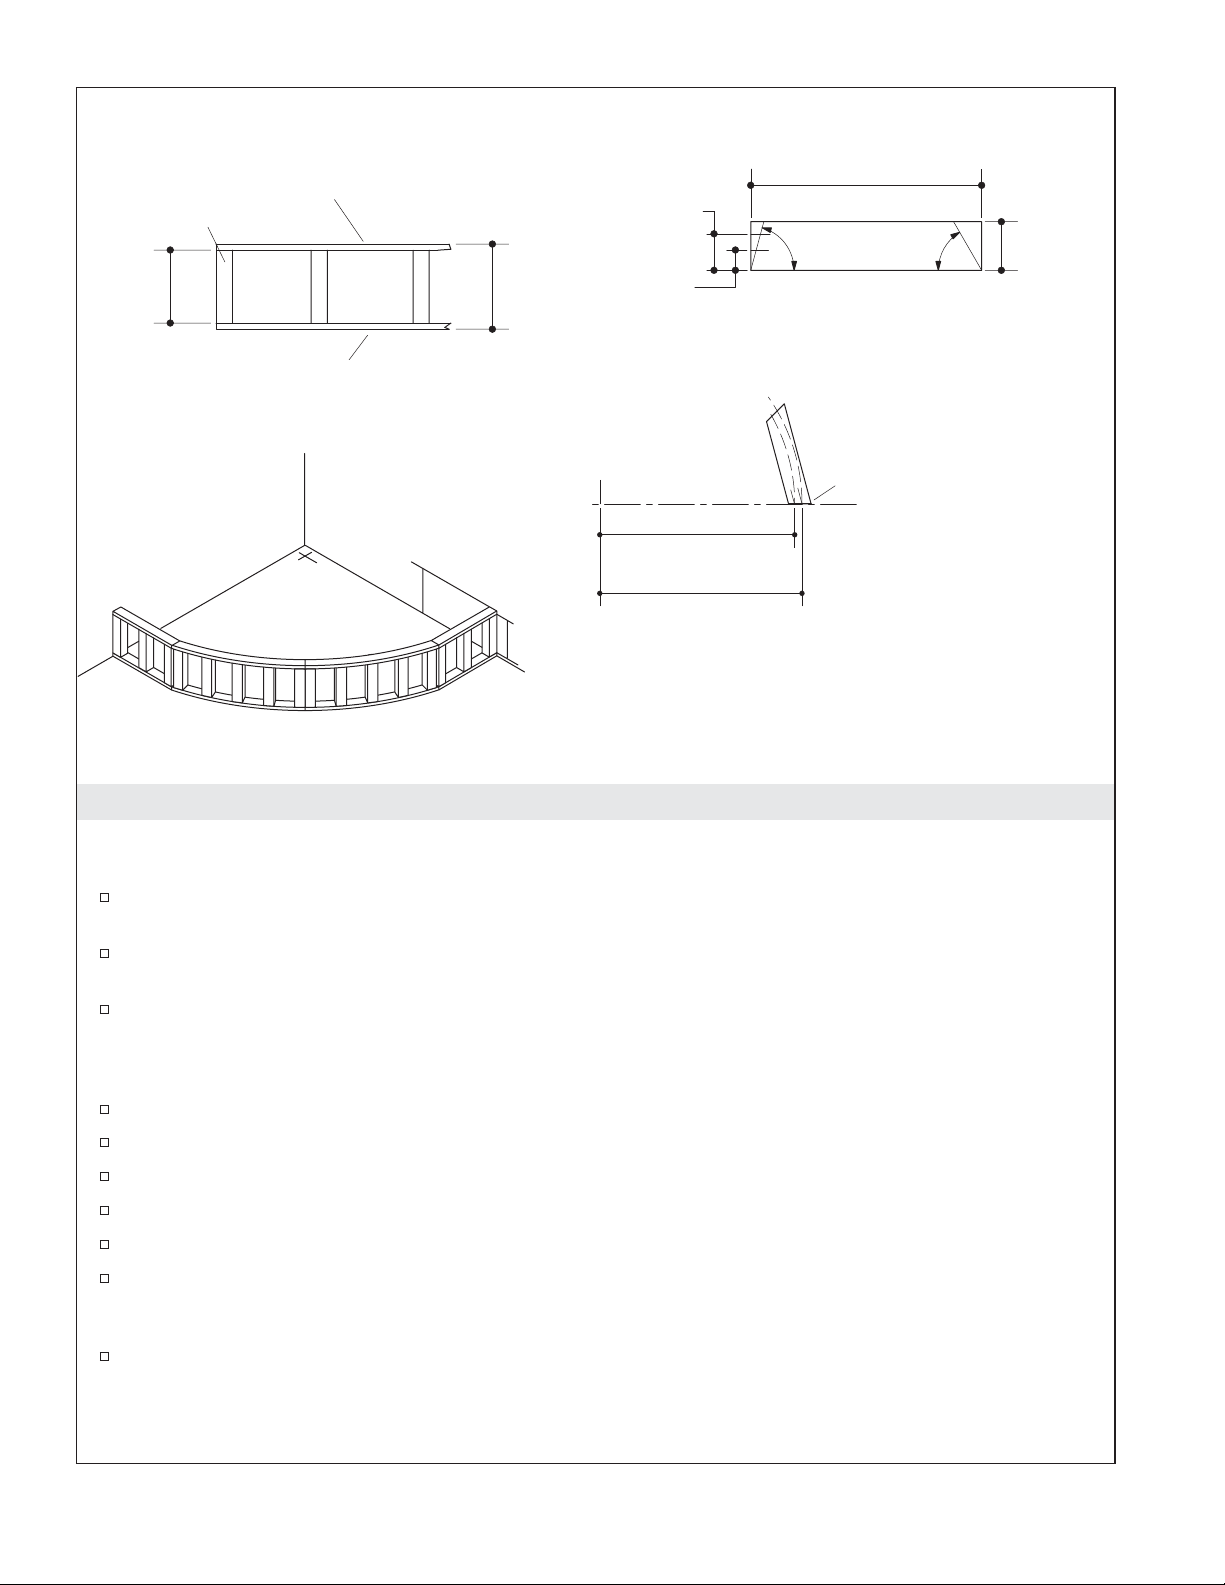
Framing Preparation .............................................................. 5
Plumbing Preparation .............................................................. 6
Install the Footbath ............................................................... 6
Construct the Apron ............................................................... 7
Install Plumbing .................................................................. 8
Tower Mounting Frame Preparation ................................................... 8
Install the Tower Mounting Frame ..................................................... 8
Connect the Suction Assembly ....................................................... 9
Connect the Tower and Pump ...................................................... 10
Make Electrical Connections ........................................................ 11
Install the Wall Jambs ............................................................ 13
Apply Silicone Sealant ............................................................ 13
Complete the Finished Wall ........................................................ 14
Install the Side Panels ............................................................ 15
Install the Header ................................................................ 15
Secure the Side Panels ........................................................... 16
Set the Header Height ............................................................ 17
Hang the Door Panels ............................................................ 18
Adjust Header Height ............................................................. 19
Install the Side Jamb Seals ........................................................ 20
Adjust the Side Door Panels ........................................................ 20
Adjust the Center Door Panel ....................................................... 21
Install the Backstop .............................................................. 21
Install the Door Handles ........................................................... 22
Adjust the Stop Blocks ............................................................ 22
Apply Sealant to the Door ......................................................... 23
Install the Tower ................................................................. 25
Complete the Tower Installation ..................................................... 25
Faucets and Fittings .............................................................. 25
Install the Keypad ............................................................... 26
Install the Seat .................................................................. 27
Water Test the System ............................................................ 27
Clean Up After Installation ......................................................... 27
Troubleshooting Procedures ........................................................ 28
Kohler Co. 3 1032108-2-D

Before You Begin
IMPORTANT! The hydro-massage system is intended for indoor use only.
IMPORTANT! The stud supports must be within 3/8″(1cm) of plumb. The door enclosure is designed to
fit the footbath. Proper door assembly and operation depends upon installation of the footbath against
square and plumb studding.
The hydro-massage system operates at flow rates up to 80 gallons (302 L) per minute. To achieve a
watertight installation, it is critical that you follow all the installation instructions carefully. Pay
particular attention to leveling and sealing details to obtain a satisfactory installation.
It is critical that you follow the installation sequence and details in the steps that follow to
successfully install and operate your system, and to prevent costly repairs and rework.
Kohler Co. shall not be responsible for leakage that occurs as a result of inadequate or poor
assembly or installation techniques.
All information in this manual is based on the latest product information available at the time of
publication. At Kohler, we constantly strive to improve the quality of our products. We reserve the
right to make changes in product characteristics, packaging or availability at any time without
notice.
Tools and Materials
Plus:
• Conventional Woodworking
Tools and Materials
• Plumbing Tools and
Equipment
• Drop Cloth
• 2x4s or 2x6s
• Plywood
• Cement Board
• Solvent Welding Solution
• Pencil
Masking
Tape
Shims Level Claw
Hammer
1-5/8" Carbide
Hole Saw
Drill Bits
Safety
Glasses
Measuring
Tape
Silicone
Sealant
1032108-2-D 4 Kohler Co.

1. Framing Preparation
NOTE: Carefully study the roughing-in pages and the illustration above before you construct the framing.
Follow the framing details carefully.
IMPORTANT! The stud supports must be within 3/8″(1 cm) of plumb. The door enclosure is designed to
fit the footbath. Proper door enclosure assembly and operation depends upon installation of the footbath
against square and plumb studding.
Use 2x4 framing. Choose a preferred side for installing the pump and provide sufficient access
accordingly. Refer to the roughing-in information for further details.
The distance from the rough floor to the finished ceiling or header must be between 83-1/2″(212.1
cm) and 84″(213.4 cm) to provide adequate clearance when assembling the door enclosure to the
footbath.
Make sure the ceiling and header are level.
Provide double stud support for the door enclosure wall jambs. You must secure the door enclosure
wall jams directly to the studs to obtain proper support and correct opening dimensions. Expanding
wall anchors will not provide adequate support for the door enclosure assembly.
The stud supports must be plumb for proper door operation. Maintain a maximum tolerance of
3/8″(1 cm) to ensure a satisfactory, watertight installation.
The footbath requires no additional bottom support when the rough floor is plumb and level with
respect to the stud framing. If the rough floor is not level, shim as needed.
IMPORTANT! Leave studs exposed. You must secure the door enclosure wall jambs directly to the studs.
Do not install the finished wall material until instructed.
If you plan to install grab bars or other accessories, provide sufficient backing.
52" (132.1 cm)
*29" (73.7 cm)
*Pump/Control Access
(can be provided on
either side)
Double Stud (required for
door installation)
Attach tower
piping here.
Side ViewTop View
Double Stud (required for
door installation)
18-7/8"
(47.9 cm)
18-7/8"
(47.9 cm)
52"
(132.1 cm)
12"
(30.5 cm) 14"
(35.6 cm)
12"
(30.5 cm)
10-3/4"
(27.3 cm)
83-1/2"
(212.1 cm)
to 84"
(213.4 cm)
12"
(30.5 cm)
Use 2x4s on corners.
*Pump/Control Access can
be provided on either side.
Allow for protrusion.
14" (35.6 cm)
Kohler Co. 5 1032108-2-D

2. Plumbing Preparation
Position the plumbing supplies and drain trap according to the roughing-in dimensions. Cap the
supplies and check for leaks.
Install the drain on the footbath according to the drain manufacturer’s instructions. When installing
the drain overflow tube and hood, be sure to adequately seal along the edges of the hood to prevent
leakage.
3. Install the Footbath
Double studs for the wall jambs must be square and plumb within 3/8″(1 cm) for proper door
installation.
The pump is detached from the footbath harness for ease of transport. Additional components are
shipped with the unit in kit form. Remove these and place them next to the pump for later
installation.
Set the footbath on the subfloor. Align the trap with the tailpiece.
Position a clean drop cloth in the footbath to prevent damage.
Confirm that the footbath is level using a level on the rim surfaces. Do not use the nailing-in flange
to level the unit.
NOTE: The footbath must be level to properly install and operate the door.
Place shims under the wood blocks as needed to level the footbath.
NOTE: Drill the holes in the nailing-in flange from the finished side to avoid chipping the acrylic.
From the finished side of the nailing-in flange, drill and countersink the pilot holes halfway up the
nailing-in flange at each stud location. Use galvanized drywall screws to secure the footbath to the
studs.
Add furring strips to the stud framing inside the recess area to ensure the studs are even with the
nailing-in flange.
2-3/8"
(6 cm)
1032108-2-D 6 Kohler Co.

4. Construct the Apron
NOTE: Kohler recommends this procedure to construct the apron. Other methods can be used to obtain an
acceptable result.
Cut four 3/4″plywood boards to 6″(15.2 cm) x 28-1/2″(72.4 cm). Measure and cut a 60° taper at
one end of each board, and a 75° taper at the other end. Both ends must taper to the same side.
Draw a pencil mark 2-1/2″(6.4 cm) from the long side of one of the boards at the 75° taper end.
Draw a second mark 4-1/2″(11.4 cm) from the long side, as shown above.
Use a pencil, string and nail to carefully draw a 51-1/4″(130.2 cm) radius (for 1/2″(1.3 cm) thick
finished wall) across the full length of the board at the 2-1/2″(6.4 cm) pencil mark. For different
finished wall thickness, adjust this radius accordingly. Draw a 49-1/4″(125.1 cm) radius across the
4-1/2″(11.4 cm) pencil mark.
Use a saber saw to cut the plywood along the radius lines.
Use this board as a template to mark and cut the other three plywood boards.
Cut four 3/4″plywood boards to 2″(5.1 cm) x 15-1/2″(39.4 cm).
Cut sixteen 2x2 studs 9″(22.9 cm) long.
Assemble the apron frame sections as shown.
Position the apron frame sections under the footbath rim so the 75° tapered ends of the curved
sections touch. Align the apron frame sections so they are recessed correctly for the finished apron
wall thickness. Make sure the sections are plumb.
Secure the apron frame sections to the floor.
3/4" Plywood
3/4" Plywood
2x2 Studs
10-1/2"
(26.7 cm)
9"
(22.9 cm)
28-1/2" (72.4 cm)
6" (15.2 cm)
4-1/2"
(11.4 cm)
2-1/2"
(6.4 cm)
Measure 2-1/2" (6.4 cm)
and 4-1/2" (11.4 cm)
down from this edge.
49-1/4"
(125.1 cm) R.
51-1/4" (130.2 cm) R.
75˚ 60˚
Kohler Co. 7 1032108-2-D

5. Install Plumbing
CAUTION: Risk of damage to the footbath bottom and subfloor. Ensure a watertight seal on the
footbath drain connections.
When the footbath is securely positioned, connect and leak test the drain and fittings. Make sure to
plug the suction line if the pump is not yet attached.
NOTE: An access panel will simplify future maintenance.
6. Tower Mounting Frame Preparation
The location of the tower mounting frame is critical. Be precise with this measurement.
Measure 2-3/8″(6 cm) from the deck surface of the footbath to the tower mounting stud. Draw a
pencil line at that location.
7. Install the Tower Mounting Frame
Remove the three 3/8″tower bolts and carefully lift the tower out of the mounting frame. Carefully
set the tower aside where it will not be damaged.
Position and level the mounting frame between the tower mounting studs and align the bottom
metal edge with the pencil line you drew on one of the studs.
Secure the mounting frame to the tower mounting studs with the 10 provided drywall screws.
2-3/8"
(6 cm)
Nailing-In
Flange
Mounting
Frame
Pencil Line
Drywall
Screw
Mounting
Studs
Bolts
Bolt
1032108-2-D 8 Kohler Co.

8. Connect the Suction Assembly
Orient the Pump
Remove the pump from the shipping box and position it near where it will be installed.
NOTE: The pump and control must be properly oriented for your installation. If the pump is facing the
proper direction and the cooling fins face away from the footbath, as shown in the illustration, proceed to
Install the Suction Assembly.
The pump should be oriented with the control cooling fins situated away from the footbath.
If the cooling fins are not properly oriented, detach the pump from the control by removing the four
nuts.
Turn the pump 180° so it is facing in the opposite direction.
Confirm that the cooling ribs are properly situated and re-attach the four nuts.
Securely tighten the nuts.
Install the Suction Assembly
Locate the heater subassembly. It is located in the kit that was packed with the pump.
Orient the heater subassembly so that it will connect the suction line to the pump. This step will
determine the final position of the pump.
Position the O-ring and attach the heater end of the assembly to the suction line.
Position the O-ring and attach the opposite end of the assembly to the pump.
Pump
Ensure minimum 1/4"
(6 mm) pitch per foot
(30.5 cm) toward
suction assembly.
Place cooling fins to
the outside of pump.
Heater Subassembly
Suction Line
Pump
Pump
Pump Drainage
Kohler Co. 9 1032108-2-D

9. Connect the Tower and Pump
NOTE: If the pump was shimmed up in the previous step, you may need to move the tower mounting
frame up an equivalent distance. Check for clearance before moving the tower mounting frame.
Position the O-ring and loosely hand tighten the union nut, elbow and tee assembly to the pump.
Orient the assembly to face the mounting frame.
Check to make sure that all piping from the pump to the suction intake fitting is sloped at least
1/4″(6 mm) per foot (30.5 cm). If not, shim under the pump to achieve the required slope.
Locate the threaded adapter, the 1-1/4″x 90° street elbow, the 1-1/4″x 45° street elbow, and the
piece of flexible hose.
Dry fit the components by assembling them as shown in the illustration. Measure and cut the
section of flex hose if necessary.
Check for appropriate clearances and maintain a minimum 1/4″(6 mm) per foot (30.5 cm) pitch
between the tower and the pump. Move the tower mounting frame up, if necessary. Maintaining a
constant downslope pitch from the tower is important to draining the system and preventing
cavitation of the pump due to an air lock.
Use PVC primer and glue to secure the joints once the parts have been properly positioned.
Position the O-ring and connect the adapter fitting to the mounting frame union nut.
Secure all nut fittings until each of them are hand tight, plus 1/4 turn more (maximum). Do not
overtighten.
Mounting Frame
Union Nut
1-1/4" x 45˚ PVC
Street Elbow
Pump
O-Ring
O-Ring
O-Ring
Measure and
cut to length.
1-1/4" x 90˚ PVC
Street Elbow
Flex Hose (supplied)
Pressure Switch
Mounting Frame
Threaded
Adapter
Heater
Subassembly
1032108-2-D 10 Kohler Co.

10. Make Electrical Connections
NOTE: The product model number is printed on a label on the pump side of the overflowing bath. This
label also identifies the electrical rating of the product. These whirlpools come equipped with two wiring
junction boxes and are designed to operate between 208 VAC and 240 VAC at either 50 Hz or 60 Hz.
WARNING: Risk of electrical shock. Make sure the power has been disconnected before
performing the following procedures. Refer to the ″Important Information″section.
WARNING: Risk of electrical shock. To reduce the risk of electrical shock, connect the pump to a
properly grounded Ground-Fault Circuit-Interrupter (GFCI) or Earth-Leakage Circuit-Breaker
(ELCB). The heater will also need to be connected to a properly grounded Ground-Fault
Circuit-Interrupter (GFCI) or Earth-Leakage Circuit-Breaker (ELCB). This will provide additional
protection against line-to-ground shock hazard. Two 208-240 V, 20 A, 50/60 Hz dedicated circuits
are required.
IMPORTANT! The load neutral is not used. There should be no connection to the load neutral terminal
on the Ground-Fault Circuit-Interrupter (GFCI) breaker. The green wire with the yellow stripes is the
equipment ground and needs to be connected to the neutral bus in the main circuit breaker box.
The control and heater have been pre-wired at the factory. A licensed electrician should make
routine service connections to each of the junction boxes.
Connect service to the junction boxes. Both junction boxes contain blue, brown, and green with
yellow stripe colored wires.
Follow local electrical codes. Bond in accordance with national and local codes.
A wiring harness has been pre-wired at the factory, allowing communication between the keypad,
all features, and the control. No additional wiring is required, but ensure that all wires are securely
fastened.
From
Control
Brown (L2)
* Connections to be Made
at the Circuit Breaker
S/N
* Equipment Ground Wire Connectors
Neutral Bus
(In Breaker Box)
120/240 VAC
Source
Typical Two-Pole
Circuit Breaker
with GFCI
* Line Neutral
(White Curly
Wire)
Typical Wiring Connection for North America
Ground
(Green with
Yellow Stripes)
*L1
No Connection
(Load Neutral)
Field Wiring
(From Junction Box
to GFCI Breaker)
Electrician to provide suitable
strain relief cable.
Wire
Connector
Blue (L1)
*L2
240 V
120 V
240 V
120 V
Breaker Box
L1 L2N
Bond in accordance with national and local codes.
Open bonding lugs are located at the top of the
junction box.
Heater
Pressure
Switch
Ground Wire
Earth Ground
Earth Ground
Kohler Co. 11 1032108-2-D

Make Electrical Connections (cont.)
NOTE: Your wiring harness included an antenna for the optional remote control. Do not alter or damage
this antenna during installation.
1032108-2-D 12 Kohler Co.

11. Install the Wall Jambs
IMPORTANT! Leave the studs exposed. The wall jambs must be secured directly to the stud wall frame
to achieve proper support of the enclosure. Expanding wall anchors do not provide adequate support for
the door. Do not install the finished wall until instructed to do so.
NOTE: The enclosure components are identified with removable labels to assist you with component
identification.
Remove the wall jamb kit from the carton and locate the wall jambs. Leave the protective tape in
place.
Install one of the wall jambs by positioning it over the footbath locating pin. The two countersunk
holes must be on the inside top. The wall jambs are not interchangeable.
Use a level and adjust the wall jamb to be exactly plumb. Secure the wall jamb to the double stud
framing and furring strips with four 2″(5 cm) stainless steel flathead screws (provided).
Repeat for the other wall jamb.
12. Apply Silicone Sealant
CAUTION: Risk of concealed leakage. Apply silicone sealant, following the sealant manufacturer’s
instructions, to ensure a watertight installation.
Apply a continuous bead of silicone sealant to the inside of the wall jamb where it contacts the
footbath, as shown.
Repeat for the other wall jamb.
Level
2" Stainless Steel
Flathead Screw
Footbath
Locating
Pin
Wall
Jamb
Countersunk
Holes Top View
Inside of
Wall Jamb
Silicone
Sealant
Kohler Co. 13 1032108-2-D

13. Complete the Finished Wall
CAUTION: Risk of product damage. Use care to avoid scratching the wall jambs.
NOTE: The total finished wall thickness, including furring strips, cement board, and finished wall material
must not exceed 1-1/2″(3.8 cm).
Install cement board. Position the cement board so the gap above the top of the footbath rim is no
larger than 1/4″(6 mm).
Apply a bead of silicone sealant to the seam between the cement board and the footbath.
Install the finished wall material.
Use a sharp utility knife to carefully remove the protective tape from the wall jambs.
1/4" (6 mm)
Max
Bead of Silicone
Sealant Between
Cement Board and
Footbath
Galvanized
Nails or Screws
1/2" Cement
Board
Finished Wall
Material
Furring Strip
1-1/2" (3.8 cm) Max
1032108-2-D 14 Kohler Co.

14. Install the Side Panels
NOTE: The locating pins have been factory installed to help position the side panels and center supports.
Do not remove, reposition, or modify the locating pins. Altering the locating pins will modify the fit and
reduce the sealing ability of the door panels and may void warranty coverage of this product.
Slide one of the side panels into the wall jamb so the larger horizontal frame is on top. The side
panels are not interchangeable. Insert the side panel fully into the wall jamb, then raise and pivot
the side panel so the center pocket fits against the locating pin.
Attach a center support to the center frame of the side panel assembly. Connect the edge of the
center support to the side panel, and pivot the center support until it rests inside the side panel.
Secure with eight #8 x 3/8″panhead screws. Do not overtighten.
Repeat for the other side panel.
15. Install the Header
With assistance, lift the header between the center supports so the bottom side holes in the header
brackets fit over the adjustment screws.
Check the alignment of the side holes in both header brackets to the adjustment screw heads. If the
holes do not line up, loosen the setscrews in the header bracket(s), and realign the header bracket(s)
until the holes align with the adjustment screw heads. Retighten the header bracket setscrews.
Add a 1/4″flat washer to each of the two buttonhead screws. Thread a buttonhead screw and
washer through each header bracket top hole, and into the center support.
Securely tighten each buttonhead screw with the supplied hex tool and ratchet wrench.
Wall Jamb
Footbath
Top View
#8 x 3/8"
Panhead Screws
Side
Panel
Locating
Pin
Center
Support
Locating
Pin
1/4-20 x 5/8"
Buttonhead
Screw
Header
Center Support
1/4" Washer Setscrew
Adjustment
Screw
Header
Bracket
Kohler Co. 15 1032108-2-D

16. Secure the Side Panels
Ensure that each side panel is resting flat against the footbath curb.
Plumb one side panel, and hold it firmly in place so it cannot shift.
Use the countersunk holes at the top of the wall jamb as a guide, and drill 1/8″holes through the
side panel wall frame. Drill only through the inside wall of the side panel wall frame.
Secure the side panel with two #8 x 5/8″flathead screws. Do not overtighten.
Repeat for the other side panel.
Wall Jamb
Holes
#8 x 5/8" Flathead
Screws
Footbath Curb
Side Panel
1032108-2-D 16 Kohler Co.

17. Set the Header Height
Measure the distance between the header height and the footbath rim at both the end and the center
of the header. Compare the distance. The header should be 1/4″(6 mm) higher at the center. The
combined weight of the door panels will pull the header down until it is level or close to level.
Adjust the level of the header by first loosening the buttonhead screw securing the header to the
center support. Back out the adjustment screw one or two turns. Retighten the buttonhead screw
with the hex tool and ratchet. This will cause the header to pivot slightly upward.
Alternate this procedure on both ends of the header and remeasure the header height at both ends
and the center. Tighten the buttonhead screws when the adjustments are complete.
IMPORTANT! The header must be 1/4″(6 mm) higher at the center. The center of the header must not
sag downward or the door panels will not operate correctly.
Center Section
Tape
Measure
Side Panel Section
Header
Buttonhead Screw
Adjustment Screw
Kohler Co. 17 1032108-2-D

18. Hang the Door Panels
Hang the Side Door Panels
Fit a bushing over each outside track roller in the header.
With assistance, lift one of the side doors into place, and fit an outside track roller into each of the
two holes in the glass.
Insert another bushing into each hole from the opposite side of the glass. Thread a roller nut into
each roller. Hand tighten each roller nut. Use the nut wrenches (included) to carefully turn each
roller nut until the locking pellet feature is engaged. Do not completely tighten at this time, and do
not try to level the door panels yet.
Repeat for the other side door.
Hang the Center Door Panel
Fit a bushing over each outside track roller in the header.
With assistance, lift the center door panel into place, and fit an inside track roller into each of the
two holes in the glass.
Insert another bushing into each hole from the opposite side of the glass. Thread a roller nut into
each roller. Hand tighten each roller nut. Use the nut wrenches (included) to carefully turn each
roller nut until the locking pellet feature is engaged. Do not completely tighten at this time, and do
not try to level the door panels yet.
Bushing
Header
Roller
Roller Nut
Bushing
Side Door
Panel
Bushing
Header
Roller
Roller Nut
Bushing
Center Door
Panel
1032108-2-D 18 Kohler Co.

19. Adjust Header Height
Slide all three door panels to the center. Measure and record the distance from the footbath curb to
the header at three locations: the left corner, along the wall jamb; the right corner, along the wall
jamb; and the center, along the center door panel.
If the three measurements are the same, no header adjustment is needed. If the center height is
different from the corner measurements, adjust the header as described below.
Loosen one of the buttonhead screws approximately two complete turns. Loosen the adjustment
screw a complete turn or two and retighten the buttonhead screw. Check the center height. Repeat
this procedure until 1/2 the needed height correction is obtained.
Repeat this adjustment procedure on the other end of the header.
NOTE: The center height measurement must be the same as the corner measurements when the doors are
in the center.
Header
Buttonhead Screw
Adjustment Screw
Center Jamb
Header Bracket
Top View
Center
Support
Center Jamb
#8 x 1" Panhead
Screws
Kohler Co. 19 1032108-2-D

20. Install the Side Jamb Seals
Lubricate one of the side jamb seals with glass cleaner.
Starting at the bottom of one of the center jambs, insert the side jamb seal into the center jamb
groove.
Trim the top of the seal as needed.
Repeat for the other side jamb seal.
21. Adjust the Side Door Panels
Use the nut wrenches provided to loosen a roller nut on one of the side door assemblies.
Adjust the height of the door panel by turning the cam roller with one of the wrenches so the
corner of the bottom deflector just rests on the acrylic surface of the footbath.
Use both nut wrenches to carefully turn each roller nut until the locking pellet feature is securely
tightened.
Loosen the other roller nut, and adjust the side door height by turning the cam roller with the
wrench so the side door edge lines up perfectly with the side jamb seal.
Use both nut wrenches to carefully turn each roller nut until the locking pellet feature is tightened
securely.
Check that the bottom deflector just rests on the acrylic surface of the footbath across the entire
deflector length.
Adjust the side door cam roller as needed to ensure proper contact of the bottom deflector with the
acrylic surface of the footbath and parallel alignment between the side door handle edge and the
side jamb seal.
Repeat for the other side door assembly.
Center Jamb
Side Jamb Seal
Footbath
Top View
Side Jamb
Seal
Roller Nut
Footbath
Side Door
Assembly
Center
Door Panel
Side Jamb
Seal
Side Door
Assembly
Bottom Deflector
1032108-2-D 20 Kohler Co.
Other manuals for 10-Jet K-1000-H2
5
This manual suits for next models
2
Table of contents
Languages:
Other Kohler Massager manuals