manuals.online logo
Brands
  1. Home
  2. •
  3. Brands
  4. •
  5. KOKEN
  6. •
  7. Respiratory Product
  8. •
  9. KOKEN 1021R-06 Installation instructions

KOKEN 1021R-06 Installation instructions

1
Part names and structure
*1 Facepiece is available in two sizes: Size M (standard) and Size S.
◎1021KC Welder’s Ozone Filter for 1021R, designed to remove ozone
which is generated during welding, and 1021KB Odor Filter for 1021R,
designed to remove odor such as mercaptans, are also available (option).
Exhalation valve
(Type T-6K)
Exhalation
valve cover
Exhalation
valve seat
Filtering material
(1021 Mighty Micron Filter or
1021 Mighty Micron Filter-02)
Filter
gasket
Inhalation valve
(Round shape)
Filter
case
Facepiece*1
Headband Type RB
Filter cover
Strap slit
Plastic molded cradle harness
Buckle
Inhalation
opening
User Instruction
lBefore use of this respirator, read carefully and understand this User Instruction of
Model 1021R to obtain designed protection.
lKeep this User Instruction as useful reference if you have any questions during usage.
Replaceable Type Particulate Respirator
(Direct connection type, half-facepiece, Category: RL2)
Model 1021R-06
Japan National Assay Registration No. TM207
Model 1021R-07
Japan National Assay Registration No. TM545
*Before use, make sure that the approval label is attached on the respirator.
Approval labels are attached on the filter cover and the rear side of the filter
case.
For Industrial Use ONLY
This product is designed for industrial use only. Make sure that this product
be used by persons who:
lHave sufficient knowledge on occupational health and safety and
respiratory protective equipment; or,
lWork under the close supervision of personnel with sufficient knowledge.
Scope of applications
Model 1021R is a particulate respirator designed to protect the wearer from
breathing particulates, etc. Regardless of the presence of oil mist etc., Model
1021R can be used in the workplaces where:
lMetal fume (including welding fume) diffuses;
Particulate substances with control concentration of 0.1mg3or less diffuse;
The use of particulate respirators categorized under the Category 4 for
asbestos removal is allowed; and/or,
lAny works corresponding to the above working environments.
However, NEVER use Model 1021R in the environment specified in the
“ DANGER” below.
Model 1021R
DANGER indicates an imminently hazardous
situation. Unless following the
instructions, there is a high possibility of
resulting in death or serious injury.
WARNING
indicates a potentially hazardous
situation. Unless following the
instructions, there is a possibility of
resulting in death or serious injury.
CAUTION indicates a potentially hazardous situation.
Unless following the instructions, there is
a possibility of resulting in light injury or
damage accident.
The following special messages may appear throughout this User
Instruction to warn the wearer of potential hazard. Before reading
the User Instruction, please make sure to read the definitions of
the special messages and understand the contents.
For safe and proper usage
Silicone facepiece
How to use
Inspections prior to use
Make sure to perform the following inspections before donning the respirator.
(Refer to “Inspection Procedure” (page 4) for more details).
Check points Troubleshooting
Are parts such as filtering material,
inhalation valve, exhalation valve, etc.
properly installed?
Install all parts properly.
Are there any damages such as cracks,
distortions and/or scars, or adherence of
remarkable dirt or foreign objects on
inhalation valve, exhalation valve and/or
facepiece?
Replace the parts or respirator
with new ones. Clean the parts
when adherence of remarkable
dirt and/or foreign objects is
observed.
Are there any damages such as distortion
or hole or adherence of remarkable dirt on
filtering material?
Replace the filtering material
with a new one.
Is headband well elastic without dirt,
damages and/or deterioration?
Replace the headband with a
new one.
Make sure to use only the Koken genuine parts.
●Do NOT use this respirator in oxygen-deficient environment (where
the concentration of oxygen is less than 18%) or workplaces where
the concentration of oxygen is unknown or toxic gas exists.
Misuse will result in death or acute intoxication due to lack of oxygen
and/or gas inhalation. Use supplied air respirator in such environment.
●Do NOT use this respirator in workplaces categorized as
“Working environment with a possibility of exposure to
radioactive materials due to spillage or related emergency
works,” “Working environment involving asbestos removal
where the use of particulate respirators categorized under
categories other than Category 4 is required,” “Working
environment with a possibility of exposure to dioxins, etc.,” or
“Any works corresponding to these works.”
For these works, use proper respiratory protective devices such as
particulate respirators categorized under RS3 or RL3.
DANGER
Document No. NS OM D-486 (E-001). Translation of Japanese User Instruction on Model 1021R as of July, 2013. Contents described in this User Instruction
may differ from the requirements/specifications exercised outside Japan. In such case, make sure to follow local laws and regulation.
lDo NOT use the respirator in the high-temperature environment where
the respirator itself becomes remarkably hot or in the low-temperature
environment where moisture from the exhaled breath becomes frozen.
Deforming of parts or freezing may cause exhalation valve etc. to
malfunction, resulting in leakage of toxic substances into the respirator.
lMake sure that facepiece is well fit on the face.
Check the fit of the facepiece according to the “Performing fit test” (page 2).
lAirtight cannot be maintained under the following conditions,
which may cause hazardous substances to leak into the facepiece.
Do NOT use the respirator until improvements are made.
• There is beard, sideburns, and/or hair that come inside the face-
contacting area of the respirator.
• There is mustache and/or chin beard that interfere the operation of
the exhalation valve.
lDo NOT use the respirator if the wearer has a disorder in
respiratory or circulatory system, or the doctor determines that
the wearer does not have a fitness to wear a respirator.
lIf spatters or heavy sparks are generated in such works as
gouging, use a dust hood together with a faceshield.
There is a possibility that spatters or sparks leak through the gap
between the faceshield and the respirator.
lWhen working in a confined space, be careful not to bang the
respirator against the wall.
The respirator slipped out of place may cause hazardous substance
to leak into the facepiece.
WARNING
2
①Install fit tester type F (option),
composed of two pieces: a lid-shaped
piece and a pipe-shaped piece. Insert a
lid-shaped piece into an opening on one
side, and a pipe-shaped piece into an
opening on the other side.
②Don the respirator, pinch the end of the
pipe-shaped piece with fingers, and inhale.
③Good fit is obtained if the facepiece is
pressed against the wearer’s face.
④Good fit is not obtained if the wearer feels the leakage of air between
facepiece and face. Re-inspect various parts of the respirator (mainly
exhalation valve), adjust headband, adjust the position of the
respirator, etc. and perform ①〜③again.
⑤If good fit is obtained, make sure to remove the fit tester from the
respirator before entering into the workplace.
Performing fit test
Perform fit test in safe place without hazardous substance.
Fitting instructions Don or doff the respirator in safe place without hazardous substance.
123
Hook
<Buckle>
D-Ring
4 5
Plastic
molded
cradle
harness
qPlace the plastic
molded cradle har-
ness on the crown of
your head.
wHold the buckle (hook
and D-ring) and pull
them evenly so that the
respirator approaches
to your face.
eFasten the buckle on
the back of your neck.
rAdjust the length of the head-
band according to the
<Adjustment of headband
length>. Place the facepiece
over the bridge of your nose so
that it stays completely over
face, and then, place it over chin.
tAdjust the respi-
rator position on
face for stable
position by align-
ing it left and
right, up and
down.
yMake sure to per-
form fit test after
donning is com-
pleted.
uTo doff the respira-
tor, remove the
buckle.
Replacement of headband
lDo NOT wear the respirator on towel applied over face.
Particulates may leak into the facepiece.
lMake sure that the left and right sides of the headband are even
in length.
There is a possibility that over-extended headband and/or longer side
of the headband than the other side may be caught up in a machine.
lThe wearer with allergic tendency and/or fragile skin may suffer
from rough skin surface, eczema, etc. by using the respirator.
And the similar symptom may occur due to sweat, particulates
and/or dirt attached on the surface of the facepiece. In such
case, stop using the respirator and consult with a doctor.
lIn case proper donning cannot be maintained, such as dislocation
of the respirator while working, move to a clean area without
hazardous substance and don the respirator properly again.
lDo NOT apply vibration or excessive force onto the filtering material.
It may result in decrease in performance and/or damage to the
filtering material.
<Adjustment of headband length>
Adjust the length of the headband so that there is no slight opening between
respirator and face. Also make sure not to over-tighten the headband to avoid
oppression. Perform the adjustment of the headband length according to the
following procedure.
*Make sure that the headband is evenly tightened.
qTo tighten, pull the headband on both the hook side and the D-ring side.
wTo loosen, release the tension of the headband by lifting both tabs of the
hook and D-ring.
Replacement schedule
Replace the headband with a new one when:
◎Remarkable dirt and/or sticky surface due to rubber deterioration is
observed on the headband;
◎The headband is not fully elastic or it does not have enough strength to
hold the respirator;
◎Crack, distortion, damage, missing parts, etc. are found on the buckles
and/or plastic molded cradle harness; and/or,
◎The buckles cannot be securely fastened or cannot be disconnected easily.
Replacement procedure
qRemove the headband straps from the strap slit located on the left/right
sides.
wTo install a new headband, insert the straps of the new headband through
the strap slits from the facepiece side.
Hook
To tighten
D-Ring
Tab
To loosen
Tab
lIf the length of the headband is too short or too long, make
adjustment following <Adjustment of headband length>.
lMake sure that the headband is well elastic and not over-
extended.
lIf the headband is over-tightened, feeling of good fit may be lost,
and the wearer may experience a feeling of discomfort after
working for a long time.
lAfter adjustment, make sure to perform fit test.
WARNING
CAUTION
lMake sure to perform fit test prior to each use.
If not donned properly, hazardous substance may leak through
the opening created between face and facepiece, and be inhaled.
lIf air leakage into the facepiece is perceived when performing
fit test, do NOT use the respirator.
Hazardous substance may leak and be inhaled.
lMake sure that the respirator would not be dislocated when
removing the fit tester.
DANGER
• Replace the headband in safe place without hazardous substance.
• Make sure to use only the Koken genuine headband.
Caution: Be sure with strap direction. Do NOT twist the
headband.
Document No. NS OM D-486 (E-001). Translation of Japanese User Instruction on Model 1021R as of July, 2013. Contents described in this User Instruction
may differ from the requirements/specifications exercised outside Japan. In such case, make sure to follow local laws and regulation.
Strap slitRear view
3
Replacement of filtering material (filter) • Replace filtering material in safe place without hazardous substance.
• Make sure to use only the Koken genuine filtering material.
Document No. NS OM D-486 (E-001). Translation of Japanese User Instruction on Model 1021R as of July, 2013. Contents described in this User Instruction
may differ from the requirements/specifications exercised outside Japan. In such case, make sure to follow local laws and regulation.
Replacement of inhalation valve / exhalation valve
Replacement schedule
◎Replace when damages such as crack, distortion, scar, hole, etc.,
remarkable dirt and/or sticky surface due to rubber deterioration is
observed.
Replacement procedure of inhalation valve
①Remove the used inhalation valve from the retainer pin of the valve seat
located inside of the respirator.
②To place a new inhalation valve in its position, widen the hole located at
the center of the new inhalation valve with fingers so that the retainer pin
easily goes through the hole. Make sure not to strongly press down the
retainer pin and its surroundings.
Optional accessories and usage
●Sponge (Egg shape)
Use when the wearer feels discomfort on moisture or sweat accumulated
inside of the respirator.
How to use
Insert the sponge with its narrow end up into the inside of the facepiece.
Make sure that it does not interfere the movement of the exhalation valve.
●Facelet (Type P)
Use facelet to avoid skin irritation due to
sweat.
How to use
Expand the rim of the facelet and cover
it over the facepiece evenly so that it
stays without crimp.
*Make sure that the facepiece would not
get deformed.
Sponge
(Egg shape)
Facelet (Type P)
●Use the facelet only when there is a possibility that the use of
the particulate respirator causes eczema on facial skin and
sufficient airtight is obtained on facepiece.
The use of the facelet may become a cause of leakage of
particulates into the facepiece.
●Do NOT use the facelet when wearing a respirator in asbestos-
handling works or in the works where highly hazardous
particulates, such as arsenic, chrome, etc., generate. (Facelet
should not be used even when sufficient airtight is obtained).
WARNING
Replacement schedule
Replace the filtering material with a new one when:
◎Breathing becomes difficult; and/or,
◎Filtering material is damaged, distorted and/or got hole.
Replacement procedure
One set (two pieces) of 1021 Mighty Micron Filter, filtering material for
replacement, is packaged in each bag. Make sure to replace two pieces of the
filtering material simultaneously according to the procedure described on the right.
●Do NOT reuse the used filtering material by flipping it over.
Particulates captured on the filtering material may diffuse and be
inhaled. It could cause pneumoconiosis, or in some cases,
intoxication depending on the type of particulates inhaled.
WARNING
①Remove the filter cover by turning it counterclockwise.
②Remove the used filtering material located inside the filter case. *1
③Make sure that the filter gasket is securely installed in the filter case all the
way to the end without misalignment, deformation, etc.
④Place one piece of new filtering material on the filter gasket without gap,
misalignment and/or deformation. *2
⑤Place the filter cover on the filter case. Turn the filter cover clockwise until
it stops.
⑥Make sure that the thread of the filter case is not jammed and/or is
installed correctly without deformation.
⑦Make sure that the indicators, stamped inside the facepiece, stay at the
same position.
Filter case
Filter gasket
Filter cover
Filtering material
(1021 Mighty Micron Filter or
1021 Mighty Micron Filter-02)
To loosen
To tighten
Indicator
*1 Dispose of the used filtering material in a sealed bag, etc. so that
hazardous substances do not diffuse. Clearly indicate that the bag
contains “waste plastic.” Inform the industrial waste disposal operator that
hazardous substances are attached on the used filtering material and ask
for proper disposal.
*2 When 1021KC Welder’s Ozone Filter for 1021R (option) or 1021KB Odor
Filter for 1021R (option) is used, make sure to install the KC/KB Filter
between the filter case and the filtering material.
Replacement procedure of exhalation valve
①Open the exhalation valve cover located on the lower side of the facepiece.
②Pinch the used exhalation valve with fingers and remove it from the respirator.
③To install a new exhalation valve, insert the stem of the new exhalation
valve into the hole located at the center of the exhalation valve seat.
④With fingers, pinch the stem of the exhalation valve which comes out inside of
the facepiece, and pull it until the protruding portion on the stem comes out.
⑤Make sure that the exhalation valve is not turned inwardly and completely
close the exhalation valve cover.
Inhalation valve
(Round shape)
Hole
Facepiece
Retainer pin Exhalation valve cover
Stem of exhalation valve
Exhalation valve seat
CLOSE
OPEN
Exhalation valve
(Type T-6K)
Protruding portion
●Make sure that the exhalation valve seat is not get scarred.
There is a possibility that hazardous substance may leak inside the
facepiece.
WARNING
•
Replace inhalation valve / exhalation valve in safe place without hazardous substance.
• Make sure to use only the Koken genuine parts.
• Install or replace the optional accessories in safe place without hazardous substance.
• Make sure to use only the Koken genuine parts.
4
Inspection procedure Perform in safe place without hazardous substance.
Maintenance and storage
lSpecifications
The values above represent the performance level with the use of standard
facepiece and without optional parts, etc.
*For cleaning, refer to “Cleaning after use.”
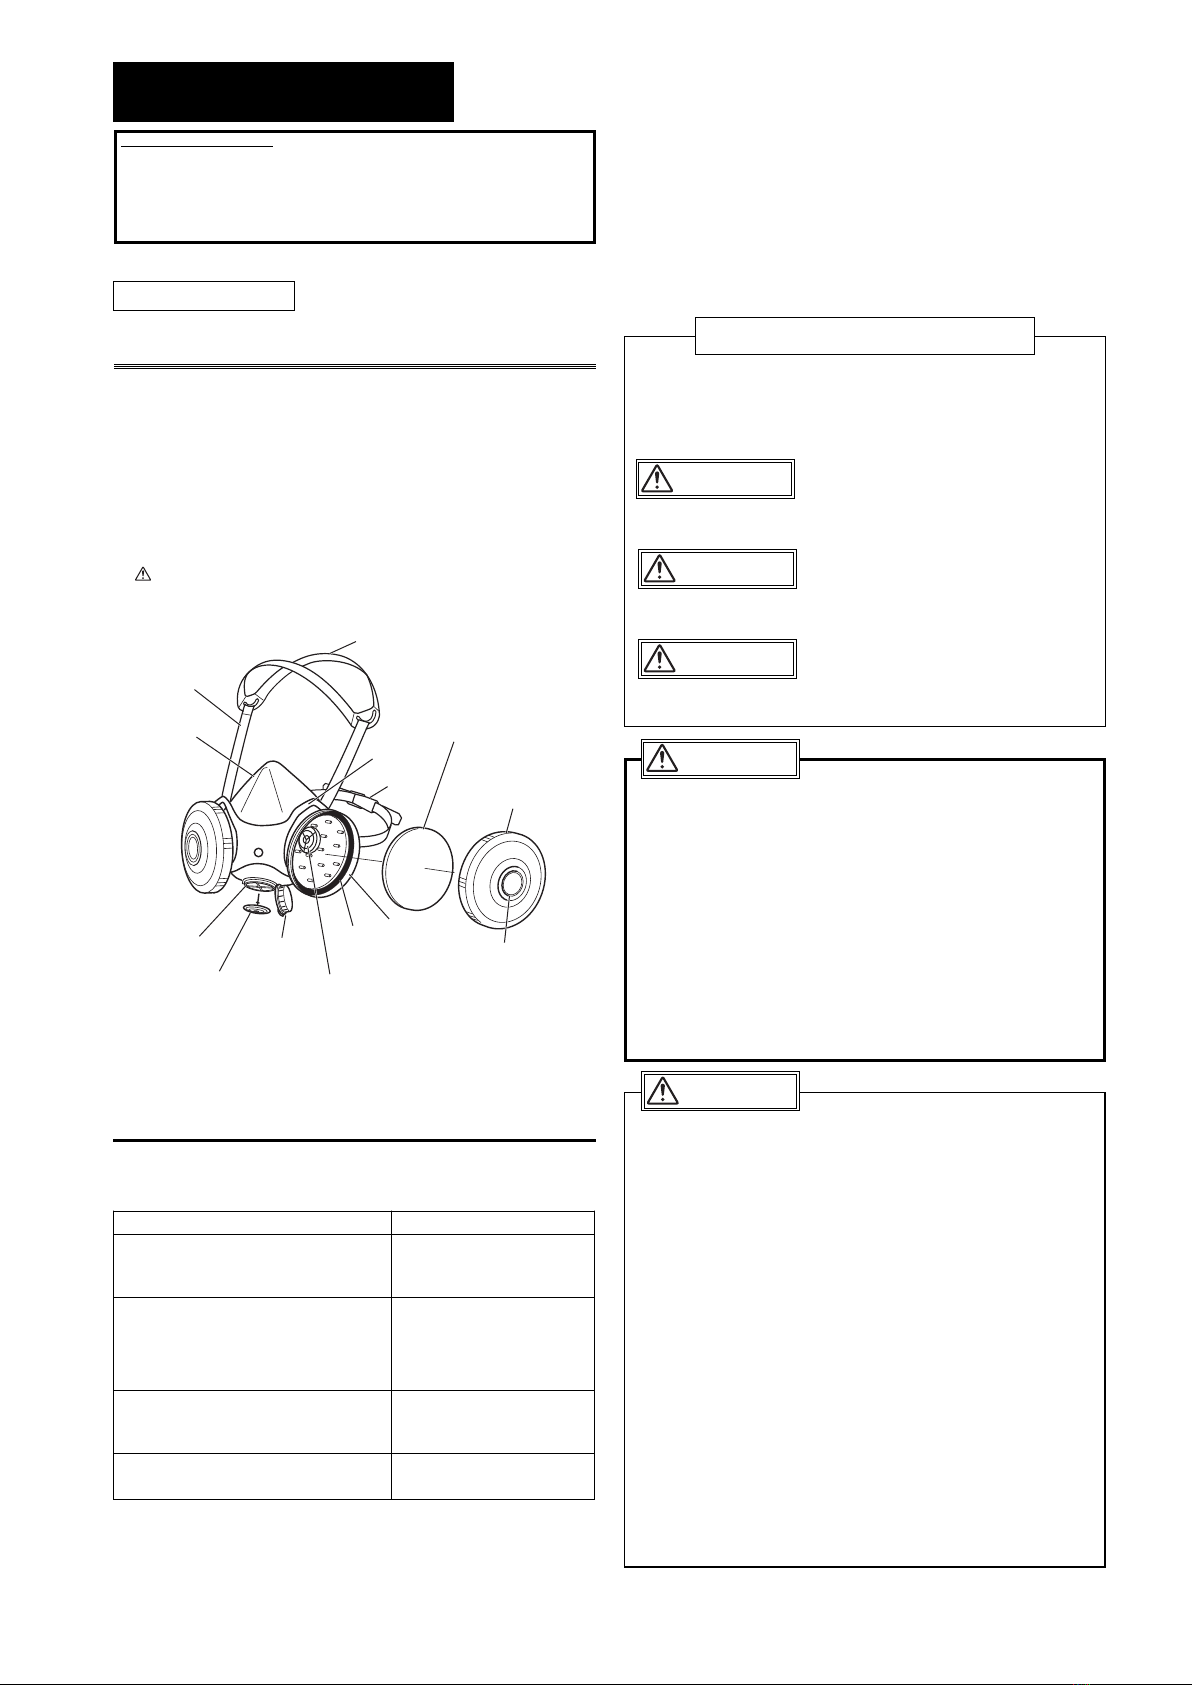
Replacement parts
Call Koken or local distributor to purchase the following replacement
parts.
lFiltering material -------1021 Mighty Micron Filter or
1021 Mighty Micron Filter-02 (2pcs/set per bag)
lInhalation valve --------Inhalation Valve Round Shape (Black)
(5pcs per bag)
Exhalation valve -------Exhalation Valve Type T-6K (5pcs per bag)

Exhalation valve cover
--
Exhalation Valve Cover Type T-6 (5pcs per bag)
Exhalation valve seat-Exhalation Valve Seat for T-6 (5pcs per bag)
Headband ---------------Headband Type RB (5pcs per bag)
Sponge-------------------Sponge Egg Shape (50pcs per package)
Facelet -------------------Facelet Type P (5pcs per bag)
Filter gasket-------------Filter Gasket Type 1021-II (10pcs per bag)
Filter cover --------------Filter Cover Type 1021-II (10pcs per bag)
Optional parts (sold separately)
●Fit tester for ensuring the fitness between respirator and face
---------------Fit Tester Type F (1set)
●Auxiliary filter to remove ozone odor
---------------1021KC Welder’s Ozone Filter for 1021R (5pcs per bag)
●Auxiliary filter to remove mercaptan odor
---------------1021KB Odor Filter for 1021R (5pcs per bag)
1. Cleaning after use
Perform cleaning in safe place without hazardous substance.
International Trade Division
7, Yonbancho, Chiyoda-ku, Tokyo, 102-8459, Japan
Tel :+81-3-5276-1925
Fax :+81-3-3265-1976
lDo NOT remodel or disassemble the parts that are not replaceable.
lDo NOT use parts that are not Koken genuine when replacing
parts.
WARNING
NEVER attempt the followings, or the filtering material could be
distorted or damaged, or the filtering performance be decreased.
lDo NOT apply unnecessary impact on the filtering material to get
rid of captured particulates, for example.
lDo NOT use compressed air to blow away captured particulates
attached on the filtering material. Do NOT use a vacuum cleaner
to suck captured particulates attached on the filtering material.
lDo NOT wash the filtering material in water.
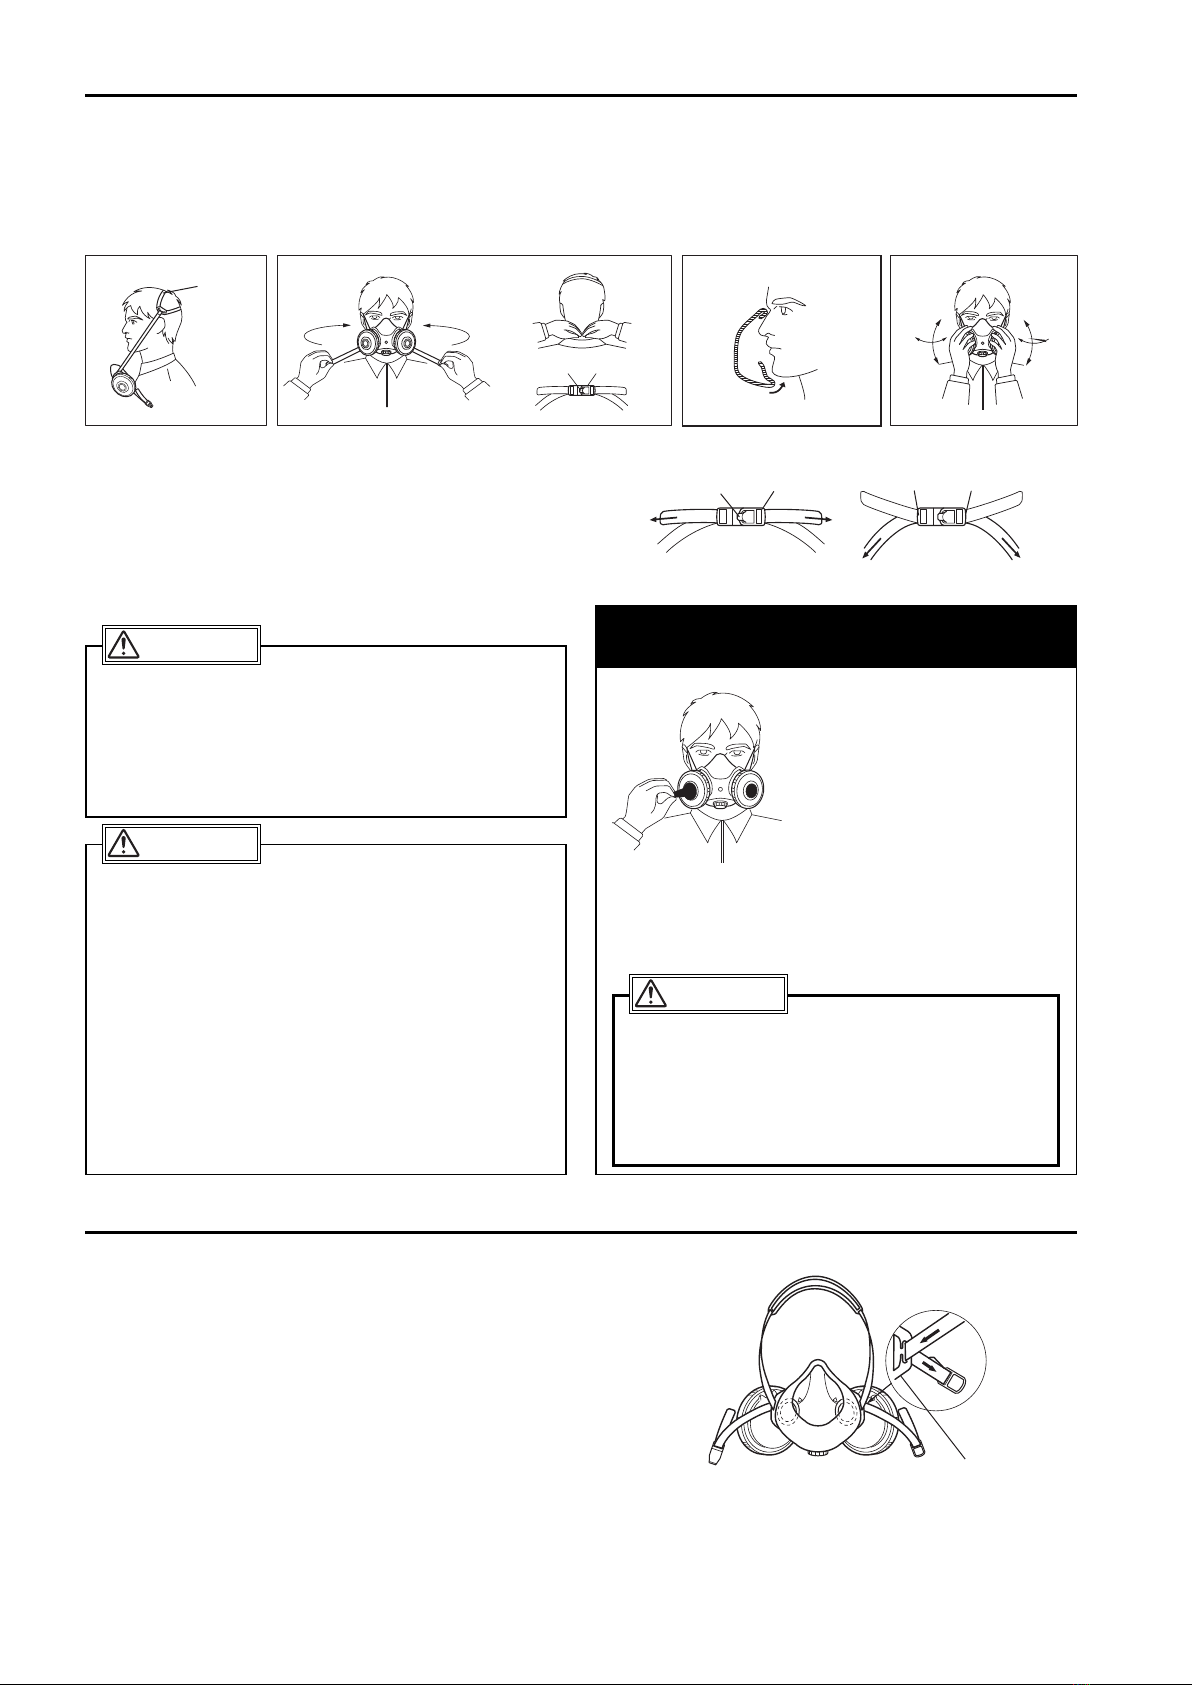
WARNING
lMake sure to remove the filtering material before cleaning
respirator.
CAUTION
lAlways keep the face-contacting area clean.
Dirt attached on the face-contacting area could cause rough skin and
skin irritation.
lIf alcohol for disinfection is used, dry the respirator completely
or wipe water completely after rinsing it with water.
lDo NOT use organic solvents, such as thinner, for maintenance.
CAUTION
Check points Criteria Troubleshooting
Facepiece
No damages such as crack, distortion,
and hole, no sticky surface due to
rubber deterioration and/or no
remarkable dirt are found.
Replace the respirator
with a new one.
Clean the respirator if
remarkable dirt and/or
foreign object attached
are found.
Strap slit
Filter case
No damages such as crack, distortion,
and hole, and no remarkable dirt are
found. Filtering material can be firmly
installed.
Exhalation valve
Inhalation valve
Filter gasket
No damages such as crack, distortion,
scar, and hole and no sticky surface
due to rubber deterioration are found.
There is no adherence of remarkable
dirt and/or foreign objects.
Replace the exhalation
valve, inhalation valve
and/or filter gasket with
a new one. Clean the
parts if remarkable dirt
and/or foreign object
attached are found.
Filter cover
Exhalation valve
cover
Exhalation valve seat
No damages such as crack, distortion,
and scar are found. There is no
adherence of remarkable dirt and/or
foreign objects.
Replace the filter cover,
exhalation valve cover
and/or exhalation valve
seat with a new one.
Clean the parts if
remarkable dirt and/or
foreign object attached
are found.
Headband
Straps Fully elastic. It keeps necessary
strength to hold the respirator. Replace the headband
with a new one. Clean
the headband if
remarkable dirt is
found.
Buckles,
Plastic
molded
cradle
harness
No cracks and/or no distortions are
found. Buckles can be disconnected at
ease and can be securely fastened.
Filtering
material
External
appearance
No damages such as distortion and
hole, no remarkable dirt and/or no
excessive moisture are found.
Replace the filtering
material with a new
one.
Inhalation
resistance
Breathing is not difficult when donning
the respirator.
Overall conditions
after all parts are
assembled.
There are no missing parts. There are
no gaps created at connecting parts.
Filtering material is correctly installed in
the filter case.
Install missing parts.
Make sure to perform maintenance after
each use and keep the respirator clean.
lParts other than filtering material
2. Storage
lPlace for storage
After cleaning, store the respirator in a dry place without heavy
temperature fluctuations and/or high humidity. Do NOT pile up the
cleaned respirators, as the facepiece, headband, etc. could be
cracked and/or distorted. Avoid a direct sunlight for storage.
Prepare an exclusive storage place so that the storage condition
can be checked at ease.
1021R-06 1021R-07
Internal standard
Average
Internal standard
Average
Filtering efficiency
(Test particulate: DOP) 95.0% or more 98.8% 95.0% or more 98.0%
Inhalation resistance 80Pa or less 56Pa 80Pa or less 51Pa
Exhalation resistance 52Pa or less 34Pa 52Pa or less 29Pa
Increased value of
inhalation resistance -75Pa -87Pa
Increased value of
carbon dioxide
concentration / Dead
space
0.7% (280cm3)
or less
0.56% /
224cm3
0.7% (280cm3)
or less
0.56% /
224cm3
Weight 170g or less 150g 160g or less 149g
lFiltering material
lDo NOT perform maintenance on the used filtering material. Put
the used filtering material in a sealed bag so that captured
particulates would not diffuse and dispose of it in a proper way.
DANGER
lDo NOT reuse the filtering material that was already exposed to
highly toxic particulates such as arsenic, chrome, asbestos, etc.
(Dispose of the filtering material after each use).
WARNING
◎Gently wipe out attached particulates and dirt such as sweat with
dry and slightly wet cloth. Be sure not to damage the respirator.
◎Wash out remarkable dirt with mild neutral detergent diluted with
warm water. Be careful when handling especially on the exhala-
tion valve seat and the exhalation valve. Then rinse off neutral
detergent by rinsing completely.
◎Wipe out residual water after cleaning and dry it in the shade.
◎Disinfect the face-contacting area and inside of the facepiece by
wiping it with alcohol-soaked cloth. Then wipe the alcohol out
completely.
Document No. NS OM D-486 (E-001). Translation of Japanese User Instruction on Model 1021R as of July, 2013. Contents described in this User Instruction
may differ from the requirements/specifications exercised outside Japan. In such case, make sure to follow local laws and regulation.

This manual suits for next models

1

Popular Respiratory Product manuals by other brands

ResMed Full Face Mask Mirage Liberty user guide

ResMed

ResMed Full Face Mask Mirage Liberty user guide

TREND AIR Original instructions

TREND

TREND AIR Original instructions

3M Versaflo User instructions

3M

3M Versaflo User instructions

Pari KINDERMASKE SOFT quick start guide

Pari

Pari KINDERMASKE SOFT quick start guide

Apex Digital WiZARD 310 Assembly guide

Apex Digital

Apex Digital WiZARD 310 Assembly guide

ResMed Mirage Micro user guide

ResMed

ResMed Mirage Micro user guide

Chicco SUPER SOFT 00009067000000 instructions

Chicco

Chicco SUPER SOFT 00009067000000 instructions

Full Support Easiair 2020 Instructions for use

Full Support

Full Support Easiair 2020 Instructions for use

ResMed VPAP VPAP Adapt SV System user guide

ResMed

ResMed VPAP VPAP Adapt SV System user guide

3M Adflo 15-5401-01 User instruction

3M

3M Adflo 15-5401-01 User instruction

CAS Healthcare Solution NB-152U owner's manual

CAS

CAS Healthcare Solution NB-152U owner's manual

SUNSET NEB402 instruction manual

SUNSET

SUNSET NEB402 instruction manual

Koolmask Hexa 001 user manual

Koolmask

Koolmask Hexa 001 user manual

Dräger Panorama Nova PE Instructions for use

Dräger

Dräger Panorama Nova PE Instructions for use

3M N95 Tips for use

3M

3M N95 Tips for use

Microlife NEB200 user manual

Microlife

Microlife NEB200 user manual

Walter ArcOne AirPlus User instruction manual

Walter

Walter ArcOne AirPlus User instruction manual

3B G3 Series user manual

3B

3B G3 Series user manual

manuals.online logo
manuals.online logoBrands
  • About & Mission
  • Contact us
  • Privacy Policy
  • Terms and Conditions

Copyright 2025 Manuals.Online. All Rights Reserved.