Korg PA Series User manual

Pa-Series
Factory Reset
Charger les
réglages
d’origine
Laden der
Werksvorgaben
Ricaricare i
dati originali
Inicialización
de fábrica
システムおよびファクトリー・データの復旧
1M


1
Pa-Series – Factory Reset
Introduction
The procedure described in this document allows you to
install the Operating System and the original Factory data
in the instrument’s internal memory, by loading the Fac-
tory Reset file from an USB storage device. This operation
is only due when the instrument appears ‘frozen’, due to
memory corruption or loading of incompatible data.
The most up-to-date version of the Factory Reset file can be
downloaded from our web site (www.korg.com).
Note: Loading this file may take several minutes. Please do
not turn the instrument off before the loading operation
has been completed!
Loading the Factory Reset file
Here is how to load the Factory Reset file into your instru-
ment.
1. Unzip the Factory Reset file from its .zip archive, and
copy the resulting .pkg file to an USB storage device.
2. If it is on, keep the STANDBY button pressed for about
one second to put the instrument to standby. Then keep the
INTRO 1 button pressed, and press the STANDBY button to
turn the instrument on again.
3. Keep the INTRO 1 button pressed, until the Touch Panel
Calibration page appears: this will confirm that the system
loading procedure has been started. Execute the display
calibration by touching the red cross wherever it appears.
4. A message will appear, asking you to select a .pkg file.
Connect the USB storage device where you copied the Fac-
tory Reset file to the USB HOST port, then touch the OK but-
ton in the display to close the dialog box.
5. When a file selector appears, use the Device pop-up
menu (in the lower left side of the display) to choose the
device connected to the USB HOST port. Then touch the
Factory Reset .pkg file to select it, and touch the Select but-
ton on the display to confirm loading.
Device pop-up menu File selector
6. A dialog box will appear, asking you to choose an op-
eration or to cancel it. Touch the Format & Reset button to
confirm the Reset procedure.
Warning: Confirming will delete all data from the internal
memory. See above for instructions on how to make a safe-
ty copy of your data.
7. A progress bar appears, showing the loading status.

2
8. When the loading procedure is finished, the “System
Update Completed” message appears, inviting you to re-
start the instrument.
9. Set the instrument to standby by keeping the STANDBY
button pressed for about one second, then turn it on again
by shortly pressing the STANDBY button.
10. If you have saved or backed up your data, reload them
by using the Media > Load operations, or the Resource Re-
store command in the Media > Utility page. See the “Media”
chapter in the User’s Manual for more information.

3
Pa-Series – Charger les réglages d’origine
Introduction
Ce document explique comment installer le système d’ex-
ploitation et charger les données d’origine de l’instrument
par le biais du fichier “Factory Reset” résidant sur un sup-
port USB. Cette opération n’est à effectuer que lorsque
l’instrument semble “bloqué”, ce qui peut être dû à des
données corrompues ou incompatibles.
La version la plus récente du fichier “Factory Reset” est
téléchargeable de notre site web (www.korg.com).
Remarque: Le chargement de ce fichier peut prendre
quelques minutes. Ne mettez jamais l’instrument hors ten-
sion avant la fin du chargement des données!
Charger le fichier ‘Factory Reset’
Voici comment charger le fichier “Factory Reset” dans l’ins-
trument.
1. Ouvrez le fichier “Factory Reset” de l’archive .zip et co-
piez le fichier “.pkg” qui en résulte sur un support de mé-
moire USB.
2. Si l’instrument est sous tension, maintenez le bouton
STANDBY enfoncé une seconde environ pour passer en
veille. Maintenez ensuite le bouton INTRO 1 enfoncé pen-
dant que vous appuyez sur STANDBY pour remettre l’instru-
ment sous tension.
3. Maintenez le bouton INTRO 1 enfoncé jusqu’à ce que la
page “Touch Panel Calibration” s’affiche. C’est là la confir-
mation que la procédure de chargement a été lancée. Ef-
fectuez le calibrage de l’écran en touchant la croix rouge
partout où elle apparaît.
4. Un message vous demande de sélectionner un fichier
.pkg. Branchez le support de mémoire USB contenant le fi-
chier “Factory Reset” à la prise USB HOST puis touchez le
bouton [OK] à l’écran pour fermer la fenêtre de dialogue.
5. Quand un sélecteur de fichier apparaît, utilisez le
menu déroulant “Device” (dans le coin inférieur gauche de
l’écran) pour sélectionner le dispositif branché à la prise
USB HOST. Touchez ensuite le fichier Factory Reset.pkg pour
le sélectionner puis touchez le bouton [Select] à l’écran
pour confirmer le chargement.
Menu déroulant “Device” Sélecteur de chier
6. Une fenêtre de dialogue apparaît et vous permet de
lancer ou d’annuler l’opération. Touchez le bouton [For-
mat & Reset] pour confirmer le rétablissement des données
d’origine.
Avertissement: Si vous confirmez l’opération, la mémoire
interne est entièrement vidée. Voyez plus haut pour savoir
comment archiver vos données personnelles.
7. Une barre de progression indique où en est le charge-
ment.

4
8. Lorsque les données sont chargées, le message “Sys-
tem Update Completed” est affiché, vous invitant à redé-
marrer l’instrument.
9. Mettez l’instrument en veille en maintenant le bouton
STANDBY enfoncé environ une seconde puis remettez l’ins-
trument sous tension en actionnant à nouveau mais briève-
ment le bouton STANDBY.
10. Si vous avez sauvegardé ou archivé vos données, vous
pouvez alors les recharger en effectuant les opérations
“Media > Load” ou en utilisant la commande “Resource Res-
tore” de la page “Media > Utility”. Voyez le chapitre “Media”
dans le mode d’emploi pour en savoir plus.

5
Pa-Series – Laden der Werksvorgaben
Vorweg
Hier wird erklärt, wie man das Betriebssystem und die
Werksdaten des Instruments lädt. Dafür benötigen Sie eine
„Factory Reset“-Datei, die sich auf einem USB-Datenträger
befindet. Diese Maßnahme ist z.B. notwendig, wenn das In-
strument nicht mehr erwartungsgemäß hochgefahren wer-
den kann, was z.B. auf defekte oder nicht-kompatible Daten
zurückzuführen ist.
Die jeweils aktuelle Version der „Factory Reset“-Datei steht
auf unserer Webpage zum Download bereit (www.korg.
com).
Anmerkung: Das Laden dieser Datei kann eine Weile dau-
ern. Schalten Sie das Instrument niemals aus, bevor die
neuen Systemdaten komplett geladen sind!
Laden der ‘Factory Reset’-Datei
Zum Laden der „Factory Reset“-Daten in das Instrument
verfahren Sie bitte folgendermaßen.
1. Packen Sie die „Factory Reset“-Datei (.zip-Archiv) aus
und kopieren Sie die betreffende „.pkg“-Datei zu einem
USB-Datenträger.
2. Wenn das Instrument momentan eingeschaltet ist,
müssen Sie den STANDBY-Taster ±1 Sekunde gedrückt hal-
ten, um den Bereitschaftsbetrieb zu wählen. Halten Sie den
INTRO 1-Taster gedrückt, während Sie den STANDBY-Taster
betätigen, um das Instrument wieder einzuschalten.
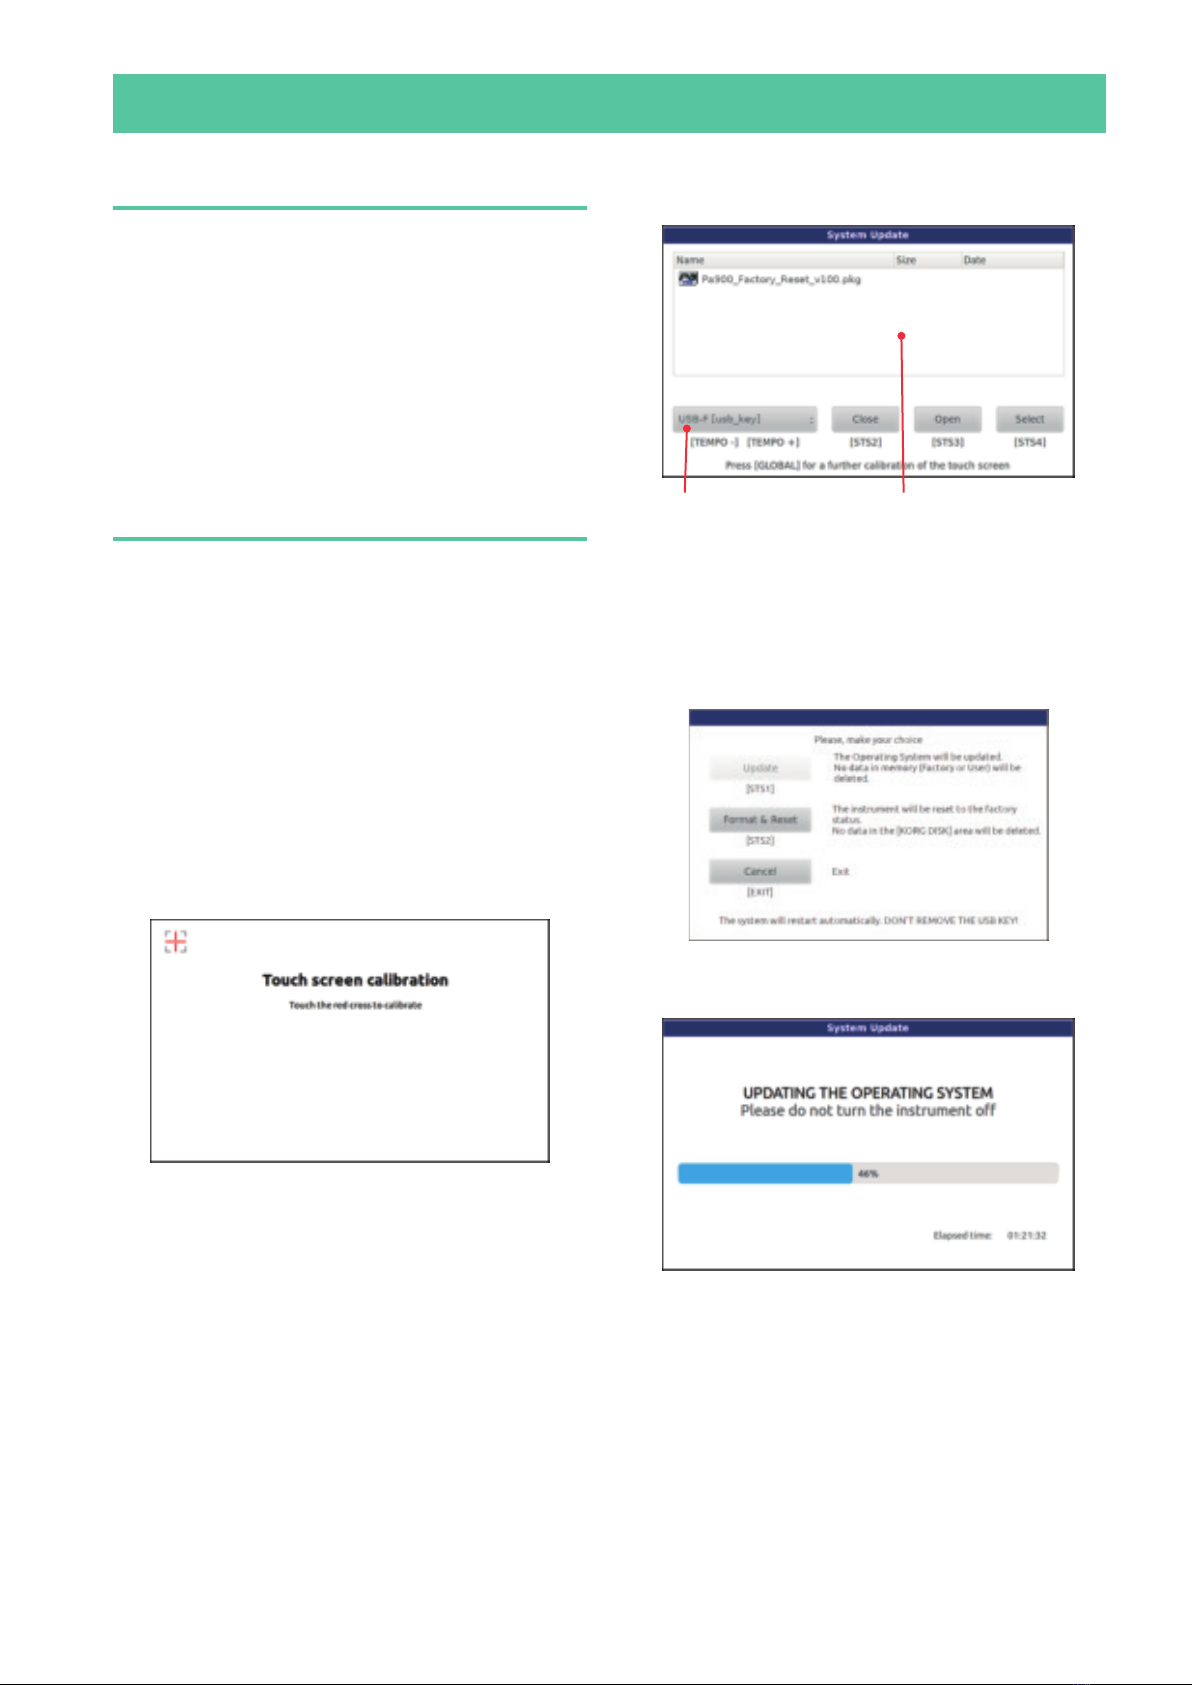
3. Halten Sie den INTRO 1-Taster so lange gedrückt, bis die
Seite „Touch Panel Calibration“ erscheint. Das ist die Bestä-
tigung, dass der Ladevorgang vorbereitet wird. Kalibrieren
Sie das Display den Anweisungen entsprechend, indem Sie
auf die angezeigten roten Kreuze drücken.
4. Nun erscheint die Aufforderung, die gewünschte „.pk-
g“-Datei zu wählen. Schieben Sie den USB-Datenträger mit
der vorbereiteten „Factory Reset“-Datei in den USB HOST-
Port und drücken Sie den [OK]-Button im Display, um das
Dialogfenster zu schließen.
5. Wenn jetzt ein Fenster für die Dateianwahl erscheint,
müssen Sie mit der „Device“-Liste (unten links im Display)
den an den USB HOST-Port angeschlossenen Datenträger
wählen. Drücken Sie anschließend [Factory Reset.pkg] und
den [Select]-Button im Display, um den Ladebefehl zu be-
stätigen.
„Device“-Liste Dateianwahl
6. Es erscheint ein Dialogfenster, in dem Sie angeben kön-
nen, ob Sie den Befehl ausführen oder abbrechen möchten.
Drücken Sie den [Format & Reset]-Button, um den Befehl zu
bestätigen.
Warnung: Wenn Sie den Befehl bestätigen, wird der interne
Speicher komplett gelöscht. Archivieren Sie Ihre wichtigen
Daten also vorher (siehe oben).
7. Ein Balken zeigt an, wie weit der Ladevorgang gedie-
hen ist.

6
8. Wenn alle Daten geladen sind, erscheinen die Meldung
„System Update Completed“ und die Aufforderung das Ins-
trument neuzustarten.
9. Halten Sie den STANDBY-Taster gedrückt, um den Be-
reitschaftsbetrieb des Instruments zu wählen. Schalten Sie
es danach wieder ein, indem Sie den STANDBY-Taster kurz
drücken.
10. Bei Bedarf können Sie Ihre zuvor archivierten Daten
jetzt mit den „Media > Load“-Befehlen oder „Resource Res-
tore“ („Media > Utility“-Seite) laden. Weitere Informationen
hierzu finden Sie im Kapitel „Media“ in der Bedienungsan-
leitung.

7
Pa-Series – Ricaricare i dati originali (Factory Reset)
Introduzione
La procedura descritta in questo documento spiega come
ricaricare nella memoria interna dello strumento il sistema
operativo e i dati Factory originali, mediante il caricamen-
to del file di Factory Reset da un dispositivo di memorizza-
zione USB. Questa operazione va eseguita solo quando lo
strumento sembra ‘inchiodato’, a causa del contenuto della
memoria danneggiato o del caricamento di dati non com-
patibili.
La versione più aggiornata del file di Factory Reset può
sempre essere prelevata dal nostro sito web (www.korgpa.
com).
Nota: Il caricamento di questo file può richiedere diversi
minuti. Non spegnete lo strumento durante il caricamento!
Caricare il file di Factory Reset
Ecco come caricare il file di Factory Reset nello strumento.
1. Estraete il file del Factory Reset dall’archivio .zip, poi
copiate il file .pkg risultante in un dispositivo di memoriz-
zazione USB.
2. Se lo strumento è acceso, mettetelo in standby tenen-
do premuto il pulsante STANDBY per circa un secondo. Poi
tenete premuto il pulsante INTRO 1 e premete il pulsante
STANDBY per riaccenderlo.
3. Tenete premuto il pulsante INTRO 1, fino a quando non
appare la pagina Touch Panel Calibration: la sua comparsa
conferma che la procedura di caricamento del sistema
operativo è iniziata. Eseguite la calibrazione del display
toccando la croce rossa nel punto esatto in cui appare, e
confermate.
4. Appare un messaggio che chiede di selezionare un file
.pkg. Collegate alla porta USB HOST il dispositivo di memo-
rizzazione USB in cui avete copiato il file di Factory Reset.
Una volta collegato il dispositivo, toccate il pulsante OK per
confermare.
5. Quando appare la finestra di selezione file, usate il
menu a comparsa Device (in basso a sinistra nel display)
per scegliere il dispositivo collegato alla porta USB HOST.
Poi toccate il file .pkg del Factory Reset per selezionarlo, e
infine toccate il pulsante Select nel display per confermare
il caricamento.
Menu Device Selettore le
6. Appare una finestra di dialogo, che chiede se si deside-
ra scegliere un’operazione o annullare. Toccate il pulsante
Format & Reset per confermare la procedura di Reset.
7. Appare una barra di avanzamento che mostra lo stato
dell’operazione di caricamento.

8
8. Una volta completata la procedura di caricamento, ap-
pare il messaggio “System Update Completed!”, che invita
a riavviare lo strumento.
9. Mettete lo strumento in standby tenendo il pulsante
STANDBY premuto per circa un secondo, poi riaccendetelo
premendo brevemente il pulsante STANDBY.
10. Se avete salvato o effettuato un backup dei vostri dati,
ricaricateli con le procedure Media > Load, oppure usate il
comando Resource Restore nella pagina Media > Utility. Vedi
il capitolo “Media” nel Manuale di istruzioni per maggiori
informazioni.

9
Pa-Series – Inicialización de fábrica
Introducción
El procedimiento descrito en este documento describe
cómo restaurar los datos originales de fábrica en la memo-
ria interna del instrumento, cargando el archivo de Iniciali-
zación de Fábrica desde un dispositivo de almacenamiento
USB. Esta operación sólo es necesaria si el instrumento
aparece ‘colgado’, debido a daños en la memoria o a la car-
ga de datos incompatibles.
La versión más actualizada de la Inicialización de Fábrica
puede ser descargada de nuestra página Web (www.korg.
com).
Nota: La carga de este archivo puede tardar varios minu-
tos. ¡Por favor no apague el instrumento antes de que se
haya completado la operación de carga!
Cargar el archivo de inicialización
Para cargar el archivo de inicialización en el instrumento.
1. Descomprima el archivo .zip para extraer el archivo de
Inicialización de Fábrica y copie el archivo .pkg en un dispo-
sitivo de almacenamiento USB.
2. Si está encendido, pulse el botón STANDBY para apagar
el instrumento. A continuación, mantenga presionado el
botón INTRO 1 y pulse el botón STANDBY para encender de
nuevo el instrumento.
3. Mantenga presionado el botón INTRO 1, hasta que apa-
rezca la página Touch Panel Calibration: Esto confirma que
se ha iniciado el procedimiento de inicialización. Ejecute la
calibración de la pantalla tocando la cruz roja donde apa-
rezca.
4. Aparece un mensaje pidiéndole que seleccione el archi-
vo .pkg. Conecte el dispositivo de almacenamiento USB que
contiene el archivo de inicialización al puerto USB HOST y, a
continuación, toque el botón OK en la pantalla para cerrar
el cuadro de diálogo.
5. Cuando aparezca el selector de archivos use el menú
de selección de dispositivo (en la parte inferior izquierda de
la pantalla) para elegir el dispositivo conectado al puerto
USB HOST. Ahora toque el archivo de inicialización de fá-
brica .pkg para seleccionarlo y toque el botón Select en la
pantalla para confirmar la carga.
Menú de dispositivo Selector de archivo
6. Aparece un cuadro de diálogo que le pide si actualizar
o cancelar la operación. Toque el botón Format & Reset para
confirmar la inicialización.
Advertencia: Confirmar eliminará todos los datos de la me-
moria interna. Consulte más arriba para obtener instruccio-
nes sobre cómo hacer una copia de seguridad de sus datos.
7. Aparece una barra de progreso, que muestra el estado
de carga.

10
8. Al finalizar el procedimiento de carga, aparece el men-
saje “System Update Completed”, invitando a que se reini-
cie el ins-trumento.
9. Apague el instrumento manteniendo pulsado el botón
STANDBY durante un segundo, y después vuelva a encen-
derlo pulsando brevemente el botón STANDBY.
10. Si ha guardado una copia de sus datos, cárguelos me-
diante Media > Load o el comando Resource Restore en la
página Media > Utility. Consulte el capítulo “Media” en el
Manual del usuario para obtener más información.

11
システムおよびファクトリー・データの復旧
5. ファイル・セレクターが表示されたら、ディスプレイの左下に表示されたデバイス・ポップアップメニューからUSB HOST端子に接続したデバイスを選択します。そして、ファクトリー・リセット.pkgファイルを選択しSelectボタンにタッチします。デバイス・ポップアップ・メニューファイル・セレクター6. ロードの実行を確認するダイアログが表示されます。Format & Resetボタンにタッチしてロードを実行します。Warning: 内蔵メモリー上のすべてのデータを消去するかどうかを確認してください。データを残しておきたい場合は、前述の「内蔵データのコピーを作成する」をご覧ください。7. プログレス・バーでロードの進行状況が表示されます。
はじめに
何らかの原因で本機が正常に起動しない等の問題が起きたときに、ファクトリー・リセット・ファイルをロードすることによって、本機のシステムとファクトリー・データ(工場出荷時データ)を復旧することができます。ファクトリー・リセット・ファイルの最新のバージョンは、コルグ・ホーム・ページ(www.korg.com)からダウンロードすることができます。Warning: ファイルをロードするには数分の時間がかかります。ロードが完了するまで、絶対に本機の電源をオフにしないでください。
ファクトリー・リセット・ファイルをロードする
ファクトリー・リセット・ファイルのロードの手順を説明します。1. ファクトリー・リセット・ファイルの圧縮ファイルを解凍します。そして、解凍してできた.pkgファイルをUSBストレージ・デバイスにコピーします。2. 本機の電源がオンになっているのであれば、STANDBYキーを約1秒間押したままにして電源をオフにします。そして、フロント・パネルのINTRO1キーを押しながら、再びSTANDBYキーを押します。INTRO1キーは押したままにします。3. ディスプレイに「Touch screen calibration」が表示されたらINTRO1キーから手を離します。画面に表示される赤い×印をタッチしてディスプレイ・キャリブレーションを実行します。4. .pkgファイルの選択を求めるメッセージが表示されます。ファクトリー・リセット・ファイルを入れたUSBストレージ・デバイスをフロント・パネルのUSB HOST端子に接続します。そして、ディスプレイに表示されているOKボタンにタッチしてメッセージを閉じます。

128. ロードが終了すると、「SYSTEM UPDATE COMPLETED」のメッセージが表示されます。9. 本機を再起動します。STANDBYキーを約1秒間押したままにして電源をオフにします。そして、STANDBYキーを押して電源をオンにします。
10.
必要に応じてセーブまたはバックアップしたデータをロードします。
Mediaモード Loadページでロードするか、UtilityページのFull Resource Restore コマンドを使用します。詳細はユーザー・マニュアルの「リファレンス・ガイド - Mediaモード」をご覧ください。


システムおよびファクトリー・データの復旧
© KORG Italy 2014. All rights reserved
Address
KORG ITALY SpA
Via Cagiata, 85
I-60027 Osimo (An)
Italy
Web
www.korg.com
Other manuals for PA Series
3
Table of contents
Languages:
Other Korg Musical Instrument manuals

Korg
Korg C-900 User manual

Korg
Korg S3 User manual

Korg
Korg C-6500 User manual

Korg
Korg Stage Vintage SV-1 User manual

Korg
Korg BX-3 User manual

Korg
Korg EASYSTART CX-3 Product information sheet

Korg
Korg Triton Studio Product information sheet

Korg
Korg M1 User manual

Korg
Korg TRITON Extreme Technical manual

Korg
Korg KARMA 2 General instructions