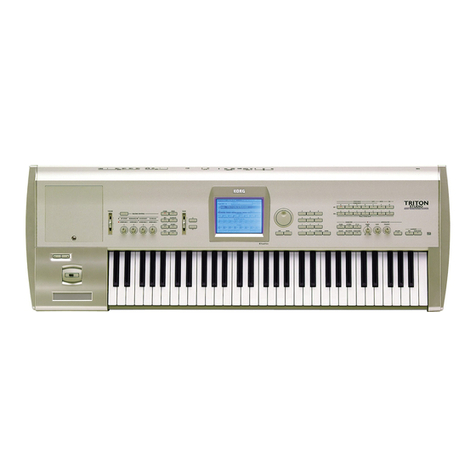
Korg Triton Studio Product information sheet

EasyStart CONTENTS
Making connections, Loading the preload data, Listening to demo songs 2
Selecting and playing Programs and Combinations 3
Arpeggiator mode 4
Sequence mode 4-5
Sampling mode 6-7
Sampling in Program, Combi and Sequence modes / In-Track Sampling 7
Resampling as a WAV file / Creating an audio CD 8
Ripping audio from a CD / Important Owner’s Manual references 9
Eas
y
Start
• Incredible sound: Up to 120 note polyphony, 48MB
of waveform ROM (including a new 16MB velocity-
switched stereo piano sample), expandable to 256
MB with up to seven EXB-PCM expansion boards,
plus EXB-MOSS DSP synthesis board.
• 1280 onboard sounds, expandable to 3584.
• TouchView graphic interface makes navigation a
breeze, and the new ultra-powerful processor is
six times faster than TRITON “classic” and twice
as powerful as Karma!
• World -class Effects: 102 algorithms, 5 inserts, 2
masters include sync-able effects, 3-Band EQ.
• Open Sampling System allows sampling and
resampling in all modes: 16 MB Sample RAM
(expandable to 96 MB), 48kHz sampling rate, with
Time Slicing / Stretching, Cross-fade Looping,
Sampling/Resampling through all insert and
master effects, “Ripping” audio from CD, and
resampling entire songs to internal HD as WAV
files.
•Easy and creative Sequencing: 16 Tracks,
200,000 events, with Cue List and RPPR
functions, shortcuts like Song Templates, preset
rhythm patterns, independent track-looping.
• In-Track sampling allows sampling direct to
sequencer as MIDI events –sample direct to
internal hard drive as longer samples for ext.
computer editing or audio CD burning!
• Dual polyphonic Arpeggiators, 507 User
locations, sync-able to MIDI clock.
• Plenty of storage: Internal 5GB hard drive, floppy
drive, SCSI, and optional CDRW1x8 internal
drive.
• 6 outputs allow routing of any sound to any
output or stereo pair with any effects!
• S/PDIF digital I/O 48kHz and compatible
w/96kHz
• Optional 6-channel EXB-DI ADAT optical output
and EXB-mLAN 6-channel digital audio/MIDI I/O
TRITON STUDIO Main Features

TRITON STUDIO Easy Start
2
Making connections and Loading the preload data
Connect AC power cable, and connect L/R audio outputs to monitor system. All factory data, including Programs,
Combinations, Global data and demo song/sampling data is located on the internal hard disk, in a folder named
“PRELOAD”.
In-Store Note: When you power off the TRITON STUDIO, loaded demo songs/samples will be erased from memory. For sales
presentations, make sure to reload the demos each morning using the following procedure!
! Make sure to backup any of your own internal songs/sounds to the internal hard drive or floppy drive before proceeding!
1. Press the [DISK] key. Ä
ÄÄ
ÄPress the Load tab in the lower left of the display.
2. Press the Drive Select Xpopup button (lower left of the display) and select HDD: INTERNAL HD.Ä
ÄÄ
ÄPress the
PRELOAD folder and press the Open button.
a. To load all of the factory data at once: Press any one of the files named PRELOAD ÄPress the Load ▼button in
the upper right corner of the display ÄPress Load selected from the popup menu ÄCheck the boxes for the other two
Load PRELOAD queries ÄMake sure that the PCG Contents X
XX
Xpopup button (Programs, Combinations, Global data) is
set to All, and the Clear radio buttons are selected in answer to “Select KSC Allocation” and “Select SNG Allocation”
ÄPress the [OK] button.
b. To load just the factory demo songs: Press the file named PRELOAD.SNGÄCheck the box for the Load
PRELOAD.KSC query ÄMake sure the Clear radio buttons are selected in answer to “Select KSC Allocation”and
“Select SNG Allocation” ÄPress the OK button.
c. To load just the factory sounds: Press the file named PRELOAD.PCG ÄPress the Load button on the upper right
corner of the display ÄPress Load selected from the popup menu ÄPress the OK button.
New!! Instantly preview Programs from internal or external drives before loading!
1. Select the PRELOAD.PCG file (step 2c above) Ä
ÄÄ
ÄPress the Open button Ä
ÄÄ
ÄPress Program, and then press Open Ä
ÄÄ
Ä
Select any Bank 1A-D, and press Open.
2. Press any sound’s name and play the keyboard: You can preview any sound from any drive by pressing its file name
before you load it into memory! Versus loading an entire bank of Programs before hearing any sounds, this feature
allows you to audition, then load just the Programs you like.
Listening to the demo songs
1. After the preload demo songs have been loaded, press the [SEQ] key ÄPress the SEQUENCER [START/STOP] key to
play the first song, “Bullet Timing” ÄPlayback will automatically stop at song’s end, or press [START/STOP] at any time
to stop.
2. To select another song, press the Xpopup button to the left of S000 ÄPress the song title you’d like to hear ÄPress
SEQUENCER [START/STOP].

TRITON STUDIO Easy Start
3
To play the Demo Cue List:
1. Press the [MENU] key ÄPress P1: Cue List (or press 1 on the numeric keypad) ÄPress SEQUENCER [START/STOP]
- all songs will play in succession as well as endlessly loop from the beginning of the list ÄPress [START/STOP] anytime
to stop playback.
Selecting and playing Programs and Combinations
1. To select Programs, press the [PROG] key. To select Combinations, press the [COMBI] key.
2. Press one of the [BANK] keys to select a sound bank, followed by using the DIAL, ▲/ ▼keys, or numeric keypad to
select sounds from within the bank.
! Factory Programs are located in BANKS IA-D (and Gfor General MIDI). Factory Combinations are in BANKS IA-D.
Selecting Programs and Combinations by Category
1. Press the Category button above the Program or Combi name ÄScroll and press the name of any sound in the current
category, and then you can instantly play it on the keyboard ÄSelect another category by pressing one of the Category
tabs on the left or right side of the center menu; then audition the sounds in similar fashion ÄPress the OK button when
you want to access the play and edit mode pages of the selected sound.
Work with these great TRITON STUDIO Programs and Combinations:
NEW!! Program C001 and Combination A000 showcase the new 16MB velocity-switched stereo grand piano
sample, with up to 60 voices of this piano’s polyphony available in addition to 60 voices of the great Triton waveforms!
PROGRAM Name Performance Tips
C001 C. Grand Piano SW1: Octave; Knob1: Attack; Ribbon: Filter
C002 VCF Sample&Hold Ribbon: Filter; SW2: Decimator; Knob1: Attack
C014 Gating Voice Pad Knobs 1&2: LFO to filter; Knob 4: Reverb; Try with Arp!
C086 Acid Dist Bass Arp: OFF; SW1: OD Off; SW2:Filter; Knob 3: Wah; JS-Y: Filter Envelope
D004 D’ n’B Gate Kit Arp: ON!; Knob3: Pitch; SW1: Ring mod
D043 Da Mute…Joy-Y Ribbon: Mute; JS-Y: Un-mute; Slider: Pitch
D061 Talkin’ Keys SW1: Ring mod amt.; JS-Y: Ring mod freq.; Knob1: Portamento time
COMBINATION Name Performance Tips
A000 Stereo Piano SW1: Octave; Knob 3: Chorus ; Knob 4: Reverb
A089 Bellacoola Ribbon: Filter; SW1: Pitch; Knob 4: Chorus & Delay
B025 Song Of Angels Ribbon: filter; SW1: Piano octave; Knob 3: Delay
B036 Wave Sequencer Ribbon: Filter; Knob 3: Chorus; Knob 4: Reverb
B092 Arp Factory SW2: Ring mod; Knobs 1&2: Auto Wah and St Comp
B100 Stutter Pad Arp: ON!; Knob 1: Attack; Knob 2: Res; SW1: Pitch +4; JS-Y/SW2: Lock
C006 Alien Jungle Jam SW1: Decimator; JS-Y: Pitch; Knob 3: Phaser
C095 Radio Ribbonizer Ribbon: Record noise & Decimator; Knob 1: Scratch
D037 Mutant Hop Knbs Knob 1: Cutoff; Knob 2: Resonance; Knob 3: BPM delay; Arp: Gate & Velo

TRITON STUDIO Easy Start
4
Arpeggiator mode
TRITON has dual polyphonic arpeggiators, fully editable and syncable to MIDI clock. One program uses one arpeggio
pattern - Combi or Sequence modes can use up to two arpeggio patterns at once.
1. Programs have an arpeggio pattern assigned to them even if the Arpeggiator [ON/OFF] key does not “wake up” in the
ON position. Example: Select Program C54, Wah Space Bass ÄPress the Arpeggiator [ON/OFF] key so it is on (lit) Ä
Work with the realtime controls: TEMPO, GATE (overall step length), and VELOCITY (loudness of arpeggiated notes) Ä
Press the Arpeggio tab at the bottom of the screen ÄWork with the Octave radio button, change the clock Reso
(=Resolution), check the Keyboard box.
2. View the Arpeggiator grid: Press the [GLOBAL] key, press [MENU], press P.6 User Arpeggio ÄPress the Pattern
Edit tab ÄThe procedure to edit or create your own arpeggio patterns is covered in the Owners Manual Basic Guide,
pgs. 134-137.
3. Combinations may have up to two arpeggio patterns assigned to them even if the Arpeggiator [ON/OFF] key does not
“wake up” in the On position ÄExample:Select COMBI A48, Wine& Cheese ÄNote that Realtime controls affect both
arps globally ÄPress the Arpegg. A or Arpegg. B tab at the bottom of the screen to work with individual parameters Ä
Press the Xpopup at the Pat: (Pattern) field and try substituting a different arp pattern.
Sequence mode: Creating songs quickly with Song Templates
1. Press the [SEQ] key ÄPress the ►popup by S### (song number) and press any number not in use ÄPress OK in
response to the query “Create new song this Song No.”
2. Press the upper right ▼popup, and then press “Load Template Song” ÄPress the ►popup in the From: field and
select one of the Preset song templates (P00,etc) by pressing it. Each song selection will load eight programs to the first
eight tracks, together with the appropriate effects and routing. Before you press OK…
3. Check the box “Copy Pattern to Track too?” and then press OK.ÄMake sure that the Pattern: ►popup is set to
“Preset” ÄPress the ►popup by P### and select a Pattern in the same style as your Song Template choice ÄPress
the OK button 4to 8times, to copy the pattern into the track for a number of measures (as noted by the Measure value),
and then press Exit ÄPress theSEQUENCER [START/STOP] key to audition the copied drum pattern ÄPress the
SEQUENCER [START/STOP] key again to stop.
! Before you press OK to copy a pattern, you can first select a new pattern to create a mapped set of patterns in the track.
Record a new track:
1. Press the [LOCATE] key to return to the to the beginning of the Song ÄPress the ►popup to the left of Track beneath
the Song name) and select Track 2 (except for the Orchestral Template, Track 2 is always Bass) ÄPress the
[REC/WRITE] key, and then press the SEQUENCER [START/STOP] key, and record 2to 4measures ÄWhen finished,
press the SEQUENCER [START/STOP] key to stop recording.
Set a Play Loop for track 2:
2. Press the PlyLoop 1-8 tab at the bottom of the display ÄPress the Track Play Loop checkbox for Track 2 ÄLeave the
Loop Start Measure at “001” ÄPress the Loop End Measure (“001”) and set it to the last measure you played on Track
2 (using Svalue key, DIAL, or keypad)ÄPress the SEQUENCER [START/STOP] key to play back the song and
looped bass track ÄPress the SEQUENCER [START/STOP] key again to stop.
3. Repeat previous steps 4and 5as you record additional tracks and set desired Play Loops.
! The Play Intro checkbox when set, allows a track to play from measure 1 up until the Loop Start Measure and then
begin looping the selected measures.

TRITON STUDIO Easy Start
5
New!! Copy from a Dual-Arp Combi and Set the Song for Multi-channel recording
1. Create a new song as above ÄPress upper right ▼popup and press “Copy from Combi”ÄExample: Select B01, Wack
Attack.
2. Check the box “with Effects”ÄMake sure the radio button for Tracks 1 to 8 is selected ÄCheck the box “Auto adjust
Arp setting for Multi REC”: Note that the first eight tracks have all been armed for Recording.
3. Record a few measures as above, and listen to the playback: The sequencer assigned the correct MIDI channels to the
tracks with active arpeggation.
4. Press the [MENU] key, then Page 2, Trk Param. ÄPress the tab for MIDI Ch 9-16, and select and change tracks 10-16
(OFF) to INT.
…Continue by Automating the Mix:
5. Press the Preference tab, then press the Overdub radio button under Recording Setup.
6. Press the Mixer 1-8 tab at the bottom of the screen, and select a track from the previous steps for mixing by pressing its
“fader”.
7. Press the [REC/WRITE] key, followed by the SEQUENCER [START/STOP] key, and record volume changes on the
track by using the DIAL or the VALUE slider ÄPress the SEQUENCER [START/STOP] key when finished.
8. Press the SEQUENCER [START/STOP] key again, to audition the results - the volume parameter and value will update
as the song plays back. Note that track pan messages may be recorded in similar fashion.
Using the Compare function as ‘UNDO’ in Sequence mode:
If you are dissatisfied with a ‘take’ or a recorded mix, press the [COMPARE] key once so it is lit: it serves as “one level
of Undo”. Simply Record again while the [COMPARE] key is lit, and you’ll record new data in the current track. “Toggle”
the [COMPARE] key to listen to both “takes”. Note thatmoving to, and recording/editing another track (or leaving
sequence mode) will clear the Compare buffer. Beforeyou begin work on a new track, make sure that the currently
selected state ofCompare contains the data that you want to keep!
Examine the effects in your Song Template: 5 Insert FX, 2 Master FX, and Global 3-Band EQ!
1. Press the [MENU] key, then P.8 Insert Effect to view the (up to) 5 stereo Insert Effects loaded with the Song Template Ä
Look at the field labeled IFX/Indiv. Out BUS Select ÄTracks whose X
XX
Xpopup is assigned to L/R are fed directly into the
Master Effects by the values in the Send1 (MFX1) and Send 2 (MFX2) rows. ÄTracks whose X
XX
Xpopup is assigned to
IFX# are assigned to the Insert Effects visible in the top half of the display.
2. Press the X
XX
Xpopup for Track 2 (your bass track): the second column contains the choices for assigning a track to one or
two of the TRITON STUDIO’s 4 auxiliary outputs.
3. Press the Insert FX tab at the bottom of the display to see an expanded view of the currently selected Insert effects Ä
The Send1 and Send2 rows govern how much an Insert Effect is being fed to the Master Effects ÄClick on one of the X
XX
X
popups in the Insert Effects row: Just like the TRITON STUDIO’s sounds, effects are arranged in categories ÄPress
any other effect algorithm in the current category to choose it, or press one of the effect category tabs on the left side of
the display, to choose an effect from another category ÄPress one of the five IFX tabs to view all the parameters of the
currently selected Insert Effect ÄPress any of the X
XX
Xpopups (other than Control Ch.) to view the 32 available Dynamic
Modulation Sources. (Note that the Control Ch. X
XX
Xpopup allows control of a given effect by a specific MIDI channel of the
sequencer)
4. Press P.9 Master Effect to view the 2 Master Effects chosen by the Song Template ÄPress one of the X
XX
Xpopups by
MFX1 or MFX 2 to substitute effect algorithms as on the IFX page ÄPress either the [MFX1] or [MFX2] tab at the bottom
to view and edit the currently selected effect’s parameters ÄPress the Master EQ tab to view and edit the global 3-Band
EQ.
TRITON STUDIO Easy Start
6
Sampling mode
The TRITON STUDIO samples at 48kHz, 16-bit, in mono or stereo. With the provided 16 MB, the TRITON
STUDIO is capable of recording samples of up to 174 seconds @ mono, or 87 seconds @ stereo. Fully expanded
with SIMM modules to 96 MB, it allows about 17.4 mono minutes or 8.6 stereo minutes of sampling.
! Three 32 MB SIMM modules can be user-installed to fully-expand sample ram to 96 MB. The correct SIMMS are 72-pin,
non-parity, ECO or Fast Page (FPM) DRAM SIMM, 60 ns (nanoseconds) or faster, 11-bit addressing.
Recording “one-shot” vocal samples
! Before proceeding, clear the TRITON STUDIO’s sample RAM by powering OFF, then ON. Alternatively you can delete all
Multisamples and Samples in SAMPLING mode: From the page menu select “Delete MS” and check both “All
Multisamples” and “Delete Samples too?” boxes.
1. Connect a microphone to the [AUDIO INPUT 1] jack on the rear panel, set the MIC/LINE switch to MIC, and set the
LEVEL control to the 12 o’clock position.
2. Press the [SAMPLING] key ÄPress the [Input Setup] tab ÄIn the Input 1 field, press the X
XX
Xpopup by BUS(IFX)
Select: and choose L/R ÄSet Input 1 Pan: to “C064” with the DIAL or numeric keypad ÄIn the Recording Setup
field, press the Auto radio button, set the Threshold to –30 db, and set Pre Trigger REC: to 5ms with the DIAL or
keypad.
3. Press the [Recording] tab and make sure that “MS” (Multisample) is set to “000:new MS____000” ÄSet both the
OrigKey and TopKey fields to a value of “C2”. The easiest way to set this is by holding down the [ENTER] key and
pressing the [C2] key on the keyboard. ÄUnder the REC Sample Setup field, touch the X
XX
Xpopup next to Sample Mode:
and set to “L-Mono”.
4. Press the Preference tab and set the Zone Range to 1key with the DIAL or numeric keypad.
5. Press the Recording tab ÄPress the SAMPLING [REC] key to “arm” the sampler, and then speak into the microphone.
If “ADC Overload” flashes above the “level indicators”, lower the rear panel LEVEL control until this message no longer
flashes ÄPress the dB “fader” in the Recording Level field and adjust with the DIAL while speaking into the mic. Set
this for a “hot” signal level, but watch and adjust if the display indicates, “CLIP”.
6. Press the SAMPLING [START/STOP] key and say the word, “Sampling” ÄPress SAMPLING [START/STOP] again to
stop sampling, and then press the Create button in the display.Note that the “keyboard” display moves to the next key
after you press “Create”.
7. Press the SAMPLING [REC]key ÄPress the SAMPLING [START/STOP] key and say, “is easy” ÄPress SAMPLING
[START/STOP] again to stop sampling, then press Create.
8. Press the SAMPLING [REC]key ÄPress the SAMPLING [START/STOP] key and say, “with the” ÄPress SAMPLING
[START/STOP] again to stop sampling, then press Create.
9. Press the SAMPLING [REC]key ÄPress the SAMPLING [START/STOP] key and say, “TRITON STUDIO ” ÄPress
SAMPLING [START/STOP] again to stop sampling.
10. That’s it! Now play the keyboard: play each note (half-step) from [C2] to [D#2], and you’ll hear the sampled words,
“Sampling is easy with the TRITON STUDIO“.

TRITON STUDIO Easy Start
7
…Continue by sampling through one of the TRITON STUDIO’s 102 Insert effects:
11. Press the Input Setup tab ÄIn the Input 1 field, press the Xpopup by BUS(IFX) Select and choose IFX1.
12. Press the[MENU] key, and then press P8: Insert Efffect. ÄPress the OFF toggle button in the IFX1 box to turn it ON,
and then make sure that 000: “No Effect” is highlighted. ÄUse the numeric keypad to enter 5> 2, and then press the
[ENTER] key (“52: Reverb Hall”) ÄSpeak into the microphone to hear the effect being applied ÄPress the IFX1 tab at
the bottom of the screen to view and edit the effect parameters.
13. Press the [MENU] key, then press P0: Recording ÄPress theRecording tab, then press the SAMPLING [REC/WRITE]
key to “arm” the sampler ÄSpeak into the mic and adjust the recording level as needed.
14. Press Create to make a new index in the multisample ÄPress the SAMPLING [START/STOP] key, speak to sample Ä
Press SAMPLING [START/STOP] again to stop sampling. The new sample will playback on key [E2] – the next
available index.
New!! Sampling in Program, Combi, or Sequence modes
The TRITON STUDIO easily allows sampling in Program, Combi or Sequence Mode. Note that thereis a Sampling tab
on the main playpage of each mode. The following Combi example illustrates the procedure for all three modes:
1. Press the [Combi] key and select A032, “SKOOL of FUNK”:The objective is to sample all this information,(up to 8
Timbres, 7 Effects, and 2 polyphonic Arps) as a single new event, freeing up tracks and polyphony in sequencing.
2. Press the Sampling tab at the bottom of the display ÄMake sure that the Input Xpopup is set to Analog ÄPress the
SAMPLING [REC] key and adjust the level as in step 5 above ÄWhen finished, press the SAMPLING [REC] key again
ÄTurn OFF the ARPEGGIATOR [ON/OFF] key.
3. In the Sampling Setup field set Source BUS to L/R ÄSet Trigger to Note On ÄSet Save to to RAM ÄSet Mode to
Stereo.
4. Press the upper right corner ▼popup and press Select Bank & Sample No.ÄCheck the box in reply to Convert to
Program and select a Program destination ÄPress the Xpopup by MS and select the next empty Multisample slot
(MS001 assuming that you’ve performed the previous “One-shot” tutorial): Orig. Key will then default to C2 ÄPress OK.
5. Turn on the ARP [ON/OFF] switch ÄPress the SAMPLING [REC] key ÄPress the SAMPLING [START/STOP] key Ä
Play the keyboard ÄWhen finished, turn off the SAMPLING [REC] and ARP [ON/OFF] keys.
6. Press the [PROG] key and select the Program you selected in step 4: Play [C2] and hear your entire phrase as one
sample!
Tip! Try the previous exercise using another “realtime controllable” Combination like C095 Radio Ribbonizer – but this time,
as you sample, work with the REALTIME CONTROLS, RIBBON,JOYSTICK and ARPEGGIATOR CONTROLS – all
your controller movements are recorded in your new sample, available for use as a single MIDI event in your sequences!
New!! In-Track Sampling in Sequence mode
TRITON STUDIO allows an external audio input (a guitar or mic for example) to easily be sampled and assigned a
trigger note to an empty sequence track in order to play back at the correct location. The following example shows the
procedure utilizing the mic you’ve previously connected to Audio Input 1.
1. Clear the Sample RAM, but not your Sequences: To do this, press the [SAMPLING] mode key, press the upper right
corner ▼popup and press Delete MS ÄCheck both boxes All Multisamples and Delete samples Too? ÄPress OK
2. Press the [SEQUENCE] mode key and select one of the songs you created from the steps above. ÄPress the Sampling
tab in the display.

TRITON STUDIO Easy Start
8
3. Make sure that the Input 1 X
XX
Xpopup is set to Analog ÄCheck that Input 1’s Level is set to 127 and that Pan is set to
L000 ÄSet the X
XX
Xpopup for BUS (IFX/Indiv.) Select to 1/2. ÄSet Mode to Mono.
4. In the Sampling Setup field set Source BUS to Indiv. 1/2 ÄUnplug the cable from AUDIO OUTPUT Rand insert it into
INDIVIDUAL OUTPUT 1 – to monitor what is sent to the sampler.
5. Press the upper right corner ▼popup and press Select Bank & Sample No. ÄCheck the Convert to Program box and
select a Program (for example: E-G127) ÄCheck the Convert to Seq. Event box and select an empty track (Track 16
for example) ÄPress OK.
6. Check the recording level by “arming” the sampler: Press the SAMPLING [REC] key and speak into the mic, and adjust
the level as needed ÄPress the SAMPLING [START/STOP] key ÄPress the SEQUENCER [START/STOP] key and
sing or speak into the mic ÄPress the SAMPLING [START/STOP] key and the Sequencer [START/STOP] key to halt
sampling and song playback.
7. Press the [LOCATE] key, then press the SEQUENCER [START/STOP] key to hear your song with its in-track sample!
8. Unplug the cable from the INDIVIDUAL OUTPUT 1 jack, and insert it back into the AUDIO OUTPUT R jack.
NEW!! Resampling your entire performance as a WAV file to the internal hard disk
TRITON STUDIO lets you easily resample the above performance (sequence and all in-track samples) as a WAV file to
the internal hard drive, or via SCSI to an external drive. A maximum of 80 minutes can be written in one operation!
With the CDRW-1 option, the WAV files you’ve re-sampled can be burned to an audio CD! (See the Getting Started
Guide, pp.115-116 for more info.)
1. Remain in Sequence mode, re-selecting the song you created in the steps above ÄPress the Sampling tab ÄIn the
Sampling Setup field set Source BUS to L/R ÄSet Trigger to Seq. START SW. ÄSet Save To to DISK ÄSet Mode to
Stereo.
2. Press the upper right corner ▼popup and press Select Directory ÄName your file, leaving Take No. checked (This
Take number becomes the final two characters of your file name.) ÄPress Done.
3. In the Sampling Setup field set Sampling Time to a figure slightly greater than the song’s length ÄSet level: Press the
SAMPLING [REC] key, wait until it is solidly lit, then press the SEQUENCER [START/STOP] key and adjust the
sampling level.
4. Press the [LOCATE] key to return to the beginning of the song ÄPress SAMPLING [START/STOP] , then press
Sequencer [START/STOP] ÄPress SAMPLING [START/STOP] and Sequencer [START/STOP] when done.
5. Press the upper right corner ▼popup and press Select Directory ÄPress the file name you chose, and press the
SAMPLING [START/STOP] key to audition the WAV file. That’s it!
NEW!! Creating an audio CD from WAV files
With the CDRW-1x8 option or an external CDRW drive connected via SCSI, the TRITON STUDIO lets you assemble a
list of WAV files and burn them to an audio CD!
1. Press the [DISK] mode key ÄPress the Make Audio CD tab ÄPress ====End===== and press Insert ÄSelect the
Drive and desired WAV file (you can audition it by pressing the SAMPLING [START/STOP] key) and press Insert.
2. Insert a blank CD-R or CD-RW into the CDRW-1x8 drive (or connected external CDRW drive) ÄPress the lower left X
popup to select the drive CDD ÄPress the upper right ▼popup and press Write to CD ÄSpecify the writing speed -You
can choose to run a test for errors at selected writing speed ÄSet Mode to Write ÄIf this is the only, or final WAV file to
be burned to this CD,check Execute Finalize too ÄPress OK.
3. The resulting audio CD, once finalized, can be played by pressing the Play Audio CD tab.

TRITON STUDIO Easy Start
9
! See the TRITON STUDIO Getting Started Guide, pp. 116-117 for more information.
NEW!! Ripping audio from a CD
Digital data from an audio CD in the CDRW-1 option can be imported as sample data in the digital domain. This
process is known as “ripping”.
1. Insert an audio CD into the CDRW-1 ÄPress the [SAMPLING] mode key ÄIn the Input Setup tab, check that the Input
Xpopup is set to Analog ÄSet levels to 127 for both Inputs 1 and 2ÄSet Pan of Input 1 to L000 and Pan of Input 2 to
R127 ÄSet BUS(IFX/Indiv.) to L/R for both Inputs 1 and 2.
2. Press the [MENU] key, then press P.5 Audio CDÄCheck that Drive is set to CDD: Audio CD (or ID# for external
CDRW) ÄSelect the CD Track Xthat you want to rip ÄPress the Volume “slider” in the display and use the DIAL to
set CD playback level ÄP-ress the SEQUENCER [START/STOP] key to begin playback, and press the [ENTER] key to
make markers defining the ripping Range Start and Range End. ÄP-ress the SEQUENCER [START/STOP] key to stop
playback. Note that the Range Start and End points can be selected and values changed with the DIAL or numeric
keypad. You can then playback, re-entering start to end points to determine the exact range for ripping to occur.
3. Press the upper right ▼popup and press Destination ÄSelect RAM as the destination if you want to place this digital
data in sample memory ÄPress OK. Now you can continue to edit the ripped audio sample in Sampling mode.(Note that
selecting DISK sets the ripped audio data destination as the internal hard disk)
Important Owner’s Manual References
Basic Program and Combination editing Basic Guide, pgs. 34 and 35
Copying a Combination to the Sequencer Basic Guide, pgs. 95-97
Creating and Recording RPPR (Realtime Pattern Play/Record) Basic Guide, pgs. 93-95
Sampling: Converting a Multisample to a Program Basic Guide, pg. 112
Sample Looping, Time Slicing and advanced Sample editing Basic Guide, pgs 104-110; Param Guide, pgs. 107-118
In-Track Sampling Basic Guide, pg. 115-116
Resampling song playback to create a WAV file Basic Guide, pg. 116
Creating an Audio CD from WAV files Basic Guide, pg. 118
Creating a user arpeggio pattern Basic Guide, pgs. 134-137
Effect Guide Param Guide, pg. 177
Alternate Modulation Param Guide, pg. 241
Dynamic Modulation Param Guide, pg. 246
Routing Individual Outputs Param Guide, pg. 185
Other manuals for Triton Studio
6
Table of contents
Other Korg Musical Instrument manuals

Korg
Korg Stage Vintage SV-1 User manual

Korg
Korg SP-500 User manual

Korg
Korg EK-50 User manual

Korg
Korg SP-170DX User manual

Korg
Korg CONCERT C-550 User manual

Korg
Korg Concert-5500 User manual

Korg
Korg Professional Arranger Liverpool User manual

Korg
Korg C-900 User manual

Korg
Korg TRITON Musical Instrument User manual

Korg
Korg LP-380 User manual