KORNEFF Amplified Instrument Processor User manual


Amplified Instrument Processor - User Manual
___________________________________________________________________________________________________
Amplified Instrument Processor
The Amplified Instrument Processor is a complete suite of tools designed to help you sculpt
the ultimate guitar, bass or keyboard tone. But while it was designed initially to work with
amplified instruments, its power and versatility make it an excellent processor for virtually
any audio task. The AIP can work wonders on vocals, acoustic instruments, pianos, group
buses and even across the whole mix. Heck, you can even master a finished recording with
it. It's that good, and it's that versatile.
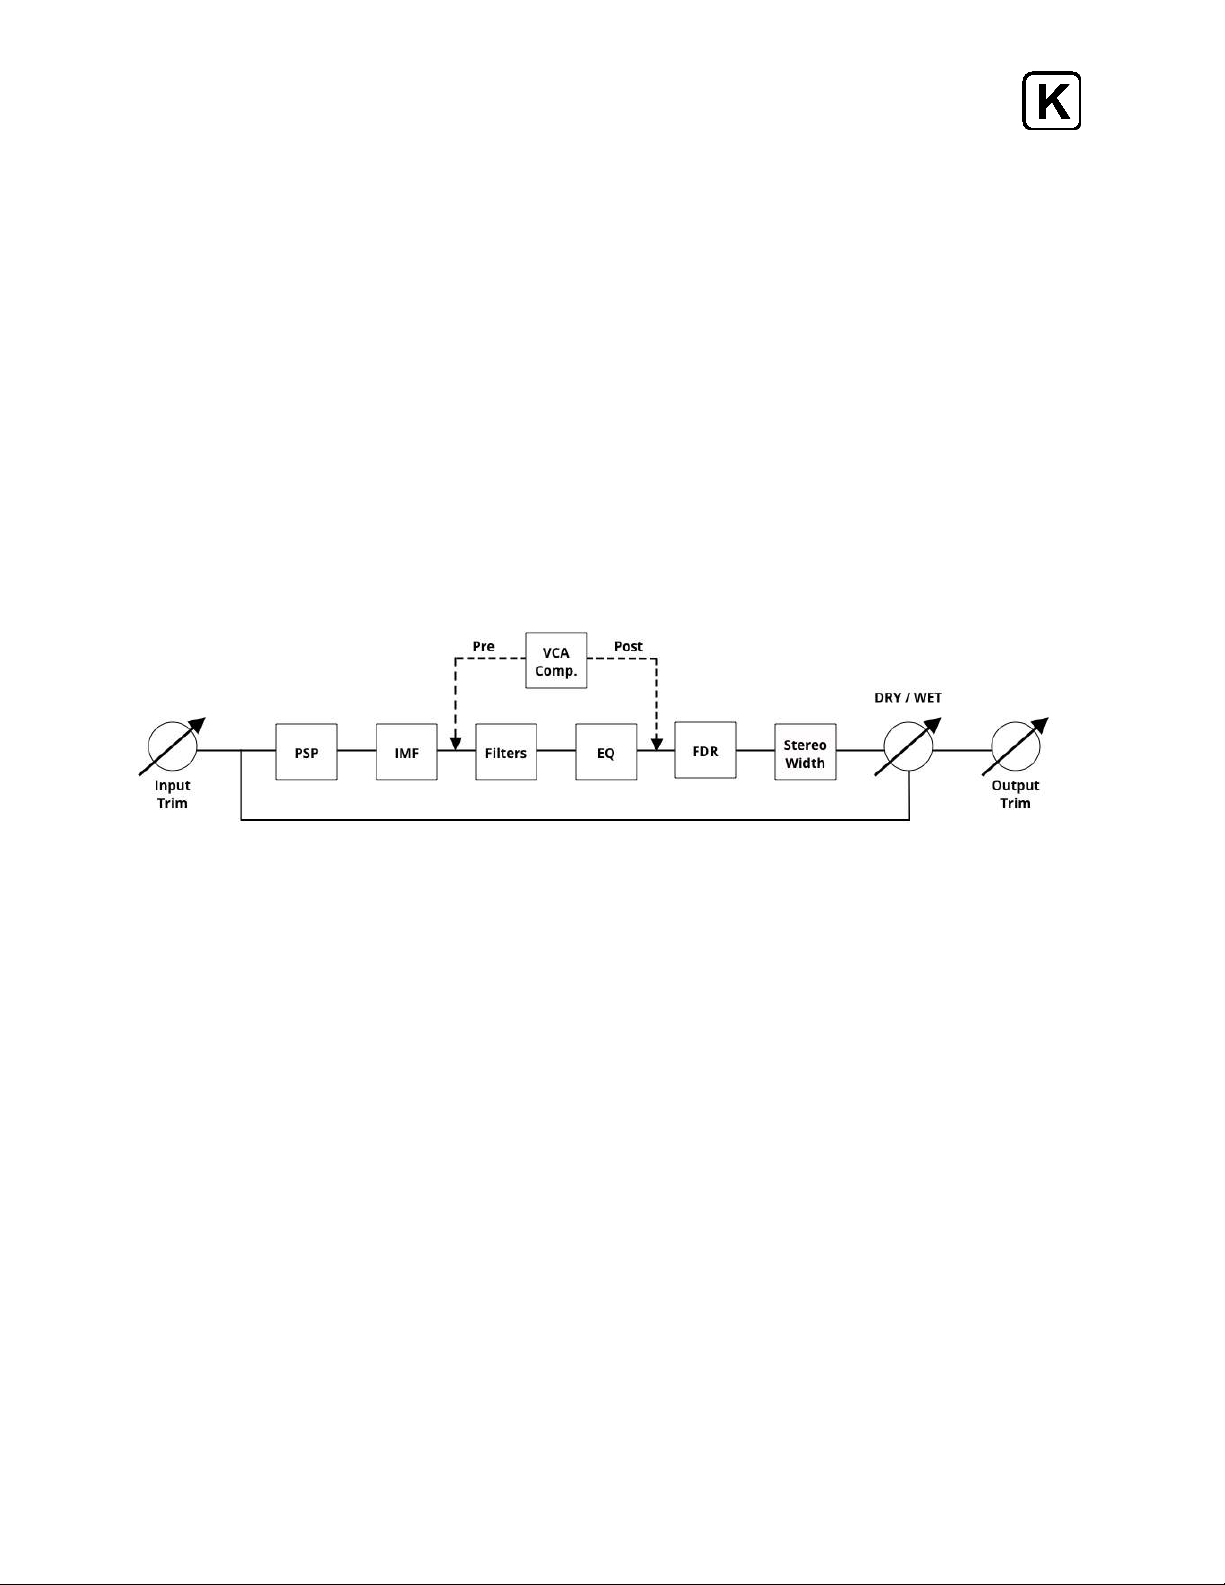
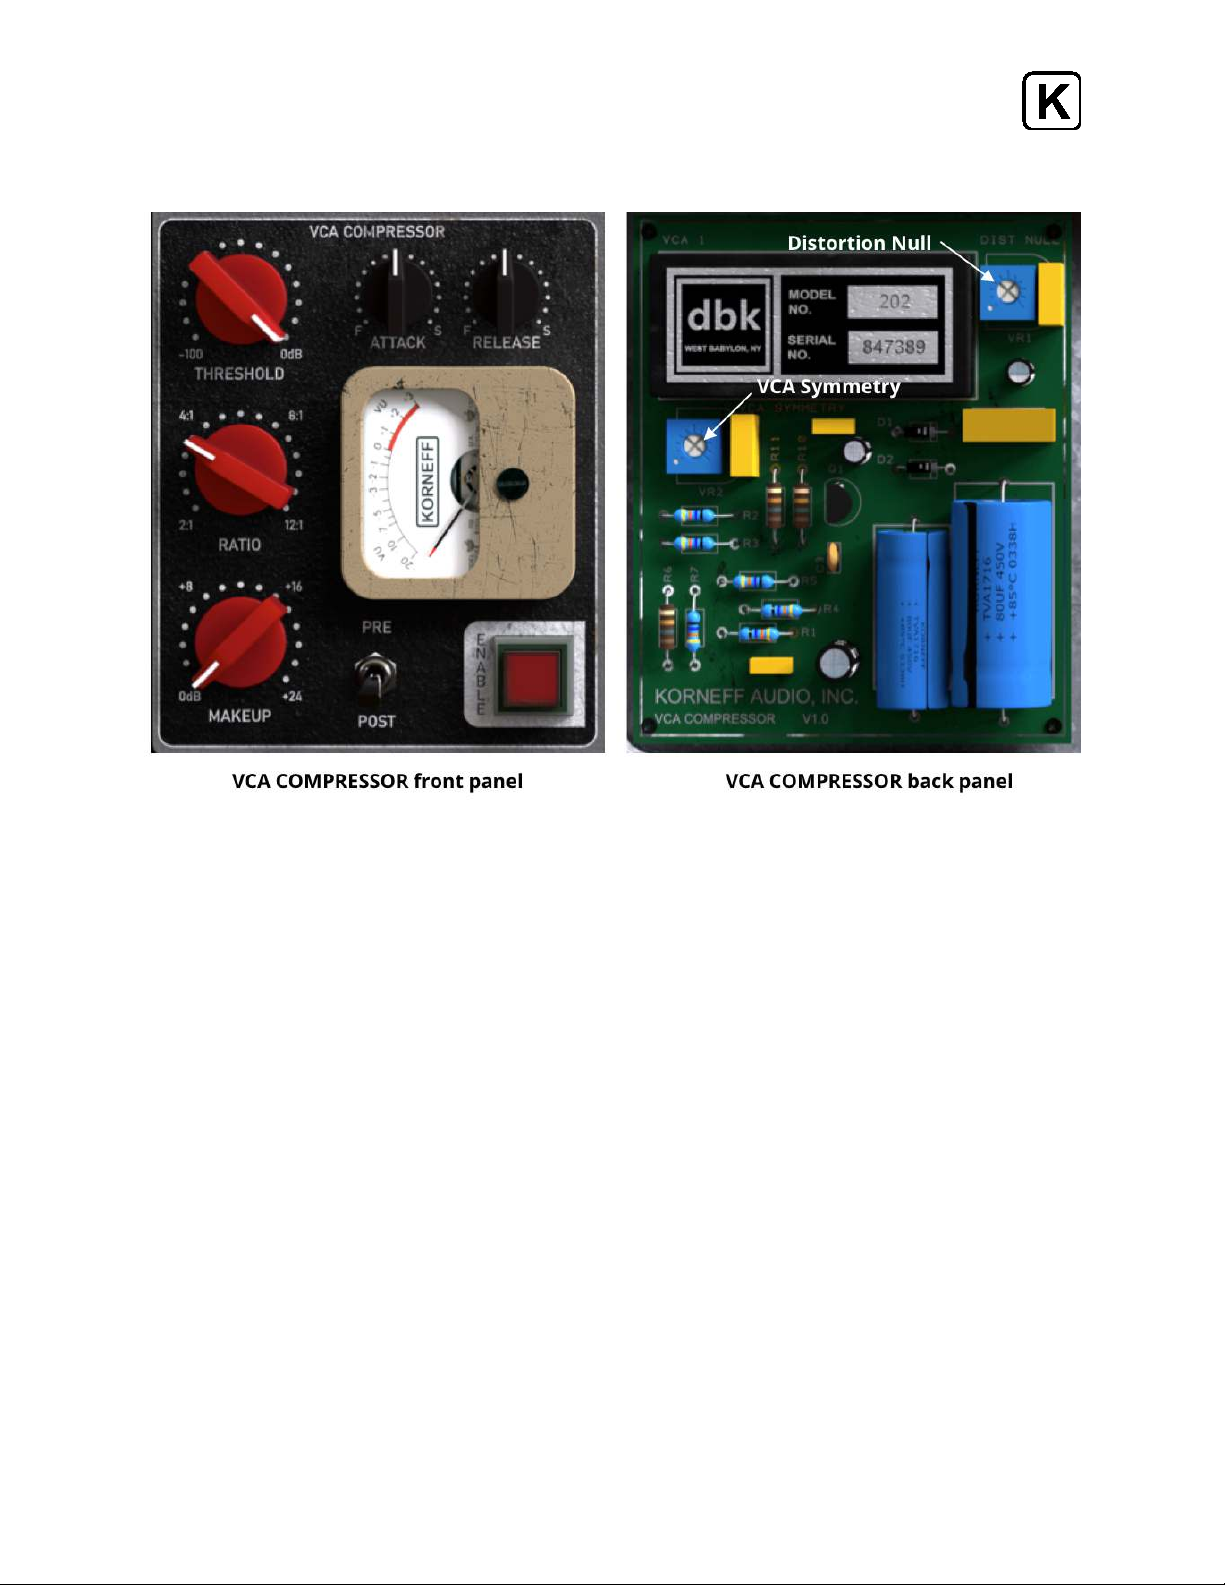
The AIP combines a seriously powerful four band EQ, a VCA based compressor, specialized
filter networks, a psycho-acoustic stereo widener, a frequency dependent compressor, and
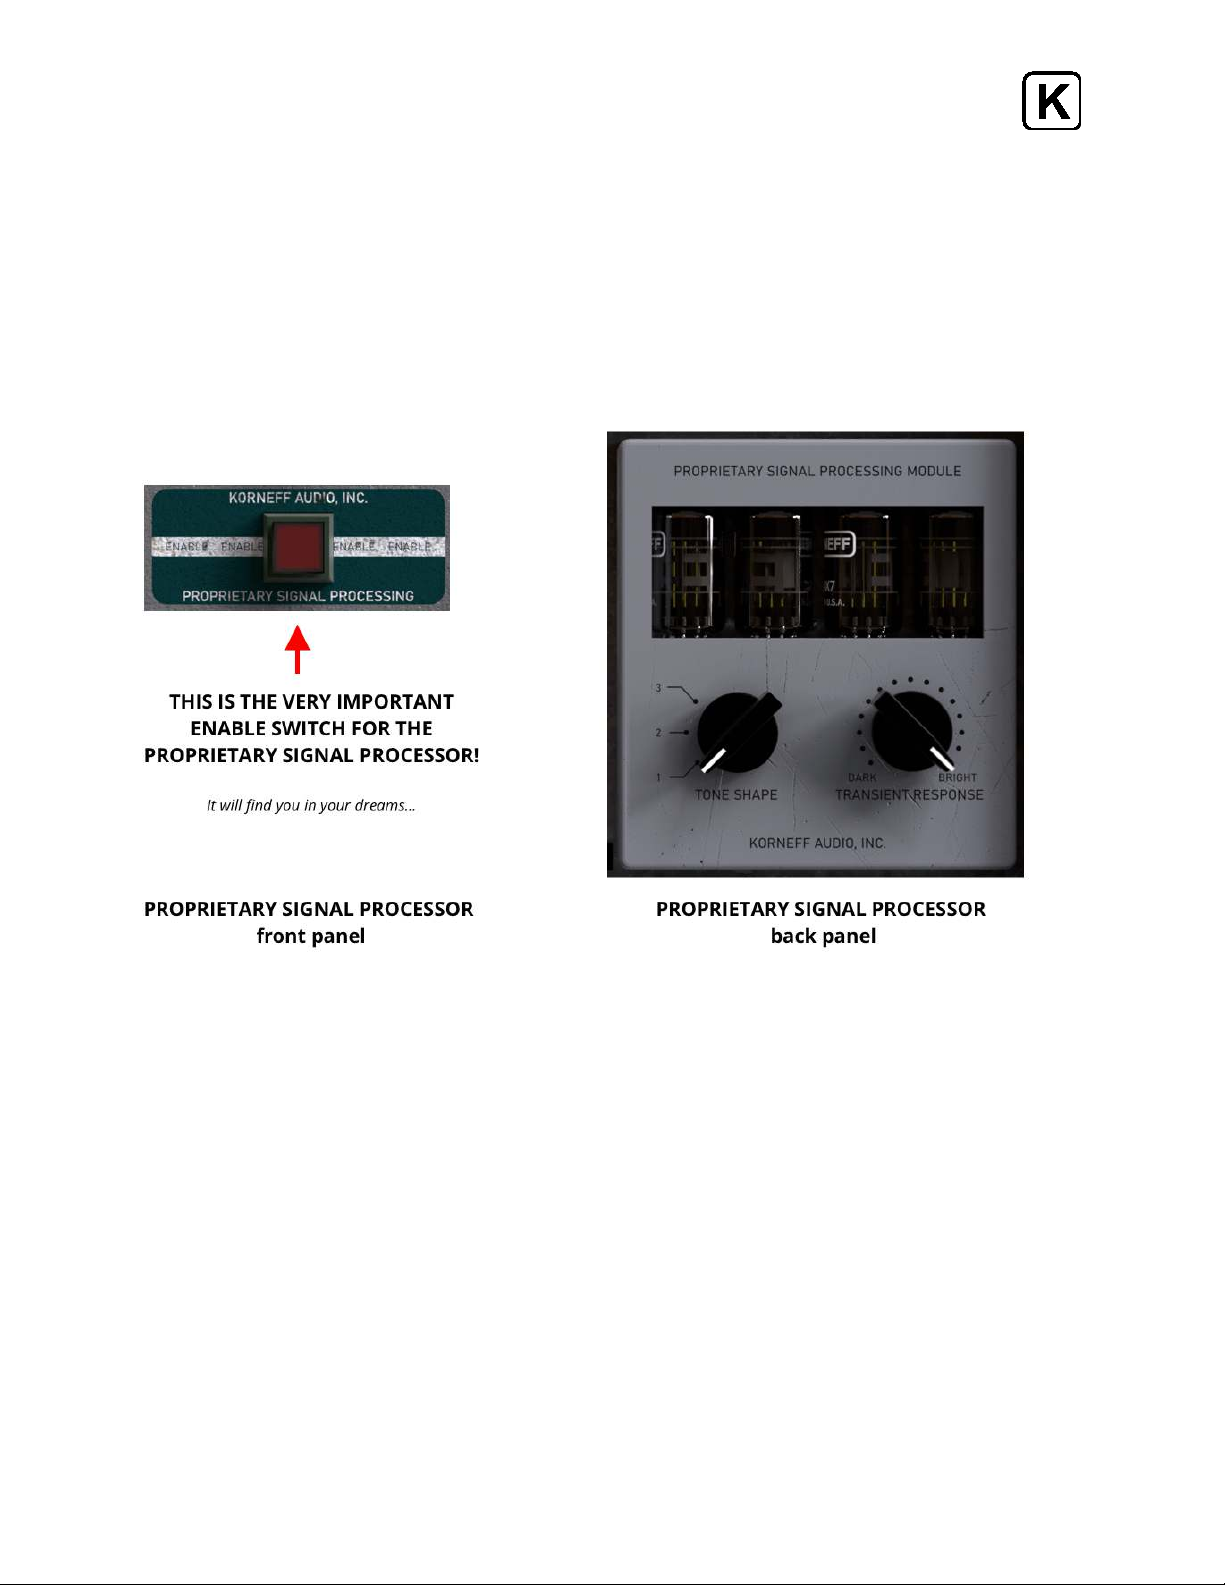
a proprietary signal processing unit, a real time analyzer.. oh god... it's basically a killer
audio channel that has everything except delay, reverb and an assistant to get you coffee.
Using his years of experience shaping rock records behind the console, Dan Korneff
developed a processor that contains the entire mixing chain for his signature guitar and
bass sounds. Not only does it#speed up his work flow, but the result#gives him the extra
flexibility and features of the digital world without compromising analog vibe.
Behold, the AIP!
Minimum System Requirements Supported Plugin Formats
Quad Core i5 Processor Intel Mac 64bit: VST3, AU, AAX
4GB of RAM Windows 64bit: VST3, AAX
Mac OS X 10.14 or Later
Windows 7 & Above
1

Amplified Instrument Processor - User Manual
___________________________________________________________________________________________________
TABLE OF CONTENTS
1. Introduction
2. Table of Contents
3. Specifications
4. Overview
5. Front Panel
6. Back Panel
7. Block Diagram
8. Processing Sections
9. Utility Panel
10. Usage Ideas
11. Conclusions
Copyright 2020 by KorneffAudio Inc.
2

Amplified Instrument Processor - User Manual
___________________________________________________________________________________________________
OVERVIEW
There is a lot going on with The Amplified Instrument Processor (we are going to call it the
AIP from here on out), and it has a lot of controls and functionality.
Many of the AIP processing sections have controls on both the front and back panels of the
plugin. Generally, the front panel controls can do 90% of what you need to do, and the back
panel provides additional tweakability to either get exactly the sound you want or add a bit
of vintage analog flavor and unpredictability to things.
FRONT PANEL
3

Amplified Instrument Processor - User Manual
___________________________________________________________________________________________________
The front panel is divided into an eq section, a compressor section, the Insufferable
Midrange Filter (IMF) section, the KorneffProprietary Signal Processing (PSP) section, and a
stereo widening section that includes a goniometer. There are ENABLE buttons all over the
place to insert the various sections in and out of the signal flow.
At the bottom of the AIP is our UTILITY PANEL, which allows you to trim the input and
output levels, access the preset library, AB compare settings, and bring tool tips and this
manual if you need information.
Click on the KORNEFF NAMEPLATE at the top to go to the back panel of the plugin.
BACK PANEL
4

Amplified Instrument Processor - User Manual
___________________________________________________________________________________________________
The"other side" of the plugin is dominated by a REAL TIME ANALYZER at the top. This RTA
lets you see the frequency response of whatever audio is going through the plugin, and it
also gives you visual feedback on how your eq settings are affecting the overall response.
Below the RTA are additional tweaks for the compressor section and the Proprietary Signal
Processing. There's also the FREQUENCY DEPENDENT REDUCTION (FDR) unit, which is a
compressor that is tunable to work on specific frequencies. You can also control the size of
the GUI and switch in OVERSAMPLING to reduce aliasing and digital artifacts. There's also
a DRY / WET control that lets you use the AIP as a parallel processor.
Click on the KORNEFF NAMEPLATE at the top to go to the front panel of the plugin.
SIMPLIFIED BLOCK DIAGRAM
The signal flow of the AIP is similar to that of an audio console channel strip. The biggest
difference is that all of the AIP's processing can be used in parallel via the DRY / WET
control. Please note that the position of the compressor is switchable—it can be before or
after the equalization section.
5

Amplified Instrument Processor - User Manual
___________________________________________________________________________________________________
PROCESSING SECTIONS
EQUALIZATION SECTION
HPF/LPF : These are first order high pass and low pass filters with gentle 6db/octave
curves. Use them to get rid of low end rumble and high end chiff. The IN button takes
them in and out of the signal path.
Four Band Fully Parametric Equalizer: This is a ridiculously powerful and wonderful
sounding eq. Based on the response curves of old German Klangfilm eq's, the AIP adds full
continuous control of frequency, gain and Q (bandwidth). It covers from 20hz to 20kHz in
four separate bands that have reasonable overlap and are independently switchable.
Back in the good old Klangfilm days, equipment was handmade and the tolerances on
components was pretty loose. Hence, there was variation in the frequency response of
individual channels in equipment. In modern gear, the right channel and the left are very
likely identical in sound. In the old days, not so much. The AIP's ANALOG CHANNEL
VARIANCE has 16 different response curves that you can set between the two channels to
recreate a vintage difference in channel tone. If you want the channels to sound the same,
set them to the same number. Press the RANDOM button to generate almost infinite
channel mismatch. The effect is subtle, but it is definitely there. We'll have some hints on
how to use this effect later in the manual. And no, we won't tell you what the 16 different
response curves are. And there are also some more EQ controls on the Other Side...
6

Amplified Instrument Processor - User Manual
___________________________________________________________________________________________________
Oh! There's that nifty REAL TIME ANALYZER that shows the frequency response of your
recording and the curves of your eq's. Please note that this wasn't a feature on Klangfilm
eq's made in 1957, but we thought you would like it.
You can further futz with the eq by using the FREQ CURVE control to switch the eq's
response curves from MODERN to VINTAGE. The VINTAGE setting simulates a passive eq
curve, which adds a slight dip at each of the bandwidth cutofffrequencies. You can see all
this in action on the RTA.
GAIN SCALE is a multiplier for the front panel eq gains. At 100% , each gain knob has the
has +/- 18dB of gain. Set it to 200% if you need something insane, like 36dB of boost! Set it
lower than 100% and the gain control for each frequency will become more precise to use
but with less overall gain, similar to how a mastering eq might feel. Dan loves the CIRCUIT
AGE control, which simulates capacitors and other components in the eq circuit wearing
out. Turn it towards OLD and you'll introduce ripples in the response of the eq that bring it
to life in an old analog way—you can see this on the RTA. Click INVERT to reverse the curve
of the eq.
7

Amplified Instrument Processor - User Manual
___________________________________________________________________________________________________
VCA COMPRESSION SECTION
VCA Compressor: The VCA compressor is built around an emulation of the venerable DBX
202 VCA integrated circuit. Sound wise, this compressor is similar to a cross between a DBX
160 and an SSL channel compressor, but smoother and perhaps cleaner. If you want huge
amounts of punch and color, go patch in our Pawn Shop Comp or Talkback Limiter. But if
you want to beautifully smooth things out while still controlling articulation and details, the
AIP's VCA compressor is your new best buddy.
It has a full range of controls.
THRESHOLD: 0dB to -100dB
RATIO: 2:1 to 12:1
ATTACK: 3ms to 200ms
RELEASE: 10ms to 4 seconds
MAKEUP: 0dB to +24dB gain
Use THRESHOLD to set the level at which the compressor kicks in. Use RATIO to adjust
how much the signal is compressed, and use ATTACK and RELEASE to adjust articulation
and detail. ENABLE puts the compressor into the signal chain, and PRE POST places it
before the eq section or after it. And there are more compressor controls on the back!
8

Amplified Instrument Processor - User Manual
___________________________________________________________________________________________________
There are two additional controls for the compressor on the back panel. DISTORTION
NULL lets you adjust the amount of grit and saturation you get when you hit the
compressor hard. Set it high to get more of a gnarly, vintage 70's sound. The VCA
SYMMETRY introduces inconsistencies between the compression curves of the right and
left channels of the compressor. This is analogous to the the ANALOG CHANNEL
VARIANCE function of the equalizer.
PSP - PROPRIETARY SIGNAL PROCESSING SECTION
PSP: This section adds a sweet secret sauce to the input section of the plugin. It packs a lot
of functionality into its very minimal controls—you'll be amazed at what the PSP can do for
your tracks.
Pop the PSP in and out by pressing the big red button on the front panel. Hopefully you'll
be able to find it...
On the back, the TONE SHAPE lets you select between three different shaping options that
simulate the effects of various tubes, transformers, transistors and whatnot. All three
sound different and all are very useful.
9

Amplified Instrument Processor - User Manual
___________________________________________________________________________________________________
1- Tube-ish. Warms things up and rounds out the top a bit. Lovely on bass!
2- Tape-ish. This setting gives you the sound of pushing the signal a bit into analog tape.
Extended bottom end with a high end sparkle. A bit like a loudness button if you're into
Fletcher-Munson.
3- Solid State-ish: Like a vintage 70's channel strip offan API or Quad Eight console, this
setting has a forward push to the midrange.
Transient Response is an emulation of Slew Rate. What is that, you ask? Basically, it is how
quickly power is available to reproduce a fast incoming transient. A high slew rate means
that there is a lot of power immediately available and the transient is reproduced cleanly
and linearly; a low slew rate means that power isn't available quickly and the transient is
somewhat rounded off. Another way to think of this is as compression that effects the high
end of signal—from about 1kHz up on the AIP. When engineers refer to a piece of
equipment as being "fast" or "slow" they are probably referring to slew rate. Set it to
BRIGHT for fast slew and a nice, sharp attack. Set it to DARK to round offthe transients a
bit and get the sound of a channel with a slower slew rate, like an old tube console or a
Neve 1073 preamp. Dan tends to use BRIGHT for his main guitars and DARK for clean and
less dirty sounds. Luke thinks of it as way of pushing things forward or back in the mix -
BRIGHT brings things forward, DARK pushes them back.
IMF - INSUFFERABLE MIDRANGE FILTER SECTION
10

Amplified Instrument Processor - User Manual
___________________________________________________________________________________________________
As tracks are overdubbed and doubled, there tends to be a build-up of midrange in the
presence region—from 2kHz to 8kHz. It tends to impart a "whistling" sort of sound to a
recording. The IMF is a notch filter specifically designed to clean up the whistle on electric
guitar tracks, but it works well to tame cymbals, keyboards and vocals as well. Click in the
LISTEN button to hear exactly where you're tuning the filter. Set the center frequency of
the notch filter by adjusting FREQUENCY to the spot where the whistle is most annoying,
and then turn REDUCTION counterclockwise to nip it out. Use the OCTAVE RANGE control
to also remove the whistle frequency's upper harmonic by setting it to 2. Remove both the
upper harmonic and the subharmonic by setting it to 3. You'll have to play with this control
to get the result you want.
The HF COMPENSATION is a gentle shelf boost starting at the center frequency of the
notch to restore some life to the high end. ENABLE inserts the IMF into the signal path. Be
sure to pop out the LISTEN button when you're done unless you want things to sound like a
broken iPhone. The IMF only has controls on the front panel, thank the Lord above.
FDR - FREQUENCY DEPENDENT REDUCTION SECTION
On the back side only, you have access to a nifty compressor that can be tuned to reduce
the gain of a small range of frequencies. Think of it as a cut only parametric eq with a
threshold control on it. It works great to keep chugging guitar parts from taking over your
mix, or taming resonant notes on a bass, etc. The FREQUENCY control selects the center
frequency, from 20Hz up to 600hz. BANDWIDTH lets you select how wide an area is
affected. Pull the THRESHOLD slider down to kick the compressor in—a red LED bar will
11

Amplified Instrument Processor - User Manual
___________________________________________________________________________________________________
give you a visual indicator of how much gain reduction is happening. ATTACK and RELEASE
give you control over the attack and release times of the compressor, and you can adjust
the output using the GAIN trim. Beneath the BANDWIDTH knob is the ENGAGE button. Use
the RTA to adjust your settings—#you'll see a red negative peak curve that moves in
accordance with the amount of gain reduction happening.
STEREO WIDTH and GONIOMETER
At the end of the signal chain is a psycho-acoustic processor that works like a charm to
increase the apparent width of your signal. It has been fine tuned to work especially well
with guitars, but it works great for anything. The STEREO WIDTH slider controls the amount
of effect. Push to to the right to increase the width to ULTRA WIDE. Pull the slider to the
left to make the output MONO.
The GONIOMETER give you a visual indication of the width of your signal. If the meter
shows a line running up and down the center, surprise! Things are mono! The wider and all
over the place the dots are, the wider and all over the place the signal is.
12

Amplified Instrument Processor - User Manual
___________________________________________________________________________________________________
GUI SCALE, OVERSAMPLING and DRY / WET
The GUI SCALE allows you to change the size of the AIP's interface on your screen. This can
make it easier to see things and impressive to people that are easily impressed.
OVERSAMPLING increases the sample rate of the plugin 4 times over the current sample
rate of your project. Oversampling minimizes deleterious digital artifacts that can lessen
the sound quality of signals. However, engaging OVERSAMPLING will increase the load on
your computer's processors, which can cause stuttering and other issues with your audio. If
you are working at sample rates above 48kHz, you probably don't need to use
oversampling because artifacts will most likely already be minimized. At rates below 48kHz,
clicking in oversampling can yield an improvement in sound quality.
DRY / WET: The default position of this control is 100% wet, meaning all the audio coming
out of the AIP has been processed by the AIP. As you lower this control towards DRY,
counterclockwise, signal from the input of the plugin—before any processing—will be
mixed in with the processed output. This allows you to parallel process signals and fine
tune how much you "hear" of the AIP on your audio. Generally, we use the AIP with this set
to 100% wet, but there are times, such as when you're getting down to the final stages of a
mix, that you might decide that you want to back offthe processing of the AIP. The DRY /
WET control allows you to do this without changing any of the setting of the eq,
compressor, etc. It can be very handy, so keep this control in mind. It can save your ass on
occasion.
13

Amplified Instrument Processor - User Manual
___________________________________________________________________________________________________
UTILITY PANEL
TOOL TIPS/USER MANUAL: The LIGHTBULB brings up the tool tips, and the BOOK opens
the user manual, which you are currently reading.
A/B COMPARISON: The comparison tools are very cool. Aand Bare two independent
snapshots of the AIP's settings. Click A and make a few adjustments to the AIP's controls.
Click B and make some different adjustments. Click back on A and you'll see all the
adjustments you made for A. Click back on B and you'll see all the adjustments you made
on B. The >> key copies whatever setting you have in A over to B.
UNDO/REDO: UNDO, to the left, reverses all the damage mankind has done to the planet.
REDO, to the right, restores all the damage mankind has done to the planet, starting with
the latest control you tweaked on the AIP. There are unlimited levels of Undo, so feel free
to go back to the Cretaceous Period.
PRESET BROWSER: Click on the piece of tape with the Sharpie text on it at the bottom of
the unit to access the preset browser and load and save presets. The red arrows to the
right of the tape allow you to step through and audition presets. The yellow SAVE button
saves the current setting of the AIP to the preset library.
14

Amplified Instrument Processor - User Manual
___________________________________________________________________________________________________
USAGE IDEAS
The AIP is the most versatile and flexible plugin we've yet devised at KorneffAudio. You can
use it on any individual channel and have just about every tool you need to get kick ass
sounds. You can also use it on grouped channels, across the mix, on reverb returns—
wherever. Don't let the name limit your creativity. Go AIP!
GUITARS - The AIP was specifically designed for use with big ass, heavy electric guitars.
Some thoughts by the developer of the plugin, Dan Korneff, on using the AIP:
"My Philosophy when working with instruments is to remove the stuffI don't like first and then
sweeten the sound. I always reach for my filters first and remove any excess rumble or fizz. Then
I'll add a character piece of gear to help shape the tone in an overall sense.
The PSP (Proprietary Signal Processing) contains three tone shapes that I use frequently on my
tracks. Once I find an overall tone that I'm really happy with, I'll reach for the EQ to help the
track fit into the mix.
I'll usually add a little compression to help accentuate detail. Depending on the source content,
that compressor maybe pre or post equalizer. At this point, I reach for the FDR (Frequency
Dependent Reduction) module to tame down the low end build up that happens on heavier
guitar parts. My final process in the signal chain is the Stereo Widener, which I use to spread
those guitars out to the sides."
BASS - The AIP is an excellent processor for bass. Switch the COMPRESSOR to PRE so that
when you fiddle around with eq settings you don't have to constantly reset the compressor
threshold. Start with the RATIO at about 3:1, the ATTACK at about 80ms, the RELEASE at
around 300ms. Watch the meter—you want its movement to seem similar to the bass part:
if the part is slow, the meter should react slowly; if the part is fast, the meter should be
moving quickly. Use the eq with wide (counterclockwise) Q settings for general low end
shaping. You can get rid of thumpy low end garbage by popping in the HIGH PASS filter and
getting rid of unmusical low stuff.
The FDR is especially useful for keeping neck and body resonances from making certain
notes pop out loudly. Start with the BANDWIDTH at about 2 o'clock, pull down the
THRESHOLD slider and adjust the FREQUENCY down into the 60 - 200 Hz area, which is
where most of the fundamentals on the bass live.
KEYBOARDS - The secret weapon on the AIP for keyboards is the PSP, which will allow you
to easily add an analog vibe to an otherwise sterile sounding keyboard patch. For
additional mojo, slap the VCA COMPRESSOR to post, drop the threshold down low and then
go around to the back and adjust the DISTORTION NULL to add some crunch. For keyboard
15

Amplified Instrument Processor - User Manual
___________________________________________________________________________________________________
pad parts, max out the STEREO WIDENER to really get amp up the space and movement of
the part.
ACOUSTIC INSTRUMENTS - The AIP combines an equalizer that has an especially sweet top
end with a compressor that is very smooth. This makes the AIP an excellent plugin for
treating groups of instruments, such as a string ensemble or even an orchestra (or
orchestral samples). Set the farthest right band of the eq to a wide Q setting and then turn
the FREQUENCY up above 17kHz or so. Flip around to the back, set the GAIN SCALE to
about 50%, then flip back to the front and use the GAIN control to gently lift up the high
frequencies to give the ensemble air and upper harmonic extension. This trick works
beautifully on acoustic guitars as well. The ANALOG CHANNEL VARIANCE is fun to play with
here. Experiment with changes the curves of the two channels to accentuate the
differences in the instruments. Variance is also fun to play with whenever you're running
doubled tracks through the AIP. Things matching exactly is boring. Little differences = cool
ear candy. And don't forget that STEREO WIDENER!
GROUP BUSES - the AIP can be used across a group of similar tracks to bind them together
and simplify your overall processing workload.
As an example, group a bunch of background vocal tracks and strap the AIP across that
bus. Use the VCA Compressor to "glue" the vocals together. Set the RATIO to 2:1, ATTACK to
20ms, RELEASE to over 700ms and bring down the THRESHOLD such that the meter is
almost always moving a bit. At those settings, the AIP's VCA compressor will work in a
manner similar to an Opto unit, albeit without the tubes. The IMF can be used to nip out
sibilance. Set the OCTAVE RANGE to 2 and poke around in the 4kHz region to find the
offending frequencies. Add a bit of sheen with the HF COMPENSATION knob. You can
control the obtrusiveness of the backing vocals by switching in the PSP and setting it to 1,
which will pull the vocals back a bit in the mix, or 3, which will push them forward and
make them more "in your face." Pulling back a bit on the TRANSIENT RESPONSE knob will
also tend to tuck the vocals back. Lastly, use the STEREO WIDTH to either get the vocals to
"wrap" around the lead vocal (push the slider to the right) or pull the slider to the left
toward mono to group them spatially tighter and render them less distracting.
MASTERING or ACROSS the MIX BUS - A combination of a powerful eq, a gentle
compressor and stereo widening make the AIP very capable as an overall mix processor
and even as a mastering suite. Set the VCA COMPRESSOR to PRE and adjust the ATTACK to
10ms and the RELEASE to 200ms. Set the RATIO for something between 4:1 and 12:1. The
higher you set ratio, the more noticeable the compression. Pull down the THRESHOLD so
that the meter is showing maybe 4dB of gain reduction. Use the eq to sculpt the overall
response—think wide BANDWIDTH. Use the GAIN SCALE on the back panel—#set it to 25%
as a starter—to reduce the throw of the front panel eq GAIN controls so that your
movements are more precise. Finally, use the STEREO WIDENER to expand and accentuate
the space of the finished mix. Many stereo widening schemes widen the soundstage at the
16

Amplified Instrument Processor - User Manual
___________________________________________________________________________________________________
expense of weakening the center. You'll find that the AIP's Stereo Widener maintains a
strong center presence even at extreme settings.
Ok, there it is—our gargantuan AMPLIFIED INSTRUMENT PROCESSOR in the War and Peace
of plugin user manuals. Please visit our Facebook group (https://www.facebook.com/
KorneffAudio/) and leave a message there if you have any questions, or email us directly at
info@korneffaudio.com.
Thanks again for supporting KorneffAudio. We hope you love your AIP.
Make great records! Make great music.
17
Table of contents
Other KORNEFF Recording Equipment manuals