KORNEFF MDR 1.0 User manual


Micro Digital Reverberator - User Manual
___________________________________________________________________________________________________
MICRO DIGITAL REVERBERATOR
The KorneffAudio Micro Digital Reverberator gives you access to the funky reverb sounds
that influenced a generation of producers and engineers who got their start in home
studios in the 1980s and '90s.
In the early '80s, plate reverbs, digital reverbs, and good-sounding spring reverbs cost a lot,
and were found only in big, commercial studios. Kids with four-track cassette recorders,
making punk and hip-hop tracks, were lucky to have a boingy-ass, cheap spring reverb to
throw on a vocal. But everything changed in 1986, when digital reverb became affordable.
Actually, it became cheap.
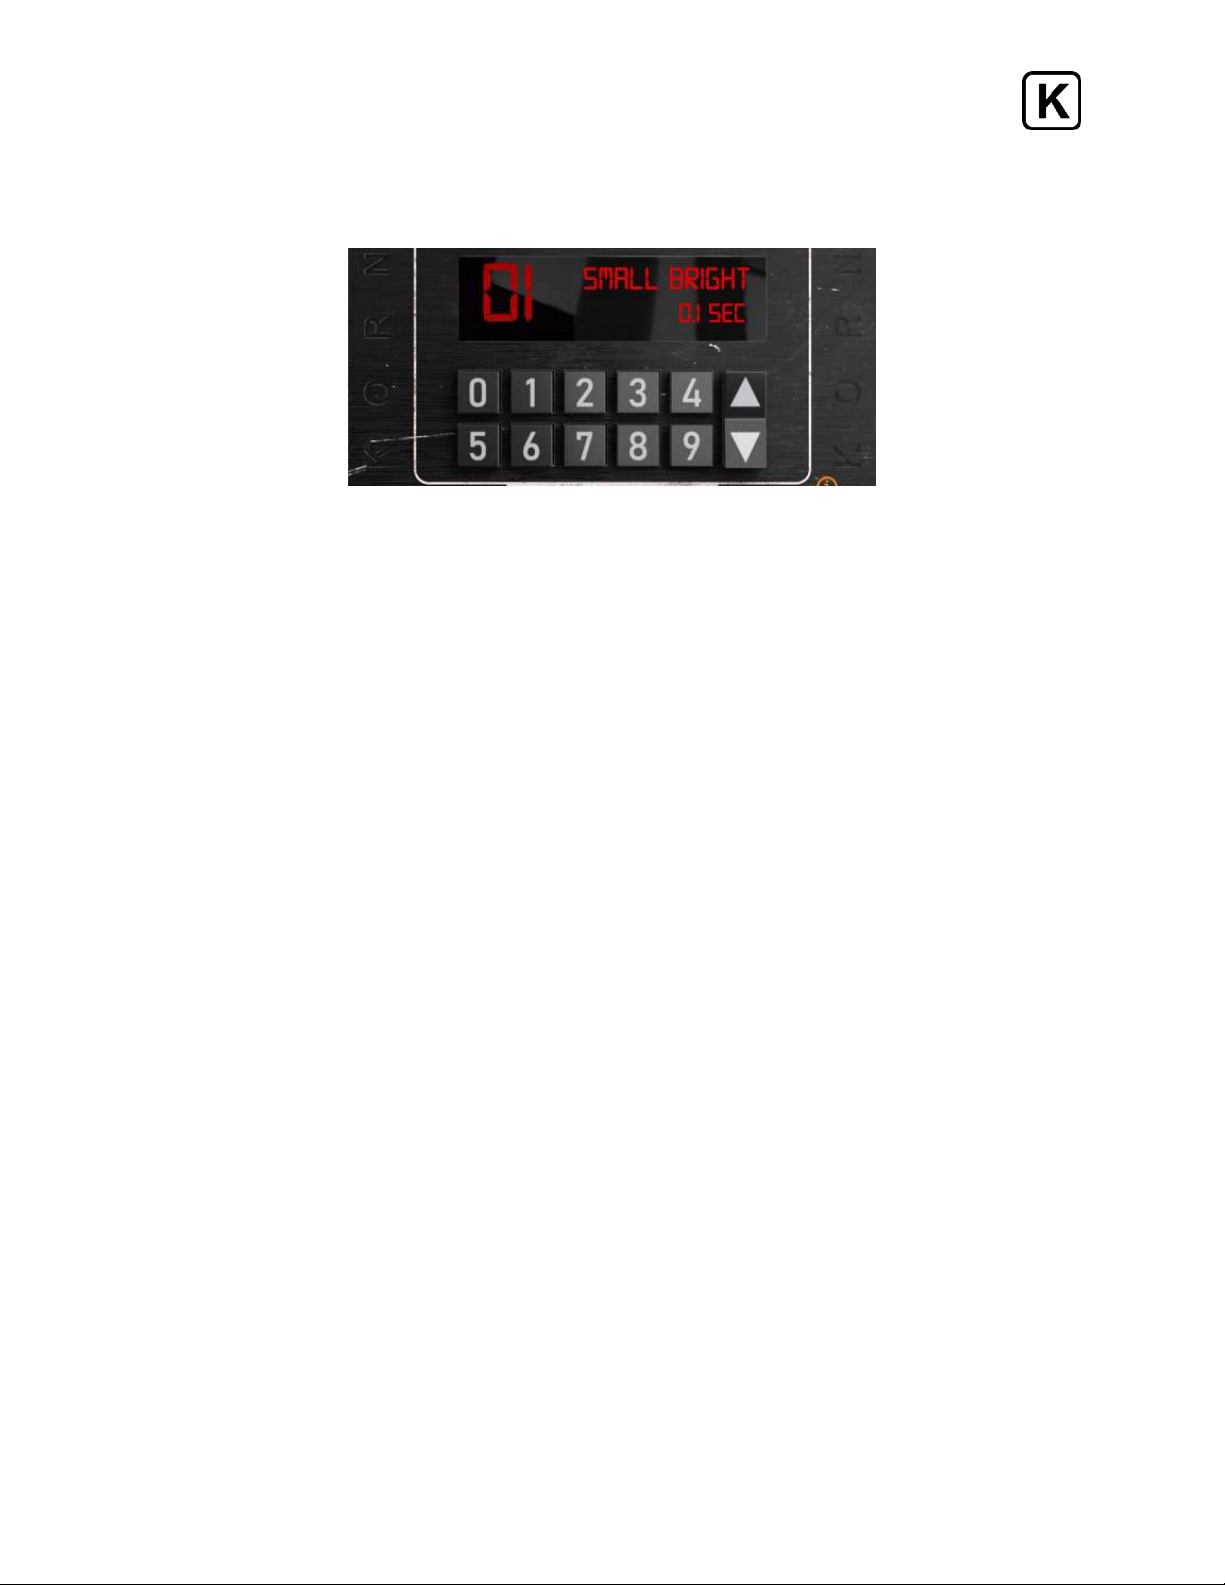
These game-changing devices were small black boxes with minimal controls and only pre-
programmed sounds—there was no adjusting of decay time, damping, early reflections, or
any of that fancy stuff. It was pick a program and go. There were a few room simulations
ranging from crawlspace to concert hall, some plates, a few gated reverb sounds (it was the
'80s, so of course there were gated reverbs) and some weird but strangely musical
backwards effects. And considering the price, these things sounded AMAZING.
And soon they were EVERYWHERE—home studios, live sound set-ups, on guitar rigs.
Commercial studios also adopted them, and why not: for $1000 you could get three digital
reverb units. The sounds of these cheap little boxes are all over many of your favorite
records from that time.
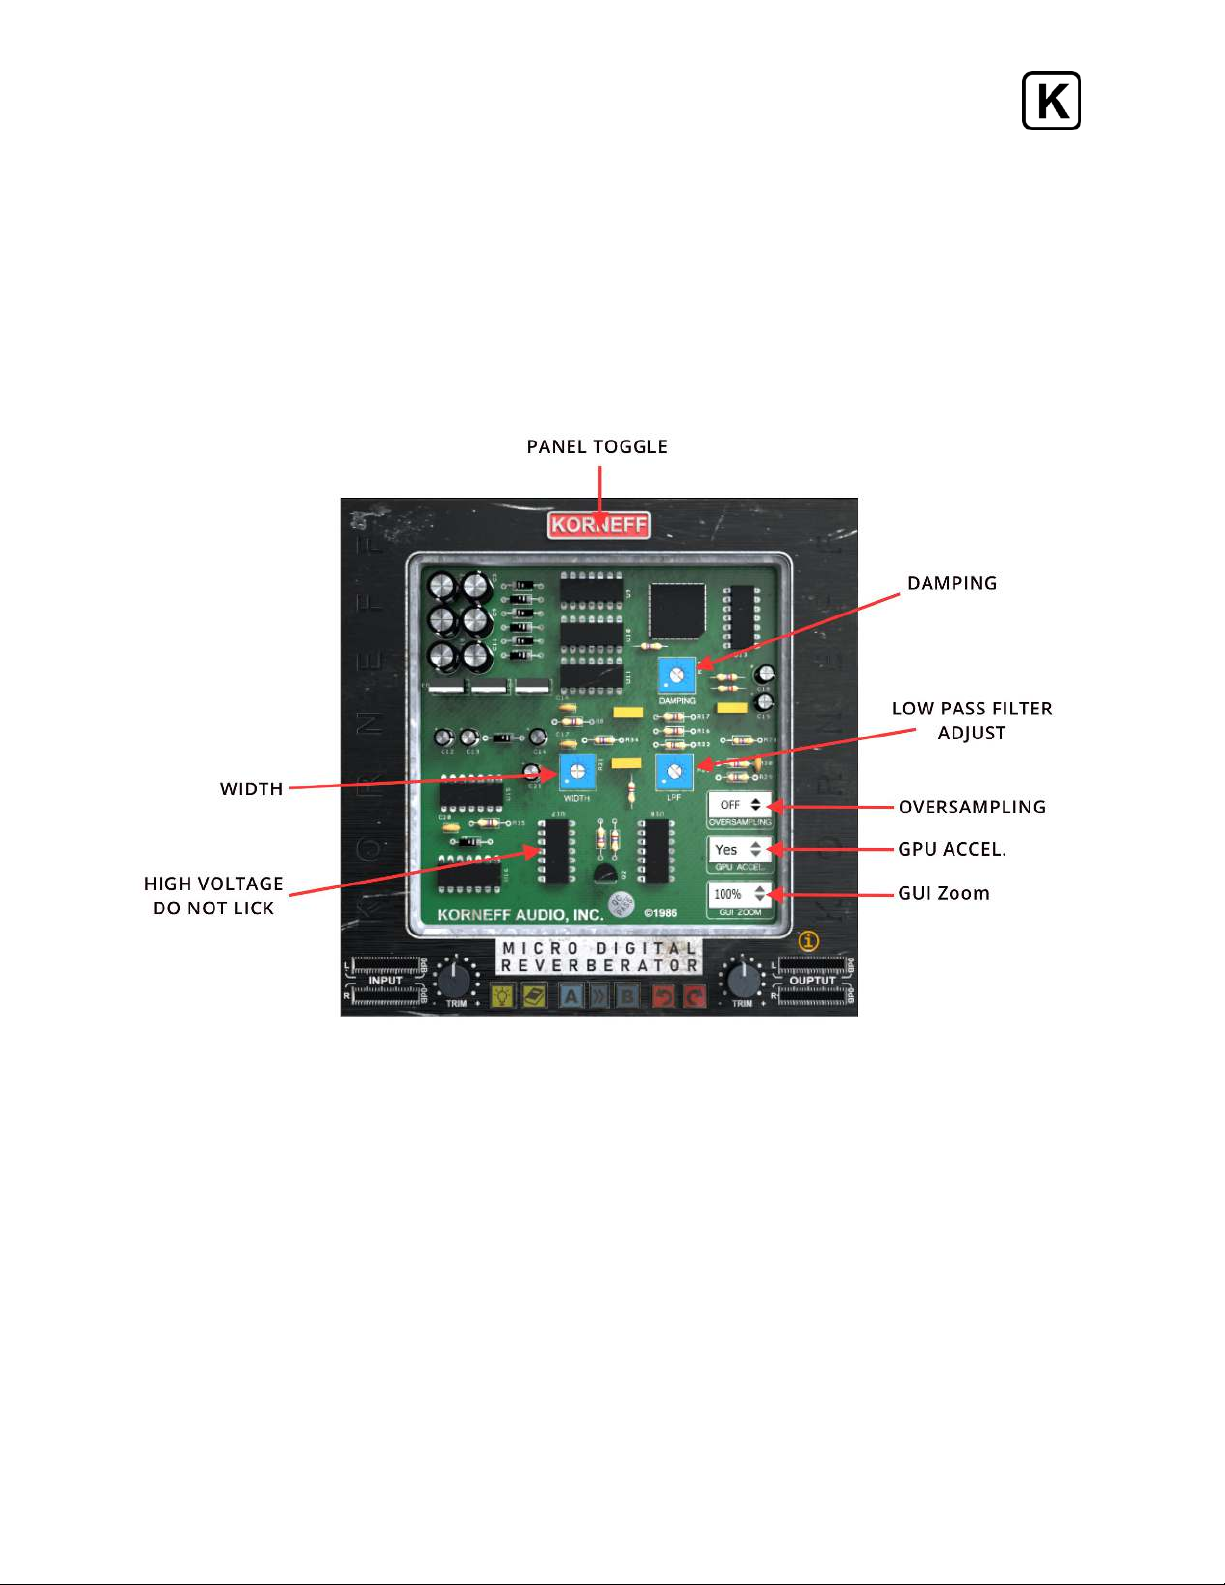
Our Micro Digital Reverberator has two different, iconic vintage digital reverberators,
replicating the one-of-a-kind sounds and simple interface that made these things fast and
fun to work with. Slap our MDR across an insert, click through the various reverb and effect
programs, pick one, and go!
Feel free to ignore the manual! I sure did, back then! But if you do read on, we’ll give you
some ideas and hints on how to think about this particular plugin, and get some great
sounds on your recordings.
Minimum System Requirements Supported Plugin Formats
Quad Core i5 Processor Intel Mac 64bit: VST3, AU, AAX
4GB of RAM Windows 64bit: VST3, AAX
Mac OS X 10.14 or Later
Windows 7 & Above
1

Micro Digital Reverberator - User Manual
___________________________________________________________________________________________________
TABLE OF CONTENTS
1. Introduction
2. Table of Contents
3. Overview / Front Panel
4. Common Controls
5. Machine 1 Programs
6. Machine 2 Programs
7. Back Panel
8. Utility Panel
9. Usage Ideas
Copyright 2021 by KorneffAudio Inc.
2

Micro Digital Reverberator - User Manual
___________________________________________________________________________________________________
OVERVIEW
The MDR has very simple controls. Basically, there are three knobs in common to both
machines, and then specialized program selection controls for each machine. At the
bottom is KorneffAudio's quintessential utility panel for loading and storing presets,
getting help, trimming levels for proper gain matching and all that engineery stuff.
SIMPLIFIED BLOCK DIAGRAM
FRONT PANEL
3

Micro Digital Reverberator - User Manual
___________________________________________________________________________________________________
Common Front Panel Controls
Click on the KORNEFF NAMEPLATE at the top to go to the back panel of the plugin.
MACHINE 1 & 2 - press to switch between two different vintage reverberator simulations.
DRY - controls the level of the dry (unaffected) signal feeding the MDR’s output.
WET - controls the level of effect signal feeding the MDR's output.
PRE-DELAY - adjusts the amount of time in milliseconds between the dry signal and the
effect signal by delaying the onset of the effect signal. The original hardware units didn’t
have a pre-delay control. Back then, if you wanted to pre-delay a reverb, you had to patch
in a delay unit before it. Our MDR comes with a pre-delay built in, with a range from 0ms to
150ms. Please note that PRE-DELAY is set independently of the selected program. If you
don’t want pre-delay, set the control fully counterclockwise.
Think of pre-delay as delaying the reverb. It sort of simulates how long it takes a sound to
travel across a room, bounce offa wall and get back to a listener’s ears. This is a naturally
occurring acoustic phenomena. The bigger the room or hall, the longer the pre-delay
generally is. Smaller rooms have almost no pre-delay, and plates and spring reverbs
typically don’t have pre-delay.
Engineers began to use a delay unit in front of a reverb unit as a way of mimicking the
sound of a large acoustic space using what was available in the studio - a reverb chamber,
a plate reverb, etc. A chamber or plate with pre-delay on it sounds bigger. Pre-delay can
also be used to separate the reverberant signal from the dry, and to make a reverb more
rhythmically coherent with the recording.
4

Micro Digital Reverberator - User Manual
___________________________________________________________________________________________________
Machine 1 Programs
Program Selector - uh... you turn this to get different programmed sounds. If you’re still
confused after reading this, then I think we need to talk to your mom.
SMALL
1 - small and bright
2 - small and dark
3 - medium and dark
4 - percussion plate - put this on a snare!
5 - medium bright room
6 - long plate
Large
1 - large dark room
2 - bright hall
3 - dark, odd stairwell sort of thing
4 - large plate - like an old '70s vocal plate setting
5 - warm concert hall
6 - sounds like a parking garage to me
7 - huge government warehouse where they store abandoned spacecraft, decay time of a
long weekend w/drinking
Reverse - a backwards reverb that is rhythmically centered to about a quarter note at
120bpm. No, this won’t make your song sound like the beginning of the chorus of “Round
and Round” by Ratt. That effect is called “Preverb."
Gated 1 - this one is percussive.
5
Machine 1is asimulation of avery popular 16 bit, 1/3 rack size digital reverberator that
was introduced in 1986. Although it had alimited range of sounds, they were carefully
designed and sounded great. You stillsee this unit in guitar racks and studios all over the
world.

Micro Digital Reverberator - User Manual
___________________________________________________________________________________________________
Gated 2 - this one is smoother, better for vocals perhaps.
Machine 2 Programs
Machine 2 is a simulation of the second-generation, full-rack size digital reverberator. This
unit had lots of presets, some really interesting and useful sounds, and a straightforward
interface that made it fast in the studio and reliable in live sound situations.
Program Selector - like the original unit, the program selector requires a two-digit number
to work. You can enter the preset number in using the keypad (to get to preset 5 enter 0 5,
etc). You can also use the up and down arrows to increment it.
Machine 2 Programs are selected by clicking numbers or using the arrow keys.
Programs 01-29: Natural spaces. These are rooms of various sizes and responses.
01 - Small Bright .1 Sec 16 - Medium Bright 1.15 Sec
02 - Small Bright .2 Sec 17 - Large Bright 1.6 Sec
03 - Small Bright .3 Sec 18 - Large Dark 1.7 Sec
04 - Medium Warm 1.1 Sec 19 - Medium Bright 1.65 Sec
05 - Medium Bright .6 Sec 20 - Medium Bright 1.9 Sec
06 - Large Bright 1.2 Sec 21 - Large Warm 2.2 Sec
07 - Large Dark 1.0 Sec 22 - Large Warm 1.75 Sec
08 - Medium Dark .6 Sec 23 - Large Bright 1.45 Sec
09 - Medium Dark .5 Sec 24 - Large Dark 2.2 Sec
10 - Medium Bright .6 Sec 25 - Large Warm 2.3 Sec
11 - Medium Bright .8 Sec 26 - Large Bright 2.4 Sec
12 - Large Warm 1.0 Sec 27 - Large Bright 2.5 Sec
13 - Large Warm 1.1 Sec 28 - Xlarge Warm 5.0 Sec
14 - Medium Dark 1.0 Sec 29 - Xlarge Warm 15.0 Sec
15 - Medium Bright 1.1 Sec
6

Micro Digital Reverberator - User Manual
___________________________________________________________________________________________________
Programs 30-39: Gated Reverbs. These units were from the '80s, so this is to be expected.
The Slow Gates have a smoother decay and are more subtle. The Fast Gates are definitely
much more of that '80s drum sound. Quick, call Phil Collins!
30 - Slow Gate 100 mSec 35 - Fast Gate 150 mSec
31 - Slow Gate 200 mSec 36 - Fast Gate 75 mSec
32 - Slow Gate 250 mSec 37 - Fast Gate 200 mSec
33 - Slow Gate 400 mSec 38 - Fast Gate 100 mSec
34 - Slow Gate 450 mSec 39 - Fast Gate 175 mSec
Programs 40-50: Reverse Reverbs
40 - Reverse 400 mSec 44 - Reverse 150 mSec
41 - Reverse 450 mSec 45 - Reverse 500 mSec
42 - Reverse 250 mSec 46 - Reverse 2 Sec
43 - Reverse 200 mSec 47 - Reverse 8 Sec
48 - 2 Tap Ambient - sounds like two reverbs happening one after the other. Like echoes
but with reverb.
49 - Multitap Ambient - this is more like slapback echo but with reverbs — like in a large
bathroom but without the hand dryer running.
50 - Multitap Reverse - same bathroom, but you’ve been drinking or just got a concussion,
maybe both... moves left to right.
Programs 51-55: Some strange things
51 - Stuck Flanger - a sort of comb filter effect, like a flanger with modulation turned off.
52 - Wide Mono - short delays have a subtle widening effect on a mono signal. It also does
weird, phase shifty kinds of things that are fun. Try this on drums: set DRY to 100% and
turn up WET to shift the frequencies that cancel and reinforce. Turn up PRE-DELAY and you
get a short, bizarre ambience around the dry signal.
53 - Stereo Maker - an old-school, stereo generation effect. Highs are on the left, lows are
on the right, and delays make them happen one after the other. This effect also subtly
moves from left to right. Makes a nice vocal widener: put it on a mono vocal track, flip
around to the back panel, set the WIDTH to about 150%, and then adjust WET to get a vocal
to have a bit more size and weight in a mix. If you turn up PRE-DELAY too much it sounds
like you have a garbage can over your head. Not that I’ve done such a thing.
7

Micro Digital Reverberator - User Manual
___________________________________________________________________________________________________
54 - Regenerated Delay 2 sec - percussive effect that sounds like tape delay in an old sci-fi
movie.
55 - Regenerated Delay 3 sec - you know when you have two mirrors in the bathroom, and
if you angle them just right you can get, like, “The world of infinite mirrors?” This is like that
but with reverb. Really useful if the song has shitty lyrics.
Back Panel Controls
There can never be too many things to play with. The MDR isn't the Pawn Shop Comp when
it comes to screwing around under the hood, but we've provided some extra controls for
you that certainly weren't on the original. There are three little blue trim pots back there, as
well as controls for oversampling, how large the plugin appears on your screen and
graphics acceleration.
DAMPING, LPF and WIDTH affect only the WET reverb signal and have no effect on the dry
signal.
8

Micro Digital Reverberator - User Manual
___________________________________________________________________________________________________
Damping - this decreases the decay time of the higher frequencies in the reverbed signal.
At full clockwise, which is the initial position of the trim pot, the highs are not damped at
all. As you turn it counterclockwise, the decays of the highs shorten. Use this to fine tune
the reverb for a slightly darker color.
LPF - a low pass filter that gradually rolls offthe reverb signal. Fully clockwise — again, the
initial position, the reverb signal is passed from 20kHz down. Rotating the trim pot
counterclockwise lowers the pass frequency, giving you a much darker sound. Fully
counterclockwise sets the frequency to 20Hz, effectively filtering out all of the reverb
signal.
WIDTH - is a psychoacoustic stereo-width enhancer. The initial position is 12:00 and the
width is at 100%, which is the normal width of the unit. Clockwise increases the apparent
stereo width of the reverb (wet); counterclockwise narrows the reverb's width to mono. It's
really effective: high settings put the reverb signal "beyond" the speakers, while at 0% the
signal becomes fully mono. This control can do some interesting things, especially with the
Machine 2 presets in the 50s.
Oh my god! Play with WIDTH! It is SO COOL. You can have a stereo track with mono reverb
in the middle!
GUI ZOOM - allows you to change the size of the MDR's interface on your screen. Make the
MDR look as big-assed as it sounds!
OVERSAMPLING - increases the sample rate of the plugin 4 times over the current sample
rate of your project. Oversampling minimizes deleterious digital artifacts that can lessen
the sound quality of signals. However, engaging OVERSAMPLING will increase the load on
your computer's processors, which can cause stuttering and other issues with your audio. If
you are working at sample rates above 48kHz, you probably don't need to use
oversampling because artifacts will most likely already be minimized. At rates below 48kHz,
clicking in oversampling can yield an improvement in sound quality.
GPU ACCELERATION- Enables OpenGL processing for compatible graphics cards. This is on
by default, and will keep your DAW's graphics running without any lagging. However,
certain hardware configurations will lag and jenk with this switched in. In those cases,
which are rare, switch GPU ACCELERATION off. As a rule of thumb, leave this on and go
make noise.
9

Micro Digital Reverberator - User Manual
___________________________________________________________________________________________________
UTILITY PANEL
TOOL TIPS/USER MANUAL - The LIGHTBULB brings up the tool tips, and the BOOK opens
the user manual, which you are currently reading.
A/B COMPARISON - The comparison tools are very cool. Aand Bare two independent
snapshots of the plugin's settings. Click A and make a few adjustments to the plugin's
controls. Click B and make some different adjustments. Click back on A and you'll see all
the adjustments you made for A. Click back on B and you'll see all the adjustments you
made on B. The >> key copies whatever setting you have in A over to B.
UNDO/REDO: UNDO - to the left, reverses all the damage mankind has done to the planet.
REDO, to the right, restores all the damage mankind has done to the planet, starting with
the latest control you tweaked on the plugin. There are unlimited levels of Undo, so feel
free to go back to the Cretaceous Period.
INPUT and OUTPUT TRIM - lets you gain stage the MDR correctly. On some of our plugins,
cranking up the INPUT trim can result in cool saturation and distortion. Not on the MDR.
Crank it up and you'll get digital clipping which sounds awful and makes speakers
uncomfortable. Set these two controls such that you're not hitting 0 on the meters.
10

Micro Digital Reverberator - User Manual
___________________________________________________________________________________________________
USAGE IDEAS
It's a reverb with like five controls, how many ideas do I need, Korneffguys?
It's not how many you need, it's how many we can give you. Here:
Send and Returns or Across an Insert
Most studio applications of reverb involve patching it into the console using channel Aux
Sends and then returning via a dedicated console Effects Return, or in the case of a DAW,
via a stereo channel, sometimes called an Aux channel. The MDR, however, follows the
heritage of the units on which it is based, which were designed to be patched across the
output of an inexpensive console and fed directly into a mixdown deck or a bus
compressor.
You can use the MDR with sends or using inserts on a channel or a bus, but it does lend
itself to the latter—slapping it on an insert and skipping the whole setting up an Aux Send,
blah blah blah.
To use the MDR on an insert, simply instantiate it on a channel or bus insert, bring up DRY
to 100%, and then adjust WET to get the balance you want (feel free to adjust DRY as well).
This is a really quick way to use the unit, and when you’re writing a song or experimenting
and you want to keep your ideas flowing, bring up the MDR, spin the knobs, pick a program
and go.
To use the MDR in a more conventional way, set up a channel Aux Send, instantiate the
MDR on the Aux Send output and keep the DRY at 0 and Wet at 100%.
Monoverb
A favorite application of the MDR is to instantiate it on a mono channel, using it as an insert
with a mono output. Doing this keeps the direct and the reverberant sound tight and
compact, and reminiscent of the sound of records made in the 60’s and early 70’s when
engineers would often cut an instrument or vocal straight with all its effects straight to
tape. In a modern application, using the MDR mono on a channel lets you carve out a cool
little spot in your mix for an accent or a touch of ear candy.
Small Rooms
The small room programs are rather unique on the MDR: they actually sound like small
rooms. They're great for adding a bit more weight to an instrument or just making them a
little less lifeless and dry.
11

Micro Digital Reverberator - User Manual
___________________________________________________________________________________________________
Program Machine 1 Small 1 and Small 2 are fun, kind of ugly sounding little rooms - throw
a drum set through them and you'll get a Steve Albini sort of vibe. Add a little PRE-DELAY...
Machine 2 05 is especially "In Utero-ish"
Program Machine 2 01 doesn't really sound much like a room, but run anything through it
for instant weight gain and fatness without any mud. Play with PRE-DELAY to make the
effect less natural.
SNARES
Seriously, this thing is like the best sounding snare reverb on the planet. Machine 2 06 and
07 are wonderful for this, giving your snares a huge, cannon like slam. Hair metal, anyone?
GOOP
If you listen to rock records from the 1960's, especially Rolling Stones singles, there is this
indefinable mess hanging around in the far background. It's a combination of acoustic
guitar, bass, a band recording live in one big room, and perhaps an echo chamber.
WHATEVER - that huge background fullness fills up all the empty spaces in the record like
rice with Chinese food, and it sounds WUNDERBAR.
You'll like this! Run the entire mix through the MDR. Use program Machine 1 Large 6 or
personal favorite Machine 2 28. Start with DRY 100% and WET at 0. Roll tape (...or start
playing the song with your DAW), and slowly turn up the WET until you get a low level
blossom of reverb happening. With percussive music, the effect can be a little too
noticeable, and you might have to roll down the WET at the ending of the song to keep the
reverb tail from hanging around for 5 seconds after the song is done. You can automate
that. Speaking of automation...
AUTOMATE THE WET KNOB (or the DRY KNOB)
If you patch the MDR across a channel insert, and then set the DRY to 100%, you can
control how much reverb effect is heard by simply bringing up and down the WET knob.
And you can automate this. So, imagine the reverb on a vocal swelling and diminishing
depending on the music around the singer, or the emotional effect you want to get. Or as
the song fades out, crank up WET and things don't only fade, they seem to move back and
away. And because it is only 1 knob you're working with, the effect is easy to manage and
automate. Gah! Automate the pan AND the WET (or the DRY, which might be even cooler)
and then you can have parts move around not only left to right but front to back. Very AXIS:
Bold as Love.
12

Micro Digital Reverberator - User Manual
___________________________________________________________________________________________________
So, there ya go. The MDR is really fun to use, and really fast. It's great for smashing through
a quick mix or generating some ideas as you start planning a recording or a final mix.
Make great music, make great records, have too much fun!
13
Table of contents
Other KORNEFF Recording Equipment manuals