KOSMEN KM-20N User manual

Content
1. Important Notice................................................................................................. 1
2. Function of the Button......................................................................................... 2
2.1 Operation.................................................................................................... 2
2.2 Indicator Lights.......................................................................................... 2
3. Operating Instructions........................................................................................ 4
3.1 Dehumidification Running........................................................................ 5
3.2 Drain Indicator........................................................................................... 5
4.Maintaining........................................................................................................... 7
4.1 Cleaning...................................................................................................... 7
4.2 Placing......................................................................................................... 7
5.Specification.......................................................................................................... 8
6. Error Code............................................................................................................ 8
7. Troubleshooting................................................................................................... 9

Mục Lục
1. Thông báo quan trọng...................................................................................... 10
2. Các nút chức năng.............................................................................................. 11
2.1 Vận hành....................................................................................................... 11
2.2 Đèn báo...............................................................................................................12
3. Hướng dẫn vận hành......................................................................................... 13
3.1 Chạy máy hút ẩm......................................................................................... 14
3.2 Đèn báo thoát nước...................................................................................... 14
4. Bảo trì.................................................................................................................. 16
4.1 Vệ sinh........................................................................................................... 16
4.2 Lắp đặt.......................................................................................................... 16
5. Thông số kỹ thuật…………………………………………………………… 17
6. Mã lỗi................................................................................................................... 17
7. Xử lý sự cố........................................................................................................... 18


1.
Important Notice
1
Always keep the unit in vertical position and on a firm flat surface at all times.
Ensure that there is at least 300mm (1”) between the sides of the appliance and any flammable,
heating materials.
Do not cover the appliances intake or outlet grilles.
For indoor use only.
Not suitable for use in cabinet, closet, boats, caravans or similar locations.
Leave the unit to stand for one hour before connecting to the mains supply after transport or
when it has been tilted (e.g. during cleaning).
The mains supply must conform to the specification shown on the rating label at the back of
the unit.
Avoid overloading circuits, which is caused by using more electrical amps than your wiring
can support. Overloading electrical wires can cause excessive heat and electrical fires.
Avoid the appliance from splash.
Examine the cord carefully. Make sure that it is not punctured or frayed. Inspect the plug to
ensure that the prongs are secure and the plastic surrounding it is not cracked.
Never use the plug to start and stop the unit.Always use switch on the control panel.
Before moving the unit, turn off all controls, then unplug and empty the water tank.
Don't use bug sprays or other flammable cleaners on the unit.
Never pour or spray water over the unit.
This appliance can be used by children aged from 8 years and above and persons with reduced
physical, sensory or mental capabilities or lack of experience and knowledge if they have been
given supervision or instruction concerning use of the appliance in a safe way and understand
the hazards involved. Children shall not play with the appliance. Cleaning and user
maintenance shall not be made by children without supervision.
Only a licensed professional is allowed to dismantle or modify the appliance.
Suggested to send the appliance for professional maintenance periodically.

2
2.
Function of the Button
2.1 Operation
ON/OFF
BUTTON Press “ON/OFF” to start the dehumidifier. Press again to stop the dehumidifier.
HUMIDITY
SETTING
Press “HUMIDITY button to set the required humidity. It can be chose “CO”
(continuous dehumidifying) and 40%~70%. It sets 10% by every press.
TIMING
Press the “Timer” button, the timing indicator lights up in green, the timing time can
be adjusted in 1-24 hours, and then press the “Timer” button until the display shows
00. After eight flashes, the display shows the current humidity and the timing
function is turned off.
COMFORT
Press the “comfort” button to turn on the energy saving mode, the humidity is 60%,
and the low wind speed is running. Press the “Comfort” button again to cancel the
energy save mode.

3
DRY
Press the “Dry” button to increase the wind speed and enhance the hot air effect.
WIND SPEED
SETTING
Press the “WIND SPEED SETTING”, either “high” or “low” can be selected.
ANION
Press the “ANION” button to turn on the negative ion sterilization function.
Remarks:
In the DRY and COMFORT mode, the humidity and wind speed are automatically controlled by the dehumidifier,
and the manual adjustment of humidity and wind speed is invalid.
2.2 Indicator Lights
POWER ON/OFF:
When the power cord is plugged in, the machine display shows the current ambient humidity. Press the power
button, the power indicator will light green, and the machine will start running when the humidity is lower than the
current ambient humidity.
WATERFULL:
When the water tank is full, the full water indicator lights red, the compressor and the fan stop working, and the
buzzer sounds three times to remind the user to empty the water in the water tank and ensure that the water tank is
returned to its original position.

4
TIMING:
When the timing is activated, the timing indicator will be green.
LOWWIND SPEED:
When you set the wind speed to low, the low wind indicator will be green.
HIGH WIND SPEED:
When you set the wind speed to high, the high wind indicator will show green.
DRYING CLOTHES:
When the dehumidifier is set to the "Dry" mode, the wind speed is set to high and runs in continuous
dehumidification mode, and the indicator light is green.
COMFORT:
When the dehumidifier is set to “Comfort” mode, the wind speed is set to low, the humidity is set to 60%, and the
indicator light is green.
ANION:
When set “Anion”, the anion button will turn green. (Only available on KM-20N and KM-60S.)
3.
Operating Instructions
When the appliance is powered on for the first time, the appliance enters the standby state, press the power button
to enter the running state, and the first power-on and start-up operation is continuous dehumidification, the motor
runs at low speed, the continuous dehumidification indicator lights, if it is turned on again after the power off,
Humidity setting programmed same as before power shutdown.
Press the humidity mode button, the humidity can be switched between 70% 60% 50% 40% continuous
dehumidification, the corresponding indicator light on, if the pre-set humidity is higher than the current ambient
humidity +5%, the machine will stop working after 5 seconds. When the set humidity is lower than the current
ambient temperature, the machine will work normally.

5
3.1 Dehumidification Running
1.
When the compressor has passed the protection for 3 minutes and the indoor humidity ≥ set humidity + 5% RH,
the compressor will work again.
2.
When the indoor humidity < set humidity - 5% RH, the compressor is turned off.
3.
Set the humidity - 5% RH < indoor humidity < set humidity + 5% RH to keep the original compressor working.
4.
The compressor stops the fan if it has not been operated for three minutes after the humidity has dropped.
5.
When the machine beeps three times and the water full indicator light is on, the machine stops working. The
water in the water tank needs to be drained and the water tank is reinstalled. If the water full indicator light is still
on, check whether the water tank is in place. The operation is started until the water full indicator is off.
6.
Defrost
A)
After the machine starts to run for 30 minutes, the copper coil sensor starts to detect the tube temperature.
When the tube temperature is ≤ -1 °C (there is 3 seconds of detection time), the compressor stops and the fan runs,
and the defrosting operation starts. The lights are shining.
B)
When the temperature sensor detects that the coil temperature on the evaporator is greater than or equal to 5
degrees and the detection is greater than or equal to 5 degrees for 3 minutes, the defrosting is exited.
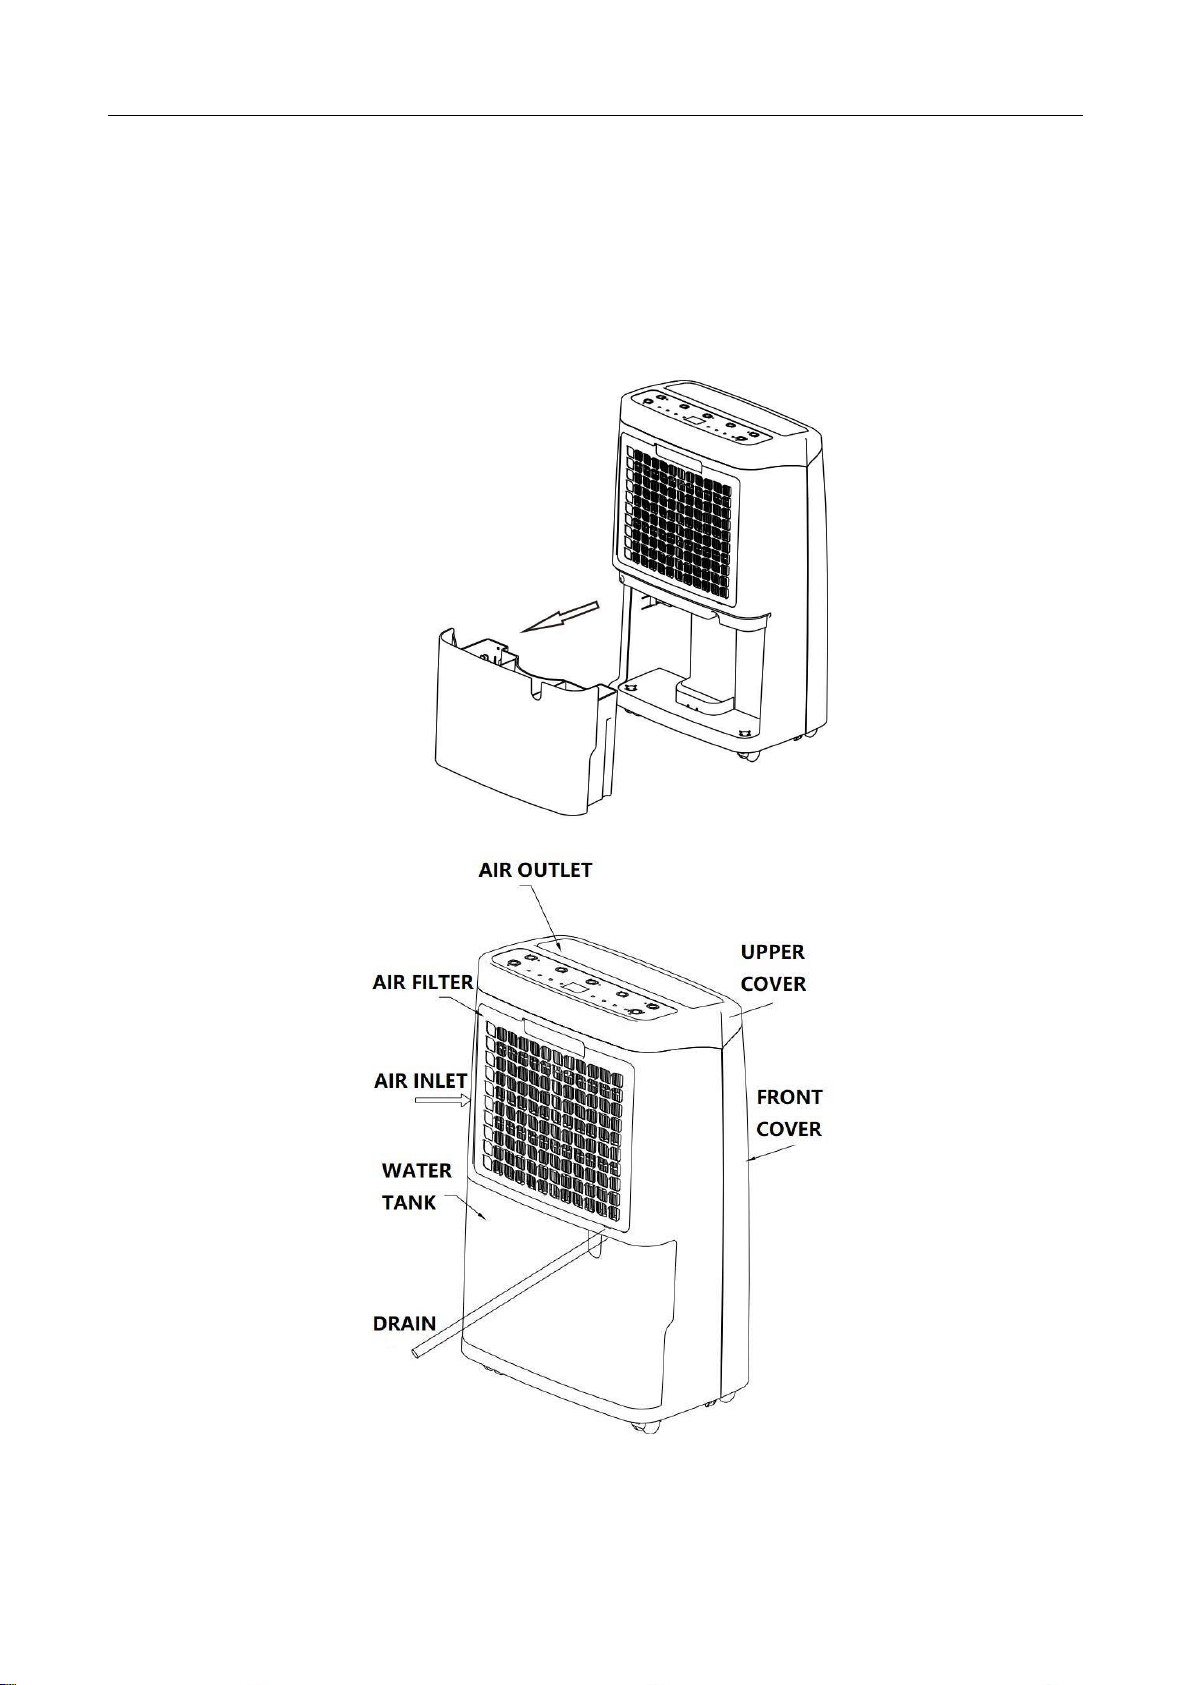
3.2 Drain Indicator
Water level float
Do not remove the float from the tank. If the float in the tank is removed, the machine will not turn on or start.
Put water tank back.
When placing in the water tank, push the water tank into the machine with both hands and put it in place. If the
water tank is not put in place, the machine will not be able to start or turn on the water after the operation, the
machine will overflow.
Clean the water tank
If the water tank is dirty, clean it with cold/warm water. Do not use detergent, steel ball, chemically treated dust
cloth, gasoline, benzene, thinner or other solvents as it may damage the water tank.

6
Continuous Drain
This product has a continuous drain hole that is connected by a plastic tube (11mm inside) through which water can
be drained. When using a water pipe, do not immerse the water outlet in the water to prevent the pipe from being
too long or the pressure is formed in the pipe when the water outlet is blocked. The water flow is not smooth,
resulting in water leakage.

7
4.
Maintaining
4.1 Cleaning
4.2 Placing
Wash the cleaning cloth in clean water, wring it out, and
gently wipe the surface of the machine.
Remarks:
Clean the carbon filter twice a month to ensure a
healthy environment and energy saving.
When the dehumidifier is working, make sure the
Minimum distance between air inlet&wall is 20cm
Minimum distance between two machines is 10cm
Minimum distance between air outlet&top is 50cm

8
5.
Specification
KM-20N
ApplicationArea
40-80 ㎡
Dehumidifying
Capacity
20L/D (30℃ 80%RH)
12L/D (27℃ 60%RH)
Operating Power
300 W
Amount of Airflow
160 m³/h
Refrigerant
R134A
Compressor
Panasonic
Power Supply
220V /50Hz
OperatingTemp.
5-38 ℃
WaterTank
3L
Dimensions
320*214*537 mm
Net Weight
10.5 KGS
6.
Error Code
Fault Code
The failure
How to do with it
E1
Temperature sensor breakdown
Replace with new temperature sensor.
E2
Humidity sensor breakdown
Replace with new humidity sensor.
HI
High current ambient humidity
(>95%)
Keep windows and doors closed and
continuous usage.
LO
Low current ambient humidity
(<30%)
The current environment doesn’t need a
dehumidifier.
HL
Low or high current temperature
Please use the dehumidifier in temperature
range of 5~38℃.

9
7.
Troubleshooting
Please do not worry if you meet following problems in the use of dehumidifier. When confirmed as
failure, timely contact for repairing.
Problems
Phenomenon/Reason
Solutions
Dehumidifier does not
work.
1.Could be a power outage.
2. The power switch is not on.
3.Maybe the fuse has blown out.
4.It’s not the definite starting up time.
5.The water tank may be full or not
fixed well, and the light of full water on
screen is flashing.
1.Please wait for power supply.
2. Turn on the power switch.
3.Change the fuse.
4.Wait or cancel the time setting.
5.Pour out water of water tank,
then put it back.
Unsatisfied
dehumidification effect.
1.The humidity setting is inappropriate.
2.The front and back of the
dehumidifier may be blocked.
3.Dehumidification time may be not
enough.
4.Door and window may be open.
5.The temperature indoor is lower than
5℃ or higher than 38℃.
1.Set appropriate humidity.
2.Clear the obstructions.
3.Keep waiting.
4.Close door and window.
5.Please use the machine in the
temperature of 5-38℃.
Power off/on within a
short time, dehumidifier
doesn’t work
3 minutes delay protection of
compressor.
The machine will work after 3
minutes.
Water leakage
1. Drain connection is slack.
2.The drainage system is blocked
3. The water tank isn’t placed well.
1.Connect the drain.
2.Clean the stopper.
3.Place the water tank well.
Frost formation.
There id frost on the surface of
dehumidifier.
It’s normal, the machine can
defrost automatically.
The dehumidifier has a
slight wobble.
A slight wobble occurs when turn on/off
dehumidifier.
It’s normal phenomenon.

10
1.
Những lưu ý khi sử dụng
Đặt máy ởvị trí thẳng đứng, trên bề mặt phẳng và chắc chắn.
Đảm bảo khoảng cách tối thiểu 30cm (1”) giữa các cạnh của thiết bị và bất kỳ vật liệu nóng
hoặc dễ cháy nào.
Không che cửa hút và lưới tản nhiệt của thiết bị.
Chỉ sử dụng thiết bị trong nhà.
Không sử dụng trong tủ, tủ quần áo, tàu thuyền, xe cộ hoặc các vị trí tương tự
Để thiết bị đứng yên trong một giờ trước khi kết nối với nguồn điện sau khi vận chuyển hoặc
khi thiết bị bị nghiêng (ví dụ: trong quá trình vệ sinh).
Nguồn điện phải phù hợp với thông số kỹ thuật được hiển thị trên nhãn của thiết bị.
Tránh quá tải điện áp, nguyên nhân là do sử dụng nhiều ampe điện hơn khả năng của dây điện.
Quá tải dây dẫn điện có thể gây ra quá nhiệt và cháy mạch.
Tránh để thiết bị bị rơi, rớt
Kiểm tra dây điện cẩn thận, tránh tình trạng bị thủng hoặc sờn. Kiểm tra phích cắm để đảm
bảo rằng các đầu cắm chắc chắn và lớp nhựa bao quanh không bị nứt.
Không được rút phích cắm điện để khởi động hoặc tắt máy, phải luôn sử dụng bảng điều khiển
để bật hoặc tắt.
Trước khi di chuyển thiết bị, hãy tắt máy, sau đó rút phích cắm và đổ hết nước trong bình ra.
Không sử dụng thuốc xịt bọ hoặc chất tẩy rửa dễ cháy khác lên thiết bị.
Không đổ hoặc phun nước lên thiết bị.
Trẻ em từ 8 tuổi trở lên và những người bị suy giảm khả năng thể chất, tinh thần hoặc người
không có kiến thức, kinh nghiệm sử dụng trước đó có thể sử dụng máy nếu được giám sát,
hướng dẫn về cách sử dụng thiết bị một cách an toàn cũng như hiểu các nguy hiểm có liên
quan. Trẻ em không được chơi với thiết bị. Trẻ em không làm vệ sinh và bảo trì nếu không có
sự giám sát.
Chỉ có chuyên gia được cấp phép mới được phép tháo dỡ hoặc sửa đổi thiết bị.
Khuyến nghị gửi thiết bị cho chuyên gia để bảo trì theo định kỳ.

11
2.
Chức năng các nút trên bảng điều khiển
2.1 Vận hành
NÚT ON/OFF
Ấn “ON/OFF” để khỏi động máy. Ấn lại để tắt máy.
HUMIDITY
SETTING
Ấn nút “HUMIDITY” để điều chỉnh nhiệt độ theo yêu cầu. Chọn “CO” (Hút ẩm liên
tục) và 40%~70%. Điều chỉnh 10% một lần ấn.
TIMING
Ấn nút “Timer”, nút báo thời gian sáng lên màu xanh, có thể điều chỉnh thời gian
trong 1-24 giờ, sau đó nhấn nút “Timer” cho đến khi màn hình hiển thị 00. Sau tám
lần nhấp nháy, màn hình hiển thị độ ẩm hiện tại và chức năng hẹn giờ được bật/ tắt.
COMFORT
(Không bắt buộc)
Ấn nút “comfort” để bật chế độ tiết kiệm năng lượng, độ ẩm là 60% và tốc độ gió
thấp. Nhấn lại nút “comfort” để hủy chế độ tiết kiệm năng lượng.

12
DRY
ẤN nút “Dry” để tăng tốc độ gió và tăng cường hiệu ứng không khí nóng.
WINDSPEED
SETTING
Nhấn “WIND SPEED SETTING”, để cài đặt tốc độ gió “cao” hoặc “thấp”.
ANION
Nhấn nút “ANION” để bật chức năng khử trùng bằng ion âm. (Chỉ tích hợp với
KM-20N và KM-60S)
Ghi chú:
Ởchế độ làm khô quần áo và tiết kiệm năng lượng, độ ẩm và tốc độ gió được điều khiển tự động bởi máy hút ẩm
và không thể điều chỉnh độ ẩm và tốc độ gió.
2.2 Đèn báo
BẬT / TẮT NGUỒN:
Khi cắm dây nguồn, màn hình máy hiển thị độ ẩm môi trường hiện tại. Nhấn nút nguồn, đèn báo nguồn sẽ
sáng màu xanh và máy sẽ bắt đầu chạy khi độ ẩm cài đặt thấp hơn độ ẩm môi trường hiện tại.
CẢNH BÁO ĐẦY NƯỚC:
Khi bình nước đầy, đèn báo đầy nước sẽ sáng đỏ, máy nén và quạt ngừng hoạt động, còi kêu ba lần để nhắc nhở
người dùng đổ hết nước trong bình nước sau đó lắp bình nước bình như vị trí ban đầu, máy sẽ tiếp tục khởi chạy
như cũ.

13
HẸN GIỜ:
Khi hẹn giờ được kích hoạt, chỉ báo thời gian sẽ có màu xanh lục.
TỐC ĐỘ GIÓ THẤP:
Khi bạn điều chỉnh tốc độ gió ởmức thấp, đèn báo tốc độ gió thấp hiện màu xanh.
TỐC ĐỘ GIÓ CAO:
Khi bạn điều chỉnh tốc độ gió ởmức cao, đèn báo tốc độ gió cao hiện màu xanh.
SẤY QUẦN ÁO:
Khi máy hút ẩm được đặt ở chế độ “Dry”, tốc độ gió được đặt ở mức cao và chạy ở chế độ hút ẩm liên tục, đèn báo
màu xanh.
TIẾT KIỆM NĂNG LƯỢNG:
Khi máy hút ẩm được đặt ởchế độ “Comfort”, tốc độ gió ởmức thấp, độ ẩm ởmức 60%, đèn báo màu xanh.
LỌC KHÔNG KHÍ BẰNG ION ÂM:
Khi đặt ở chế độ “Anion”, nút anion sẽ chuyển sang màu xanh lục. (Chỉ tích hợp với KM-20N và KM-60S)
3.
Hướng dẫn vận hành
Khi khởi động lần đầu tiên, máy sẽ ở trạng thái chờ, nhấn nút nguồn để chuyển sang trạng thái chạy, bật nguồn và
khởi động đầu tiên là chế độ hút ẩm liên tục, động cơ chạy ở tốc độ thấp, đèn báo hút ẩm liên tục sang. Nếu máy
được bật lại sau khi tắt nguồn, các cài đặt độ ẩm được lập trình sẽ giống như trước khi tắt nguồn.
Nhấn nút “Humidity”, độ ẩm có thể được thay đổi từ 70%, 60%, 50% đến 40% tại chế độ hút ẩm liên tục, đèn báo
tương ứng bật sáng, nếu độ ẩm cài đặt trước cao hơn độ ẩm môi trường hiện tại + 5%, máy sẽ ngừng hoạt động sau
5 giây. Khi độ ẩm cài đặt thấp hơn nhiệt độ môi trường hiện tại, máy sẽ hoạt động lại bình thường.
3.1 Cách máy hút ẩm hoạt động
1.
Khi máy nén đã vượt quá mức bảo vệ trong 3 phút và độ ẩm trong nhà ≥độ ẩm cài đặt + 5% RH, máy nén sẽ

14
hoạt động trở lại.
2.
Khi độ ẩm trong nhà < độ ẩm cài đặt - 5% RH, máy nén sẽ tắt.
3.
Đặt độ ẩm - 5% RH < độ ẩm trong nhà < độ ẩm cài đặt + 5% RH để giữ cho máy nén ban đầu hoạt động.
4.
Máy nén sẽ dừng quạt nếu không hoạt động trong ba phút sau khi độ ẩm giảm xuống.
5.
Khi máy kêu bíp ba lần và đèn báo đầy nước sáng, máy sẽ ngừng hoạt động. Cần xả hết nước trong bình nước
và lắp lại bình nước. Nếu đèn báo đầy nước vẫn sáng, hãy kiểm tra xem bình chứa nước đã vào đúng vị trí chưa.
Máy tiếp tục hoạt động khi đèn báo đầy nước tắt.
6.
Rã đông
C)
Sau khi máy bắt đầu chạy 30 phút, cảm biến của cuộn dây đồng cảm nhận được nhiệt độ ống. Khi nhiệt độ ống
≤-1 ° C (trong vòng 3 giây), máy nén dừng, quạt chạy và hoạt động xả đá bắt đầu. Đèn đang sáng.
D)
Khi cảm biến nhiệt độ nhận thấy nhiệt độ cuộn dây trên thiết bị lớn hơn hoặc bằng 5 độ trong vòng 3 phút, quá
trình xả đá sẽ kết thúc.
3.2 Đèn báo nước
Phao chỉ mực nước
Không tháo phao ra khỏi bình nước. Nếu phao trong bình bị tháo ra, máy sẽ không bật hoặc không khởi động.
Đặt lại bình nước
Khi đặt vào ngăn chứa nước, dùng hai tay đẩy bình chứa nước vào máy đúng vị trí. Nếu không đặt bình chứa nước,
máy sẽ không thể khởi động hoặc sau khi hoạt động nước sẽ bị tràn.
Vệ sinh bình nước
Nếu bình nước bị bẩn, hãy làm sạch bằng nước lạnh / ấm. Không sử dụng chất tẩy rửa, vải bụi đã qua xử lý hóa học,
xăng, benzen, chất pha loãng hoặc các dung môi khác vì nó có thể làm hỏng bình nước.

15
Xả liên tục
Máy có một lỗ thoát nước được nối với nhau bằng một ống nhựa (11mm bên trong) để thoát nước qua đó. Khi sử
dụng ống nước không được nhúng đầu thoát nước vào trong nước để tránh trường hợp ống quá dài hoặc tạo áp lực
trong ống khi đường thoát nước bị tắc. Dẫn đến dòng nước chảy không thông từ đó gây ra rò rỉ nước.

16
4.
Bảo trì
4.1 Vệ sinh
4.2 Lắp đặt
Giặt khăn lau bằng nước sạch, vắt kiệt và lau nhẹ bề mặt máy.
Chú ý:
Vệ sinh màng lọc hai lần một tháng để đảm bảo màng lọc
sạch và tiết kiệm năng lượng.
Khi máy hút ẩm đang hoạt động, hãy chắc chắn đảm
bảo
khoảng cách tối thiểu giữa cửa hút gió và bức tườ
ng là 20 cm
Khoảng cách tối thiểu giữa 2 máy là 10 cm
Khoảng cách tối thiểu giữa cửa thoát khí và phần
phía trên là 50cm
Table of contents
Languages:
Other KOSMEN Dehumidifier manuals