Kozumi air force one 2 lite User manual

User Manual
V1.0

1. Check the parts in your box
CPE SET
1
PoE Injector
1
Hose Clamps
2
12V DC Power Adapter
1
CD user manual
1
2. Hot to fix the CPE on the Pole (1”- 1.5”)
(For better water resistance please wrap the RJ45 connector)

Software Installation
There are no software drivers, patches or utilities installation needed, but only the configuration
setting.
Notice: It will take about 55 seconds to complete the boot up sequence after powered on the
WLAN Access Point; Power LED will be active, and after that the WLAN Activity LED will be
flashing to show the WLAN interface is enabled and working now.
Resetting the AP to Factory Default Settings
After you have tried other methods for troubleshooting your network, you may choose to Reset the
Access Point to the factory default settings.
To hard-reset the Access Point to Factory Default Settings,please do the following:
Notes: Access Point status:Power on
Locate the Reset button on the back of the Access Point PCB
Press the Reset button
Hold for about 5 seconds and then release
After the Access Point reboots (this may take a few minutes) it will be reset to the factory
default settings.
Software configuration
There are web based management and configuration functions allowing you to have the jobs done
easily.
The WLAN Access Point is delivered with the following factory default parameters on the Ethernet
LAN interfaces.
Default IP Address: 192.168.1.254
Default IP subnet mask: 255.255.255.0
WEB login User Name: <empty>
WEB login Password: <empty>
Connect to the WLAN Access Point
This product can be set up using any current web browser, i.e., Internet Explorer 6 or
Netscape Navigator 6.2.3.

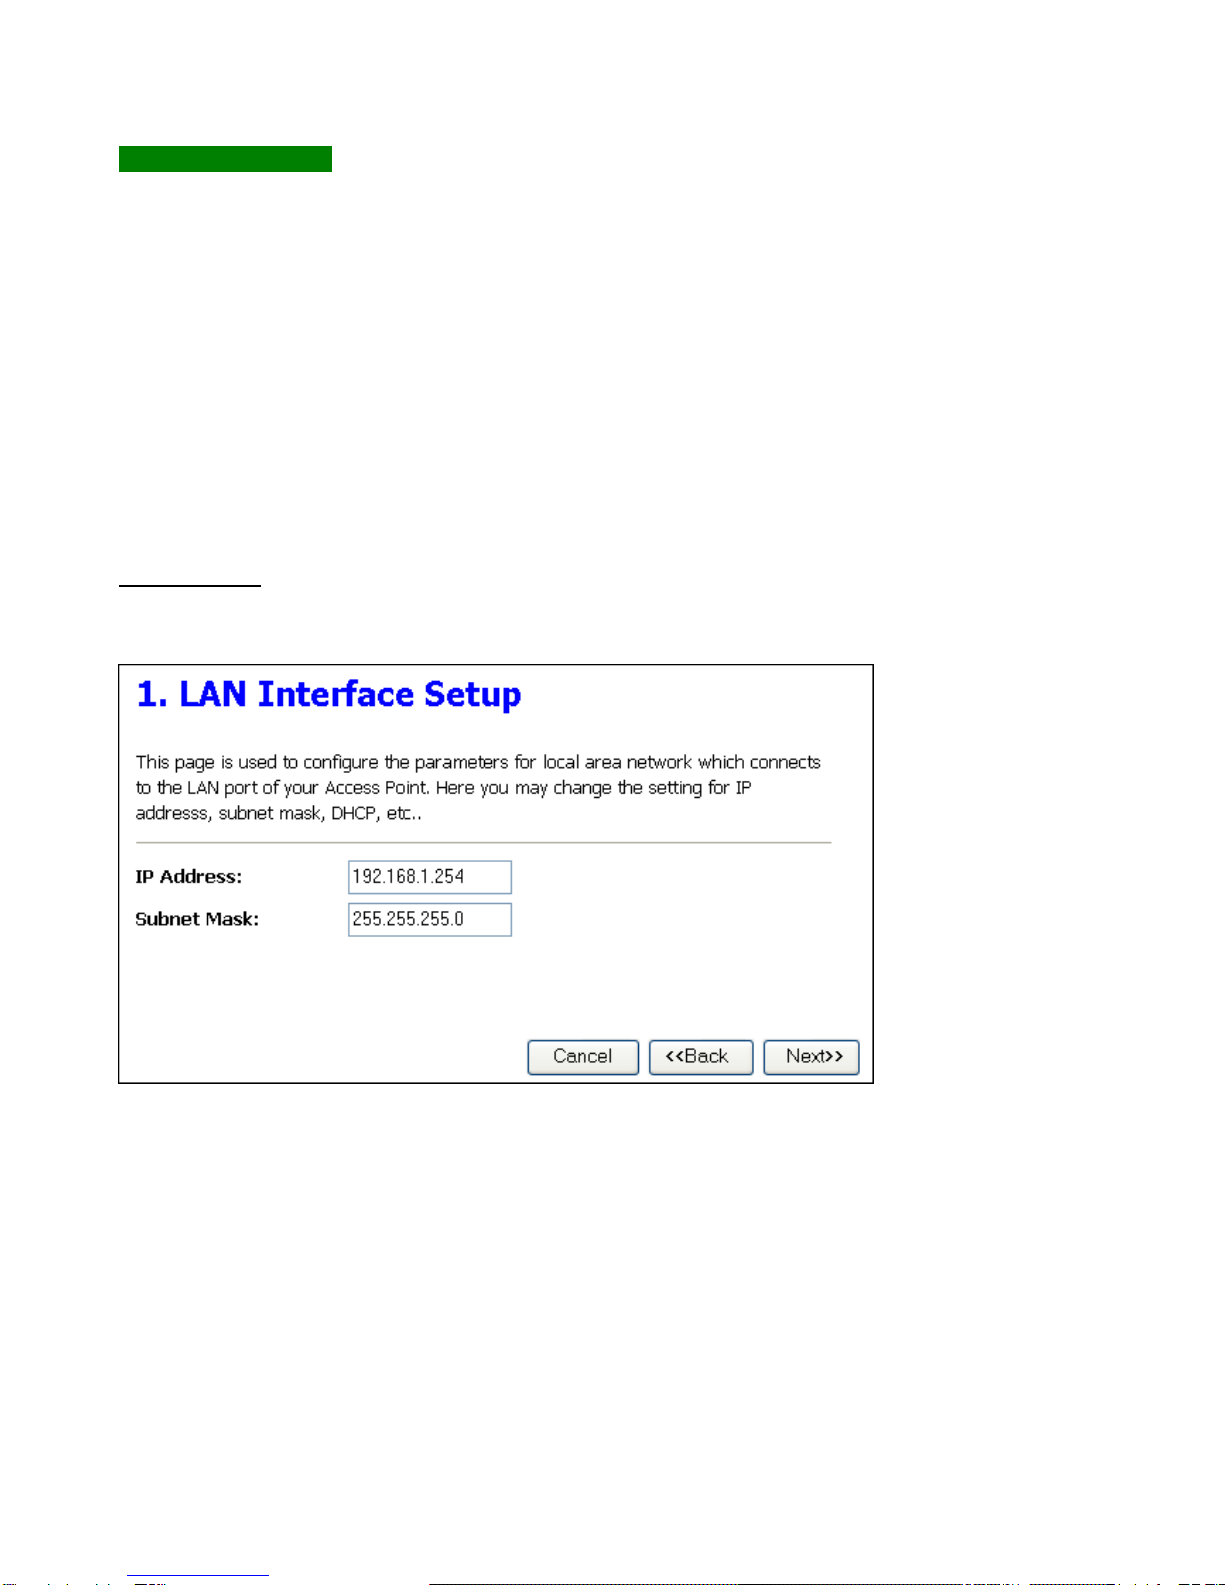
Open a WEB browser, i.e. Microsoft Internet Explore, then enter 192.168.1.254 on the URL to
connect the WLAN Access Point.
Prepare your PC to configure the WLAN Access Point
For OS of Microsoft Windows 95/ 98/ Me:
1. Click the Start button and select Settings, then click Control Panel. The Control Panel window
will appear.
Note: Windows Me users may not see the Network control panel. If so, select View all Control
Panel options on the left side of the window
2. Move mouse and double-click the right button on Network icon. The Network window will
appear.
3. Check the installed list of Network Components. If TCP/IP is not installed, click the Add button to
install it; otherwise go to step 6.
4. Select Protocol in the Network Component Type dialog box and click Add button.
5. Select TCP/IP in Microsoft of Select Network Protocol dialog box then click OK button to install
the TCP/IP protocol, it may need the Microsoft Windows CD to complete the installation. Close and
go back to Network dialog box after the TCP/IP installation.
6. Select TCP/IP and click the properties button on the Network dialog box.
7. Select Specify an IP address and type in values as following example.
IP Address: 192.168.1.1, any IP address within 192.168.1.1 to 192.168.1.253 is good to
connect the Wireless LAN Access Point.
IP Subnet Mask: 255.255.255.0
8. Click OK and reboot your PC after completes the IP parameters setting.
For OS of Microsoft Windows 2000, XP:
1. Click the Start button and select Settings, then click Control Panel. The Control Panel window
will appear.
2. Move mouse and double-click the right button on Network and Dial-up Connections icon. Move
mouse and double-click the Local Area Connection icon. The Local Area Connection window will
appear. Click Properties button in the Local Area Connection window.
3. Check the installed list of Network Components. If TCP/IP is not installed, click the Add button to
install it; otherwise go to step 6.
4. Select Protocol in the Network Component Type dialog box and click Add button.
5. Select TCP/IP in Microsoft of Select Network Protocol dialog box then click OK button to install
the TCP/IP protocol, it may need the Microsoft Windows CD to complete the installation. Close and
go back to Network dialog box after the TCP/IP installation.
6. Select TCP/IP and click the properties button on the Network dialog box.
7. Select Specify an IP address and type in values as following example.
IP Address: 192.168.1.1, any IP address within 192.168.1.1 to 192.168.1.253 is good to
connect the Wireless LAN Access Point.
IP Subnet Mask: 255.255.255.0
8. Click OK to completes the IP parameters setting.
For OS of Microsoft Windows NT:
1. Click the Start button and select Settings, then click Control Panel. The Control Panel window
will appear.
2. Move mouse and double-click the right button on Network icon. The Network window will appear.
Click Protocol tab from the Network window.

3. Check the installed list of Network Protocol window. If TCP/IP is not installed, click the Add
button to install it; otherwise go to step 6.
4. Select Protocol in the Network Component Type dialog box and click Add button.
5. Select TCP/IP in Microsoft of Select Network Protocol dialog box then click OK button to install
the TCP/IP protocol, it may need the Microsoft Windows CD to complete the installation. Close and
go back to Network dialog box after the TCP/IP installation.
6. Select TCP/IP and click the properties button on the Network dialog box.
7. Select Specify an IP address and type in values as following example.
IP Address: 192.168.1.1, any IP address within 192.168.1.1 to 192.168.1.253 is good to
connect the Wireless LAN Access Point.
IP Subnet Mask: 255.255.255.0
8. Click OK to complete the IP parameters setting.
Management and configuration
Status
This page shows the current status and some basic settings of the device, includes system,
wireless, and Ethernet LAN configuration information.

System
[Uptime]
It shows the duration since WLAN Access Point is powered on.
[Firmware version]
It shows the firmware version of WLAN Access Point.
Wireless configuration
[Mode]
It shows wireless operation mode
[Band]
It shows the current wireless operating frequency.
[SSID]
It shows the SSID of this WLAN Access Point.
The SSID is the unique name of WLAN Access Point and shared among its service area, so
all devices attempts to join the same wireless network can identify it.
[Channel Number]
It shows the wireless channel connected currently.
[Encryption]
It shows the status of encryption function.
[Associated Clients]
It shows the number of connected clients (or stations, PCs).
[BSSID]

It shows the BSSID address of the WLAN Access Point. BSSID is a six-byte address.
[Associated Clients]
It shows total numbers of WLAN clients connected,
TCP/IP Configuration
[Attain IP Protocol]
It shows how the WLAN Access Point gets the IP address. The IP address can be set
manually to a fixed one or set dynamically by DHCP server.
[IP Address]
It shows the IP address of WAN interface of WLAN Access Point.
[Subnet Mask]
It shows the IP subnet mask of LAN interface of WLAN Access Point.
[Default Gateway]
It shows the default gateway setting for outgoing data packets.
[MAC Address]
It shows the MAC address of WLAN Access Point.
Setup Wizard
This page guides you to configure wireless Access Point for first timeEnter topic text here.
1.LAN Interface Setup
This page is used to configure local area network IP address and subnet mask

2.Wireless Basic Settings
This page is used to configure basic wireless parameters like Band, Mode, Network Type SSID,
Channel Number, Enable Mac Clone(Single Ethernet Client)
3.Wireless Security Setup
This page is used to configure wireless security
Wireless - Basic Settings
This page is used to configure the parameters for wireless LAN clients that may connect to your
Access Point. Here you may change wireless encryption settings as well as wireless network
parameters.

Disable Wireless LAN Interface
Click on to disable the wireless LAN data transmission.
Band
Click to select 2.4GHz(B) / 2.4GHz(G) / 2.4GHz(B+G)
Mode
Click to select the WLAN AP / Client / WDS / AP+WDS wireless mode.
Site Survey
The Site Survey button provides tool to scan the wireless network. If any Access Point or IBSS is
found, you could choose to connect it manually when client mode is enabled.
SSID
It is the wireless network name. The SSID can be 32 bytes long.
Channel Number
Select the wireless communication channel from pull-down menu.
Associated Clients
Click the Show Active Clients button to open Active Wireless Client Table that shows the MAC
address, transmit-packet, receive-packet and transmission-rate for each associated wireless client.
Enable Mac Clone (Single Ethernet Client)
Take Laptop NIC MAC address as wireless client MAC address. [Client Mode only]
Enable Universal Repeater Mode
Click to enable Universal Repeater Mode
SSID of Extended Interface
Assign SSID when enables Universal Repeater Mode.
Apply Changes
Click the Apply Changes button to complete the new configuration setting.
Reset

Click the Reset button to abort change and recover the previous configuration setting.
Wireless - Advanced Settings
These settings are only for more technically advanced users who have a sufficient knowledge
about wireless LAN. These settings should not be changed unless you know what effect the
changes will have on your WLAN Access Point.
Authentication Type
Click to select the authentication type in Open System, Shared Key or Auto selection.
Fragment Threshold
Set the data packet fragmentation threshold, value can be written between 256 and 2346 bytes.
RTS Threshold
Set the RTS Threshold, value can be written between 0 and 2347 bytes.
Beacon Interval
Set the Beacon Interval, value can be written between 20 and 1024 ms.
Data Rate
Select the transmission data rate from pull-down menu. Data rate can be auto-select, 11M, 5.5M,
2M or 1Mbps.
Preamble Type

Click to select the Long Preamble or Short Preamble support on the wireless data packet
transmission.
Broadcast SSID
Click to enable or disable the SSID broadcast function.
IAPP
Click to enable or disable the IAPP function.
802.11g Protection
Protect 802.11b user.
RF Output Power
To adjust transmission power level.
Turbo Mode
Click to enable/disable turbo mode.(Only apply to WLAN IC of Realtek).
Apply Changes
Click the Apply Changes button to complete the new configuration setting.
Reset
Click the Reset button to abort change and recover the previous configuration setting.
Wireless - Security Setup
This page allows you setup the wireless security. Turn on WEP, WPA, WPA2 by using encryption
keys could prevent any unauthorized access to your wireless network.

Encryption
Select the encryption supported over wireless access. The encryption method can be None, WEP,
WPA(TKIP), WPA2 or WPA2 Mixed
Use 802.1x Authentication
While Encryption is selected to be WEP.
Click the check box to enable IEEE 802.1x authentication function.
WPA Authentication Mode
While Encryption is selected to be WPA.
Click to select the WPA Authentication Mode with Enterprise (RADIUS) or Personal (Pre-Shared
Key).
WPA Cipher Suite
Enable TKIP or AES. Depends on which encryption you set.
WPA2 Cipher Suite
Enable TKIP or AES. Depends on which encryption you set.
Pre-Shared Key Format
While Encryption is selected to be WPA.
Select the Pre-shared key format from the pull-down menu. The format can be Passphrase or Hex
(64 characters). [WPA, Personal(Pre-Shared Key) only]
Pre-Shared Key
Fill in the key value. [WPA, Personal(Pre-Shared Key) only]
Enable Pre-Authentication
Click to enable Pre-Authentication. [WPA2/WPA2 Mixed only, Enterprise only]
Authentication RADIUS Server
Set the IP address, port and login password information of authentication RADIUS sever.
Apply Changes
Click the Apply Changes button to complete the new configuration setting.
Reset
Click the Reset button to abort change and recover the previous configuration setting.
WEP Key Setup

Key Length
Select the WEP shared secret key length from pull-down menu. The length can be chose between
64-bit and 128-bit (known as “WEP2”) keys.
The WEP key is composed of initialization vector (24 bits) and secret key (40-bit or 104-bit).
Key Format
Select the WEP shared secret key format from pull-down menu. The format can be chose between
plant text (ASCII) and hexadecimal (HEX) code.
Default Tx Key
Set the default secret key for WEP security function.
Value can be chose between 1 and 4.
Encryption Key 1
Secret key 1 of WEP security encryption function.
Encryption Key 2
Secret key 2 of WEP security encryption function.
Encryption Key 3
Secret key 3 of WEP security encryption function.
Encryption Key 4
Secret key 4 of WEP security encryption function.
Apply Changes
Click the Apply Changes button to complete the new configuration setting.
Close
Click to close this WEP Key setup window.
Reset
Click the Reset button to abort change and recover the previous configuration setting.
WEP encryption key (secret key) length:
Length
Format 64-bit 128-bit
ASCII
5 characters
13 characters

HEX
10 hexadecimal codes
26 hexadecimal codes
Wireless - Access Control
If you enable wireless access control, only those clients whose wireless MAC addresses are in the
access control list will be able to connect to your Access Point. When this option is enabled, no
wireless clients will be able to connect if the list contains no entries.
Wireless Access Control Mode
Click the Disabled, Allow Listed or Deny Listed of drop down menu choose wireless access control
mode.
This is a security control function; only those clients registered in the access control list can link to
this WLAN Access Point.
MAC Address
Fill in the MAC address of client to register this WLAN Access Point access capability.
Comment
Fill in the comment tag for the registered client.
Apply Changes
Click the Apply Changes button to register the client to new configuration setting.
Reset
Click the Reset button to abort change and recover the previous configuration setting.
Current Access Control List
It shows the registered clients that are allowed to link to this WLAN Access Point.
Delete Selected
Click to delete the selected clients that will be access right removed from this WLAN Access Point.
Delete All

Click to delete all the registered clients from the access allowed list.
Reset
Click the Reset button to abort change and recover the previous configuration setting.
WDS Settings
Wireless Distribution System uses wireless media to communicate with other APs, like the
Ethernet does. To do this, you must set these APs in the same channel and set MAC address of
other AP that you want to communicate with in the table and then enable the WDS.]
Requirement: Set [Wireless]->[Basic Settings]->[Mode]->AP+WDS
Enable WDS
Click the check box to enable wireless distribution system. Refer to 4.21 What is Wireless
Distribution System (WDS)?
MAC Address
Fill in the MAC address of AP to register the wireless distribution system access capability.
Comment
Fill in the comment tag for the registered AP.
Apply Changes
Click the Apply Changesbutton to register the AP to new configuration setting.
Reset

Click the Reset button to abort change and recover the previous configuration setting.
Set Security
Click button to configure wireless security like WEP(64bits), WEP(128bits), WPA(TKIP),
WPA2(AES) or None
Show Statistics
It shows the TX, RX packets, rate statistics
Delete Selected
Click to delete the selected clients that will be removed from the wireless distribution system.
Delete All
Click to delete all the registered APs from the wireless distribution system allowed list.
Reset
Click the Reset button to abort change and recover the previous configuration setting.
WDS Security Setup
Requirement: Set [Wireless]->[Basic Settings]->[Mode]->AP+WDS
This page is used to configure the wireless security between APs.
WDS AP Table
This page is used to show WDS statistics

MAC Address
It shows the MAC Address within WDS.
Tx Packets
It shows the statistic count of sentpackets on the wireless LAN interface.
Tx Errors
It shows the statistic count of error sent packets on the Wireless LAN interface.
Rx Packets
It shows the statistic count of received packets on the wireless LAN interface.
Tx Rare (Mbps)
It shows the wireless link rate within WDS.
Refresh
Click to refresh the statistic counters on the screen.
Close
Click to close the current window.
Site Survey
This page is used to view or configure other APs near yours.

SSID
It shows the SSID of AP.
BSSID
It shows BSSID of AP.
Channel
It show the current channel of AP occupied.
Type
It show which type AP acts.
Encrypt
It shows the encryption status.
Signal
It shows the power level of current AP.
Select
Click to select AP or client you’d like to connect.
Refresh
Click the Refresh button to re-scan site survey on the screen.
Connect
Click the Connect button to establish connection.
Requirement: Set
[Wireless]->[Basic Settings]->[Mode]->client
TCP/IP Settings
This page is used to configure the parameters for local area network that connects to the LAN
ports of your WLAN Access Point. Here you may change the setting for IP address, subnet mask,
DHCP, etc.

IP Address
Fill in the IP address of LAN interfaces of this WLAN Access Point.
Subnet Mask
Fill in the subnet mask of LAN interfaces of this WLAN Access Point.
Default Gateway
Fill in the default gateway for LAN interfaces out going data packets.
DHCP
Click to select Disabled, Client or Server in different operation mode of wireless Access Point.
DHCP Client Range
Fill in the start IP address and end IP address to allocate a range of IP addresses; client with
DHCP function set will be assigned an IP address from the range.
Show Client
Click to open the Active DHCP Client Table window that shows the active clients with their
assigned IP address, MAC address and time expired information. [Server mode only]
DNS Server
Manual setup DNS server IP address.
Domain Name
Assign Domain Name and dispatch to DHCP clients. It is optional field.
802.1d Spanning Tree
Select to enable or disable the IEEE 802.1d Spanning Tree function from pull-down menu.
Clone MAC Address
Fill in the MAC address that is the MAC address to be cloned. Refer to 4.24 What is Clone MAC
Address?
Apply Changes
Click the Apply Changes button to complete the new configuration setting.
Reset
Click the Reset button to abort change and recover the previous configuration setting.

Log
This page is used to configure the remote log server and shown the current log.
Enable Log
System all
Wireless only
Click the checkbox to enable log.
Show all log of wireless Access Point.
Only show wireless log.
Enable Remote Log
Click the checkbox to enable remote log service.
Log Server IP Address
Input the remote log IP address
Apply Changes
Click the Apply Changes button to save above settings.
Refresh
Click the refresh the log shown on the screen.
Clear
Clear log display screen
Table of contents
Popular Wireless Access Point manuals by other brands

OBERON
OBERON 1020 Installation tips

HFCL
HFCL iO ion12xi h quick start guide

TRENDnet
TRENDnet TEW-453APB - 108Mbps Wireless Super G HotSpot Access... Specifications

Samsung
Samsung WEA302i installation manual

Hewlett Packard Enterprise
Hewlett Packard Enterprise Aruba 318 Series Startup guide

Huawei
Huawei Quidway W1000 Series Quick installation guide

SMC Networks
SMC Networks EliteConnect SMC2890W-AG Specifications

Motorola
Motorola AP-7131 Series installation guide

NETGEAR
NETGEAR Telstra Wi-Fi 4G Advanced II AirCard 790S user manual

peplink
peplink Pepwave AP One Series user manual

Planet
Planet WDAP-C7200E user manual

PROception
PROception ProWiFi Wave2.0 Advanced instructions